|
|
|
Porsche, and the Porsche crest are registered trademarks of Dr. Ing. h.c. F. Porsche AG.
This site is not affiliated with Porsche in any way. Its only purpose is to provide an online forum for car enthusiasts. All other trademarks are property of their respective owners. |
|
|

  |

| FL000 |
 Aug 13 2016, 03:51 PM Aug 13 2016, 03:51 PM
Post
#1
|
|
Member  Group: Members Posts: 389 Joined: 31-January 12 From: Lancaster, CA Member No.: 14,076 Region Association: Southern California |
I am going to attempt to paint my car this fall. I say attempt because if I fail miserably with the primer coats I will seek professional help! Most of the car looks accessible except in the front trunk area under the headlight buckets behind the front cross brace. Looks pretty tight in there. How do you get that area painted? I imagine a small detail gun helps, but is there anything else?
Thanks |
   |

 
|
| Mikey914 |
Aug 13 2016, 08:04 PM
Post
#2
|
|
The rubber man Group: Members Posts: 12,639 Joined: 27-December 04 From: Hillsboro, OR Member No.: 3,348 Region Association: None |
The headlight assemblies and eyebrow pieces should be pretty easily removed. If you want a decent paint job you'll want to pull.
Mark |
|
|
|
| worn |
Aug 13 2016, 09:50 PM
Post
#3
|
|
can't remember Group: Members Posts: 3,149 Joined: 3-June 11 From: Madison, WI Member No.: 13,152 Region Association: Upper MidWest |
QUOTE(Mikey914 @ Aug 13 2016, 06:04 PM)  The headlight assemblies and eyebrow pieces should be pretty easily removed. If you want a decent paint job you'll want to pull. Mark (IMG:style_emoticons/default/agree.gif) and I had trouble with paint ricochet in those boxes. If anyone has a cure let us all know. Please? |
|
|
|
| Luke M |
Aug 14 2016, 04:37 AM
Post
#4
|
|
Senior Member Group: Members Posts: 1,369 Joined: 8-February 05 From: WNY Member No.: 3,574 Region Association: North East States |
QUOTE(FL 000 @ Aug 13 2016, 02:51 PM) I am going to attempt to paint my car this fall. I say attempt because if I fail miserably with the primer coats I will seek professional help! Most of the car looks accessible except in the front trunk area under the headlight buckets behind the front cross brace. Looks pretty tight in there. How do you get that area painted? I imagine a small detail gun helps, but is there anything else? Thanks A long time ago, I helped a friend of mine paint his 914 front trunk. The area that you speak of is a real pain to get to but it can be done. He used an air suction gun with a long 90 degree nozzle at the end. Mask off the car because it makes a mess from the over spray. Put the suction hose into your paint can and spray all around. It helps if one person holds the hose into the can while the other sprays. I'm sure you could find a replaceable tip for the gun to make things easier. My friend just did it on the cheap by pinching off the tip with a hammer. He did this until it sprayed the way he wanted it to. Here's a pic of what I'm talking about. Attached image(s) 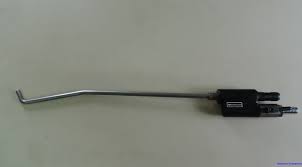
|
|
|
|
| worn |
Aug 14 2016, 11:34 AM
Post
#5
|
|
can't remember Group: Members Posts: 3,149 Joined: 3-June 11 From: Madison, WI Member No.: 13,152 Region Association: Upper MidWest |
QUOTE(Luke M @ Aug 14 2016, 02:37 AM) Here's a pic of what I'm talking about. Geez! That looks like it would deliver the paint alright. And I have one. Not sure I have the nerve though. |
|
|
|
| Mikey914 |
Aug 14 2016, 12:37 PM
Post
#6
|
|
The rubber man Group: Members Posts: 12,639 Joined: 27-December 04 From: Hillsboro, OR Member No.: 3,348 Region Association: None |
I've never personally shot these, but if you wanted to get paint into the bucket you could put a vacuum vise from a shop vacume in the bottom of the drain tube (underneatg) .
This would get you good airflow. You may kill your filter but for as much area as you'll need to cover it may help get better coverage. |
|
|
|
| falcor75 |
Aug 14 2016, 12:47 PM
Post
#7
|
|
Senior Member Group: Members Posts: 1,579 Joined: 22-November 12 From: Sweden Member No.: 15,176 Region Association: Scandinavia |
Inte the bucket isnt hard, its the area under the bucket thats tricky.
I did it with alot of thin dustings from the inside of the trunk and from the round holes in the front panel. When finished I then covered the area with a layer of clear cavity wax. |
|
|
|
| Luke M |
Aug 14 2016, 03:24 PM
Post
#8
|
|
Senior Member Group: Members Posts: 1,369 Joined: 8-February 05 From: WNY Member No.: 3,574 Region Association: North East States |
I'm pretty sure the red arrows are pointing to the area that the op is talking about.
The upper headlight bucket area would be fairly easy to paint. The lower area ( red arrows ) is what I was talking about in my earlier post. Attached image(s) 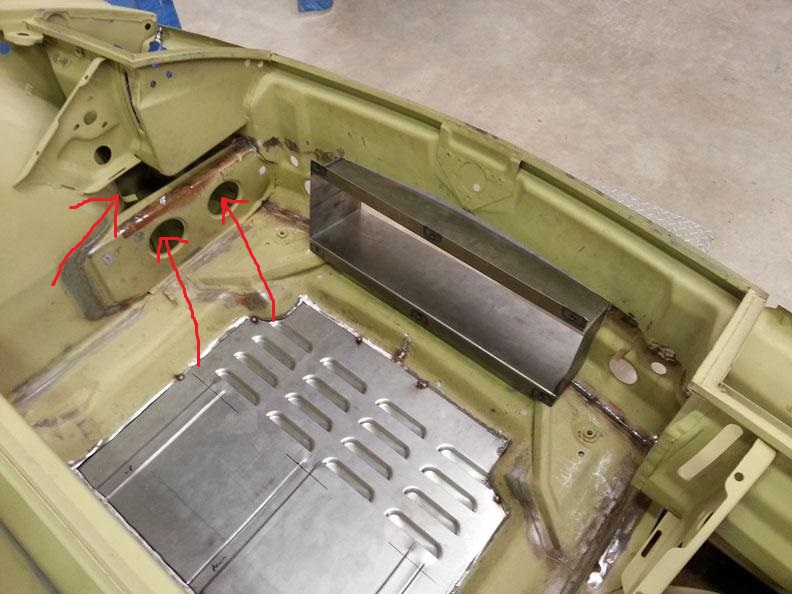
|
|
|
|
| SixerJ |
Aug 14 2016, 03:36 PM
Post
#9
|
|
Member Group: Members Posts: 448 Joined: 24-June 13 From: UK Member No.: 16,042 Region Association: England |
Maybe bonkers but what about a expanding foam gun? With a hose into the paint / variation on the suction gun I guess
You can adjust the needle stop & wind up and down pressure paint delivery on the compressor or air line to change the level of splurge...... Interesting thread to watch this one |
|
|
|
| Olympic 914 |
Aug 14 2016, 04:43 PM
Post
#10
|
|
Group: Members Posts: 1,662 Joined: 7-July 11 From: Pittsburgh PA Member No.: 13,287 Region Association: North East States |
Eastwood internal frame coating. you can get in there with the nozzle but paint this area first because the stuff goes everywhere. then just dust some paint in there with a detail gun to get some color.
I tried to use the nozzle on a prevail sprayer with body color paint, it would have been a great way to get in there but the tip wasn't compatible. Maybe you could figure out a way of using the hose. http://www.eastwood.com/internal-frame-coa...-nozzle-qt.html |
|
|
|
| 914GT |
Aug 14 2016, 07:10 PM
Post
#11
|
|
Senior Member Group: Members Posts: 1,100 Joined: 11-October 04 From: Tucson Member No.: 2,923 Region Association: Southwest Region |
This is what I've done in that area. First I blow a lot of compressed air from the top, sides and front to dislodge as much dirt as possible. Then for both epoxy primer and top coats I turn the pressure down on the gun, and reduce the fan-out, and spray in there as best I can to fully cover the insides, using a flashlight to check how it's looking. Nothing is really visible in there but want good coverage to protect the metal.
|
|
|
|
|
1 User(s) are reading this topic (1 Guests and 0 Anonymous Users)
0 Members:

|
Lo-Fi Version | Time is now: 28th April 2024 - 08:35 PM |
Invision Power Board
v9.1.4 © 2024 IPS, Inc.