|
|
|
Porsche, and the Porsche crest are registered trademarks of Dr. Ing. h.c. F. Porsche AG.
This site is not affiliated with Porsche in any way. Its only purpose is to provide an online forum for car enthusiasts. All other trademarks are property of their respective owners. |
|
|


| Dion |
 Sep 9 2016, 10:27 AM Sep 9 2016, 10:27 AM
Post
#21
|
|
RN  Group: Members Posts: 2,927 Joined: 16-September 04 From: Audubon,PA Member No.: 2,766 Region Association: MidAtlantic Region |
Well I've started the process of preparing for
my 2056 GT to 2.4L six "rallye tribute" auto. Tearing into the interior I discovered some rust mites have been eating for a while. Doesn't look too extensive but will be probing some more. The exterior left long was patched a long time ago, albeit incorrectly. This was done by shop that wasn't fully up to speed on these cars and I was still a novice, well still am. I'll be doing some exploratory surgery on this left side inside and out. So I'll get this addressed before any engine install takes place. Would like to have it buttoned up for Hershey 2017. Wish me luck. " Attached thumbnail(s) 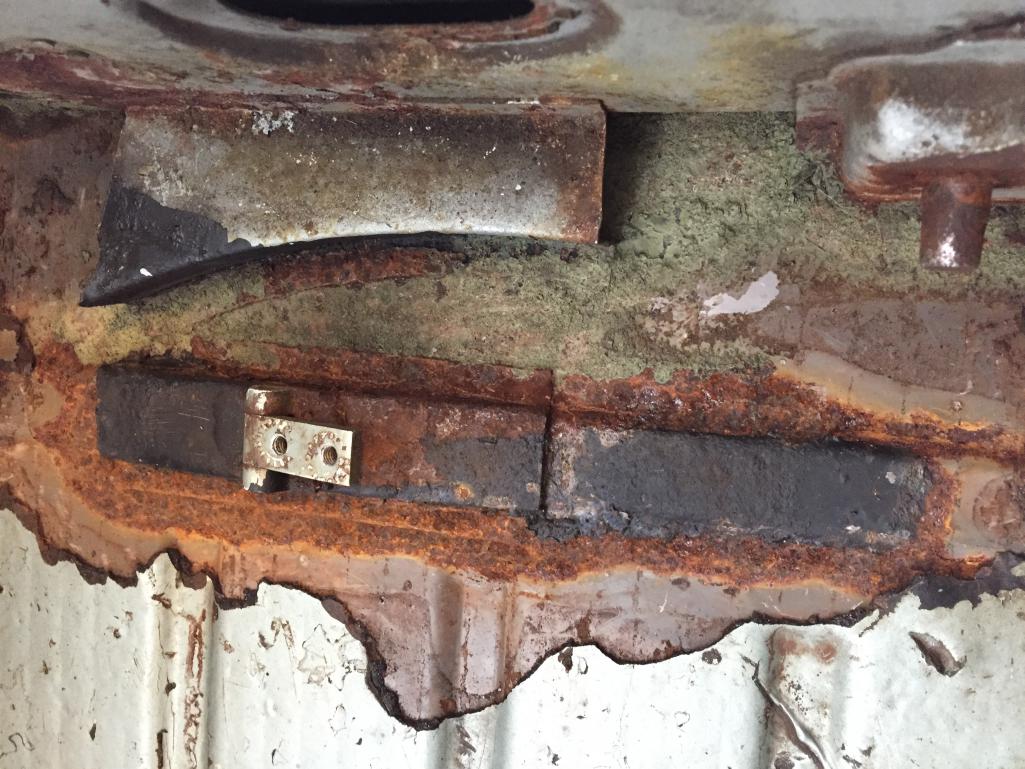 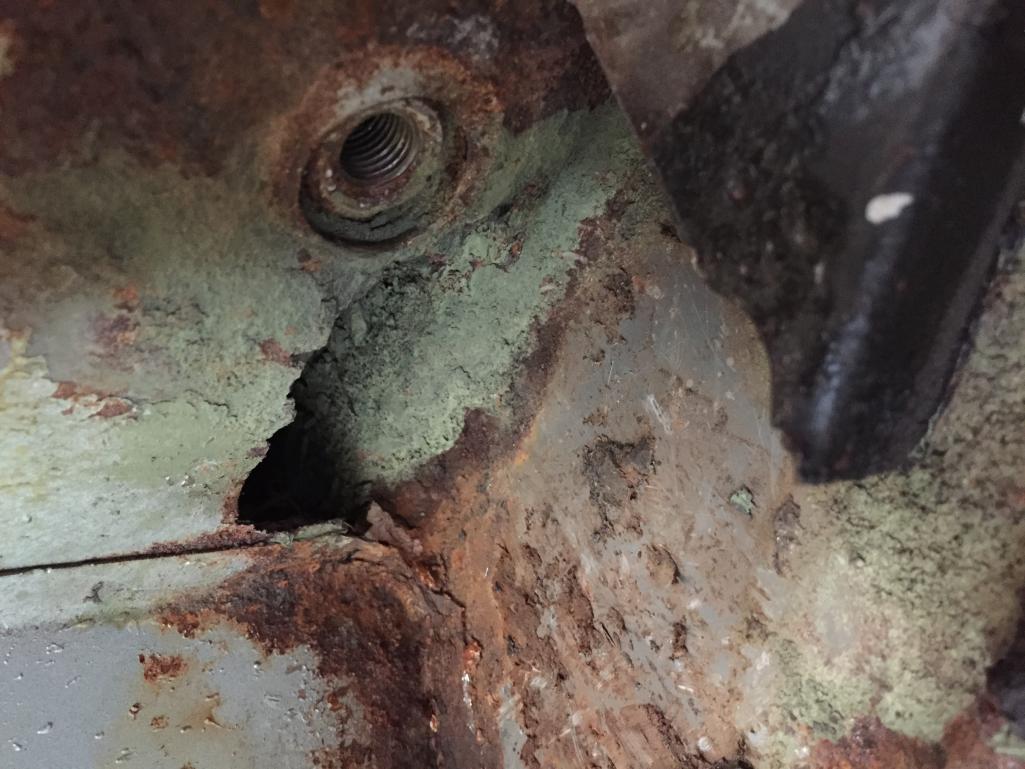
|
   |

 
|
Posts in this topic
 Dion *Project 2.4* • Dion’s endeavor • Six conversion Sep 9 2016, 10:27 AM
 Dion E brake area top:
Exterior long near door sill bot... Sep 9 2016, 10:28 AM mepstein Doesn't look bad. Grab a multi tool and get ri... Sep 9 2016, 11:16 AM
Dion E brake area top:
Exterior long near door sill bot... Sep 9 2016, 10:28 AM mepstein Doesn't look bad. Grab a multi tool and get ri... Sep 9 2016, 11:16 AM
 914dave
Doesn't look bad. Grab a multi tool and get r... Sep 9 2016, 11:47 AM rgalla9146
Doesn't look bad. Grab a multi tool and get ... Sep 9 2016, 12:25 PM mepstein
[quote name='914dave' post='2396059' date='Sep 9 ... Sep 9 2016, 12:32 PM Dion I intend to Mark.
As always Dave has my back! ... Sep 9 2016, 12:16 PM Dion At what point do I go to Earl Schreib & Zeibar... Sep 9 2016, 12:49 PM 914dave Right after the foil. If you want it proper. Sep 9 2016, 01:10 PM mepstein All you need to do a pro repair- no metal work... Sep 9 2016, 01:43 PM Dion I knew this club would payoff in its wealth of kno... Sep 9 2016, 02:54 PM flippa
It's a VW. The proper method is to steal som... Sep 9 2016, 04:22 PM wndsnd
It's a VW. The proper method is to steal so... Sep 9 2016, 05:23 PM bretth
What, no pop rivets? :huh:
Yeah one pop rivet o... Sep 9 2016, 05:14 PM Dion You guys are great. This is gonna be fun. :beer3: Sep 9 2016, 05:30 PM jmitro looks like you got a little work to do. Good luck... Sep 9 2016, 07:56 PM rgalla9146 Paint it Red.
Very important. Sep 10 2016, 03:25 AM cary The problem your going to run into is the degradat... Sep 10 2016, 08:10 AM Dion Hey Cary,
The jack point was completely cut out.... Sep 10 2016, 10:25 AM Dion Ok, tar all scraped out. Door braces in place.
Tim... Oct 2 2016, 05:27 PM Dion Well did more exploratory surgery and it's ugl... Oct 4 2016, 06:01 PM Dion Ugly Oct 4 2016, 06:02 PM Dion :blink: Oct 4 2016, 06:03 PM Dion <_< Oct 4 2016, 06:05 PM Dion Opened up whole of left longitudinal today. I... Oct 5 2016, 09:34 PM altitude411 Your going to need a few more license plates and p... Oct 6 2016, 11:48 AM Dion
Your going to need a few more license plates and ... Oct 6 2016, 12:25 PM mepstein
Your going to need a few more license plates and... Oct 17 2016, 08:59 PM Dion So the build challenge is on. Happy to say I'v... Oct 17 2016, 08:50 PM Dion Mark, I don't think I'd go this deep into ... Oct 17 2016, 09:07 PM Larmo63 SoCalAndy makes the stickers..... Oct 17 2016, 09:15 PM altitude411 Socalandy. His awesome six build is in the restora... Oct 17 2016, 09:28 PM Dion Thanks for the info on the stickers. I'll give... Oct 18 2016, 07:13 AM mbseto I would say you have your work cut out for you. B... Oct 18 2016, 07:53 AM Dion Still cutting away. Parts from Restoration Design ... Oct 25 2016, 06:31 PM porschetub
Still cutting away. Parts from Restoration Design... Oct 28 2016, 04:13 PM JmuRiz After knowing and talking with ScottyB enough, he ... Oct 25 2016, 07:07 PM theleschyouknow keep up the good work
somebody I think in the 201... Oct 25 2016, 08:04 PM DirtyCossack
keep up the good work
somebody I think in the 20... Oct 26 2016, 10:57 AM theleschyouknow
keep up the good work
somebody I think in the 2... Oct 26 2016, 11:17 AM Dion Thanks guys. Appreciate the confidence. Oct 25 2016, 09:28 PM Dion Fed ex truck dropped off some goods today.
Thanks ... Oct 28 2016, 03:04 PM tygaboy
Fed ex truck dropped off some goods today.
Thanks... Oct 28 2016, 04:30 PM Dion Thanks Dean, the whole dash is out. Have a nice NO... Oct 28 2016, 04:40 PM Dion Ok finally removed rear quarter. It's really ... Nov 5 2016, 07:15 PM Dion Panel off Nov 5 2016, 07:17 PM Dion So this will get fresh paint Nov 5 2016, 07:22 PM tygaboy
So this will get fresh paint
I love pics like t... Nov 6 2016, 07:43 AM Dion So with the rear panel off was better able to acce... Nov 13 2016, 04:13 PM Dion Deterioration Nov 13 2016, 04:14 PM tygaboy Dion - I have a '72 donor car that is virtuall... Nov 13 2016, 07:43 PM Dion Cut away the remainder of the sill panel.
Surface ... Dec 1 2016, 01:29 PM Dion Removed more of the door jamb except for brace are... Dec 1 2016, 01:37 PM Dion Pics Dec 1 2016, 01:41 PM Dion Pics Dec 1 2016, 01:43 PM Dion New firewall panel test-fit & de-brazed E-brak... Dec 1 2016, 01:44 PM tygaboy I'm amazed at the level and extent of :sawzal... Dec 1 2016, 01:46 PM Dion Thanks for that Chris. I'm the one that gets ... Dec 1 2016, 02:01 PM Mitox Ok, I'm an idiot. I moved my post to the offi... Dec 1 2016, 08:15 PM Dion
Ok, I'm an idiot. I moved my post to the off... Dec 1 2016, 10:04 PM Dion Since PA has been hit with the 20*F temps for a wh... Jan 9 2017, 04:06 PM Dion Bilsteins Jan 9 2017, 04:07 PM 914dave The weather and electrician have conspired against... Jan 9 2017, 05:45 PM tygaboy Your Bilsteins are making me green with envy... :... Jan 9 2017, 06:17 PM Dion Tackling front suspension work. Replaced hub beari... Jan 22 2017, 09:26 PM Dion Baked the hubs at 250*F for 25 minutes to coax th... Jan 22 2017, 09:28 PM Dion Clean hubs Jan 22 2017, 09:29 PM Dion Repacked Jan 22 2017, 09:30 PM Dion New ball joints installed. Pay attention to the ty... Jan 22 2017, 09:35 PM Dion Rotors Jan 22 2017, 09:36 PM Dion Front calipers will be sent to PMB soon.
Time to g... Jan 22 2017, 09:38 PM tygaboy Nothing like a little brake and suspension porn on... Jan 22 2017, 10:50 PM Garland Looks great, Jan 22 2017, 10:58 PM jmitro great work; the bilsteins look very nice Jan 22 2017, 11:00 PM Dion Some garage time this afternoon.
Started prepping ... Jan 26 2017, 04:23 PM Dion Also some body filler escaped proper contouring fr... Jan 26 2017, 04:27 PM Dion Hammered. Jan 26 2017, 04:27 PM Dion Curious? Anyone have a "proper" hole on ... Jan 26 2017, 04:31 PM altitude411
Curious? Anyone have a "proper" hole on... Jan 26 2017, 04:49 PM Dion Tow hook spot? Jan 26 2017, 04:32 PM 914dave Mine has the same hole. No idea what it's for. Jan 26 2017, 04:49 PM tom.esh My replacement pan has that hole. I don't thin... Jan 26 2017, 06:29 PM Dion Bodywork has come full stop for now.
Temps are in ... Feb 5 2017, 10:26 AM Dion Took the carbs off for cleaning and replaced all t... Feb 5 2017, 10:28 AM Dion Found the ball that was supposed to be on the spri... Feb 5 2017, 10:30 AM Dion Replaced the alternator and painted the fan and s... Feb 5 2017, 10:43 AM Dion Shroud Feb 5 2017, 10:47 AM Dion Fan installed Feb 5 2017, 10:51 AM Dion So the upper valve covers that I did in silver pai... Feb 5 2017, 11:00 AM Dion Put the carbs back on. Added the surrounding sheet... Feb 5 2017, 11:04 AM Dion Engine tin Feb 5 2017, 11:06 AM Dion Weather finally gave me a window to sandblast the ... Feb 28 2017, 11:37 AM Dion Sandblasted Feb 28 2017, 11:39 AM Dion Cut out the firewall to make my life easier in the... Feb 28 2017, 11:44 AM porschetub Nice work on the motor Dion,what history do you ha... Mar 19 2017, 02:37 PM Dion Hey Dean, thanks for the compliments. I can't ... Mar 19 2017, 03:41 PM Dion So it's sort of warming up here. Did a little ... Mar 19 2017, 03:45 PM Dion Primer & paint. Mar 19 2017, 03:46 PM porschetub Cool sounds like a nice engine with great mods,you... Mar 19 2017, 06:18 PM Dion Dean, I wish I could say E cams but alas it's ... Mar 19 2017, 06:53 PM
914dave
Doesn't look bad. Grab a multi tool and get r... Sep 9 2016, 11:47 AM rgalla9146
Doesn't look bad. Grab a multi tool and get ... Sep 9 2016, 12:25 PM mepstein
[quote name='914dave' post='2396059' date='Sep 9 ... Sep 9 2016, 12:32 PM Dion I intend to Mark.
As always Dave has my back! ... Sep 9 2016, 12:16 PM Dion At what point do I go to Earl Schreib & Zeibar... Sep 9 2016, 12:49 PM 914dave Right after the foil. If you want it proper. Sep 9 2016, 01:10 PM mepstein All you need to do a pro repair- no metal work... Sep 9 2016, 01:43 PM Dion I knew this club would payoff in its wealth of kno... Sep 9 2016, 02:54 PM flippa
It's a VW. The proper method is to steal som... Sep 9 2016, 04:22 PM wndsnd
It's a VW. The proper method is to steal so... Sep 9 2016, 05:23 PM bretth
What, no pop rivets? :huh:
Yeah one pop rivet o... Sep 9 2016, 05:14 PM Dion You guys are great. This is gonna be fun. :beer3: Sep 9 2016, 05:30 PM jmitro looks like you got a little work to do. Good luck... Sep 9 2016, 07:56 PM rgalla9146 Paint it Red.
Very important. Sep 10 2016, 03:25 AM cary The problem your going to run into is the degradat... Sep 10 2016, 08:10 AM Dion Hey Cary,
The jack point was completely cut out.... Sep 10 2016, 10:25 AM Dion Ok, tar all scraped out. Door braces in place.
Tim... Oct 2 2016, 05:27 PM Dion Well did more exploratory surgery and it's ugl... Oct 4 2016, 06:01 PM Dion Ugly Oct 4 2016, 06:02 PM Dion :blink: Oct 4 2016, 06:03 PM Dion <_< Oct 4 2016, 06:05 PM Dion Opened up whole of left longitudinal today. I... Oct 5 2016, 09:34 PM altitude411 Your going to need a few more license plates and p... Oct 6 2016, 11:48 AM Dion
Your going to need a few more license plates and ... Oct 6 2016, 12:25 PM mepstein
Your going to need a few more license plates and... Oct 17 2016, 08:59 PM Dion So the build challenge is on. Happy to say I'v... Oct 17 2016, 08:50 PM Dion Mark, I don't think I'd go this deep into ... Oct 17 2016, 09:07 PM Larmo63 SoCalAndy makes the stickers..... Oct 17 2016, 09:15 PM altitude411 Socalandy. His awesome six build is in the restora... Oct 17 2016, 09:28 PM Dion Thanks for the info on the stickers. I'll give... Oct 18 2016, 07:13 AM mbseto I would say you have your work cut out for you. B... Oct 18 2016, 07:53 AM Dion Still cutting away. Parts from Restoration Design ... Oct 25 2016, 06:31 PM porschetub
Still cutting away. Parts from Restoration Design... Oct 28 2016, 04:13 PM JmuRiz After knowing and talking with ScottyB enough, he ... Oct 25 2016, 07:07 PM theleschyouknow keep up the good work
somebody I think in the 201... Oct 25 2016, 08:04 PM DirtyCossack
keep up the good work
somebody I think in the 20... Oct 26 2016, 10:57 AM theleschyouknow
keep up the good work
somebody I think in the 2... Oct 26 2016, 11:17 AM Dion Thanks guys. Appreciate the confidence. Oct 25 2016, 09:28 PM Dion Fed ex truck dropped off some goods today.
Thanks ... Oct 28 2016, 03:04 PM tygaboy
Fed ex truck dropped off some goods today.
Thanks... Oct 28 2016, 04:30 PM Dion Thanks Dean, the whole dash is out. Have a nice NO... Oct 28 2016, 04:40 PM Dion Ok finally removed rear quarter. It's really ... Nov 5 2016, 07:15 PM Dion Panel off Nov 5 2016, 07:17 PM Dion So this will get fresh paint Nov 5 2016, 07:22 PM tygaboy
So this will get fresh paint
I love pics like t... Nov 6 2016, 07:43 AM Dion So with the rear panel off was better able to acce... Nov 13 2016, 04:13 PM Dion Deterioration Nov 13 2016, 04:14 PM tygaboy Dion - I have a '72 donor car that is virtuall... Nov 13 2016, 07:43 PM Dion Cut away the remainder of the sill panel.
Surface ... Dec 1 2016, 01:29 PM Dion Removed more of the door jamb except for brace are... Dec 1 2016, 01:37 PM Dion Pics Dec 1 2016, 01:41 PM Dion Pics Dec 1 2016, 01:43 PM Dion New firewall panel test-fit & de-brazed E-brak... Dec 1 2016, 01:44 PM tygaboy I'm amazed at the level and extent of :sawzal... Dec 1 2016, 01:46 PM Dion Thanks for that Chris. I'm the one that gets ... Dec 1 2016, 02:01 PM Mitox Ok, I'm an idiot. I moved my post to the offi... Dec 1 2016, 08:15 PM Dion
Ok, I'm an idiot. I moved my post to the off... Dec 1 2016, 10:04 PM Dion Since PA has been hit with the 20*F temps for a wh... Jan 9 2017, 04:06 PM Dion Bilsteins Jan 9 2017, 04:07 PM 914dave The weather and electrician have conspired against... Jan 9 2017, 05:45 PM tygaboy Your Bilsteins are making me green with envy... :... Jan 9 2017, 06:17 PM Dion Tackling front suspension work. Replaced hub beari... Jan 22 2017, 09:26 PM Dion Baked the hubs at 250*F for 25 minutes to coax th... Jan 22 2017, 09:28 PM Dion Clean hubs Jan 22 2017, 09:29 PM Dion Repacked Jan 22 2017, 09:30 PM Dion New ball joints installed. Pay attention to the ty... Jan 22 2017, 09:35 PM Dion Rotors Jan 22 2017, 09:36 PM Dion Front calipers will be sent to PMB soon.
Time to g... Jan 22 2017, 09:38 PM tygaboy Nothing like a little brake and suspension porn on... Jan 22 2017, 10:50 PM Garland Looks great, Jan 22 2017, 10:58 PM jmitro great work; the bilsteins look very nice Jan 22 2017, 11:00 PM Dion Some garage time this afternoon.
Started prepping ... Jan 26 2017, 04:23 PM Dion Also some body filler escaped proper contouring fr... Jan 26 2017, 04:27 PM Dion Hammered. Jan 26 2017, 04:27 PM Dion Curious? Anyone have a "proper" hole on ... Jan 26 2017, 04:31 PM altitude411
Curious? Anyone have a "proper" hole on... Jan 26 2017, 04:49 PM Dion Tow hook spot? Jan 26 2017, 04:32 PM 914dave Mine has the same hole. No idea what it's for. Jan 26 2017, 04:49 PM tom.esh My replacement pan has that hole. I don't thin... Jan 26 2017, 06:29 PM Dion Bodywork has come full stop for now.
Temps are in ... Feb 5 2017, 10:26 AM Dion Took the carbs off for cleaning and replaced all t... Feb 5 2017, 10:28 AM Dion Found the ball that was supposed to be on the spri... Feb 5 2017, 10:30 AM Dion Replaced the alternator and painted the fan and s... Feb 5 2017, 10:43 AM Dion Shroud Feb 5 2017, 10:47 AM Dion Fan installed Feb 5 2017, 10:51 AM Dion So the upper valve covers that I did in silver pai... Feb 5 2017, 11:00 AM Dion Put the carbs back on. Added the surrounding sheet... Feb 5 2017, 11:04 AM Dion Engine tin Feb 5 2017, 11:06 AM Dion Weather finally gave me a window to sandblast the ... Feb 28 2017, 11:37 AM Dion Sandblasted Feb 28 2017, 11:39 AM Dion Cut out the firewall to make my life easier in the... Feb 28 2017, 11:44 AM porschetub Nice work on the motor Dion,what history do you ha... Mar 19 2017, 02:37 PM Dion Hey Dean, thanks for the compliments. I can't ... Mar 19 2017, 03:41 PM Dion So it's sort of warming up here. Did a little ... Mar 19 2017, 03:45 PM Dion Primer & paint. Mar 19 2017, 03:46 PM porschetub Cool sounds like a nice engine with great mods,you... Mar 19 2017, 06:18 PM Dion Dean, I wish I could say E cams but alas it's ... Mar 19 2017, 06:53 PM  |
1 User(s) are reading this topic (1 Guests and 0 Anonymous Users)
0 Members:

|
Lo-Fi Version | Time is now: 15th June 2026 - 01:13 PM |
Invision Power Board
v9.1.4 © 2026 IPS, Inc.