|
|
|
Porsche, and the Porsche crest are registered trademarks of Dr. Ing. h.c. F. Porsche AG.
This site is not affiliated with Porsche in any way. Its only purpose is to provide an online forum for car enthusiasts. All other trademarks are property of their respective owners. |
|
|

  |

| oakdalecurtis |
 Sep 24 2016, 01:33 AM Sep 24 2016, 01:33 AM
Post
#1
|
|
Oakdalecurtis  Group: Members Posts: 1,322 Joined: 5-June 15 From: Oakdale, Ca Member No.: 18,802 Region Association: Central California |
I purchased the 6 foot BlazeCut Fire Suppression System. This length only requires one length down one side of the lid, one curve, and one length back the other side of the lid. I also found that the stiff tubing does not like to bend into a tight enough arc to fit into the confines of the engine lid. The tube kinked at the center of the curve, but I don't think it damaged it. I bought an electrical gray pipe curve, 3/4" ID, split it with my band saw, and zip tied and taped it around the BlazeCut tubing at the center of the arc where the tubing wanted to kink. This supported and held the tubing, keeping the tubing in the required arc while preventing it from kinking. I also found that plastic zip ties were not strong enough to hold the tubing in position under the engine lid. The stiff BlazeCut tubing does not like to bend or go where you want it to very easily. As you can see, I removed my rain tray a while ago since I never take the car out in bad weather and the engine runs cooler without it.
I fastened the tubing to the underside of the engine lid using metal pipe claps, 3/4 ID, and short self tapping metal screws into the lid supports. I wrapped the BlazeCut in heavy plumbers tape wherever it came in contact with the metal lid. I also cut thin strips of black tape and put them on the top side of the BlazeCut tube so you could not easily see the white tubing through the engine grill from the outside. If you look on the left side of my engine lid, you can also see a steel braided cable I added a while back so I don't have to hold on to the engine lid when I open it. Without the cable, if you popped the engine lid and didn't hold it, it would fly open and put a lot of bending force on the hinges, which I have already rewelded once. Now the cable catches it before it works on the hinges. BTW, if you have a weak opening engine cover, here's a link to an easy and simple fix that lets you put more pop in the opening, especially with the extra weight of the BlazeCut under the lid. My lids pops open fully now, even with the tubing under it. http://www.914world.com/bbs2/index.php?sho...=290514&hl= I hope I never have to find out how well the BlazeCut tubing works! 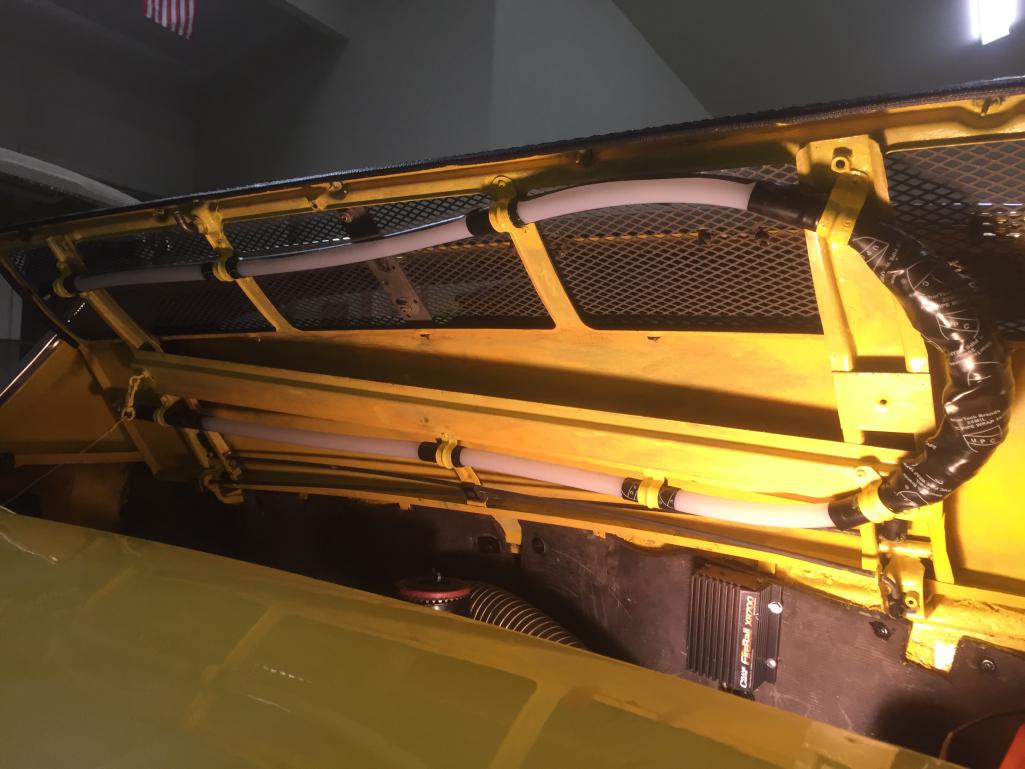  |
   |

 
|
| Frankvw |
Sep 24 2016, 02:56 AM
Post
#2
|
|
working on my first 914 ! Group: Members Posts: 651 Joined: 13-April 16 From: Holland, the Netherlands Member No.: 19,896 Region Association: Europe |
Thanks for your update and tips&trics. I understand you removed the raintray.
Do you think it will be possible to install one WITH the raintray still there based on your experiences with the install now ? |
|
|
|
| oakdalecurtis |
Sep 24 2016, 03:07 AM
Post
#3
|
|
Oakdalecurtis Group: Members Posts: 1,322 Joined: 5-June 15 From: Oakdale, Ca Member No.: 18,802 Region Association: Central California |
QUOTE(Frankvw @ Sep 24 2016, 01:56 AM)  Thanks for your update and tips&trics. I understand you removed the raintray. Do you think it will be possible to install one WITH the raintray still there based on your experiences with the install now ? The rain tray would block most of the mounting points on used in my car. I don't know how I would mount it with the tray in place, but there is enough room above the engine. You can't drill holes for mounting screws in the plastic tray for obvious reasons, so you would have to come up with some other clever way to mount it there. (IMG:style_emoticons/default/smash.gif) |
|
|
|
| BeatNavy |
Sep 24 2016, 06:03 AM
Post
#4
|
|
Certified Professional Scapegoat Group: Members Posts: 2,924 Joined: 26-February 14 From: Easton, MD Member No.: 17,042 Region Association: MidAtlantic Region |
Yeah, I bought one of these a few months ago, and it's been sitting on my workbench waiting for me to figure out how to install without removing the raintray. I need my raintray, so I'm not sure how or if it's going to get installed any time soon...
Thanks for the write up. |
 |
|
| oakdalecurtis |
Sep 24 2016, 09:46 AM
Post
#5
|
|
Oakdalecurtis Group: Members Posts: 1,322 Joined: 5-June 15 From: Oakdale, Ca Member No.: 18,802 Region Association: Central California |
QUOTE(BeatNavy @ Sep 24 2016, 05:03 AM) Yeah, I bought one of these a few months ago, and it's been sitting on my workbench waiting for me to figure out how to install without removing the raintray. I need my raintray, so I'm not sure how or if it's going to get installed any time soon... Thanks for the write up. I suppose you could screw the clamps right into the rain tray if you put a little silicone glue on each screw as it went through the plastic. It's not like the water from rain that gets in the tray on the top side is under any pressure to get past the screws. |
|
|
|
| Andyrew |
Sep 24 2016, 09:48 AM
Post
#6
|
|
Spooling.... Please wait Group: Members Posts: 13,376 Joined: 20-January 03 From: Riverbank, Ca Member No.: 172 Region Association: Northern California |
Looks good! Conduit clamps work well in this situation. (IMG:style_emoticons/default/smile.gif)
|
|
|
|
| PanelBilly |
Sep 24 2016, 11:18 AM
Post
#7
|
|
914 Guru Group: Members Posts: 5,796 Joined: 23-July 06 From: Kent, Wa Member No.: 6,488 Region Association: Pacific Northwest |
 Mine fit |
|
|
|
| oakdalecurtis |
Sep 24 2016, 11:50 AM
Post
#8
|
|
Oakdalecurtis Group: Members Posts: 1,322 Joined: 5-June 15 From: Oakdale, Ca Member No.: 18,802 Region Association: Central California |
QUOTE(PanelBilly @ Sep 24 2016, 10:18 AM) Mine fit Looks good Billy, you may find that heat and ozone degrade the zip ties over time and they will break. Also, if you can see the white tubing through the engine grill, you can hide it from view. Put about on inch long strips of black plumbers tape on the top half of the tubing where you can see it from above the engine grill, and the white tubing "disappears' from outside view. (IMG:style_emoticons/default/piratenanner.gif) |
|
|
|
| FlacaProductions |
Jul 9 2020, 11:07 AM
Post
#9
|
|
Senior Member Group: Members Posts: 1,550 Joined: 24-November 17 From: LA Member No.: 21,628 Region Association: Southern California |
@BeatNavy - given the recent couple of engine fires that have been documented here, I thought I'd dig this thread back up - any luck on an install WITH the rain tray over the years?
|
|
|
|
| willieg |
Jul 9 2020, 12:16 PM
Post
#10
|
|
Member Group: Members Posts: 130 Joined: 13-August 18 From: Pleasant Hill Member No.: 22,389 Region Association: Northern California |
QUOTE(PanelBilly @ Sep 24 2016, 12:18 PM) Mine fit PanelBilly: How did you stop the BlazeCut from kinking at the bends? |
|
|
|
| mb911 |
Jul 9 2020, 12:59 PM
Post
#11
|
|
914 Guru Group: Members Posts: 6,801 Joined: 2-January 09 From: Burlington wi Member No.: 9,892 Region Association: Upper MidWest |
I ended up getting mine from @beatnavy .. I painted it flat black and put it on mu GT lid. Fits perfect.
|
|
|
|
| BeatNavy |
Jul 9 2020, 01:18 PM
Post
#12
|
|
Certified Professional Scapegoat Group: Members Posts: 2,924 Joined: 26-February 14 From: Easton, MD Member No.: 17,042 Region Association: MidAtlantic Region |
QUOTE(FlacaProductions @ Jul 9 2020, 01:07 PM) @BeatNavy - given the recent couple of engine fires that have been documented here, I thought I'd dig this thread back up - any luck on an install WITH the rain tray over the years? Hey Brian - as Ben noted above, I ended up giving mine to him so he could install. I still wanted to keep the rain tray and didn't want to try to make it fit with that. Hopefully I won't come to regret that in a big way, and hopefully Ben won't need it! |
|
|
|
| mb911 |
Jul 9 2020, 01:32 PM
Post
#13
|
|
914 Guru Group: Members Posts: 6,801 Joined: 2-January 09 From: Burlington wi Member No.: 9,892 Region Association: Upper MidWest |
QUOTE(BeatNavy @ Jul 9 2020, 11:18 AM) QUOTE(FlacaProductions @ Jul 9 2020, 01:07 PM) @BeatNavy - given the recent couple of engine fires that have been documented here, I thought I'd dig this thread back up - any luck on an install WITH the rain tray over the years? Hey Brian - as Ben noted above, I ended up giving mine to him so he could install. I still wanted to keep the rain tray and didn't want to try to make it fit with that. Hopefully I won't come to regret that in a big way, and hopefully Ben won't need it! I agree. 2020 has been an overall awful year in many ways.. I don't want to need it. |
|
|
|
| Coondog |
Jul 9 2020, 02:48 PM
Post
#14
|
|
Advanced Member Group: Members Posts: 2,089 Joined: 24-September 15 From: Apple Valley Calif Member No.: 19,195 Region Association: Southern California |
I like it and Curtis is doing it right by carrying a back up extinguisher..... (IMG:style_emoticons/default/smile.gif)
|
|
|
|
| eric9144 |
Jul 9 2020, 03:03 PM
Post
#15
|
|
Advanced Member Group: Members Posts: 2,732 Joined: 30-March 11 From: San Diego, CA Member No.: 12,876 Region Association: Southern California |
QUOTE(Coondog @ Jul 9 2020, 01:48 PM) I like it and Curtis is doing it right by carrying a back up extinguisher..... (IMG:style_emoticons/default/smile.gif) Since most of us seem to do a lot of running in groups, I've always figured an extinguisher is there as much for me as anyone we may be driving with... Anytime I see a torched 914 it gets me in the gut because I know how much most of us put into them in blood, sweat, tears and $$$$. "Two is one and one is none" aka a backup is never a bad plan in case one doesn't work or finish the job. |
|
|
|
| Beach914 |
Jul 9 2020, 03:17 PM
Post
#16
|
|
Senior Member Group: Members Posts: 961 Joined: 28-March 10 From: Aliso Viejo Member No.: 11,519 Region Association: Southern California |
I carry a Halon extinguisher and one of the "Element" brand extinguisher sticks in each of my cars.
I remember reading this thread awhile back and its something I should consider doing. |
|
|
|
| iankarr |
Jul 9 2020, 03:19 PM
Post
#17
|
|
The wrencher formerly known as Cuddy_K Group: Members Posts: 2,471 Joined: 22-May 15 From: Heber City, UT Member No.: 18,749 Region Association: Intermountain Region |
The Blaze Cut system looks really cool...but looks like it's only effective on fires above the engine tins. Is there a piece for under?
|
|
|
|
| PanelBilly |
Jul 9 2020, 06:12 PM
Post
#18
|
|
914 Guru Group: Members Posts: 5,796 Joined: 23-July 06 From: Kent, Wa Member No.: 6,488 Region Association: Pacific Northwest |
QUOTE(willieg @ Jul 9 2020, 11:16 AM) QUOTE(PanelBilly @ Sep 24 2016, 12:18 PM) Mine fit PanelBilly: How did you stop the BlazeCut from kinking at the bends? I bought it from Amazon and it came rolled up. I took advantage of the natural curve and fit it into the lid. |
|
|
|
| oakdalecurtis |
Jul 9 2020, 06:30 PM
Post
#19
|
|
Oakdalecurtis Group: Members Posts: 1,322 Joined: 5-June 15 From: Oakdale, Ca Member No.: 18,802 Region Association: Central California |
PanelBilly: How did you stop the BlazeCut from kinking at the bends?
[/quote] I actually over bent mine at first and it kinked! I was shocked that it didn’t blow! But since it continued to try to kink at the center as I curved it, I took some electrical pipe curves, cut them in half and wired them around the curve to prevent the BlazeCut from kinking any more. You can see my fix in the photo. If you don’t overbend it, it will make the 180 without kinking... 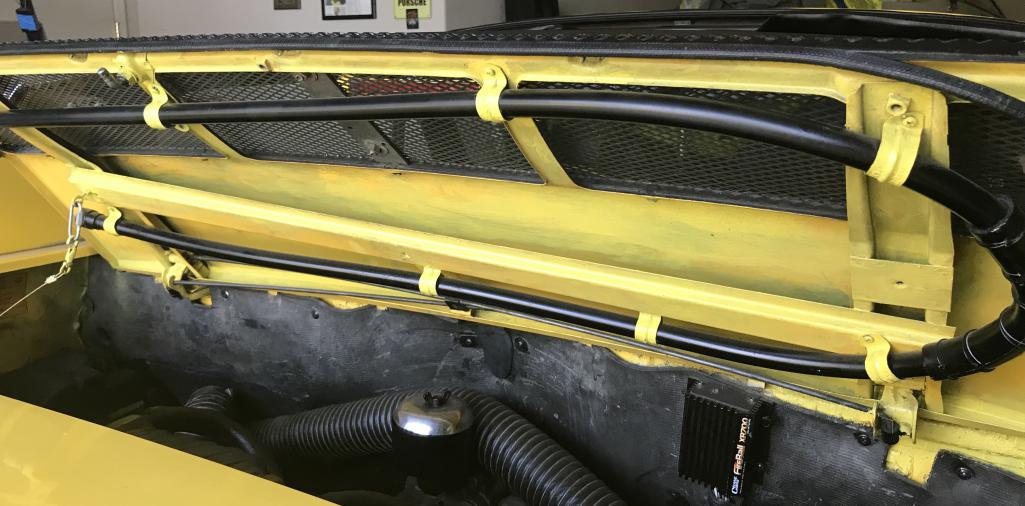 |
|
|
|
| CHIZ 914 |
Jul 9 2020, 07:15 PM
Post
#20
|
|
Member Group: Members Posts: 199 Joined: 14-May 18 From: Mountlake Terrace, Wa Member No.: 22,118 Region Association: None |
Was thinking about that system and looks to work very good, the fit with a rain tray would be the issue
Now just have a fire bottle with a quick release seat frame mounted, perhaps add another one, but might clutter up the cabin. (IMG:style_emoticons/default/idea.gif) Attached image(s) 
|
|
|
|
|
1 User(s) are reading this topic (1 Guests and 0 Anonymous Users)
0 Members:

|
Lo-Fi Version | Time is now: 19th April 2024 - 06:01 PM |
Invision Power Board
v9.1.4 © 2024 IPS, Inc.