|
|
|
Porsche, and the Porsche crest are registered trademarks of Dr. Ing. h.c. F. Porsche AG.
This site is not affiliated with Porsche in any way. Its only purpose is to provide an online forum for car enthusiasts. All other trademarks are property of their respective owners. |
|
|

  |

| 76-914 |
 Nov 11 2016, 09:17 PM Nov 11 2016, 09:17 PM
Post
#81
|
|
Repeat Offender & Resident Subaru Antagonist  Group: Members Posts: 13,490 Joined: 23-January 09 From: Temecula, CA Member No.: 9,964 Region Association: Southern California |
Can't remember where I saw them. I lost all of my bookmarks when my laptop took a shit months back. (IMG:style_emoticons/default/mad.gif) Maybe Jags that Run. They're ips threaded so you'd need a tee to screw them in. Does your friends car have a CI block? If so I'd think steel would be fine. You want t avoid a mix of metals that are so far apart on the Galvanic chart. Al is the more noble of the two metals and with steel tubes you've got enough mass to attract the Al. It will want to draw the Al to the steel and where will it come from? Your radiator or block. How quickly this happens depends upon the amount of energy i.e stray current. If you ran rubber hoses vs. steel I doubt you'd see any anodic reaction. (IMG:style_emoticons/default/beerchug.gif)
|
   |

 
|
| flmont |
Nov 12 2016, 06:25 PM
Post
#82
|
|
Senior Member Group: Members Posts: 879 Joined: 21-October 08 From: Tucson,Az Member No.: 9,676 Region Association: Southwest Region |
here are the Rad lines,...and they are 1" lines in and out
Attached thumbnail(s) 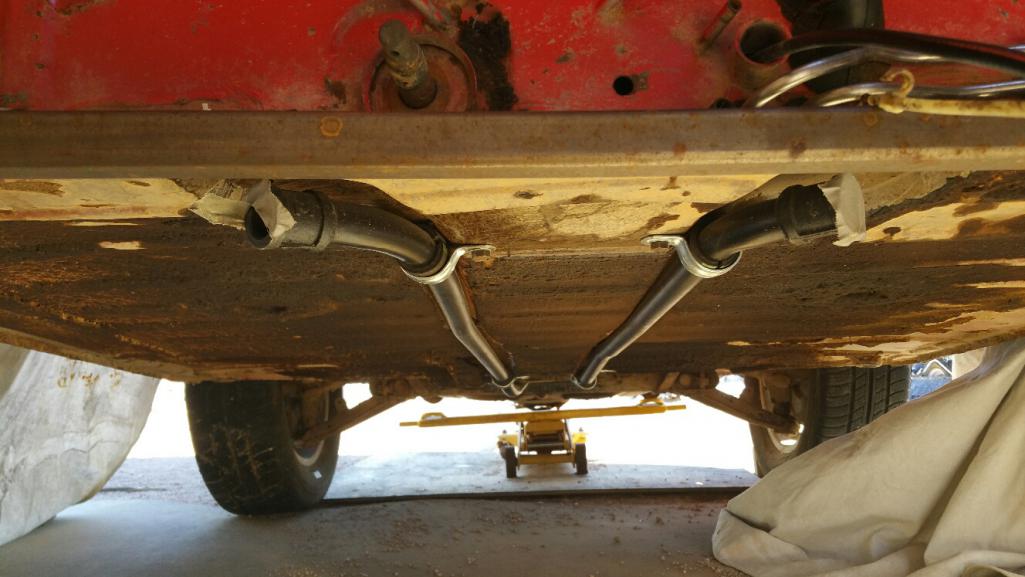 
|
|
|
|
| Chris H. |
Nov 13 2016, 08:38 AM
Post
#83
|
|
Senior Member Group: Members Posts: 4,028 Joined: 2-January 03 From: Chicago 'burbs Member No.: 73 Region Association: Upper MidWest |
Yeah those should be fine. So you just need to look at the link I posted before and get the correct reducers. The engine inlets are 1.5" I think. Measure them to be sure. Don't forget to measure your radiator inlets too. They might be different than the engine since the rad is not stock.
|
|
|
|
| flmont |
Nov 13 2016, 10:25 AM
Post
#84
|
|
Senior Member Group: Members Posts: 879 Joined: 21-October 08 From: Tucson,Az Member No.: 9,676 Region Association: Southwest Region |
Thanks Chris I will,...
|
|
|
|
| flmont |
Nov 13 2016, 10:28 AM
Post
#85
|
|
Senior Member Group: Members Posts: 879 Joined: 21-October 08 From: Tucson,Az Member No.: 9,676 Region Association: Southwest Region |
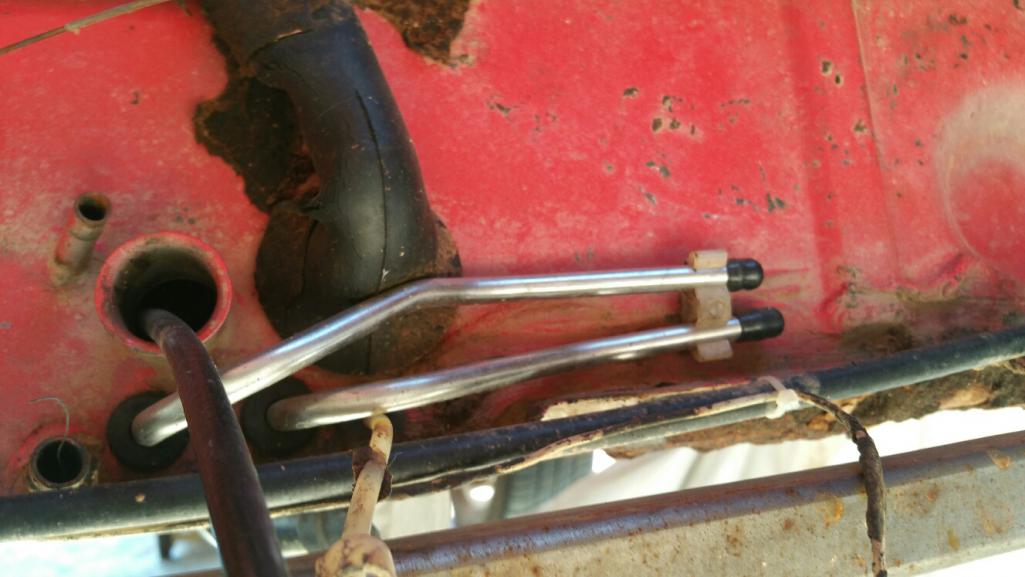
But here is another issue,..Y does these lines stop right at the bracket,..are these lines short ??
 |
|
|
|
| Chris H. |
Nov 13 2016, 10:05 PM
Post
#86
|
|
Senior Member Group: Members Posts: 4,028 Joined: 2-January 03 From: Chicago 'burbs Member No.: 73 Region Association: Upper MidWest |
They are shorter than the stock lines only because they are made of stainless steel rather than the plastic composite material the originals are made of, so of course they are not as flexible so the designer had to stop them there. Those are Tangerine Racing lines, and they either come as a 2 piece or 4 piece set. The 4 piece set has another length of stainless lines that run into the engine compartment connected with a small piece of FI hose to the tunnel lines. Mine are just like yours, just the tunnel lines, and I ran high pressure FI hose from there into the engine compartment. You can use 5/16 as a substitute for 8mm. Just make sure it's high pressure hose made for later model engines.
Here's a link to the lines you have: SS Fuel Lines They are the best thing out there to replace stock lines with. |
|
|
|
| flmont |
Nov 14 2016, 03:04 PM
Post
#87
|
|
Senior Member Group: Members Posts: 879 Joined: 21-October 08 From: Tucson,Az Member No.: 9,676 Region Association: Southwest Region |
yes, I have the 4 piece set,..Thanks,..Ill just secure them a different way,..on the fire wall
|
|
|
|
| flmont |
Nov 21 2016, 07:48 PM
Post
#88
|
|
Senior Member Group: Members Posts: 879 Joined: 21-October 08 From: Tucson,Az Member No.: 9,676 Region Association: Southwest Region |
Over the holiday weekend I will attempt to fit the engine inplace and set up fuel line's and Rad lines and hope to get the crossbar installed and measured,..So I can get it welded up for perminet install. harness should be finished soon..!!!
|
|
|
|
| flmont |
Nov 21 2016, 10:49 PM
Post
#89
|
|
Senior Member Group: Members Posts: 879 Joined: 21-October 08 From: Tucson,Az Member No.: 9,676 Region Association: Southwest Region |
would there be a smaller throttle body set up to use on this 3.3 so I don't have to flip intake or cut the trunk ???
|
|
|
|
| mgp4591 |
Nov 22 2016, 02:23 AM
Post
#90
|
|
914 Guru Group: Members Posts: 5,366 Joined: 1-August 12 From: Salt Lake City Ut Member No.: 14,748 Region Association: Intermountain Region |
QUOTE(flmont @ Nov 21 2016, 09:49 PM)  would there be a smaller throttle body set up to use on this 3.3 so I don't have to flip intake or cut the trunk ??? The only thing I'd think you could do would be to build a custom intake. I haven't done the measurements taking advantage of moving the engine as absolutely far forward as possible but I'd bet it's been done before to see what the final measurements would be... |
|
|
|
| Chris H. |
Nov 22 2016, 07:10 PM
Post
#91
|
|
Senior Member Group: Members Posts: 4,028 Joined: 2-January 03 From: Chicago 'burbs Member No.: 73 Region Association: Upper MidWest |
No way to do it with the stock intake manifold. You're practically touching the rear firewall with the stock setup too. It has the iris valve and all, very unique to the SVX. Saw a custom one on the internet that was a tube design with a 70mm throttle body but it was built for a plane I think. They were more concerned with safe, reliable power than getting every last bit of performance out of it. Probably lose some horses with that setup.
Flipping the intake is not hard. Wish I'd tried a little harder the first time (IMG:style_emoticons/default/headbang.gif) . |
|
|
|
| 914forme |
Nov 23 2016, 11:35 AM
Post
#92
|
|
Times a wastin', get wrenchin'! Group: Members Posts: 3,896 Joined: 24-July 04 From: Dayton, Ohio Member No.: 2,388 Region Association: None |
Yes it is easy to flip the stock intake.
I would disagree with the intake manifold. It helps more for the broader torque curve, but a properly tuned manifold will make more peak horsepower. It will just be across a very narrow RPM range. The advantage to IRIS is it broadens the drivability of the engine. Which helps on the street. The manifold in question is more than likely seen on SDS' web site. The EG33 link is down. It is the same concept as the EJ22 build though, add a few runners. And they built the EG out of Aluminum. |
|
|
|
| flmont |
Dec 19 2016, 07:19 PM
Post
#93
|
|
Senior Member Group: Members Posts: 879 Joined: 21-October 08 From: Tucson,Az Member No.: 9,676 Region Association: Southwest Region |
Well, The harness will be on the way soon, a day or two,..he connected to a svx,..and it started ...So I hope mine will do the same ..!! I think I will have all the parts needed to start assembley,..Iam waiting for the spacers so I can flip my intake manifold,..If that dos'nt work out, that will just slow things up a bit , not stop the process ,.Then of course the gauge package...will be next !! right ?? Thanks Frank
|
|
|
|
| flmont |
Dec 30 2016, 08:59 PM
Post
#94
|
|
Senior Member Group: Members Posts: 879 Joined: 21-October 08 From: Tucson,Az Member No.: 9,676 Region Association: Southwest Region |
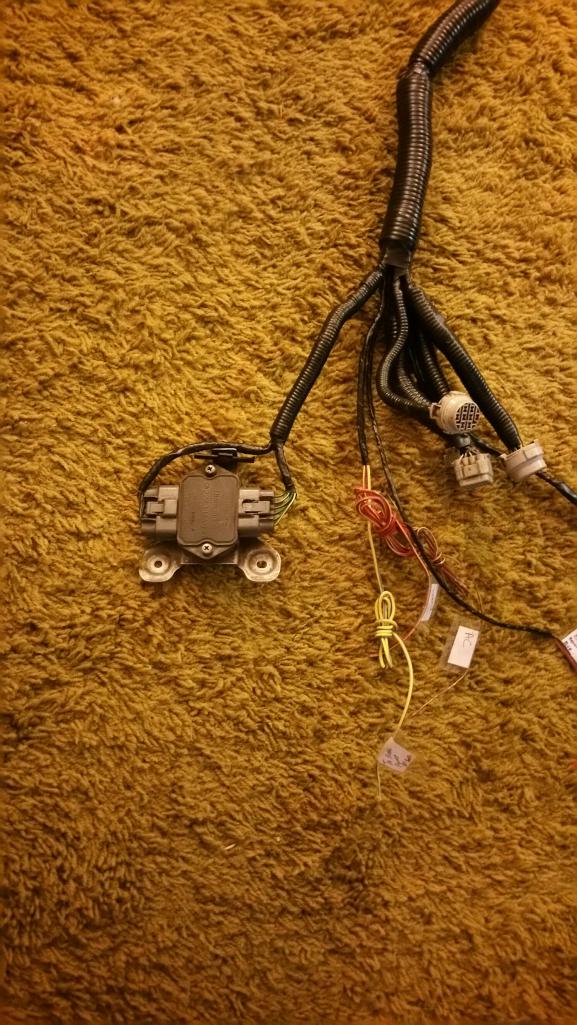
Now that I have my harness back Thanks Jeff,..I would like to know how others have installed thier's its bigger that I thought it would be,..and also what is this item that has the bracket attached and where does it mount ??
 Thanks Frank Thanks Frank |
|
|
|
| flmont |
Dec 31 2016, 01:00 PM
Post
#95
|
|
Senior Member Group: Members Posts: 879 Joined: 21-October 08 From: Tucson,Az Member No.: 9,676 Region Association: Southwest Region |
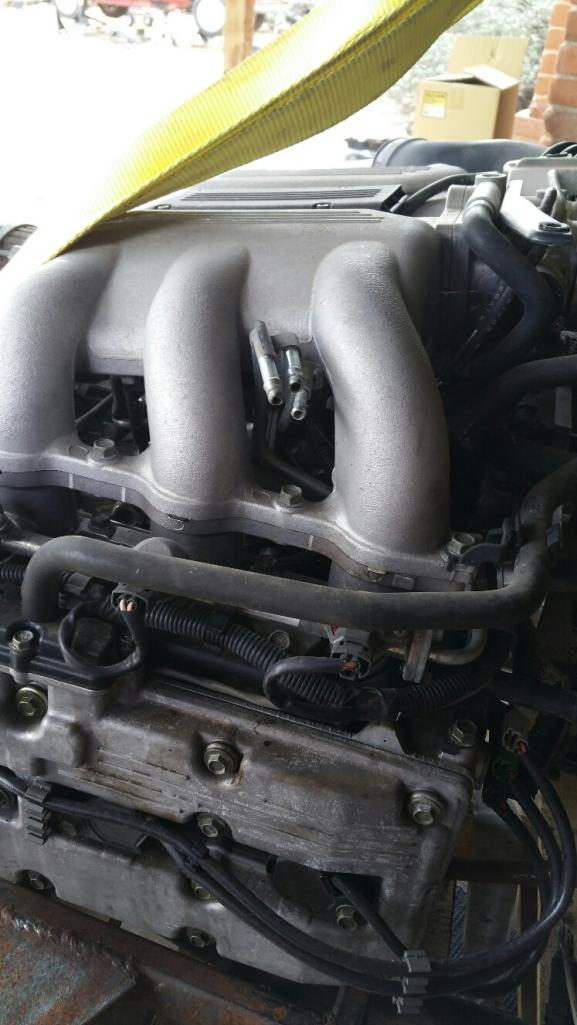
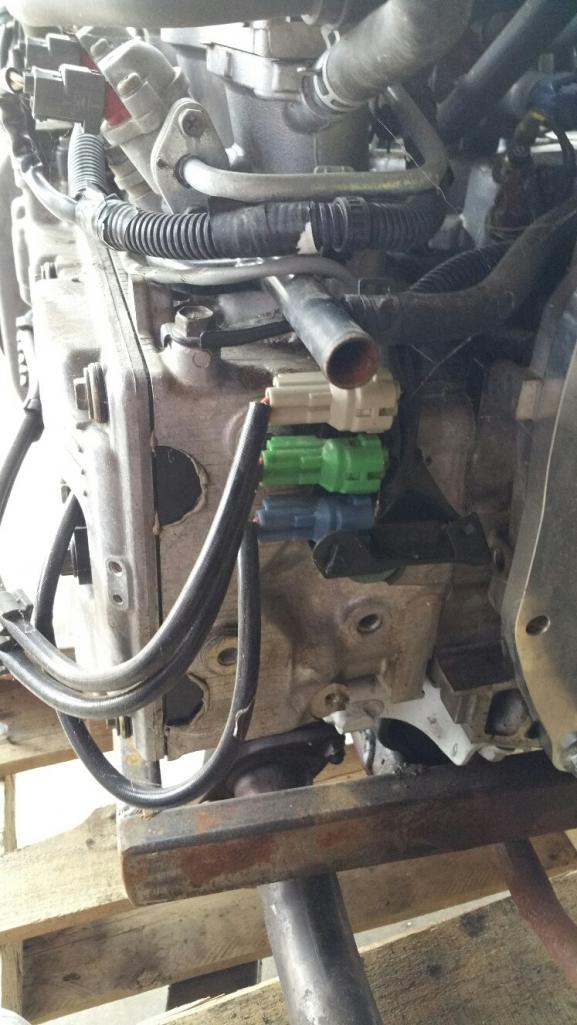
I have more Q's about this upgrade,
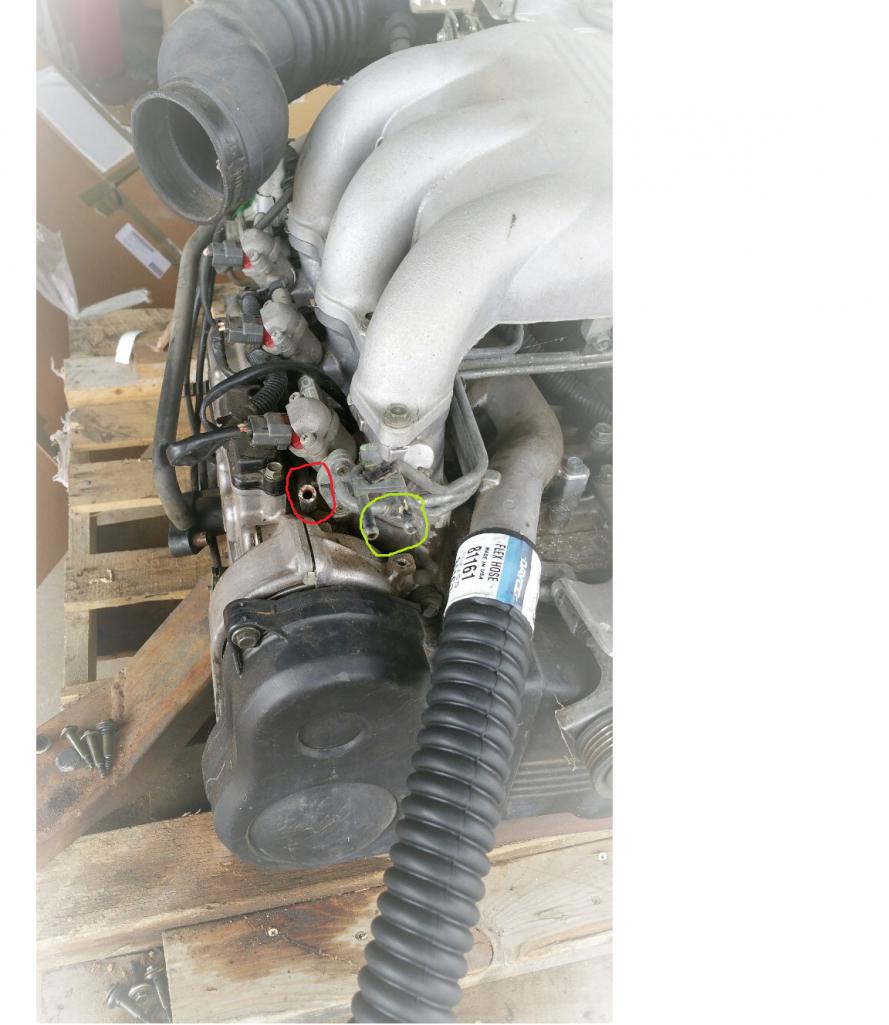 1st what is this line circled in RED,..and what are the other 2 lines circled in green. TIA 1st what is this line circled in RED,..and what are the other 2 lines circled in green. TIA |
|
|
|
| flmont |
Dec 31 2016, 01:04 PM
Post
#96
|
|
Senior Member Group: Members Posts: 879 Joined: 21-October 08 From: Tucson,Az Member No.: 9,676 Region Association: Southwest Region |
Plus It seems these are the fuel lines, but I did'nt expect 3 ,how do I find out which is inbound and return lines
 |
|
|
|
| flmont |
Dec 31 2016, 01:07 PM
Post
#97
|
|
Senior Member Group: Members Posts: 879 Joined: 21-October 08 From: Tucson,Az Member No.: 9,676 Region Association: Southwest Region |
And last Q for now, How do I hook up this water line,.just run a jumper line ??
 Thanks Very Much !! Frank Thanks Very Much !! Frank |
|
|
|
| 914forme |
Jan 1 2017, 09:43 PM
Post
#98
|
|
Times a wastin', get wrenchin'! Group: Members Posts: 3,896 Joined: 24-July 04 From: Dayton, Ohio Member No.: 2,388 Region Association: None |
QUOTE(flmont @ Dec 31 2016, 02:00 PM) I have more Q's about this upgrade, 1st what is this line circled in RED,..and what are the other 2 lines circled in green. TIAGo to the charcoal canister, in green if I remember correctly. Red Circle, I have forgotten also. The three in the other picture. Vent to the tank, goes over to the charcoal canister. which is mounted in he right front corner of the SVX. Return from EFI Return routes from the pressure regulator back under the manifold, and out the side. Fuel feed to the engine. Subaru loved doing all these metal lines under the intake manifold. |
|
|
|
| flmont |
Jan 1 2017, 10:16 PM
Post
#99
|
|
Senior Member Group: Members Posts: 879 Joined: 21-October 08 From: Tucson,Az Member No.: 9,676 Region Association: Southwest Region |
Ahh,...Thank You ..!! Frank
|
|
|
|
| Ncchany |
Jan 1 2017, 11:12 PM
Post
#100
|
|
Newbie Group: Members Posts: 36 Joined: 1-October 16 From: New york Member No.: 20,456 Region Association: None |
How hard is this kinda swap and how costly is it?
|
|
|
|
|
1 User(s) are reading this topic (1 Guests and 0 Anonymous Users)
0 Members:

|
Lo-Fi Version | Time is now: 26th April 2024 - 03:27 AM |
Invision Power Board
v9.1.4 © 2024 IPS, Inc.