|
|

|
Porsche, and the Porsche crest are registered trademarks of Dr. Ing. h.c. F. Porsche AG.
This site is not affiliated with Porsche in any way. Its only purpose is to provide an online forum for car enthusiasts. All other trademarks are property of their respective owners. |
|
|
  |
| Andyrew |
 Nov 27 2016, 11:19 PM Nov 27 2016, 11:19 PM
Post
#101
|
|
Spooling.... Please wait           Group: Members Posts: 13,380 Joined: 20-January 03 From: Riverbank, Ca Member No.: 172 Region Association: Northern California 
|
Stiffeners look great, Love the firewall stiffener!!
|
| Krieger |
 Nov 28 2016, 12:02 AM Nov 28 2016, 12:02 AM
Post
#102
|
|
Advanced Member     Group: Members Posts: 4,833 Joined: 24-May 04 From: Santa Rosa CA Member No.: 2,104 Region Association: None 
|
Looking good Chris! (IMG:style_emoticons/default/welder.gif)
|
| tygaboy |
 Dec 1 2016, 01:15 PM Dec 1 2016, 01:15 PM
Post
#103
|
|
914 Guru      Group: Members Posts: 5,742 Joined: 6-October 15 From: Petaluma, CA Member No.: 19,241 Region Association: Northern California 
|
I treated the project to an early Christmas present! Ordered a set of GTS Le Mans seats done up like these: grommets, 5-point belt set up. I went with the oval headrest (vs the one pictured or the one that comes standard with the Le Mans)
I added heaters, too. Gotta keep SWMBO happy, don'cha know. They are due to arrive end of January. And the rumors are true: Stefan is GREAT to work with, as others have pointed out. OK, so I also have ulterior motives. I want the roll cage bar that runs from the main hoop to the door bar to match the angle of the side bolster. So I "NEEDED" to get the seats! Plus, I'll just run them in the '74 DD until I get this one running. That's my story and I'm sticking to it. Attached image(s) 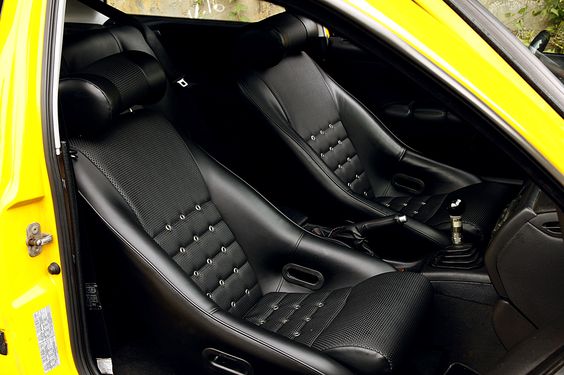
|
| tygaboy |
 Dec 4 2016, 07:16 PM Dec 4 2016, 07:16 PM
Post
#104
|
|
914 Guru      Group: Members Posts: 5,742 Joined: 6-October 15 From: Petaluma, CA Member No.: 19,241 Region Association: Northern California 
|
The firewall arch installation is FINALLY underway! (IMG:style_emoticons/default/aktion035.gif)
I have a TIG machine but: I the spirit of full disclosure, this beautiful welding (IMG:style_emoticons/default/wub.gif) is thanks to my buddy Martin, mentioned earlier. He's a master fabricator who designed and build ProStock motorcycle chassis while working at Kosman. He's done all sorts of crazy cool projects... Anyway, we collaborate on various things and he said "Hey, you have a TIG machine. I'd be happy to do the welding on your cage tubes...", I didn't think too long before taking him up on it! I'll continue to do all the other welding but I have to say, this has me looking forward to when I'll have time to learn and practice TIG. Until then, it's Martin on the final cage welding! Attached thumbnail(s) 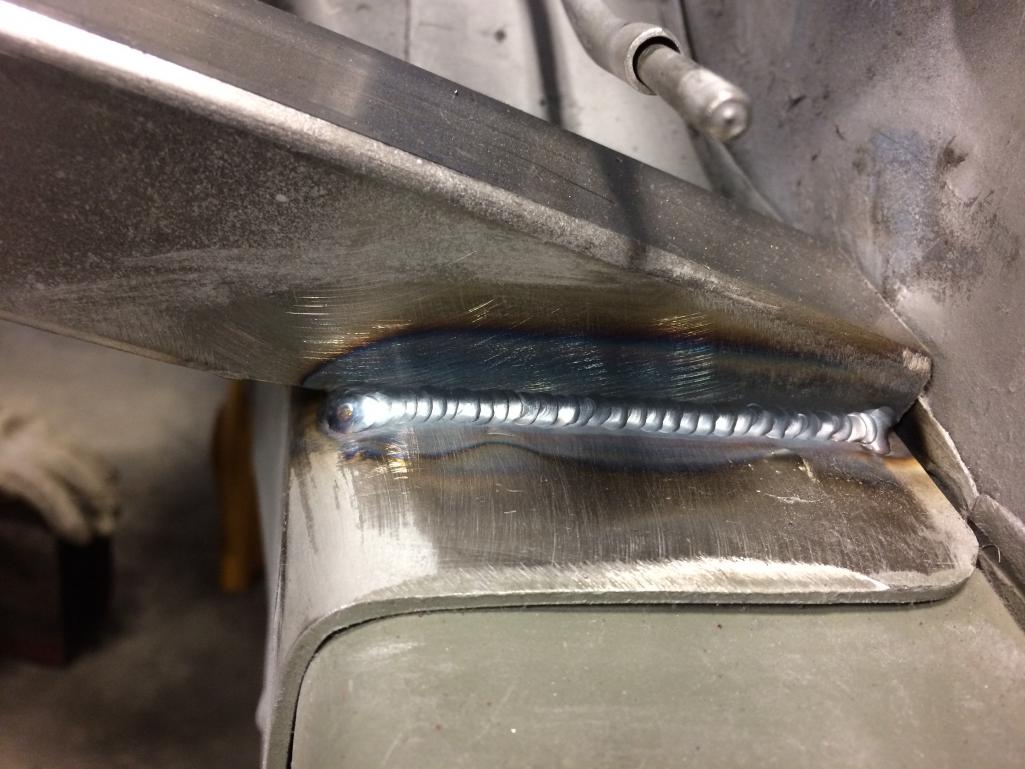 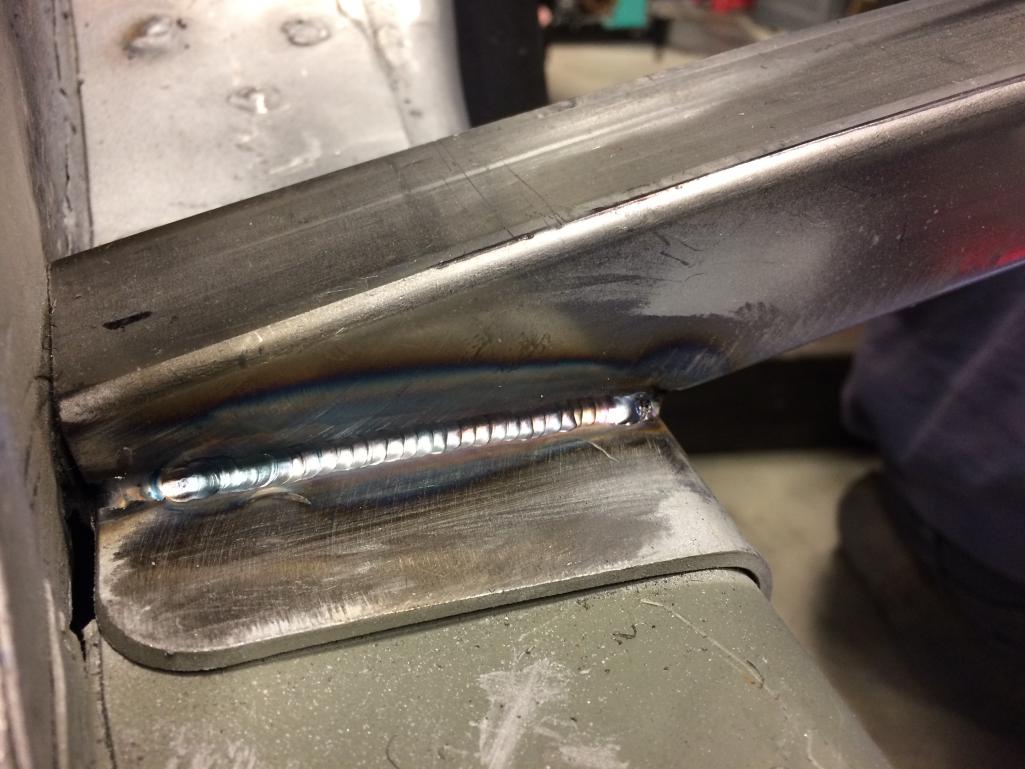
|
| Cracker |
 Dec 4 2016, 07:39 PM Dec 4 2016, 07:39 PM
Post
#105
|
|
Advanced Member     Group: Members Posts: 2,148 Joined: 2-February 10 From: Atlanta (area) Member No.: 11,316 Region Association: South East States 
|
Cheater, cheater, apple eater!
Looks very nice Chris...just make sure I fit! (IMG:style_emoticons/default/shades.gif) Tony |
| Rand |
 Dec 4 2016, 08:36 PM Dec 4 2016, 08:36 PM
Post
#106
|
|
Cross Member      Group: Members Posts: 7,413 Joined: 8-February 05 From: OR Member No.: 3,573 Region Association: None |
Nice. So great to see a good fish scale weld after all the straight run blobbing that's so common.
|
| Curbandgutter |
 Dec 9 2016, 11:54 AM Dec 9 2016, 11:54 AM
Post
#107
|
|
Senior Member    Group: Members Posts: 566 Joined: 8-March 13 From: Murrieta CA Member No.: 15,637 Region Association: Southern California 
|
Love those seats. Those are the ones I'm thinking of using as well. Those grommets really add a classic look to the car. I'd like to sit it them before buying though. Maybe I may make a trip out there and see your build as well.
|
| tygaboy |
 Dec 9 2016, 12:35 PM Dec 9 2016, 12:35 PM
Post
#108
|
|
914 Guru      Group: Members Posts: 5,742 Joined: 6-October 15 From: Petaluma, CA Member No.: 19,241 Region Association: Northern California 
|
Love those seats. Those are the ones I'm thinking of using as well. Those grommets really add a classic look to the car. I'd like to sit it them before buying though. Maybe I may make a trip out there and see your build as well. Rudy - My shop is always open so come on up! Also, the seats will be installed in my '74 that I plan to have at the WCR so if you're coming to that event, you can take the car for a spin and get more than just a static sit. (IMG:style_emoticons/default/driving.gif) I went with the grommets as I'm thinking they'll fit with what I have planned for the rest of the interior. I'll be posting more about that design once I get the firewall, floor and roll cage done. |
| ssuperflyoldguy |
 Dec 9 2016, 05:21 PM Dec 9 2016, 05:21 PM
Post
#109
|
|
Member   Group: Members Posts: 190 Joined: 15-November 15 From: NorCal - East Bay Baby! Member No.: 19,364 Region Association: None |
Dang. You must have house elves too. Very clean & i'm a little late to the party (jealous of the shop & your tig-welding elf) but I use cold rolled galvanized sheet metal when ever I can. Bitch welding (Maybe Martin can help here too) but no corrosion behind panels & overlaps ever again. FabFab.us - I've used a LOT of sheetmetal, all cold rolled
|
| tygaboy |
 Dec 9 2016, 06:04 PM Dec 9 2016, 06:04 PM
Post
#110
|
|
914 Guru      Group: Members Posts: 5,742 Joined: 6-October 15 From: Petaluma, CA Member No.: 19,241 Region Association: Northern California 
|
Lower Fire Wall:
I test fit the motor in the "moved forward 1.5" position and the harmonic balancer was thiiiiiiiiiis close to where the lower fire wall cross beam sits. So I opted to play it safe and clearance the beam in the spirit of "better to be safe than... have two different parts trying to occupy the same space!" A bit of (IMG:style_emoticons/default/sawzall-smiley.gif) and (IMG:style_emoticons/default/smash.gif) then some (IMG:style_emoticons/default/welder.gif) and the beam can never say "Hey man, would you give me my space!?!?" It should be fit and welded in this weekend! Attached thumbnail(s) 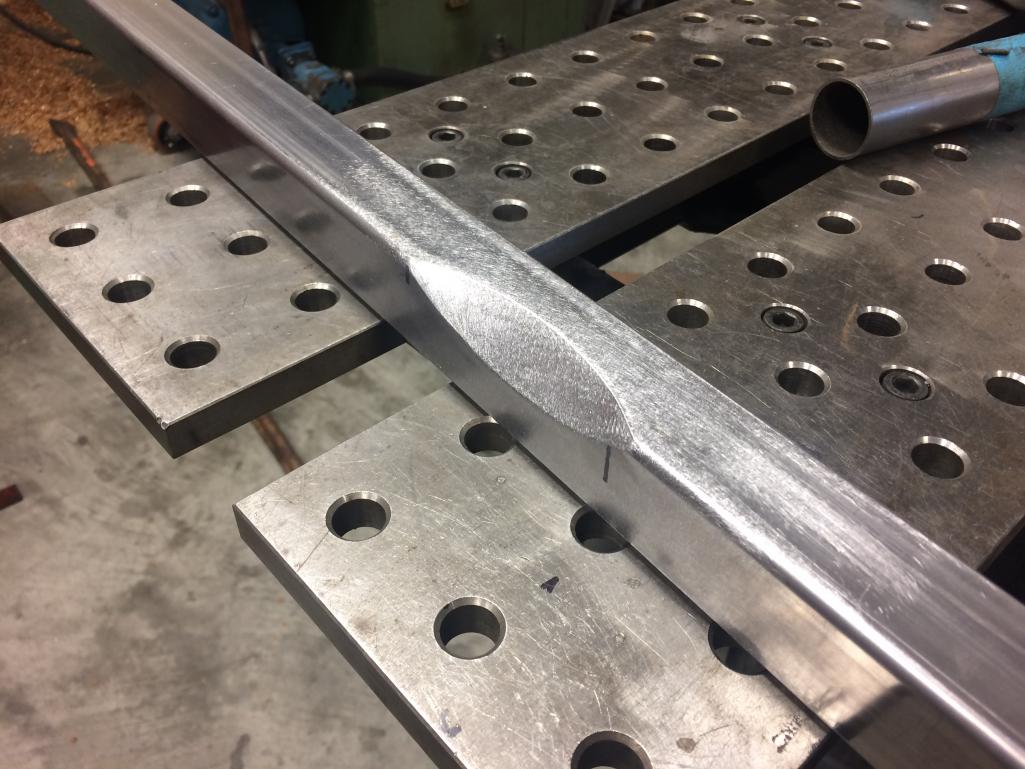
|
| Cracker |
 Dec 9 2016, 06:40 PM Dec 9 2016, 06:40 PM
Post
#111
|
|
Advanced Member     Group: Members Posts: 2,148 Joined: 2-February 10 From: Atlanta (area) Member No.: 11,316 Region Association: South East States 
|
Trust me...it is worth the effort.
Tony |
| Curbandgutter |
 Dec 10 2016, 09:40 AM Dec 10 2016, 09:40 AM
Post
#112
|
|
Senior Member    Group: Members Posts: 566 Joined: 8-March 13 From: Murrieta CA Member No.: 15,637 Region Association: Southern California 
|
Love those seats. Those are the ones I'm thinking of using as well. Those grommets really add a classic look to the car. I'd like to sit it them before buying though. Maybe I may make a trip out there and see your build as well. Rudy - My shop is always open so come on up! Also, the seats will be installed in my '74 that I plan to have at the WCR so if you're coming to that event, you can take the car for a spin and get more than just a static sit. (IMG:style_emoticons/default/driving.gif) I went with the grommets as I'm thinking they'll fit with what I have planned for the rest of the interior. I'll be posting more about that design once I get the firewall, floor and roll cage done. Hmmmmmmmm.......I just noticed you are approx. 20 miles from Napa, I just may be able to disguise the visit by telling the wife we are going to Napa. I will definitely take you up on that. I'll be in touch. |
| tygaboy |
 Dec 10 2016, 09:42 PM Dec 10 2016, 09:42 PM
Post
#113
|
|
914 Guru      Group: Members Posts: 5,742 Joined: 6-October 15 From: Petaluma, CA Member No.: 19,241 Region Association: Northern California 
|
Slowly making progress. Before I can install the roll bar, I need to reinforce the top of the long, then, in the tradition of "if more is good, too much is just enough", I'm plating in the engine mounts. I'll also add more once I get to installing the Tangerine Racing raised suspension kit.
For now, while it's not final fitment, this will give you an idea of what's planned. It took most of the day to measure, cut, fit, bend, etc., but I did get both sides done. Tomorrow, the lower fire wall beam and braces will be final welded. I like it! Attached thumbnail(s) 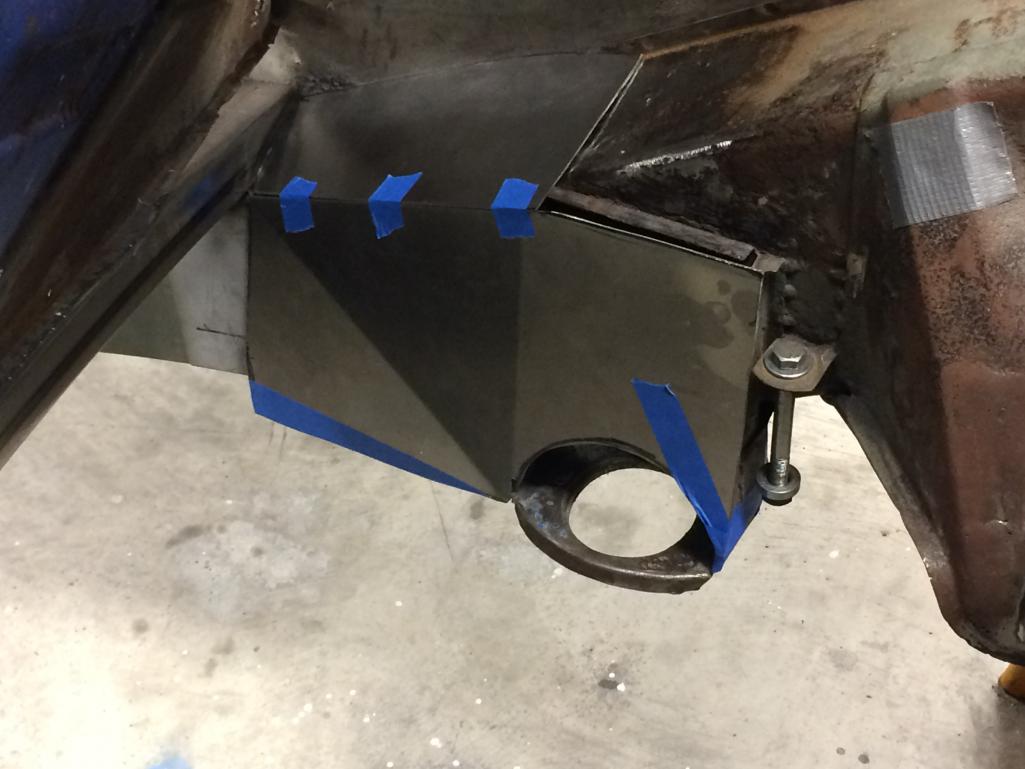
|
| tygaboy |
 Dec 12 2016, 11:05 AM Dec 12 2016, 11:05 AM
Post
#114
|
|
914 Guru      Group: Members Posts: 5,742 Joined: 6-October 15 From: Petaluma, CA Member No.: 19,241 Region Association: Northern California 
|
Best laid plans...
Didn't get the welding done that I'd planned. I did get the lower cross beam in place and partially welded in. The fun part was that because I want as much room for the motor to be moved forward, I located that lower beam a bit further forward than the upper, curved one. Those of you who paid attention in geometry class know what fun it was to get the uprights to fit well! They lean back and the top has to account for the curve. It took about 367 fit, grind, fit, grinds to get them done but - they're done! The driver side is (currently) offset to ensure no interference with the alternator. I say "currently" because I'm waiting to complete the mods to the front engine mount so I can fit the drivetrain in it's relocated position before final welding the uprights... just in case. Attached thumbnail(s) 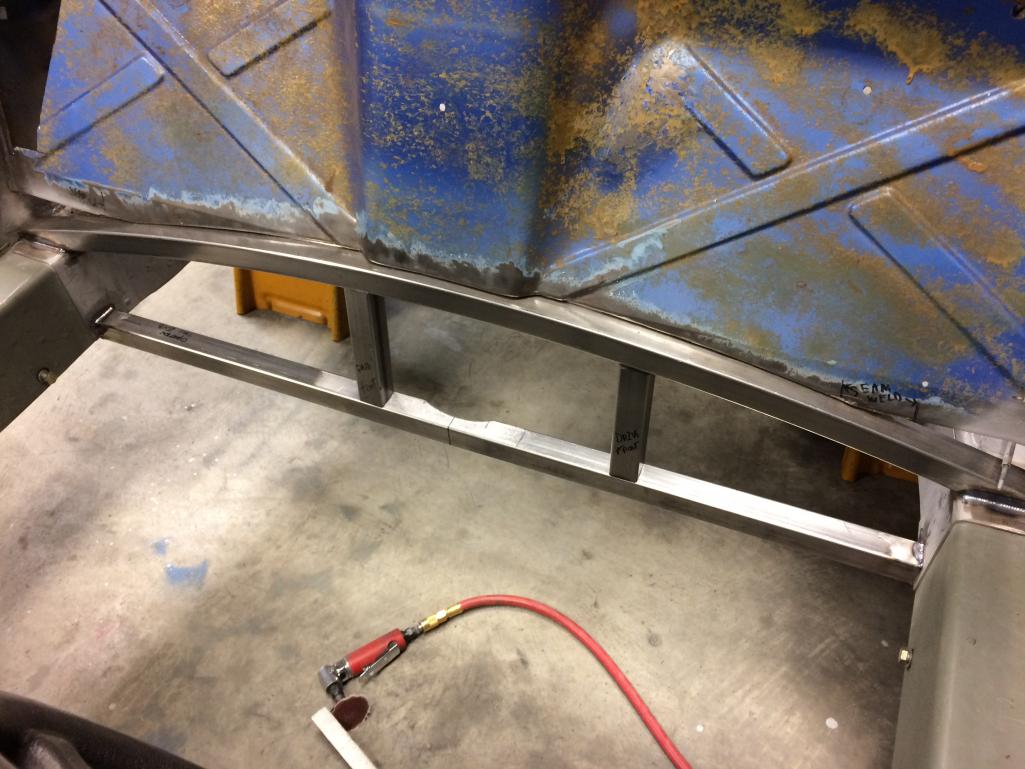 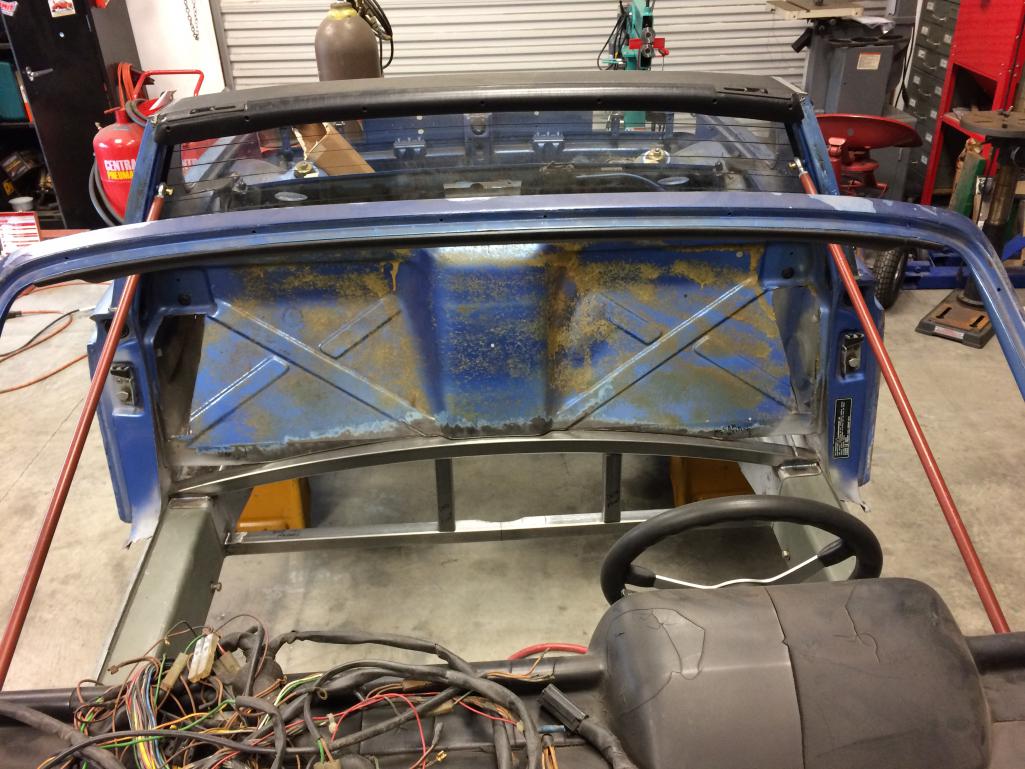
|
| tygaboy |
 Dec 12 2016, 11:13 AM Dec 12 2016, 11:13 AM
Post
#115
|
|
914 Guru      Group: Members Posts: 5,742 Joined: 6-October 15 From: Petaluma, CA Member No.: 19,241 Region Association: Northern California 
|
And that's not all I got done over the weekend: I was able to bend up the new front roll hoop as well as final fit the rear roll hoop. Also welded in the rear hoop pads.
Pics of all this in a couple days. Making progress...! (IMG:style_emoticons/default/piratenanner.gif) |
| mbseto |
 Dec 12 2016, 01:04 PM Dec 12 2016, 01:04 PM
Post
#116
|
|
Senior Member    Group: Members Posts: 1,257 Joined: 6-August 14 From: Cincy Member No.: 17,743 Region Association: North East States |
Beautiful work!
|
| Wew |
 Dec 12 2016, 04:57 PM Dec 12 2016, 04:57 PM
Post
#117
|
|
Member   Group: Members Posts: 236 Joined: 17-January 15 From: Novato, ca Member No.: 18,335 Region Association: None |
Chris, you are an artist. Enjoying the progress you are making.
(IMG:style_emoticons/default/beerchug.gif) |
| tygaboy |
 Dec 17 2016, 05:25 PM Dec 17 2016, 05:25 PM
Post
#118
|
|
914 Guru      Group: Members Posts: 5,742 Joined: 6-October 15 From: Petaluma, CA Member No.: 19,241 Region Association: Northern California 
|
To move the motor forward, I opted to modify the ends of the Renegade engine mount. As delivered, the bosses on the end are set forward of the cross bar by ~1.5".
Here's a pic of the mount, as delivered from Renegade. Attached image(s) 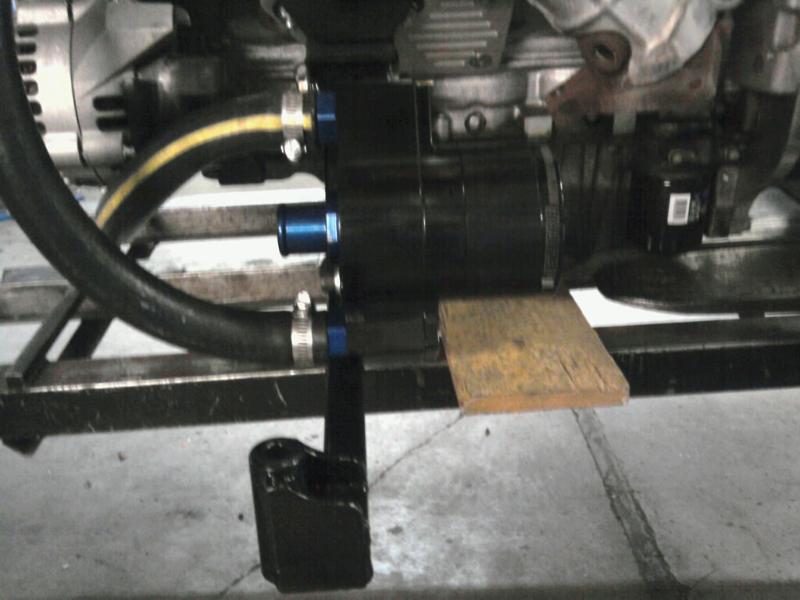
|
| tygaboy |
 Dec 17 2016, 05:27 PM Dec 17 2016, 05:27 PM
Post
#119
|
|
914 Guru      Group: Members Posts: 5,742 Joined: 6-October 15 From: Petaluma, CA Member No.: 19,241 Region Association: Northern California 
|
So lop off those bosses, make new ones and line it all up with the cross bar.
It'll need a gusset so I used a knock-out punch and dimple die to fab up a suitable part. Attached thumbnail(s) 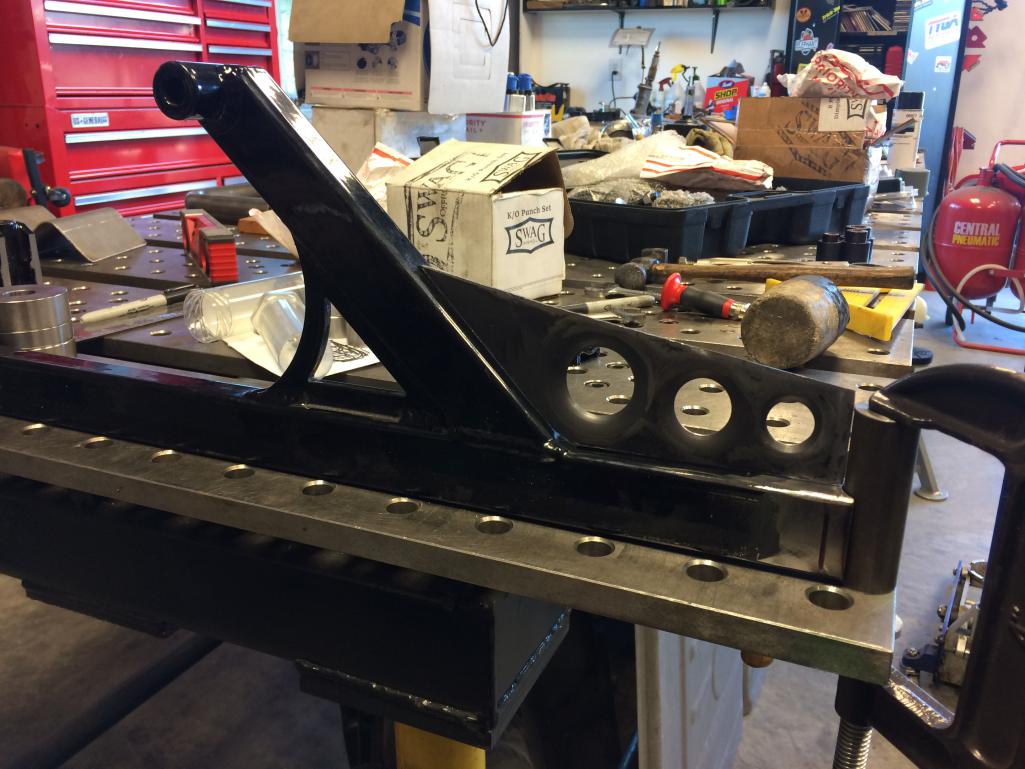 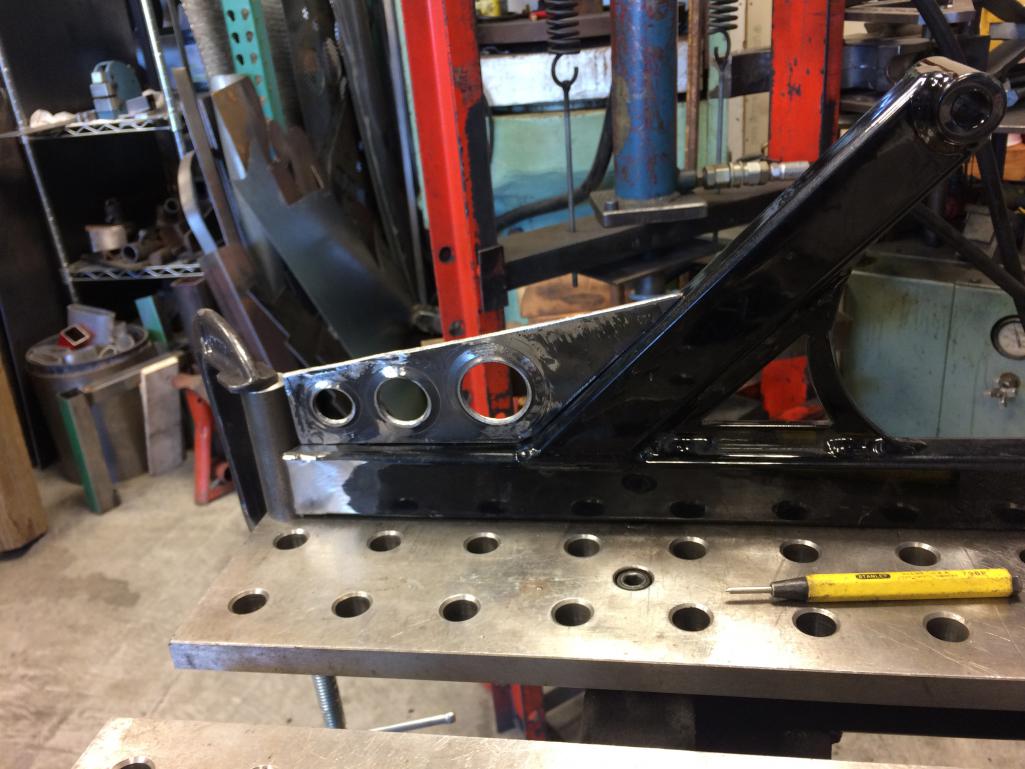
|
| tygaboy |
 Dec 17 2016, 05:34 PM Dec 17 2016, 05:34 PM
Post
#120
|
|
914 Guru      Group: Members Posts: 5,742 Joined: 6-October 15 From: Petaluma, CA Member No.: 19,241 Region Association: Northern California 
|
And the main hoop is final fit and ready for welding!
I wanted to get it as tight to the fire wall as possible so I needed to relieve the top "corner" of the fire wall to get the bar to sit back at the proper angle. No one will ever see this area once the car is built but that "corner" area is essentially reversed from the stock shape. I used a scrap piece of roll bar material and slowly hammered it into the top of the fire wall area until the bar fit as desired. I'm not going to run a back pad so I removed the 4 tabs that the back pad clips into to get that last little bit of clearance. There's about 1/8" clearance between the bar and the firewall. I'm developing an appreciation for why custom builds cost so much. Not that I'm highly skilled or efficient, but the work needed to get the hoop to sit back about a 1/2" (relieve the fire wall then grind the footing of each side of the hoop to the correct angle) took me the better part of the day. Attached thumbnail(s) 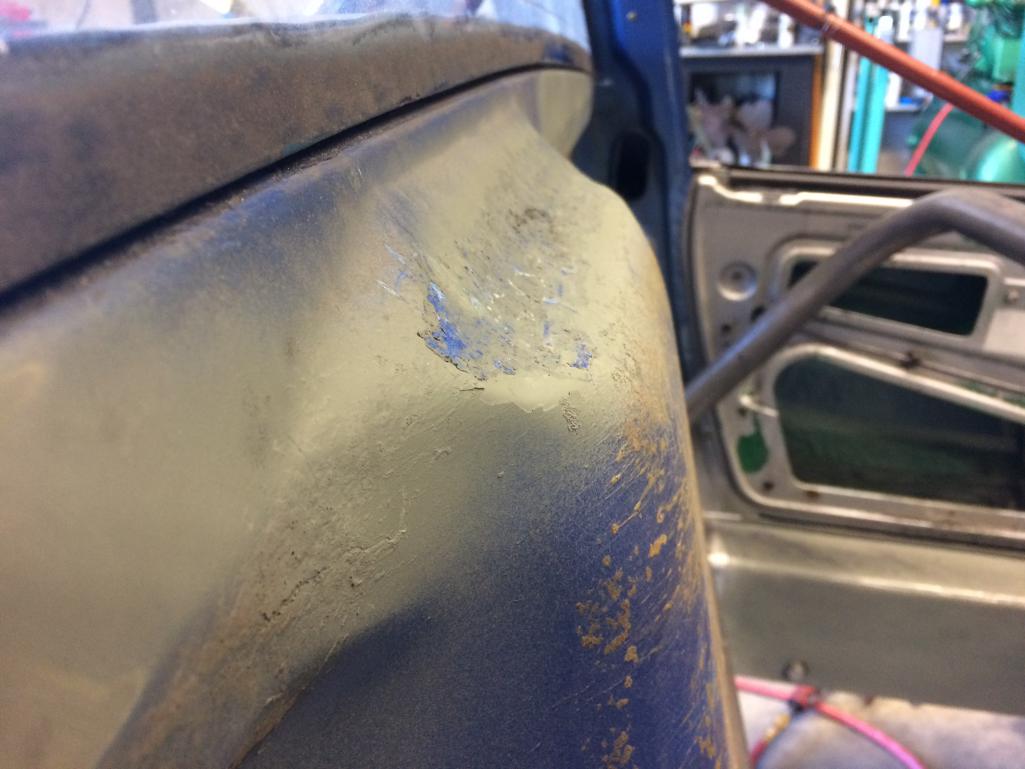 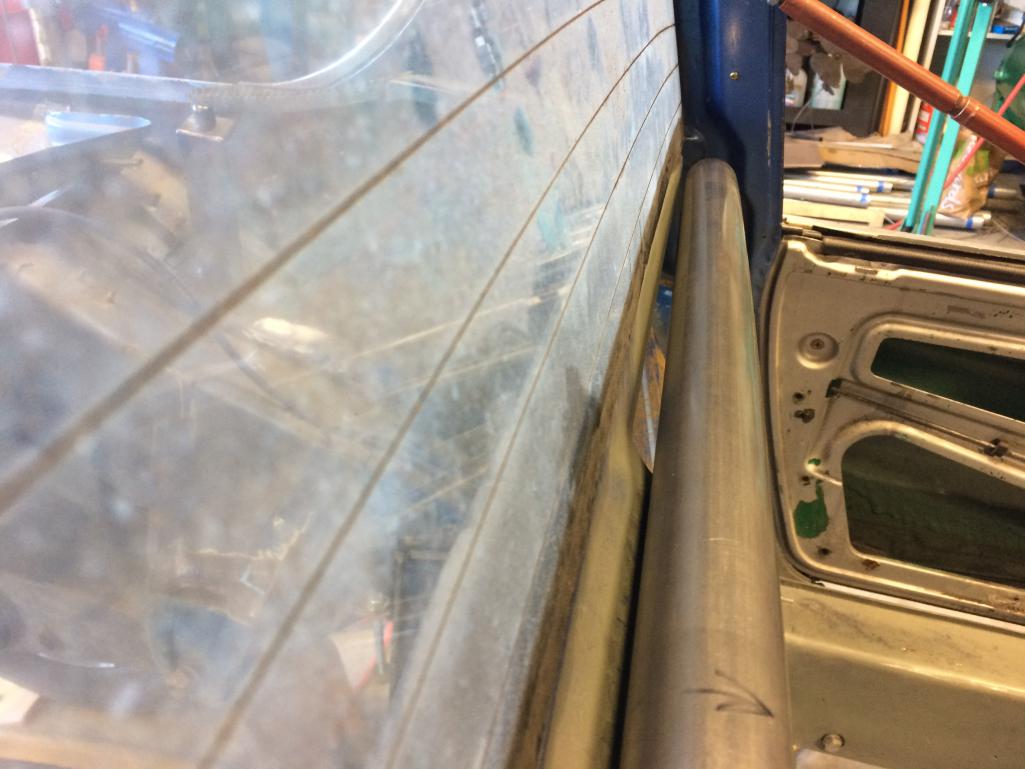
|
  |
1 User(s) are reading this topic (1 Guests and 0 Anonymous Users)
0 Members:

|
Lo-Fi Version | Time is now: 11th January 2026 - 03:51 PM |
Invision Power Board
v9.1.4 © 2026 IPS, Inc.


