|
|
|
Porsche, and the Porsche crest are registered trademarks of Dr. Ing. h.c. F. Porsche AG.
This site is not affiliated with Porsche in any way. Its only purpose is to provide an online forum for car enthusiasts. All other trademarks are property of their respective owners. |
|
|

  |

| tygaboy |
 Sep 2 2018, 04:05 PM Sep 2 2018, 04:05 PM
Post
#1201
|
|
914 Guru  Group: Members Posts: 5,819 Joined: 6-October 15 From: Petaluma, CA Member No.: 19,241 Region Association: Northern California |
QUOTE(914forme @ Sep 2 2018, 02:49 PM)  Okay I got it, the picture left out one detail, the upper upper die, or that flat piece that sets onto of the 10ga plate that presses down. I like the setup here, and the bulk head for the fuel lines. Same general setup going inlace at the back of the cabin? And if you think a plasma table is cheating then keep right on doing it, as the end product is worth the "cheat". Thanks Stephen. Yep, I'm laying out the rear bulkhead now. It's more complicated as it has to support the fuel lines, brake and clutch lines and throttle cable. Should be fun to make, though. Pics as I get to it... Thanks again! |
   |

 
|
| Curbandgutter |
Sep 2 2018, 05:43 PM
Post
#1202
|
|
Senior Member Group: Members Posts: 566 Joined: 8-March 13 From: Murrieta CA Member No.: 15,637 Region Association: Southern California |
Chris love how your project is coming out. Saw your Tilton pedal assembly....excellent. Loved your magnetic brake and how you did that 1" radius. All that incredible work on that firewall.....my goodness. (IMG:style_emoticons/default/pray.gif) (IMG:style_emoticons/default/pray.gif) Loved your rear trunk/hood and how it opens backward. I may steal that idea. (IMG:style_emoticons/default/shades.gif)
|
|
|
|
| bbrock |
Sep 2 2018, 07:15 PM
Post
#1203
|
|
914 Guru Group: Members Posts: 5,269 Joined: 17-February 17 From: Montana Member No.: 20,845 Region Association: Rocky Mountains |
QUOTE(tygaboy @ Sep 2 2018, 07:45 AM) Using the plasma table really does feel like cheating. The only thing wrong with using a plasma table is that it fuels my tool envy. (IMG:style_emoticons/default/icon8.gif) I seriously love seeing this quality of fabrication and attention to detail. (IMG:style_emoticons/default/pray.gif) |
|
|
|
| 914dave |
Sep 3 2018, 07:34 AM
Post
#1204
|
|
914 Addict Group: Members Posts: 740 Joined: 19-October 03 From: Willow Grove Pa. Member No.: 1,262 Region Association: North East States |
it’s a pleasure to watch you exercise your fabrication skills!!! |
|
|
|
| tygaboy |
Sep 3 2018, 02:44 PM
Post
#1205
|
|
914 Guru Group: Members Posts: 5,819 Joined: 6-October 15 From: Petaluma, CA Member No.: 19,241 Region Association: Northern California |
I really appreciate all the kind words. I'll keep posting the details...
Today it was the rear bulkhead. I decided to try a multi-area raise: one for the fuel lines and throttle cable and one each for the hydraulics (brake line and clutch). Note the only holes that are cut to approximate size are the fuel lines. I'll come back to the others later in the process. So, first I designed the panel and cut it. I'm using 18 ga. for these sorts of parts. Then determined the shapes and locations for the raised areas and cut the dies. For this, it's 10 ga. It seems that gives a nice dimension for the raise. I cut the male parts first, came back and cut the female sections then cut the outline. Attached thumbnail(s) 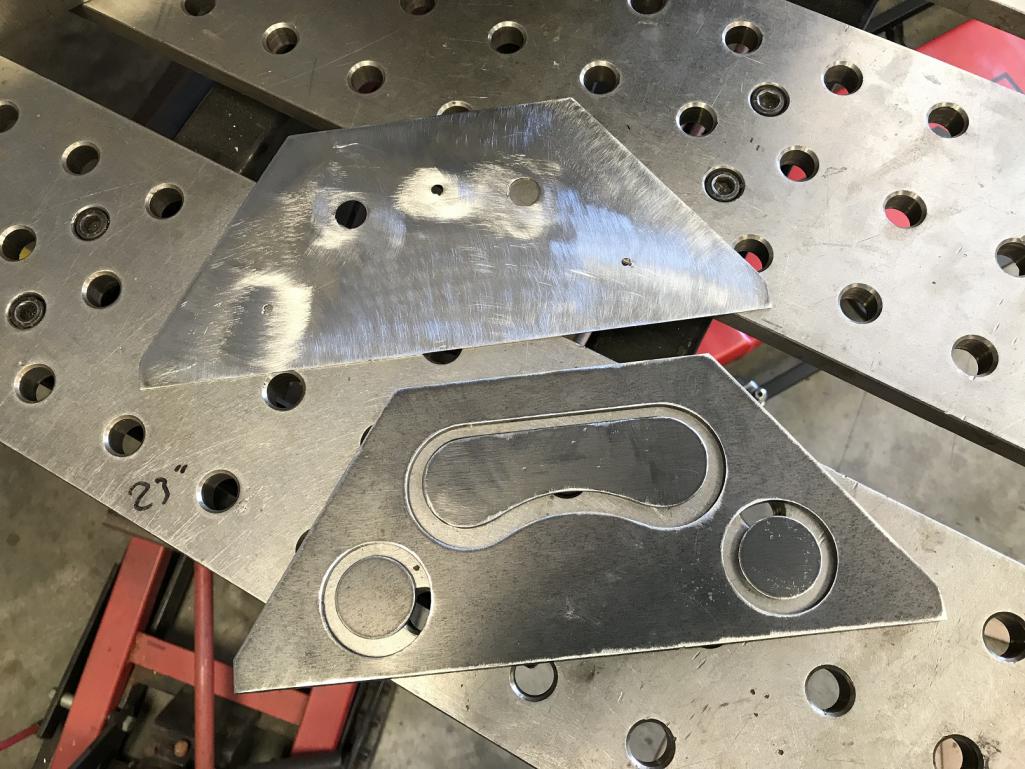
|
|
|
|
| tygaboy |
Sep 3 2018, 02:46 PM
Post
#1206
|
|
914 Guru Group: Members Posts: 5,819 Joined: 6-October 15 From: Petaluma, CA Member No.: 19,241 Region Association: Northern California |
Then, set the female part on top of the panel and trace the locations of each opening.
Attached thumbnail(s) 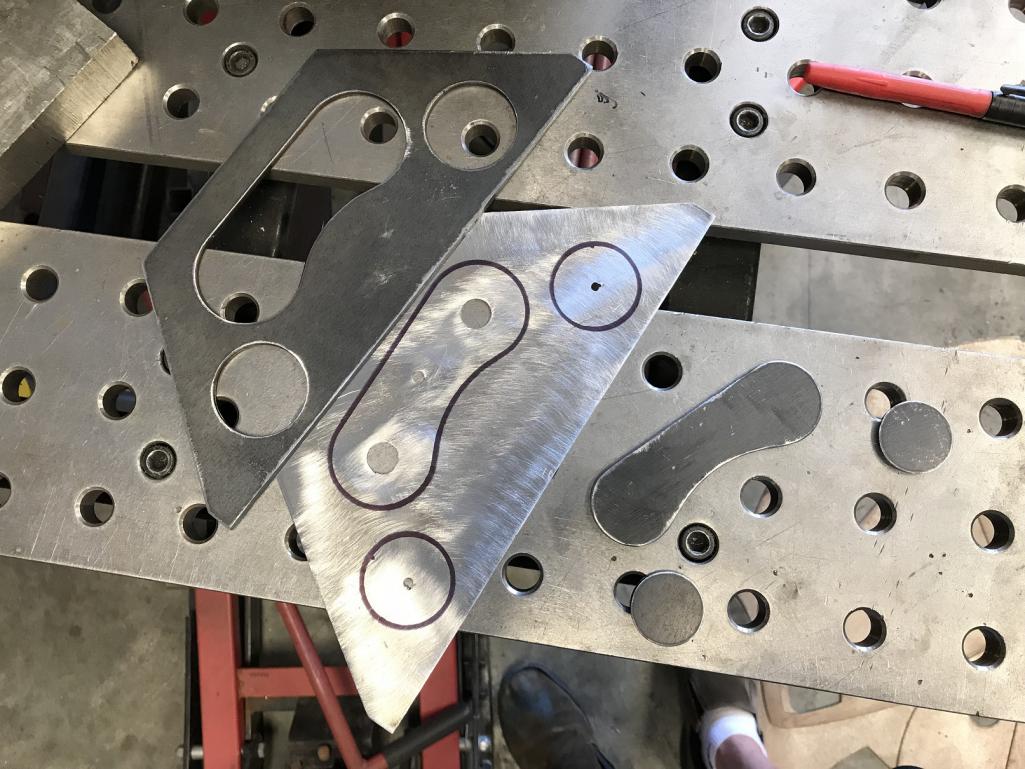
|
|
|
|
| tygaboy |
Sep 3 2018, 02:49 PM
Post
#1207
|
|
914 Guru Group: Members Posts: 5,819 Joined: 6-October 15 From: Petaluma, CA Member No.: 19,241 Region Association: Northern California |
Assemble the set up for the press:
Female die, then the panel, then the male dies (placed as symmetrically as I can get them!) I also ran into what I hoped wouldn't be an issue: I don't have press plates that are large enough to cover this whole piece. So I figured "what the heck, it's only metal..." and I tried a two-step operation. First I stamped the dog bone shape, then came back and stamped the two circles. It worked great! Attached thumbnail(s) 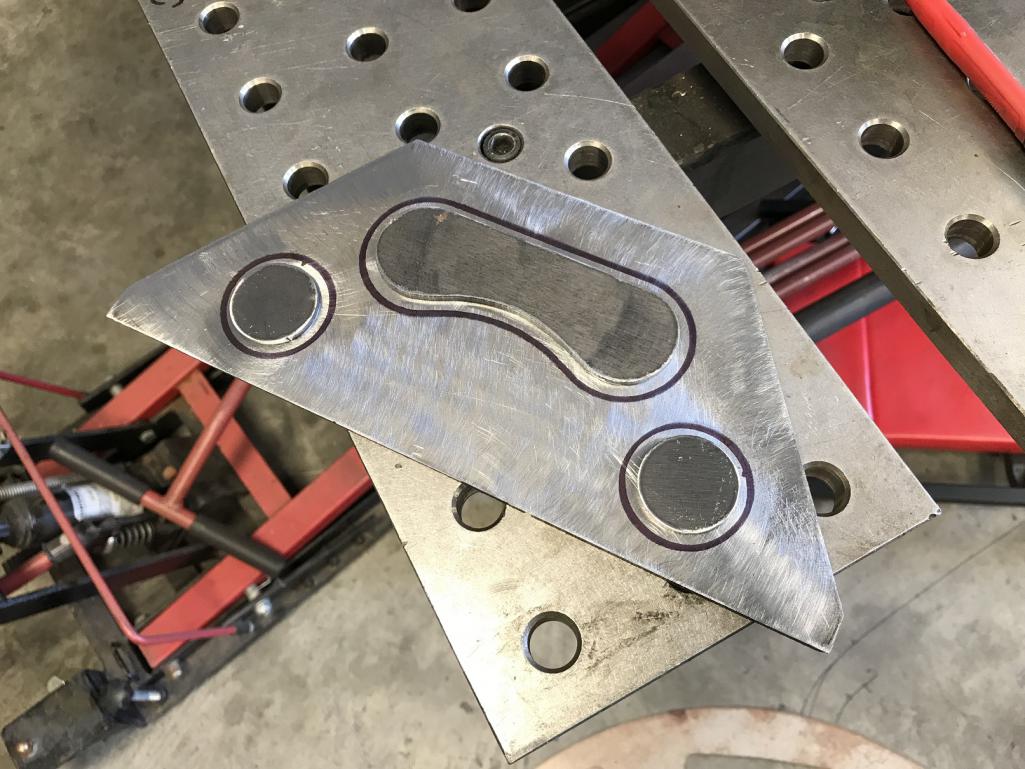
|
|
|
|
| tygaboy |
Sep 3 2018, 02:51 PM
Post
#1208
|
|
914 Guru Group: Members Posts: 5,819 Joined: 6-October 15 From: Petaluma, CA Member No.: 19,241 Region Association: Northern California |
Set in place, just to see how it'll work. Looks good to me.
And I have to say, this all happened with no "practice pieces". Famous last words, but I think I'm starting to figure this out. Attached thumbnail(s) 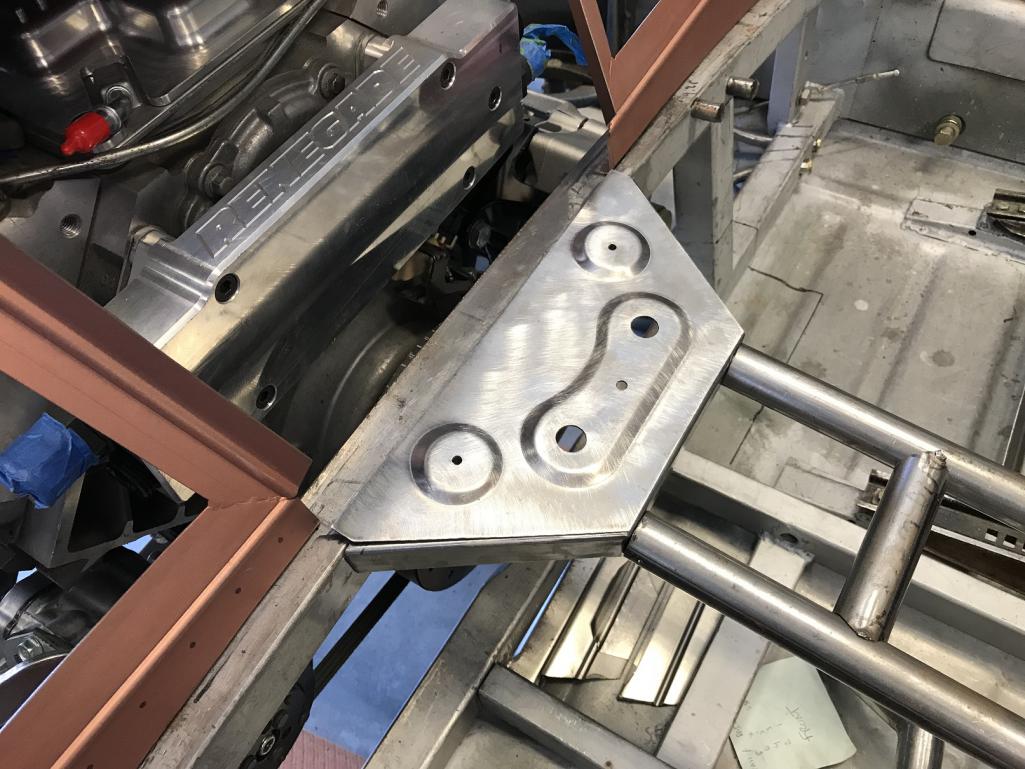
|
|
|
|
| tygaboy |
Sep 3 2018, 05:48 PM
Post
#1209
|
|
914 Guru Group: Members Posts: 5,819 Joined: 6-October 15 From: Petaluma, CA Member No.: 19,241 Region Association: Northern California |
A quick mock up of the fittings.
Attached thumbnail(s) 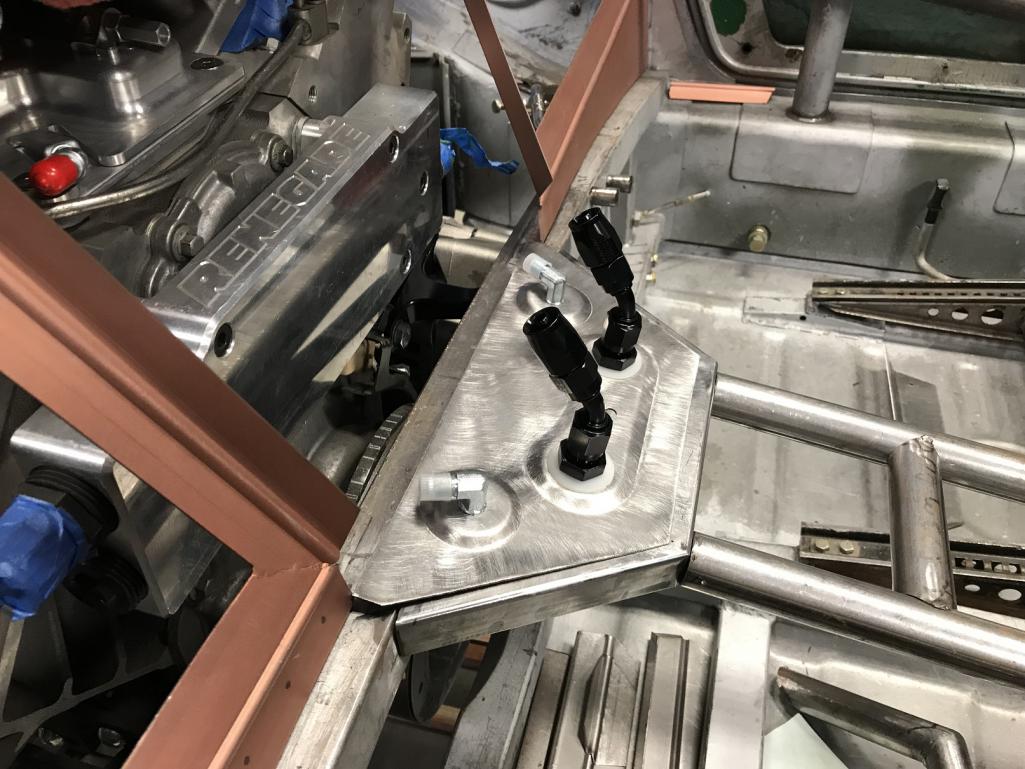
|
|
|
|
| worn |
Sep 3 2018, 06:03 PM
Post
#1210
|
|
Winner of the Utah Twisted Joint Award Group: Members Posts: 3,569 Joined: 3-June 11 From: Madison, WI and North Bend WA Member No.: 13,152 Region Association: Upper MidWest |
QUOTE(tygaboy @ Sep 3 2018, 04:48 PM) A quick mock up of the fittings. Yep. But you oughta make a bunch of them maybe. While you are at it. Nice. |
|
|
|
| tygaboy |
Sep 23 2018, 06:54 AM
Post
#1211
|
|
914 Guru Group: Members Posts: 5,819 Joined: 6-October 15 From: Petaluma, CA Member No.: 19,241 Region Association: Northern California |
Not much progress lately as my wife and I just returned from a week at Cycle Oregon. ~400 miles on our road tandem. Great weather, challenging routes and a wonderful group of people. All you bicyclists should check it out...
Back to the build: There are so many things to do... I decided to go after prepping the fuel tank. Here's the in-tank pump plate nearly ready for welding. Attached thumbnail(s) 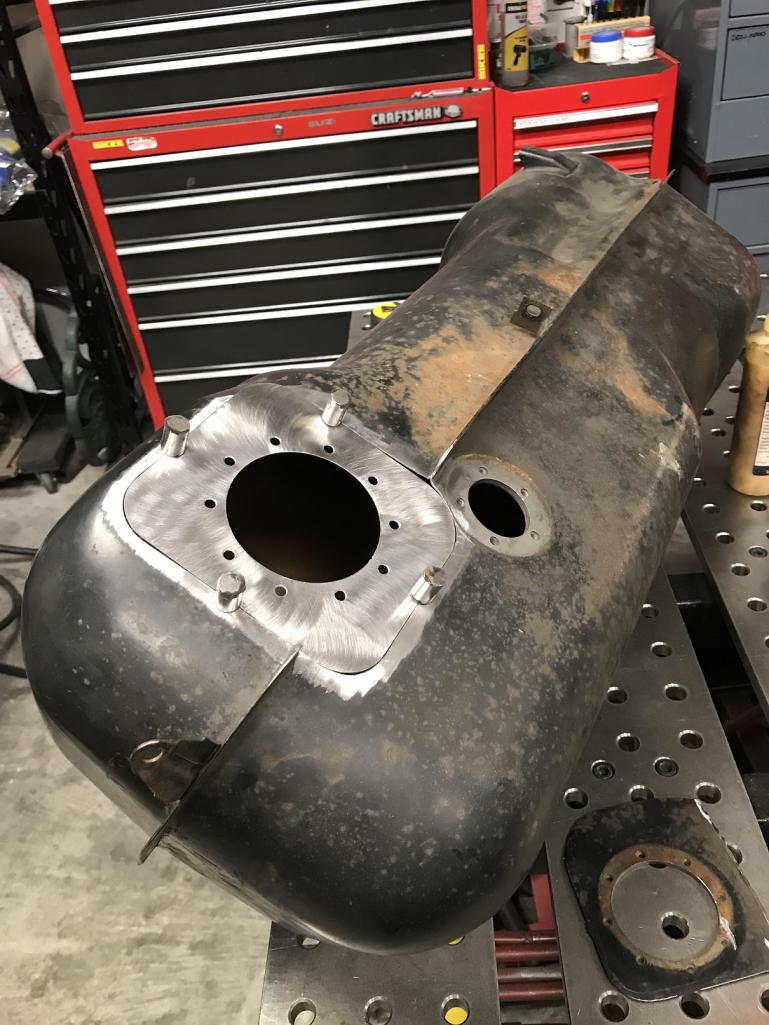
|
|
|
|
| tygaboy |
Sep 23 2018, 07:00 AM
Post
#1212
|
|
914 Guru Group: Members Posts: 5,819 Joined: 6-October 15 From: Petaluma, CA Member No.: 19,241 Region Association: Northern California |
The pump I'm running (Aeromotive Phantom 340) has a large piece of foam that sits in its own perforated, rubber-ish "sump". Anyway, this contraption interfered with the stock tank's internal baffling so I sliced out the bottom of the tank to remove it and create the needed clearance.
You can see the "small hole" I now need to close up! Attached thumbnail(s) 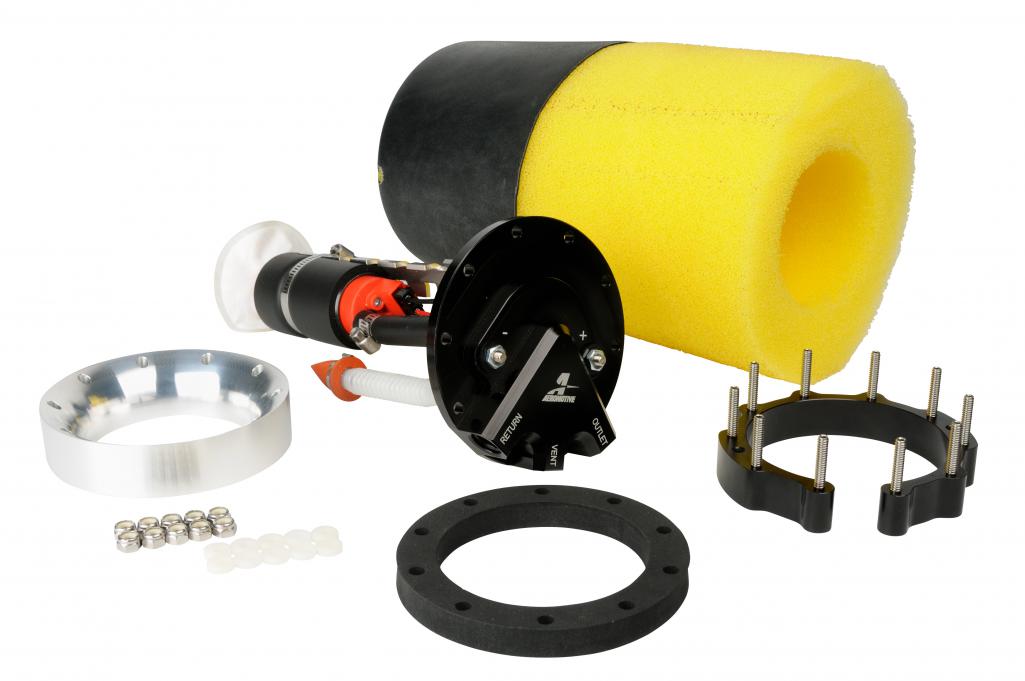 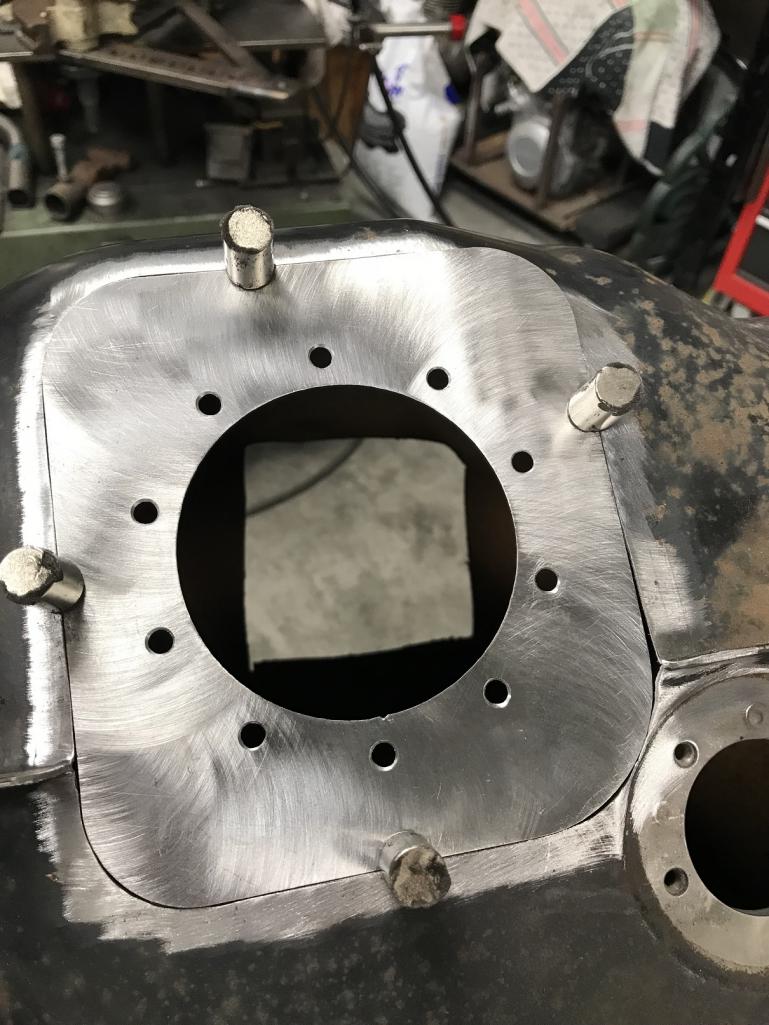
|
|
|
|
| Krieger |
Sep 23 2018, 07:55 AM
Post
#1213
|
|
Advanced Member Group: Members Posts: 4,855 Joined: 24-May 04 From: Santa Rosa CA Member No.: 2,104 Region Association: None |
Looking good! Dang, perfectly cut replacement panel...
|
|
|
|
| 914forme |
Sep 23 2018, 09:25 AM
Post
#1214
|
|
Times a wastin', get wrenchin'! Group: Members Posts: 3,899 Joined: 24-July 04 From: Dayton, Ohio Member No.: 2,388 Region Association: None |
Nice work Chris. I'm starting to think we ( as in you ) need to start doing videos of this.
I would gladly be the videographer for this project. Have a access to a couple of 4K cameras and a sling studio so we could stream this work live. (IMG:style_emoticons/default/drooley.gif) Sorry all if I get distracted and you miss so of the action or all of the action, you would understand. (IMG:style_emoticons/default/confused24.gif) I would get the test stream setup, before I got distracted and started to watch Chris work, and all you all get shots of is the floor or ceiling. I know everyone would understand. (IMG:style_emoticons/default/confused24.gif) |
|
|
|
| Dion |
Sep 23 2018, 10:17 AM
Post
#1215
|
|
RN Group: Members Posts: 2,926 Joined: 16-September 04 From: Audubon,PA Member No.: 2,766 Region Association: MidAtlantic Region |
Nice to see ya back, but yeah you deserved a break! That tank panel is slick.
Tuned in for more. |
|
|
|
| tygaboy |
Sep 23 2018, 12:22 PM
Post
#1216
|
|
914 Guru Group: Members Posts: 5,819 Joined: 6-October 15 From: Petaluma, CA Member No.: 19,241 Region Association: Northern California |
QUOTE(914forme @ Sep 23 2018, 08:25 AM) Nice work Chris. I'm starting to think we ( as in you ) need to start doing videos of this. I would gladly be the videographer for this project. Have a access to a couple of 4K cameras and a sling studio so we could stream this work live. (IMG:style_emoticons/default/drooley.gif) Sorry all if I get distracted and you miss so of the action or all of the action, you would understand. (IMG:style_emoticons/default/confused24.gif) I would get the test stream setup, before I got distracted and started to watch Chris work, and all you all get shots of is the floor or ceiling. I know everyone would understand. (IMG:style_emoticons/default/confused24.gif) Thanks Stephen. I can do video so I'll try and remember to do that going forward. In the meantime, it sounds like some folks want more detail on the "how" parts. So I'll provide a bit more on info on how I finalized the fuel filler plate... |
|
|
|
| tygaboy |
Sep 23 2018, 12:25 PM
Post
#1217
|
|
914 Guru Group: Members Posts: 5,819 Joined: 6-October 15 From: Petaluma, CA Member No.: 19,241 Region Association: Northern California |
What you couldn't see in the earlier pics is that one of the corners of the plate needs to curve to match the profile of the tank. I hadn't started on that yet.
So first, I did a rough bend to get that corner closer to the correct shape. This allows for a more accurate scribe/cut line. If I tried to scribe the cut line before I bent the corner, I'd end up removing too much material - the corner will "fall inward" as it's bent down, meaning I need more material there. Attached thumbnail(s) 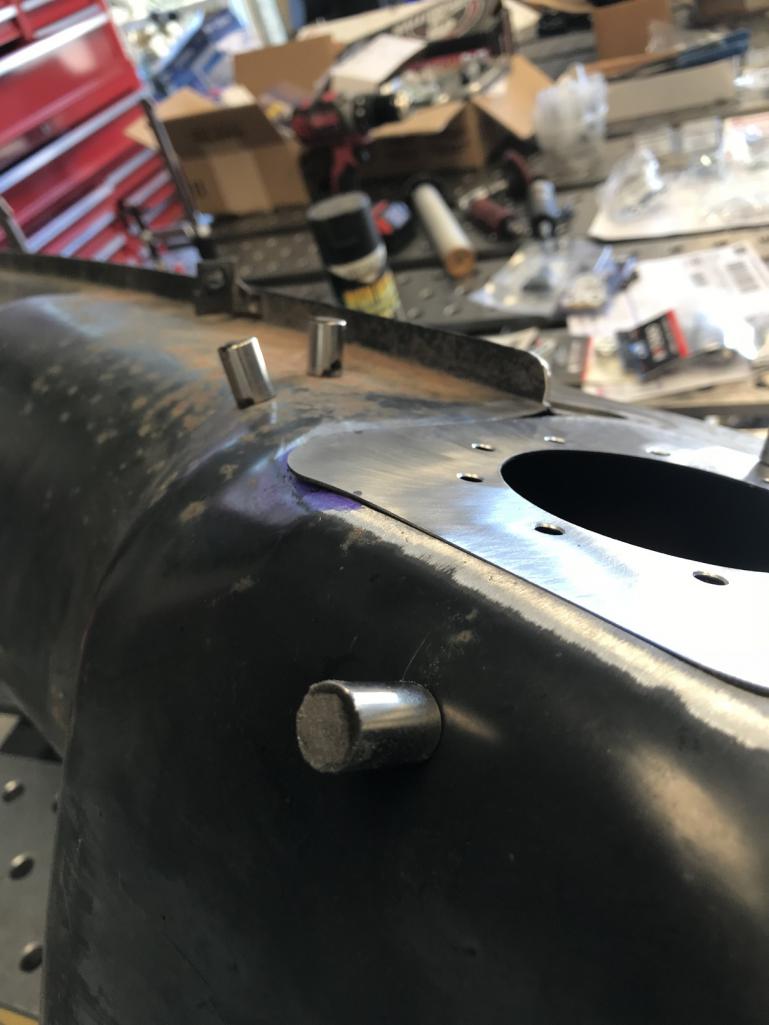
|
|
|
|
| tygaboy |
Sep 23 2018, 12:29 PM
Post
#1218
|
|
914 Guru Group: Members Posts: 5,819 Joined: 6-October 15 From: Petaluma, CA Member No.: 19,241 Region Association: Northern California |
Then I applied some Dykem. Mostly to make the scribe line show up better in the pics, but it does make things easier to see.
Then I use the handy dandy Harbor Freight body saw to make a rough cut. I just want to get close with this cut. Attached thumbnail(s) 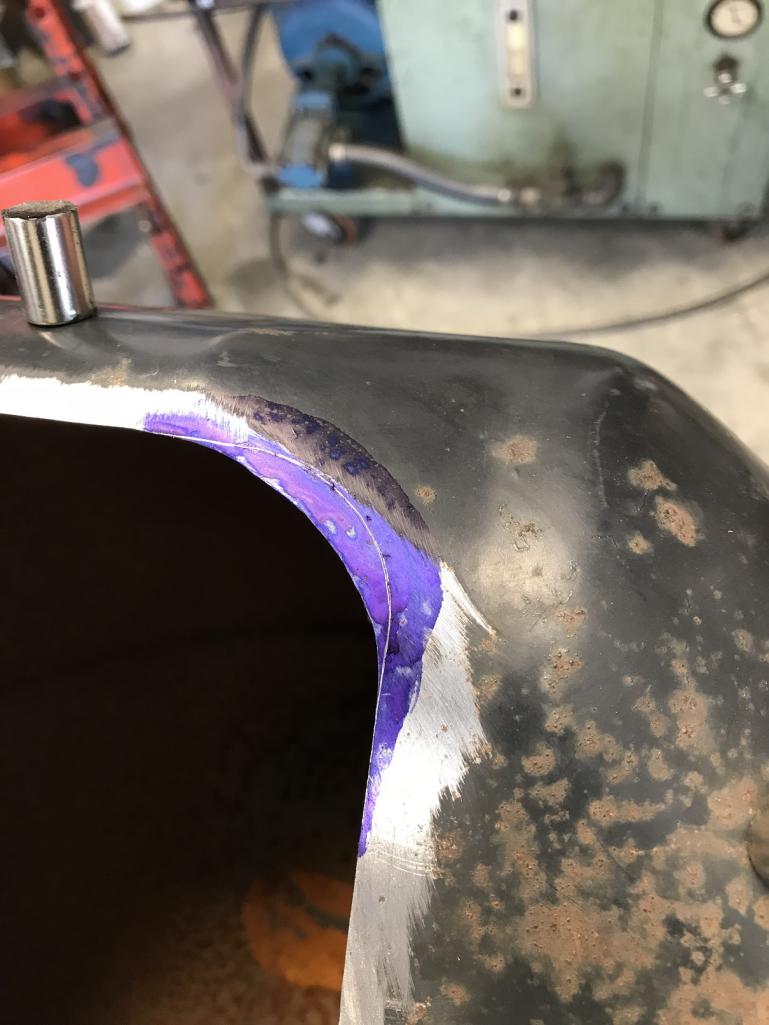  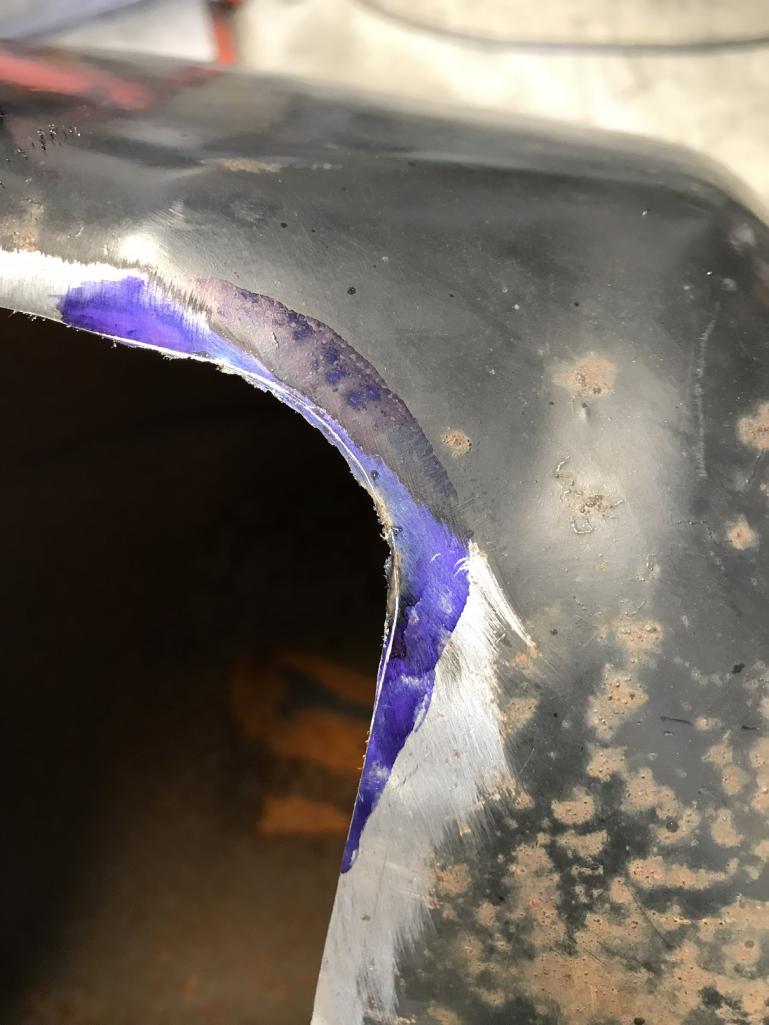
|
|
|
|
| tygaboy |
Sep 23 2018, 12:30 PM
Post
#1219
|
|
914 Guru Group: Members Posts: 5,819 Joined: 6-October 15 From: Petaluma, CA Member No.: 19,241 Region Association: Northern California |
Next, it's the drum sander to take the opening to the line.
Attached thumbnail(s) 
|
|
|
|
| tygaboy |
Sep 23 2018, 12:34 PM
Post
#1220
|
|
914 Guru Group: Members Posts: 5,819 Joined: 6-October 15 From: Petaluma, CA Member No.: 19,241 Region Association: Northern California |
Finally, it's "fit, drum sand, fit, tweak the corner bend, fit, drum sand..." until things slip into place and I'm happy with the fit.
Done and done! There is usually a bit of minor tweaking, maybe some hammer and dolly, as the welding is happening, just to get the edges aligned as cleanly as possible. Attached thumbnail(s) 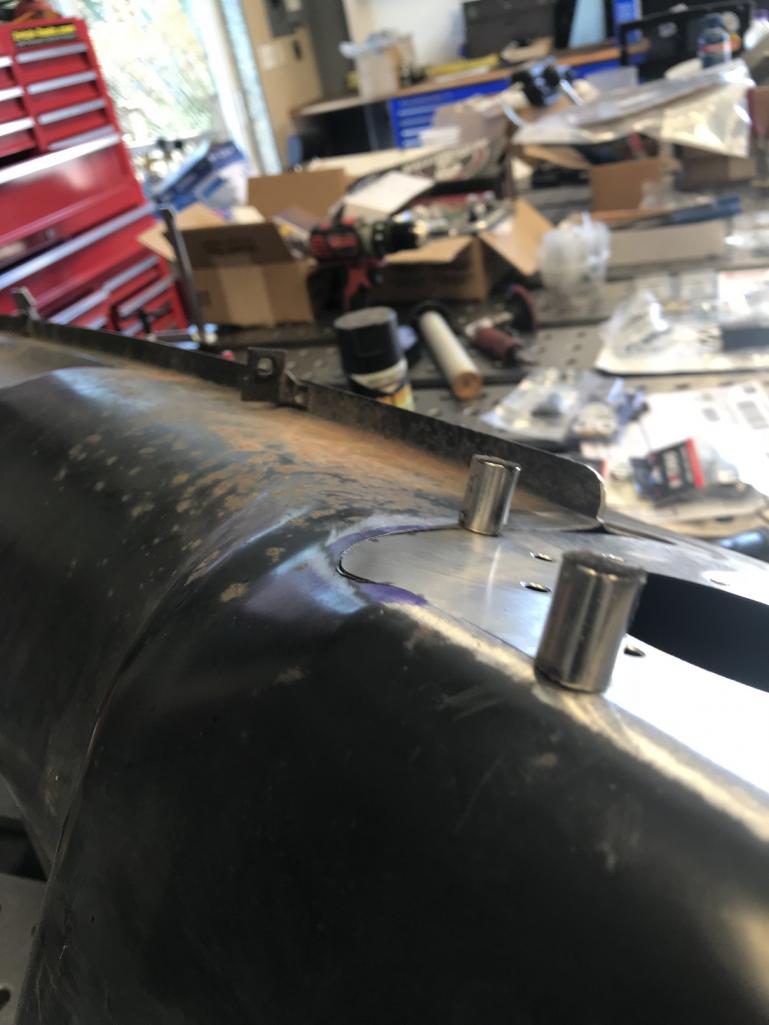 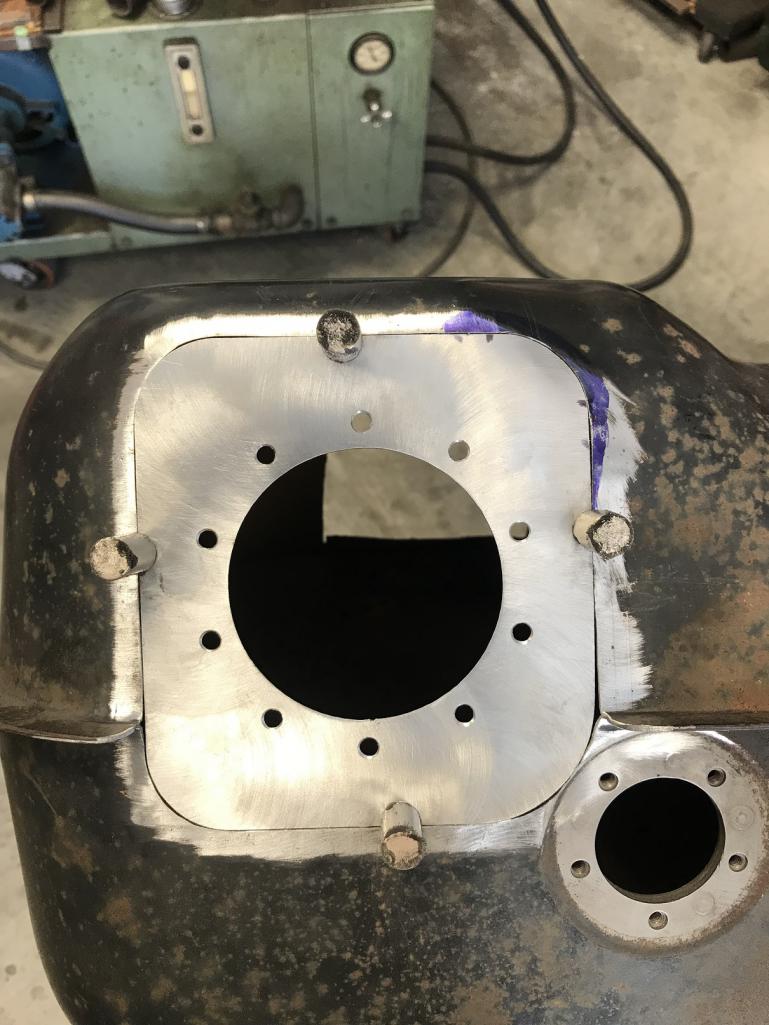
|
|
|
|
|
2 User(s) are reading this topic (2 Guests and 0 Anonymous Users)
0 Members:

|
Lo-Fi Version | Time is now: 29th April 2026 - 11:02 AM |
Invision Power Board
v9.1.4 © 2026 IPS, Inc.