|
|
|
Porsche, and the Porsche crest are registered trademarks of Dr. Ing. h.c. F. Porsche AG.
This site is not affiliated with Porsche in any way. Its only purpose is to provide an online forum for car enthusiasts. All other trademarks are property of their respective owners. |
|
|

  |

| tygaboy |
 Sep 23 2018, 02:38 PM Sep 23 2018, 02:38 PM
Post
#1221
|
|
914 Guru  Group: Members Posts: 5,819 Joined: 6-October 15 From: Petaluma, CA Member No.: 19,241 Region Association: Northern California |
It wouldn't be in keeping with my build if I didn't do something at least twice. So why would I expect this to be any different? (IMG:style_emoticons/default/dry.gif)
After removing the stock sump via cutting a large hole in the bottom of the tank, I was able to see how it's attached to the tank. Turns out I could have just drilled out four spot welds. Easier to start over with another tank! This one had a bit of pocky rust starting on one spot so I figured I'd patch it. I probably could have just treated it but I'd rather have clean material. Here's what needs to be closed up. Attached thumbnail(s) 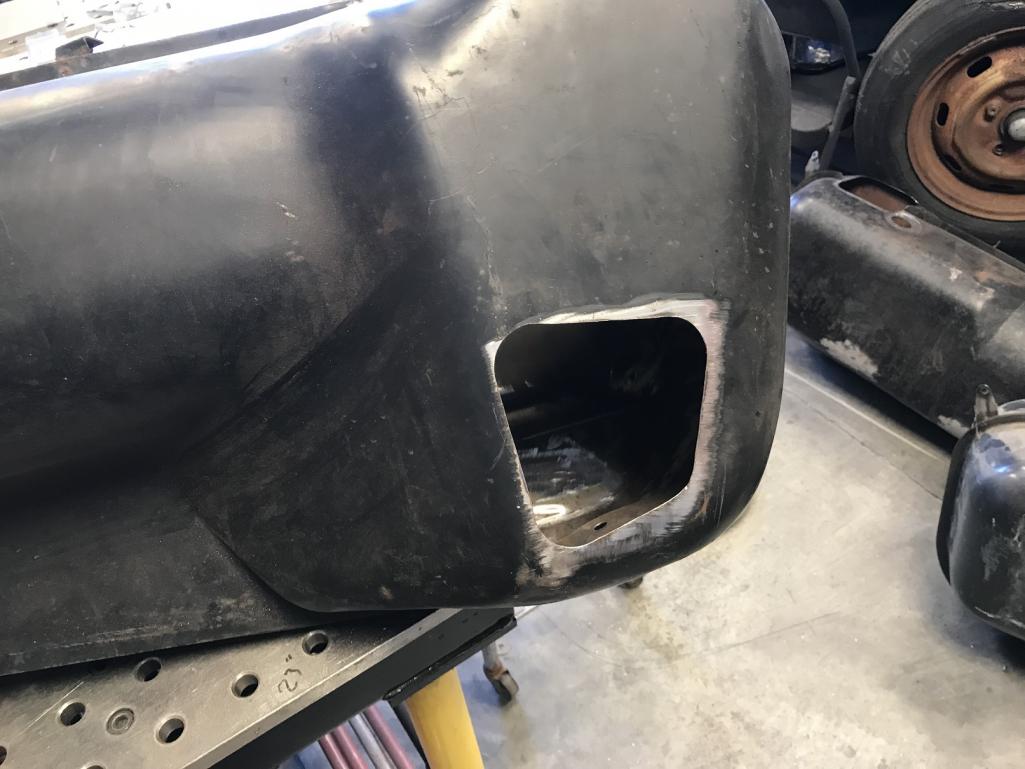
|
   |

 
|
| tygaboy |
Sep 23 2018, 02:40 PM
Post
#1222
|
|
914 Guru Group: Members Posts: 5,819 Joined: 6-October 15 From: Petaluma, CA Member No.: 19,241 Region Association: Northern California |
And here's the same filler panel (weld through primered) fitted to the "new" tank. You can see the spot weld holes I need to fill. Far simpler than the patch I'd have had to do to the other tank.
Plus, this one's far cleaner on the inside and out. Attached thumbnail(s) 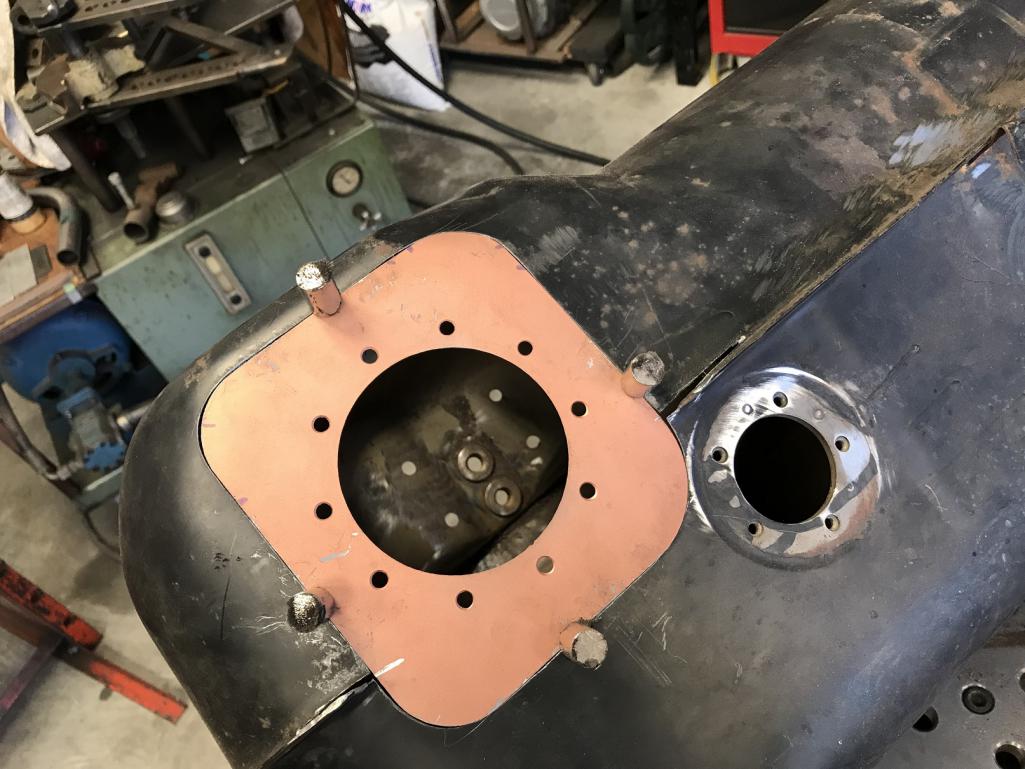
|
|
|
|
| restore2seater |
Sep 23 2018, 08:09 PM
Post
#1223
|
|
Future 914 copilot. Group: Members Posts: 313 Joined: 30-October 04 From: Dunlap,IL Member No.: 3,037 Region Association: None |
QUOTE(tygaboy @ Sep 23 2018, 03:38 PM)  It wouldn't be in keeping with my build if I didn't do something at least twice. So why would I expect this to be any different? (IMG:style_emoticons/default/dry.gif) After removing the stock sump via cutting a large hole in the bottom of the tank, I was able to see how it's attached to the tank. Turns out I could have just drilled out four spot welds. Easier to start over with another tank! This one had a bit of pocky rust starting on one spot so I figured I'd patch it. I probably could have just treated it but I'd rather have clean material. Here's what needs to be closed up. Pocky? (IMG:style_emoticons/default/confused24.gif) Had to look that one up. Japanese snack food? |
|
|
|
| tygaboy |
Sep 23 2018, 08:36 PM
Post
#1224
|
|
914 Guru Group: Members Posts: 5,819 Joined: 6-October 15 From: Petaluma, CA Member No.: 19,241 Region Association: Northern California |
Patch in place...
Attached thumbnail(s) 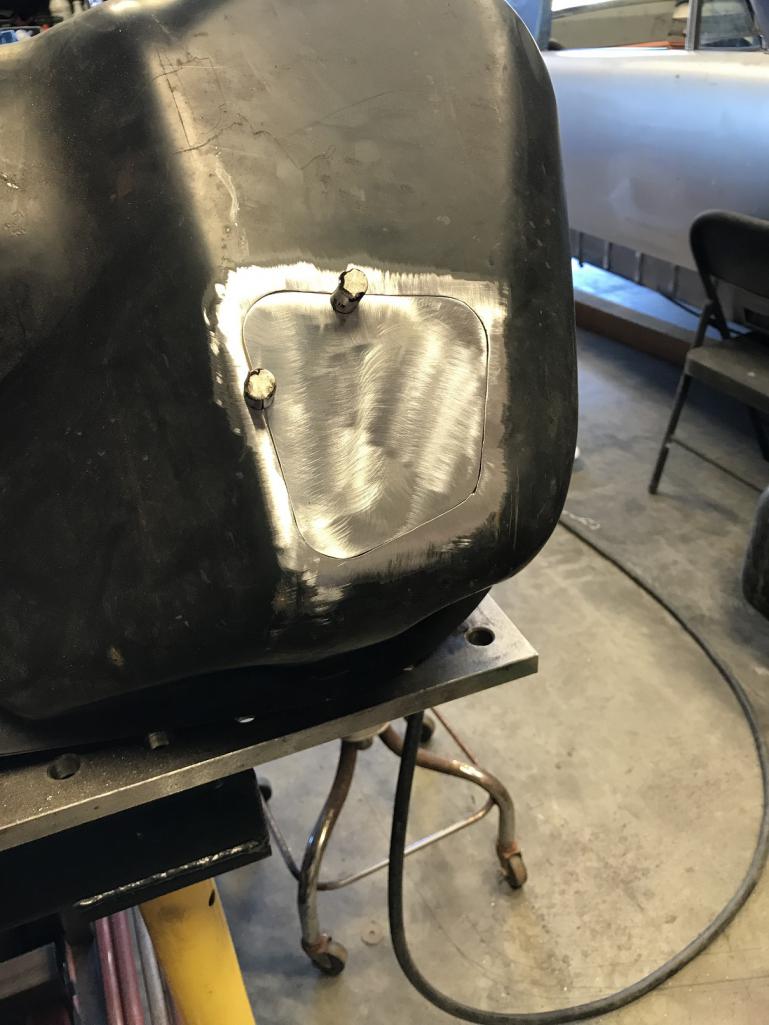
|
|
|
|
| tygaboy |
Sep 23 2018, 08:36 PM
Post
#1225
|
|
914 Guru Group: Members Posts: 5,819 Joined: 6-October 15 From: Petaluma, CA Member No.: 19,241 Region Association: Northern California |
Fuel pump plate welded in. Still need to fill the spot weld holes and the original fuel in/outlets but I feel like I made some progress this weekend!
Attached thumbnail(s) 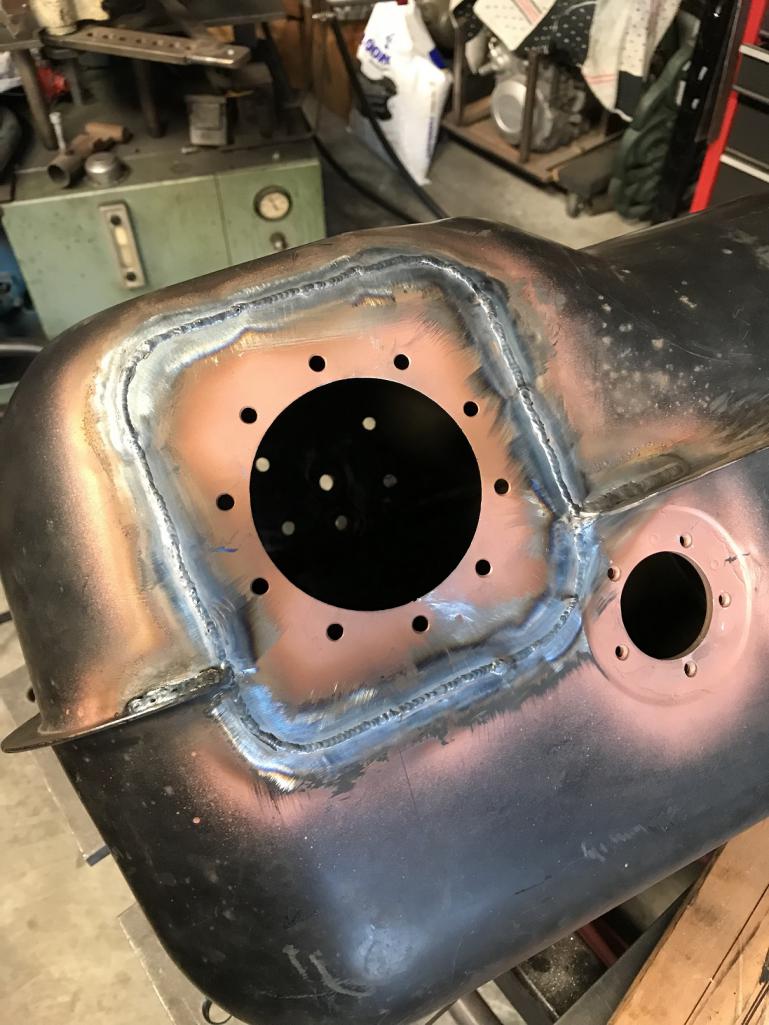
|
|
|
|
| tygaboy |
Sep 23 2018, 08:55 PM
Post
#1226
|
|
914 Guru Group: Members Posts: 5,819 Joined: 6-October 15 From: Petaluma, CA Member No.: 19,241 Region Association: Northern California |
QUOTE(restore2seater @ Sep 23 2018, 07:09 PM) QUOTE(tygaboy @ Sep 23 2018, 03:38 PM) It wouldn't be in keeping with my build if I didn't do something at least twice. So why would I expect this to be any different? (IMG:style_emoticons/default/dry.gif) After removing the stock sump via cutting a large hole in the bottom of the tank, I was able to see how it's attached to the tank. Turns out I could have just drilled out four spot welds. Easier to start over with another tank! This one had a bit of pocky rust starting on one spot so I figured I'd patch it. I probably could have just treated it but I'd rather have clean material. Here's what needs to be closed up. Pocky? (IMG:style_emoticons/default/confused24.gif) Had to look that one up. Japanese snack food? I was going for "pock mark-ish". You know, pocky! |
|
|
|
| restore2seater |
Sep 23 2018, 09:05 PM
Post
#1227
|
|
Future 914 copilot. Group: Members Posts: 313 Joined: 30-October 04 From: Dunlap,IL Member No.: 3,037 Region Association: None |
QUOTE(tygaboy @ Sep 23 2018, 09:55 PM) QUOTE(restore2seater @ Sep 23 2018, 07:09 PM) QUOTE(tygaboy @ Sep 23 2018, 03:38 PM) It wouldn't be in keeping with my build if I didn't do something at least twice. So why would I expect this to be any different? (IMG:style_emoticons/default/dry.gif) After removing the stock sump via cutting a large hole in the bottom of the tank, I was able to see how it's attached to the tank. Turns out I could have just drilled out four spot welds. Easier to start over with another tank! This one had a bit of pocky rust starting on one spot so I figured I'd patch it. I probably could have just treated it but I'd rather have clean material. Here's what needs to be closed up. Pocky? (IMG:style_emoticons/default/confused24.gif) Had to look that one up. Japanese snack food? I was going for "pock mark-ish". You know, pocky! Well, I guess you're into fabrication so.... |
|
|
|
| tygaboy |
Sep 28 2018, 07:17 PM
Post
#1228
|
|
914 Guru Group: Members Posts: 5,819 Joined: 6-October 15 From: Petaluma, CA Member No.: 19,241 Region Association: Northern California |
Next up is relocating the fuel filler.
Rough cut of the mounting plate fresh off the plasma table to check placement... Attached thumbnail(s) 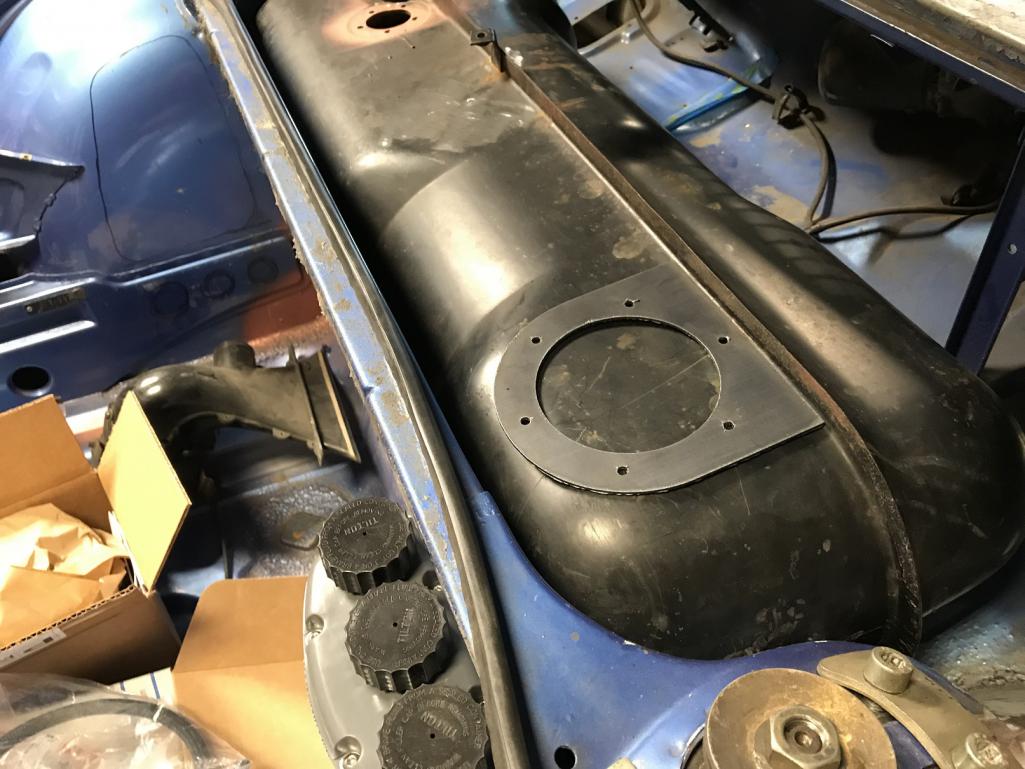
|
|
|
|
| tygaboy |
Sep 28 2018, 07:19 PM
Post
#1229
|
|
914 Guru Group: Members Posts: 5,819 Joined: 6-October 15 From: Petaluma, CA Member No.: 19,241 Region Association: Northern California |
I'm running a Holley HP ECU so I figured they deserved at least a little bit of credit.
It's actually quite a nice piece. Attached thumbnail(s) 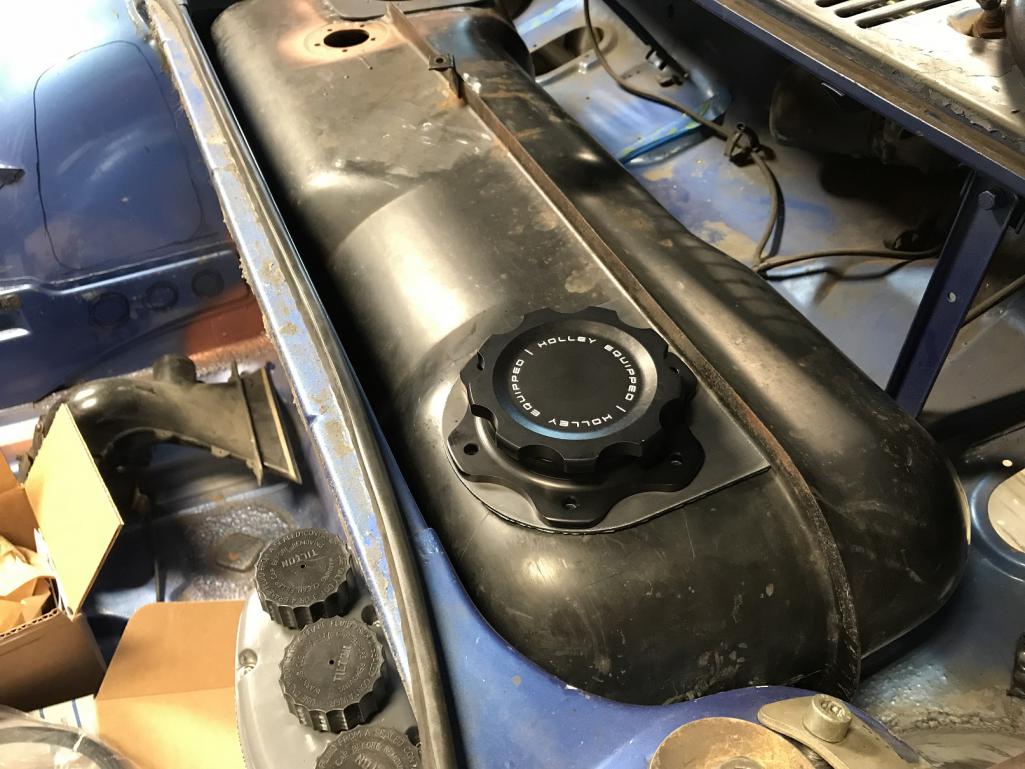
|
|
|
|
| worn |
Sep 28 2018, 08:11 PM
Post
#1230
|
|
Winner of the Utah Twisted Joint Award Group: Members Posts: 3,569 Joined: 3-June 11 From: Madison, WI and North Bend WA Member No.: 13,152 Region Association: Upper MidWest |
QUOTE(ValcoOscar @ Sep 2 2018, 06:52 AM) QUOTE(tygaboy @ Sep 2 2018, 06:45 AM) Then moved on to making a new plate to mount the in-tank fuel pump. This will get welded to the tank in place of the filler, which will be relocated. Using the plasma table really does feel like cheating. Nice Chris- If using a plasma table makes you a feel like a cheater, I'm like Kent. A repeat offender relying on some of my shop talent when pressed. Your creativity is mind blowing. Love this thread. Oscar @76-914 To me it certainly is cheating. But that is because I don’t have the table but you do. I say cheat em while you can. |
|
|
|
| FourBlades |
Sep 29 2018, 06:07 AM
Post
#1231
|
|
From Wreck to Rockin Group: Members Posts: 2,056 Joined: 3-December 07 From: Brevard, FL Member No.: 8,414 Region Association: South East States |
This is such a great build. It is a learning experience to follow it! (IMG:style_emoticons/default/first.gif) I never knew I needed a plasma table but there is no doubt now. (IMG:style_emoticons/default/biggrin.gif) I need to try making some pieces with my manual press... Did you mig or tig weld that panel onto the tank? John |
|
|
|
| tygaboy |
Sep 29 2018, 07:06 AM
Post
#1232
|
|
914 Guru Group: Members Posts: 5,819 Joined: 6-October 15 From: Petaluma, CA Member No.: 19,241 Region Association: Northern California |
QUOTE(FourBlades @ Sep 29 2018, 05:07 AM) This is such a great build. It is a learning experience to follow it! (IMG:style_emoticons/default/first.gif) I never knew I needed a plasma table but there is no doubt now. (IMG:style_emoticons/default/biggrin.gif) I need to try making some pieces with my manual press... Did you mig or tig weld that panel onto the tank? John Hi John - Thanks for the compliments. It true - everyone needs a plasma table... or a friend who has one! I'm really pleased by what the press can do. Give it a go, you'll be surprised! Just be careful or you'll end up like me: I have so much fun messing about with designing the parts and playing with the tools, experimenting, etc., that it takes forever to make actual progress on the build. But to me, it's about the journey, not the destination. And that panel was TIG welded. |
|
|
|
| tygaboy |
Sep 29 2018, 05:19 PM
Post
#1233
|
|
914 Guru Group: Members Posts: 5,819 Joined: 6-October 15 From: Petaluma, CA Member No.: 19,241 Region Association: Northern California |
For this location and application, I wanted the plate to be flat across its entire surface so I added a small eyebrow to close the gap where the tank rolls over.
Attached thumbnail(s) 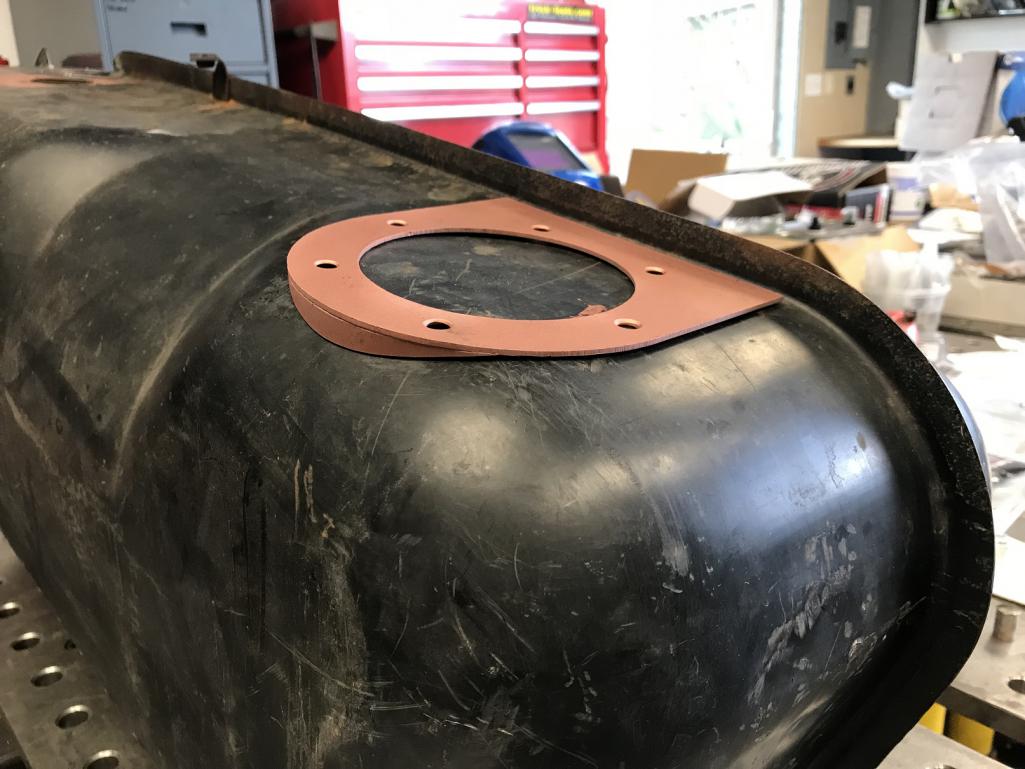
|
|
|
|
| tygaboy |
Sep 29 2018, 05:20 PM
Post
#1234
|
|
914 Guru Group: Members Posts: 5,819 Joined: 6-October 15 From: Petaluma, CA Member No.: 19,241 Region Association: Northern California |
Then it's the same drill as before: scribe, body saw to cut the rough opening, drum sand 'til it fits.
Hope to get it welded in tomorrow. Attached thumbnail(s) 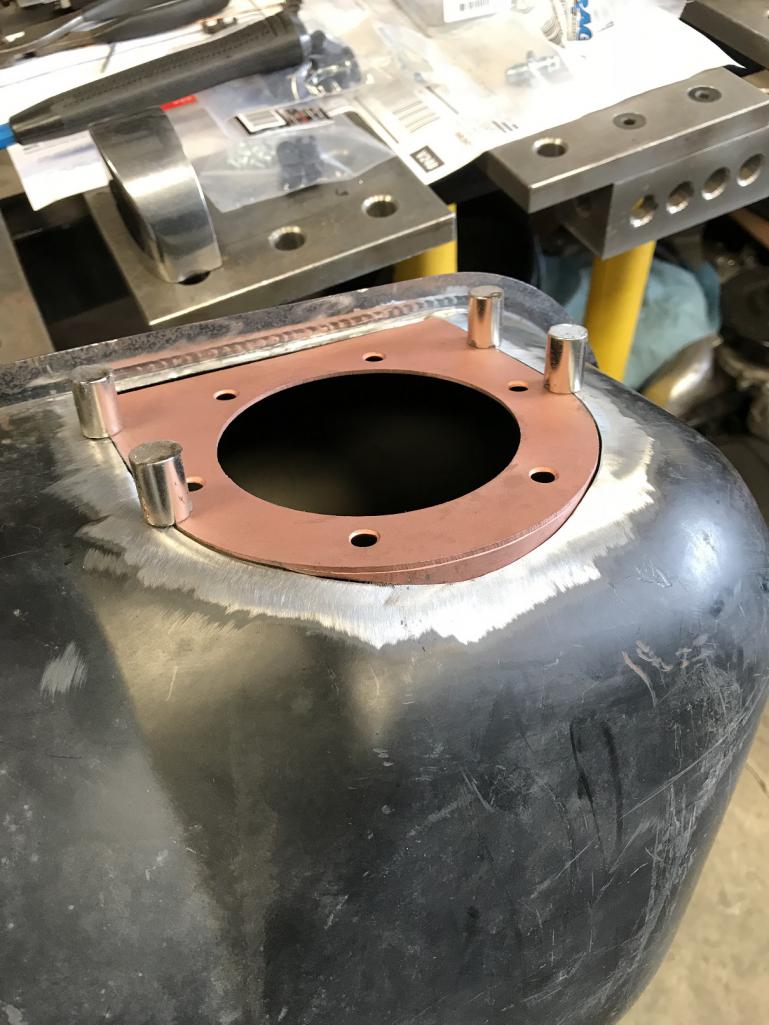
|
|
|
|
| tygaboy |
Sep 30 2018, 07:41 AM
Post
#1235
|
|
914 Guru Group: Members Posts: 5,819 Joined: 6-October 15 From: Petaluma, CA Member No.: 19,241 Region Association: Northern California |
Just getting a feel for how it'll all layout, which way to orient the pump / run the fuel and vent lines, etc.
Attached thumbnail(s) 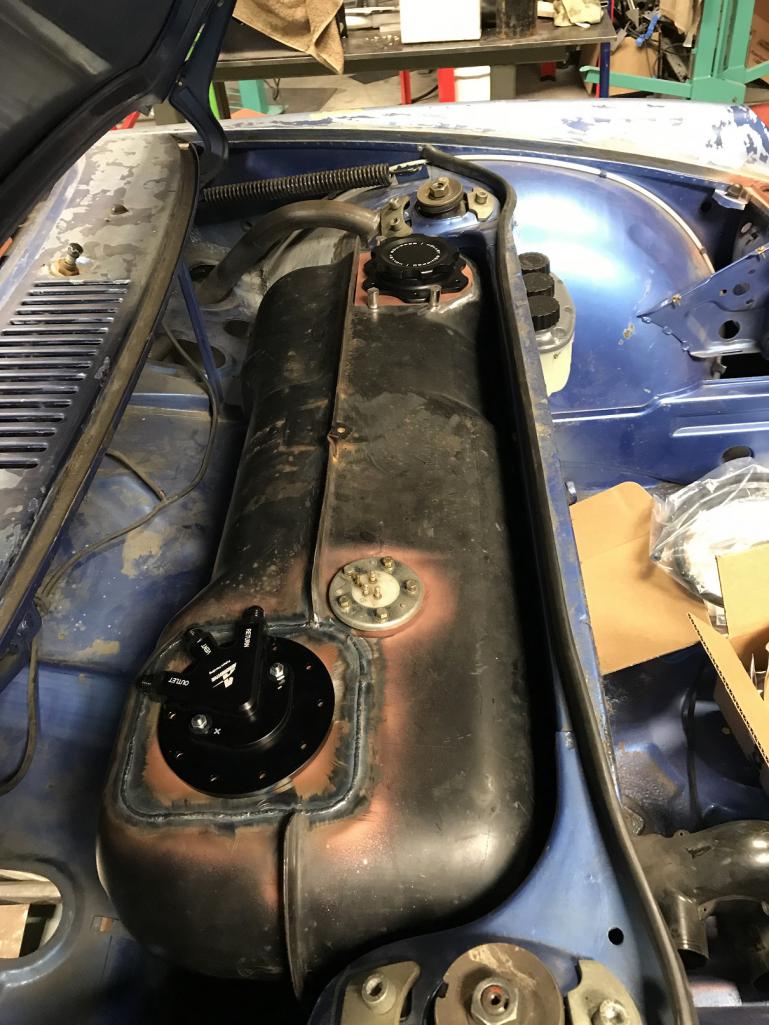 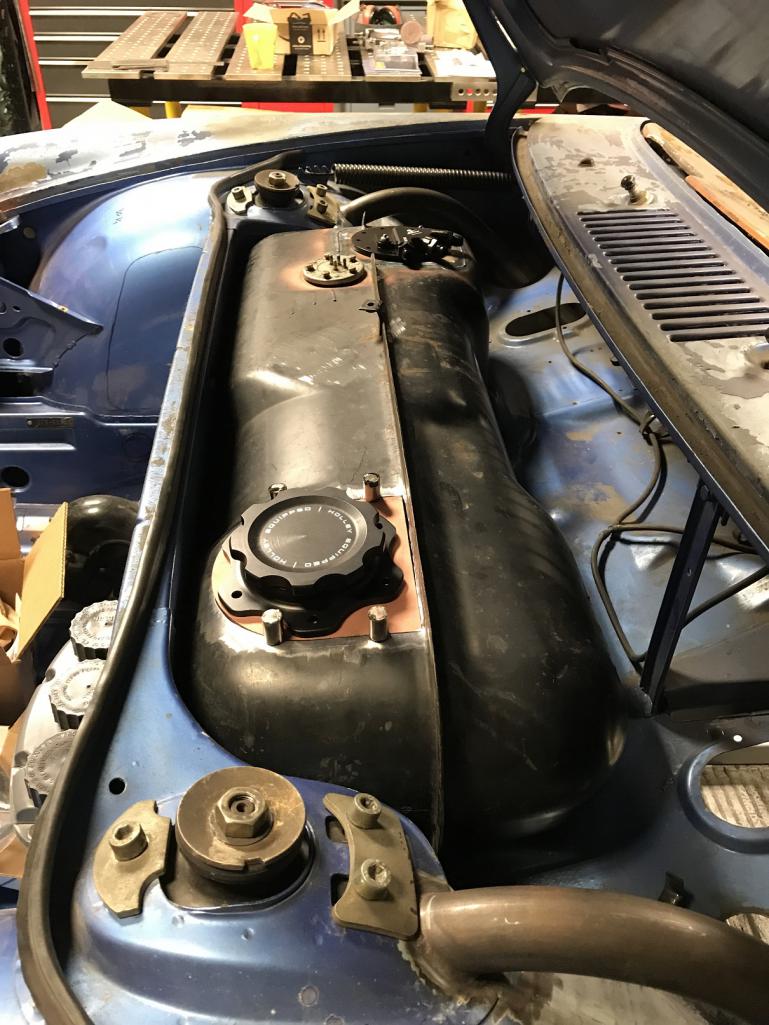
|
|
|
|
| tygaboy |
Sep 30 2018, 09:49 PM
Post
#1236
|
|
914 Guru Group: Members Posts: 5,819 Joined: 6-October 15 From: Petaluma, CA Member No.: 19,241 Region Association: Northern California |
Doing what I can to disappear the welds. Should look pretty good after powder coat.
Attached thumbnail(s) 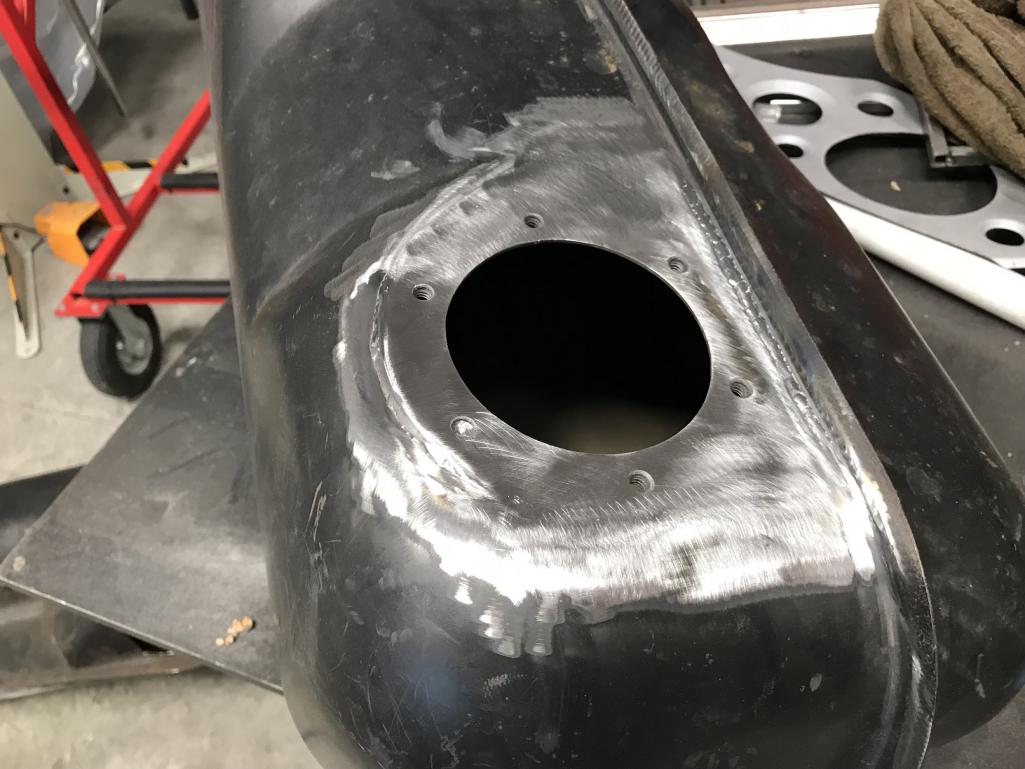
|
|
|
|
| tygaboy |
Oct 1 2018, 07:31 AM
Post
#1237
|
|
914 Guru Group: Members Posts: 5,819 Joined: 6-October 15 From: Petaluma, CA Member No.: 19,241 Region Association: Northern California |
Big gulp all done...
Attached thumbnail(s) 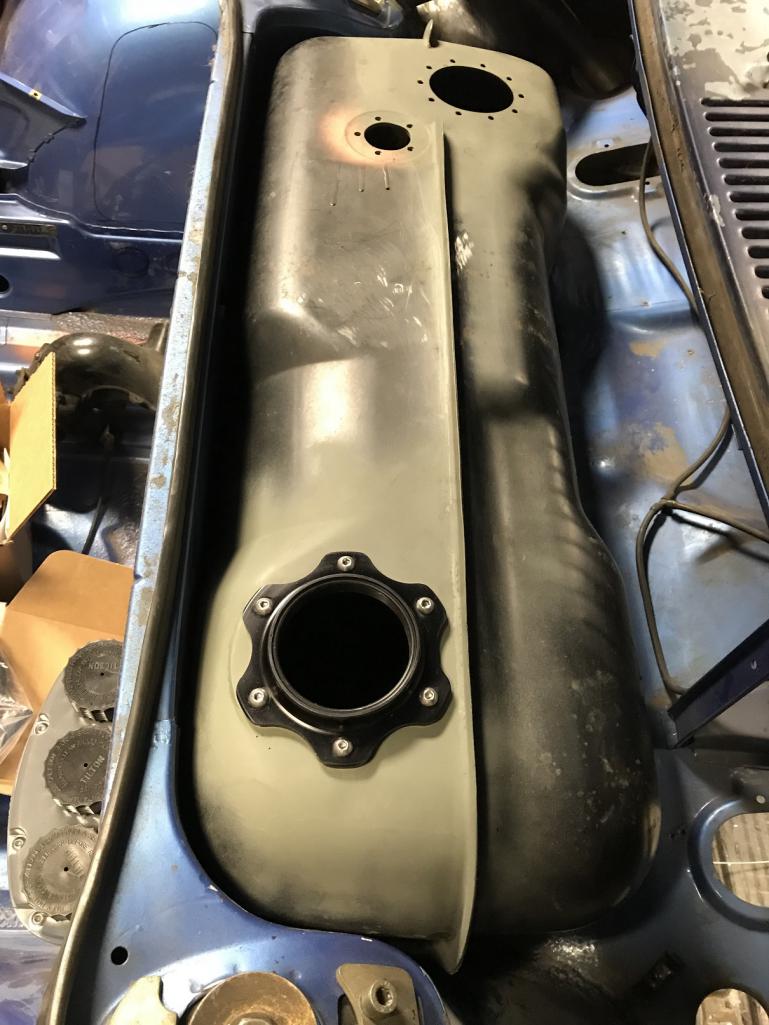
|
|
|
|
| tygaboy |
Oct 6 2018, 04:58 PM
Post
#1238
|
|
914 Guru Group: Members Posts: 5,819 Joined: 6-October 15 From: Petaluma, CA Member No.: 19,241 Region Association: Northern California |
On to the hydraulics. I have to get the reservoir lines into the cockpit as the Tilton pedal M/Cs live right on the back of the assembly.
So first version is figure where to drill the hole, drill it, install grommet and install the first line. Simple enough. But I'm not sure I like the 90 degree bend. Attached thumbnail(s) 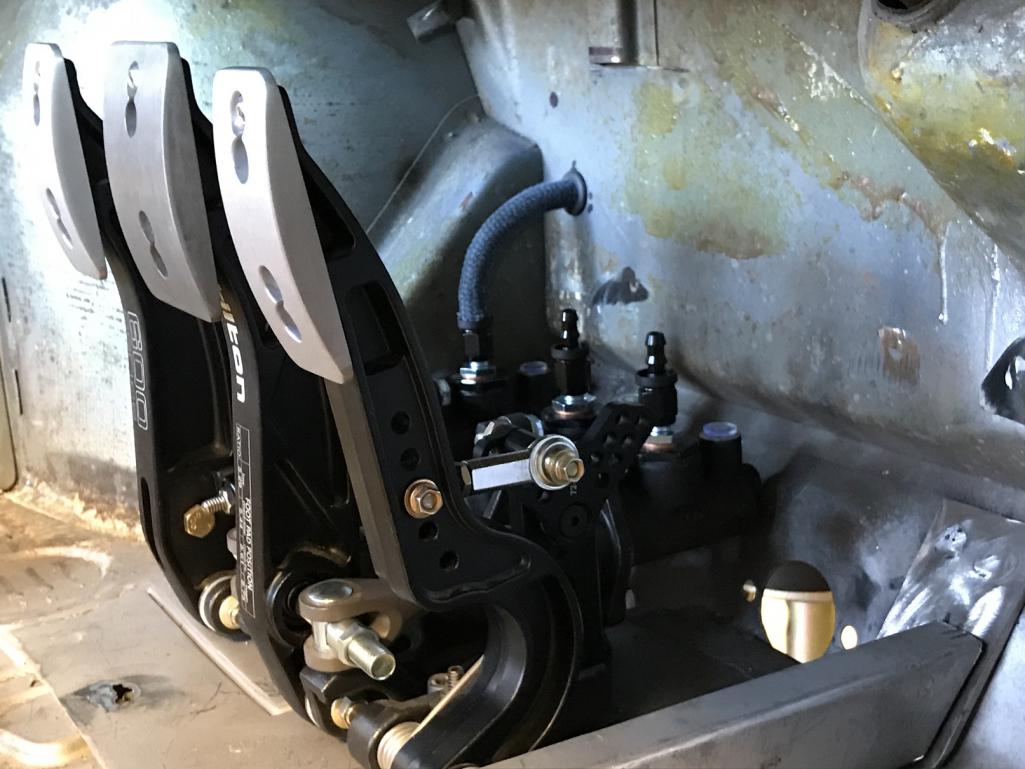 
|
|
|
|
| tygaboy |
Oct 6 2018, 05:01 PM
Post
#1239
|
|
914 Guru Group: Members Posts: 5,819 Joined: 6-October 15 From: Petaluma, CA Member No.: 19,241 Region Association: Northern California |
So, just to see, I fabbed up a panel that adds an angle and used 45 degree fittings.
This solution would be more work but I do like it. We shall see... Attached thumbnail(s) 
|
|
|
|
| tygaboy |
Oct 6 2018, 05:03 PM
Post
#1240
|
|
914 Guru Group: Members Posts: 5,819 Joined: 6-October 15 From: Petaluma, CA Member No.: 19,241 Region Association: Northern California |
Mocked into place. I'd weld in end panels to fully close things off.
Attached thumbnail(s) 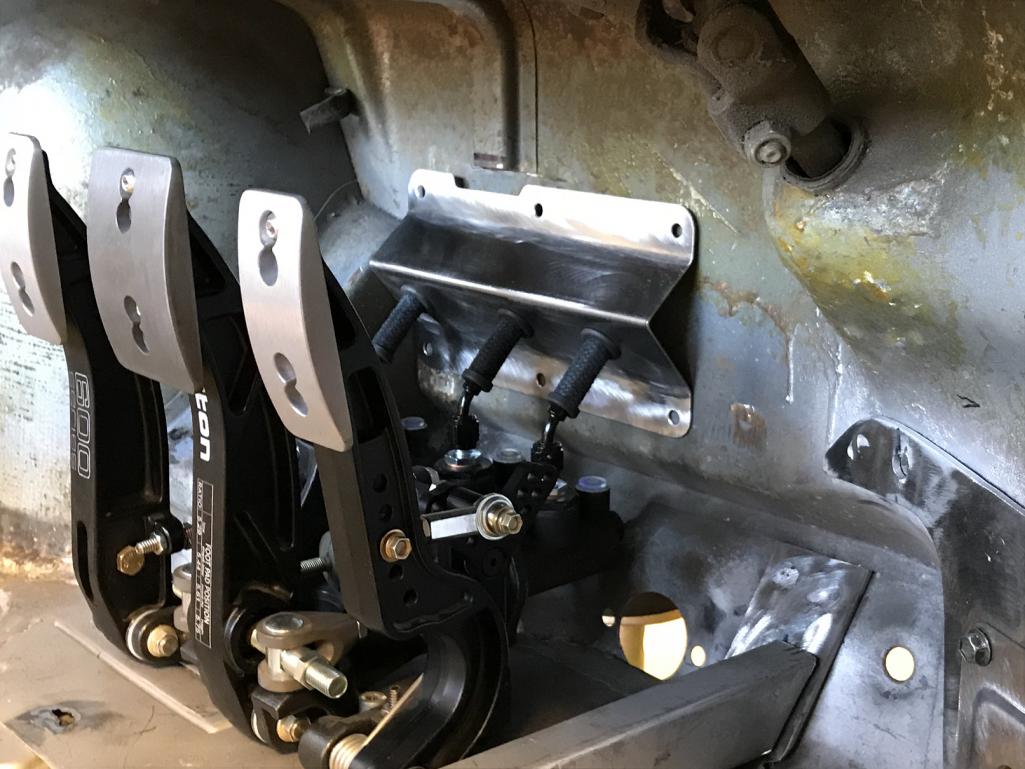
|
|
|
|
|
2 User(s) are reading this topic (2 Guests and 0 Anonymous Users)
0 Members:

|
Lo-Fi Version | Time is now: 29th April 2026 - 11:07 AM |
Invision Power Board
v9.1.4 © 2026 IPS, Inc.