|
|
|
Porsche, and the Porsche crest are registered trademarks of Dr. Ing. h.c. F. Porsche AG.
This site is not affiliated with Porsche in any way. Its only purpose is to provide an online forum for car enthusiasts. All other trademarks are property of their respective owners. |
|
|

  |

| tygaboy |
 Oct 18 2018, 03:38 PM Oct 18 2018, 03:38 PM
Post
#1281
|
|
914 Guru  Group: Members Posts: 5,819 Joined: 6-October 15 From: Petaluma, CA Member No.: 19,241 Region Association: Northern California |
And with the split panel.
Nice, relaxed cable position in the 2nd pic. Oh yea, and that other hole on the upper right side of the main panel? That aligns with an allen head bolt that allows for the alternator belt to be adjusted. (I can't believe I remembered to account for that that as I was laying out design!) It'll get a removable plug. Attached thumbnail(s) 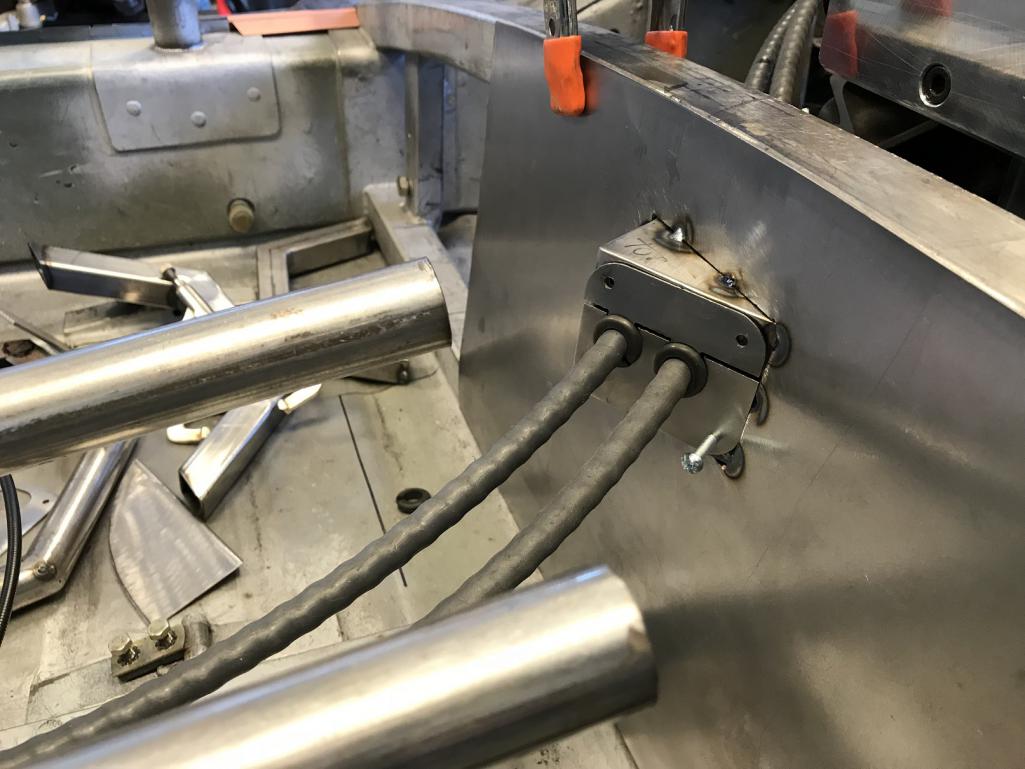 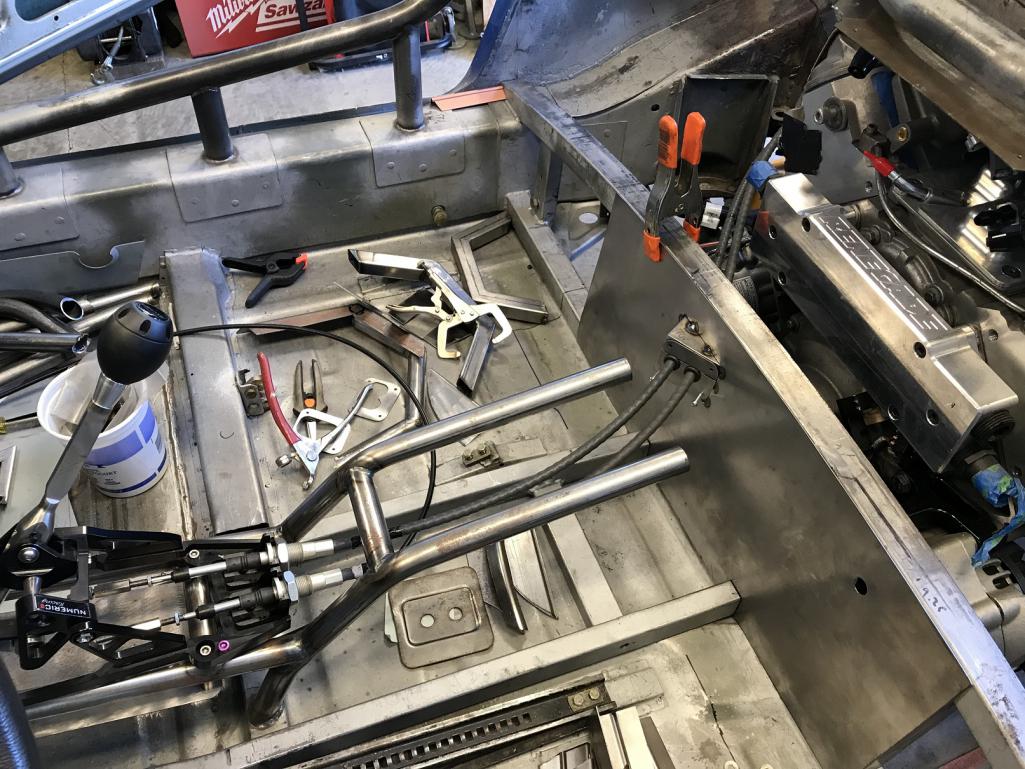
|
   |

 
|
| tygaboy |
Oct 18 2018, 05:48 PM
Post
#1282
|
|
914 Guru Group: Members Posts: 5,819 Joined: 6-October 15 From: Petaluma, CA Member No.: 19,241 Region Association: Northern California |
Then I finished it off with a reinforcement plate.
Attached thumbnail(s) 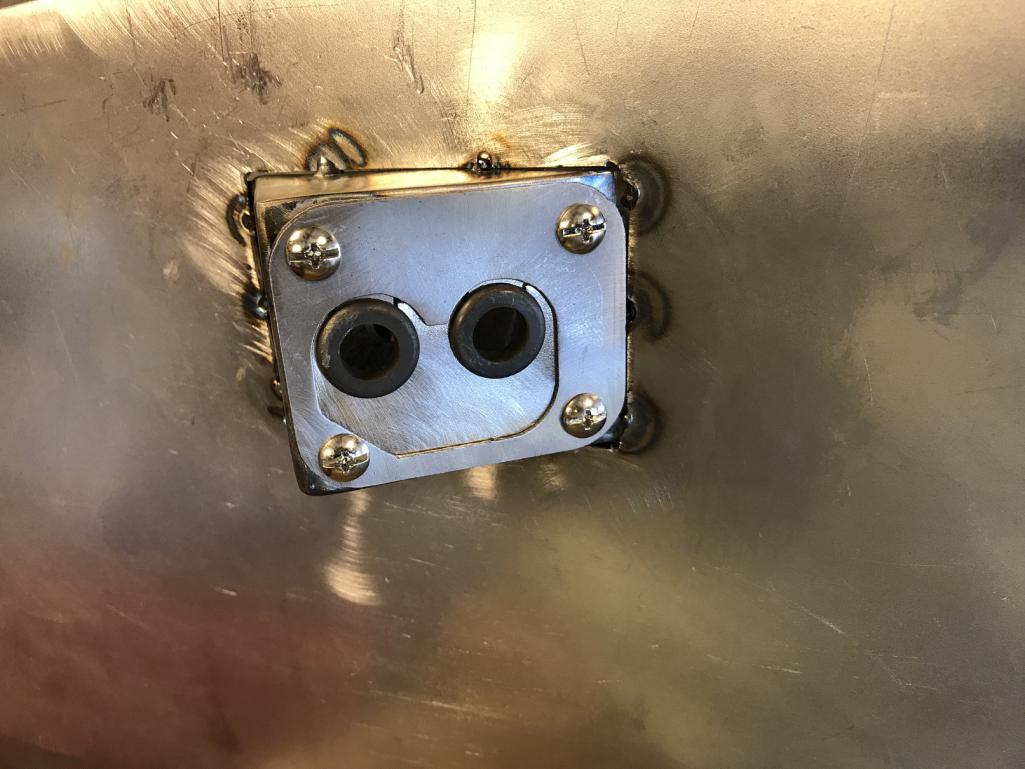
|
|
|
|
| tygaboy |
Oct 18 2018, 05:48 PM
Post
#1283
|
|
914 Guru Group: Members Posts: 5,819 Joined: 6-October 15 From: Petaluma, CA Member No.: 19,241 Region Association: Northern California |
Earlier fails... or would I feel better calling them prototypes? (IMG:style_emoticons/default/idea.gif)
Attached thumbnail(s) 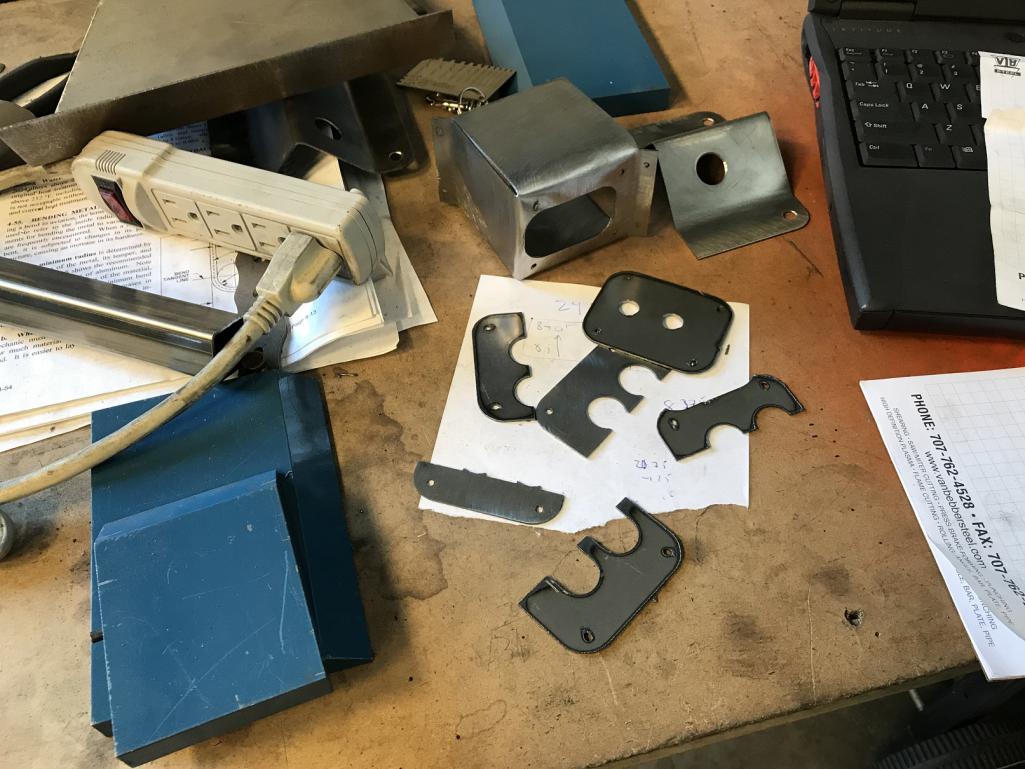
|
|
|
|
| 914forme |
Oct 18 2018, 06:17 PM
Post
#1284
|
|
Times a wastin', get wrenchin'! Group: Members Posts: 3,899 Joined: 24-July 04 From: Dayton, Ohio Member No.: 2,388 Region Association: None |
I can't believe after all of this you still have stock seat rails and adjusters (IMG:style_emoticons/default/confused24.gif)
|
|
|
|
| Curbandgutter |
Oct 18 2018, 07:56 PM
Post
#1285
|
|
Senior Member Group: Members Posts: 566 Joined: 8-March 13 From: Murrieta CA Member No.: 15,637 Region Association: Southern California |
Chris looking real good. Love that shifter!!
|
|
|
|
| FourBlades |
Oct 19 2018, 11:08 AM
Post
#1286
|
|
From Wreck to Rockin Group: Members Posts: 2,056 Joined: 3-December 07 From: Brevard, FL Member No.: 8,414 Region Association: South East States |
So much trial and error when building a custom car! Looking good, those shifter cables are pretty thick and inflexible. John |
|
|
|
| tygaboy |
Oct 21 2018, 02:07 PM
Post
#1287
|
|
914 Guru Group: Members Posts: 5,819 Joined: 6-October 15 From: Petaluma, CA Member No.: 19,241 Region Association: Northern California |
QUOTE(FourBlades @ Oct 19 2018, 10:08 AM)  So much trial and error when building a custom car! John Oh, I had no idea just how many "one forward, two backs" I'd be doing. The latest is that with the shifter cables in place, I ran into just how incorrect my earlier assumptions were about how the other systems would route. So, back to the drawing board. The fuel lines won't be able to route symmetrically so it's off to the driver's side with both of them. Then, I realized I'd need some angle on the throttle cable as it passed through the panel. I fabbed a new die set with the goal that the cable would route through the angled part of the step in the raised section of the panel. It worked great. Add a grommet to seal things up and it's on to the next item on the to-do list. Attached thumbnail(s) 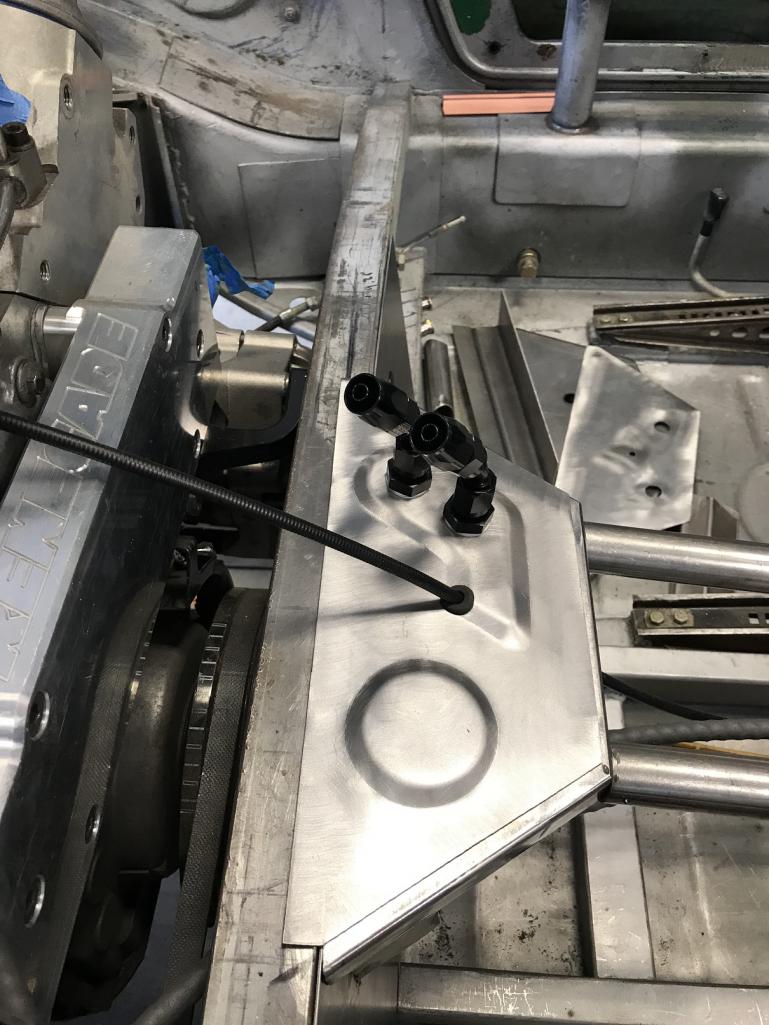
|
|
|
|
| tygaboy |
Oct 21 2018, 02:11 PM
Post
#1288
|
|
914 Guru Group: Members Posts: 5,819 Joined: 6-October 15 From: Petaluma, CA Member No.: 19,241 Region Association: Northern California |
Rear brake and clutch line bulkhead fittings located. Also found a little flush plug for the alternator adjustment access hole.
It's going to get more crowded down there with the supply and return fuel lines but it's coming together pretty well. At least until I realize I've once again forgotten something! (IMG:style_emoticons/default/huh.gif) Attached thumbnail(s)  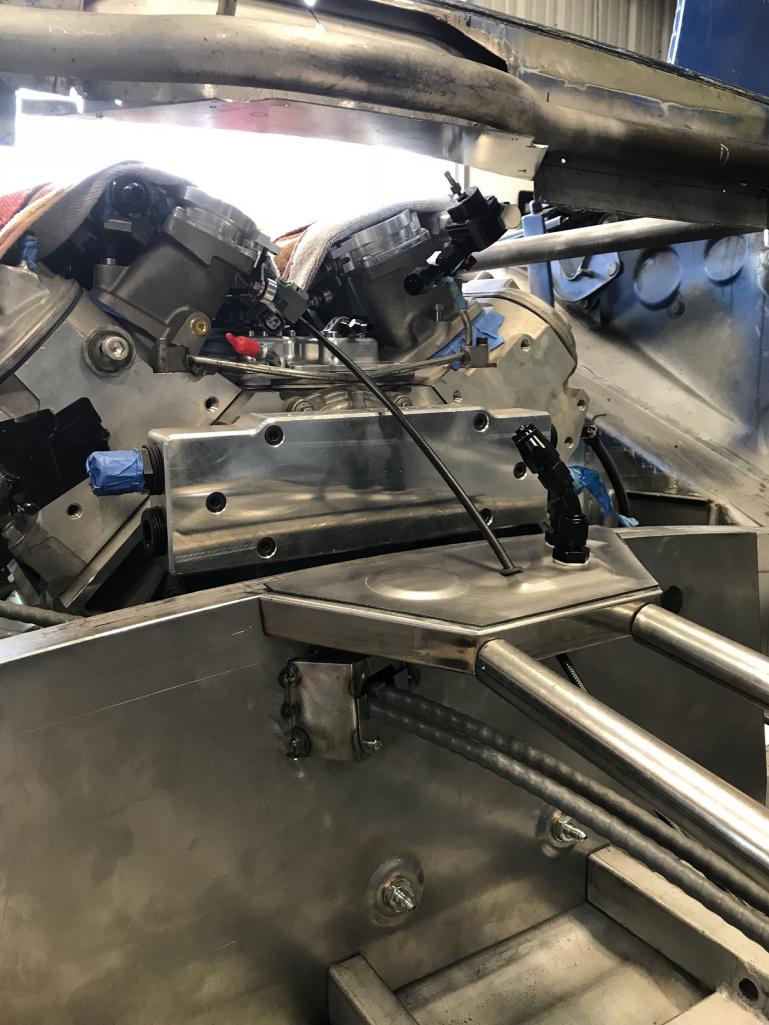
|
|
|
|
| bbrock |
Oct 21 2018, 06:52 PM
Post
#1289
|
|
914 Guru Group: Members Posts: 5,269 Joined: 17-February 17 From: Montana Member No.: 20,845 Region Association: Rocky Mountains |
Fabulous work as always. It's fun watching you work through these complexities and seeing how plan B, C, or D turns out just as perfect and professional looking as the first idea. (IMG:style_emoticons/default/beerchug.gif)
|
|
|
|
| Morph914 |
Oct 21 2018, 07:45 PM
Post
#1290
|
|
Member Group: Members Posts: 435 Joined: 22-August 16 From: St Augustine, FL Member No.: 20,326 Region Association: South East States |
Chris, a belated congrats! I have been off the grid for a few days in Ireland. I'll have a pint ( or many) of Guinness in celebration of your retirement, and again next time I see you with a proper bottle of vino!
And could you hurry up with the car, I would like a ride this spring when back in Napa. New mods looking ok I guess... (IMG:style_emoticons/default/pray.gif) Cheers, John |
|
|
|
| tygaboy |
Oct 25 2018, 03:14 PM
Post
#1291
|
|
914 Guru Group: Members Posts: 5,819 Joined: 6-October 15 From: Petaluma, CA Member No.: 19,241 Region Association: Northern California |
I made another stamping die set and added a raised section to each side of the panel. Then it was trimmed so it can go in and out as I figure out final placement of everything.
I also welded in the cable pass-through. The nice thing about all this is now that I've worked up all the dies and related plasma files, I can pretty quickly recreate the panels, should I screw up on anything - or change my mind on any aspect of the design. Not that I have a habit of that... (IMG:style_emoticons/default/laugh.gif) Attached thumbnail(s) 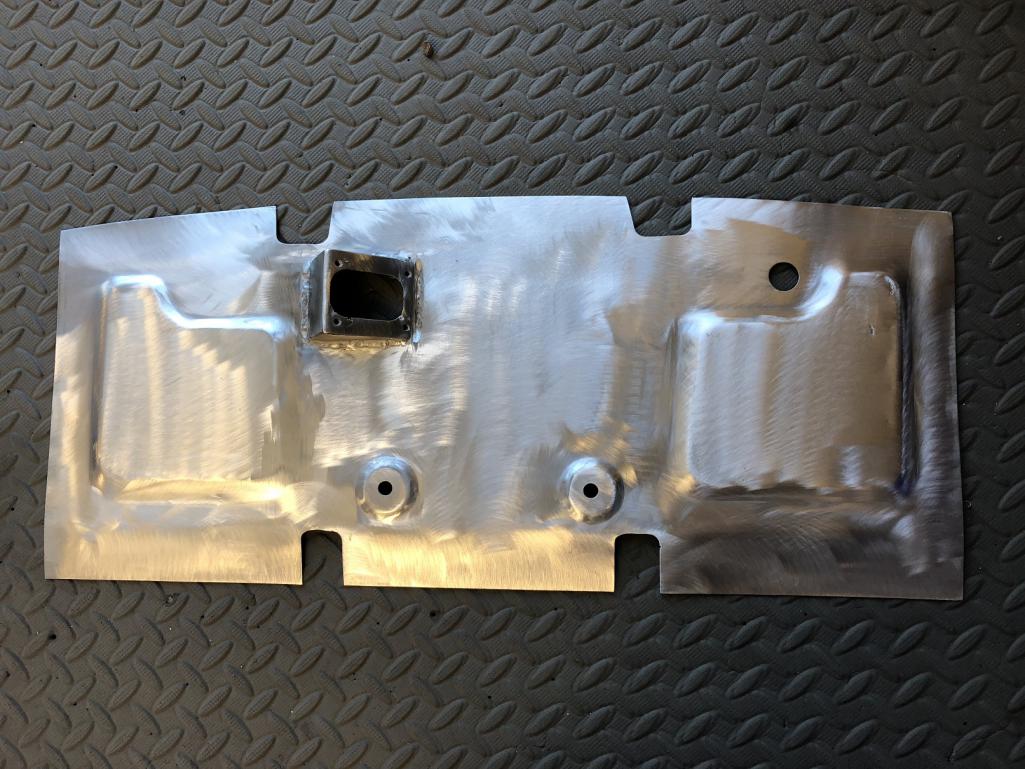
|
|
|
|
| tygaboy |
Oct 25 2018, 03:14 PM
Post
#1292
|
|
914 Guru Group: Members Posts: 5,819 Joined: 6-October 15 From: Petaluma, CA Member No.: 19,241 Region Association: Northern California |
Mocked in place.
Attached thumbnail(s) 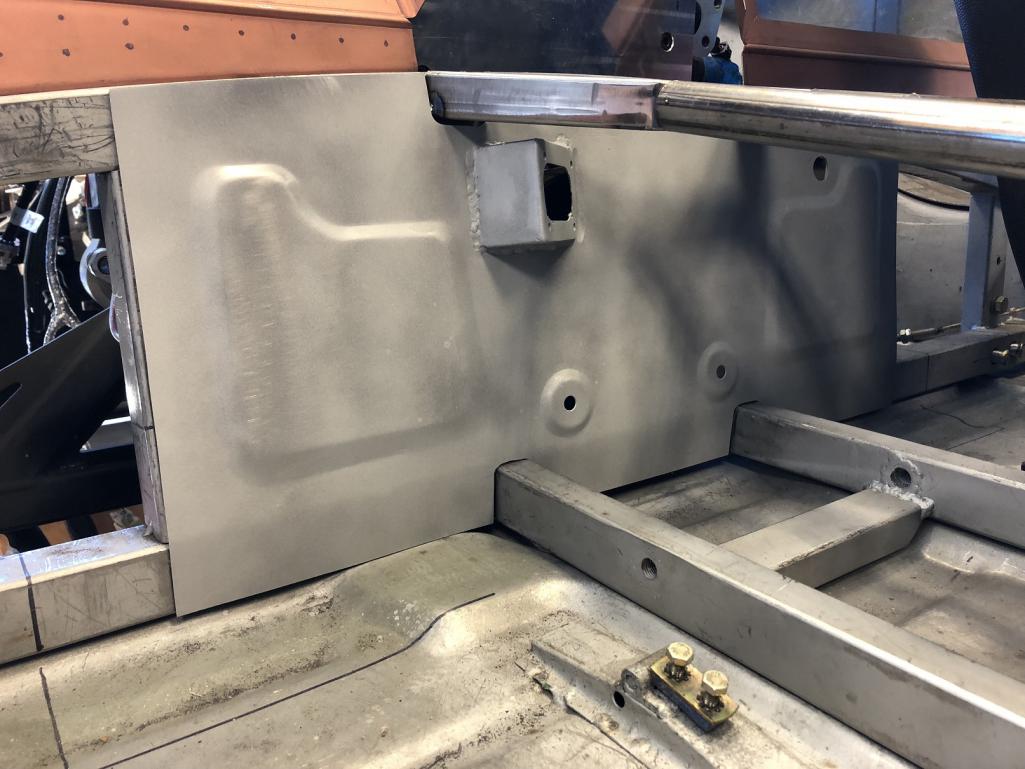
|
|
|
|
| tygaboy |
Oct 28 2018, 06:14 PM
Post
#1293
|
|
914 Guru Group: Members Posts: 5,819 Joined: 6-October 15 From: Petaluma, CA Member No.: 19,241 Region Association: Northern California |
I started work on locating all the components of the electrical system. Not insignificant in that I'm running the Infinity Box system. While it does eliminate nearly all the wires that would run from the front to the rear of the car, I have to determine where to mount the three (3) magic boxes that make up the system. Plus, I have the Holley ECU.
Then there's the A/C components and the heating system - more on that later... It drives home just how small these cars are. Or maybe I've been a bit too agressive in what I'm trying to include in this build? We're about to find out. Anyway, my good buddy Gareth volunteered to come by and help out today. So we designed and fabbed a mounting plate for the Infinity Box "Master Cell". It's the main brain that drives two "Power Cells", one at each end of the car. I'll post details as things start getting mounted. I'm locating the Master Cell in the approximate location of the stock fuse block. Since this system is programmable, I need to be able to access this and mess with it. So this plate will utilize a hinge system that allows it to fold up to be out of the way and fold down to make it easier to get to, if needed. A little plasma table, bender, knock out punches and dimple dies and we're all set! Attached thumbnail(s) 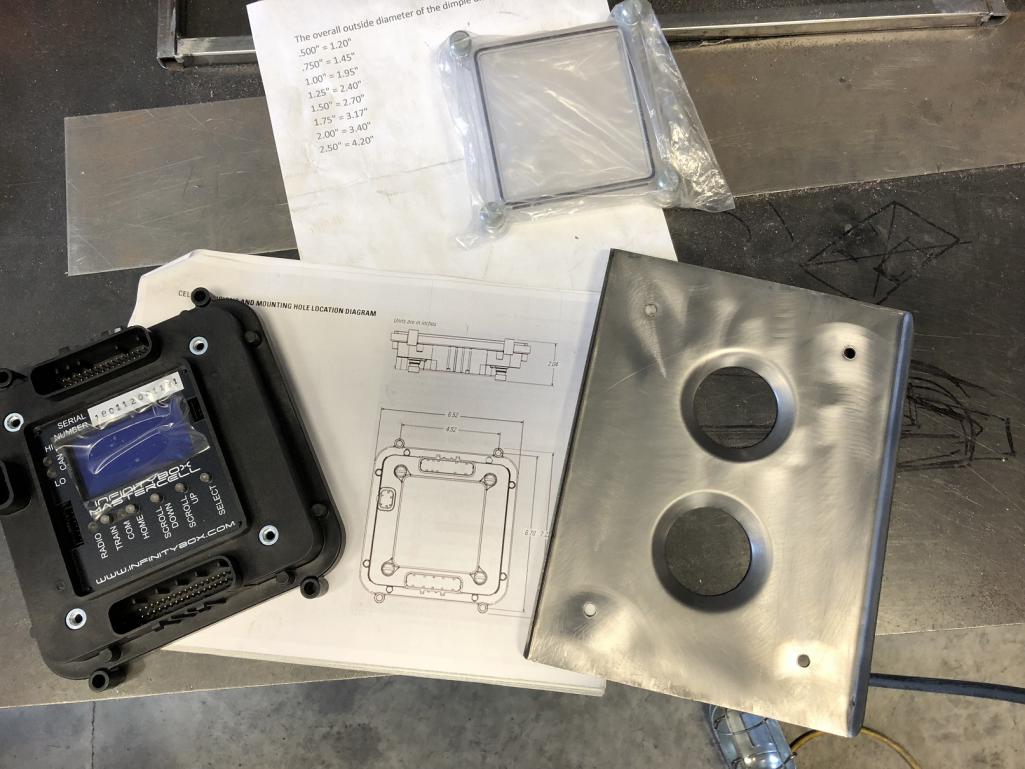
|
|
|
|
| tygaboy |
Nov 1 2018, 04:08 PM
Post
#1294
|
|
914 Guru Group: Members Posts: 5,819 Joined: 6-October 15 From: Petaluma, CA Member No.: 19,241 Region Association: Northern California |
I decided to remake the Infinity Box brain tray. It's thinner material (20 ga) and since I'm starting to consider the weight of everything I'm doing, I added some additional lightness to the design.
Attached thumbnail(s) 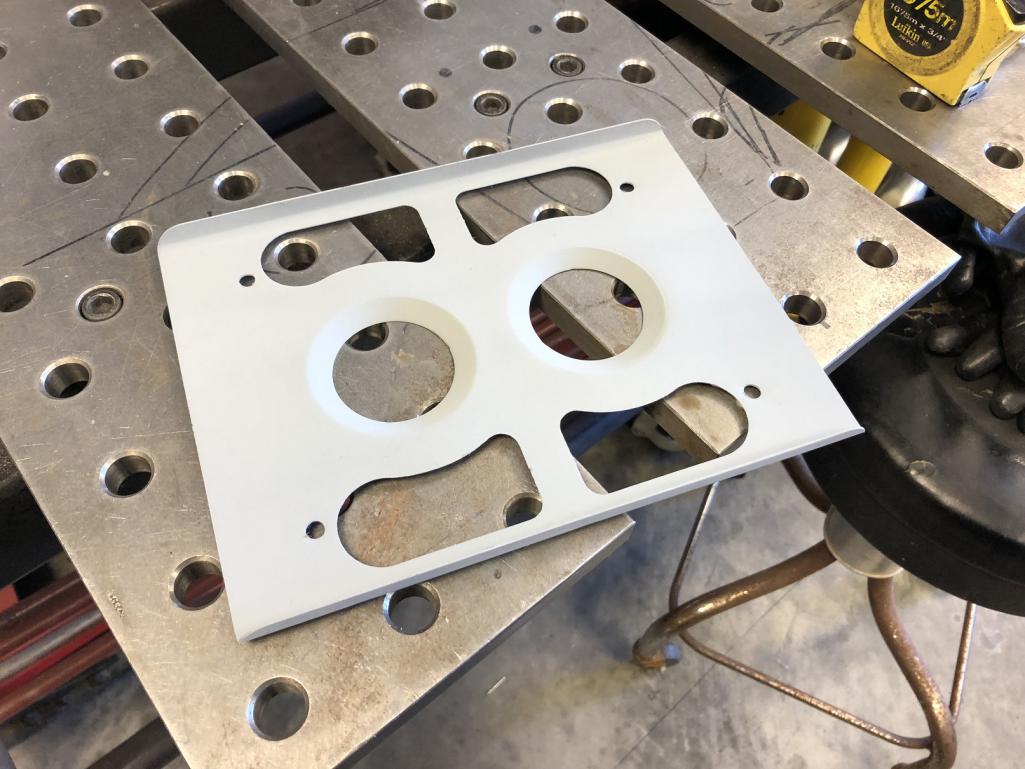
|
|
|
|
| tygaboy |
Nov 1 2018, 04:14 PM
Post
#1295
|
|
914 Guru Group: Members Posts: 5,819 Joined: 6-October 15 From: Petaluma, CA Member No.: 19,241 Region Association: Northern California |
Speaking of weight, the upper fire wall design wasn't doing it for me. Too many pieces, lots of fiddly fitting and I wasn't liking any of the designs I came up with for closing in the top area, between the window and the removable cover.
So, now that I'm no longer working a day job (!), I have plenty of time to redesign and fab parts I've already made (at least once already!) So far, this design is way simpler and gives me a roomier cockpit. Hard to explain but you'll get an idea once the pieces start coming together. Attached thumbnail(s) 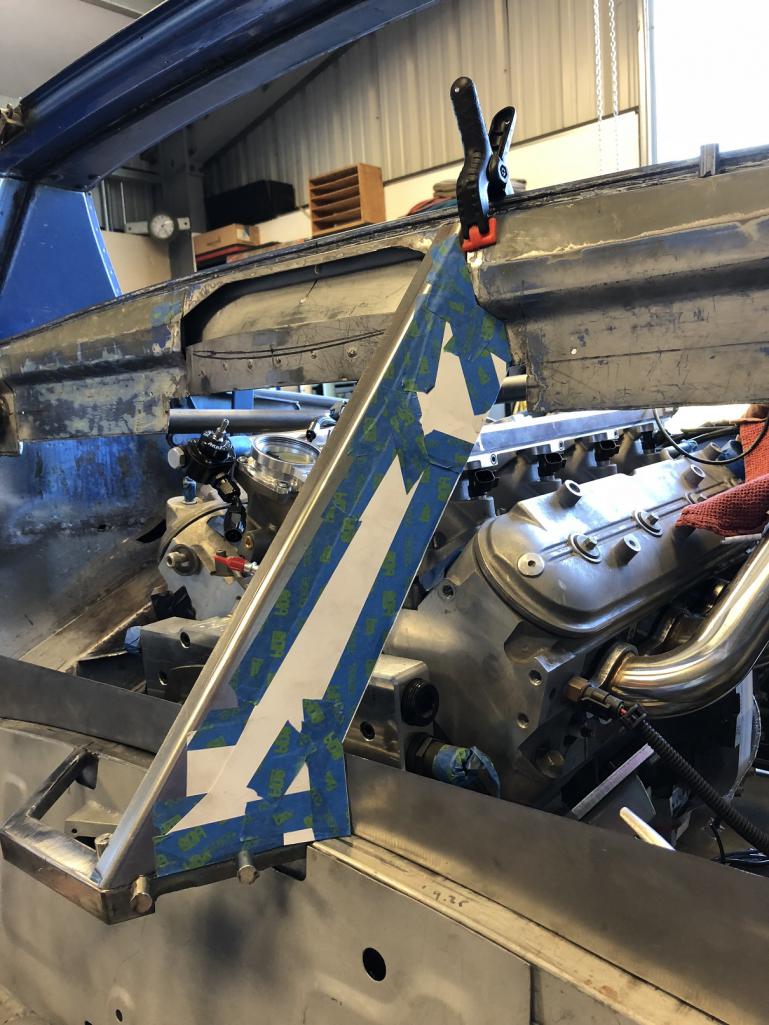 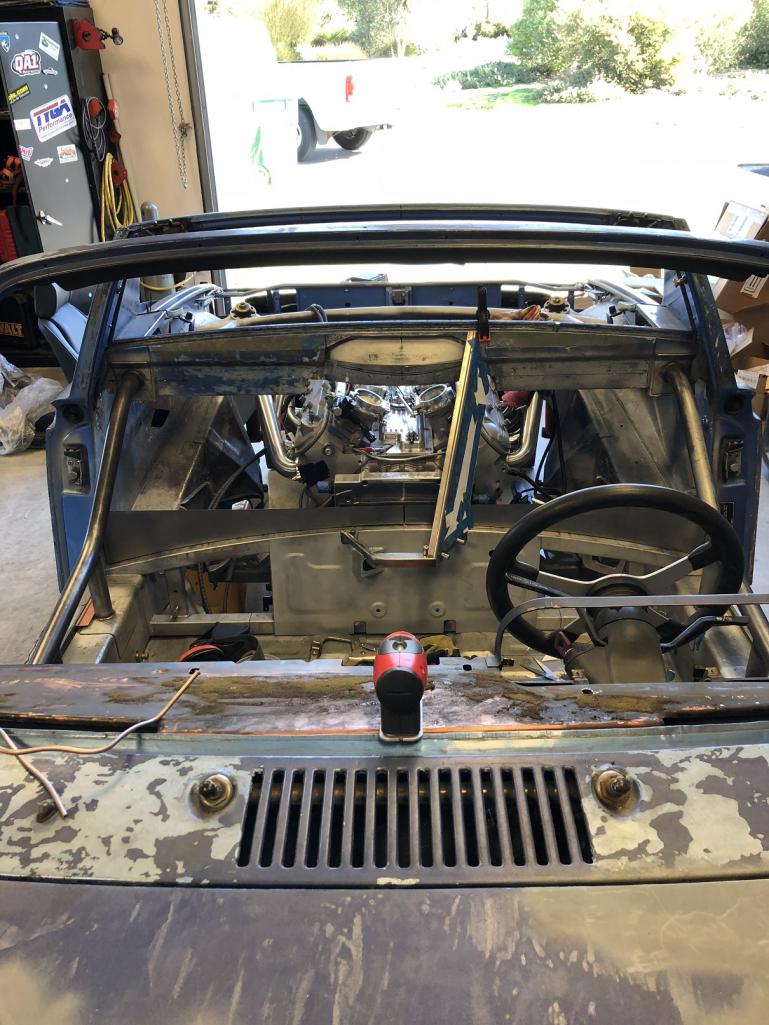
|
|
|
|
| Mueller |
Nov 1 2018, 04:14 PM
Post
#1296
|
|
914 Freak! Group: Members Posts: 17,155 Joined: 4-January 03 From: Antioch, CA Member No.: 87 Region Association: None |
Looking forward to the seeing the install and programming of the Infinity system.
|
|
|
|
| tygaboy |
Nov 1 2018, 04:19 PM
Post
#1297
|
|
914 Guru Group: Members Posts: 5,819 Joined: 6-October 15 From: Petaluma, CA Member No.: 19,241 Region Association: Northern California |
QUOTE(Mueller @ Nov 1 2018, 03:14 PM) Looking forward to the seeing the install and programming of the Infinity system. Ha! You and me both! It seems pretty straight forward. (IMG:style_emoticons/default/blink.gif) Mostly it's working out where to mount all the electrical system components. And the battery... Maybe I should make it a single seater! That'd solve lots of the space challenges! |
|
|
|
| Chi-town |
Nov 1 2018, 05:05 PM
Post
#1298
|
|
Senior Member Group: Members Posts: 851 Joined: 31-August 18 From: Disneyland Member No.: 22,446 Region Association: Southern California |
One seat in the center would be incredible!
|
|
|
|
| jd74914 |
Nov 2 2018, 05:34 AM
Post
#1299
|
|
Its alive Group: Members Posts: 4,876 Joined: 16-February 04 From: CT Member No.: 1,659 Region Association: North East States |
QUOTE(tygaboy @ Nov 1 2018, 05:19 PM) QUOTE(Mueller @ Nov 1 2018, 03:14 PM) Looking forward to the seeing the install and programming of the Infinity system. Ha! You and me both! It seems pretty straight forward. (IMG:style_emoticons/default/blink.gif) Sweet mount! Do they now have software so you can program yourself, or do you still have to ask them to do it and then flash it at home? |
 |
|
| tygaboy |
Nov 2 2018, 06:30 PM
Post
#1300
|
|
914 Guru Group: Members Posts: 5,819 Joined: 6-October 15 From: Petaluma, CA Member No.: 19,241 Region Association: Northern California |
QUOTE(jd74914 @ Nov 2 2018, 04:34 AM) QUOTE(tygaboy @ Nov 1 2018, 05:19 PM) QUOTE(Mueller @ Nov 1 2018, 03:14 PM) Looking forward to the seeing the install and programming of the Infinity system. Ha! You and me both! It seems pretty straight forward. (IMG:style_emoticons/default/blink.gif) Sweet mount! Do they now have software so you can program yourself, or do you still have to ask them to do it and then flash it at home? I haven't even gotten that far! But I think you can "borrow" their programmer. Or you can buy one. That's all TBD, at this point. |
|
|
|
|
3 User(s) are reading this topic (3 Guests and 0 Anonymous Users)
0 Members:

|
Lo-Fi Version | Time is now: 29th April 2026 - 01:01 PM |
Invision Power Board
v9.1.4 © 2026 IPS, Inc.