|
|
|
Porsche, and the Porsche crest are registered trademarks of Dr. Ing. h.c. F. Porsche AG.
This site is not affiliated with Porsche in any way. Its only purpose is to provide an online forum for car enthusiasts. All other trademarks are property of their respective owners. |
|
|

  |

| tygaboy |
 Dec 21 2016, 07:07 PM Dec 21 2016, 07:07 PM
Post
#141
|
|
914 Guru  Group: Members Posts: 5,817 Joined: 6-October 15 From: Petaluma, CA Member No.: 19,241 Region Association: Northern California |
Nothing like being on vacation to get things done! The spacers are nearly done. See how the trans mounts are slotted? When I test fit the drive train, the bolts end up tight against the end of the mount slot so I'm going to mill ~1/4" off the spacers. Better all around with that minor adjustment.
Plus, I'll dress the corners and probably add some relief pockets to lighten then up. Attached thumbnail(s) 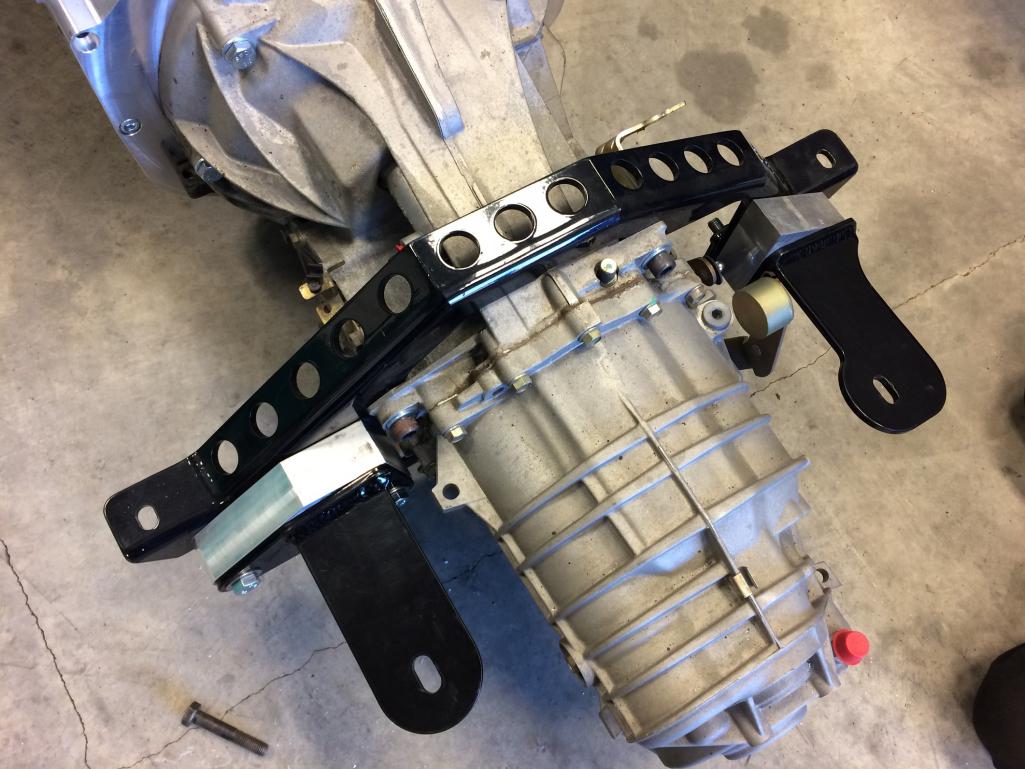
|
   |

 
|
| tygaboy |
Dec 21 2016, 07:16 PM
Post
#142
|
|
914 Guru Group: Members Posts: 5,817 Joined: 6-October 15 From: Petaluma, CA Member No.: 19,241 Region Association: Northern California |
And this will start to give you an idea of the new mount I want to add to address the additional leverage those spacers give the Renegade trans mounts.
The Boxster trans has a mount at the end. I'll either use that by punching a hole and adding a boss that will support this 3rd mount or I'll fab up a new mount. Then, when I build the rear part of the cage/stiffening, I'll run bars from the shock mounts, past the stock trans mount cross bar and out to support this mount. I'll drop supports to the stock trans mount, too. More on this as I get to it. Boy, I say that alot. But then, there's a lot to get to! But it's coming along. Attached thumbnail(s) 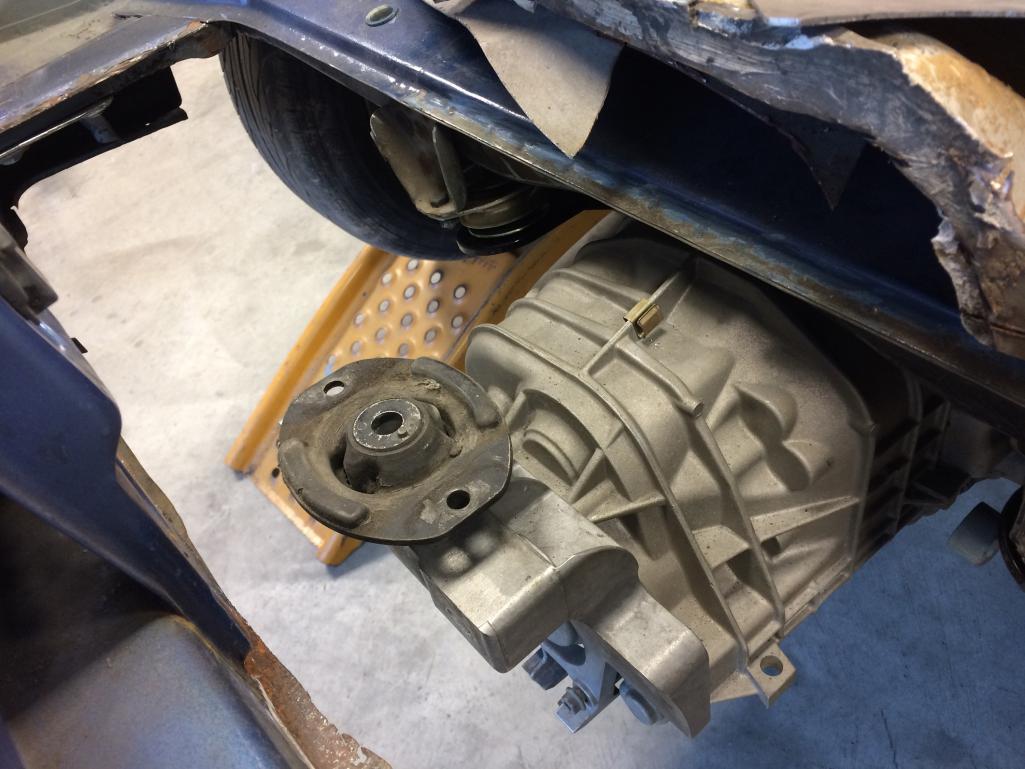
|
|
|
|
| tygaboy |
Dec 21 2016, 07:20 PM
Post
#143
|
|
914 Guru Group: Members Posts: 5,817 Joined: 6-October 15 From: Petaluma, CA Member No.: 19,241 Region Association: Northern California |
And here are the money shots: What does moving the drive train forward 1.5" look like?
Well, the harmonic balancer/alternator belt will live juuuuust inside the engine side outer fire wall! That's the rear floor pan in the stock location. So a couple key points: 1. You can see that there's no way this would have worked without messing with the lower section of the fire wall. 2. Good thing I just happened to add an arched upper fire wall support! If I'd opted for a straight bar, I'd have had interference. And there are a couple spots on the upper fire wall that I did have to relieve: 1. at the left side valve cover and 2. a small adjustments to provide extra clearance for the Renegade water block. It clears, but only just, so I figure better safe than sorry. But best of all, this is exactly how it was planned to fit. And it did! (IMG:style_emoticons/default/aktion035.gif) OK, I sorta lied. Turns out, I didn't HAVE to add that clearance crescent in the lower cross bar. But to be fair, right before that was welded in, I bumped it forward about 1/4", "just in case". Again, better safe than sorry. The only concession is that I'll need one small access hole to access the allen bolt when adjusting the alternator belt tension. I've already verified I can get the belt on and off, too. Attached thumbnail(s) 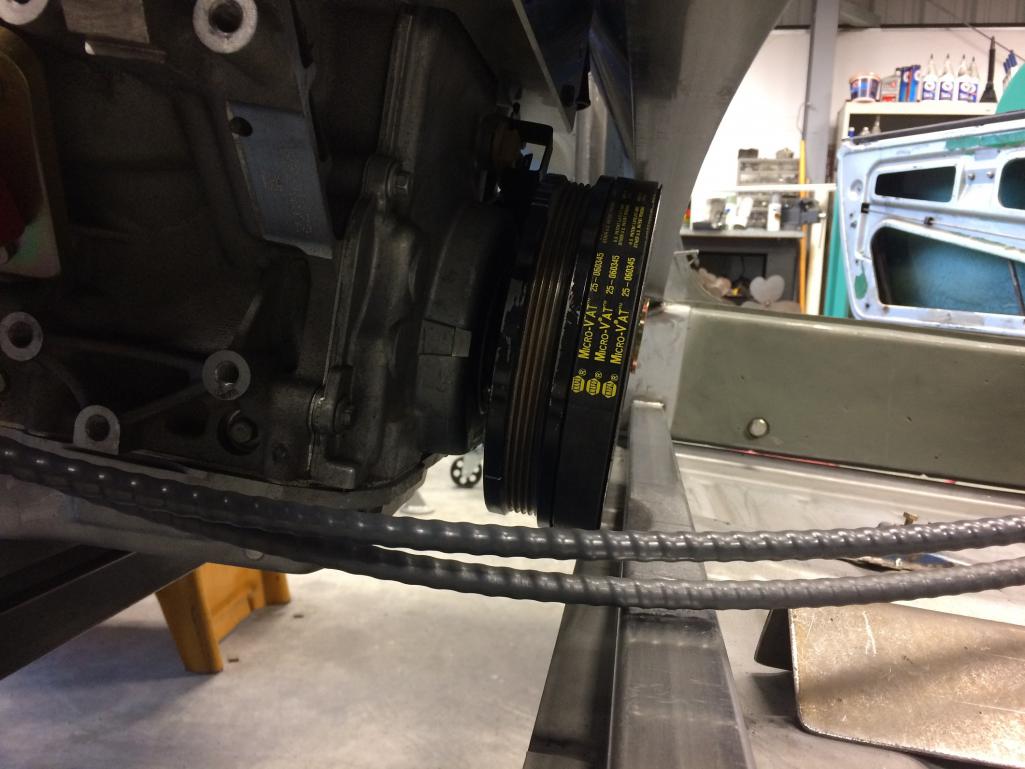 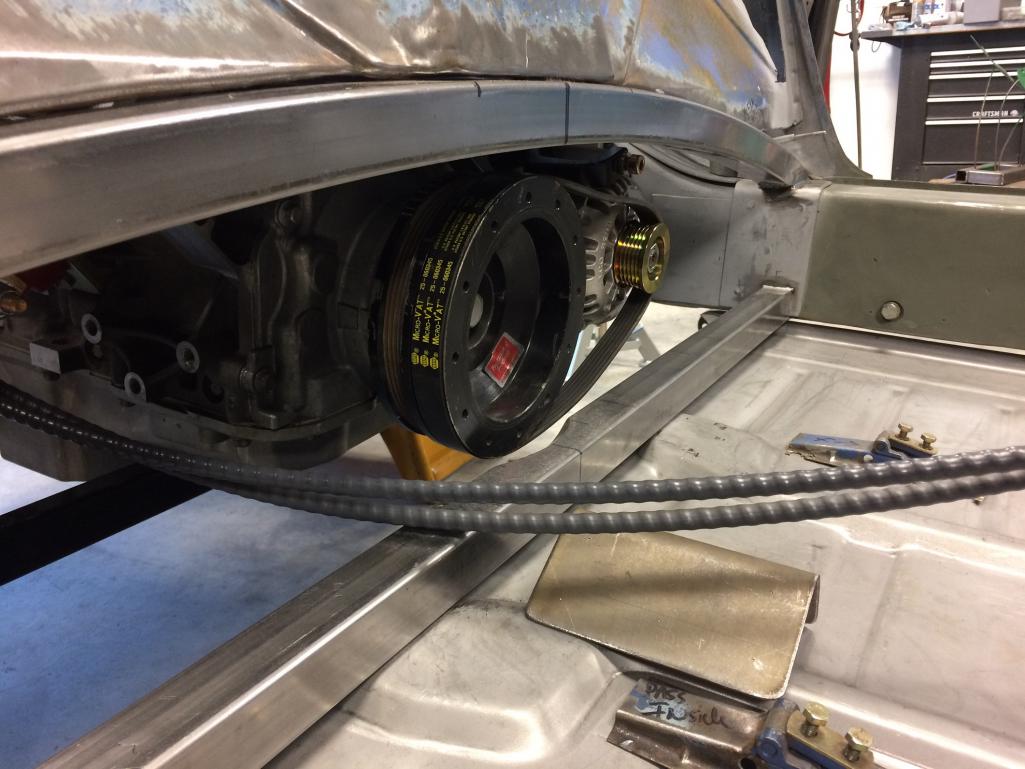 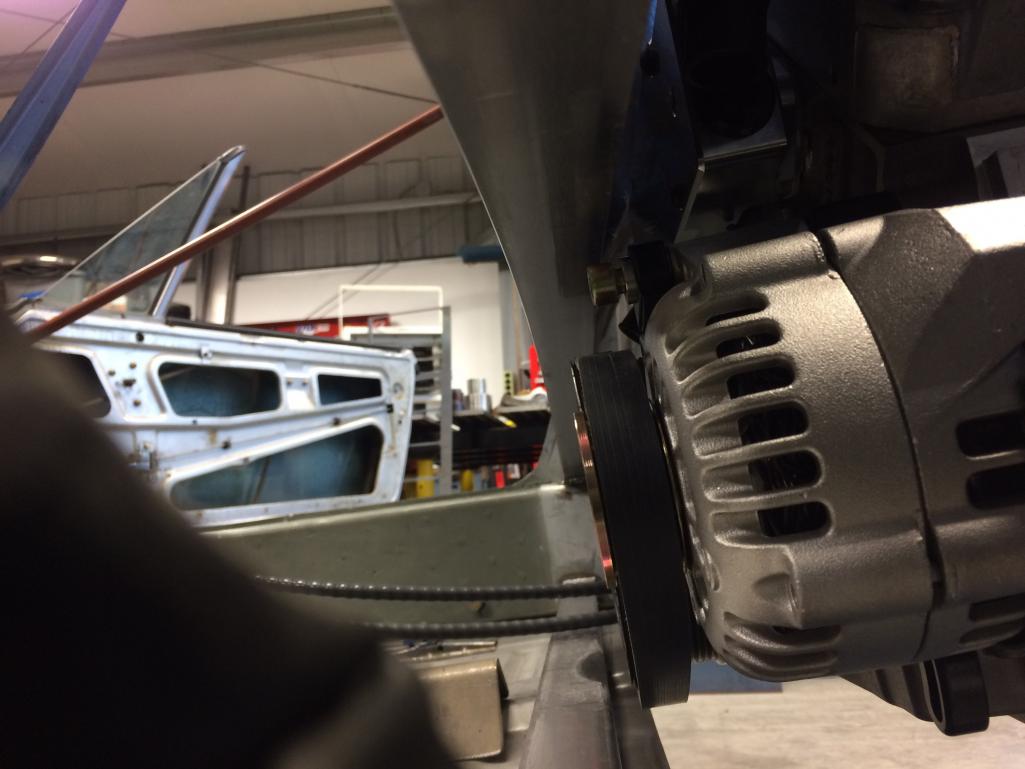
|
|
|
|
| tygaboy |
Dec 21 2016, 07:32 PM
Post
#144
|
|
914 Guru Group: Members Posts: 5,817 Joined: 6-October 15 From: Petaluma, CA Member No.: 19,241 Region Association: Northern California |
Next, the rear floor goes in and it's on to the custom floor bracing and tunnel! (IMG:style_emoticons/default/piratenanner.gif)
|
|
|
|
| Cracker |
Dec 21 2016, 07:39 PM
Post
#145
|
|
Advanced Member Group: Members Posts: 2,148 Joined: 2-February 10 From: Atlanta (area) Member No.: 11,316 Region Association: South East States |
Pick up the pace Chris...you are obviously taking your time! (IMG:style_emoticons/default/blink.gif)
I knew it would be tight but... T |
|
|
|
| tygaboy |
Dec 21 2016, 07:42 PM
Post
#146
|
|
914 Guru Group: Members Posts: 5,817 Joined: 6-October 15 From: Petaluma, CA Member No.: 19,241 Region Association: Northern California |
QUOTE(Cracker @ Dec 21 2016, 05:39 PM)  Pick up the pace Chris...you are obviously taking your time! (IMG:style_emoticons/default/blink.gif) I knew it would be tight but... T To quote a builder I admire (David Palatov of Palatov Motorsport): "Clearance is clearance." |
|
|
|
| Curbandgutter |
Dec 23 2016, 10:14 AM
Post
#147
|
|
Senior Member Group: Members Posts: 566 Joined: 8-March 13 From: Murrieta CA Member No.: 15,637 Region Association: Southern California |
Love your work. Are you planning on adding lateral bracing in the open area of the lower firewall using sheet metal and bracing or only sheet metal? Loving the progress so far. I'm progressing on mine but I'm waiting until I reach a "milestone" before I post again. BTW loved how you slipped the sheet metal around your hoop so that you can weld it in later. Excellent thinking and craftsmanship!
|
|
|
|
| tygaboy |
Dec 23 2016, 06:34 PM
Post
#148
|
|
914 Guru Group: Members Posts: 5,817 Joined: 6-October 15 From: Petaluma, CA Member No.: 19,241 Region Association: Northern California |
Time to mill the spacers. Here's an action shot of the flycutter doing its thing (IMG:style_emoticons/default/sawzall-smiley.gif) , the finished products (IMG:style_emoticons/default/wub.gif) and the new spacers installed. (IMG:style_emoticons/default/aktion035.gif)
Prior to resizing them, it was a bit of work to get everything lined up and the hanger bolts in place. Now, both sides slide in just like that! Attached thumbnail(s) 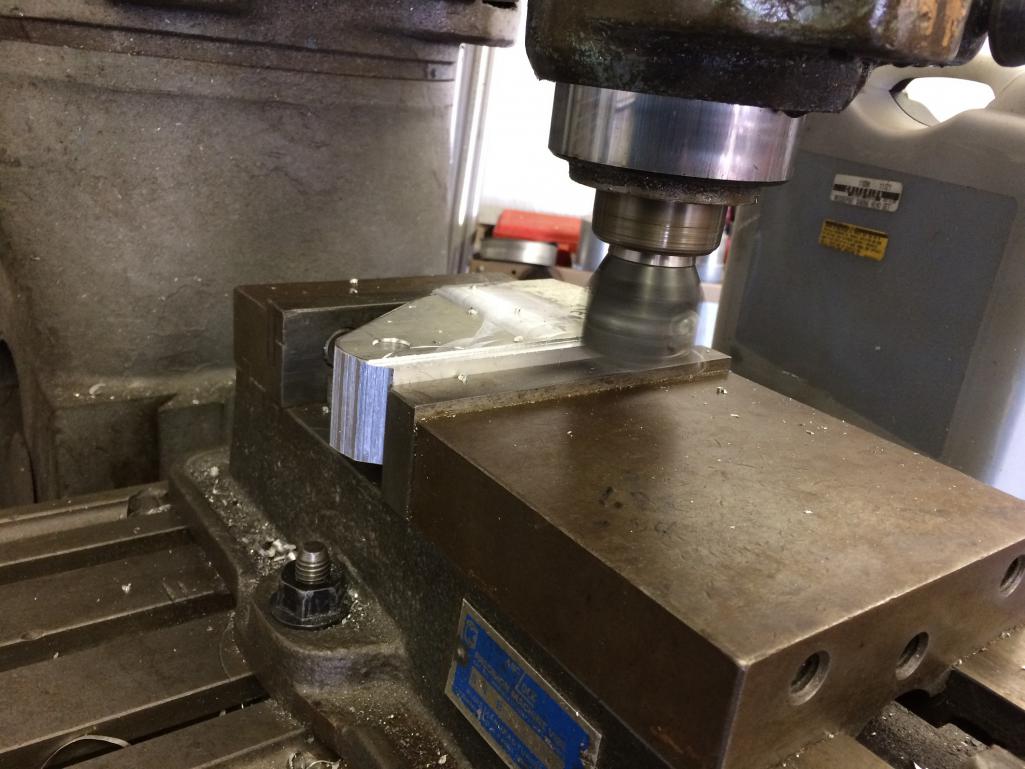  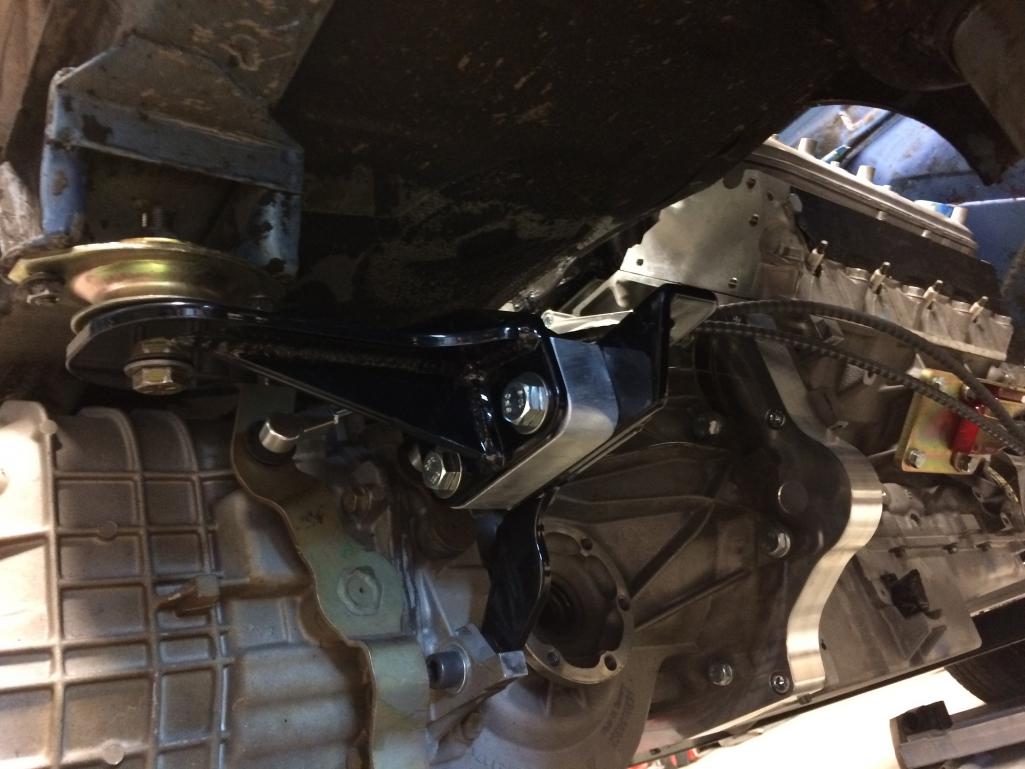 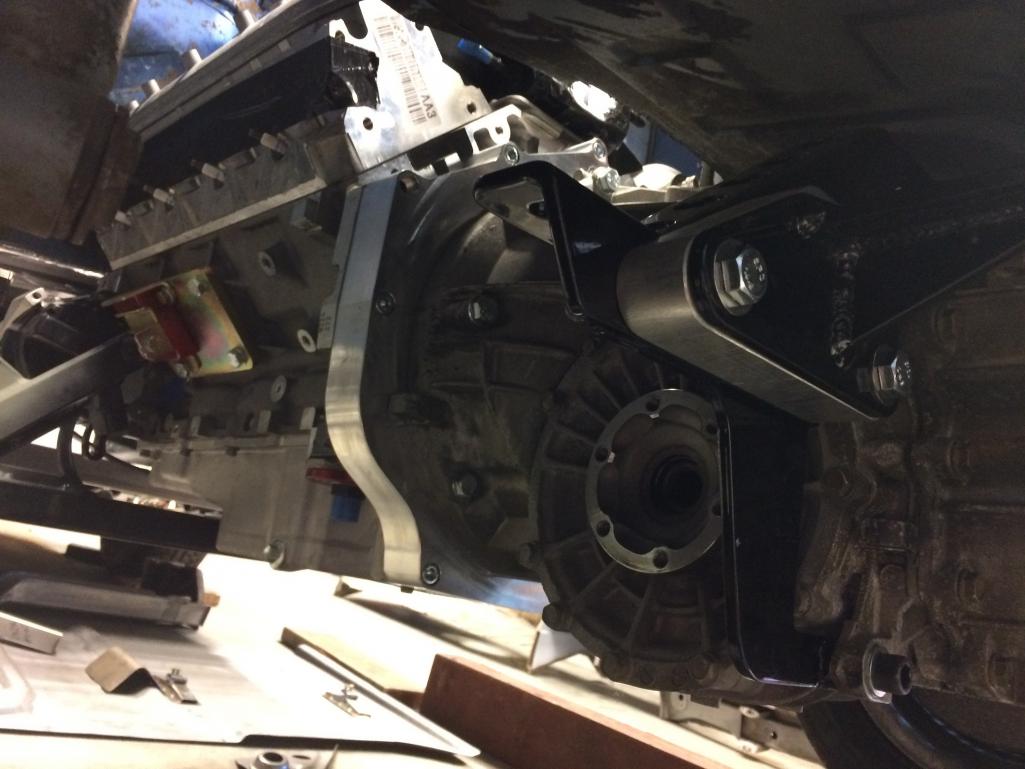
|
|
|
|
| tygaboy |
Dec 23 2016, 06:36 PM
Post
#149
|
|
914 Guru Group: Members Posts: 5,817 Joined: 6-October 15 From: Petaluma, CA Member No.: 19,241 Region Association: Northern California |
QUOTE(Curbandgutter @ Dec 23 2016, 08:14 AM) Love your work. Are you planning on adding lateral bracing in the open area of the lower firewall using sheet metal and bracing or only sheet metal? Loving the progress so far. I'm progressing on mine but I'm waiting until I reach a "milestone" before I post again. BTW loved how you slipped the sheet metal around your hoop so that you can weld it in later. Excellent thinking and craftsmanship! Thanks for the kind words, Rudy. I'm going to have two braces, one on each side of the harmonic balancer, and sheet metal on the interior sides. I'm contemplating skinning both sides of the wall. Still not sure. |
|
|
|
| Cracker |
Dec 23 2016, 06:37 PM
Post
#150
|
|
Advanced Member Group: Members Posts: 2,148 Joined: 2-February 10 From: Atlanta (area) Member No.: 11,316 Region Association: South East States |
I know I caused you allot of extra work but I guarantee you - it was the right call to take it on! Merry Christmas to you and Lori!
PS: All of that "spacer" weight might slow the car down a bit... (IMG:style_emoticons/default/poke.gif) T |
|
|
|
| tygaboy |
Dec 26 2016, 06:26 PM
Post
#151
|
|
914 Guru Group: Members Posts: 5,817 Joined: 6-October 15 From: Petaluma, CA Member No.: 19,241 Region Association: Northern California |
Today was about closing up the main hoop and fire wall.
I started with this little spot above the fire wall arch. First, cut a paper template (and remember to account for the flanges!) Then I used the bead roller to fold the flanges. Attached thumbnail(s) 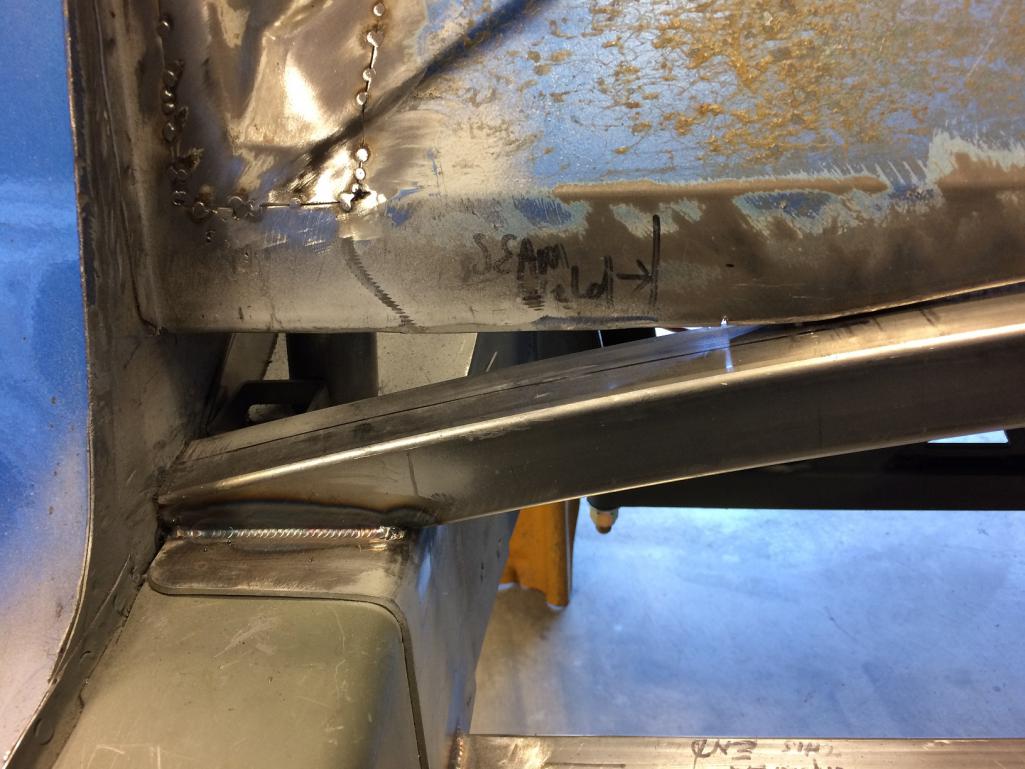 
|
|
|
|
| tygaboy |
Dec 26 2016, 06:29 PM
Post
#152
|
|
914 Guru Group: Members Posts: 5,817 Joined: 6-October 15 From: Petaluma, CA Member No.: 19,241 Region Association: Northern California |
Here's the template and the finished piece.
It's funny, I talked with Tony (Cracker) today and we laughed about how these build threads show all the pics but there's no real evidence of just how much work it takes to get from what was to what now is. All told, this little piece took me about 2 hours to make. Attached thumbnail(s) 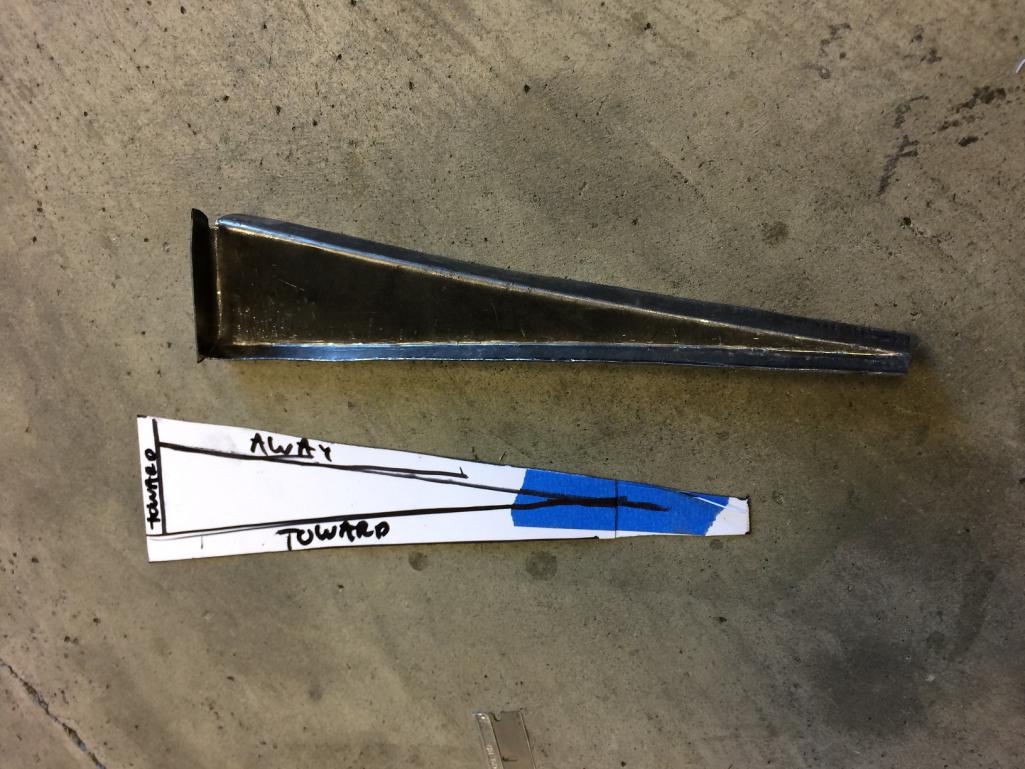
|
|
|
|
| tygaboy |
Dec 26 2016, 06:30 PM
Post
#153
|
|
914 Guru Group: Members Posts: 5,817 Joined: 6-October 15 From: Petaluma, CA Member No.: 19,241 Region Association: Northern California |
...but it turned out quite nicely! (IMG:style_emoticons/default/beerchug.gif)
Attached thumbnail(s) 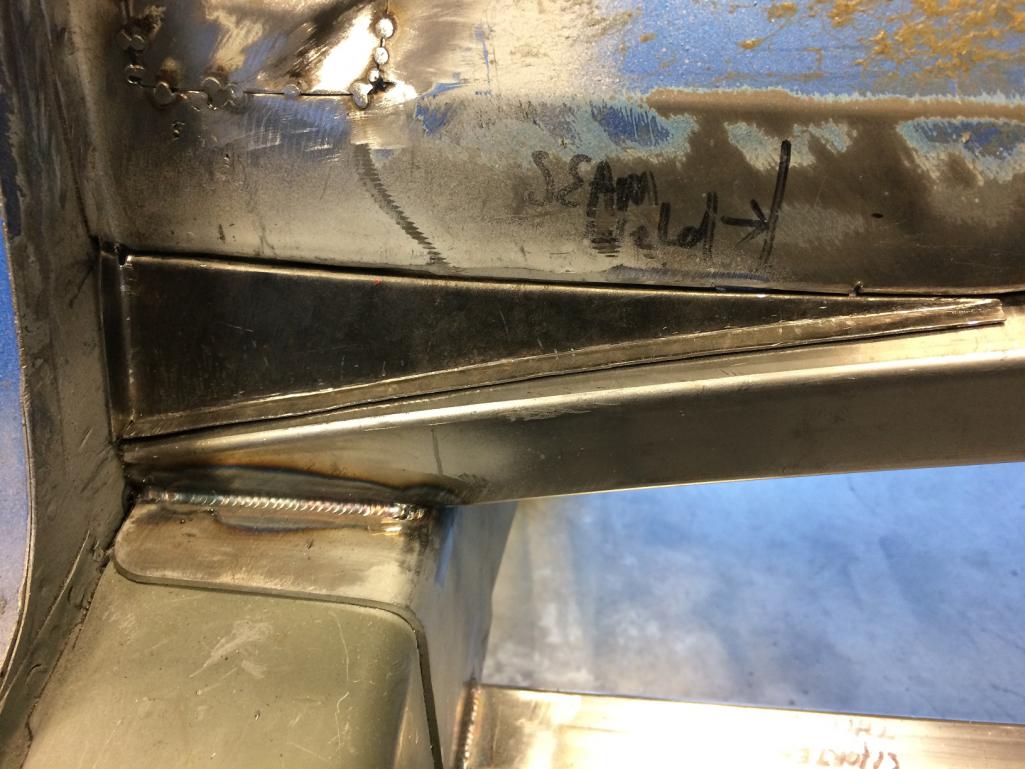
|
|
|
|
| tygaboy |
Dec 26 2016, 06:33 PM
Post
#154
|
|
914 Guru Group: Members Posts: 5,817 Joined: 6-October 15 From: Petaluma, CA Member No.: 19,241 Region Association: Northern California |
I was feeling pretty good about fabbing sheet metal so I figured I may as well get started on the inner fire wall.
Template, metal shears, fit, fit, fit and... Well, OK... There will be some more fitting. But it's looking good so far. Next is laying out and rolling in some sort of bead to help it resist oil canning and to add some visual appeal. Attached thumbnail(s) 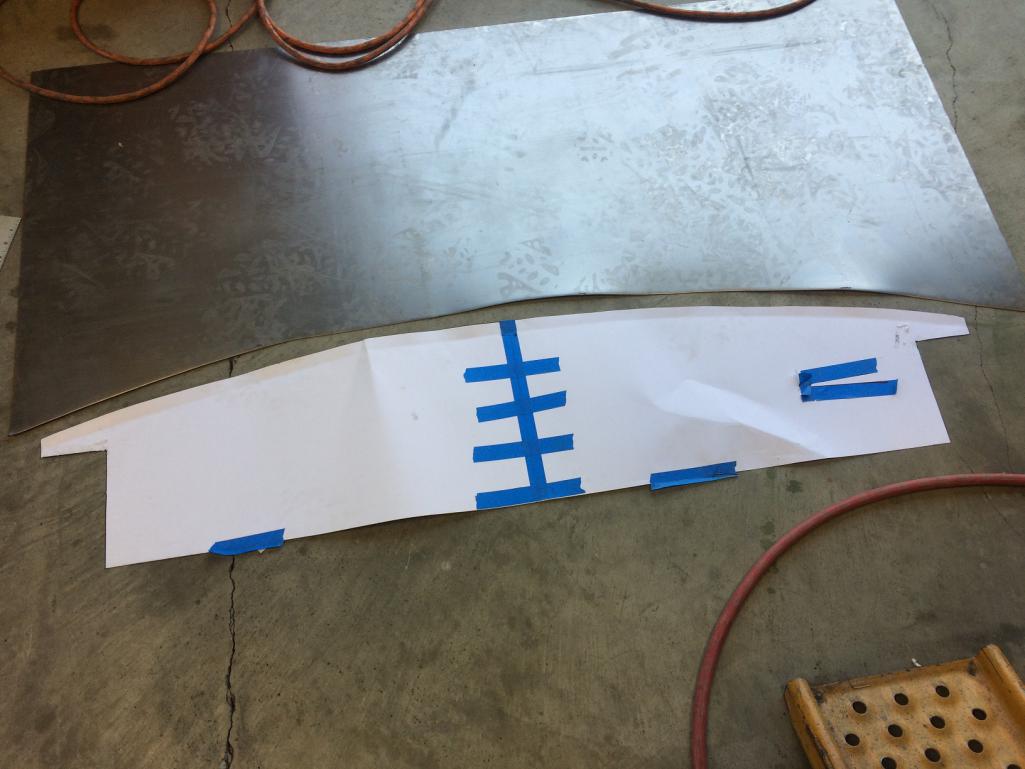 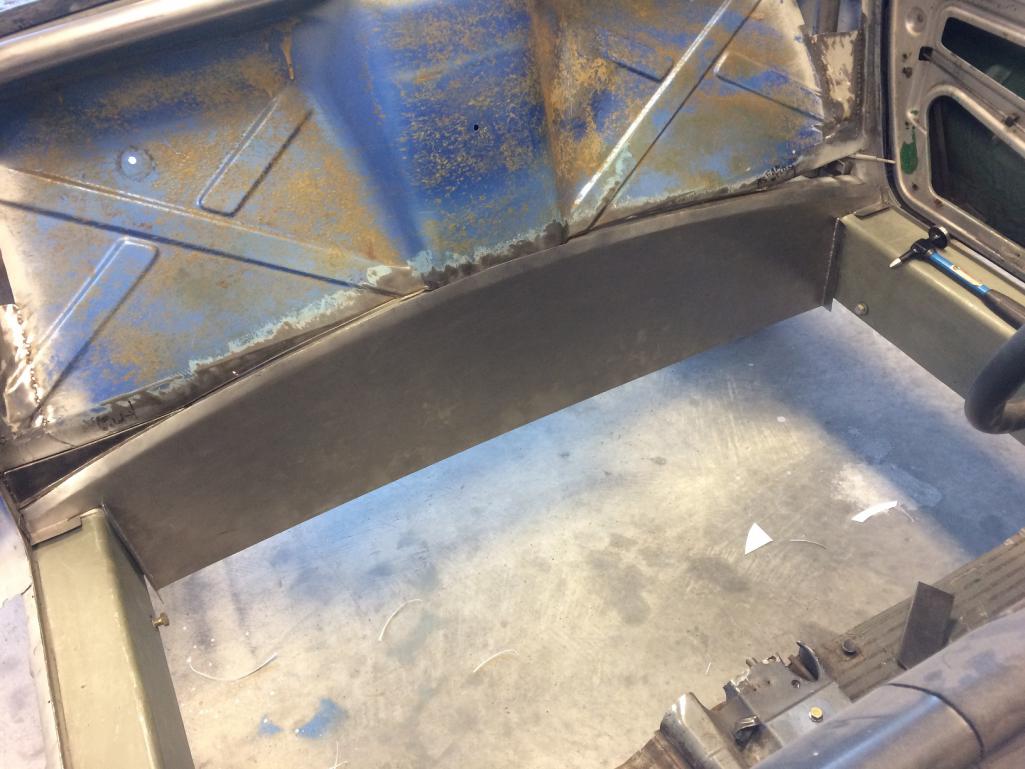
|
|
|
|
| Andyrew |
Dec 27 2016, 09:34 AM
Post
#155
|
|
Spooling.... Please wait Group: Members Posts: 13,380 Joined: 20-January 03 From: Riverbank, Ca Member No.: 172 Region Association: Northern California |
Looking good!!!!
That extra clearance for the pulley will just make it easier to replace the belt... |
|
|
|
| Krieger |
Dec 27 2016, 02:30 PM
Post
#156
|
|
Advanced Member Group: Members Posts: 4,853 Joined: 24-May 04 From: Santa Rosa CA Member No.: 2,104 Region Association: None |
That looks really good Chris! You are very talented at fabrication! Fred and Wilma are going to love it!
|
|
|
|
| tygaboy |
Dec 27 2016, 06:11 PM
Post
#157
|
|
914 Guru Group: Members Posts: 5,817 Joined: 6-October 15 From: Petaluma, CA Member No.: 19,241 Region Association: Northern California |
Did the final trimming and fitting of the lower fire wall. The electric shears are awesome and make quick work of getting a clean cut right to the mark.
Got the final flange bent across the top. Happy with the fit. Attached thumbnail(s)  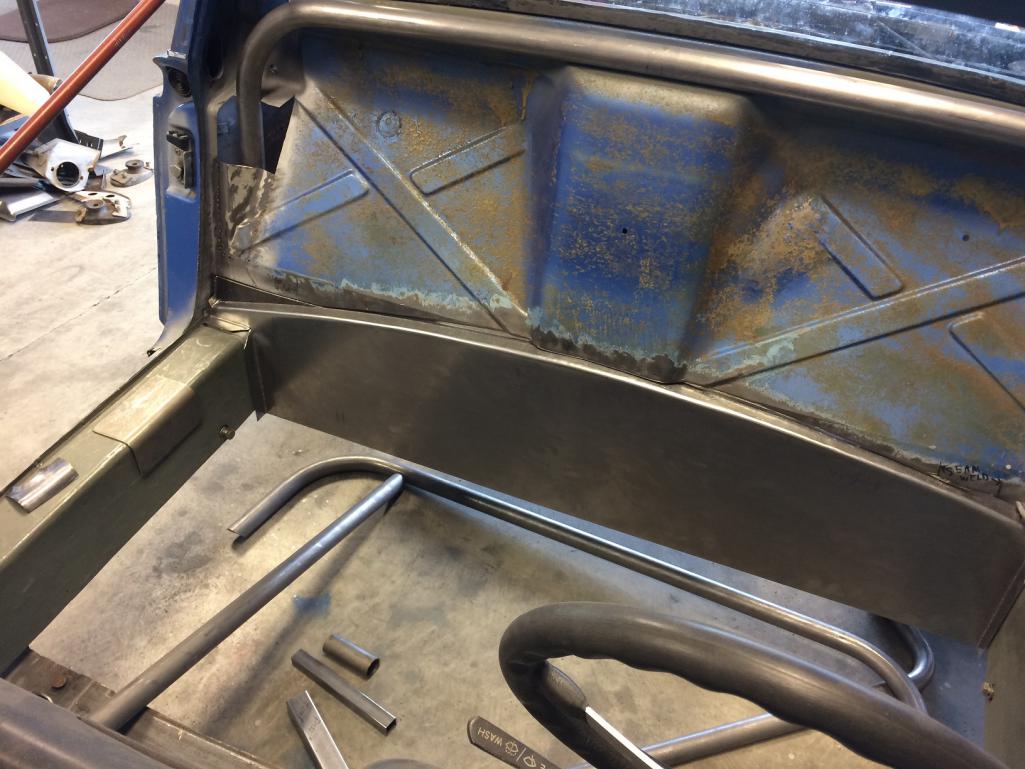
|
|
|
|
| tygaboy |
Dec 27 2016, 06:13 PM
Post
#158
|
|
914 Guru Group: Members Posts: 5,817 Joined: 6-October 15 From: Petaluma, CA Member No.: 19,241 Region Association: Northern California |
Here a shot of the fire wall and how it's fit with the little filler piece made earlier. Almost looks like I know what I'm doing...!
Attached thumbnail(s) 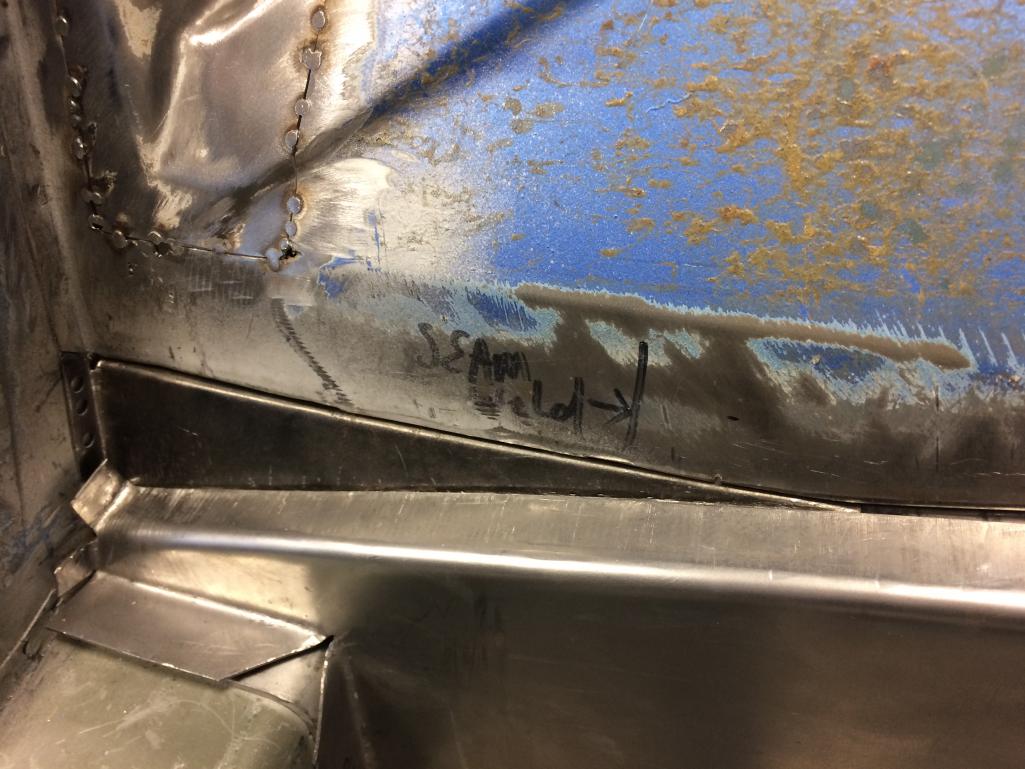
|
|
|
|
| tygaboy |
Dec 27 2016, 06:20 PM
Post
#159
|
|
914 Guru Group: Members Posts: 5,817 Joined: 6-October 15 From: Petaluma, CA Member No.: 19,241 Region Association: Northern California |
Next I started on the boxing in of the main roll hoop, this time on the engine side.
I made paper templates to figure the location of the holes then used the dimple die to pretty them up. These slide up out of the way to allow for the hoop to be welded to the pads that are welded to the longs. Then these slide into place and get welded in as part of boxing in the engine mounts. Can't tell you what a relief it is to fit the second on and actually have it all fit! Remember, this is the first time I've tried virtually any of this sort of fabrication and I hope it encourages anyone who's thinking of giving it a go. I just take my time, measure 100 times and only post pics of when it actually works out! (IMG:style_emoticons/default/lol-2.gif) Attached thumbnail(s) 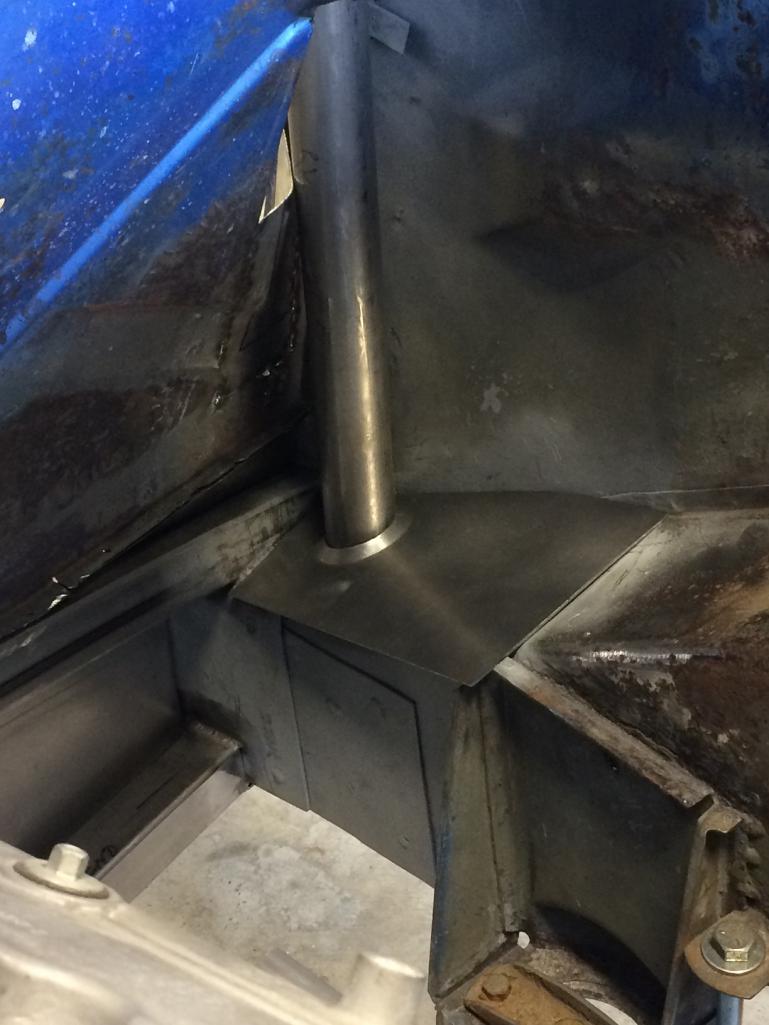 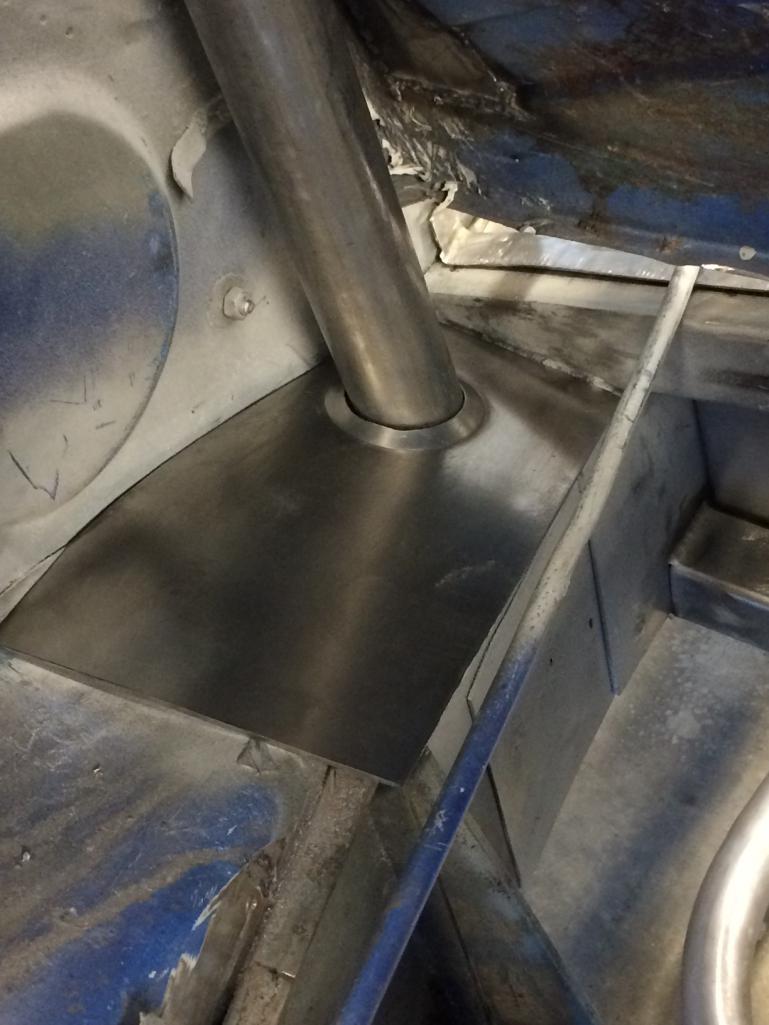
|
|
|
|
| cali914 |
Dec 27 2016, 11:58 PM
Post
#160
|
|
cali914 Group: Members Posts: 458 Joined: 26-April 06 From: Berkeley Ca. Member No.: 5,934 Region Association: Northern California |
Very nice I wish I could weld like that.
|
|
|
|
|
1 User(s) are reading this topic (1 Guests and 0 Anonymous Users)
0 Members:

|
Lo-Fi Version | Time is now: 28th April 2026 - 01:27 AM |
Invision Power Board
v9.1.4 © 2026 IPS, Inc.