|
|
|
Porsche, and the Porsche crest are registered trademarks of Dr. Ing. h.c. F. Porsche AG.
This site is not affiliated with Porsche in any way. Its only purpose is to provide an online forum for car enthusiasts. All other trademarks are property of their respective owners. |
|
|

  |

| tygaboy |
 Apr 19 2019, 09:30 AM Apr 19 2019, 09:30 AM
Post
#1541
|
|
914 Guru  Group: Members Posts: 5,681 Joined: 6-October 15 From: Petaluma, CA Member No.: 19,241 Region Association: Northern California |
QUOTE(914forme @ Apr 19 2019, 08:27 AM)  Yes it should do that just fine, it can be shaped sanded , filed, if hit that the right set time, you can even shape it like putty, but that is a minimum work time in that state. just hit the area behind the repair with a bit of grit so it has a bite. And go to town. JB Weld is not good after heating so this is a last step thing, not a still welding kind of thing. I have used it in the past to make great repairs in 1970s body work on my Ghia coupe. Gas welding with bronze fill achieves the same thing, or go old school and use lead. JBWeld is just easier to deal with in the long run. No tinning, no flame, no tallow, etc.... Awesome. I do think I'll tack weld those areas in a couple spots, maybe from behind, to get them locked in place. Off to the store for some JB Weld! Man, I love this site. All the help and great support from you guys really helps! (IMG:style_emoticons/default/smilie_pokal.gif) |
   |

 
|
| tygaboy |
Apr 19 2019, 12:00 PM
Post
#1542
|
|
914 Guru Group: Members Posts: 5,681 Joined: 6-October 15 From: Petaluma, CA Member No.: 19,241 Region Association: Northern California |
Time for some style points on the center panel. Here's a look into how I go about this sort of thing.
Starting on the left is the panel blank that's in the earlier pics. To the right is a version that will have cut outs. I'm thinking I could first paint it, then rivet on, from behind, a polished aluminum panel. Maybe carry that look throughout the interior. The next two items are a panel blank that the four, far right pieces attach to. It becomes the male stamping die to emboss raised or sunken shapes into the "plain" panel blank. All the holes precisely locate each piece. This would be used if I decided to go with a "raised/sunken" look throughout the interior. The cool part is, I can have multiple versions of the removable cover! After all, a girl can never have too many pairs of shoes! (IMG:style_emoticons/default/lol-2.gif) I hope to get to some of this today. Should be fun to see how it turns out. Attached thumbnail(s) 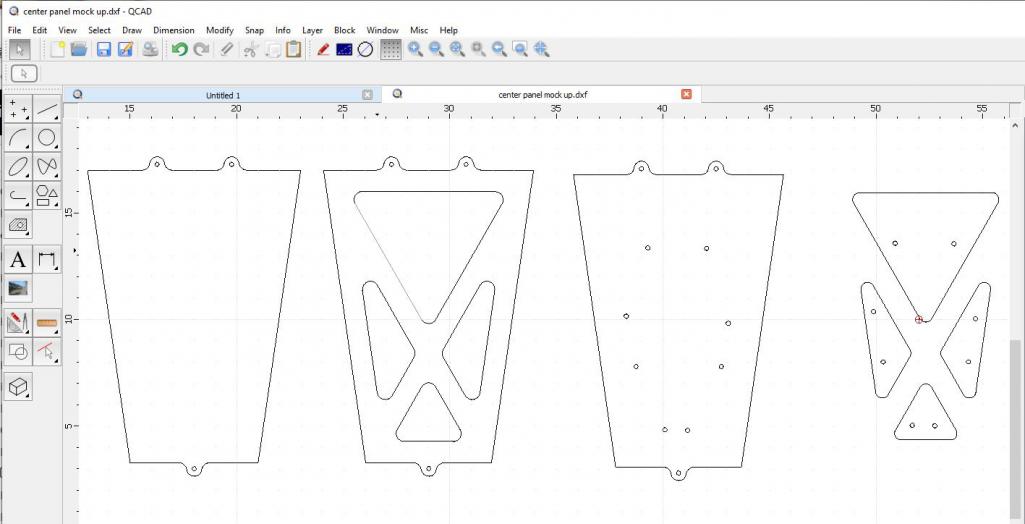
|
|
|
|
| tygaboy |
Apr 19 2019, 01:40 PM
Post
#1543
|
|
914 Guru Group: Members Posts: 5,681 Joined: 6-October 15 From: Petaluma, CA Member No.: 19,241 Region Association: Northern California |
A quick trip to the metal store to replenish my supply and...
Something like this? This is a new panel sitting on top of the earlier, plain one. Imagine it backed up with polished aluminum... or maybe Lexan? (IMG:style_emoticons/default/idea.gif) And I think I'll design up new side panels with some cut outs so everything is matchy-match. Attached thumbnail(s) 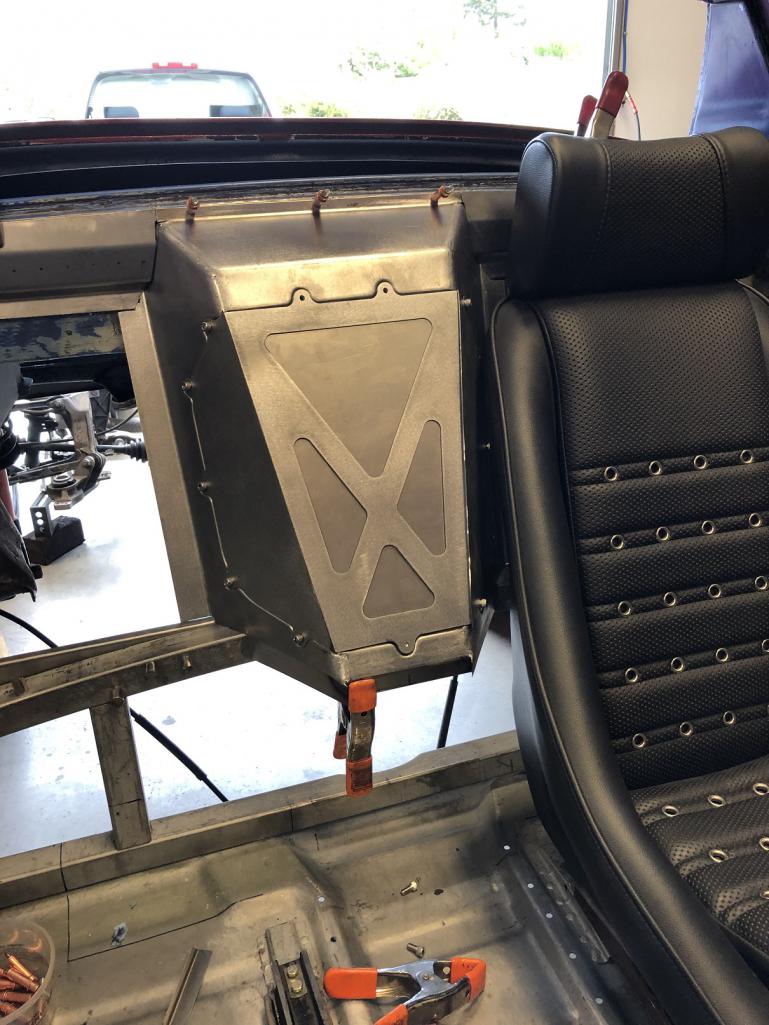
|
|
|
|
| tygaboy |
Apr 19 2019, 05:58 PM
Post
#1544
|
|
914 Guru Group: Members Posts: 5,681 Joined: 6-October 15 From: Petaluma, CA Member No.: 19,241 Region Association: Northern California |
And here's V1 of the side panels. I like this look and probably won't sweat these too much as you can hardly see them, once the seats are in place. Still, I want it to look nice...
Attached thumbnail(s) 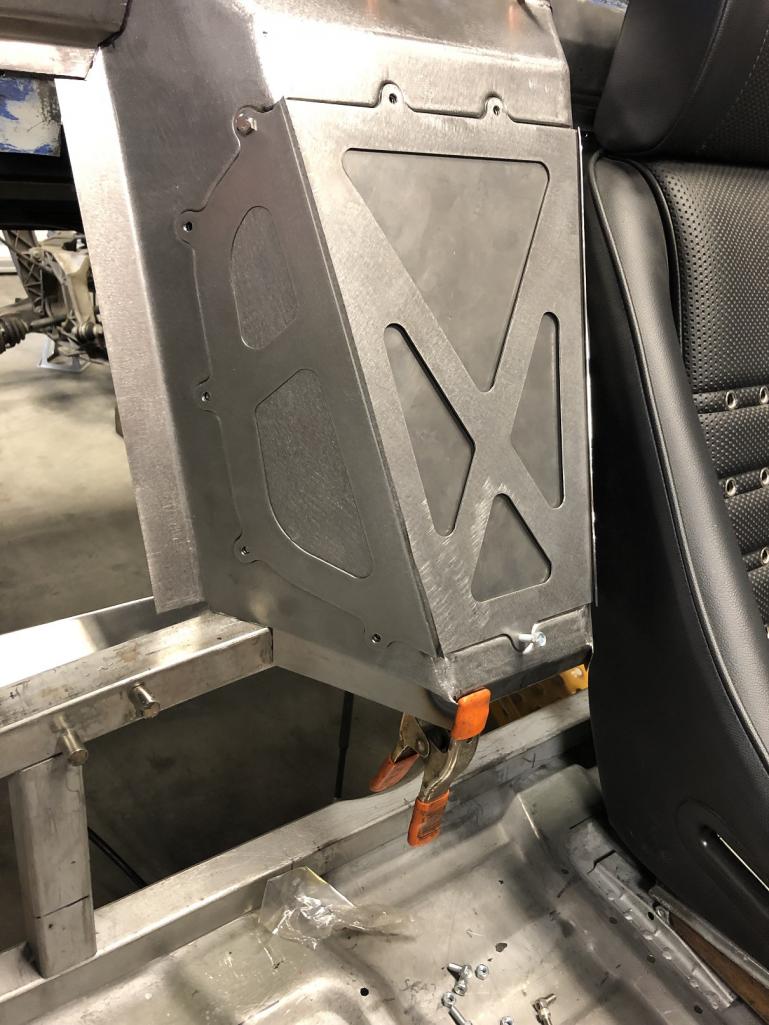 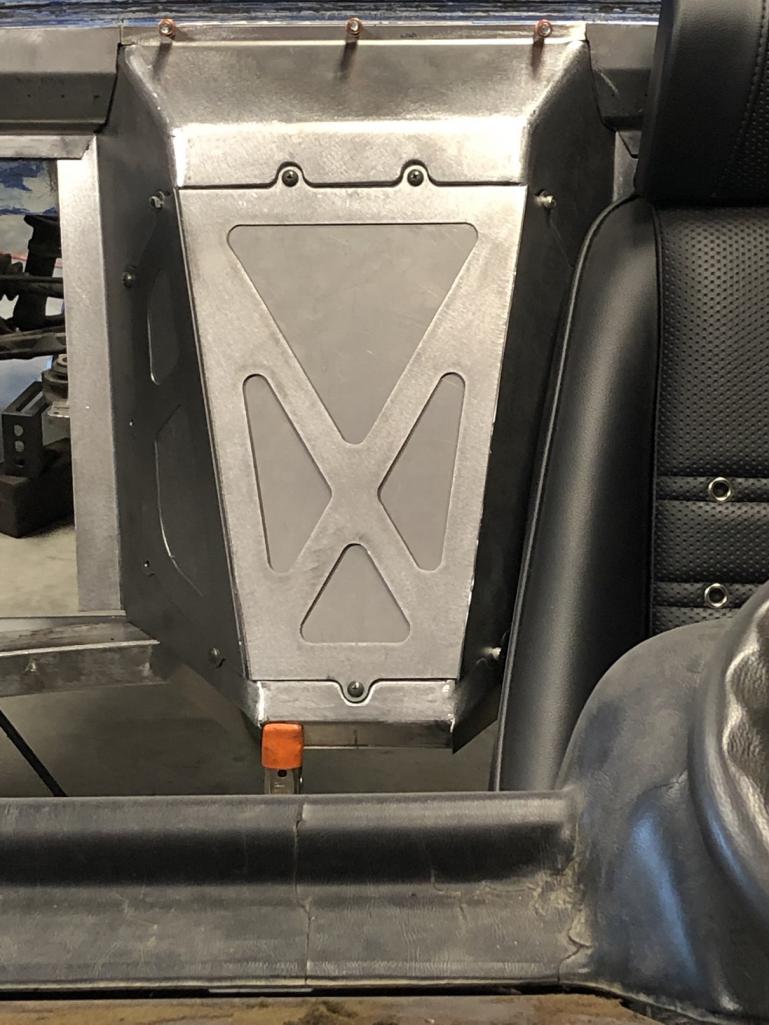
|
|
|
|
| preach |
Apr 20 2019, 06:17 AM
Post
#1545
|
|
Ridge Runner Group: Members Posts: 1,059 Joined: 27-March 10 From: Live Free or Die Member No.: 11,513 Region Association: North East States |
Lexan might be cool but it will be noisy. My Cayman has a lexan cover and is much (and delightfully) louder than stock in the cabin.
Keep up the fantastic work! |
|
|
|
| tygaboy |
Apr 20 2019, 04:59 PM
Post
#1546
|
|
914 Guru Group: Members Posts: 5,681 Joined: 6-October 15 From: Petaluma, CA Member No.: 19,241 Region Association: Northern California |
Fitting the cover pieces in prep for welding. Overall, there are a few imperfections, but I think I can mostly hide and live with the mistakes.
I learned a lot the past few days as I was making and fitting these pieces. I know I could make some improvements were I to give it another go but unless something goes really wrong, I'm moving forward with this as is. Once the cover is final welded, I'll work up the filler pieces and determine how they'll be attached. Rivets? Welded? Or, I could make up some carbon fiber panels and bond them in. That might be pretty cool... (IMG:style_emoticons/default/idea.gif) Attached thumbnail(s) 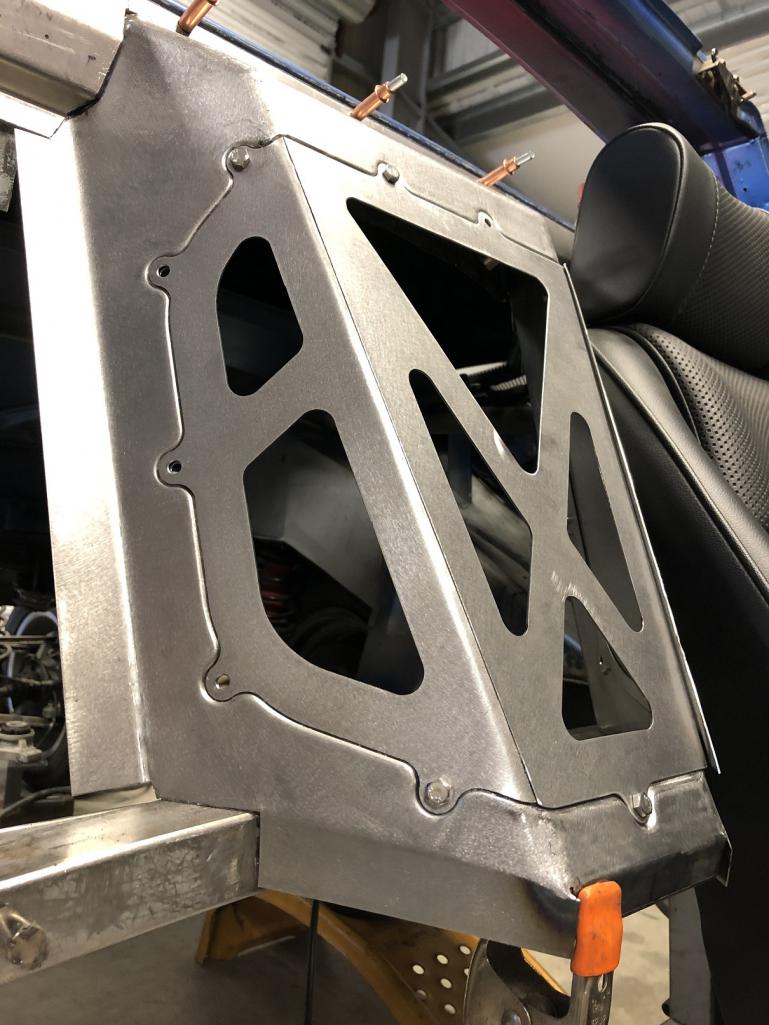 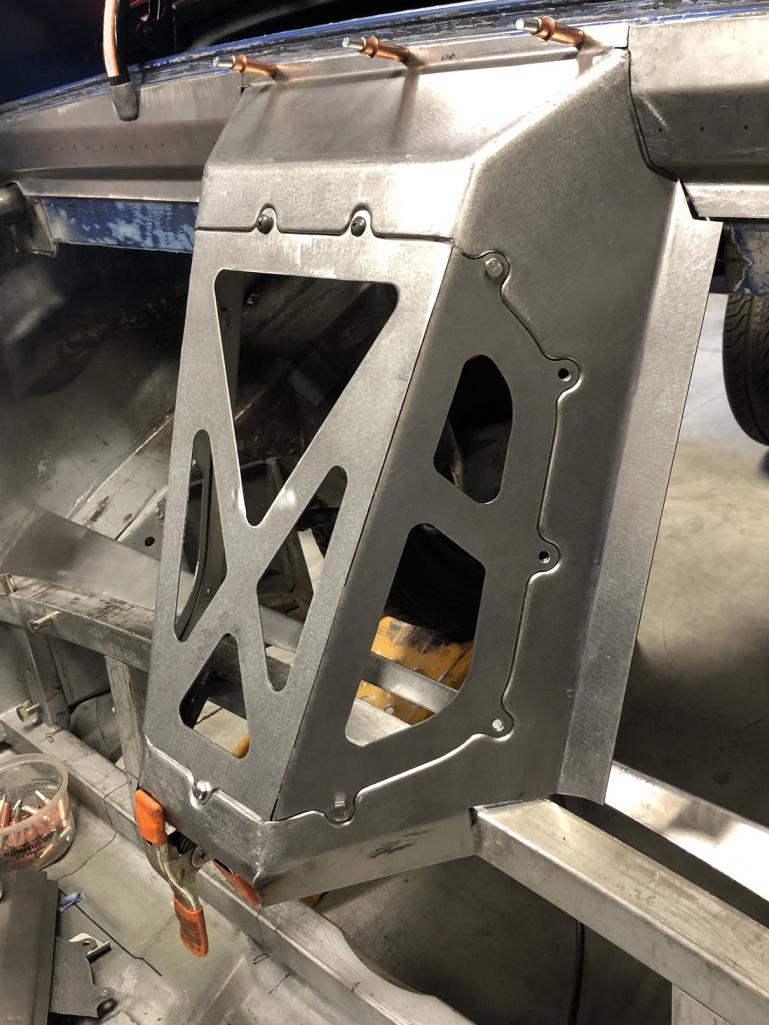 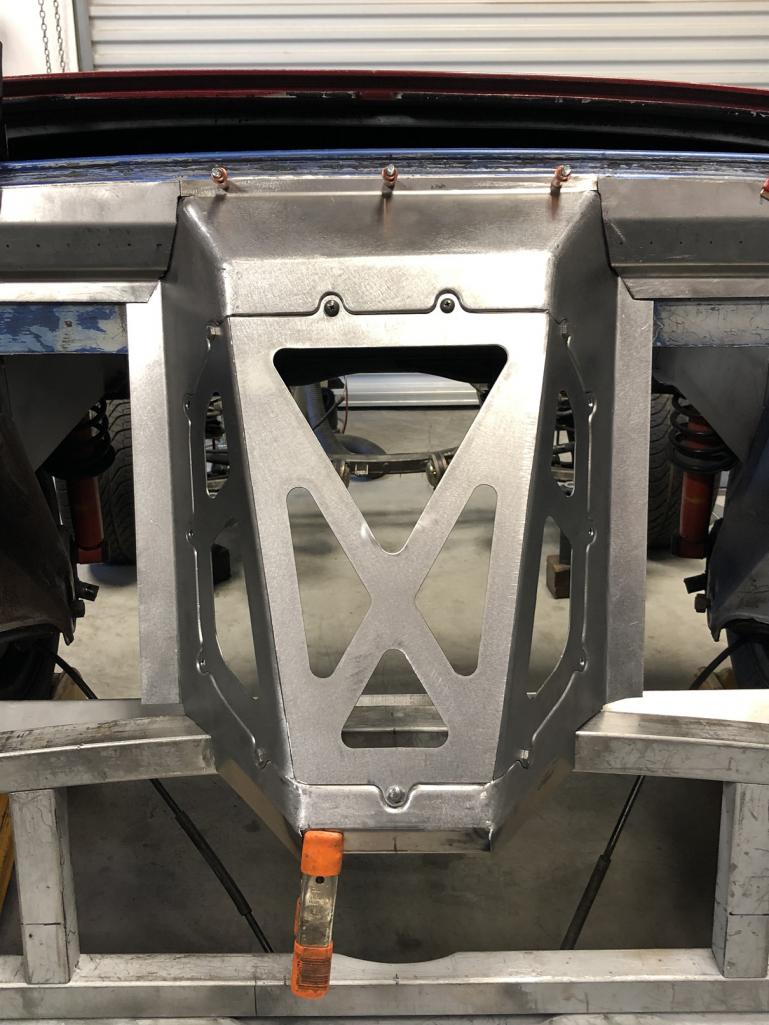
|
|
|
|
| billium01 |
Apr 20 2019, 05:42 PM
Post
#1547
|
|
Member Group: Members Posts: 136 Joined: 12-April 13 Member No.: 15,764 Region Association: None |
looks awesome!
|
|
|
|
| bbrock |
Apr 20 2019, 09:15 PM
Post
#1548
|
|
914 Guru Group: Members Posts: 5,269 Joined: 17-February 17 From: Montana Member No.: 20,845 Region Association: Rocky Mountains |
QUOTE(tygaboy @ Apr 20 2019, 04:59 PM) ... but I think I can mostly hide and live with the mistakes. @tygaboy someone has obviously hacked your account!!! (IMG:style_emoticons/default/new_shocked.gif) But that looks badass. Any filler you pick is going to look great. If it were me, I'd think about what would provide some sound dampening. |
|
|
|
| billium01 |
Apr 21 2019, 10:00 AM
Post
#1549
|
|
Member Group: Members Posts: 136 Joined: 12-April 13 Member No.: 15,764 Region Association: None |
Flux capacitor fluxing
|
|
|
|
| Andyrew |
Apr 21 2019, 10:41 AM
Post
#1550
|
|
Spooling.... Please wait Group: Members Posts: 13,380 Joined: 20-January 03 From: Riverbank, Ca Member No.: 172 Region Association: Northern California |
|
|
|
|
| tygaboy |
Apr 21 2019, 04:40 PM
Post
#1551
|
|
914 Guru Group: Members Posts: 5,681 Joined: 6-October 15 From: Petaluma, CA Member No.: 19,241 Region Association: Northern California |
One side welded. I still have some metal finishing to do. It was lots of fun trying to control the shrinkage. It messed with the fit and caused the mounting holes to move a bit out of place. But with some hammer and dolly work, and a bit of muscle, I got things back to where they're supposed to be.
I stopped at this point today because the other side is going to be critical in that this side and the front panel (one piece, at this point) need to stay exactly where they are, in terms of the mounting holes. I need to think through what's going to shrink and start with a fit that, after welding, ends up with things where they need to be. I'm waiting til tomorrow and hoping to approach things with a fully fresh brain. Wish me luck... Attached thumbnail(s) 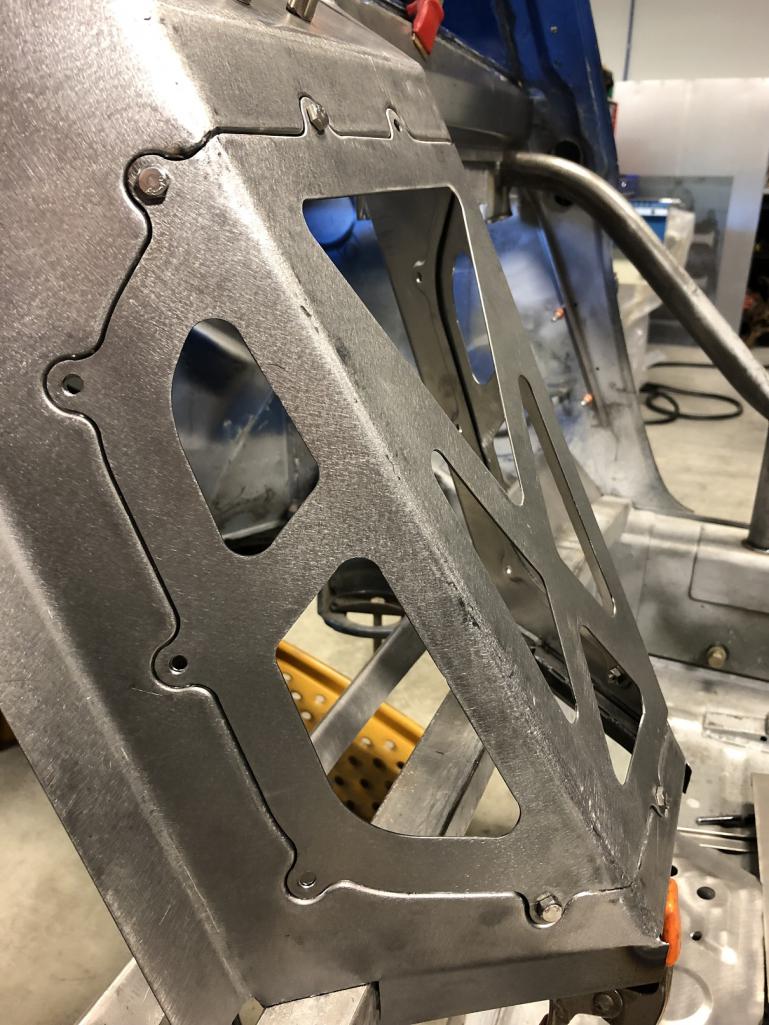
|
|
|
|
| tygaboy |
Apr 21 2019, 04:46 PM
Post
#1552
|
|
914 Guru Group: Members Posts: 5,681 Joined: 6-October 15 From: Petaluma, CA Member No.: 19,241 Region Association: Northern California |
Then I found a piece of scrap carbon fiber so figured I'd see what it might look like as filler for the openings. Imaging this with the panels in paint.
I kinda like it! I'll mock up some aluminum panels, many some with upholstery and see what I like. Attached thumbnail(s) 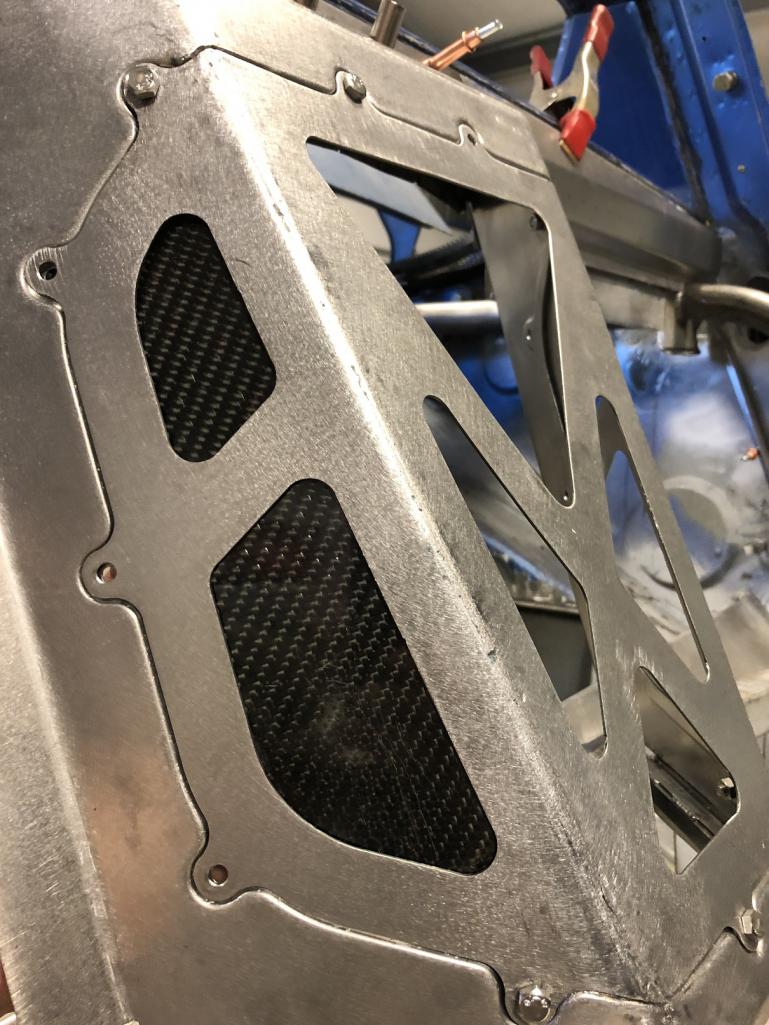
|
|
|
|
| Morph914 |
Apr 21 2019, 07:49 PM
Post
#1553
|
|
Member Group: Members Posts: 435 Joined: 22-August 16 From: St Augustine, FL Member No.: 20,326 Region Association: South East States |
Beautiful work Chris! I can't imagine what this kind of fabrication would cost...
Don't forget the pop out cup holder. |
|
|
|
| Cracker |
Apr 22 2019, 06:28 AM
Post
#1554
|
|
Advanced Member Group: Members Posts: 2,148 Joined: 2-February 10 From: Atlanta (area) Member No.: 11,316 Region Association: South East States |
Here is Chris's "bracket" installed...it is 100x better than what it replaced! Thanks again for the time - well done! (IMG:style_emoticons/default/beerchug.gif)
T 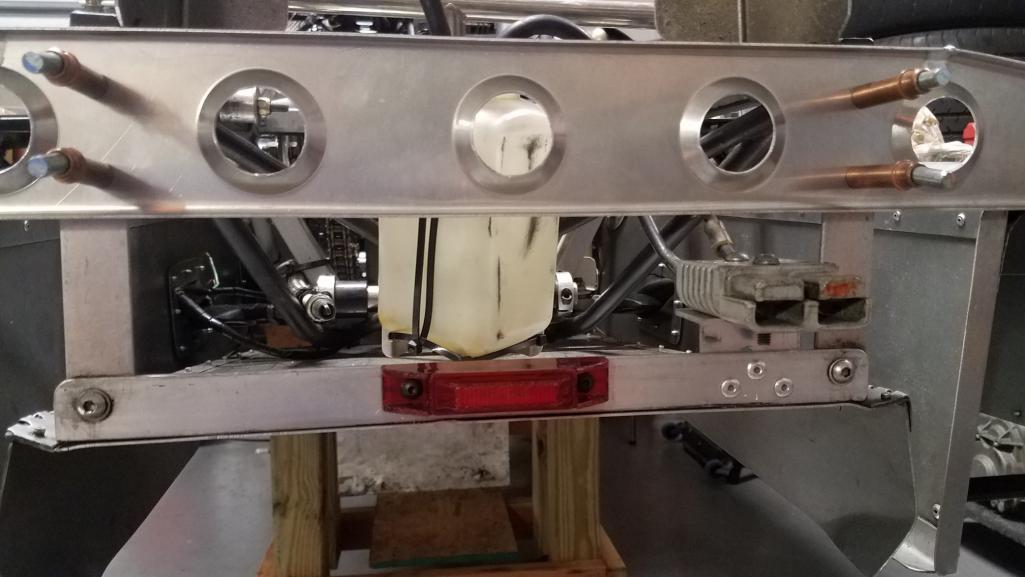 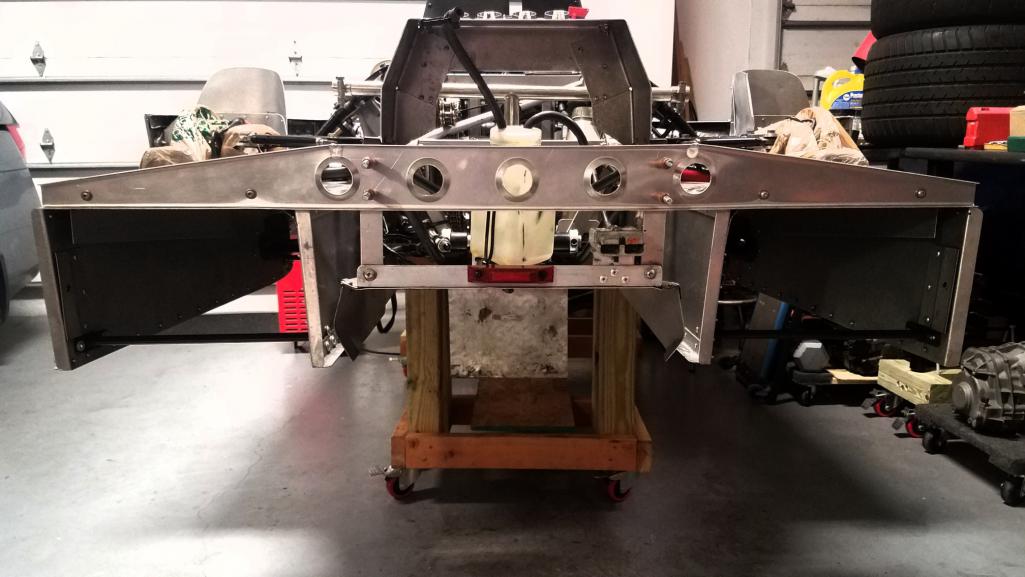 |
|
|
|
| tygaboy |
Apr 22 2019, 08:22 AM
Post
#1555
|
|
914 Guru Group: Members Posts: 5,681 Joined: 6-October 15 From: Petaluma, CA Member No.: 19,241 Region Association: Northern California |
QUOTE(Cracker @ Apr 22 2019, 05:28 AM) Here is Chris's "bracket" installed...it is 100x better than what it replaced! Thanks again for the time - well done! (IMG:style_emoticons/default/beerchug.gif) T Hey Tony - Ha! Who'd a thunk? Me... a motorsports fabricator! (IMG:style_emoticons/default/laugh.gif) Glad to see it worked out. (Let's see how it holds up when you whack your first curb...) |
|
|
|
| tygaboy |
Apr 22 2019, 08:25 AM
Post
#1556
|
|
914 Guru Group: Members Posts: 5,681 Joined: 6-October 15 From: Petaluma, CA Member No.: 19,241 Region Association: Northern California |
QUOTE(Morph914 @ Apr 21 2019, 06:49 PM) Beautiful work Chris! I can't imagine what this kind of fabrication would cost... Don't forget the pop out cup holder. @Morph914 Hi John! Funny you should mention the cup holder. I'm trying to figure out if I can hide a couple in the side of the console. Yet another minor reason for the redesign. And are you out here? If so, let's plan a time to meet up. Hope to see you soon! Chris |
|
|
|
| tygaboy |
Apr 22 2019, 02:04 PM
Post
#1557
|
|
914 Guru Group: Members Posts: 5,681 Joined: 6-October 15 From: Petaluma, CA Member No.: 19,241 Region Association: Northern California |
@bbrock and @Retroracer Brent and Tony - You've both been helpful in pointing out the potential for the cover to interfere with the dog house during installation and removal.
So I did a couple things: 1. I put a small spacer behind each mounting tab before welding the side panels on. (I still have to weld the driver's side). This simulates the protrusion of the top of the rivnuts I think I may use (vs welding a nut on the back side of the dog house). 2. I took this pic! It does an OK job of showing that the tabs aren't actually captured by the stamping recess. The cover comes off straight forward and, with those little spacers, there's no interference. But big thanks for pointing out that possibility. (IMG:style_emoticons/default/aktion035.gif) It made me add the spacers and verify the fit in terms of real world use. Hey, I can use all the help I can get! And a few of you have asked about another "Red Barn Fabrication Day". I'll start a new thread and see who'd like to do what and we can get something on calendar. If you're interested or want to let me know what you'd like to do, feel free to PM me, or post to the thread, once it's up. Attached thumbnail(s) 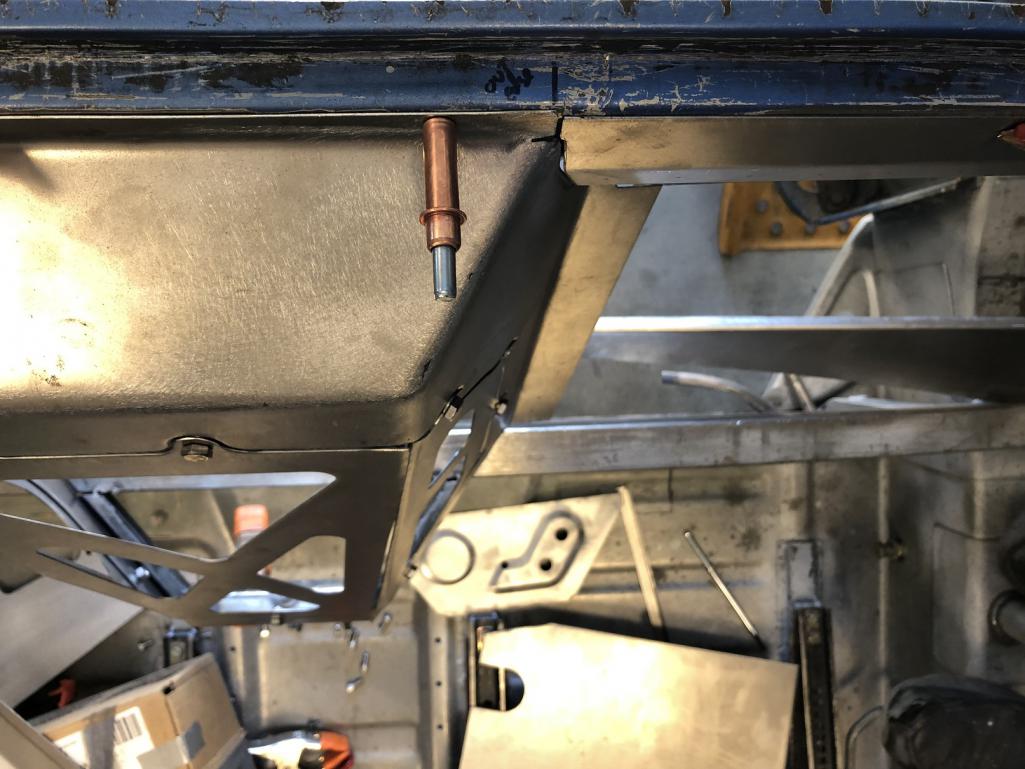
|
|
|
|
| tygaboy |
Apr 23 2019, 08:40 AM
Post
#1558
|
|
914 Guru Group: Members Posts: 5,681 Joined: 6-October 15 From: Petaluma, CA Member No.: 19,241 Region Association: Northern California |
The really nice thing about the plasma table is that I end up using it as a (pretty) rapid prototyping tool. I'm only working in 2D so I can quickly work up a drawing and make the part. Literally, some of these things take just a few minutes, from start to finish. ANd if I don't like it, I've only wasted a bit of material. I don't consider any of this a waste of time in that it's all about learning and trying things out. I'm a physical learner and I need to see it, hold it, etc. before I know how I really feel about what ever it is I'm trying to make. Not the most expedient method, but what are you going to do? (IMG:style_emoticons/default/sunglasses.gif)
I started making the main firewall panels, cut the driver's side and started fitting it. It's currently just a plain sheet so I'll need some sort of stiffening added. As with the dog house cover, I figured why not work up a similar cut out version and see if I like it? Easy as that, I just added the cut outs to the drawing. Then I pulled everything together, just to sorta get a vibe of the look. Seems OK to me so it's back to the plasma table... Note that very lower part is just an idea. It won't work as is due to the seat belt retractor locations be moved down there, as well as a few other things. I'll need to figure out something for that area pretty soon. Attached thumbnail(s) 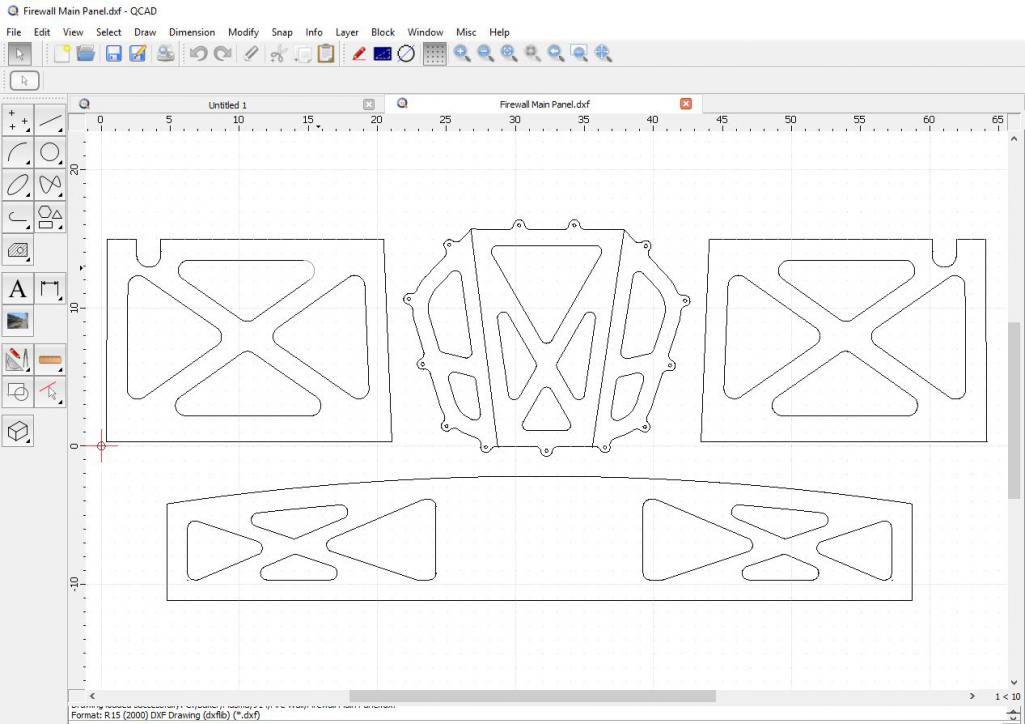
|
|
|
|
| Superhawk996 |
Apr 23 2019, 10:18 AM
Post
#1559
|
|
914 Guru Group: Members Posts: 7,504 Joined: 25-August 18 From: Woods of N. Idaho Member No.: 22,428 Region Association: Galt's Gulch |
QUOTE(tygaboy @ Apr 8 2019, 06:30 PM) Fresh out of the press! WOW! Just found your thread. Amazing that you're making dies to do this press work. What size press are you using? This is just amazing workmanship. |
 |
|
| tygaboy |
Apr 23 2019, 11:22 AM
Post
#1560
|
|
914 Guru Group: Members Posts: 5,681 Joined: 6-October 15 From: Petaluma, CA Member No.: 19,241 Region Association: Northern California |
QUOTE(Superhawk996 @ Apr 23 2019, 09:18 AM) QUOTE(tygaboy @ Apr 8 2019, 06:30 PM) Fresh out of the press! WOW! Just found your thread. Amazing that you're making dies to do this press work. What size press are you using? This is just amazing workmanship. Thanks for the kind words. The press is nothing special, just a basic H-frame, standard floor model size. But it is hooked to the same pump that powers the bender. Makes it zero effort to use it. |
|
|
|
|
1 User(s) are reading this topic (1 Guests and 0 Anonymous Users)
0 Members:

|
Lo-Fi Version | Time is now: 5th November 2025 - 06:45 PM |
Invision Power Board
v9.1.4 © 2025 IPS, Inc.