|
|
|
Porsche, and the Porsche crest are registered trademarks of Dr. Ing. h.c. F. Porsche AG.
This site is not affiliated with Porsche in any way. Its only purpose is to provide an online forum for car enthusiasts. All other trademarks are property of their respective owners. |
|
|

  |

| tygaboy |
 Apr 23 2019, 11:24 AM Apr 23 2019, 11:24 AM
Post
#1561
|
|
914 Guru  Group: Members Posts: 5,680 Joined: 6-October 15 From: Petaluma, CA Member No.: 19,241 Region Association: Northern California |
A few minutes on the plasma table and I have the cut blanks. But in terms of fitting them, I don't have the exact measurements for some of the trickier spots so it's fit, file, fit, file, til it's where I want it. I'm happy with this result!
Attached thumbnail(s) 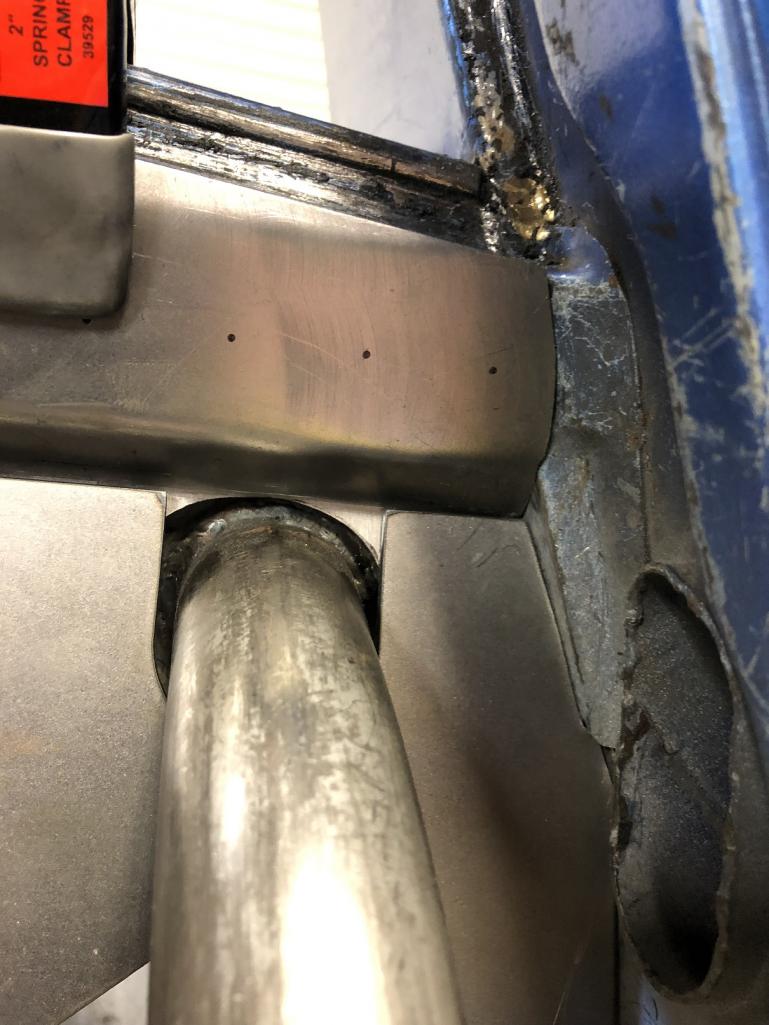
|
   |

 
|
| tygaboy |
Apr 23 2019, 11:27 AM
Post
#1562
|
|
914 Guru Group: Members Posts: 5,680 Joined: 6-October 15 From: Petaluma, CA Member No.: 19,241 Region Association: Northern California |
And about 1.5 hours later, both main panels are shaped and fit, the lip is bent on the bottom (it'll get spot welded to the lip on the panel just above the acrched tube) and I'm ready for the next step. Which is to decide exactly what will back them up and how I want to attach everything.
There will be some welding, some rivets (I think) and maybe even some panel bonding. But I think this is the design I'm going with. Oh, and I'll have to come up with a couple small trim pieces, like something for around the door bars. Attached thumbnail(s) 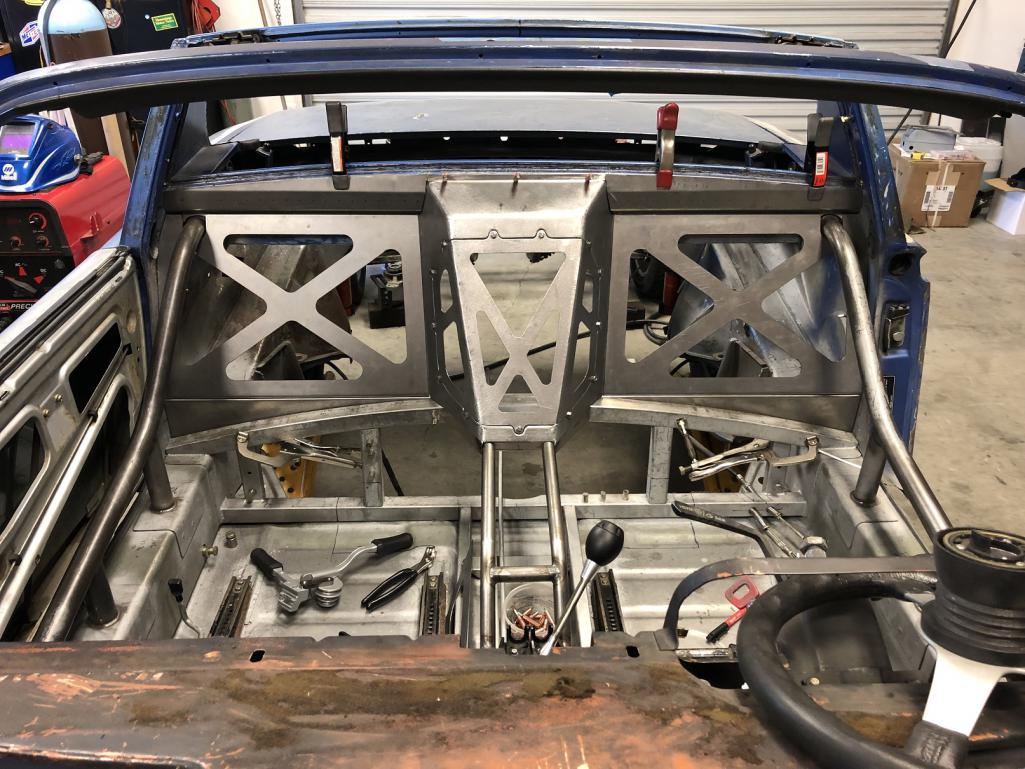
|
|
|
|
| Dion |
Apr 23 2019, 11:38 AM
Post
#1563
|
|
RN Group: Members Posts: 2,918 Joined: 16-September 04 From: Audubon,PA Member No.: 2,766 Region Association: MidAtlantic Region |
Every time I open this thread , it’s just amazing.
That carbon fiber detail is the ticket. Way to go Chris. |
 |
|
| Morph914 |
Apr 23 2019, 01:36 PM
Post
#1564
|
|
Member Group: Members Posts: 435 Joined: 22-August 16 From: St Augustine, FL Member No.: 20,326 Region Association: South East States |
QUOTE(tygaboy @ Apr 22 2019, 08:25 AM)  QUOTE(Morph914 @ Apr 21 2019, 06:49 PM) Beautiful work Chris! I can't imagine what this kind of fabrication would cost... Don't forget the pop out cup holder. @Morph914 Hi John! Funny you should mention the cup holder. I'm trying to figure out if I can hide a couple in the side of the console. Yet another minor reason for the redesign. And are you out here? If so, let's plan a time to meet up. Hope to see you soon! Chris I have no plans as of yet to travel to Napa, but when I do, I will definitely contact you. Keep up the good work! (IMG:style_emoticons/default/popcorn[1].gif) Cheers, John |
|
|
|
| Andyrew |
Apr 23 2019, 03:53 PM
Post
#1565
|
|
Spooling.... Please wait Group: Members Posts: 13,380 Joined: 20-January 03 From: Riverbank, Ca Member No.: 172 Region Association: Northern California |
QUOTE(tygaboy @ Apr 23 2019, 10:27 AM) And about 1.5 hours later, both main panels are shaped and fit, the lip is bent on the bottom (it'll get spot welded to the lip on the panel just above the acrched tube) and I'm ready for the next step. Which is to decide exactly what will back them up and how I want to attach everything. There will be some welding, some rivets (I think) and maybe even some panel bonding. But I think this is the design I'm going with. Oh, and I'll have to come up with a couple small trim pieces, like something for around the door bars. (IMG:style_emoticons/default/drooley.gif) |
|
|
|
| tygaboy |
Apr 24 2019, 06:49 PM
Post
#1566
|
|
914 Guru Group: Members Posts: 5,680 Joined: 6-October 15 From: Petaluma, CA Member No.: 19,241 Region Association: Northern California |
Hey, who you callin' tacky? (IMG:style_emoticons/default/laugh.gif)
Getting the other side tacked in REALLY locked things down. And now that the cover is all one piece, I'm happy to report that it goes on and off with no interference between the mounting tabs and the recessed areas. Very little risk of damage to what will be painted surfaces! Attached thumbnail(s) 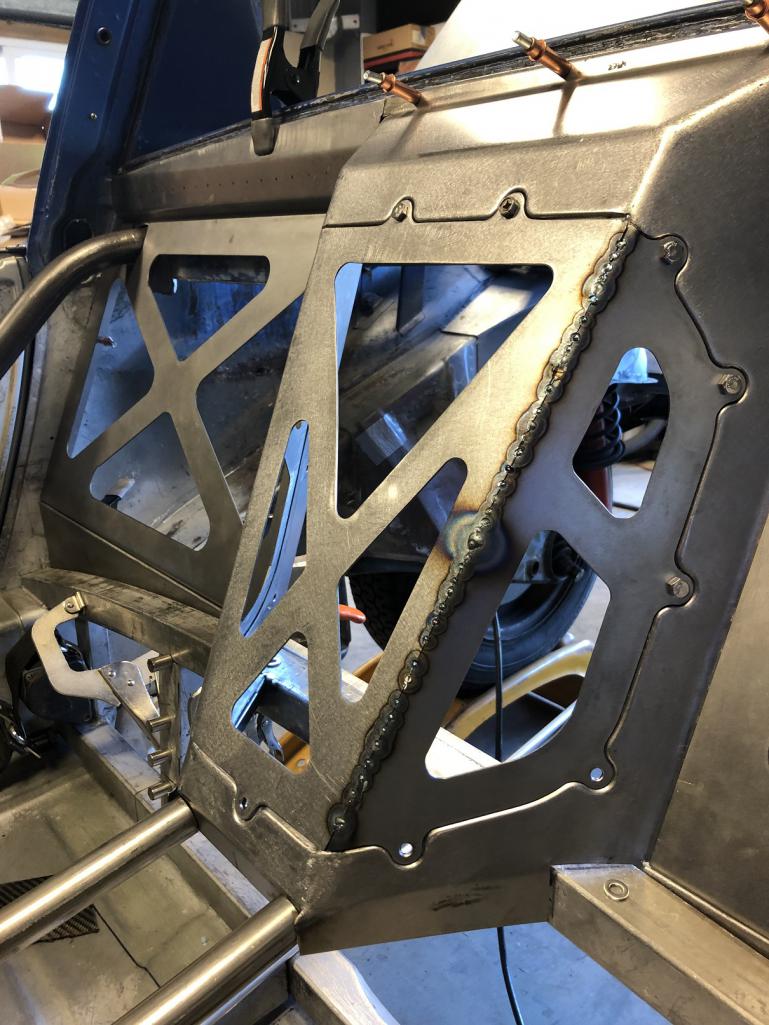
|
|
|
|
| tygaboy |
Apr 24 2019, 06:51 PM
Post
#1567
|
|
914 Guru Group: Members Posts: 5,680 Joined: 6-October 15 From: Petaluma, CA Member No.: 19,241 Region Association: Northern California |
And what the heck is going on here??? I mean, I've heard of "roll bars" but this is ridiculous!
Well, those who attend the upcoming workshop day will see! (IMG:style_emoticons/default/sunglasses.gif) Attached thumbnail(s) 
|
|
|
|
| andrewb |
Apr 24 2019, 11:42 PM
Post
#1568
|
|
Member Group: Members Posts: 114 Joined: 25-May 10 From: UK Member No.: 11,762 Region Association: None |
QUOTE(tygaboy @ Apr 25 2019, 02:49 AM) Hey, who you callin' tacky? (IMG:style_emoticons/default/laugh.gif) Getting the other side tacked in REALLY locked things down. And now that the cover is all one piece, I'm happy to report that it goes on and off with no interference between the mounting tabs and the recessed areas. Very little risk of damage to what will be painted surfaces! Crazy skills - and such a range as well. (IMG:style_emoticons/default/first.gif) One question now I've seen that last pic of the cover all welded up - why did you make it in 3 parts and not just one with 2 folds ? Good engineering reasons I'm sure. |
|
|
|
| tygaboy |
Apr 25 2019, 07:17 AM
Post
#1569
|
|
914 Guru Group: Members Posts: 5,680 Joined: 6-October 15 From: Petaluma, CA Member No.: 19,241 Region Association: Northern California |
QUOTE(andrewb @ Apr 24 2019, 10:42 PM) QUOTE(tygaboy @ Apr 25 2019, 02:49 AM) Hey, who you callin' tacky? (IMG:style_emoticons/default/laugh.gif) Getting the other side tacked in REALLY locked things down. And now that the cover is all one piece, I'm happy to report that it goes on and off with no interference between the mounting tabs and the recessed areas. Very little risk of damage to what will be painted surfaces! Crazy skills - and such a range as well. (IMG:style_emoticons/default/first.gif) One question now I've seen that last pic of the cover all welded up - why did you make it in 3 parts and not just one with 2 folds ? Good engineering reasons I'm sure. @andrewb - Great question. A friend stopped by yesterday to say hi and he asked the very same thing! It was not so much an engineering reason as a skill issue. The original plan was to do just that: one piece, two bends. But I happily confess that the dog house isn't exactly symmetrical and the odds of me measuring, calculating and bending two folds so the cover's mounting tabs ended up exactly where they need to be were essentially zero. If those tabs aren't dead on in the recess, the cover won't fit and I won't have a nice gap all around the edge. By building it in three pieces I could (better) control the outcome, given my current level of skill. There's a sort of saying in the metal shaping world that essentially says: If you're better at shaping, you'll end up make fewer, larger and more complex pieces. If you're better at welding, you're likely better off making more, smaller, simpler pieces and welding them together. I'm sorta in the middle - still on a steep learning curve for both disciplines. |
|
|
|
| tygaboy |
Apr 26 2019, 05:37 PM
Post
#1570
|
|
914 Guru Group: Members Posts: 5,680 Joined: 6-October 15 From: Petaluma, CA Member No.: 19,241 Region Association: Northern California |
I almost finished welding the driver side of the cover. I thought I'd give a try to the silicone bronze rod. I like it but need more practice, as you can see.
Also, given how flimsy this piece is, what with all the cut outs, the welding caused a fair bit of distortion. The shrinkage had the front panel oil canning pretty badly. So those darkish areas you see are where I went after the high spots using just the TIG torch to do some heat shrinking. It worked pretty well and the oil canning is gone.. I may make another cover, now that I've seen how these parts react. Attached thumbnail(s) 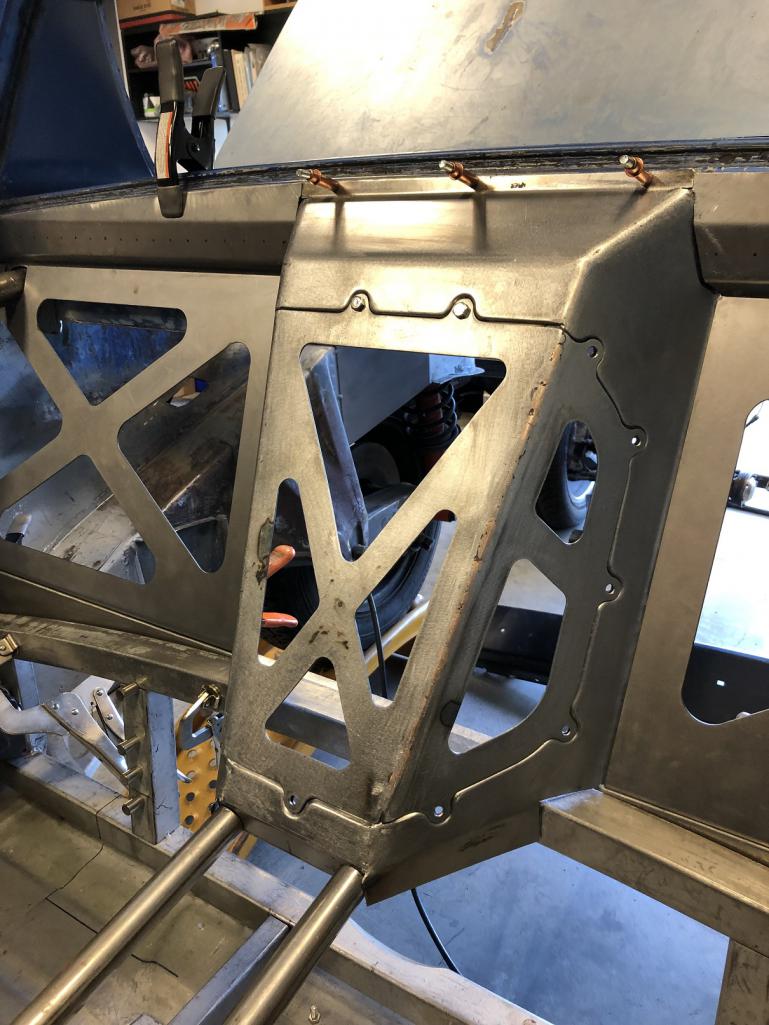
|
|
|
|
| tygaboy |
Apr 26 2019, 05:50 PM
Post
#1571
|
|
914 Guru Group: Members Posts: 5,680 Joined: 6-October 15 From: Petaluma, CA Member No.: 19,241 Region Association: Northern California |
I decided to give another go to making the cover to see if I could reduce the welding distortion.
This time, I'm going to stamp a recess into the panels ahead of fitting/welding. I'm curious to see how much of a difference this makes in the parts being a bit more resistant to distortion. I haven't landed on if the carbon panels will still go behind the openings or, with the recesses, if I'll make carbon inserts. I'll worry about that once I see how this turns out. So, I cut new side panel blanks and made the male components of the stamping die. I still have to cut the female part of the die. The two small pieces can be mounted on either side of the plate so it works to stamp both the driver and passenger side panels. Attached thumbnail(s) 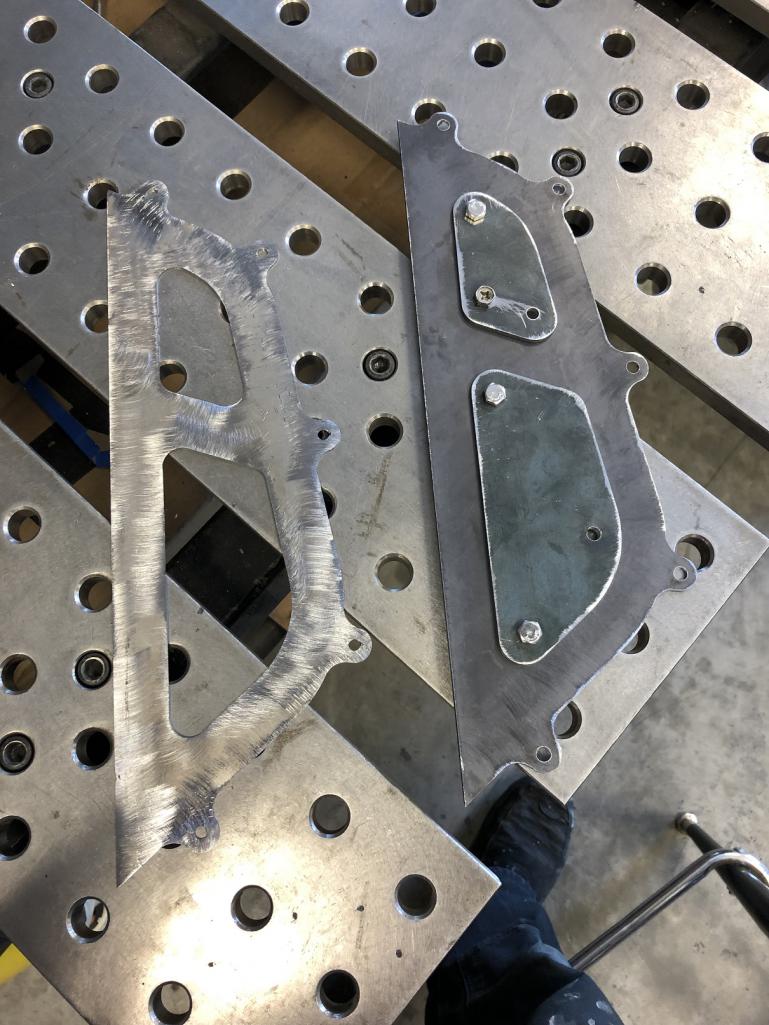
|
|
|
|
| tygaboy |
Apr 28 2019, 01:38 PM
Post
#1572
|
|
914 Guru Group: Members Posts: 5,680 Joined: 6-October 15 From: Petaluma, CA Member No.: 19,241 Region Association: Northern California |
I cut the female part of the die set and here it is, all assembled, with the panel blank installed, ready for the press.
Attached thumbnail(s) 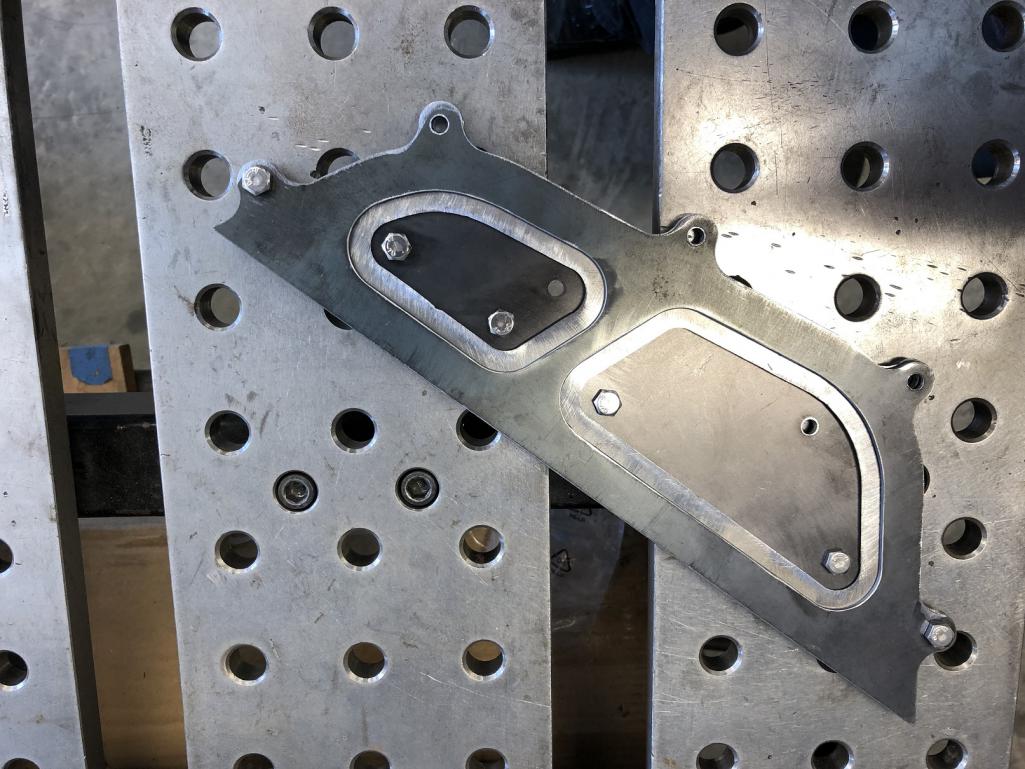
|
|
|
|
| tygaboy |
Apr 28 2019, 01:39 PM
Post
#1573
|
|
914 Guru Group: Members Posts: 5,680 Joined: 6-October 15 From: Petaluma, CA Member No.: 19,241 Region Association: Northern California |
And after the pressing process.
Attached thumbnail(s) 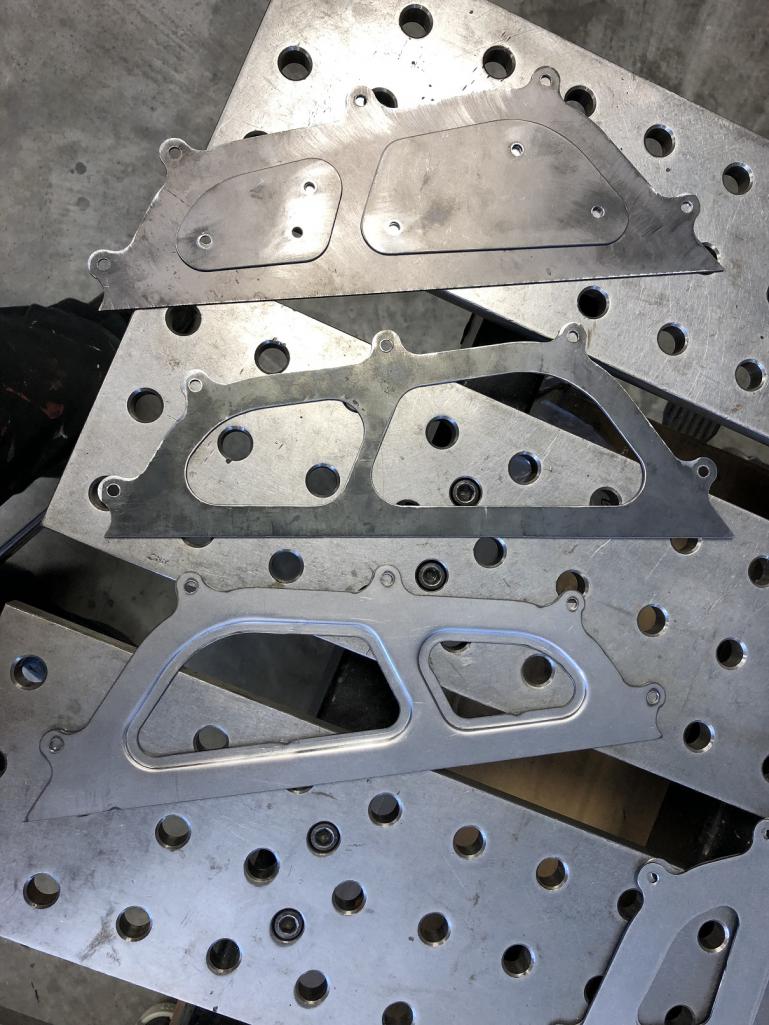
|
|
|
|
| tygaboy |
Apr 28 2019, 01:46 PM
Post
#1574
|
|
914 Guru Group: Members Posts: 5,680 Joined: 6-October 15 From: Petaluma, CA Member No.: 19,241 Region Association: Northern California |
I had a scrap of carbon fiber so I shaped it and taped it into the recess, just to get a vibe on how this design would look.
I think it looks more "finished" than just the flat panels with the carbon behind it. Remember, I've dubbed this thing a "race rod" and this new look is less race and more rod. I think I could live with either. And it'd be a lot more work to do the panels this new way as I'd need to make the same sort of stamping die set for the front of the cover as well as the main fire wall panels. Would it be worth it when most all of it will be all but covered up most of the time? (IMG:style_emoticons/default/idea.gif) Attached thumbnail(s) 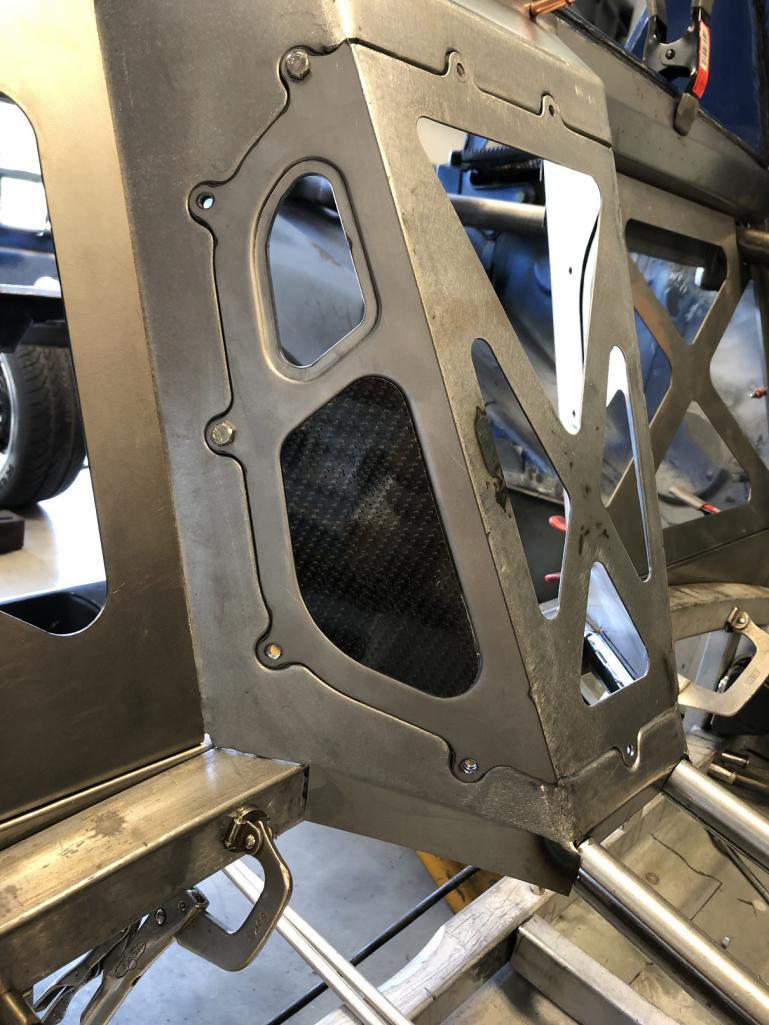
|
|
|
|
| bbrock |
Apr 28 2019, 02:09 PM
Post
#1575
|
|
914 Guru Group: Members Posts: 5,269 Joined: 17-February 17 From: Montana Member No.: 20,845 Region Association: Rocky Mountains |
QUOTE(tygaboy @ Apr 28 2019, 01:46 PM) Would it be worth it when most all of it will be all but covered up most of the time? (IMG:style_emoticons/default/idea.gif) As you know, I think your build looks more like a space ship than a rod and that carbon fiber fits perfectly. That is bitchin'! However, more than once I've felt a tinge of sadness to look at your amazing work and thing of it getting covered up in the end. What a pity nobody was allowed to gaze upon the Mona Lisa's smile. |
|
|
|
| tygaboy |
Apr 29 2019, 01:09 PM
Post
#1576
|
|
914 Guru Group: Members Posts: 5,680 Joined: 6-October 15 From: Petaluma, CA Member No.: 19,241 Region Association: Northern California |
QUOTE(bbrock @ Apr 28 2019, 01:09 PM) QUOTE(tygaboy @ Apr 28 2019, 01:46 PM) Would it be worth it when most all of it will be all but covered up most of the time? (IMG:style_emoticons/default/idea.gif) As you know, I think your build looks more like a space ship than a rod and that carbon fiber fits perfectly. That is bitchin'! However, more than once I've felt a tinge of sadness to look at your amazing work and thing of it getting covered up in the end. What a pity nobody was allowed to gaze upon the Mona Lisa's smile. Thanks Brent. I think any cover I do for the firewall will be some sort of "quick release" thing I can remove. Maybe a removable upholstery cover that snaps into place? I want some sound deadening else I think it'd be a bit much for more than just an around the block drive! |
|
|
|
| tygaboy |
Apr 29 2019, 01:13 PM
Post
#1577
|
|
914 Guru Group: Members Posts: 5,680 Joined: 6-October 15 From: Petaluma, CA Member No.: 19,241 Region Association: Northern California |
For anyone interested, here's the plasma table cutting part of the cover stamping die. I find it mesmerizing to watch. And yes, I wear an appropriate shield (#8, if I recall). With the shield, I can get right down in there and see exactly what's going on. It's pretty neat to watch.
https://www.youtube.com/watch?v=9XabU3uJWI8 |
|
|
|
| tygaboy |
Apr 29 2019, 01:14 PM
Post
#1578
|
|
914 Guru Group: Members Posts: 5,680 Joined: 6-October 15 From: Petaluma, CA Member No.: 19,241 Region Association: Northern California |
Freshly cut parts ready to prep for use.
Attached thumbnail(s) 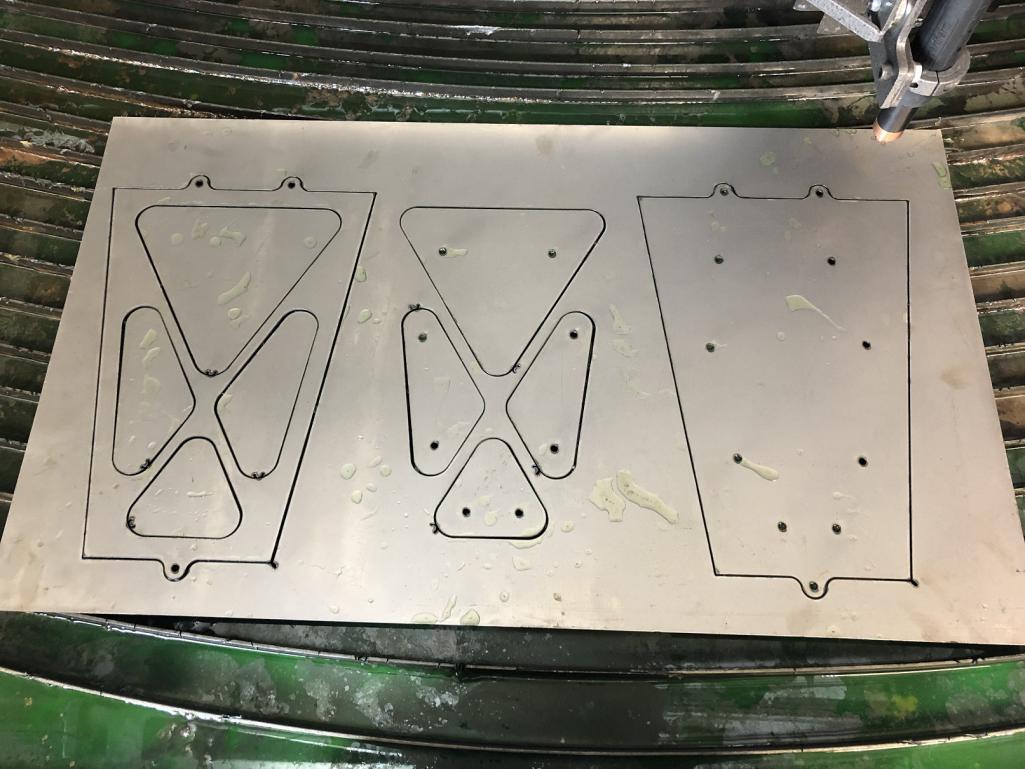
|
|
|
|
| tygaboy |
Apr 29 2019, 01:19 PM
Post
#1579
|
|
914 Guru Group: Members Posts: 5,680 Joined: 6-October 15 From: Petaluma, CA Member No.: 19,241 Region Association: Northern California |
I prep the stamping dies by dressing the edges of the parts to knock off the sharp edge in an attempt to eliminate anything snagging/cutting during the stamping process. It seems to work.
After looking at this, all I could thing was: "As a kid, I always liked recess..." (IMG:style_emoticons/default/lol-2.gif) Seriously, I like this look vs the earlier "plain" version. Next, it's on to fitting and welding it up. Attached thumbnail(s) 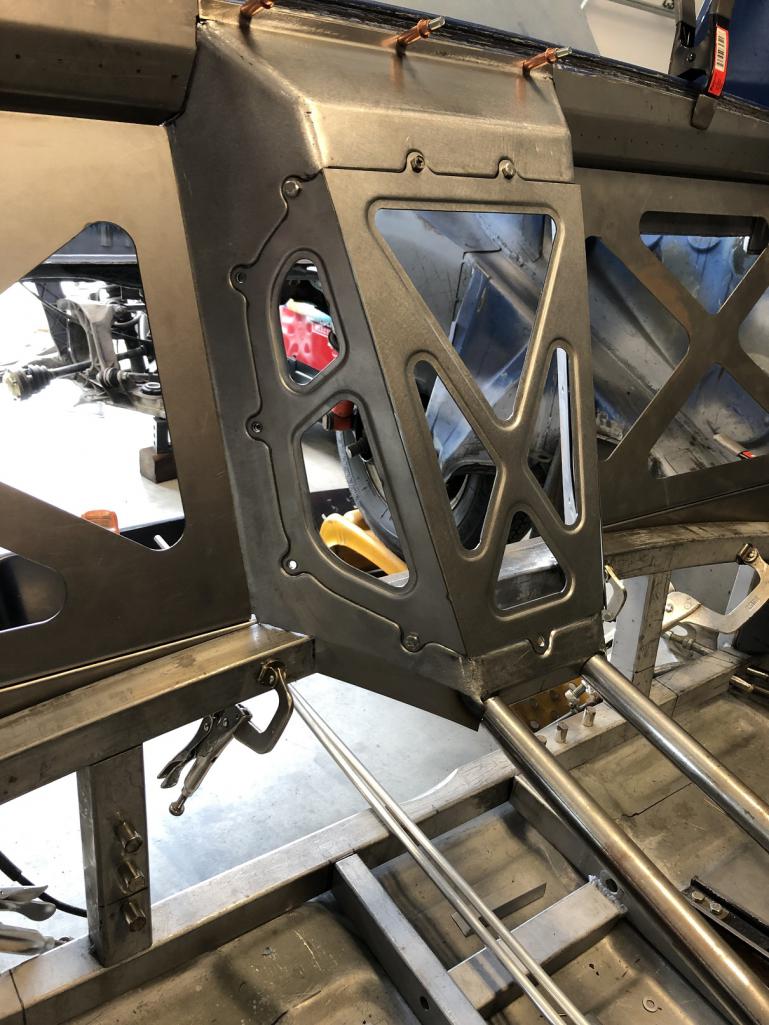
|
|
|
|
| tygaboy |
Apr 29 2019, 01:26 PM
Post
#1580
|
|
914 Guru Group: Members Posts: 5,680 Joined: 6-October 15 From: Petaluma, CA Member No.: 19,241 Region Association: Northern California |
Then I cut a test piece to get the dimensions for the door bar trim pieces.
I confess I was quite proud of myself in that I remembered the bar isn't at 90 degrees to the panel, which means the hole in the trim piece needs to be an ellipse, not a circle. I was able to get a pretty good measurement, awkward though it was to get in there with the calipers, and the initial test piece fits pretty well. Attached thumbnail(s) 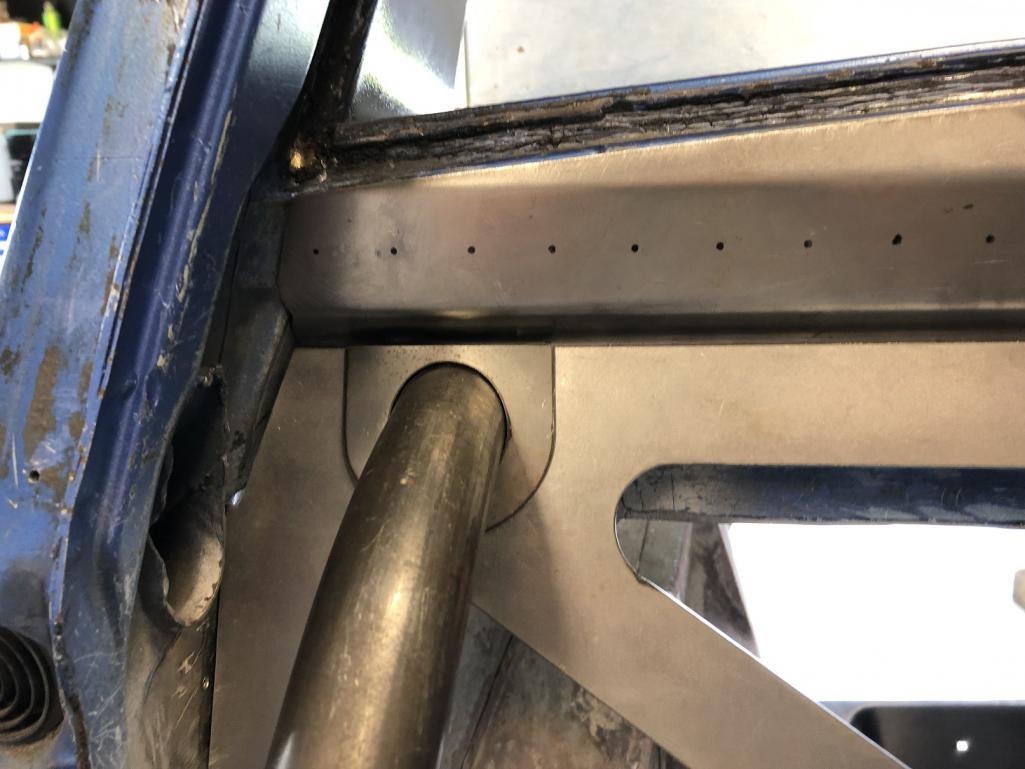
|
|
|
|
|
1 User(s) are reading this topic (1 Guests and 0 Anonymous Users)
0 Members:

|
Lo-Fi Version | Time is now: 5th November 2025 - 03:58 PM |
Invision Power Board
v9.1.4 © 2025 IPS, Inc.