|
|
|
Porsche, and the Porsche crest are registered trademarks of Dr. Ing. h.c. F. Porsche AG.
This site is not affiliated with Porsche in any way. Its only purpose is to provide an online forum for car enthusiasts. All other trademarks are property of their respective owners. |
|
|

  |

| Cracker |
 Jan 12 2017, 08:25 PM Jan 12 2017, 08:25 PM
Post
#181
|
|
Advanced Member  Group: Members Posts: 2,148 Joined: 2-February 10 From: Atlanta (area) Member No.: 11,316 Region Association: South East States |
|
   |

 
|
| tygaboy |
Jan 12 2017, 08:35 PM
Post
#182
|
|
914 Guru Group: Members Posts: 5,817 Joined: 6-October 15 From: Petaluma, CA Member No.: 19,241 Region Association: Northern California |
QUOTE(Cracker @ Jan 12 2017, 06:25 PM)  Yeah, except that part about storing the top. You Southerners... always taking the easy way out... (IMG:style_emoticons/default/poke.gif) |
|
|
|
| Cracker |
Jan 12 2017, 08:39 PM
Post
#183
|
|
Advanced Member Group: Members Posts: 2,148 Joined: 2-February 10 From: Atlanta (area) Member No.: 11,316 Region Association: South East States |
I live in the South but am from C-A-L-I-! (IMG:style_emoticons/default/w00t.gif)
Regarding the top - mine would fit if I actually wanted it to Chris. My fist LS conversion I did store it in the trunk on factory clips. No biggie. T QUOTE(tygaboy @ Jan 12 2017, 09:35 PM) QUOTE(Cracker @ Jan 12 2017, 06:25 PM) Yeah, except that part about storing the top. You Southerners... always taking the easy way out... (IMG:style_emoticons/default/poke.gif) |
|
|
|
| mgp4591 |
Jan 13 2017, 03:58 AM
Post
#184
|
|
914 Guru Group: Members Posts: 5,923 Joined: 1-August 12 From: Salt Lake City Ut Member No.: 14,748 Region Association: Intermountain Region |
So Southern California, Tony?! (IMG:style_emoticons/default/shades.gif)
|
|
|
|
| Cracker |
Jan 13 2017, 09:50 AM
Post
#185
|
|
Advanced Member Group: Members Posts: 2,148 Joined: 2-February 10 From: Atlanta (area) Member No.: 11,316 Region Association: South East States |
Sorry Chris - last hi-jack + free bump!
Mom from Thousand Oaks; Dad from Bay area; Conceived (weirdly I know) in between on coast. I am an original "Central" Cali dude! Capiche! (IMG:style_emoticons/default/shades.gif) Now past my family tree...back to Chris's lame build. (IMG:style_emoticons/default/poke.gif) T QUOTE(mgp4591 @ Jan 13 2017, 04:58 AM) |
|
|
|
| andys |
Jan 13 2017, 11:14 AM
Post
#186
|
|
Advanced Member Group: Members Posts: 2,165 Joined: 21-May 03 From: Valencia, CA Member No.: 721 Region Association: None |
Chris,
I've been remiss at commenting on your terrific build. Nice work; well thought out. I look forward to reading more as you progress. Keep up the good work!! Andys |
|
|
|
| jd74914 |
Jan 13 2017, 01:00 PM
Post
#187
|
|
Its alive Group: Members Posts: 4,876 Joined: 16-February 04 From: CT Member No.: 1,659 Region Association: North East States |
QUOTE(tygaboy @ Dec 21 2016, 08:42 PM) To quote a builder I admire (David Palatov of Palatov Motorsport): "Clearance is clearance." Palatov is awesome! He turns out some pretty cool stuff and his blog is second to none. QUOTE(tygaboy @ Jan 12 2017, 08:30 PM) I started messing with the intake. In running the Mass Airflow Sensor (MAF), I have to follow a few rules about where the sensor has to be, relative to the throttle body. I need a minimum of 10 inches from the throttle body, six inches of straight tube, the sensor has to be set at between a 9:00 - 3:00 orientation... How big is that motor? It wants 6" straight upstream then 10" downstream to TB? Interesting. That seems a little restrictive since the air shouldn't be moving super fast so the velocity profile should be pretty uniform. A while ago I actually took a similar style [thermal] sensor and offset mounted it in a duct bend to measure the effective average flow but that took a fair bit of analysis. (IMG:style_emoticons/default/blink.gif) Maybe just some stiffener tube scalloping would make everything fit nicely. It does look pretty cool now! Thanks for showing pictures of the end of the long. There is a thread around here with some, but yours show the attachment issue much better. |
|
|
|
| tygaboy |
Jan 13 2017, 01:46 PM
Post
#188
|
|
914 Guru Group: Members Posts: 5,817 Joined: 6-October 15 From: Petaluma, CA Member No.: 19,241 Region Association: Northern California |
QUOTE(jd74914 @ Jan 13 2017, 11:00 AM) QUOTE(tygaboy @ Dec 21 2016, 08:42 PM) To quote a builder I admire (David Palatov of Palatov Motorsport): "Clearance is clearance." Palatov is awesome! He turns out some pretty cool stuff and his blog is second to none. QUOTE(tygaboy @ Jan 12 2017, 08:30 PM) I started messing with the intake. In running the Mass Airflow Sensor (MAF), I have to follow a few rules about where the sensor has to be, relative to the throttle body. I need a minimum of 10 inches from the throttle body, six inches of straight tube, the sensor has to be set at between a 9:00 - 3:00 orientation... How big is that motor? It wants 6" straight upstream then 10" downstream to TB? Interesting. That seems a little restrictive since the air shouldn't be moving super fast so the velocity profile should be pretty uniform. A while ago I actually took a similar style [thermal] sensor and offset mounted it in a duct bend to measure the effective average flow but that took a fair bit of analysis. (IMG:style_emoticons/default/blink.gif) Maybe just some stiffener tube scalloping would make everything fit nicely. It does look pretty cool now! Thanks for showing pictures of the end of the long. There is a thread around here with some, but yours show the attachment issue much better. It's a 6.2 liter. First, I'm no expert so I'm only quoting what I'm finding on line. Here's a pic of what came with the blade style MAF sensor re: what needs to go where. Sorry that I wasn't more clear. Shoulda included the pic in the first place... Attached image(s) 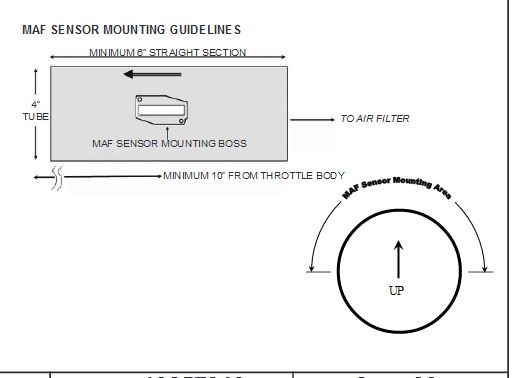
|
|
|
|
| tygaboy |
Jan 13 2017, 02:22 PM
Post
#189
|
|
914 Guru Group: Members Posts: 5,817 Joined: 6-October 15 From: Petaluma, CA Member No.: 19,241 Region Association: Northern California |
QUOTE(andys @ Jan 13 2017, 09:14 AM) Chris, I've been remiss at commenting on your terrific build. Nice work; well thought out. I look forward to reading more as you progress. Keep up the good work!! Andys Hi Andy - Wow, thanks. Coming from someone who's done such a high quality build... (IMG:style_emoticons/default/pray.gif) that means a lot. |
|
|
|
| tygaboy |
Jan 15 2017, 08:01 AM
Post
#190
|
|
914 Guru Group: Members Posts: 5,817 Joined: 6-October 15 From: Petaluma, CA Member No.: 19,241 Region Association: Northern California |
Feeling boxed in? My rear shock towers are with you!
After a bit more head scratching, I decided to go a different route: I wanted to run one piece of reinforcement from the long up to and around the tower. Since I'm not exactly sure how the removable trunk liner will work, I opted to retain the lip the runs up the tower. So I sliced a channel for the sheet metal. Attached thumbnail(s) 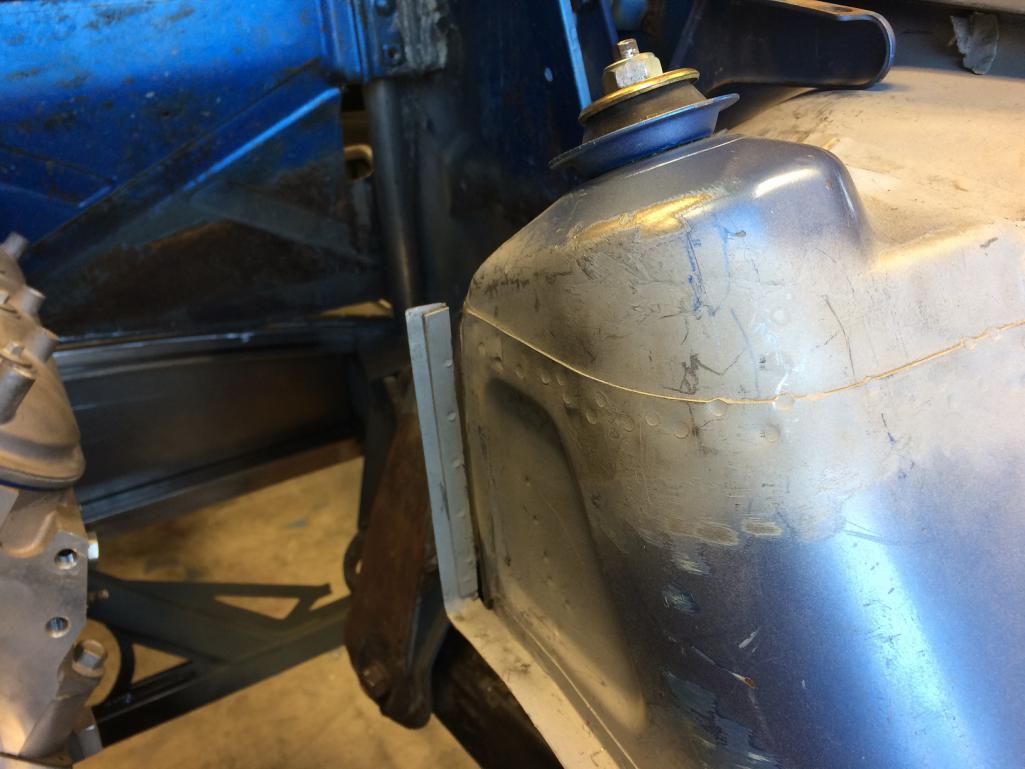
|
|
|
|
| tygaboy |
Jan 15 2017, 08:09 AM
Post
#191
|
|
914 Guru Group: Members Posts: 5,817 Joined: 6-October 15 From: Petaluma, CA Member No.: 19,241 Region Association: Northern California |
Then I made a pattern and fit a piece that slips down into that channel. This is the driver's side, which I just happened to tackle first.
I tacked it in, "persuading" it to wrap the tower, plug welding as I went along. Then fit and tacked in the top part. It's plug welded, too. I still have to final trim the top part where it wraps the tower. I left it a bit tall for now as I may plate it to the Tangerine Racing raised rear shock towers, once those are installed. Then I need to add a bottom piece to close in the box and seam weld everything. Attached thumbnail(s) 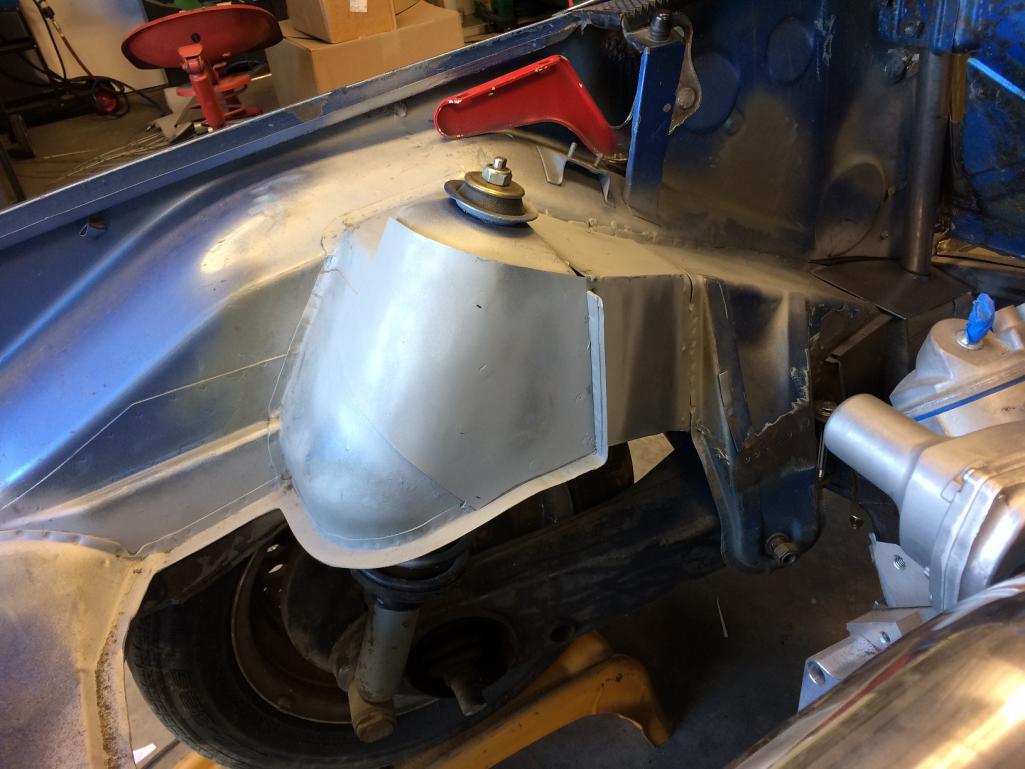 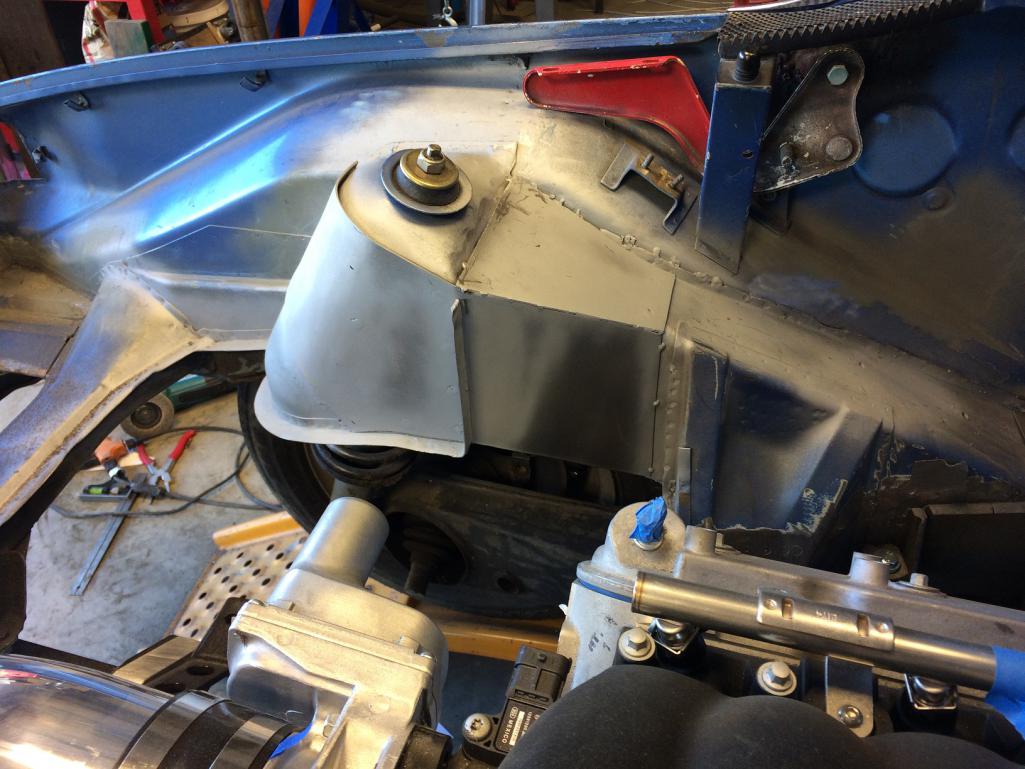
|
|
|
|
| tygaboy |
Jan 15 2017, 10:44 AM
Post
#192
|
|
914 Guru Group: Members Posts: 5,817 Joined: 6-October 15 From: Petaluma, CA Member No.: 19,241 Region Association: Northern California |
Let me back up and show a bit more detail.
Here's the pattern and the trimmed and bent piece, then how it fits before I start tacking and wrapping it around the tower. Exciting, I know...! Attached thumbnail(s) 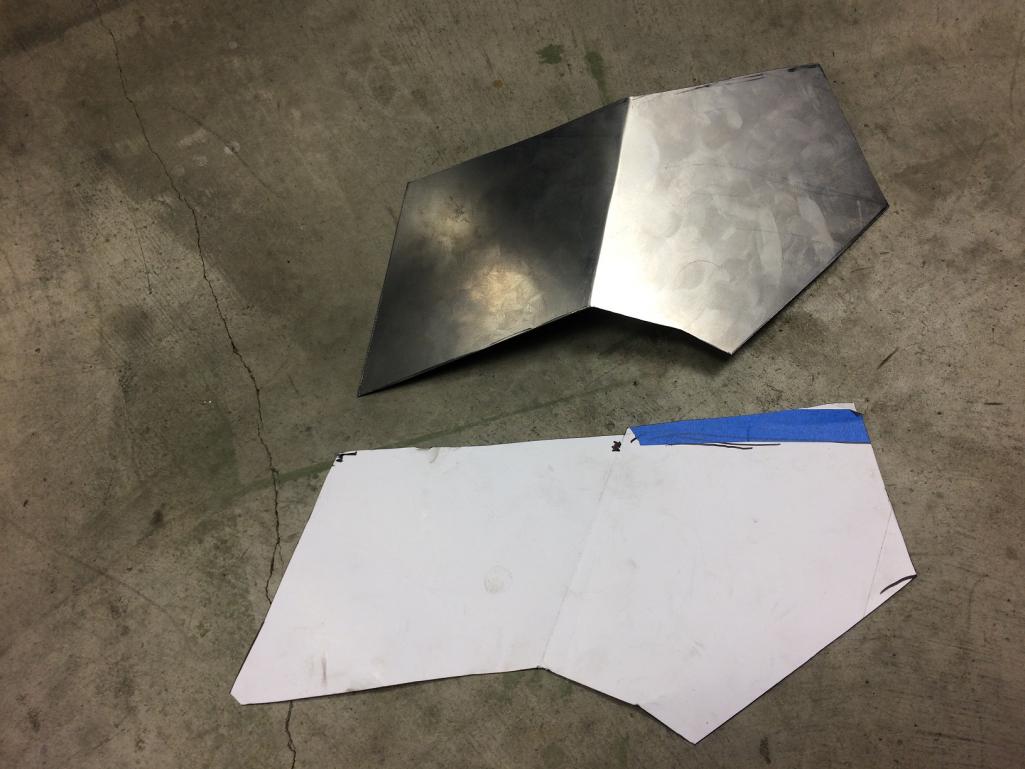 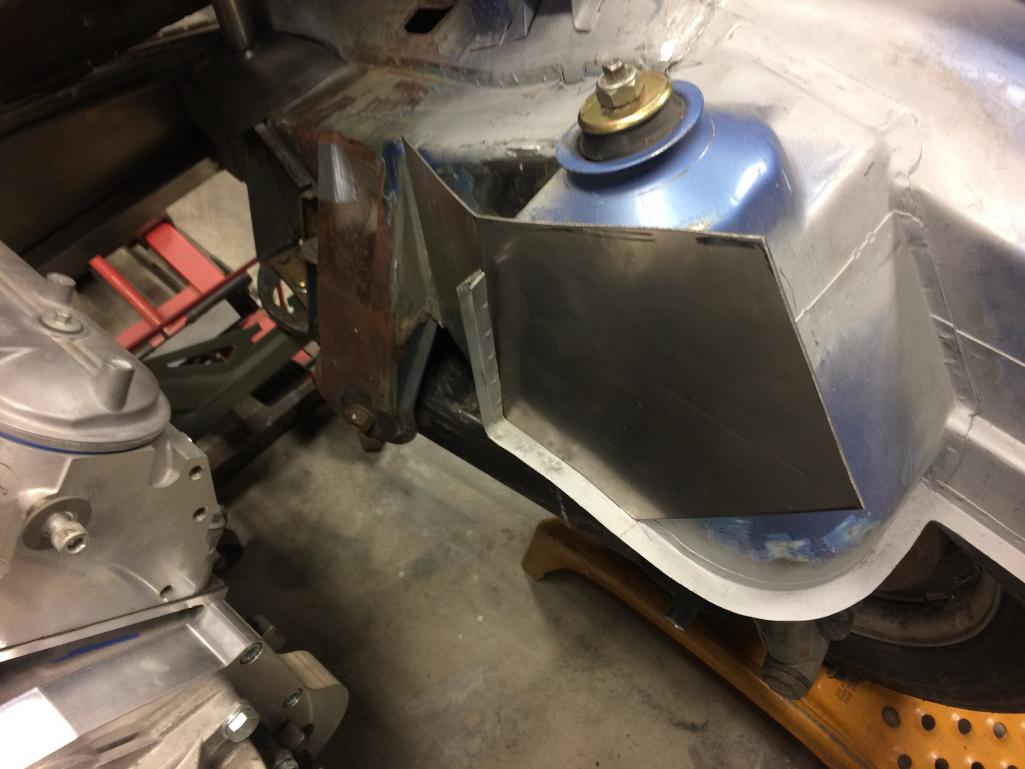 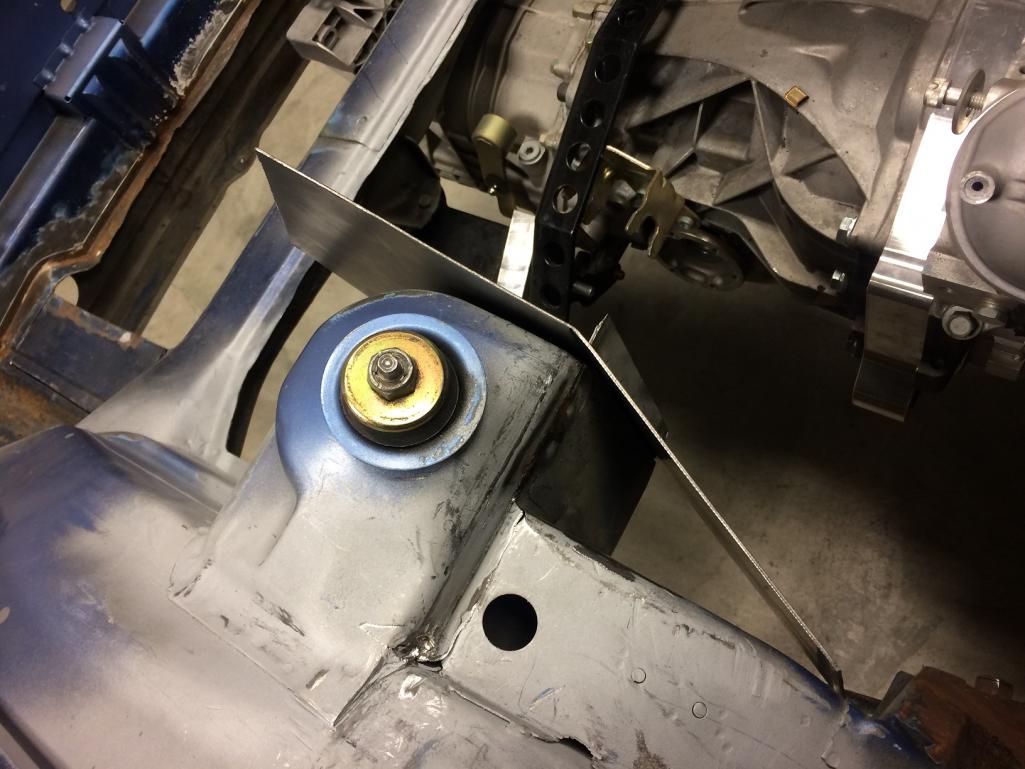
|
|
|
|
| tygaboy |
Jan 15 2017, 02:38 PM
Post
#193
|
|
914 Guru Group: Members Posts: 5,817 Joined: 6-October 15 From: Petaluma, CA Member No.: 19,241 Region Association: Northern California |
Tacked and plug welding my way around. I use a rubber mallet (IMG:style_emoticons/default/smash.gif) to help get it around the tower. The big clamp sure makes it easy to get the last couple plug welds.
Attached thumbnail(s) 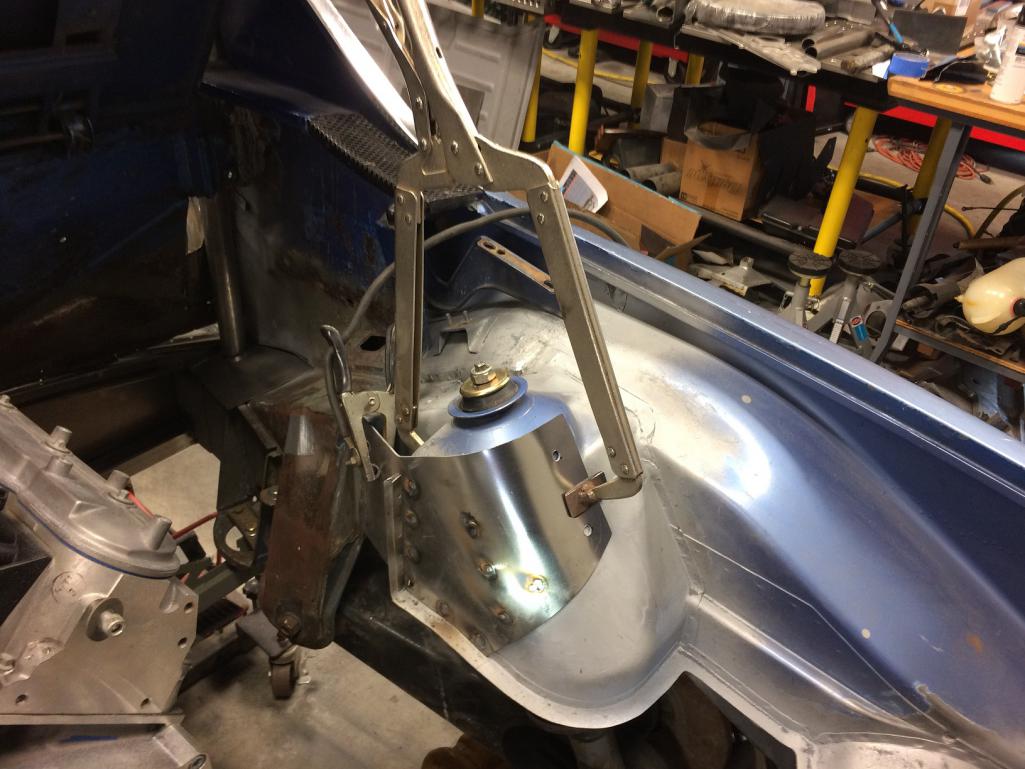
|
|
|
|
| tygaboy |
Jan 15 2017, 02:40 PM
Post
#194
|
|
914 Guru Group: Members Posts: 5,817 Joined: 6-October 15 From: Petaluma, CA Member No.: 19,241 Region Association: Northern California |
All done and ready for the final trimming before the seams get welded! (IMG:style_emoticons/default/cheer.gif)
Attached thumbnail(s) 
|
|
|
|
| tygaboy |
Jan 15 2017, 02:42 PM
Post
#195
|
|
914 Guru Group: Members Posts: 5,817 Joined: 6-October 15 From: Petaluma, CA Member No.: 19,241 Region Association: Northern California |
High altitude shot of the rough finished rear tower stiffening. This will be LOTS better than stock.
I feel like I made some progress this weekend! Attached thumbnail(s) 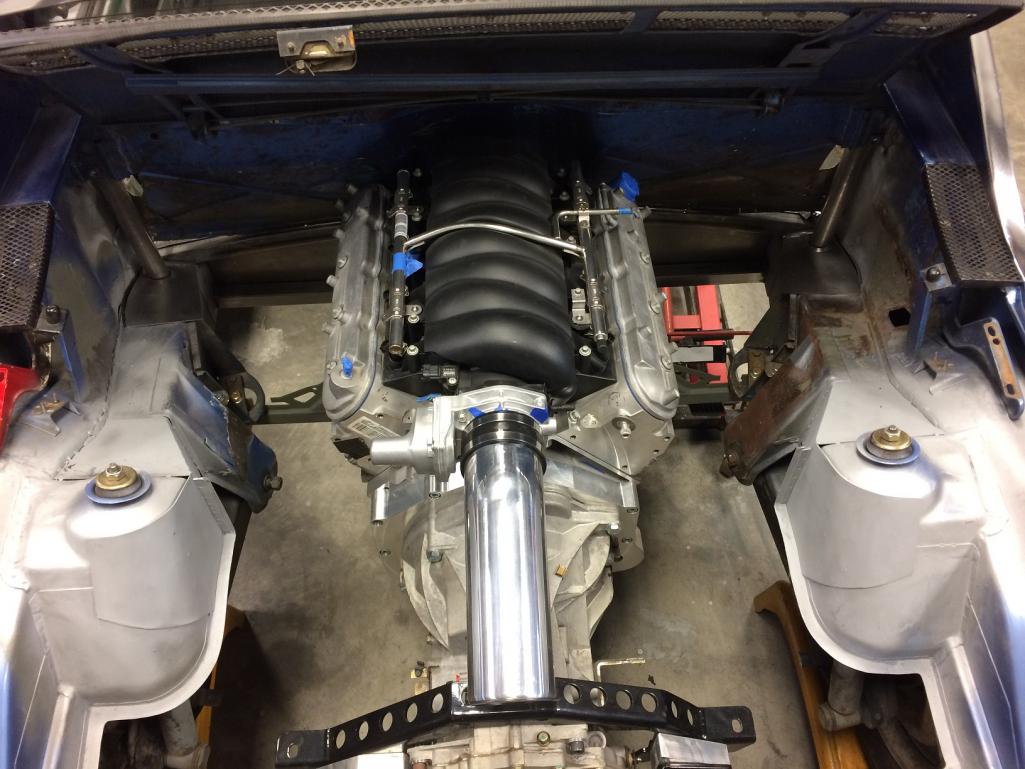
|
|
|
|
| tygaboy |
Jan 15 2017, 02:47 PM
Post
#196
|
|
914 Guru Group: Members Posts: 5,817 Joined: 6-October 15 From: Petaluma, CA Member No.: 19,241 Region Association: Northern California |
Now I can get on with the bars.
Here's the final design on the cross bracing. I'll add a filler plate between them with some fun/interesting cut outs. The final shot is proof that I have clearance and can fit the top with the arched upper bar! I then laid the trunk on and everything clears. Woop, woop! Now I'll fab up some brackets for those clips that hold the front of the top. I also need a bracket to locate the hood latch. This part of the car feels like it's finally coming together. Attached thumbnail(s) 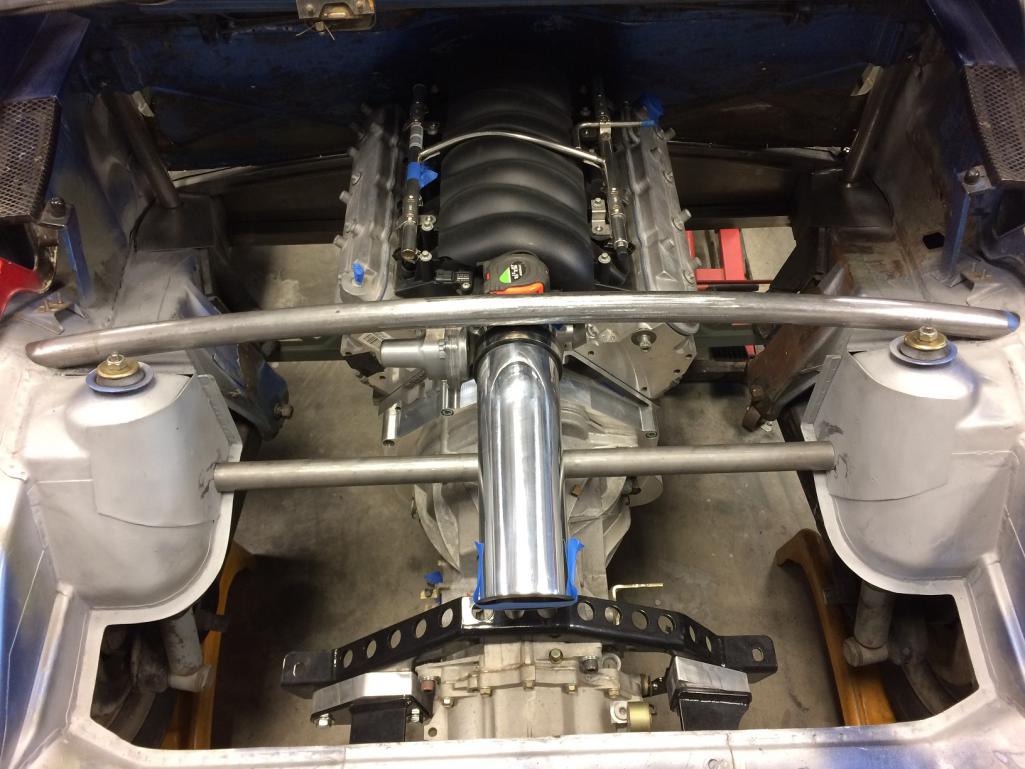 
|
|
|
|
| altitude411 |
Jan 15 2017, 03:04 PM
Post
#197
|
|
I drove my 6 into a tree Group: Members Posts: 1,306 Joined: 21-September 14 From: montana Member No.: 17,932 Region Association: Rocky Mountains |
Really enjoying your build Chris, thanks for taking the time to post. (IMG:style_emoticons/default/beerchug.gif)
|
|
|
|
| ssuperflyoldguy |
Jan 16 2017, 12:56 AM
Post
#198
|
|
Member Group: Members Posts: 190 Joined: 15-November 15 From: NorCal - East Bay Baby! Member No.: 19,364 Region Association: None |
Every time I come visit this thread there is less & less blue car there - gonna be a little sad when you start closing it in - great build tho - Napa Rocket Garage. Gonna have to come up n see Martin about some Mini stuff (he needs a transmission which I may have 4 more tomorrow), then he can tell me how much of the welding is yours...
|
|
|
|
| mbseto |
Jan 16 2017, 08:50 AM
Post
#199
|
|
Senior Member Group: Members Posts: 1,257 Joined: 6-August 14 From: Cincy Member No.: 17,743 Region Association: North East States |
No weld thru primer on that layer over the suspension tower?
|
|
|
|
| tygaboy |
Jan 16 2017, 09:14 AM
Post
#200
|
|
914 Guru Group: Members Posts: 5,817 Joined: 6-October 15 From: Petaluma, CA Member No.: 19,241 Region Association: Northern California |
QUOTE(mbseto @ Jan 16 2017, 06:50 AM) No weld thru primer on that layer over the suspension tower? Yes, I weld thru primer'd the towers and the back side of the plates before attaching them. I plan to use some Eastwood frame coating inside the box, after I close it in. |
|
|
|
|
4 User(s) are reading this topic (4 Guests and 0 Anonymous Users)
0 Members:

|
Lo-Fi Version | Time is now: 28th April 2026 - 02:50 AM |
Invision Power Board
v9.1.4 © 2026 IPS, Inc.