|
|
|
Porsche, and the Porsche crest are registered trademarks of Dr. Ing. h.c. F. Porsche AG.
This site is not affiliated with Porsche in any way. Its only purpose is to provide an online forum for car enthusiasts. All other trademarks are property of their respective owners. |
|
|

  |

| dan10101 |
 Oct 27 2019, 08:47 PM Oct 27 2019, 08:47 PM
Post
#1941
|
|
TORQUE-o-holic  Group: Members Posts: 1,140 Joined: 29-April 03 From: Eagle Point, Or Member No.: 626 Region Association: Pacific Northwest |
Dude! You rolled your car!
|
   |

 
|
| 914forme |
Oct 28 2019, 06:39 PM
Post
#1942
|
|
Times a wastin', get wrenchin'! Group: Members Posts: 3,899 Joined: 24-July 04 From: Dayton, Ohio Member No.: 2,388 Region Association: None |
|
|
|
|
| tygaboy |
Oct 30 2019, 05:31 PM
Post
#1943
|
|
914 Guru Group: Members Posts: 5,826 Joined: 6-October 15 From: Petaluma, CA Member No.: 19,241 Region Association: Northern California |
I spent some time today and finished up the radiator/condenser mount. Now to work out all the A/C hose routing.
Attached thumbnail(s) 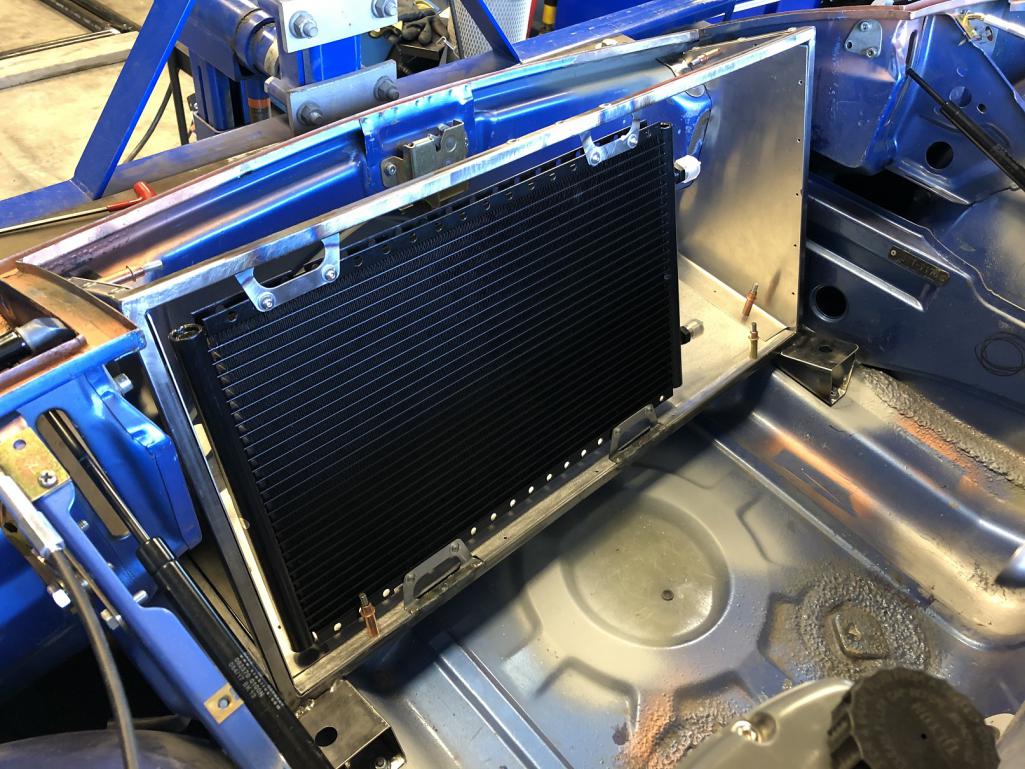 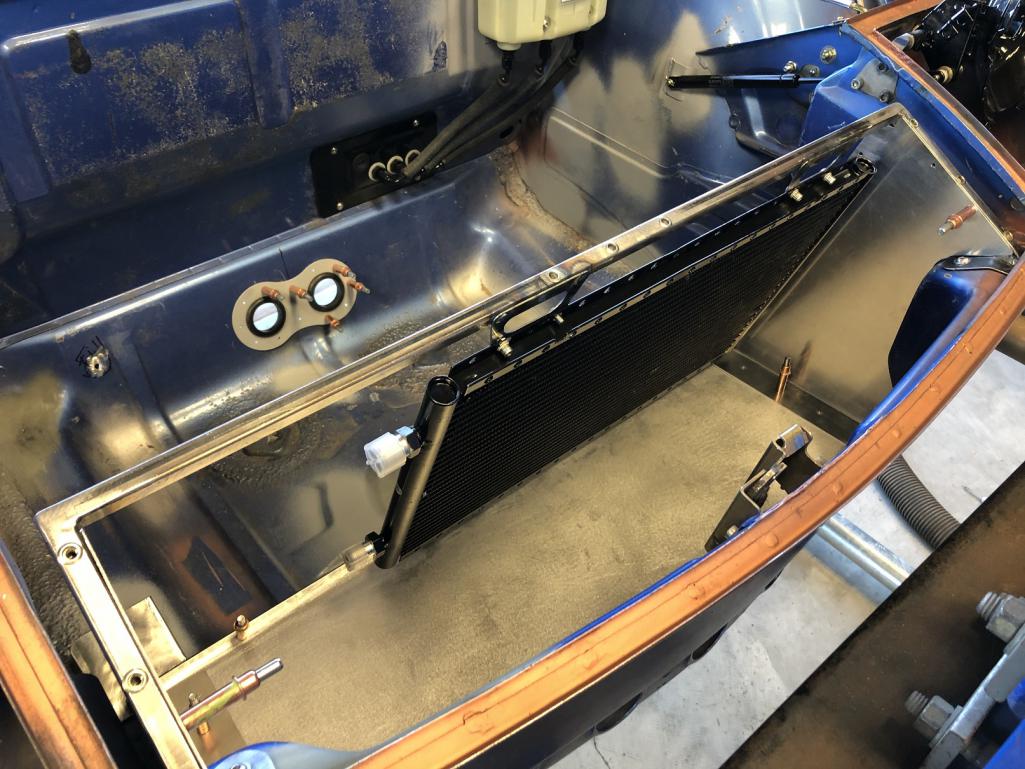
|
 |
|
| tygaboy |
Nov 1 2019, 02:01 PM
Post
#1944
|
|
914 Guru Group: Members Posts: 5,826 Joined: 6-October 15 From: Petaluma, CA Member No.: 19,241 Region Association: Northern California |
Tangerine Racing's raised rear pick up point kit install.
The kit raises the trailing arm pick up points 2". There's also a kit that raises things 3" but I opted for 2". The reason for all this is to retain proper trailing arm geometry when the car is lowered. In combination with the raised upper shock mounts I already installed, I keep full shock travel and prevent situations where too much toe happens in the upper portion of the suspension travel. Anyway, here goes... And right away, there's no turning back! The things I do for you @914forme Attached thumbnail(s) 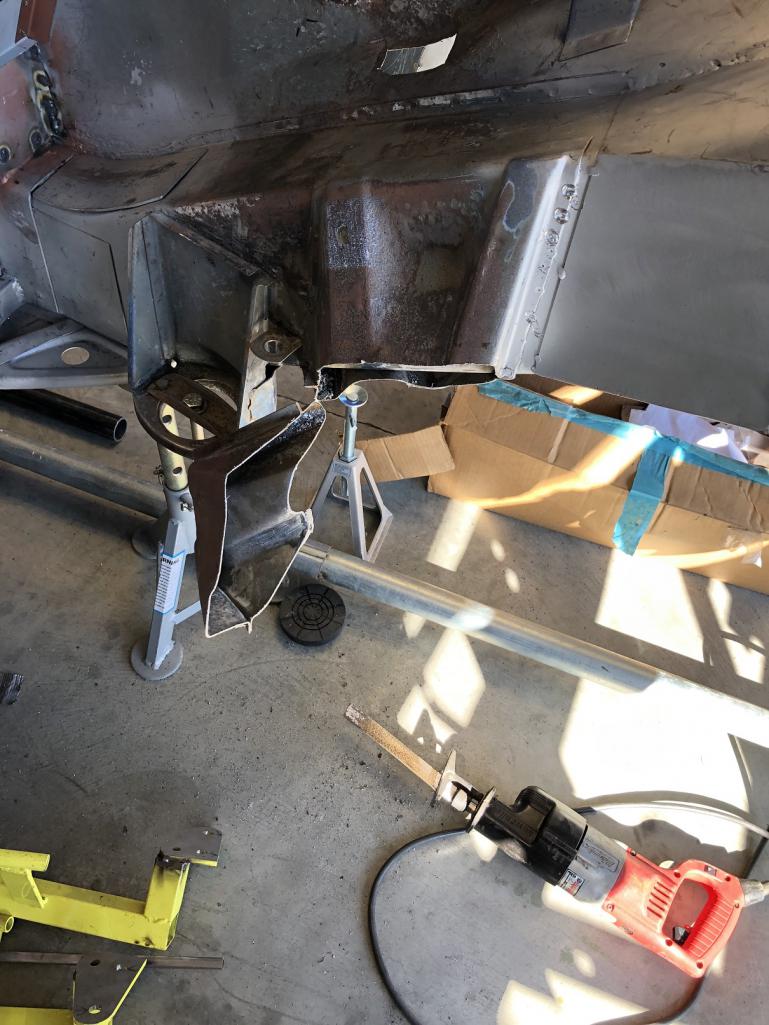
|
|
|
|
| tygaboy |
Nov 1 2019, 02:10 PM
Post
#1945
|
|
914 Guru Group: Members Posts: 5,826 Joined: 6-October 15 From: Petaluma, CA Member No.: 19,241 Region Association: Northern California |
I love how instructions can make things seem so simple. In this case, @ChrisFoley offers:
"Step 2: Completely remove the stock inner and outer suspension consoles from the chassis." OK, let's go! I mean, how hard can that be? Well, let me tell you - HARD. OK, so maybe not "hard", but for sure "time consuming"! There is a LOT of material in the lower area, particularly where it ties into that support that connects the inner and outer mounts. And it's not easy to get Sawzall blades and cut off wheels in there. All kidding aside, and to be clear, all of Chris' stuff is awesome, including his instructions! Attached thumbnail(s) 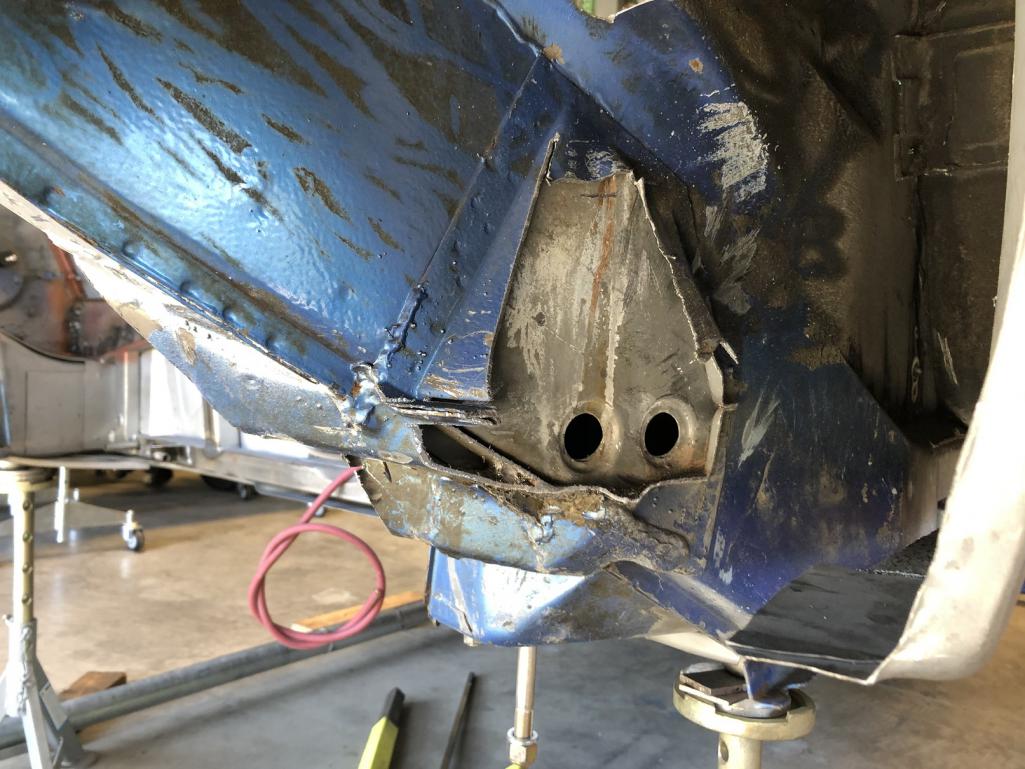
|
|
|
|
| tygaboy |
Nov 1 2019, 02:11 PM
Post
#1946
|
|
914 Guru Group: Members Posts: 5,826 Joined: 6-October 15 From: Petaluma, CA Member No.: 19,241 Region Association: Northern California |
Oh, the carnage!
And fear not, the car is on the rotisserie. Those jack stands and "spacers" are only to help stop it rocking when I'm cutting. Attached thumbnail(s) 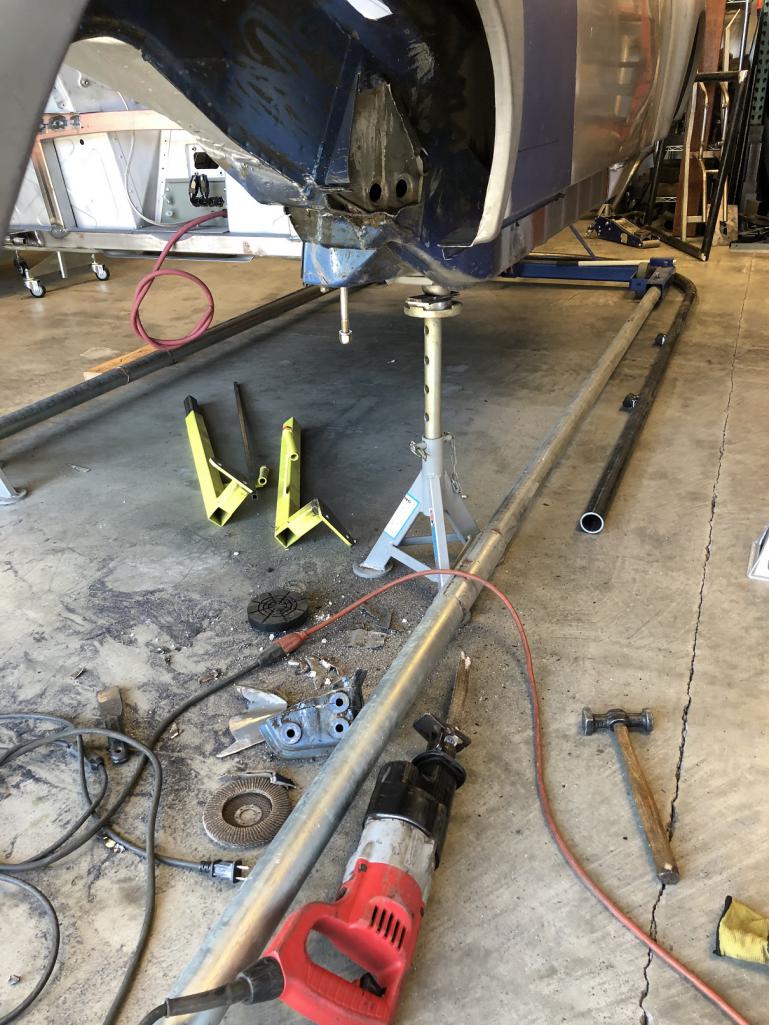
|
|
|
|
| tygaboy |
Nov 1 2019, 02:17 PM
Post
#1947
|
|
914 Guru Group: Members Posts: 5,826 Joined: 6-October 15 From: Petaluma, CA Member No.: 19,241 Region Association: Northern California |
Passenger side inner mostly done.
Attached thumbnail(s) 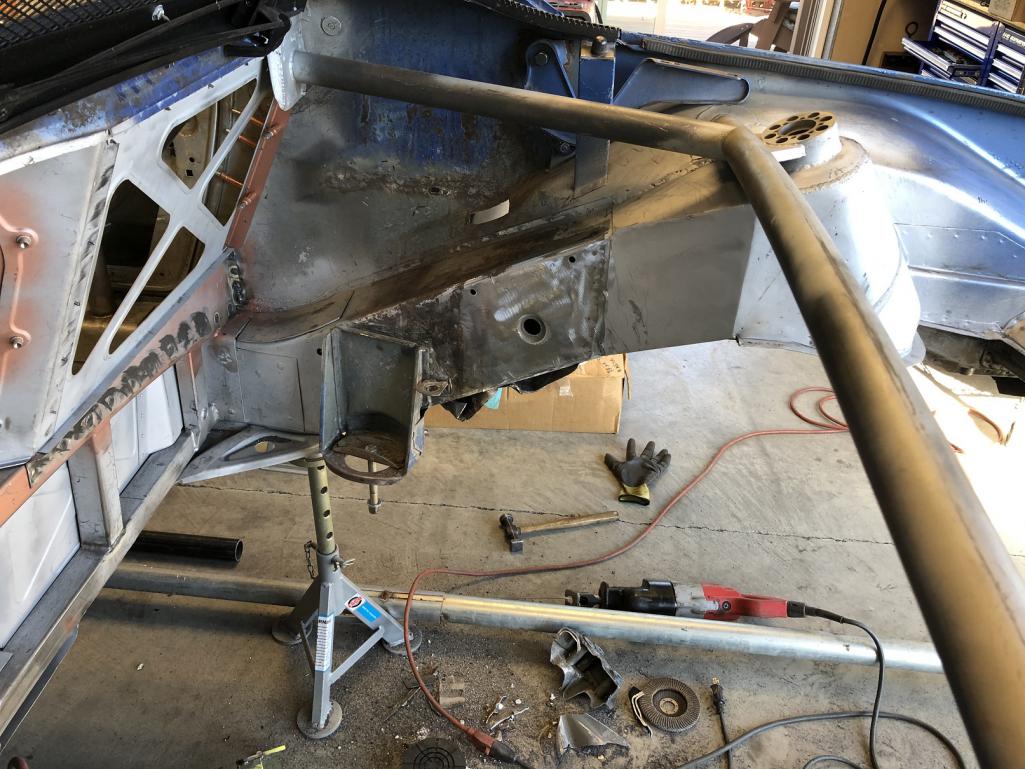
|
|
|
|
| FL000 |
Nov 1 2019, 04:07 PM
Post
#1948
|
|
Member Group: Members Posts: 481 Joined: 31-January 12 From: Lancaster, CA Member No.: 14,076 Region Association: Southern California |
I would be scared as hell cutting into my car like that - but I have total confidence in your work! Your car is coming along great.
|
|
|
|
| tygaboy |
Nov 1 2019, 05:18 PM
Post
#1949
|
|
914 Guru Group: Members Posts: 5,826 Joined: 6-October 15 From: Petaluma, CA Member No.: 19,241 Region Association: Northern California |
QUOTE(FL 000 @ Nov 1 2019, 03:07 PM)  I would be scared as hell cutting into my car like that - but I have total confidence in your work! Your car is coming along great. Truth be told, I am a little scared! It really is a "no going back" sort of moment when you chop off the suspension ear. (IMG:style_emoticons/default/blink.gif) The little guy on my shoulder keeps whispering in my ear, "it's only metal..." Let's hope he knows what he's talking about. |
|
|
|
| tygaboy |
Nov 1 2019, 05:18 PM
Post
#1950
|
|
914 Guru Group: Members Posts: 5,826 Joined: 6-October 15 From: Petaluma, CA Member No.: 19,241 Region Association: Northern California |
Passenger outer essentially ready.
Attached thumbnail(s) 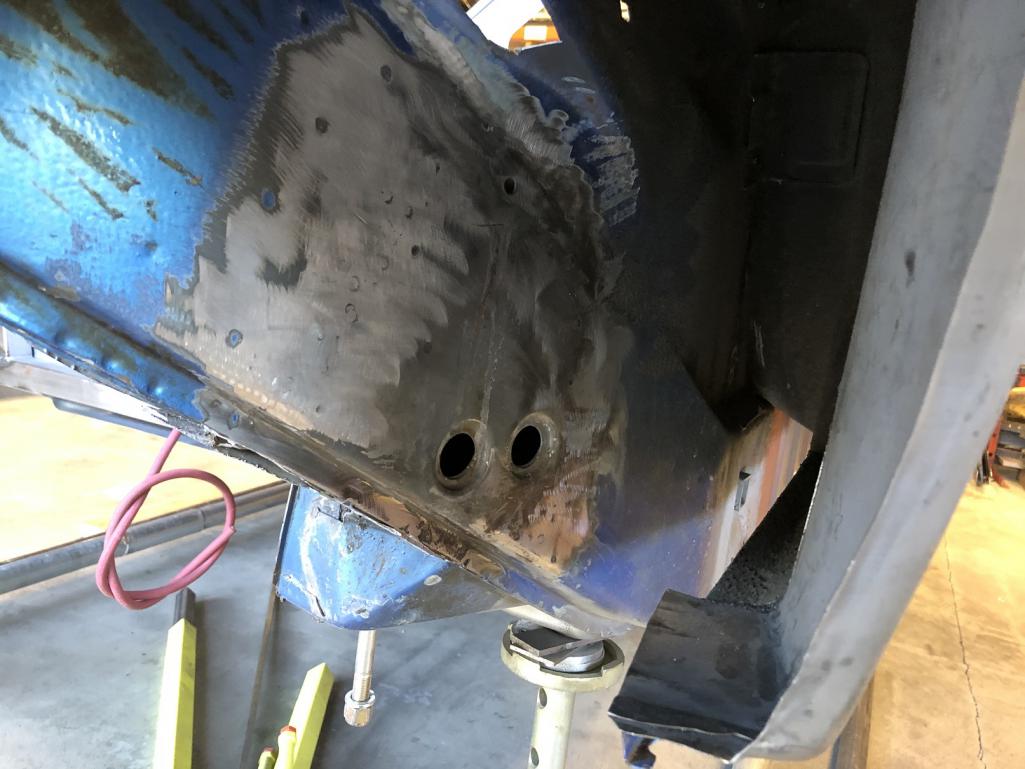
|
|
|
|
| tygaboy |
Nov 1 2019, 05:21 PM
Post
#1951
|
|
914 Guru Group: Members Posts: 5,826 Joined: 6-October 15 From: Petaluma, CA Member No.: 19,241 Region Association: Northern California |
The Tangerine kit comes with these two templates - an inner and an outer. You can see that once the suspension points are removed, it exposes those holes in the longs. These templates line up with the holes and indicate where you need to chop into the longs to create the needed clearance for the new pick up point component.
Attached thumbnail(s) 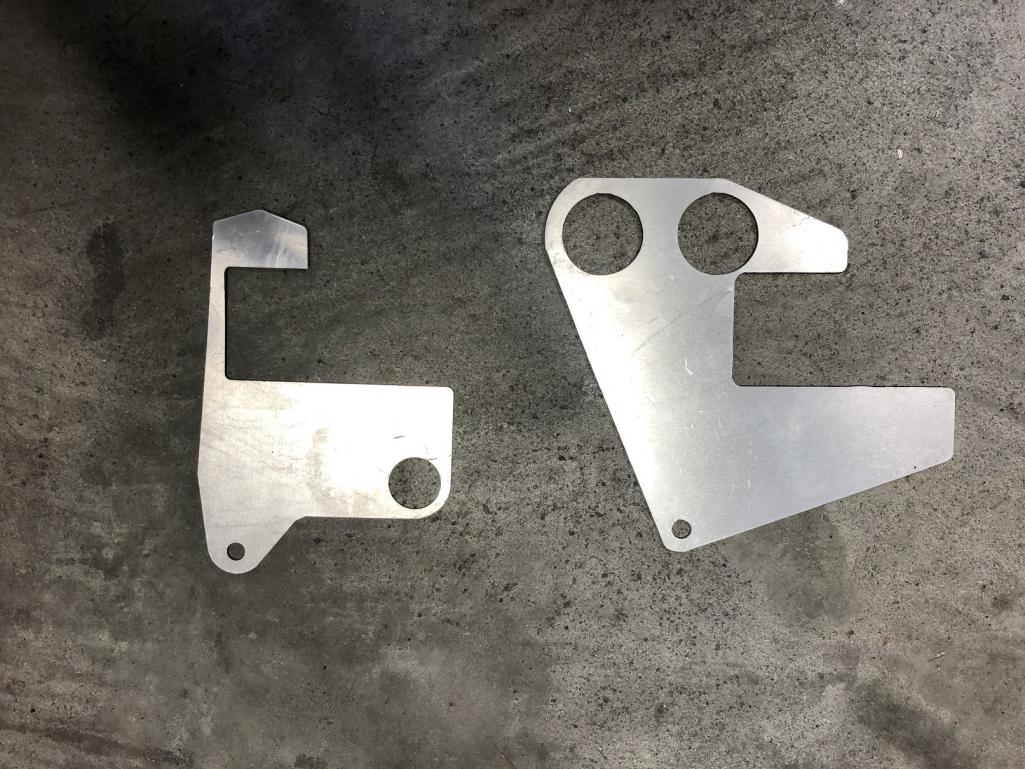
|
|
|
|
| tygaboy |
Nov 1 2019, 05:21 PM
Post
#1952
|
|
914 Guru Group: Members Posts: 5,826 Joined: 6-October 15 From: Petaluma, CA Member No.: 19,241 Region Association: Northern California |
Here are the templates in place. You can see that I've Sharpied part of the cut line on the inner.
Note that the picture makes it look like the template holes aren't aligned. It's a camera thing, they do align. Attached thumbnail(s) 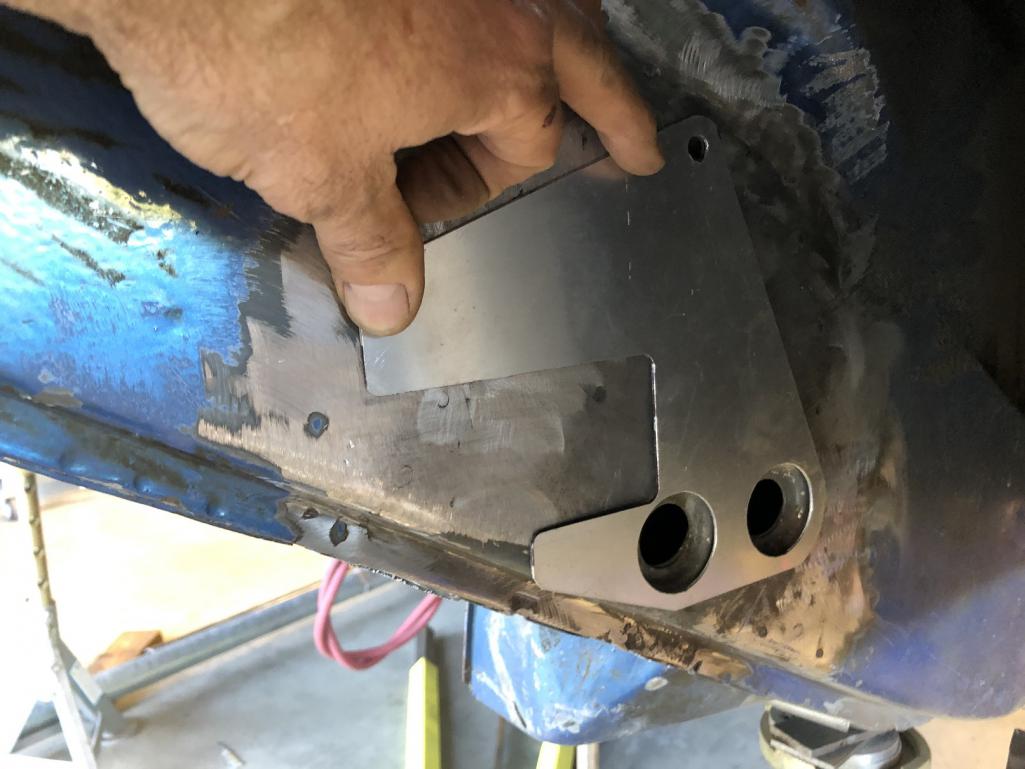 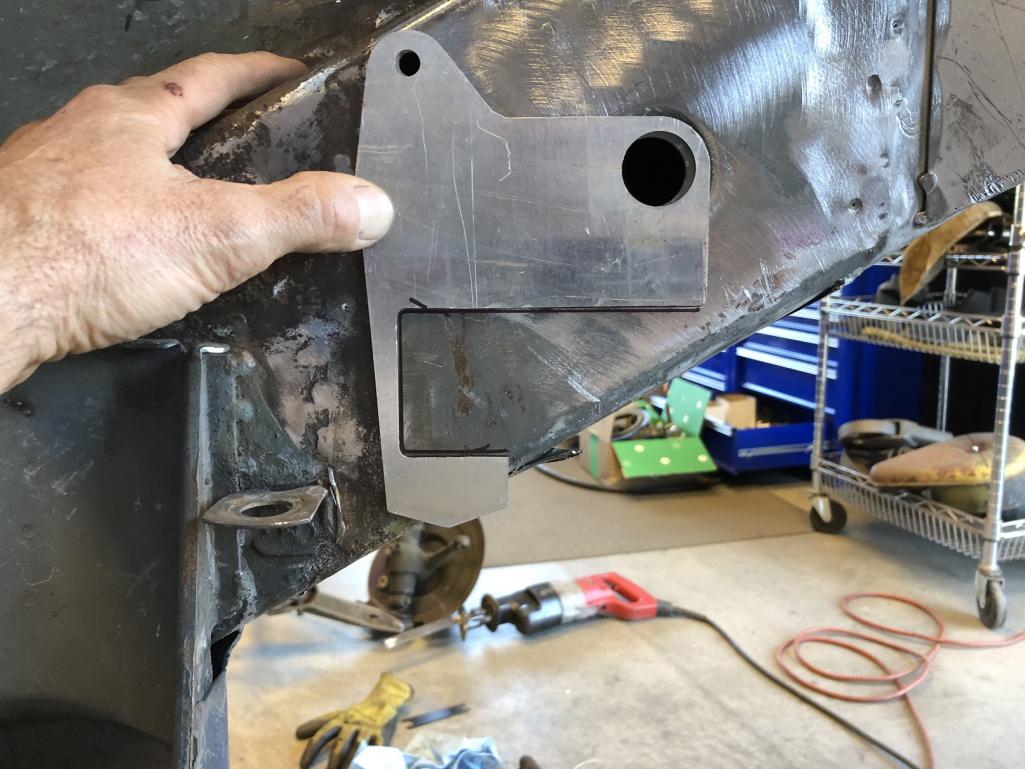
|
|
|
|
| Krieger |
Nov 1 2019, 05:22 PM
Post
#1953
|
|
Advanced Member Group: Members Posts: 4,860 Joined: 24-May 04 From: Santa Rosa CA Member No.: 2,104 Region Association: None |
(IMG:style_emoticons/default/unsure.gif) Oy, that looks messy. The primed metal underneath looks almost brand new.
|
|
|
|
| tygaboy |
Nov 1 2019, 05:24 PM
Post
#1954
|
|
914 Guru Group: Members Posts: 5,826 Joined: 6-October 15 From: Petaluma, CA Member No.: 19,241 Region Association: Northern California |
QUOTE(Krieger @ Nov 1 2019, 04:22 PM) (IMG:style_emoticons/default/unsure.gif) Oy, that looks messy. The primed metal underneath looks almost brand new. @Krieger Andy, you have no idea just how messy. Worst part of the entire build, getting all that metal cut then grinding the flanges away. But you really should experience it. How about you come down tomorrow and do the driver's side! (IMG:style_emoticons/default/happy11.gif) |
|
|
|
| markhoward |
Nov 1 2019, 05:29 PM
Post
#1955
|
|
Member Group: Members Posts: 406 Joined: 5-March 17 From: Lafayette, CA Member No.: 20,897 Region Association: Northern California |
Damn Chris! It's going to to be sweet!! (IMG:style_emoticons/default/beerchug.gif)
|
|
|
|
| Krieger |
Nov 1 2019, 05:32 PM
Post
#1956
|
|
Advanced Member Group: Members Posts: 4,860 Joined: 24-May 04 From: Santa Rosa CA Member No.: 2,104 Region Association: None |
I love you Chris, but not that much! (IMG:style_emoticons/default/lol-2.gif) I would be up for the challenge, but I am seriously wrecked from these fires again. We had a very close call on Thursday. About .25 mile from mile house and no time to to really pack. Just watched 3 tankers and 1 helicopter attack.
|
|
|
|
| ChrisFoley |
Nov 2 2019, 07:11 AM
Post
#1957
|
|
I am Tangerine Racing Group: Members Posts: 8,030 Joined: 29-January 03 From: Bolton, CT Member No.: 209 Region Association: None |
So you've done the easy part. (IMG:style_emoticons/default/smile.gif)
Cutting off the consoles is still reversible and shouldn't be too scary, but when you cut a big hunk out of the frame... (IMG:style_emoticons/default/unsure.gif) Oh, and putting it together correctly will be the hard part. Lots of opportunities to second guess yourself there. (IMG:style_emoticons/default/happy11.gif) |
|
|
|
| bbrock |
Nov 2 2019, 09:23 AM
Post
#1958
|
|
914 Guru Group: Members Posts: 5,269 Joined: 17-February 17 From: Montana Member No.: 20,845 Region Association: Rocky Mountains |
Wow! Hope you have one of these to rest those big balls.
 |
|
|
|
| sixnotfour |
Nov 2 2019, 10:26 AM
Post
#1959
|
|
914 Wizard Group: Members Posts: 11,265 Joined: 12-September 04 Member No.: 2,744 Region Association: NineFourteenerVille |
Spooky left over helloween comment,,but I have the kit also ,,got from a guy who couldn't commit... (IMG:style_emoticons/default/sawzall-smiley.gif) (IMG:style_emoticons/default/stirthepot.gif) (IMG:style_emoticons/default/popcorn[1].gif) (IMG:style_emoticons/default/welder.gif)
|
|
|
|
| tygaboy |
Nov 2 2019, 04:04 PM
Post
#1960
|
|
914 Guru Group: Members Posts: 5,826 Joined: 6-October 15 From: Petaluma, CA Member No.: 19,241 Region Association: Northern California |
QUOTE(ChrisFoley @ Nov 2 2019, 06:11 AM) So you've done the easy part. (IMG:style_emoticons/default/smile.gif) Cutting off the consoles is still reversible and shouldn't be too scary, but when you cut a big hunk out of the frame... (IMG:style_emoticons/default/unsure.gif) Oh, and putting it together correctly will be the hard part. Lots of opportunities to second guess yourself there. (IMG:style_emoticons/default/happy11.gif) @ChrisFoley - Not helping! (IMG:style_emoticons/default/laugh.gif) And remember, I have your cell number! But I do hear you on the 2nd guessing. I'm going to follow all your instructions and leverage the install Jeff Hail posted on his build thread here. It starts on page 25, post #486. |
|
|
|
|
3 User(s) are reading this topic (3 Guests and 0 Anonymous Users)
0 Members:

|
Lo-Fi Version | Time is now: 7th June 2026 - 12:07 PM |
Invision Power Board
v9.1.4 © 2026 IPS, Inc.