|
|
|
Porsche, and the Porsche crest are registered trademarks of Dr. Ing. h.c. F. Porsche AG.
This site is not affiliated with Porsche in any way. Its only purpose is to provide an online forum for car enthusiasts. All other trademarks are property of their respective owners. |
|
|

  |

| tygaboy |
 Jan 21 2017, 06:00 PM Jan 21 2017, 06:00 PM
Post
#201
|
|
914 Guru  Group: Members Posts: 5,817 Joined: 6-October 15 From: Petaluma, CA Member No.: 19,241 Region Association: Northern California |
I made up a new top cross bar because of I totally screwed up the angles of the end cuts as I was trying to final fit the first one I'd made. The joy of not using straight material is I had to duplicate the roll bend. Not that big a deal but it's another repeat effort and time spent that really gets me no further along. Ah, well...
Once that was done, I wanted to get some ideas for the filler plate so I made up a paper template. I measured it to get the dimensions for the plasma table's design software. Then I started messing with various design elements. Attached image(s) 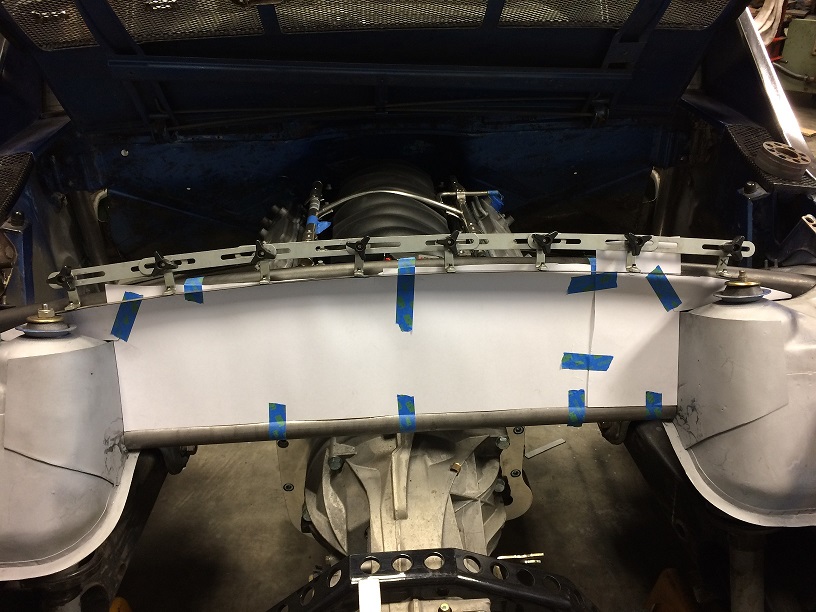
|
   |

 
|
| tygaboy |
Jan 21 2017, 06:02 PM
Post
#202
|
|
914 Guru Group: Members Posts: 5,817 Joined: 6-October 15 From: Petaluma, CA Member No.: 19,241 Region Association: Northern California |
Here's the initial version, ready to cut.
The six little holes running across the middle are 'marker' cuts that simply locate where to drill for the lightening holes - you'll see once it's all done. Attached thumbnail(s) 
|
|
|
|
| tygaboy |
Jan 21 2017, 06:05 PM
Post
#203
|
|
914 Guru Group: Members Posts: 5,817 Joined: 6-October 15 From: Petaluma, CA Member No.: 19,241 Region Association: Northern California |
Result!
It's like cheating. I could never have done this by hand. Well, OK, I could have. But it would look like crap! Attached thumbnail(s) 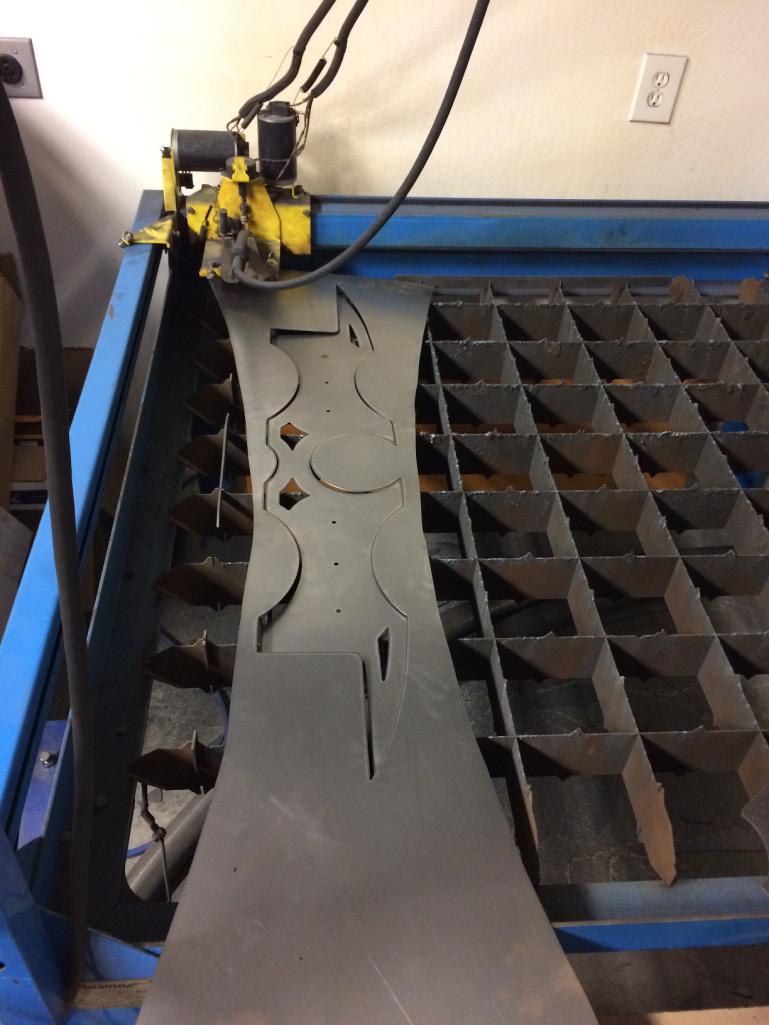
|
|
|
|
| tygaboy |
Jan 21 2017, 06:14 PM
Post
#204
|
|
914 Guru Group: Members Posts: 5,817 Joined: 6-October 15 From: Petaluma, CA Member No.: 19,241 Region Association: Northern California |
Then it's trimming to fit all the inevitable nooks and crannies and little details that happened when I plated around the shock towers.
Next, the knock out punches and dimple dies. And here's V1 of the filler panel! (IMG:style_emoticons/default/cheer.gif) Yes, the throttle body is off-center. I opted to live with that being the asymmetrical element, rather than something else. I'm toying with making a removable panel that has a tighter fit to the air cleaner tube. We'll see. Attached thumbnail(s) 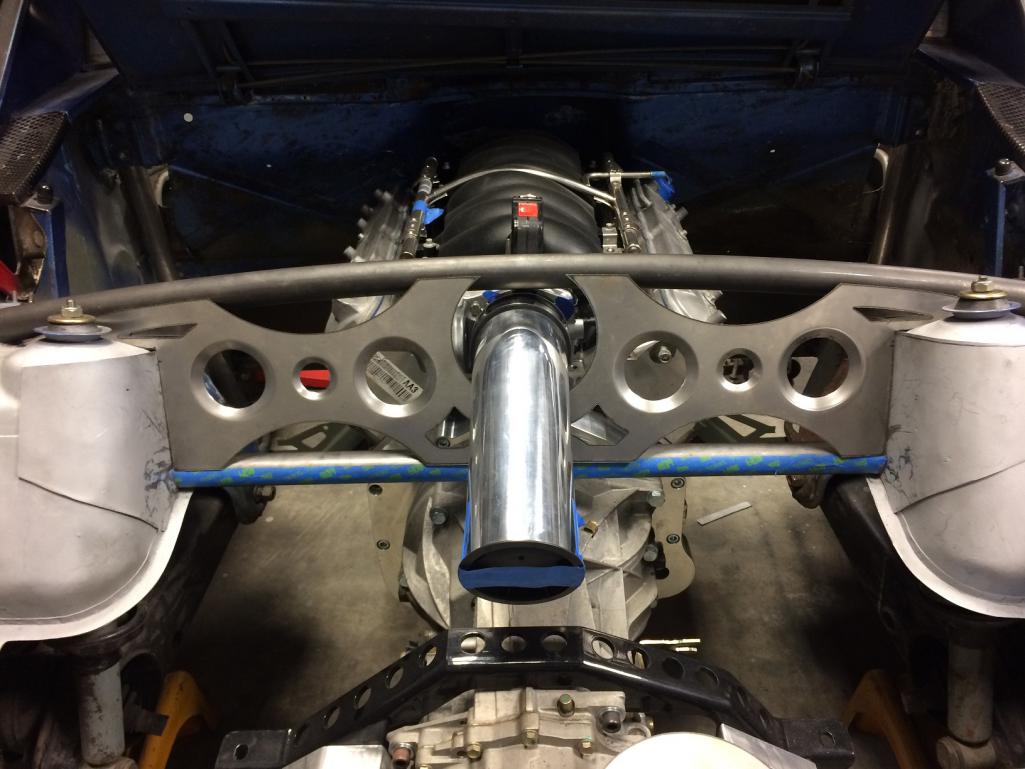
|
|
|
|
| ConeDodger |
Jan 21 2017, 06:28 PM
Post
#205
|
|
Apex killer! Group: Members Posts: 24,422 Joined: 31-December 04 From: Tahoe Area Member No.: 3,380 Region Association: Northern California |
This thing will be epic! (IMG:style_emoticons/default/biggrin.gif)
|
|
|
|
| Krieger |
Jan 21 2017, 06:51 PM
Post
#206
|
|
Advanced Member Group: Members Posts: 4,853 Joined: 24-May 04 From: Santa Rosa CA Member No.: 2,104 Region Association: None |
That's friggin awesome looking! Nice work Chris!
|
|
|
|
| Cracker |
Jan 21 2017, 07:21 PM
Post
#207
|
|
Advanced Member Group: Members Posts: 2,148 Joined: 2-February 10 From: Atlanta (area) Member No.: 11,316 Region Association: South East States |
Mee likey...
T |
|
|
|
| Dion |
Jan 21 2017, 07:40 PM
Post
#208
|
|
RN Group: Members Posts: 2,926 Joined: 16-September 04 From: Audubon,PA Member No.: 2,766 Region Association: MidAtlantic Region |
That is a badass intimidating touch!
|
|
|
|
| tygaboy |
Jan 22 2017, 09:22 AM
Post
#209
|
|
914 Guru Group: Members Posts: 5,817 Joined: 6-October 15 From: Petaluma, CA Member No.: 19,241 Region Association: Northern California |
Here's a V2 design. No, I won't be applying for a job as a Photoshop operator. (IMG:style_emoticons/default/barf.gif) All I have is MS Paint. Hey, it works well enough for me to test ideas.
Anyway, V1 had those cut outs that I wasn't sure I liked. Maybe a little too "hot roddy". Lightening holes seem more fitting. Plus, with a physical example to play with and see from all angles, I decided I wanted to close up around the sides of the intake and get a bit more room under it. You can't see it but there was only about 1/4" - 3/8" clearance on the underside. I don't know how much the motor may move around but I want more room there. This is one of the "fun" parts about design stuff: When to call it "done" and get on with other stuff that may actually get this car on the road! At this point, I'll likely go with V2. Time for less (IMG:style_emoticons/default/type.gif) and more (IMG:style_emoticons/default/sawzall-smiley.gif) (IMG:style_emoticons/default/smash.gif) and (IMG:style_emoticons/default/welder.gif) ! Oh, and some day: (IMG:style_emoticons/default/driving.gif) Attached thumbnail(s) 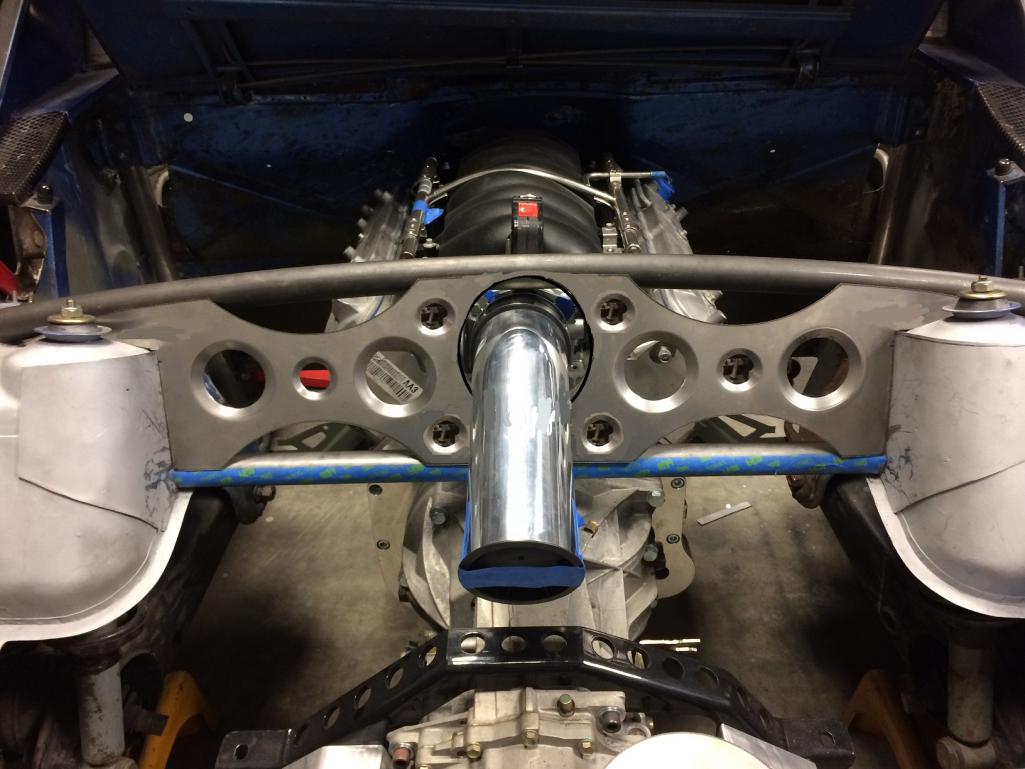
|
|
|
|
| tygaboy |
Jan 22 2017, 01:20 PM
Post
#210
|
|
914 Guru Group: Members Posts: 5,817 Joined: 6-October 15 From: Petaluma, CA Member No.: 19,241 Region Association: Northern California |
Details, details. I don't have a dimple die the size of the of-cut outs that run across the top and bottom. Since I knew I was going to make a new panel, I figured I'd use this as a practice piece. I used he bead roller and tipped in a lip that I was hoping would match the dimples on the holes.
I think I was successful and IMO, without these, it looked incomplete. It's these sorts of things that REALLY finish off the look! I'm loving how this is turning out. (IMG:style_emoticons/default/wub.gif) This was just practice and on the final version, I'll notch the corners of the dimples so they wrap the cross bar. Can't wait to get started on the V2 design! I'm out of metal so the rest of this weekend is going to shop clean up - which is sorely needed. (And wait 'til you see what's planned for the transmission support!) Attached thumbnail(s) 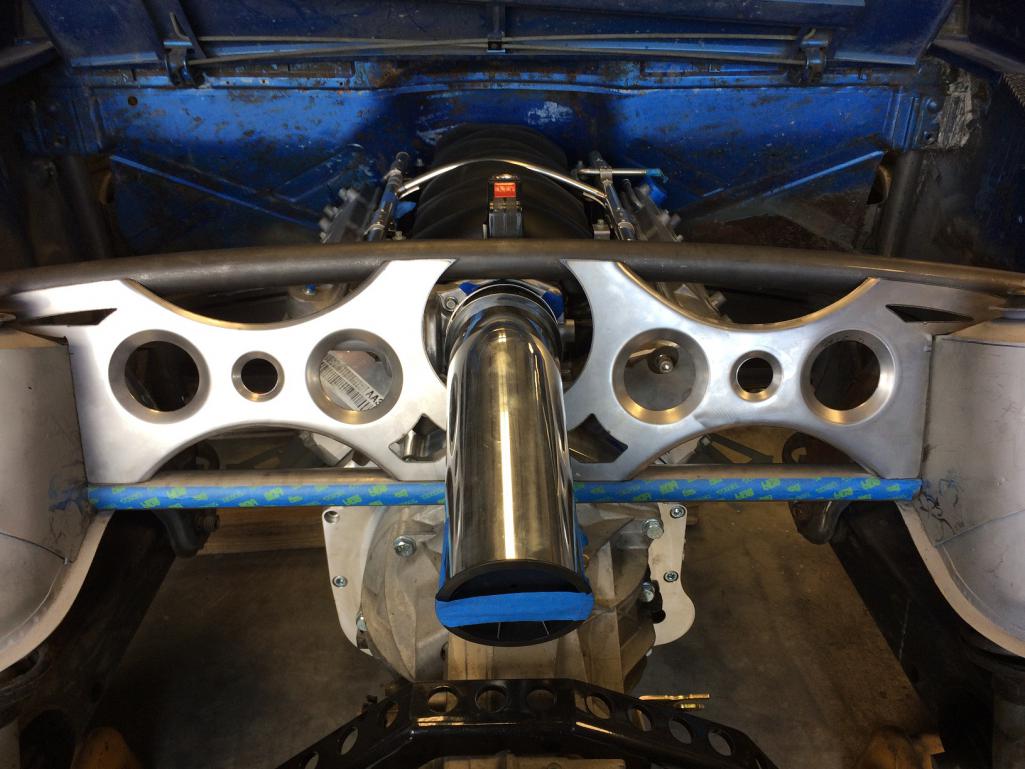
|
|
|
|
| csdilligaf |
Jan 22 2017, 01:32 PM
Post
#211
|
|
Member Group: Members Posts: 106 Joined: 18-April 12 From: San Diego CA Member No.: 14,397 Region Association: None |
I like the bead rolled edge. Recently saw a video on how to do it. Did you use the special dies? Coming along great, keep it up.
|
|
|
|
| Cracker |
Jan 22 2017, 01:38 PM
Post
#212
|
|
Advanced Member Group: Members Posts: 2,148 Joined: 2-February 10 From: Atlanta (area) Member No.: 11,316 Region Association: South East States |
Chris - maybe I am looking at this wrong but I would like to see that as an enclosed panel...maybe you are doing that anyway. Make a duplicate in reverse and weld the seam. Understand?
T |
|
|
|
| Krieger |
Jan 22 2017, 02:26 PM
Post
#213
|
|
Advanced Member Group: Members Posts: 4,853 Joined: 24-May 04 From: Santa Rosa CA Member No.: 2,104 Region Association: None |
I like the second one even better!
|
|
|
|
| tygaboy |
Jan 22 2017, 07:30 PM
Post
#214
|
|
914 Guru Group: Members Posts: 5,817 Joined: 6-October 15 From: Petaluma, CA Member No.: 19,241 Region Association: Northern California |
I did get the shop somewhat cleaned up but the car kept calling "Please work on me!"
I couldn't say no... Before I weld in the top cross bar, I need to install some support pads. The fun part is the bar lands on the top of the inner fender, right smack on a compound curve. I could do the 'tack, bend, tack' but I decided to "get fancy". First a bit of history: Back in the fall of last year, I took a 3-day metal shaping class with Lazze at his place in Pleasanton, CA. It was a very cool class. You need to take it. But be careful: The only down side (as is Lazze's plan, I'm sure (IMG:style_emoticons/default/biggrin.gif) )is you come out of the class having used these awesome tools and, if you're me, you get home and obsess about having to have those very same tools. So yes, I treated myself to the bead roller, shrinker/stretcher and English wheel. I have to say, it's reeeeeealy nice stuff. Back to today: So far, on this build, I've been able to leverage the bead roller and shrinker/stretcher but I've not yet had the occasion to need to use the English wheel. Well, when a compound curve is needed, it's the English wheel to the rescue! I made up a little curve template, grabbed a piece of scrap and went to town, hoping I'd remember what I learned in class. Seems like I did. It fits just so! This may not be much to look at but it's one of the pieces I'm most proud of. Why? Well, you can't fit that small a part in the wheel. I had to "get it right" while this piece was part of a much larger sheet of steel. And I need it to be correctly curved before being able to test fit it. So essentially, I only had one chance to trim it correctly. And once it's installed, virtually no one will ever notice. (Now I get to do it again on the other side...! (IMG:style_emoticons/default/wacko.gif) ) Funny... one of my longest posts and it about the smallest piece I'll probably fab. Attached thumbnail(s) 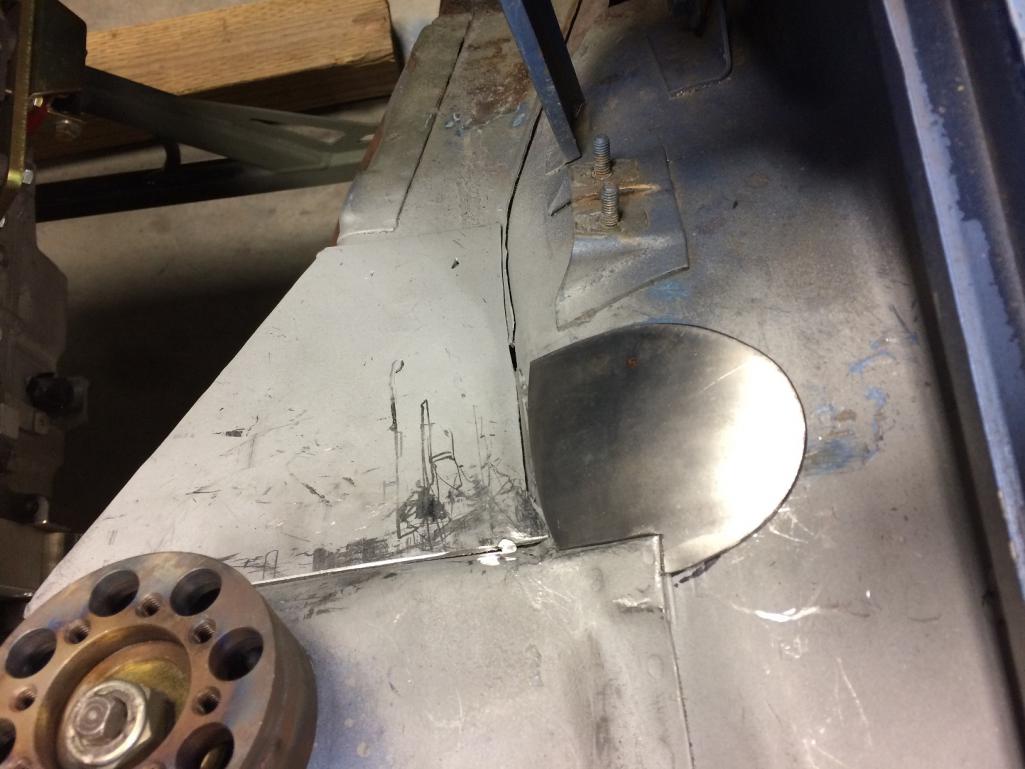 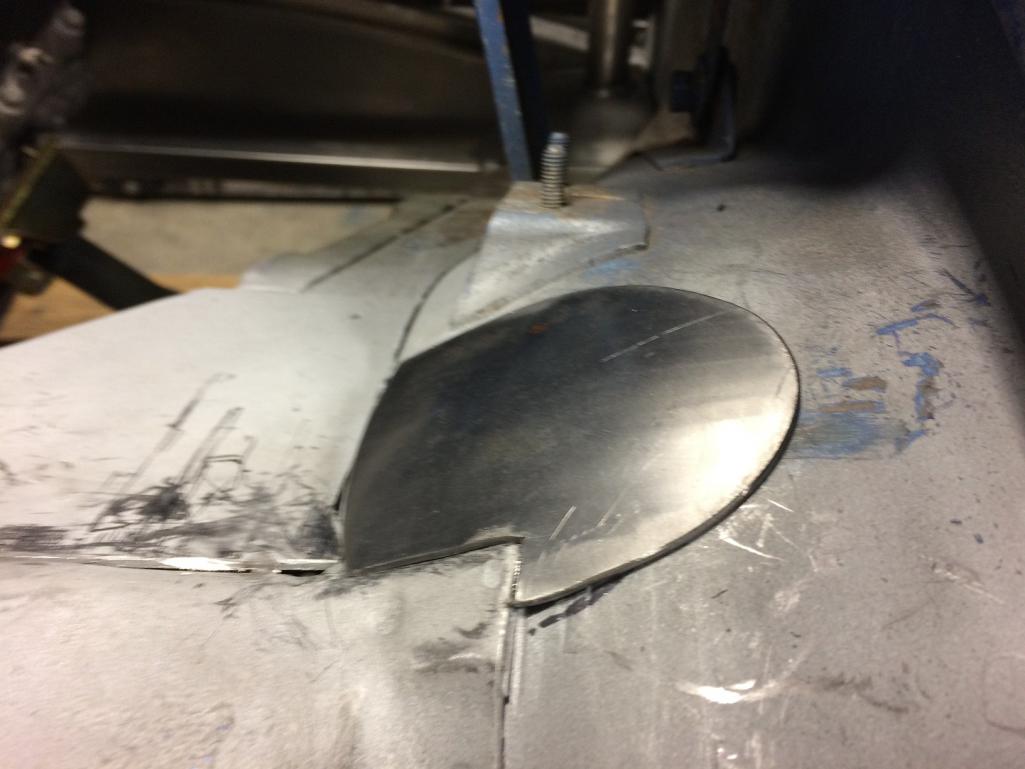
|
|
|
|
| tygaboy |
Jan 22 2017, 07:42 PM
Post
#215
|
|
914 Guru Group: Members Posts: 5,817 Joined: 6-October 15 From: Petaluma, CA Member No.: 19,241 Region Association: Northern California |
QUOTE(Cracker @ Jan 22 2017, 11:38 AM)  Chris - maybe I am looking at this wrong but I would like to see that as an enclosed panel...maybe you are doing that anyway. Make a duplicate in reverse and weld the seam. Understand? T Hi Tony. Yep, I know what you mean. From a structural perspective, doubling it as you're suggesting would certainly be stronger but even a one sided version will do a lot. With the other stiffening I have planned, it's not like I really need that panel so I'm viewing it as largely decorative. But yes, I have been toying with what you've suggested. It's really a matter of just how crazy I want to go - both as it relates to the build as well as a "doing this will make me CRAZY!" perspective. (IMG:style_emoticons/default/laugh.gif) If I do decide to go for "extra credit" stuff, I'll likely do it once the car is running. I'm starting to get worried that I'll never get it on the road. |
|
|
|
| tygaboy |
Jan 22 2017, 07:48 PM
Post
#216
|
|
914 Guru Group: Members Posts: 5,817 Joined: 6-October 15 From: Petaluma, CA Member No.: 19,241 Region Association: Northern California |
QUOTE(csdilligaf @ Jan 22 2017, 11:32 AM) I like the bead rolled edge. Recently saw a video on how to do it. Did you use the special dies? Coming along great, keep it up. Thanks for the kind words. I used a sharp edged die on the top (to get a crisp edge that matched the dimple die) and a flat die on the bottom so I had something to bend against. |
|
|
|
| tygaboy |
Jan 24 2017, 04:56 PM
Post
#217
|
|
914 Guru Group: Members Posts: 5,817 Joined: 6-October 15 From: Petaluma, CA Member No.: 19,241 Region Association: Northern California |
Panel design, V2. Maybe some day I'll get this design thing figured out a bit better and not have to "build, fit, trim, fit, realize there was a (few) incorrect assumptions and now do it all over again". As much as I like doing all this stuff, it'd be nice to get it right the first time and not build multiple versions. (IMG:style_emoticons/default/dry.gif)
I guess that's what experience is all about! Anyway, if you compare V2 to V1, you'll see I changed the 'wings' quite a bit to close a gap between the top edge of the panel and the cross bar. And I moved and changed the shape of the intake tube hole to add a bit more interest. I also changed a couple dimensions so I won't have to do as much trimming/fitting. I think the holes vs the cutouts will be more in line with the look I'm going for. Hope to get it cut before the weekend. Attached thumbnail(s) 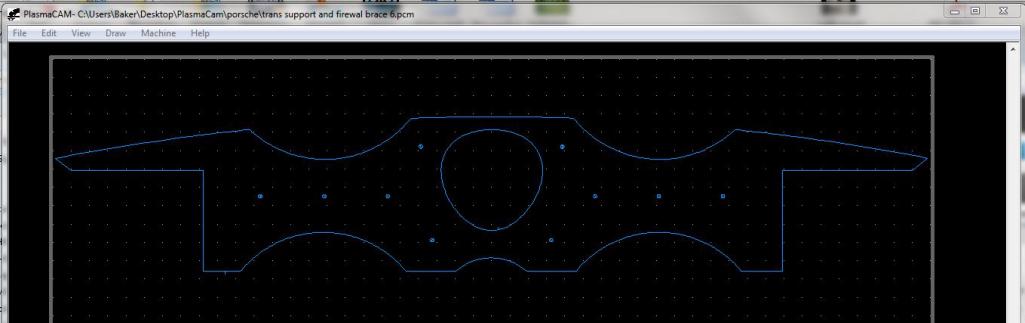 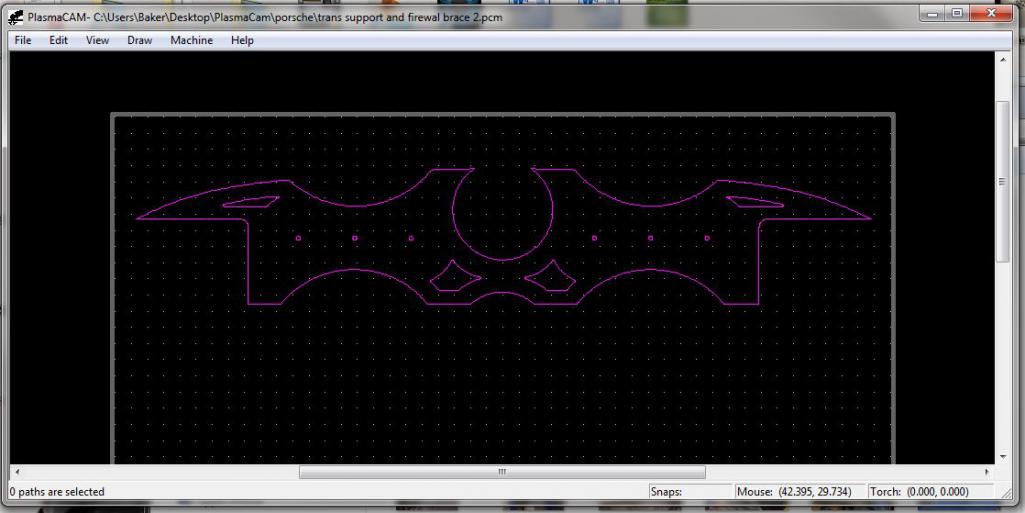
|
|
|
|
| jd74914 |
Jan 24 2017, 09:05 PM
Post
#218
|
|
Its alive Group: Members Posts: 4,876 Joined: 16-February 04 From: CT Member No.: 1,659 Region Association: North East States |
QUOTE(tygaboy @ Jan 24 2017, 05:56 PM) Panel design, V2. Maybe some day I'll get this design thing figured out a bit better and not have to "build, fit, trim, fit, realize there was a (few) incorrect assumptions and now do it all over again". As much as I like doing all this stuff, it'd be nice to get it right the first time and not build multiple versions. (IMG:style_emoticons/default/dry.gif) Without trying it a few times how would you know which one was the best? (IMG:style_emoticons/default/rolleyes.gif) (IMG:style_emoticons/default/laugh.gif) QUOTE(tygaboy @ Jan 24 2017, 05:56 PM) I think the holes vs the cutouts will be more in line with the look I'm going for. I like the holes a lot better! Rev 2 looks great! (IMG:style_emoticons/default/beerchug.gif) |
|
|
|
| Curbandgutter |
Jan 25 2017, 07:22 PM
Post
#219
|
|
Senior Member Group: Members Posts: 566 Joined: 8-March 13 From: Murrieta CA Member No.: 15,637 Region Association: Southern California |
Wow Chris the way you treated that panel was MASTERFUL! Love it man. I was wondering how you were going to get the shear forces to transfer from the top of strut to the lower portion of the strut! Well done!! I tell ya......you're giving me ideas. Looks wicked by the way (IMG:style_emoticons/default/w00t.gif)
|
|
|
|
| Cracker |
Jan 25 2017, 07:31 PM
Post
#220
|
|
Advanced Member Group: Members Posts: 2,148 Joined: 2-February 10 From: Atlanta (area) Member No.: 11,316 Region Association: South East States |
|
|
|
|
|
4 User(s) are reading this topic (4 Guests and 0 Anonymous Users)
0 Members:

|
Lo-Fi Version | Time is now: 28th April 2026 - 04:24 AM |
Invision Power Board
v9.1.4 © 2026 IPS, Inc.