|
|
|
Porsche, and the Porsche crest are registered trademarks of Dr. Ing. h.c. F. Porsche AG.
This site is not affiliated with Porsche in any way. Its only purpose is to provide an online forum for car enthusiasts. All other trademarks are property of their respective owners. |
|
|

  |

| tygaboy |
 Nov 12 2019, 03:48 PM Nov 12 2019, 03:48 PM
Post
#2001
|
|
914 Guru  Group: Members Posts: 5,279 Joined: 6-October 15 From: Petaluma, CA Member No.: 19,241 Region Association: Northern California |
I fixtured the new mounts in position, got the measurements set and tacked them in.
But in order to get the trailing arms in, this overhang has to be removed. I kept wondering why the arm wouldn't go in... What I had yet to cut: Attached thumbnail(s) 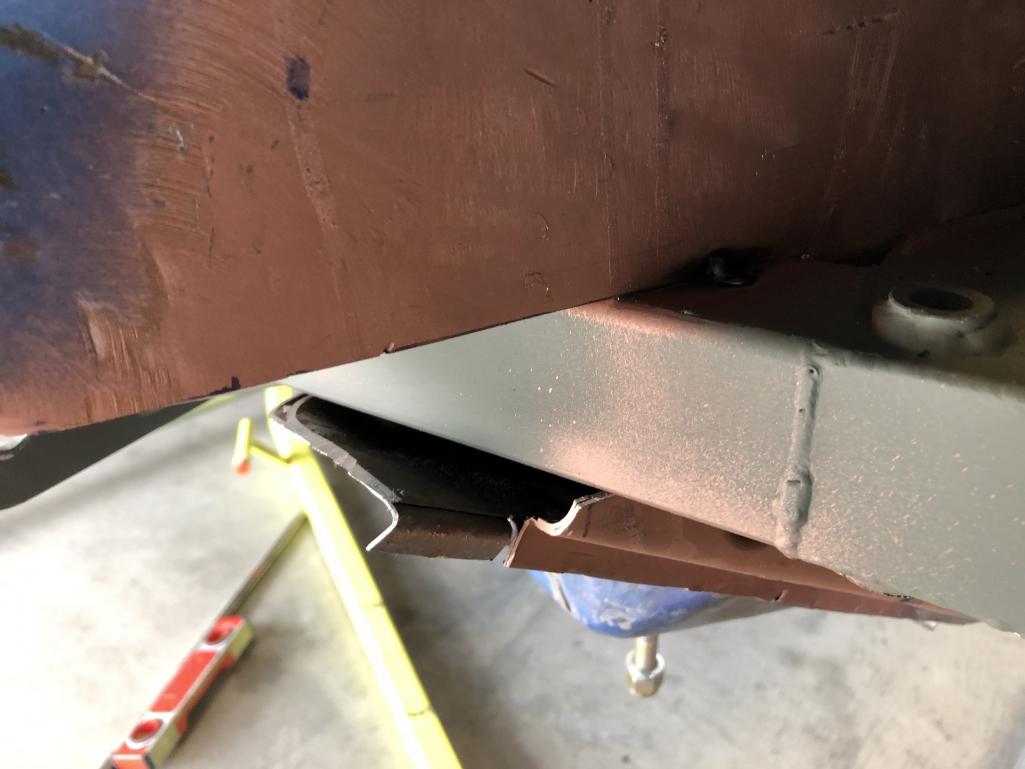
|
   |

 
|
| tygaboy |
Nov 12 2019, 03:49 PM
Post
#2002
|
|
914 Guru Group: Members Posts: 5,279 Joined: 6-October 15 From: Petaluma, CA Member No.: 19,241 Region Association: Northern California |
What it looks like after trimming. Essentially, just cut in plane with the rear face of the mount.
Attached thumbnail(s) 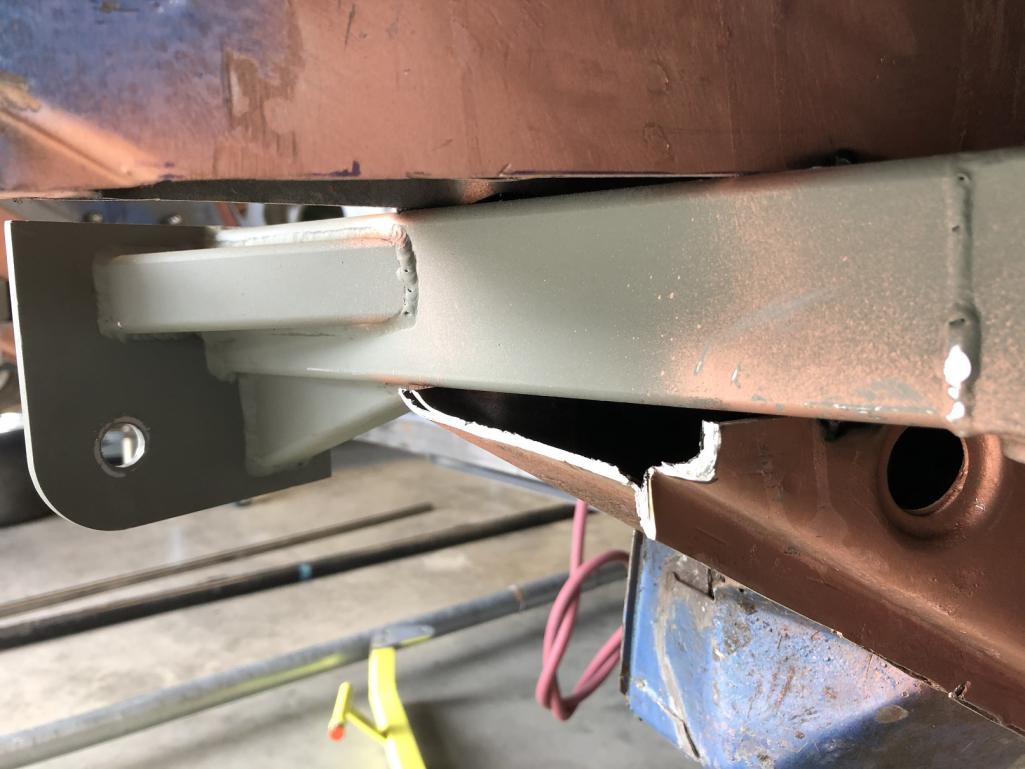
|
|
|
|
| tygaboy |
Nov 12 2019, 03:56 PM
Post
#2003
|
|
914 Guru Group: Members Posts: 5,279 Joined: 6-October 15 From: Petaluma, CA Member No.: 19,241 Region Association: Northern California |
Arm fitting.
Lesson learned: if you're doing this mod, wait until it's complete BEFORE doing your flares. I'm chasing getting the wheel centered in the flare... (IMG:style_emoticons/default/headbang.gif) Another fun fact: The mounts get welded to the outside of the longs, where they taper in towards the back of the car. So as the mounts are moved fore and aft, the track width changes. The good news is a rough measurement shows I have 2 degrees negative camber with no shims. Attached thumbnail(s) 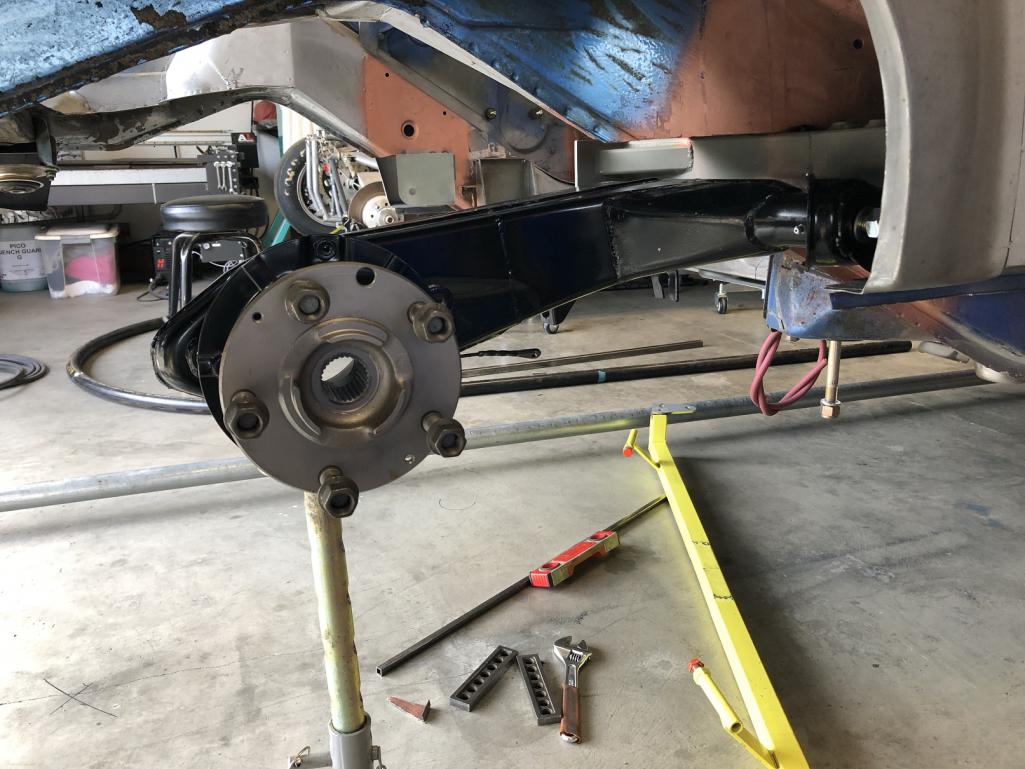
|
|
|
|
| tygaboy |
Nov 12 2019, 04:02 PM
Post
#2004
|
|
914 Guru Group: Members Posts: 5,279 Joined: 6-October 15 From: Petaluma, CA Member No.: 19,241 Region Association: Northern California |
With my wheels (16x9 w/245s), the pic shows where I am at this point. The tire does clear, it's just REALLY close.
Plus, I need the wheels to move forward about .4 inch. I think I can make it work by trimming away about 1/2 the return on inside edge of the flare. If not, I'll need to remove material from the inside of the pick up mount, where it meets the long. Or do both. Either way, I'll make it work. Just means more time spent. Attached thumbnail(s) 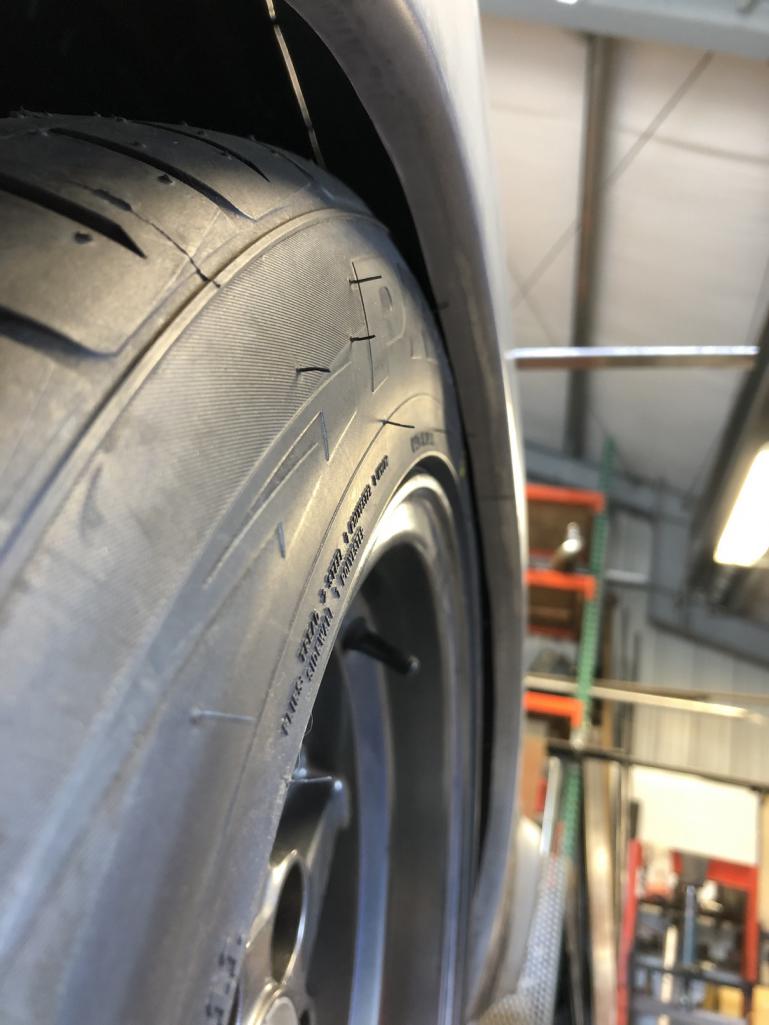
|
|
|
|
| ChrisFoley |
Nov 12 2019, 06:26 PM
Post
#2005
|
|
I am Tangerine Racing Group: Members Posts: 7,920 Joined: 29-January 03 From: Bolton, CT Member No.: 209 Region Association: None |
Trim the lip.
|
|
|
|
| Cairo94507 |
Nov 12 2019, 07:10 PM
Post
#2006
|
|
Michael Group: Members Posts: 9,723 Joined: 1-November 08 From: Auburn, CA Member No.: 9,712 Region Association: Northern California |
I think I would try to roll that part of the lip so you keep the material and strength. (IMG:style_emoticons/default/beerchug.gif)
|
|
|
|
| tygaboy |
Nov 12 2019, 07:33 PM
Post
#2007
|
|
914 Guru Group: Members Posts: 5,279 Joined: 6-October 15 From: Petaluma, CA Member No.: 19,241 Region Association: Northern California |
QUOTE(ChrisFoley @ Nov 12 2019, 04:26 PM)  Trim the lip. Chris - that's certainly the first step. The issue seems to be exacerbated by the fact that my car's original suspension pick up points measured 1.1 cm longer than the published under-chassis specs - as depicted below. When I installed the kit parts and matched my stock pick up location measurements, the gap in the center of the fixture was just under 3/4" wide and the tire was outside the flare. I may be in touch to talk in more detail. Attached image(s) 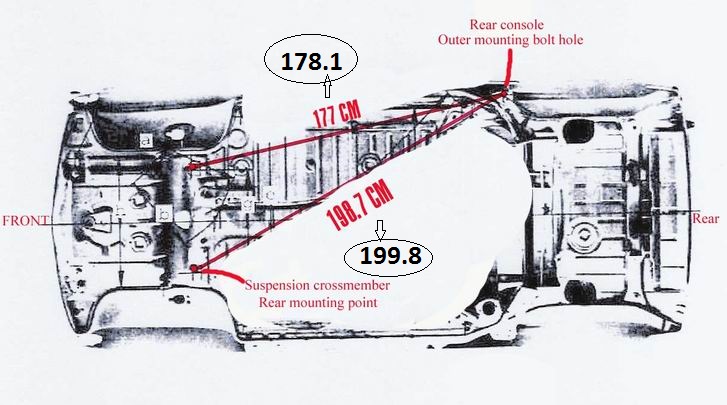
|
|
|
|
| Andyrew |
Nov 12 2019, 11:57 PM
Post
#2008
|
|
Spooling.... Please wait Group: Members Posts: 13,376 Joined: 20-January 03 From: Riverbank, Ca Member No.: 172 Region Association: Northern California |
QUOTE(tygaboy @ Nov 12 2019, 02:02 PM) With my wheels (16x9 w/245s), the pic shows where I am at this point. The tire does clear, it's just REALLY close. Plus, I need the wheels to move forward about .4 inch. I think I can make it work by trimming away about 1/2 the return on inside edge of the flare. If not, I'll need to remove material from the inside of the pick up mount, where it meets the long. Or do both. Either way, I'll make it work. Just means more time spent. Are those THE wheels? You could have 1/4" machined on the inside. I assume you have well over an inch on the inside for clearance? You pretty much need about 1/2" of room to allow the tire to flex. 1/4" with lower profile and stiff sidewalls. Granted that inner lip on the fenders is a hair excessive. . Pretty cool you got it this close on your first try (IMG:style_emoticons/default/smile.gif) |
|
|
|
| sixnotfour |
Nov 13 2019, 12:38 AM
Post
#2009
|
|
914 Wizard Group: Members Posts: 10,418 Joined: 12-September 04 From: Life Elevated..planet UT. Member No.: 2,744 Region Association: Rocky Mountains |
QUOTE Granted that inner lip on the fenders is a hair excessive. . QUOTE Trim the lip. (IMG:style_emoticons/default/sawzall-smiley.gif) (IMG:style_emoticons/default/sawzall-smiley.gif) oh hell just make some offset railing arms... (IMG:style_emoticons/default/sawzall-smiley.gif) (IMG:style_emoticons/default/welder.gif) (IMG:style_emoticons/default/blink.gif) |
|
|
|
| ChrisFoley |
Nov 13 2019, 05:26 AM
Post
#2010
|
|
I am Tangerine Racing Group: Members Posts: 7,920 Joined: 29-January 03 From: Bolton, CT Member No.: 209 Region Association: None |
I would lean toward the as built dimensions instead of the factory specs.
|
|
|
|
| tygaboy |
Nov 13 2019, 11:27 AM
Post
#2011
|
|
914 Guru Group: Members Posts: 5,279 Joined: 6-October 15 From: Petaluma, CA Member No.: 19,241 Region Association: Northern California |
Some positive validation: The driver side has essentially identical fore/aft position in the flare as well as tire-to-flare clearance.
As Huey sang, "It's hip to be square." Attached thumbnail(s) 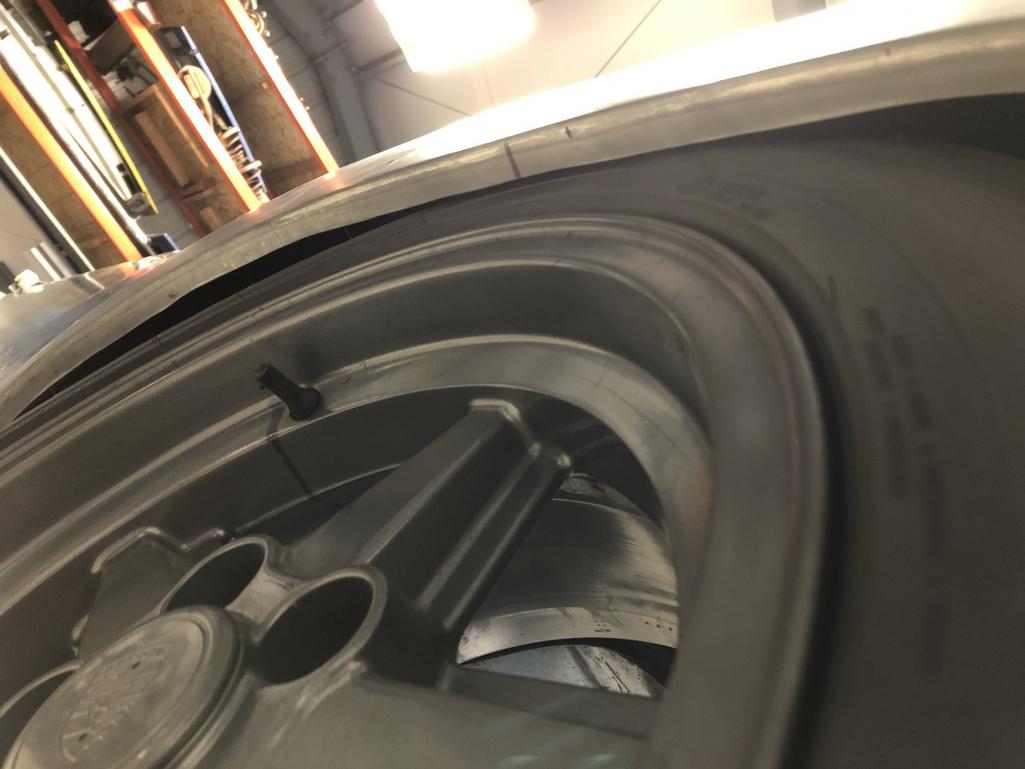
|
|
|
|
| Jeff Hail |
Nov 13 2019, 02:18 PM
Post
#2012
|
|
Senior Member Group: Members Posts: 1,141 Joined: 3-May 07 From: LA/ CA Member No.: 7,712 |
QUOTE(tygaboy @ Nov 13 2019, 09:27 AM) Some positive validation: The driver side has essentially identical fore/aft position in the flare as well as tire-to-flare clearance. As Huey sang, "It's hip to be square." On the right track. Square is hip to be. If you check a lot of 914 profile photos you will notice many are all over the place especially for tire/wheel position in the fore/ aft of the wheel openings. (with flares or without) Some appear centered, others seem like the wheel is forward a bit. Mind not because the critical stuff is all in the undercarriage. Outer body sheet metal is just a dress, if cosmetic sheet metal is where it needs to be consider it luck on the way. Try taking measurements of (3-4) 914's. The head demons will take over for a week or two. |
|
|
|
| andys |
Nov 13 2019, 03:41 PM
Post
#2013
|
|
Advanced Member Group: Members Posts: 2,165 Joined: 21-May 03 From: Valencia, CA Member No.: 721 Region Association: None |
QUOTE(tygaboy @ Nov 12 2019, 03:02 PM) With my wheels (16x9 w/245s), the pic shows where I am at this point. The tire does clear, it's just REALLY close. Plus, I need the wheels to move forward about .4 inch. I think I can make it work by trimming away about 1/2 the return on inside edge of the flare. If not, I'll need to remove material from the inside of the pick up mount, where it meets the long. Or do both. Either way, I'll make it work. Just means more time spent. Is that the fit up with 2 degrees camber? At ride height? My friend had a shop install his flares, and they rolled that inside lip around (I believe) a 1/4" rod, which yielded significantly more clearance. Andys |
|
|
|
| tygaboy |
Nov 15 2019, 03:01 PM
Post
#2014
|
|
914 Guru Group: Members Posts: 5,279 Joined: 6-October 15 From: Petaluma, CA Member No.: 19,241 Region Association: Northern California |
What was I thinking? Of COURSE it was going to take me multiple attempts before I got it right! Why would this be different from any other part of this build? (IMG:style_emoticons/default/laugh.gif)
After the first couple tries, I'd built a fair bit of confidence in terms of how this all goes together, what and where the changes happen when the parts are moved around, etc. Having established that the firewall lower cross member and tops of the engine mount plates always measured level to each other, I could use them as reference and simply work on the installation no matter what position the car was in on the rotisserie. I just had to get a measure of either of those and use it as the target # when "leveling" the tangerine components and fixture in the chassis. So after some careful measuring, a bit of math and remembering that 1/2 the time the car is upside down (wait, which side am I working on? (IMG:style_emoticons/default/blink.gif) ) I got attempt #3 positioned, leveled and tacked in. I also trimmed the inner edge of the flare. I had my fingers crossed there'd be clearance - which made installing that wheel a little harder than normal. (IMG:style_emoticons/default/lol-2.gif) Clearance is still tight-ish on the outside with about 3/4" on the inside. If needed, I can roll the remaining flare lip as @andys mentioned or as @Andyrew suggested, mill a bit off the inside of the wheel. I also have the option of removing some material from the inside of the Tangerine pickup, where it butts up to the outside of the long. Attached thumbnail(s) 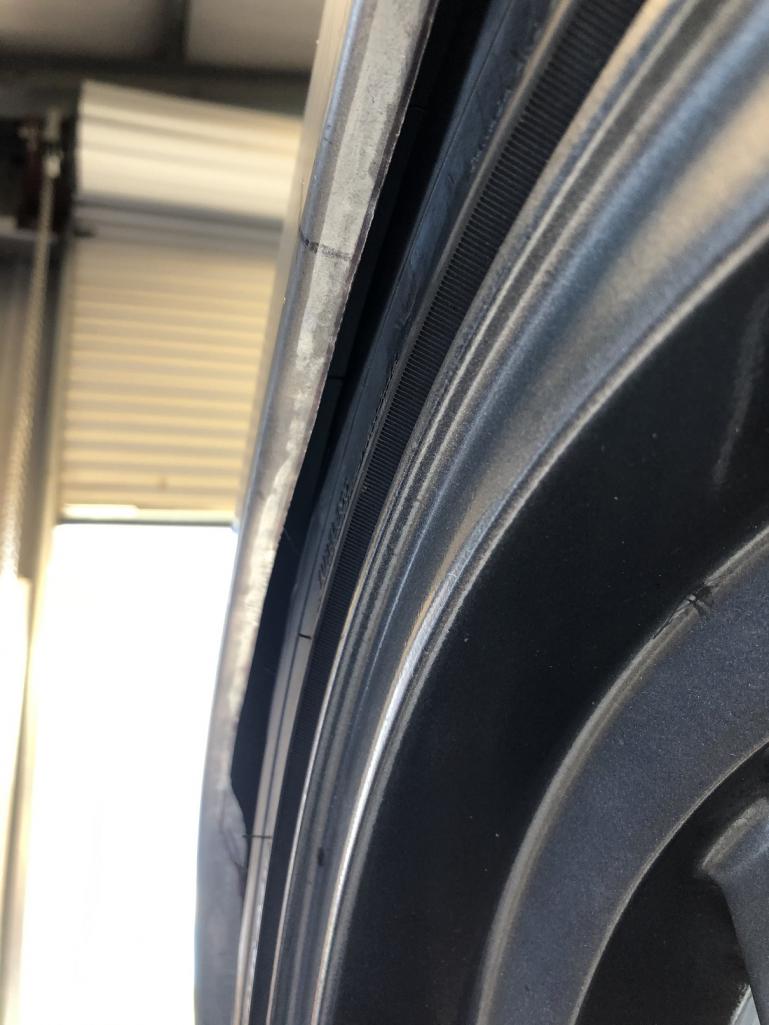 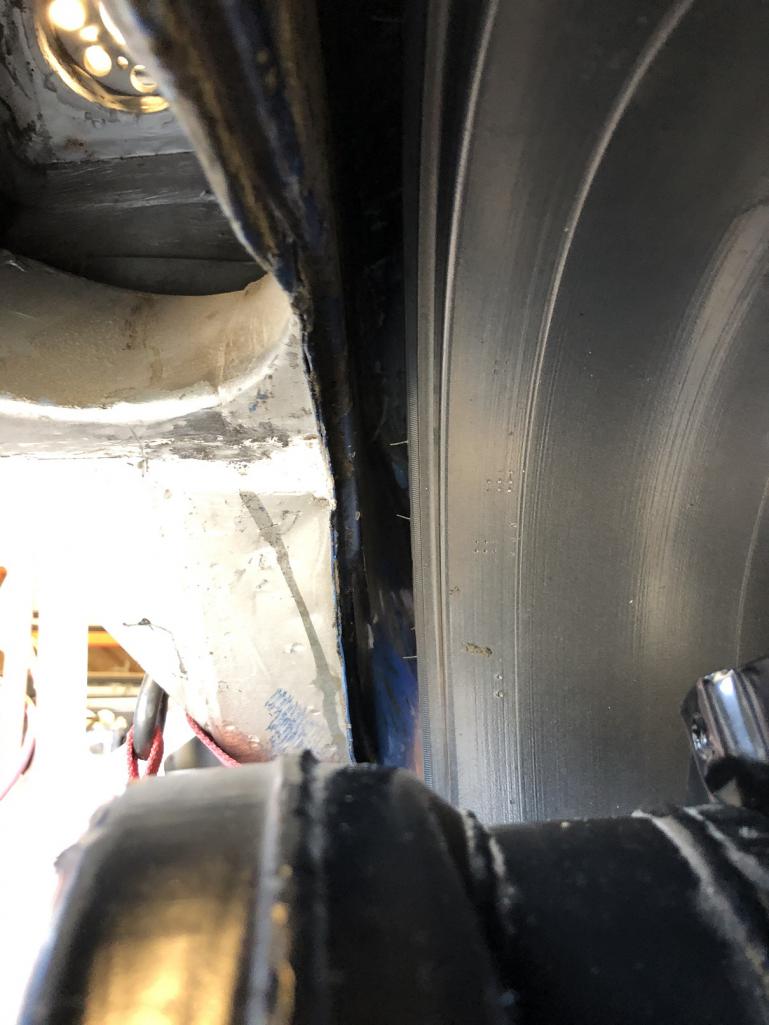
|
|
|
|
| tygaboy |
Nov 15 2019, 03:08 PM
Post
#2015
|
|
914 Guru Group: Members Posts: 5,279 Joined: 6-October 15 From: Petaluma, CA Member No.: 19,241 Region Association: Northern California |
Doing my best at channeling Jeff Hail. Check his installation of this kit and you'll understand what I mean.
Don't overreact to that camber number. Remember, I don't always have the car at "0" level. At this point, it was at -2.1 degrees, putting my ride height camber with no shims at ~ -1.7 Attached thumbnail(s) 
|
|
|
|
| tygaboy |
Nov 15 2019, 03:12 PM
Post
#2016
|
|
914 Guru Group: Members Posts: 5,279 Joined: 6-October 15 From: Petaluma, CA Member No.: 19,241 Region Association: Northern California |
And I'm happy with the wheel position in the flare opening. Wheelbase measurement spec be damned!
Actually, I don't have the front suspension on the car so can't even measure it yet. Once I do, I'll be interested to see where I ended up. I have to say, I REALLY like these wheels on this car. (IMG:style_emoticons/default/wub.gif) Attached thumbnail(s) 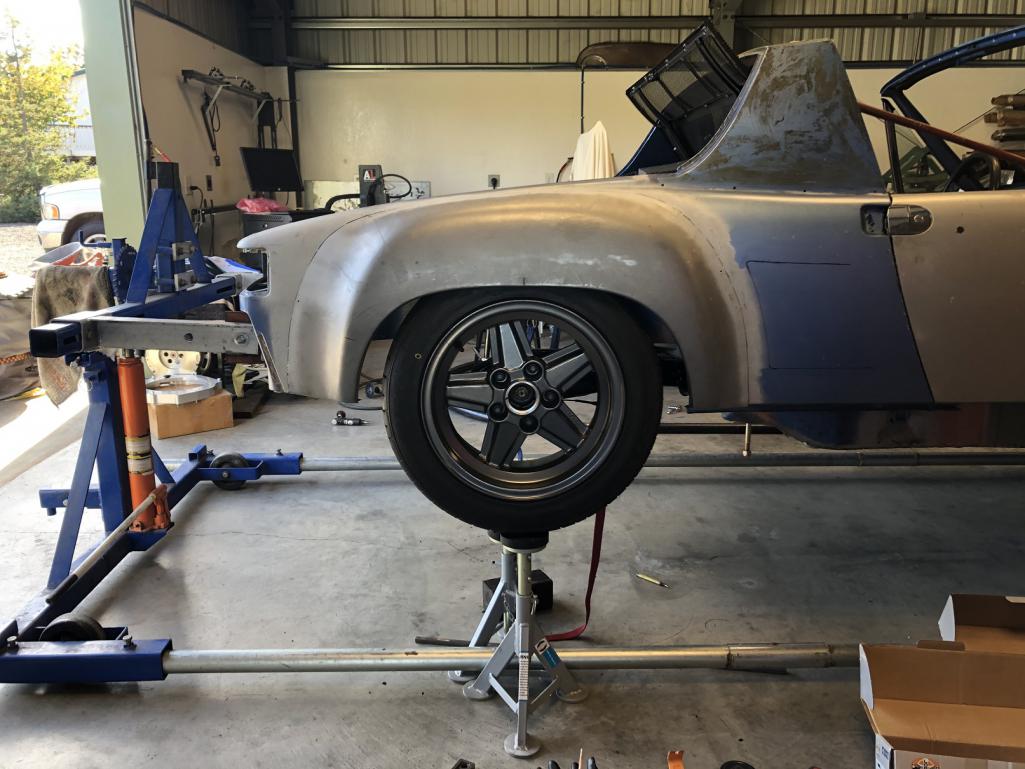
|
|
|
|
| tygaboy |
Nov 15 2019, 03:20 PM
Post
#2017
|
|
914 Guru Group: Members Posts: 5,279 Joined: 6-October 15 From: Petaluma, CA Member No.: 19,241 Region Association: Northern California |
@wes and @horizontally-opposed
Wes and Pete stopped by yesterday for a visit and to talk about a small project I may be able to help them accomplish. Another couple of characters, to say the least! So I just want to say how great it is to put faces with names and get to know others from this forum. Pete brought his insanely nice /6 conversion (as well as a very generous gift of a copy of 000!) and while the cars are always a point of interest, what I'm most fascinated by are the stories and experiences everyone has, how willing to share and help they are and in general, what great people we have in this community. Anyway, back to the build... |
|
|
|
| horizontally-opposed |
Nov 15 2019, 04:00 PM
Post
#2018
|
|
Advanced Member Group: Members Posts: 3,431 Joined: 12-May 04 From: San Francisco Member No.: 2,058 Region Association: None |
^ Back at ya. (IMG:style_emoticons/default/beerchug.gif)
Was great to hang out with you and Wes, and to see your project and shop. (IMG:style_emoticons/default/wub.gif) My only regret is you didn't actually sit in my car to check out seating position—but it looks like you are well ahead of the game on that. Your build is epic, and let me know if you ever want to take my car for a spin for lunch! |
|
|
|
| Jeff Hail |
Nov 15 2019, 07:47 PM
Post
#2019
|
|
Senior Member Group: Members Posts: 1,141 Joined: 3-May 07 From: LA/ CA Member No.: 7,712 |
QUOTE(tygaboy @ Nov 15 2019, 01:08 PM) Doing my best at channeling Jeff Hail. Check his installation of this kit and you'll understand what I mean. Don't overreact to that camber number. Remember, I don't always have the car at "0" level. At this point, it was at -2.1 degrees, putting my ride height camber with no shims at ~ -1.7 Thanks for the plug Chris from one tool whore to another. Attached image(s) 
|
|
|
|
| 914forme |
Nov 15 2019, 07:55 PM
Post
#2020
|
|
Times a wastin', get wrenchin'! Group: Members Posts: 3,896 Joined: 24-July 04 From: Dayton, Ohio Member No.: 2,388 Region Association: None |
@tygaboy doing an excellent job Chris thank you for documenting this so well.
(IMG:style_emoticons/default/poke.gif) Now what about the steel roof. (IMG:style_emoticons/default/lol-2.gif) |
|
|
|
|
2 User(s) are reading this topic (2 Guests and 0 Anonymous Users)
0 Members:

|
Lo-Fi Version | Time is now: 3rd May 2024 - 03:22 AM |
Invision Power Board
v9.1.4 © 2024 IPS, Inc.