|
|
|
Porsche, and the Porsche crest are registered trademarks of Dr. Ing. h.c. F. Porsche AG.
This site is not affiliated with Porsche in any way. Its only purpose is to provide an online forum for car enthusiasts. All other trademarks are property of their respective owners. |
|
|

  |

| tygaboy |
 Dec 7 2019, 04:45 PM Dec 7 2019, 04:45 PM
Post
#2101
|
|
914 Guru  Group: Members Posts: 5,826 Joined: 6-October 15 From: Petaluma, CA Member No.: 19,241 Region Association: Northern California |
A bit of edge trimming and the inside upper plates are tacked in.
On the driver side, I ended up having to weld on about a 3/16" extension to the front, inside vertical edge of the plate to get a nice fit round the entire plate. Again, no surprise in that we know there's all sorts of variation across 914 chassis. Attached thumbnail(s) 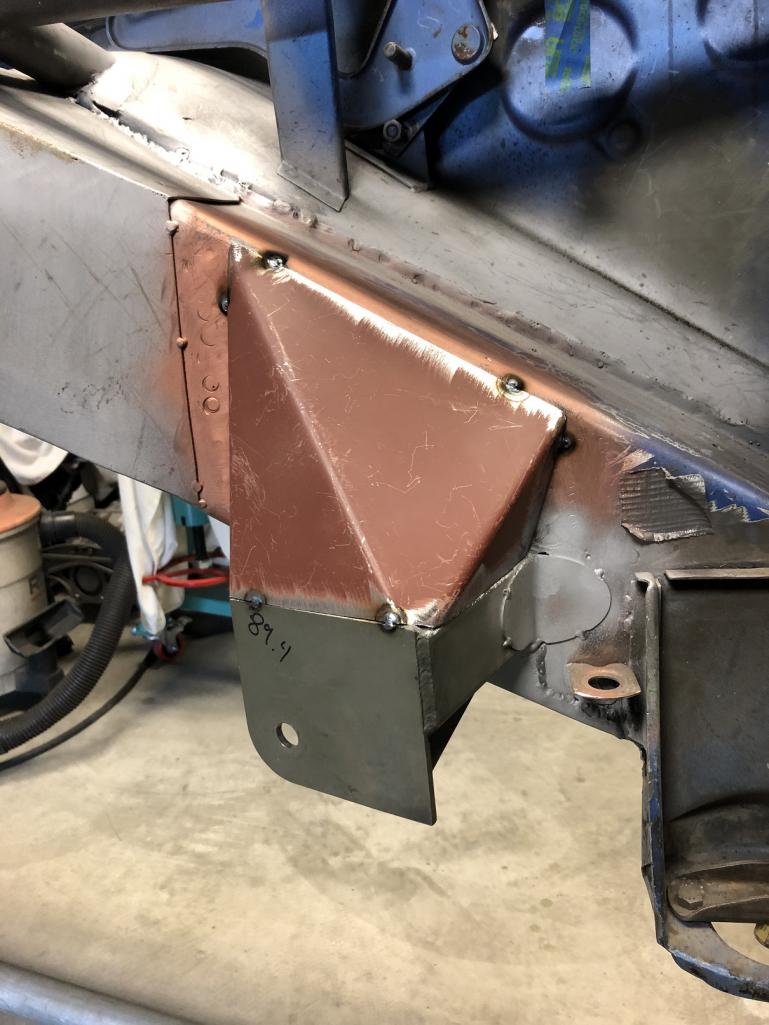 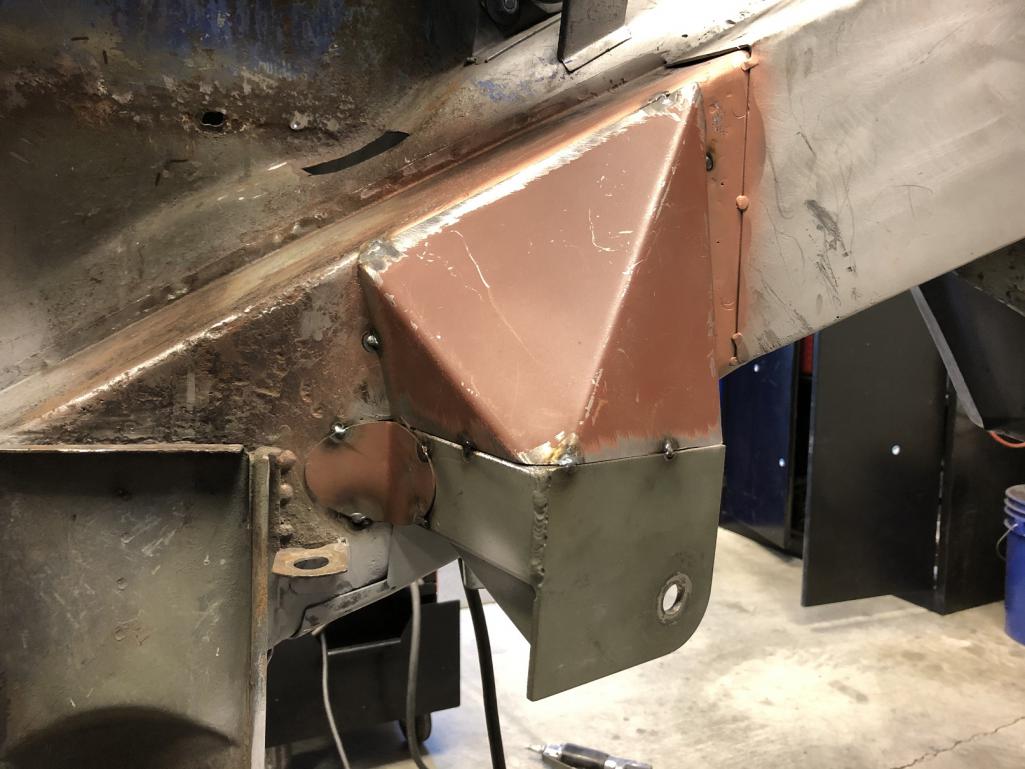
|
   |

 
|
| tygaboy |
Dec 7 2019, 04:48 PM
Post
#2102
|
|
914 Guru Group: Members Posts: 5,826 Joined: 6-October 15 From: Petaluma, CA Member No.: 19,241 Region Association: Northern California |
But I was able to get complete contact on all mating surfaces!
Most all of that credit goes to the quality of the Tangerine product, but I did take the time to fine tune. Attached thumbnail(s) 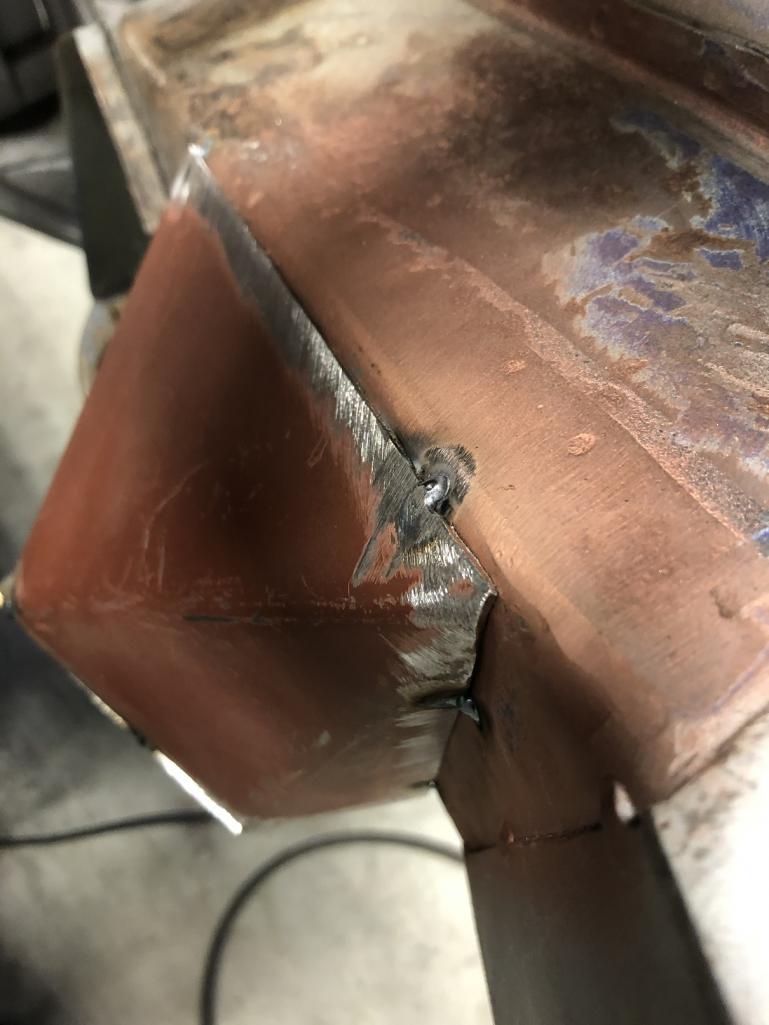
|
|
|
|
| tygaboy |
Dec 7 2019, 04:53 PM
Post
#2103
|
|
914 Guru Group: Members Posts: 5,826 Joined: 6-October 15 From: Petaluma, CA Member No.: 19,241 Region Association: Northern California |
Now it's on to the "fun" part: fitting the plates that live inside the fender well.
Ugh. Not great access and really hard to get line of sight to all the joints that need welding. And as it relates to the inner and outer large plates, these need to be first in line for final welding as any shrinkage here will add negative camber. I need to lock these down before going after those inners I just tacked in. But I'll figure it out! Hmmm, maybe this is the time to add some fender vents... (IMG:style_emoticons/default/idea.gif) |
|
|
|
| 914forme |
Dec 7 2019, 05:54 PM
Post
#2104
|
|
Times a wastin', get wrenchin'! Group: Members Posts: 3,899 Joined: 24-July 04 From: Dayton, Ohio Member No.: 2,388 Region Association: None |
Your fenders are tacked in place with several welds, easy to remove and redo. It would only be your _______ time.
|
|
|
|
| Andyrew |
Dec 7 2019, 07:44 PM
Post
#2105
|
|
Spooling.... Please wait Group: Members Posts: 13,380 Joined: 20-January 03 From: Riverbank, Ca Member No.: 172 Region Association: Northern California |
QUOTE(tygaboy @ Dec 7 2019, 03:53 PM)  He's a mad man!! (IMG:style_emoticons/default/sawzall-smiley.gif) (i would love to see this) |
|
|
|
| dan10101 |
Dec 8 2019, 09:57 AM
Post
#2106
|
|
TORQUE-o-holic Group: Members Posts: 1,140 Joined: 29-April 03 From: Eagle Point, Or Member No.: 626 Region Association: Pacific Northwest |
Woops, that was really OT. 'deleted'
Carry on.. I would like to do fender vents too, but I don't have the steel for it... (IMG:style_emoticons/default/smile.gif) |
|
|
|
| FourBlades |
Dec 8 2019, 10:57 AM
Post
#2107
|
|
From Wreck to Rockin Group: Members Posts: 2,056 Joined: 3-December 07 From: Brevard, FL Member No.: 8,414 Region Association: South East States |
Wow, great work as always! Looking good. The time you spent getting it all square and level will pay off the rest of the cars lifetime.
Sorry to hear about the health issues, hopefully they can take care of it easily. Keep on building an entertaining us all! (IMG:style_emoticons/default/chowtime.gif) Helps inspire me work on my own projects. John |
|
|
|
| tygaboy |
Dec 8 2019, 11:24 AM
Post
#2108
|
|
914 Guru Group: Members Posts: 5,826 Joined: 6-October 15 From: Petaluma, CA Member No.: 19,241 Region Association: Northern California |
QUOTE(dan10101 @ Dec 8 2019, 07:57 AM) Woops, that was really OT. 'deleted' Carry on.. I would like to do fender vents too, but I don't have the steel for it... (IMG:style_emoticons/default/smile.gif) @dan10101 - Dan, come on now! I have a roll of carbon fiber and mold making capabilities... Just sayin'. (IMG:style_emoticons/default/happy11.gif) |
|
|
|
| Mueller |
Dec 8 2019, 12:44 PM
Post
#2109
|
|
914 Freak! Group: Members Posts: 17,155 Joined: 4-January 03 From: Antioch, CA Member No.: 87 Region Association: None |
Nice trailing arm mounts, Chris
|
|
|
|
| ChrisFoley |
Dec 8 2019, 07:03 PM
Post
#2110
|
|
I am Tangerine Racing Group: Members Posts: 8,030 Joined: 29-January 03 From: Bolton, CT Member No.: 209 Region Association: None |
QUOTE(tygaboy @ Dec 7 2019, 03:32 PM) Then there's the "top cap" (even though it's the bottom part. Hey, the car is upside down and it's my build. Deal with it. (IMG:style_emoticons/default/happy11.gif) ) I haven't verified this w/ @ChrisFoley , but I suspect these pieces are used in both the 2" raise and the 3" raise kits. Since mine is the 2", you can see there's some trimming needed on that inside leg to get it to sit down where it needs to be. They are different. However that doesn't negate the possibility I sent you the wrong ones. (IMG:style_emoticons/default/smile.gif) Due to space considerations, parts storage is not fully organized. |
|
|
|
| tygaboy |
Dec 9 2019, 01:39 PM
Post
#2111
|
|
914 Guru Group: Members Posts: 5,826 Joined: 6-October 15 From: Petaluma, CA Member No.: 19,241 Region Association: Northern California |
Flip things over and you can see there are some openings to close!
The kit comes with a piece that closes the long and extends over to the inner pick up plate and the inner support piece I covered in the last couple posts. However, it didn't quite fit my chassis/pick up. I assume it's another "all these cars are slightly different". No matter as I opted to go with a slightly different design. Attached thumbnail(s) 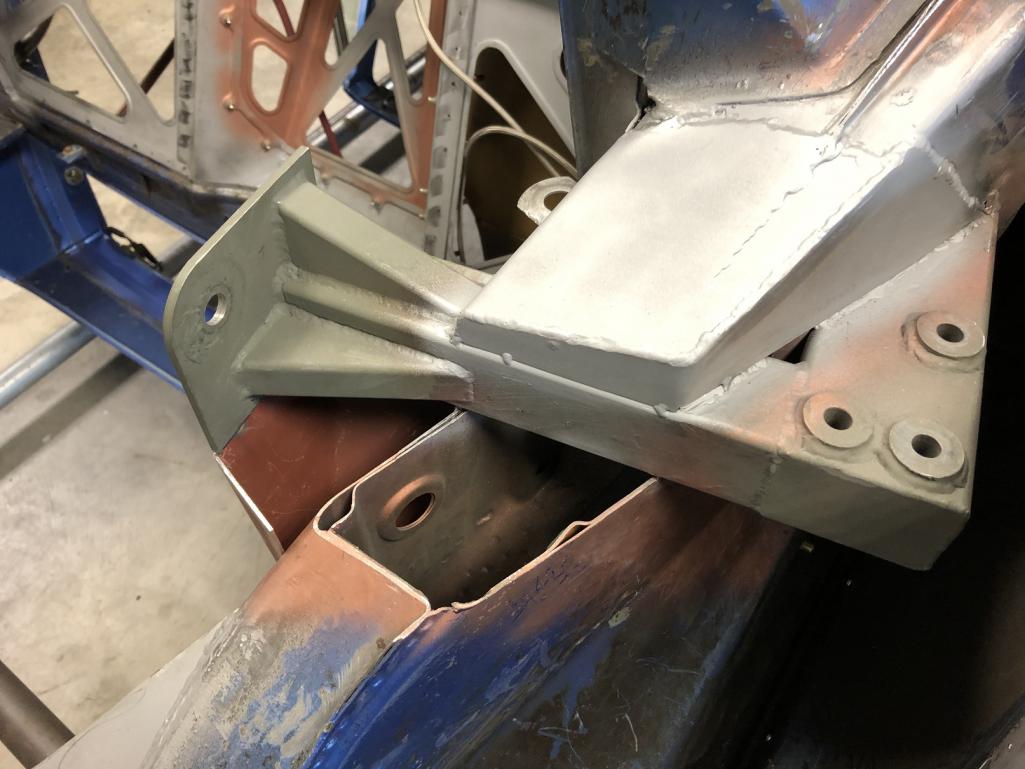
|
|
|
|
| tygaboy |
Dec 9 2019, 01:39 PM
Post
#2112
|
|
914 Guru Group: Members Posts: 5,826 Joined: 6-October 15 From: Petaluma, CA Member No.: 19,241 Region Association: Northern California |
First, I cut this piece to close off the long.
Attached thumbnail(s) 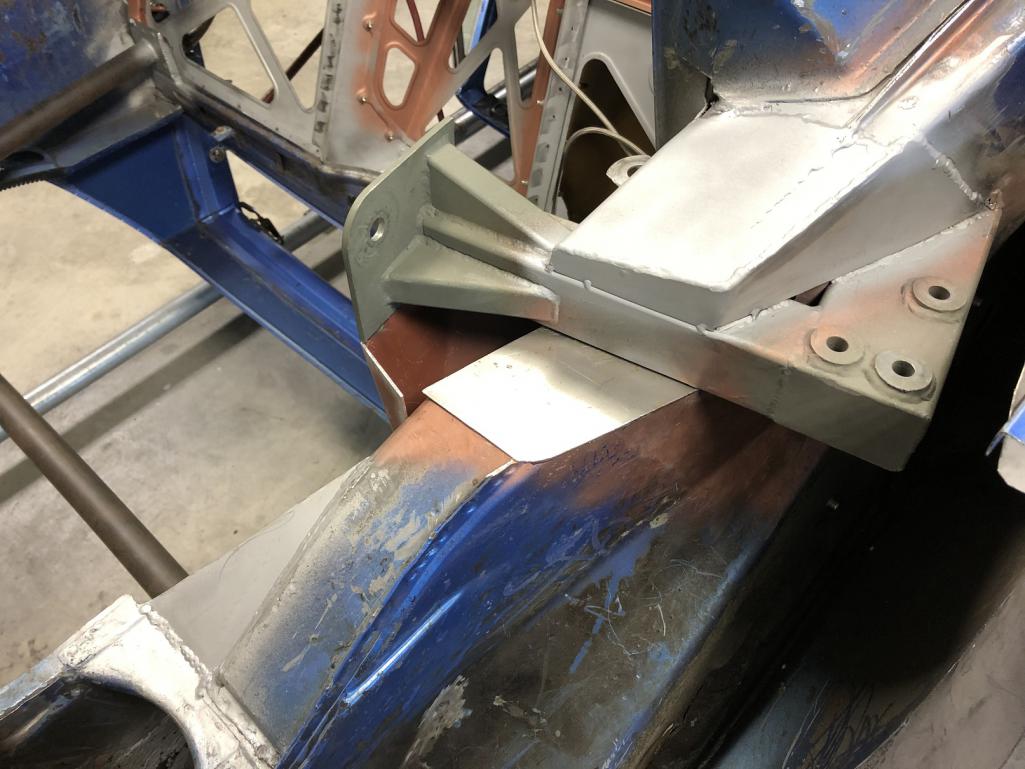
|
|
|
|
| tygaboy |
Dec 9 2019, 01:40 PM
Post
#2113
|
|
914 Guru Group: Members Posts: 5,826 Joined: 6-October 15 From: Petaluma, CA Member No.: 19,241 Region Association: Northern California |
Then I tacked it in and fully welded the areas that wouldn't be accessible once I added the other gusset plate I had planned.
Attached thumbnail(s) 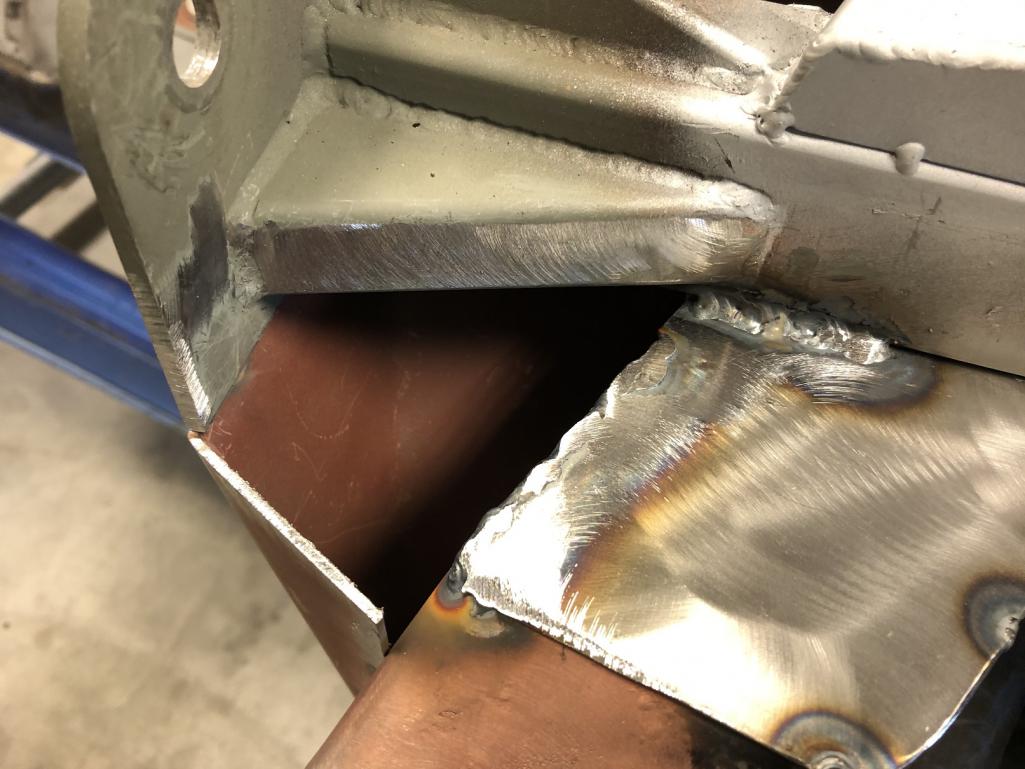
|
|
|
|
| tygaboy |
Dec 9 2019, 01:41 PM
Post
#2114
|
|
914 Guru Group: Members Posts: 5,826 Joined: 6-October 15 From: Petaluma, CA Member No.: 19,241 Region Association: Northern California |
Next, I cut, folded, fit and tacked in this piece. I also fit the trailing arm, just to be sure there would be no clearance issues.
Yes, I see that little opening in the corner... (IMG:style_emoticons/default/poke.gif) Attached thumbnail(s) 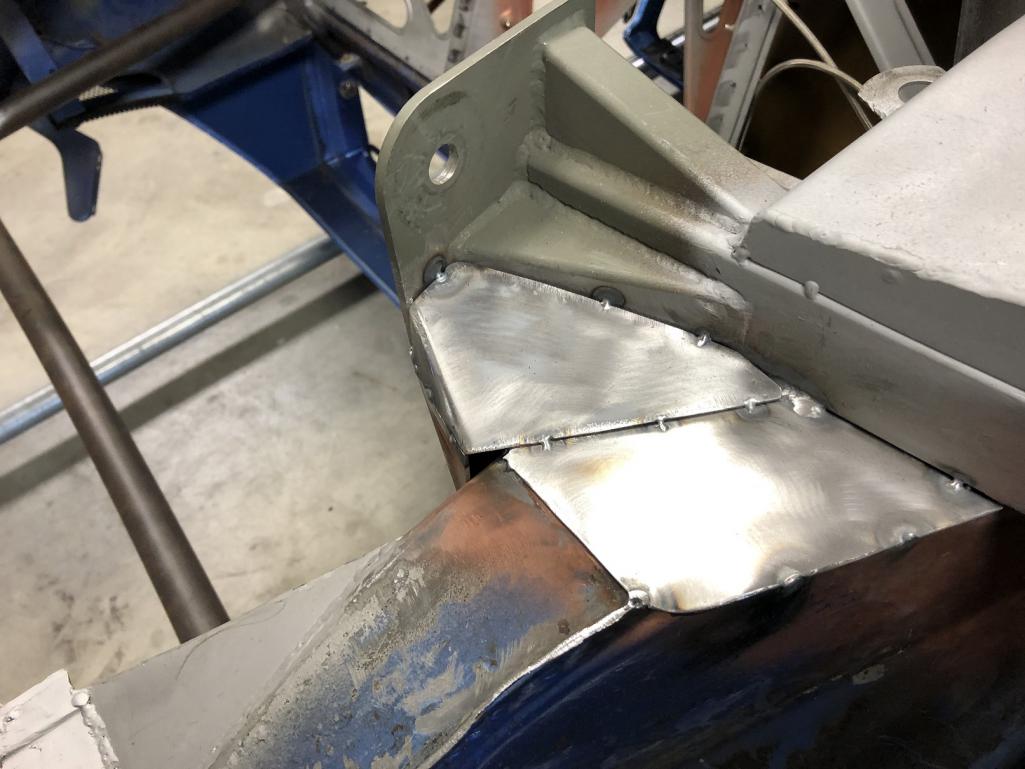
|
|
|
|
| tygaboy |
Dec 9 2019, 01:43 PM
Post
#2115
|
|
914 Guru Group: Members Posts: 5,826 Joined: 6-October 15 From: Petaluma, CA Member No.: 19,241 Region Association: Northern California |
Little opening in the corner all gone. Everything in this area ready for final welding.
On to the other side! (IMG:style_emoticons/default/sawzall-smiley.gif) (IMG:style_emoticons/default/welder.gif) Attached thumbnail(s) 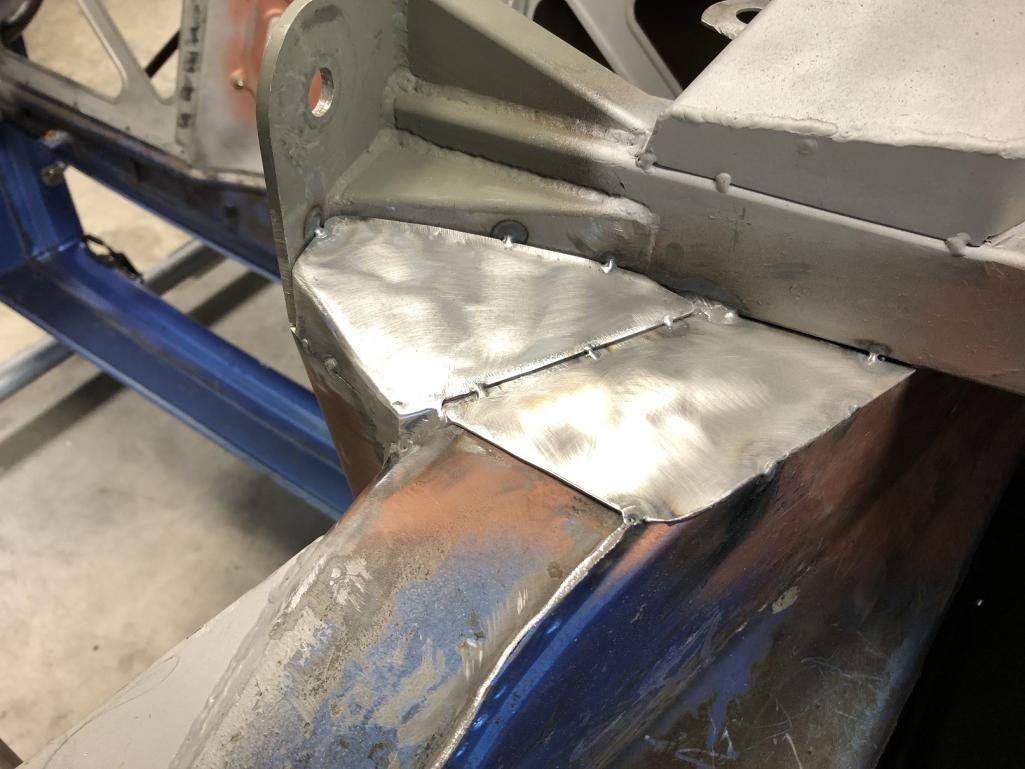
|
|
|
|
| tygaboy |
Dec 9 2019, 04:57 PM
Post
#2116
|
|
914 Guru Group: Members Posts: 5,826 Joined: 6-October 15 From: Petaluma, CA Member No.: 19,241 Region Association: Northern California |
Lather, rinse, repeat. For some reason, I ended up with some sort of contamination on the under side of the one plate and ended up with a couple surprise "POPs" that left me with a couple holes. No worries, they'll be addressed during final welding.
Attached thumbnail(s) 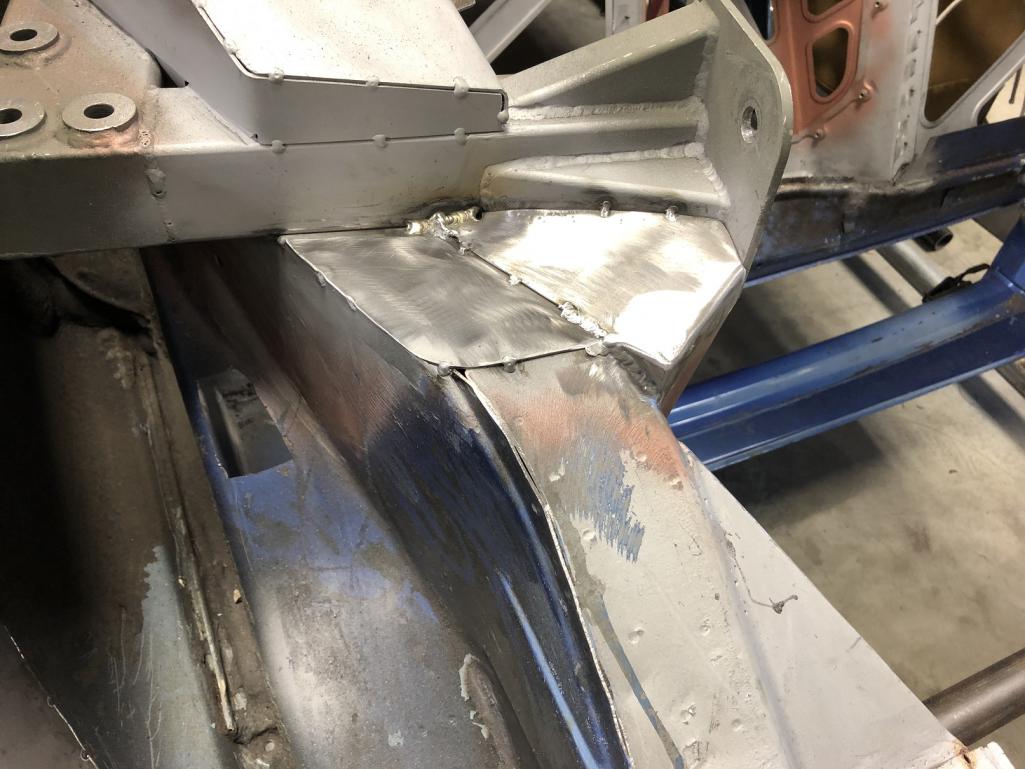
|
|
|
|
| tygaboy |
Dec 9 2019, 05:00 PM
Post
#2117
|
|
914 Guru Group: Members Posts: 5,826 Joined: 6-October 15 From: Petaluma, CA Member No.: 19,241 Region Association: Northern California |
Now the fun part: fitting and welding in the outside upper reinforcements.
After starting on the passenger side, I was reminded I haven't yet patched the hell hole-related inner wheel housing damage at the battery tray. You can see the holes, just above the upper edges of the plate. Anyway, this gives an idea of the available access I have. Attached thumbnail(s) 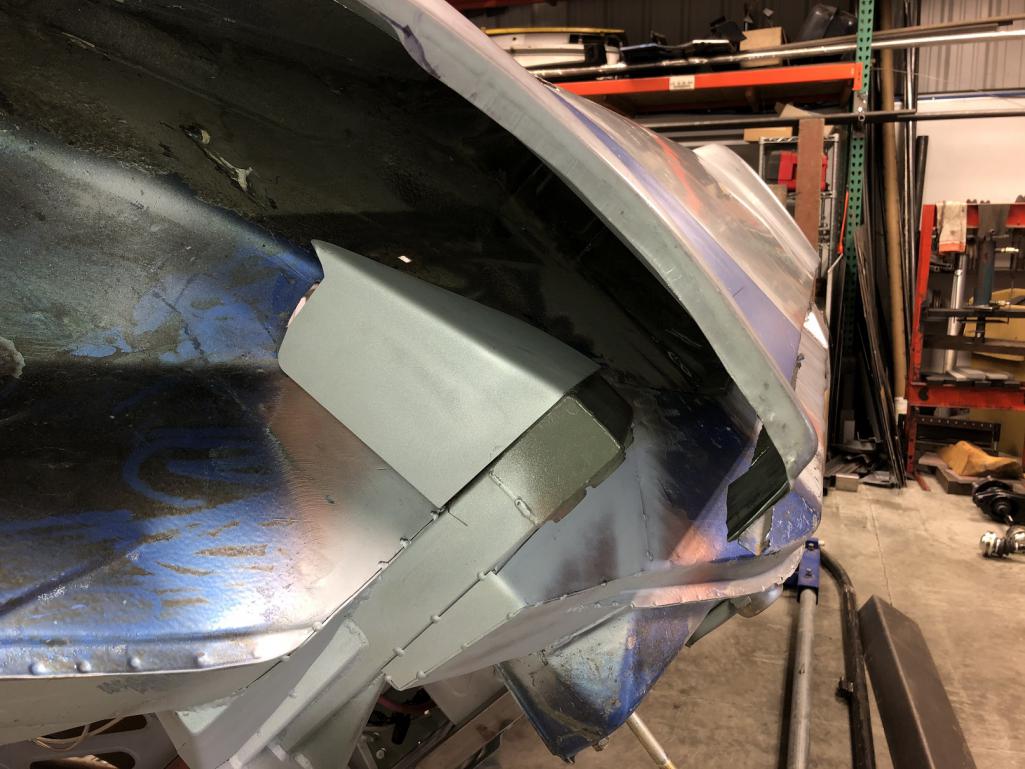
|
|
|
|
| tygaboy |
Dec 9 2019, 05:04 PM
Post
#2118
|
|
914 Guru Group: Members Posts: 5,826 Joined: 6-October 15 From: Petaluma, CA Member No.: 19,241 Region Association: Northern California |
I wanted to make at least some progress with one of these uppers so I moved to the driver side.
Have I said that I don't see how folks do this install without a rotisserie? (IMG:style_emoticons/default/blink.gif) This piece needed just a bit of trimming in a couple spots. I was able to get it tacked in and with a touch of hammering, should be able to get the edges in contact with the chassis all the way around its perimeter. Again, this is the piece I want to final weld first (on each side) to help control any distortion-induced camber change. In all, a pretty productive day. Attached thumbnail(s) 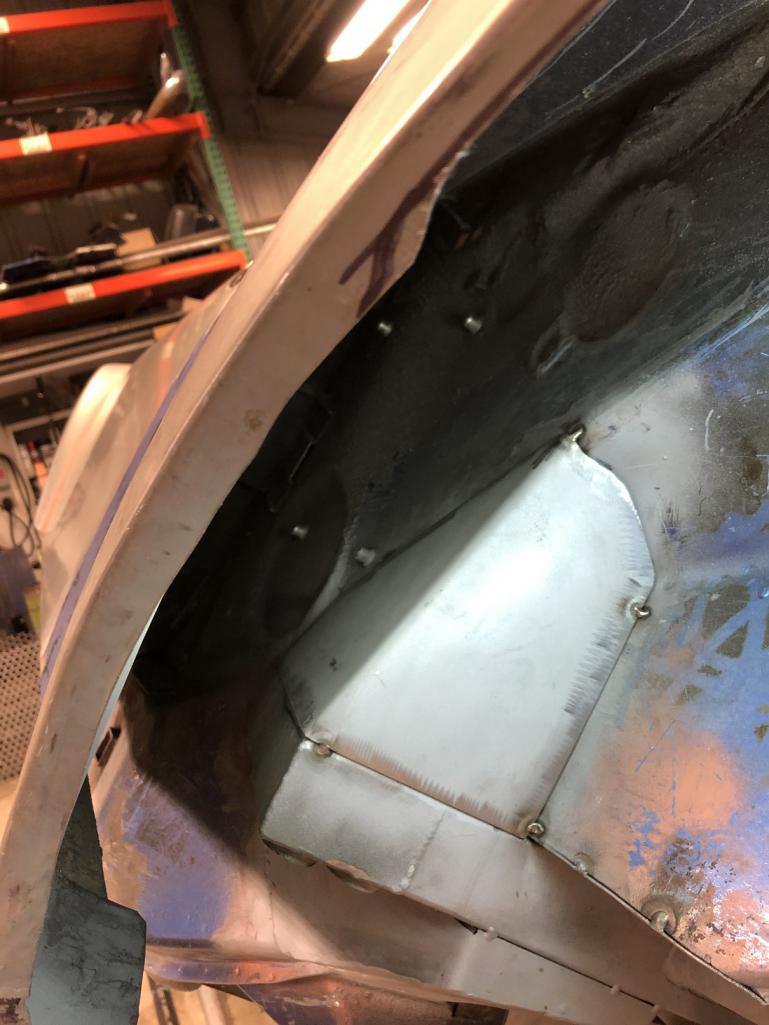
|
|
|
|
| Jeff Hail |
Dec 9 2019, 07:40 PM
Post
#2119
|
|
Senior Member Group: Members Posts: 1,141 Joined: 3-May 07 From: LA/ CA Member No.: 7,712 |
[quote name='tygaboy' date='Dec 9 2019, 03:04 PM' post='2768607']
Have I said that I don't see how folks do this install without a rotisserie? (IMG:style_emoticons/default/blink.gif) Just reverse the polarity, its like flipping the tub upside down! (IMG:style_emoticons/default/lol-2.gif) |
|
|
|
| tygaboy |
Dec 13 2019, 04:47 PM
Post
#2120
|
|
914 Guru Group: Members Posts: 5,826 Joined: 6-October 15 From: Petaluma, CA Member No.: 19,241 Region Association: Northern California |
Boring, I know, but progress is being made!
I patched all the battery acid and rust damage on the inner wheel house (except the small hole you can see just ahead of the reinforcement plate). This allowed me to get the passenger side outer reinforcement fit and tacked in; I can deal with that hole later. I REALLY want to wrap up the install of these raised pick ups. And after looking more closely, I think I can weld these plates in with the access I have. At the very least, I'll give it a go with things as they are. Attached thumbnail(s) 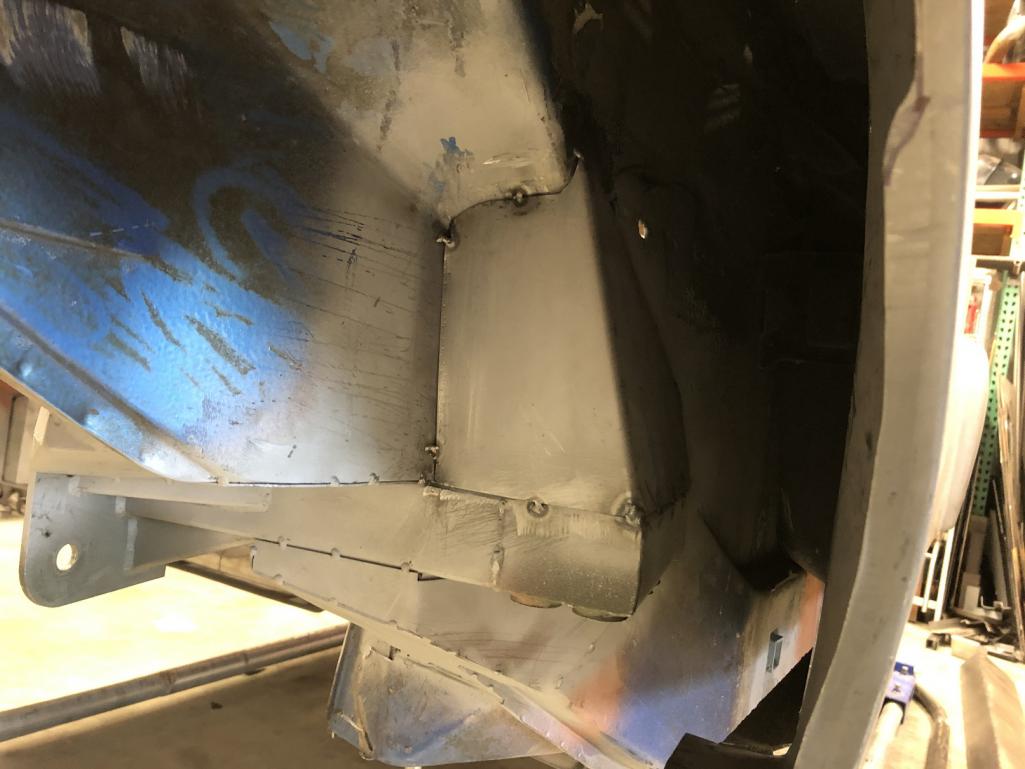
|
|
|
|
|
2 User(s) are reading this topic (2 Guests and 0 Anonymous Users)
0 Members:

|
Lo-Fi Version | Time is now: 7th June 2026 - 01:26 PM |
Invision Power Board
v9.1.4 © 2026 IPS, Inc.