|
|
|
Porsche, and the Porsche crest are registered trademarks of Dr. Ing. h.c. F. Porsche AG.
This site is not affiliated with Porsche in any way. Its only purpose is to provide an online forum for car enthusiasts. All other trademarks are property of their respective owners. |
|
|

  |

| Cairo94507 |
 Feb 4 2020, 06:31 PM Feb 4 2020, 06:31 PM
Post
#2221
|
|
Michael  Group: Members Posts: 10,674 Joined: 1-November 08 From: Auburn, CA Member No.: 9,712 Region Association: Northern California |
Man, I can not wait until I can see your car again. (IMG:style_emoticons/default/beerchug.gif)
|
   |

 
|
| tygaboy |
Feb 4 2020, 07:23 PM
Post
#2222
|
|
914 Guru Group: Members Posts: 5,827 Joined: 6-October 15 From: Petaluma, CA Member No.: 19,241 Region Association: Northern California |
QUOTE(Cairo94507 @ Feb 4 2020, 04:31 PM)  @Cairo94507 Michael - Give me a bit more time and I'll have ALL the chassis fab done. Come see it then! Plus, then you'll see the super secret newest silliness I'm considering! (IMG:style_emoticons/default/shades.gif) (IMG:style_emoticons/default/shades.gif) Any chance you'll have your /6 back soon? |
|
|
|
| FL000 |
Feb 4 2020, 09:04 PM
Post
#2223
|
|
Member Group: Members Posts: 481 Joined: 31-January 12 From: Lancaster, CA Member No.: 14,076 Region Association: Southern California |
Looking great! Do you have any goal for when it may be on the road? I am thinking by the end of the year. (IMG:style_emoticons/default/poke.gif)
I used the 3M body panel adhesive on my Sheridan body panel parts (with some strategic rivets - just in case!) and it has been holding up great. |
|
|
|
| 914forme |
Feb 4 2020, 09:08 PM
Post
#2224
|
|
Times a wastin', get wrenchin'! Group: Members Posts: 3,899 Joined: 24-July 04 From: Dayton, Ohio Member No.: 2,388 Region Association: None |
Yes that 3m Adhesive is strong, matter of fact it is used instead of welding for some operations. It is great when doing dissimilar metals or strengths that become harder to weld, or loose tensile when welded.
Though friction welding has solved some the other dissimilar metal issues. If you predrilled all the rivets you will have an easier time with the fresh paint. (IMG:style_emoticons/default/idea.gif) Wonder if you could get a laser cut mask that lays over work area, and leave the rivet area open. At least it will give you a bit of protection. Think 3M 8 mil paint protection shield. Next up structural closed cell foam. (IMG:style_emoticons/default/confused24.gif) |
|
|
|
| tygaboy |
Feb 5 2020, 09:31 AM
Post
#2225
|
|
914 Guru Group: Members Posts: 5,827 Joined: 6-October 15 From: Petaluma, CA Member No.: 19,241 Region Association: Northern California |
QUOTE(FL 000 @ Feb 4 2020, 07:04 PM) Looking great! Do you have any goal for when it may be on the road? I am thinking by the end of the year. (IMG:style_emoticons/default/poke.gif) I may be deluding myself but I'm trying to have it "running and driving" for this year's WCR. |
|
|
|
| Cairo94507 |
Feb 5 2020, 10:04 AM
Post
#2226
|
|
Michael Group: Members Posts: 10,674 Joined: 1-November 08 From: Auburn, CA Member No.: 9,712 Region Association: Northern California |
Well Chris.... that is the 64 million dollar question. I am hoping to have it at the WCR this year. (IMG:style_emoticons/default/beerchug.gif)
|
|
|
|
| FL000 |
Feb 5 2020, 02:06 PM
Post
#2227
|
|
Member Group: Members Posts: 481 Joined: 31-January 12 From: Lancaster, CA Member No.: 14,076 Region Association: Southern California |
QUOTE(tygaboy @ Feb 5 2020, 07:31 AM) QUOTE(FL 000 @ Feb 4 2020, 07:04 PM) Looking great! Do you have any goal for when it may be on the road? I am thinking by the end of the year. (IMG:style_emoticons/default/poke.gif) I may be deluding myself but I'm trying to have it "running and driving" for this year's WCR. Excellent! That is definitely a good motivator. |
|
|
|
| tygaboy |
Feb 5 2020, 02:32 PM
Post
#2228
|
|
914 Guru Group: Members Posts: 5,827 Joined: 6-October 15 From: Petaluma, CA Member No.: 19,241 Region Association: Northern California |
The instructions call out cure times when the temp is in the low 70s. It hasn't been out of the 50s for the past few days but today the sun was out and it warmed up a bit so how about a bit of the ol' "solar cure"?
I figured a few hours in the sun and I should be good to meet the "full cure in 24 hours". Not that I'm stressing the parts. And yes, I rotate the car every so often to keep the sun fully on the lower firewall. (IMG:style_emoticons/default/shades.gif) Attached thumbnail(s) 
|
|
|
|
| Andyrew |
Feb 5 2020, 04:22 PM
Post
#2229
|
|
Spooling.... Please wait Group: Members Posts: 13,380 Joined: 20-January 03 From: Riverbank, Ca Member No.: 172 Region Association: Northern California |
Did you IR temp the steel? Just curious what it got up to.
|
|
|
|
| tygaboy |
Feb 5 2020, 06:29 PM
Post
#2230
|
|
914 Guru Group: Members Posts: 5,827 Joined: 6-October 15 From: Petaluma, CA Member No.: 19,241 Region Association: Northern California |
QUOTE(Andyrew @ Feb 5 2020, 02:22 PM) Did you IR temp the steel? Just curious what it got up to. @Andyrew - I didn't. Low temp (within reason) just means a longer cure time. The adhesive changes color, from silver to purple, indicating it's cured. I wanted to move things along as much as I could and at the end of the day, everything was purple! |
|
|
|
| tygaboy |
Feb 6 2020, 03:26 PM
Post
#2231
|
|
914 Guru Group: Members Posts: 5,827 Joined: 6-October 15 From: Petaluma, CA Member No.: 19,241 Region Association: Northern California |
Time to bond in the access panel frame!
I fabbed a flange for the front edge of the access panel's upper area "close off" plate. It needed a little stretching to match the contour of the plate. Then I spot welded it to the closing plate. The tipped edges will bond to the back side of the dog house. I liberally (!) primed the inside of this area. Wow, after all this time, this is the last time I'll be seeing this part of the car! Attached thumbnail(s) 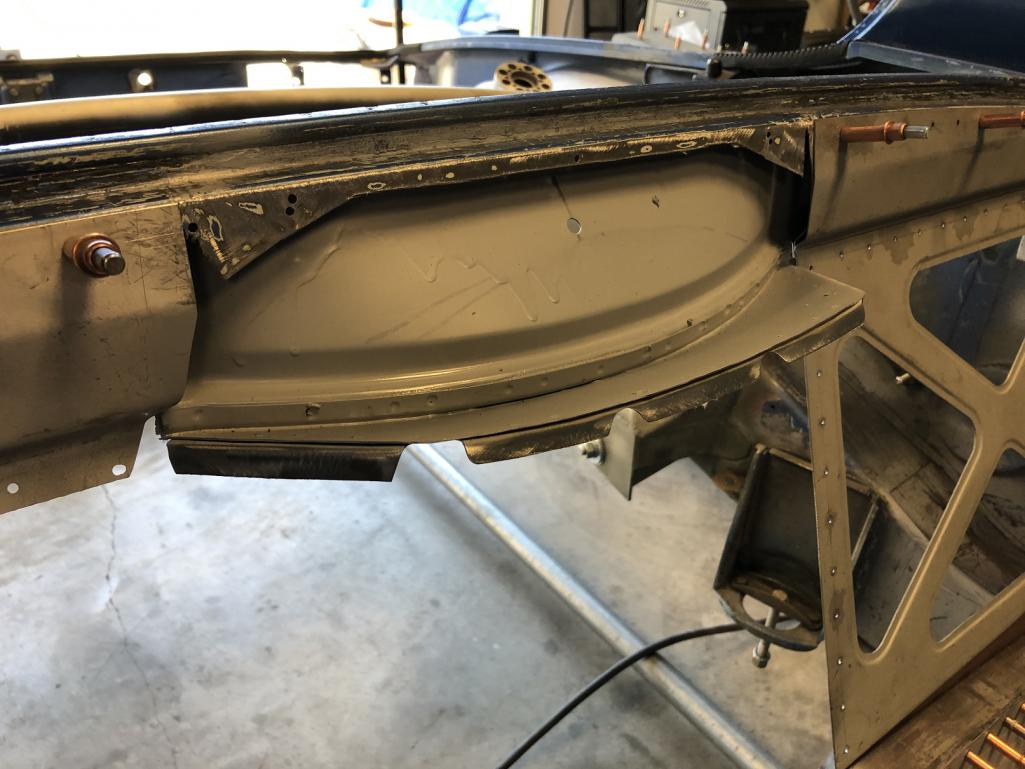
|
|
|
|
| tygaboy |
Feb 6 2020, 03:30 PM
Post
#2232
|
|
914 Guru Group: Members Posts: 5,827 Joined: 6-October 15 From: Petaluma, CA Member No.: 19,241 Region Association: Northern California |
It was much warmer today and that made a noticeable difference in how easily the adhesive tooled out. It flowed a LOT more quickly. And after my experience with bonding the lower area of the fire wall, I used more adhesive to ensure I got it to flow out of the seams during clamping.
It was a bit messier but I got the result I was after. The main panels behind the seats and the trim pieces above them are not bonded in. They are Cleco'd in place to help ensure the dog house is properly located. It's nice in that all I have to do is Cleco things together at the unbonded surfaces and everything is in the correct place. Then simply clamp the bonded areas and I know the parts are all aligned! Note the lower area is fully cured. The Clecos are there simply because I haven't yet removed them. Attached thumbnail(s) 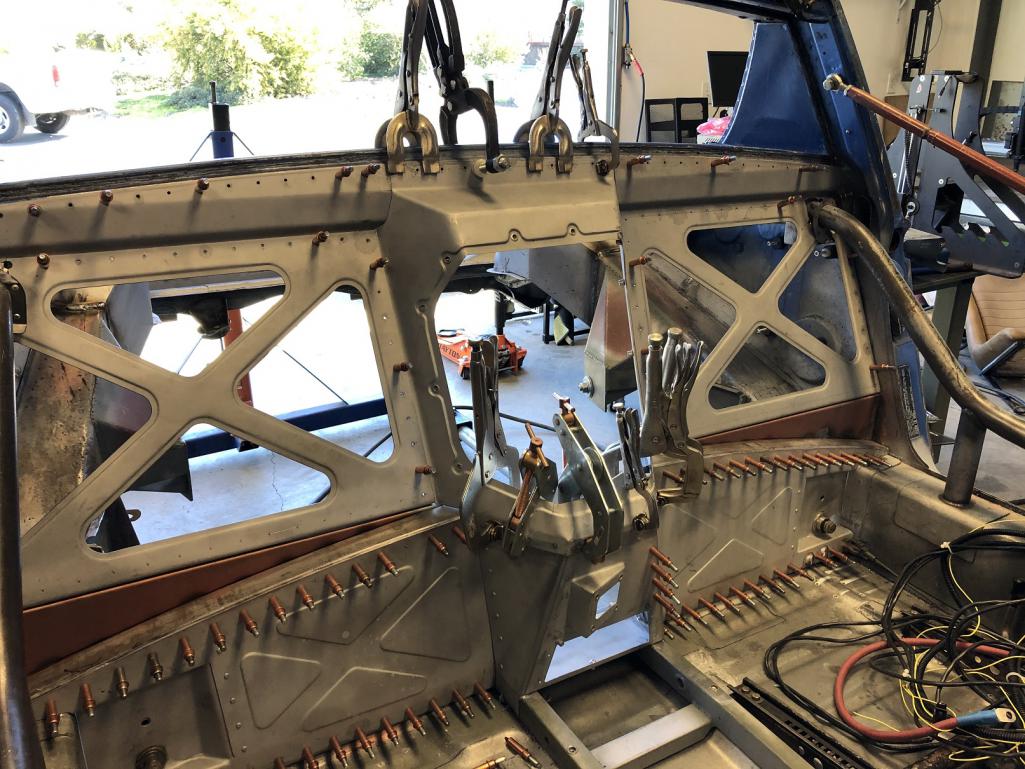
|
|
|
|
| tygaboy |
Feb 6 2020, 03:39 PM
Post
#2233
|
|
914 Guru Group: Members Posts: 5,827 Joined: 6-October 15 From: Petaluma, CA Member No.: 19,241 Region Association: Northern California |
Here's a shot of the closing plate flange and how it bonds to the dog house.
Once the chassis is media blasted and primered, and after the carbon panels are bonded in to the recesses, I'll seam seal every panel joint then spray the entire back of the fire wall with a noise and heat coating. Attached thumbnail(s) 
|
|
|
|
| tygaboy |
Feb 8 2020, 02:21 PM
Post
#2234
|
|
914 Guru Group: Members Posts: 5,827 Joined: 6-October 15 From: Petaluma, CA Member No.: 19,241 Region Association: Northern California |
I have lots of little things that I need to complete. One example is tying the seat mount cross member to the console frame.
I cut the center of the seat mount cross member to clear the custom console and am using the curved bits to connect things. This requires trimming the curved bit and making 4 small pieces to close everything up. Here, you can see the curved piece and the first of the 4 small pieces. Completing this will probably end up taking 1/2 a day, at least for me! Ah, the tedious joys of custom fabrication... Attached thumbnail(s) 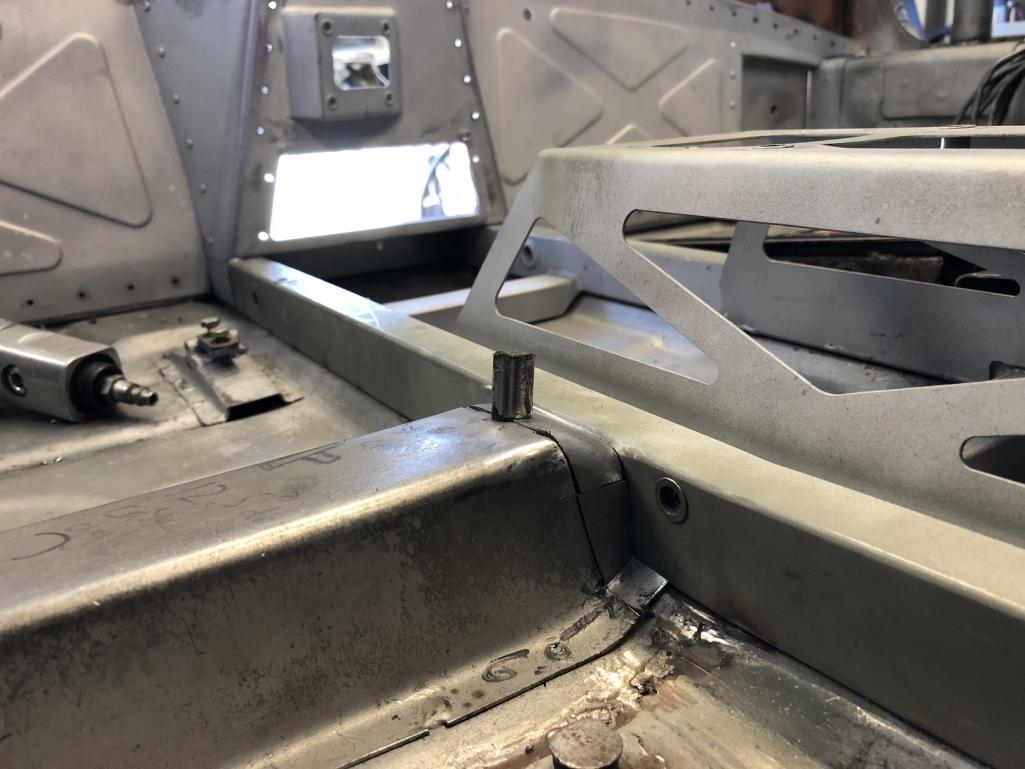
|
|
|
|
| tygaboy |
Feb 8 2020, 04:02 PM
Post
#2235
|
|
914 Guru Group: Members Posts: 5,827 Joined: 6-October 15 From: Petaluma, CA Member No.: 19,241 Region Association: Northern California |
All three pieces fit, welded to the cross bar and those welds finished.
Attached thumbnail(s) 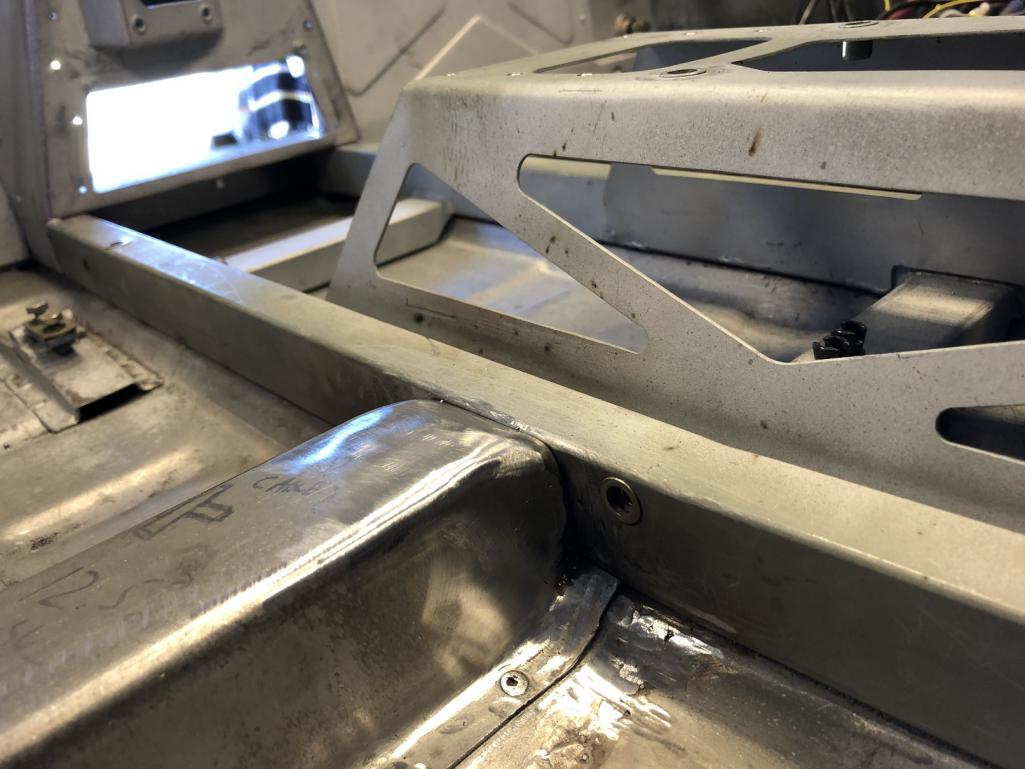 
|
|
|
|
| tygaboy |
Feb 8 2020, 04:03 PM
Post
#2236
|
|
914 Guru Group: Members Posts: 5,827 Joined: 6-October 15 From: Petaluma, CA Member No.: 19,241 Region Association: Northern California |
And the passenger side of the cross bar is now tied to the console frame.
Next, just repeat on the driver side. Attached thumbnail(s) 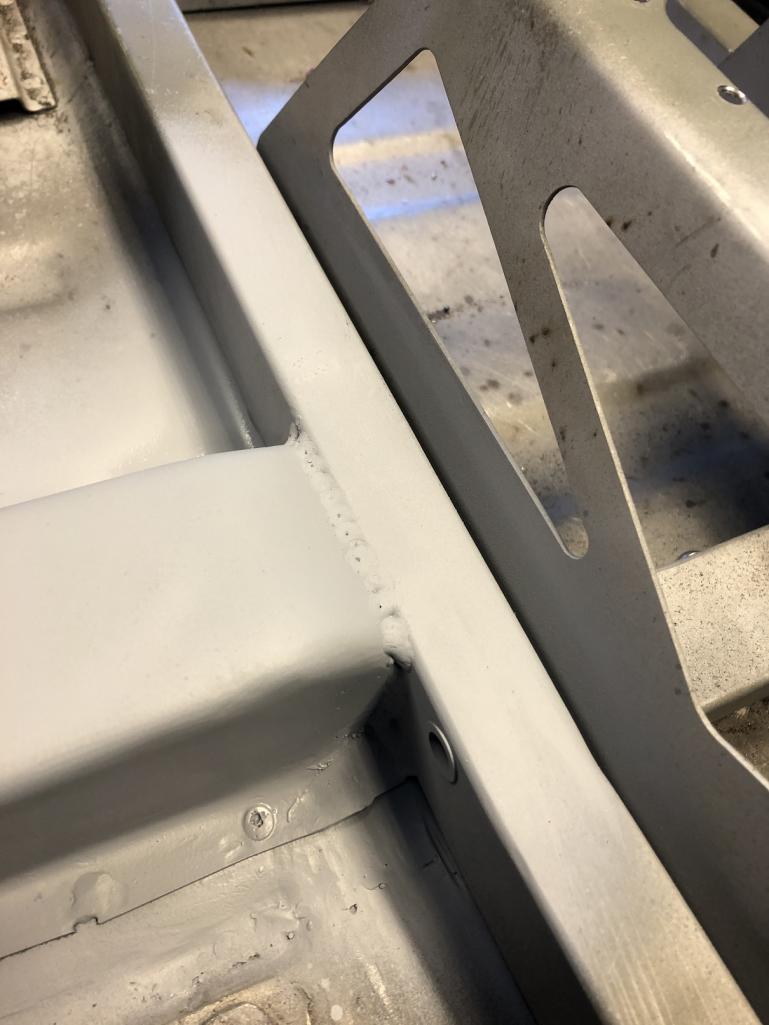 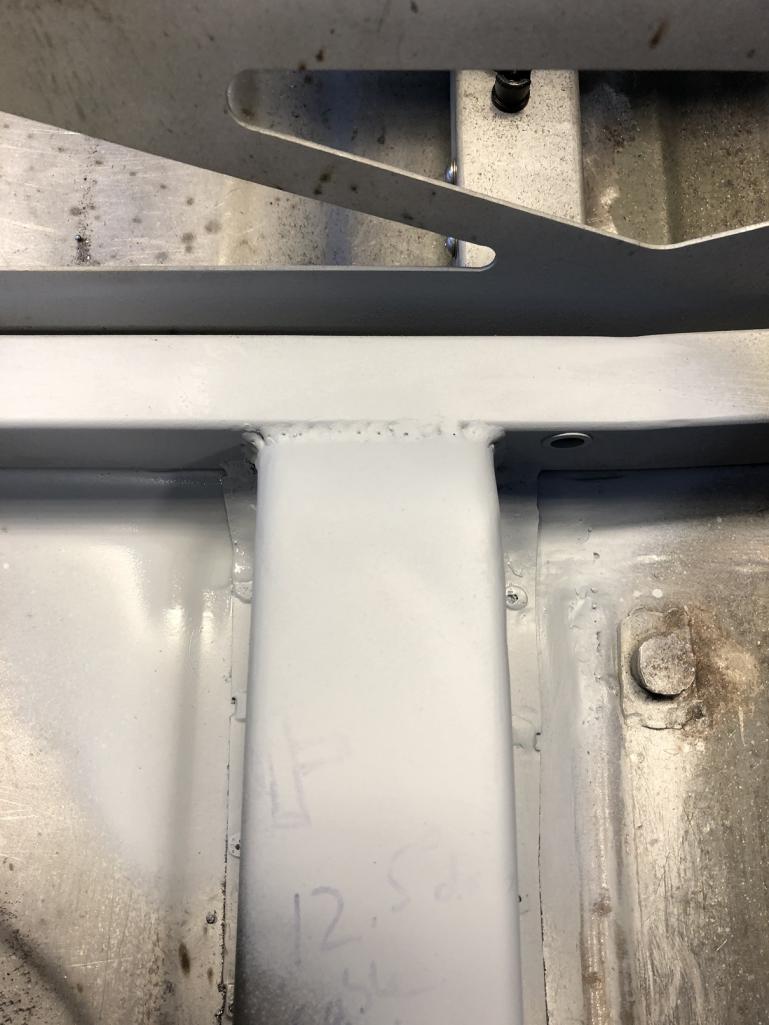
|
|
|
|
| tygaboy |
Feb 8 2020, 07:14 PM
Post
#2237
|
|
914 Guru Group: Members Posts: 5,827 Joined: 6-October 15 From: Petaluma, CA Member No.: 19,241 Region Association: Northern California |
Yep, it took 1/2 a day to complete tying both sides of the seat mount support to the console frame. The good news is that I did finish both sides and crossed another item off the to-do list. No pics of the driver side as it's essentially the same deal as what you've already seen.
Less than a page of items left on the to-do list and the chassis will be off to mesia blast and primer/sealer. Getting there! (IMG:style_emoticons/default/smash.gif) (IMG:style_emoticons/default/welder.gif) |
|
|
|
| dan10101 |
Feb 8 2020, 08:49 PM
Post
#2238
|
|
TORQUE-o-holic Group: Members Posts: 1,140 Joined: 29-April 03 From: Eagle Point, Or Member No.: 626 Region Association: Pacific Northwest |
I'm going to start calling you Prophet, cause you have a vision of the future most of us will never have.
Awesome, just Awesome... |
|
|
|
| tygaboy |
Feb 9 2020, 05:47 PM
Post
#2239
|
|
914 Guru Group: Members Posts: 5,827 Joined: 6-October 15 From: Petaluma, CA Member No.: 19,241 Region Association: Northern California |
QUOTE(dan10101 @ Feb 8 2020, 06:49 PM) I'm going to start calling you Prophet, cause you have a vision of the future most of us will never have. Awesome, just Awesome... @dan10101 - Thanks for the kind words, but as I think you can tell, this build is less about vision and more "he's making it up as he goes along!" Many of the things I'm doing are because I'll complete something then go to re-install another part and realize, "Hmmm, that's no longer going to fit!" Case in point: Today, I realized that with the seat support tied to the console frame, the console cover would require a couple notches. So I did that. Also interesting to note that welding in the console frame, along with the clamping required to bond the fire wall in, caused a couple things to move into a slightly different position. In this case, it was the rear edge of the console cover that was suddenly too long. I got lucky in that I ended up needed to trim things vs having created a gap. As they say, I'd rather be lucky than good! The rear edge is essentially a contact fit at this point so I'll be removing a bit more of it to make room for a bit of rubber trim. This to prevent anything being scratched as the cover goes in and out. Attached thumbnail(s) 
|
|
|
|
| tygaboy |
Feb 9 2020, 05:53 PM
Post
#2240
|
|
914 Guru Group: Members Posts: 5,827 Joined: 6-October 15 From: Petaluma, CA Member No.: 19,241 Region Association: Northern California |
Upper fire wall trim panels bonded, clamped and curing.
Attached thumbnail(s) 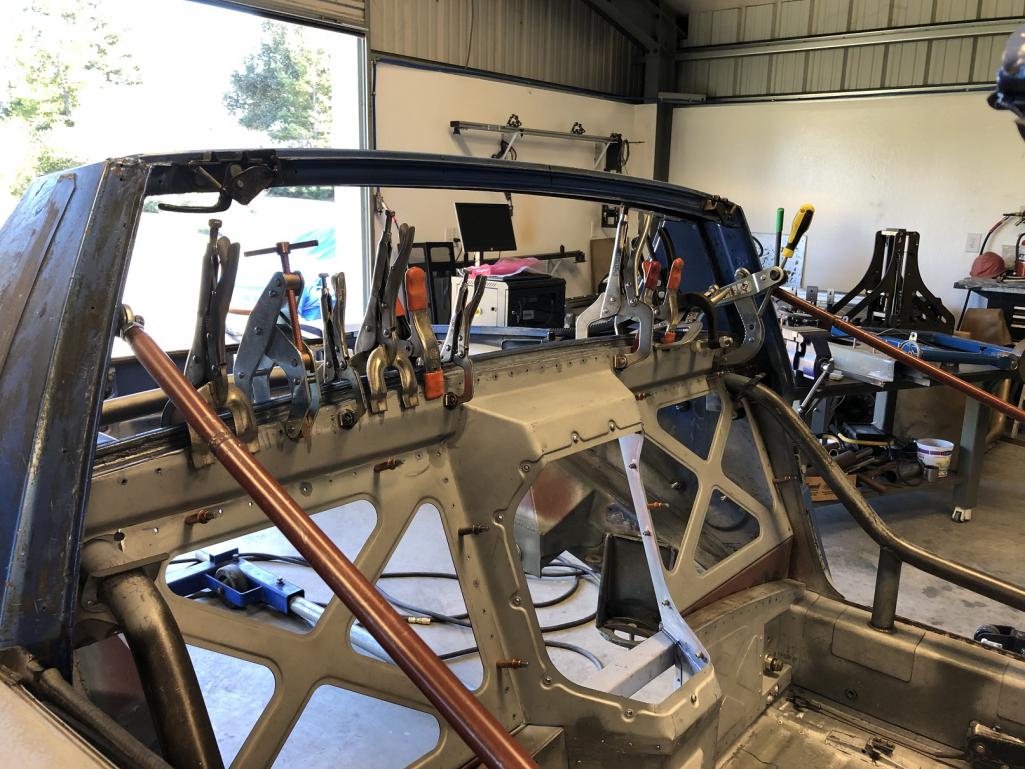
|
|
|
|
|
4 User(s) are reading this topic (4 Guests and 0 Anonymous Users)
0 Members:

|
Lo-Fi Version | Time is now: 17th June 2026 - 08:14 PM |
Invision Power Board
v9.1.4 © 2026 IPS, Inc.