|
|
|
Porsche, and the Porsche crest are registered trademarks of Dr. Ing. h.c. F. Porsche AG.
This site is not affiliated with Porsche in any way. Its only purpose is to provide an online forum for car enthusiasts. All other trademarks are property of their respective owners. |
|
|

  |

| dan10101 |
 Feb 9 2020, 08:48 PM Feb 9 2020, 08:48 PM
Post
#2241
|
|
TORQUE-o-holic  Group: Members Posts: 1,140 Joined: 29-April 03 From: Eagle Point, Or Member No.: 626 Region Association: Pacific Northwest |
QUOTE(tygaboy @ Feb 9 2020, 03:53 PM)  @dan10101 - Thanks for the kind words, but as I think you can tell, this build is less about vision and more "he's making it up as he goes along!" Many of the things I'm doing are because I'll complete something then go to re-install another part and realize, "Hmmm, that's no longer going to fit!" Oh you just do it that way because you like making things. (IMG:style_emoticons/default/sawzall-smiley.gif) (IMG:style_emoticons/default/smash.gif) (IMG:style_emoticons/default/welder.gif) |
   |

 
|
| tygaboy |
Feb 10 2020, 03:50 PM
Post
#2242
|
|
914 Guru Group: Members Posts: 5,827 Joined: 6-October 15 From: Petaluma, CA Member No.: 19,241 Region Association: Northern California |
After things cured, I removed all the excess adhesive and hit the top area with 80 grit on a d/a sander
It's amazing what a quick squirt of rattle can primer can do for how things look. I am so happy with how this is turning out! Attached thumbnail(s) 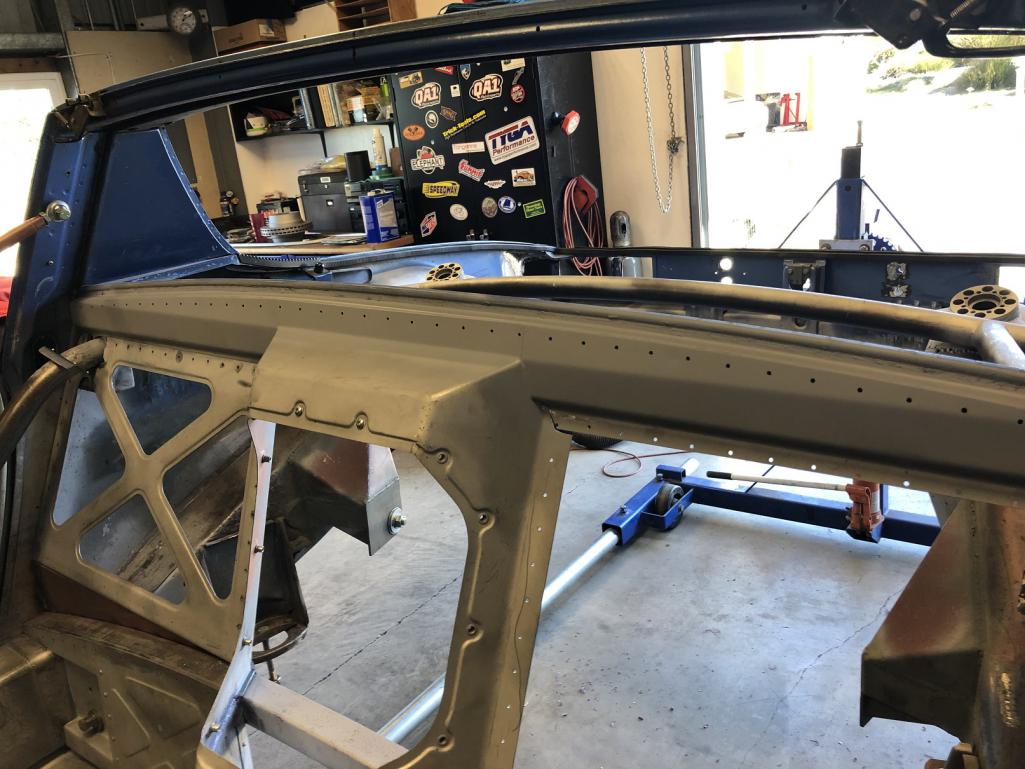
|
|
|
|
| Sideways |
Feb 10 2020, 07:50 PM
Post
#2243
|
|
Member Group: Members Posts: 119 Joined: 18-October 05 From: Calgary, AB, Canada Member No.: 4,969 |
STUNNING!
|
|
|
|
| Dion |
Feb 10 2020, 08:28 PM
Post
#2244
|
|
RN Group: Members Posts: 2,927 Joined: 16-September 04 From: Audubon,PA Member No.: 2,766 Region Association: MidAtlantic Region |
The chassis work is jaw dropping as usual. (IMG:style_emoticons/default/first.gif)
I hope that engine can live up to this chassis! I’m not all that familiar with LS3 Chevy ( that is the power plant still?) That engine is around what , 400 lbs of torque? This 914 is gonna scoot! Always enjoy reading the progress here. Always learning. Kudos Chris |
|
|
|
| tygaboy |
Feb 11 2020, 12:18 PM
Post
#2245
|
|
914 Guru Group: Members Posts: 5,827 Joined: 6-October 15 From: Petaluma, CA Member No.: 19,241 Region Association: Northern California |
QUOTE(Dion @ Feb 10 2020, 06:28 PM) The chassis work is jaw dropping as usual. (IMG:style_emoticons/default/first.gif) I hope that engine can live up to this chassis! I’m not all that familiar with LS3 Chevy ( that is the power plant still?) That engine is around what , 400 lbs of torque? This 914 is gonna scoot! Always enjoy reading the progress here. Always learning. Kudos Chris @Dion @Sideways - Thanks for the compliments! Dion, yep, still going with the LS3. I did add the ITBs so that bumps the power a bit. I had my engine dyno'd and it came back with 518 hp and 464 torque. That's at the crank so a bit less at the wheels, but I suspect it'll still be OK... (IMG:style_emoticons/default/happy11.gif) |
|
|
|
| tygaboy |
Feb 11 2020, 12:23 PM
Post
#2246
|
|
914 Guru Group: Members Posts: 5,827 Joined: 6-October 15 From: Petaluma, CA Member No.: 19,241 Region Association: Northern California |
After thinking about the fire wall for EVER, I caved in to what will be safer and went all steel vs steel w/the carbon fiber inserts. I cut new main panels, updated the stamping dies as needed and ended up with what you see on the driver side. Passenger side still in progress.
This design still allows me to add the carbon inserts although now they're just for some visual appeal, mostly hidden though they will be. And yes, this makes a far stiffer panel and a bit heavier panel but again, I think this is a better, more structurally sound way to go. Attached thumbnail(s) 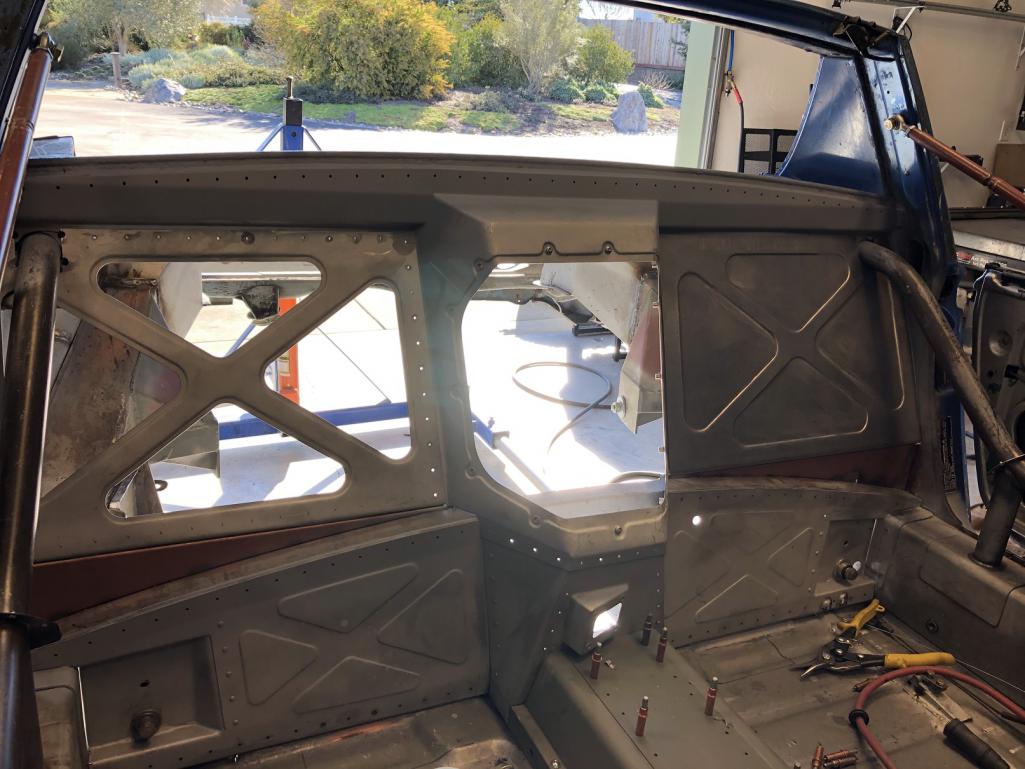
|
|
|
|
| Nogoodwithusernames |
Feb 11 2020, 03:09 PM
Post
#2247
|
|
Member Group: Members Posts: 307 Joined: 31-May 16 From: Sutter, CA Member No.: 20,051 Region Association: None |
Awesome progress, if you want the "look" of CF you could always do a vinyl wrap on those inserts. I personally think even just a complimentary paint color would make them pop a bit.
QUOTE(tygaboy @ Feb 11 2020, 10:23 AM) After thinking about the fire wall for EVER, I caved in to what will be safer and went all steel vs steel w/the carbon fiber inserts. I cut new main panels, updated the stamping dies as needed and ended up with what you see on the driver side. Passenger side still in progress. This design still allows me to add the carbon inserts although now they're just for some visual appeal, mostly hidden though they will be. And yes, this makes a far stiffer panel and a bit heavier panel but again, I think this is a better, more structurally sound way to go. |
|
|
|
| tygaboy |
Feb 12 2020, 06:51 PM
Post
#2248
|
|
914 Guru Group: Members Posts: 5,827 Joined: 6-October 15 From: Petaluma, CA Member No.: 19,241 Region Association: Northern California |
The passenger side main panel is fit and ready to go. Here, the driver side is bonded, Cleco'd and curing.
Attached thumbnail(s) 
|
|
|
|
| tygaboy |
Feb 12 2020, 06:55 PM
Post
#2249
|
|
914 Guru Group: Members Posts: 5,827 Joined: 6-October 15 From: Petaluma, CA Member No.: 19,241 Region Association: Northern California |
Detail shots of the door bar trim. These were fiddly little pieces to make but they turned out nicely.
Tomorrow I'll bond in the passenger side and the door bar trim pieces and with that, the fire wall will be all but complete. After all this time and I multiple iterations, I can't hardly believe it! (IMG:style_emoticons/default/smilie_pokal.gif) Attached thumbnail(s) 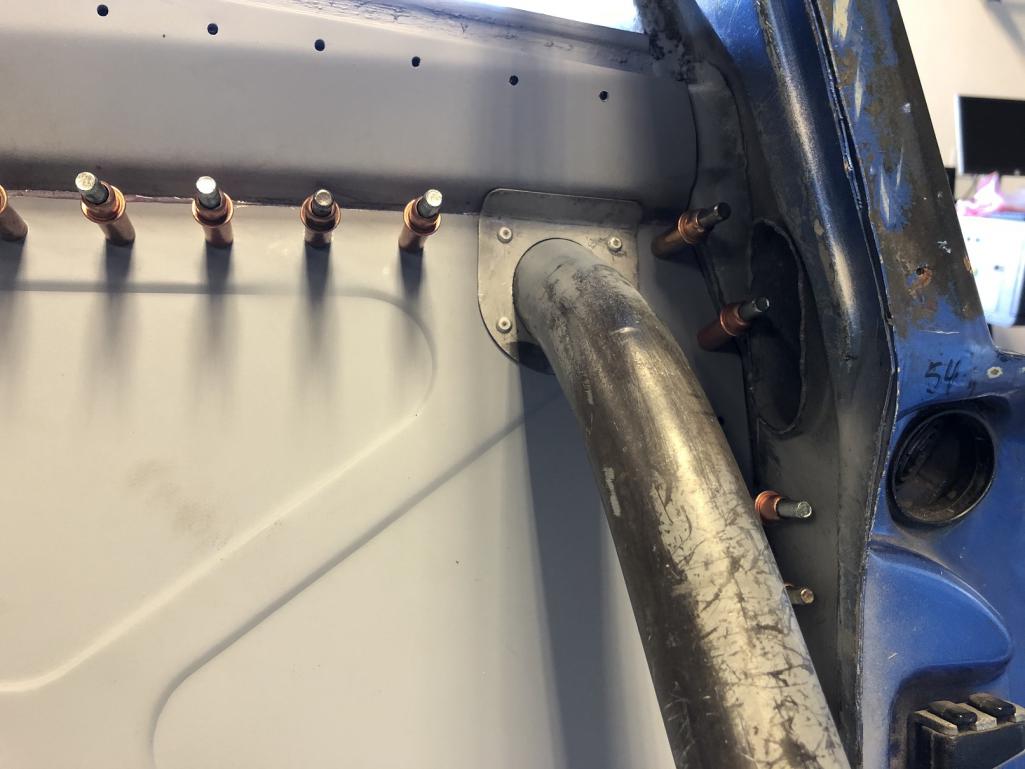 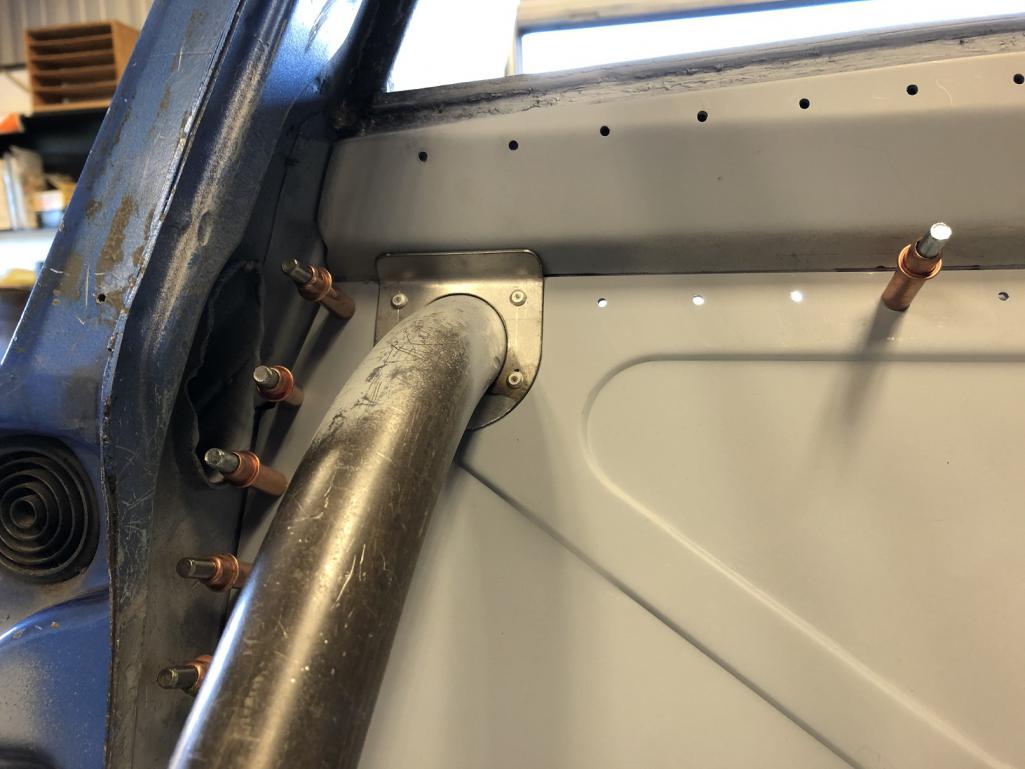
|
|
|
|
| Amenson |
Feb 12 2020, 07:07 PM
Post
#2250
|
|
That's opposite lock!! Group: Members Posts: 645 Joined: 27-May 05 From: Dublin, OH Member No.: 4,154 Region Association: None |
Amazing work as always. How did you avoid bonding in the Cleco's?
Never mind...went back and read the previous posts. Not bonding where the cleco's are. Is this going to be possible for the new back panels? |
|
|
|
| tygaboy |
Feb 12 2020, 08:14 PM
Post
#2251
|
|
914 Guru Group: Members Posts: 5,827 Joined: 6-October 15 From: Petaluma, CA Member No.: 19,241 Region Association: Northern California |
QUOTE(Amenson @ Feb 12 2020, 05:07 PM) Amazing work as always. How did you avoid bonding in the Cleco's? Never mind...went back and read the previous posts. Not bonding where the cleco's are. Is this going to be possible for the new back panels? Actually, there's adhesive EVERYWHERE! Once the panels are in place and all the Clecos are in, I go back, pull them one at a time, run a bit of welding rod through the hole to remove as much adhesive as I can, rinse the Cleco in acetone and wipe it down to be sure it's as clean as possible, then reinstall it. Then, once everything is cured, I redrill the holes to remove any excess. The holes are currently 1/8". The structural rivets need a bit larger hole so once the chassis is blasted and primer/sealed, I'll drill the holes to the final size, then install the rivets. |
|
|
|
| horizontally-opposed |
Feb 12 2020, 11:06 PM
Post
#2252
|
|
Advanced Member Group: Members Posts: 3,456 Joined: 12-May 04 From: San Francisco Member No.: 2,058 Region Association: None |
QUOTE(tygaboy @ Feb 12 2020, 04:51 PM) The passenger side main panel is fit and ready to go. Here, the driver side is bonded, Cleco'd and curing. Can a firewall be art? Yes, yes it can. Nice work, Chris!! |
|
|
|
| Mueller |
Feb 12 2020, 11:25 PM
Post
#2253
|
|
914 Freak! Group: Members Posts: 17,155 Joined: 4-January 03 From: Antioch, CA Member No.: 87 Region Association: None |
Great work as always Chris. The bonding os such a great idea.
|
|
|
|
| Andyrew |
Feb 13 2020, 09:47 AM
Post
#2254
|
|
Spooling.... Please wait Group: Members Posts: 13,380 Joined: 20-January 03 From: Riverbank, Ca Member No.: 172 Region Association: Northern California |
QUOTE(Mueller @ Feb 12 2020, 09:25 PM) Great work as always Chris. The bonding os such a great idea. (IMG:style_emoticons/default/agree.gif) So much cleaner than welding! Remind me how your planning to finish the firewall? Paint only then the pretty pretty rivets? |
|
|
|
| Cairo94507 |
Feb 13 2020, 10:30 AM
Post
#2255
|
|
Michael Group: Members Posts: 10,670 Joined: 1-November 08 From: Auburn, CA Member No.: 9,712 Region Association: Northern California |
(IMG:style_emoticons/default/smilie_pokal.gif) (IMG:style_emoticons/default/smash.gif) (IMG:style_emoticons/default/welder.gif) (IMG:style_emoticons/default/sawzall-smiley.gif) Just amazing work. This is an epic build. (IMG:style_emoticons/default/beerchug.gif)
|
|
|
|
| tygaboy |
Feb 13 2020, 11:34 AM
Post
#2256
|
|
914 Guru Group: Members Posts: 5,827 Joined: 6-October 15 From: Petaluma, CA Member No.: 19,241 Region Association: Northern California |
QUOTE(Andyrew @ Feb 13 2020, 07:47 AM) QUOTE(Mueller @ Feb 12 2020, 09:25 PM) Great work as always Chris. The bonding os such a great idea. (IMG:style_emoticons/default/agree.gif) So much cleaner than welding! Remind me how your planning to finish the firewall? Paint only then the pretty pretty rivets? @Andyrew - Going with the new main panels means I can "just" paint/rivet. But the stamped recesses are the same depth as those in the earlier open panels. Meaning I can still bond in the carbon fiber, though it'd be for looks only. I still have open panels on the dog house cover that still require the carbon inserts. |
|
|
|
| tygaboy |
Feb 13 2020, 01:27 PM
Post
#2257
|
|
914 Guru Group: Members Posts: 5,827 Joined: 6-October 15 From: Petaluma, CA Member No.: 19,241 Region Association: Northern California |
I had some scrap carbon fiber so thought I'd see how I could do trimming it to fit the recesses. I figured I could use the male component of the stamping die as a template.
I clamped the carbon to the die, trimmed it then used 80 grit sanding pad on an angle grinder to take it to the final size. That worked like a charm and took like 20 seconds! This piece is about 2X thicker than I'd use so the "real" piece will sit better in the recess. But a successful proof of concept, so I know I'm good to go on the dog house cover, and these main panels, should I opt to go this way. One thing to remember is to cut and finish each piece of carbon so the weave sits at the same angle across all the pieces and looks like the metal was placed over a single piece. Shouldn't be hard to do, I just need to remember and do it! (IMG:style_emoticons/default/laugh.gif) Attached thumbnail(s) 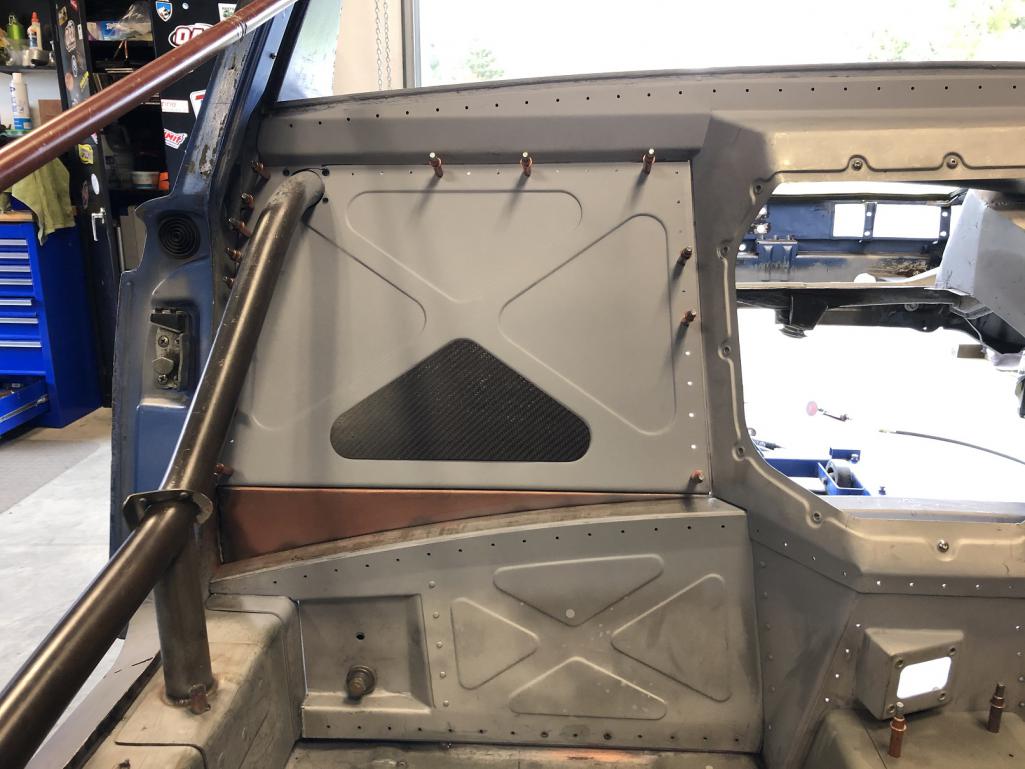
|
|
|
|
| 914forme |
Feb 13 2020, 03:27 PM
Post
#2258
|
|
Times a wastin', get wrenchin'! Group: Members Posts: 3,899 Joined: 24-July 04 From: Dayton, Ohio Member No.: 2,388 Region Association: None |
Looks good as always.
Riveting all the holes in the firewall, I do not envy you. |
|
|
|
| tygaboy |
Feb 13 2020, 03:56 PM
Post
#2259
|
|
914 Guru Group: Members Posts: 5,827 Joined: 6-October 15 From: Petaluma, CA Member No.: 19,241 Region Association: Northern California |
Pardon me, my car and I are having a bonding moment... (IMG:style_emoticons/default/lol-2.gif)
Just an example of how much adhesive there is to deal with in terms of the Clecos. Here you can see the "next hole" is cleaned but the following one isn't. And note that as you add the next Cleco, the panels pull together and the adhesive spooges out, which is what the directions say you're looking for, so that's a good thing. Plus, you end up having to recheck and reclean the previous couple Clecos. Fun all around! Attached thumbnail(s) 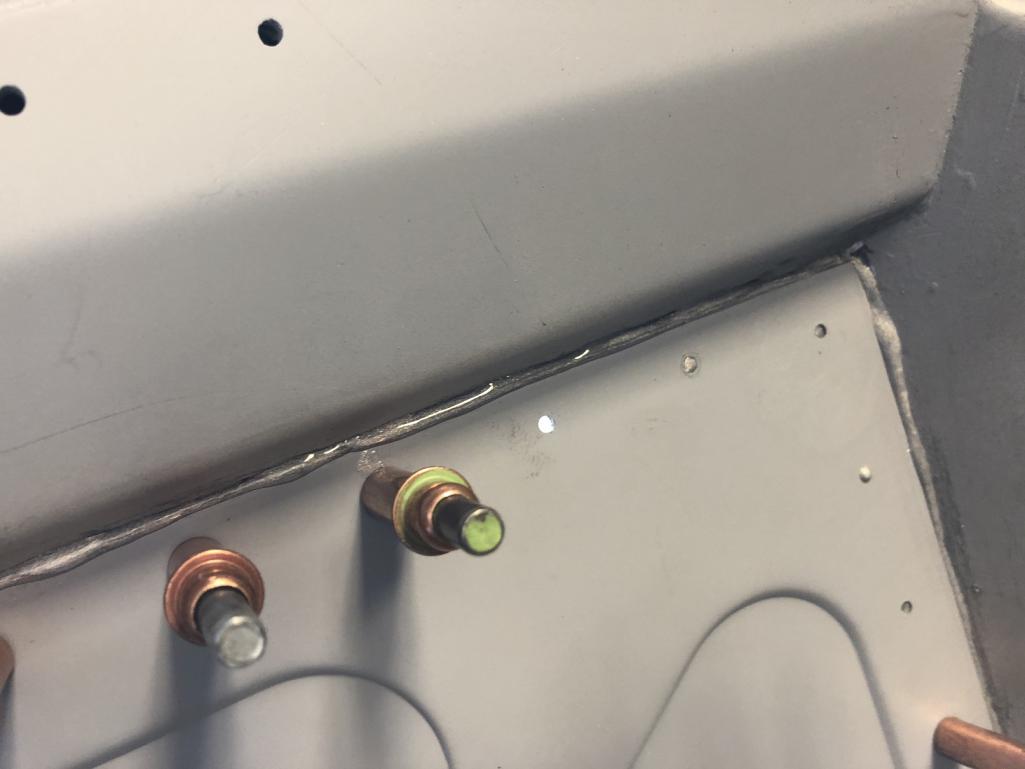
|
|
|
|
| djway |
Feb 13 2020, 10:22 PM
Post
#2260
|
|
Senior Member Group: Members Posts: 787 Joined: 16-October 15 From: Riverside Member No.: 19,266 Region Association: Southern California |
Only other person that says "Spooge" (IMG:style_emoticons/default/smile.gif)
|
|
|
|
|
3 User(s) are reading this topic (3 Guests and 0 Anonymous Users)
0 Members:

|
Lo-Fi Version | Time is now: 14th June 2026 - 06:32 AM |
Invision Power Board
v9.1.4 © 2026 IPS, Inc.