|
|
|
Porsche, and the Porsche crest are registered trademarks of Dr. Ing. h.c. F. Porsche AG.
This site is not affiliated with Porsche in any way. Its only purpose is to provide an online forum for car enthusiasts. All other trademarks are property of their respective owners. |
|
|

  |

| tygaboy |
 Mar 19 2020, 02:50 PM Mar 19 2020, 02:50 PM
Post
#2381
|
|
914 Guru  Group: Members Posts: 5,844 Joined: 6-October 15 From: Petaluma, CA Member No.: 19,241 Region Association: Northern California |
First, I fabbed up this prototype (fancy word for "practice piece" (IMG:style_emoticons/default/laugh.gif) ) to zero in on the critical dimensions.
Attached image(s) 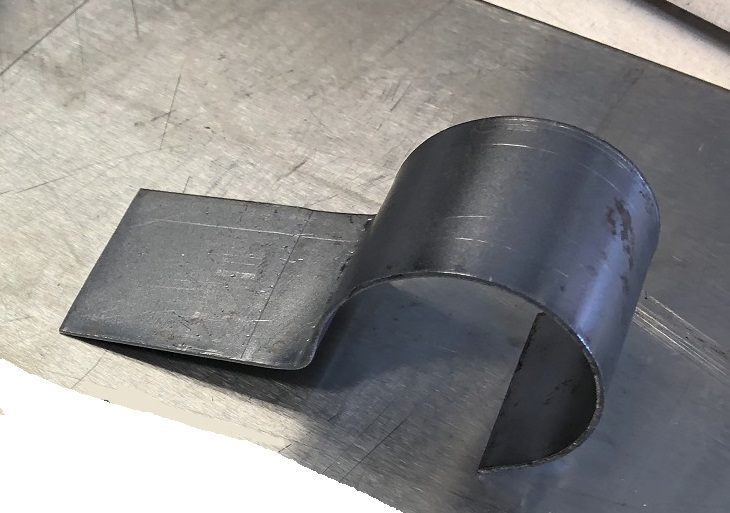
|
   |

 
|
| tygaboy |
Mar 19 2020, 02:52 PM
Post
#2382
|
|
914 Guru Group: Members Posts: 5,844 Joined: 6-October 15 From: Petaluma, CA Member No.: 19,241 Region Association: Northern California |
Once I worked out the needed dimensions, I figured I may as well add some style points so it's off to the CAD/plasma system.
Attached thumbnail(s) 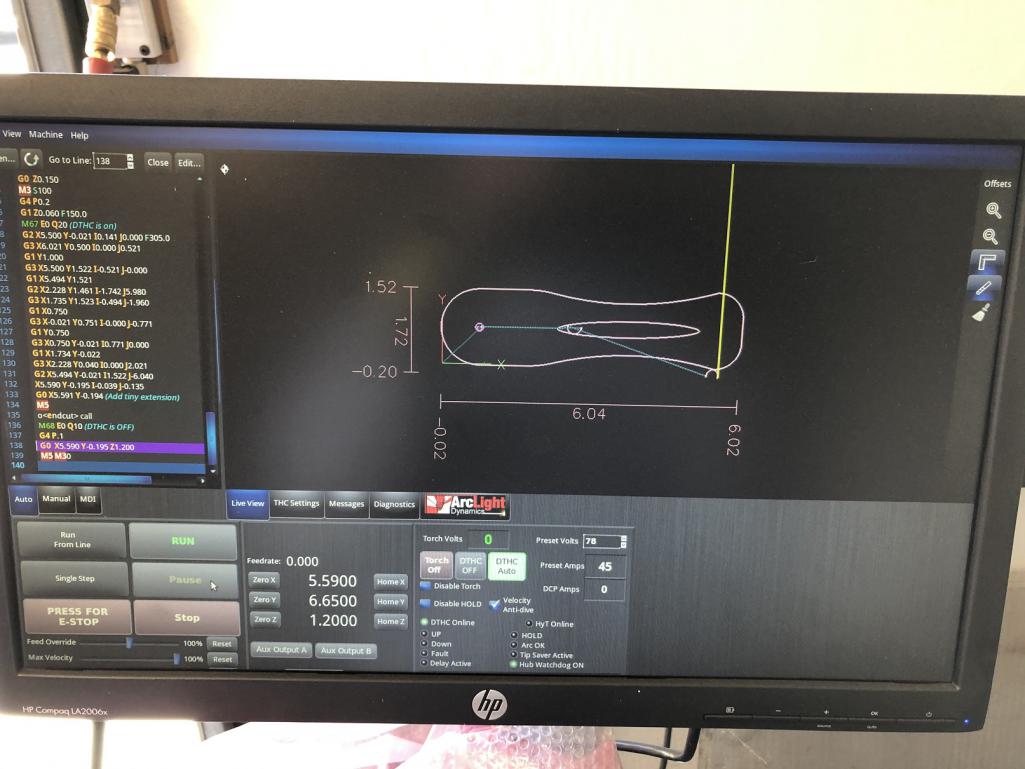
|
|
|
|
| tygaboy |
Mar 19 2020, 02:54 PM
Post
#2383
|
|
914 Guru Group: Members Posts: 5,844 Joined: 6-October 15 From: Petaluma, CA Member No.: 19,241 Region Association: Northern California |
Next, using a piece of scrap tube that's happily the same size as the radiator hose, I used the brake to bend the part to this radius, then added a 90-ish for the mounting area.
Attached thumbnail(s) 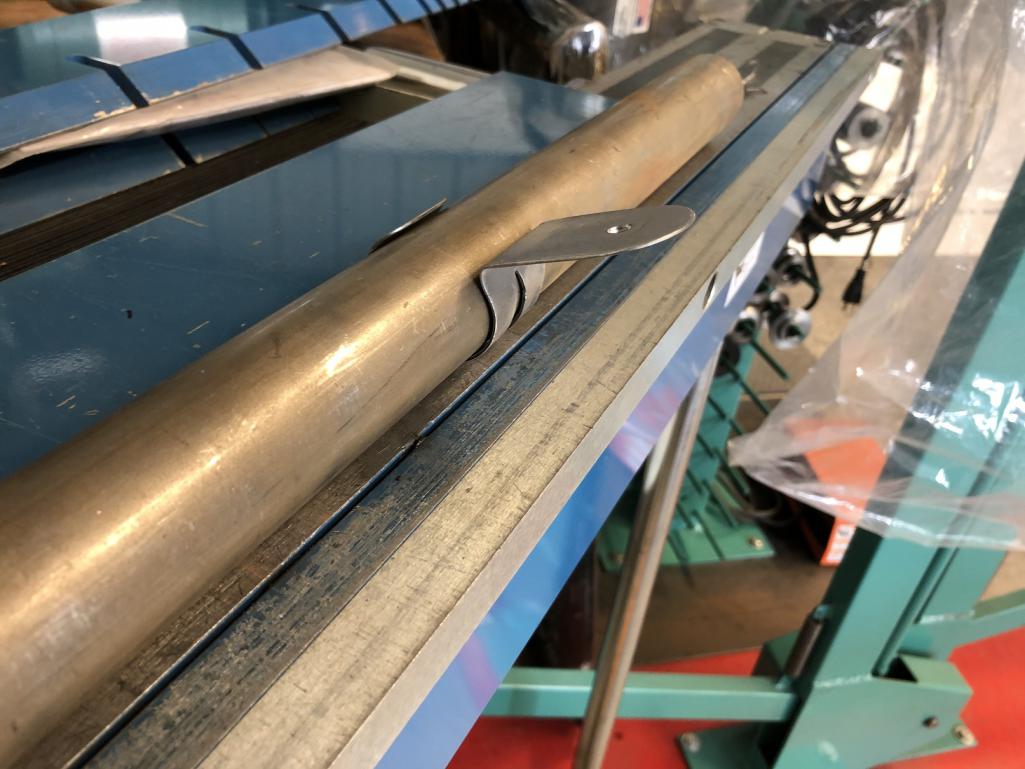
|
|
|
|
| tygaboy |
Mar 19 2020, 02:56 PM
Post
#2384
|
|
914 Guru Group: Members Posts: 5,844 Joined: 6-October 15 From: Petaluma, CA Member No.: 19,241 Region Association: Northern California |
Here's the part I think works better than the plumbers clamp:
The length I used wraps around far enough that the end is trapped by the ramp in the floor channel. That should serve as a support and help prevent it from unfolding. At least I think so... (IMG:style_emoticons/default/idea.gif) Attached thumbnail(s) 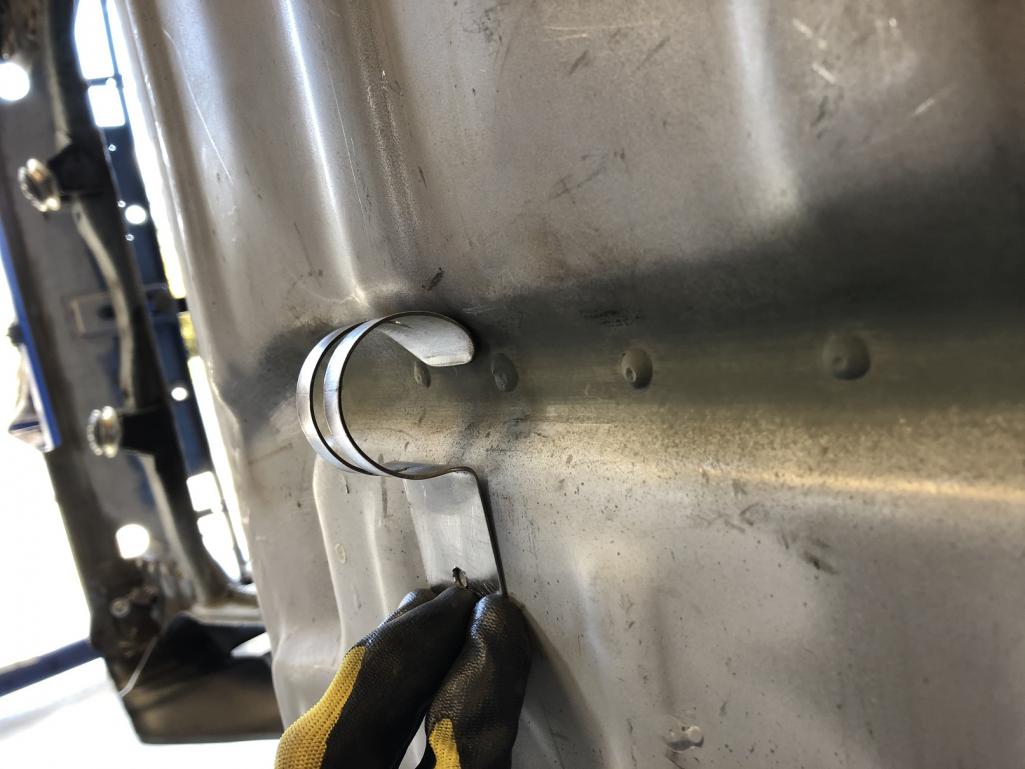
|
|
|
|
| tygaboy |
Mar 19 2020, 02:57 PM
Post
#2385
|
|
914 Guru Group: Members Posts: 5,844 Joined: 6-October 15 From: Petaluma, CA Member No.: 19,241 Region Association: Northern California |
And with the hose in place.
The other thing I like about this "single bolt attachment point" design, as well as the plumber design, is that if I run over anything that grabs the clamp, it's highly likely it would bend open. A fastener on both sides would mean the clamp would have to break/rip or else other areas of the floor would suffer damage. I'll noodle on this a while and if I convince myself the design "works", it's off to make the rest of them. Worst case, if the 90 seems too weak, I can weld in a small triangle support at that location. We'll see. Attached thumbnail(s) 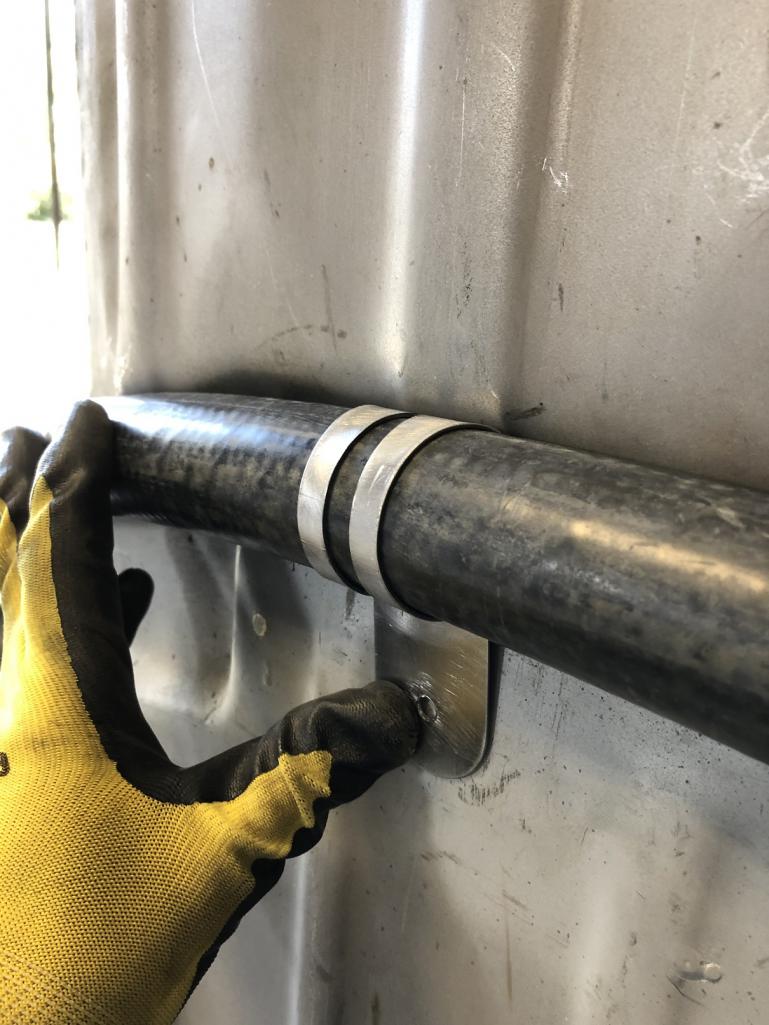
|
|
|
|
| 914forme |
Mar 19 2020, 03:40 PM
Post
#2386
|
|
Times a wastin', get wrenchin'! Group: Members Posts: 3,899 Joined: 24-July 04 From: Dayton, Ohio Member No.: 2,388 Region Association: None |
@Tygaboy - Chris if you have the clearance I would dip these in a rubber coating. Plasta-dip or similar to help reduce the possibility to chaff the rubber hose. Or even a rubber pad glued to it after you make it. I know long shot, but it is just the engineer in me saying I see a potential issue.
BTW, I like the style points. If using pasta-Dip "lol love auto-correct" style coating adding a few holes down each side will help allow it to bond to the part better. |
|
|
|
| tygaboy |
Mar 19 2020, 03:52 PM
Post
#2387
|
|
914 Guru Group: Members Posts: 5,844 Joined: 6-October 15 From: Petaluma, CA Member No.: 19,241 Region Association: Northern California |
@914forme Stephen - Funny, as I was working with the first one, I thought, "Hmmm, I should dip these in that plier handle liquid stuff..."
Great minds... And I figured I'd forge ahead into full production! Attached thumbnail(s) 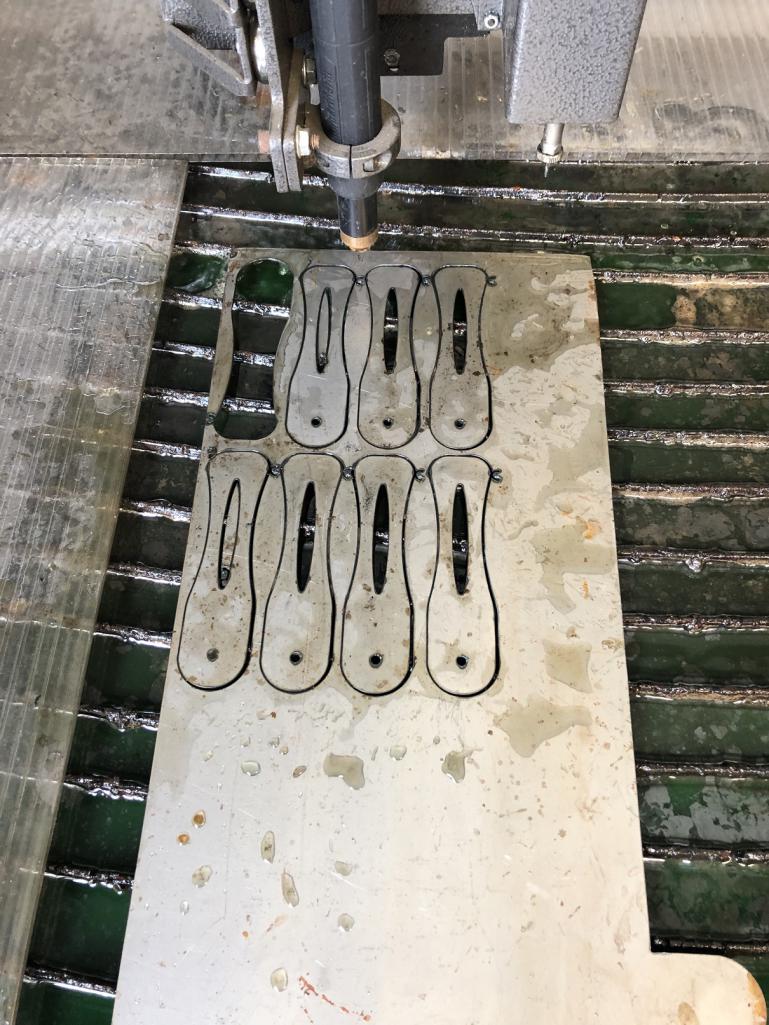
|
|
|
|
| Andyrew |
Mar 19 2020, 04:41 PM
Post
#2388
|
|
Spooling.... Please wait Group: Members Posts: 13,381 Joined: 20-January 03 From: Riverbank, Ca Member No.: 172 Region Association: Northern California |
Looks nice! Curious Chris why you didnt hard mount say a stainless piece of pipe bent to fit?
|
|
|
|
| tygaboy |
Mar 19 2020, 06:07 PM
Post
#2389
|
|
914 Guru Group: Members Posts: 5,844 Joined: 6-October 15 From: Petaluma, CA Member No.: 19,241 Region Association: Northern California |
QUOTE(Andyrew @ Mar 19 2020, 03:41 PM)  Looks nice! Curious Chris why you didnt hard mount say a stainless piece of pipe bent to fit? @Andyrew Andrew - If you mean stainless instead of the Gates rubber hose, I didn't want to risk something that could be crushed closed if I ran over something. As I understand it, these hoses can take a tremendous amount of abuse before they fail. Plus, I plan to make and carry a "patch kit": a short length of AL tube, like I made for the radiator hard lines, and a couple suitable hose clamps. If I suffer a cut line, I can cut out the damaged hose, replace it with the AL tube and at least remain drive-able. |
|
|
|
| djway |
Mar 19 2020, 06:33 PM
Post
#2390
|
|
Senior Member Group: Members Posts: 787 Joined: 16-October 15 From: Riverside Member No.: 19,266 Region Association: Southern California |
So what is the price for a set? (IMG:style_emoticons/default/smile.gif) LS in waiting
|
|
|
|
| tygaboy |
Mar 20 2020, 04:59 PM
Post
#2391
|
|
914 Guru Group: Members Posts: 5,844 Joined: 6-October 15 From: Petaluma, CA Member No.: 19,241 Region Association: Northern California |
QUOTE(djway @ Mar 19 2020, 05:33 PM) @djway - Hold on, I don't even know if these will work! (IMG:style_emoticons/default/laugh.gif) But I did go ahead and complete the set I'll be using. Those on each end have been primed. Attached thumbnail(s) 
|
|
|
|
| djway |
Mar 21 2020, 12:09 AM
Post
#2392
|
|
Senior Member Group: Members Posts: 787 Joined: 16-October 15 From: Riverside Member No.: 19,266 Region Association: Southern California |
I find the design most logical
|
|
|
|
| tygaboy |
Mar 21 2020, 02:56 PM
Post
#2393
|
|
914 Guru Group: Members Posts: 5,844 Joined: 6-October 15 From: Petaluma, CA Member No.: 19,241 Region Association: Northern California |
I'm mounting the clamps using Rivnuts and after trial mounting the first clamp, I didn't like the way the top of the Rivnut caused the clamp to sit a tiny bit proud of of the surface of the floor.
So I used a couple of different sized washers as a quick and dirty male/female die set then employed the trusty press to create a depression that just clears the top part of the Rivnut. Attached thumbnail(s) 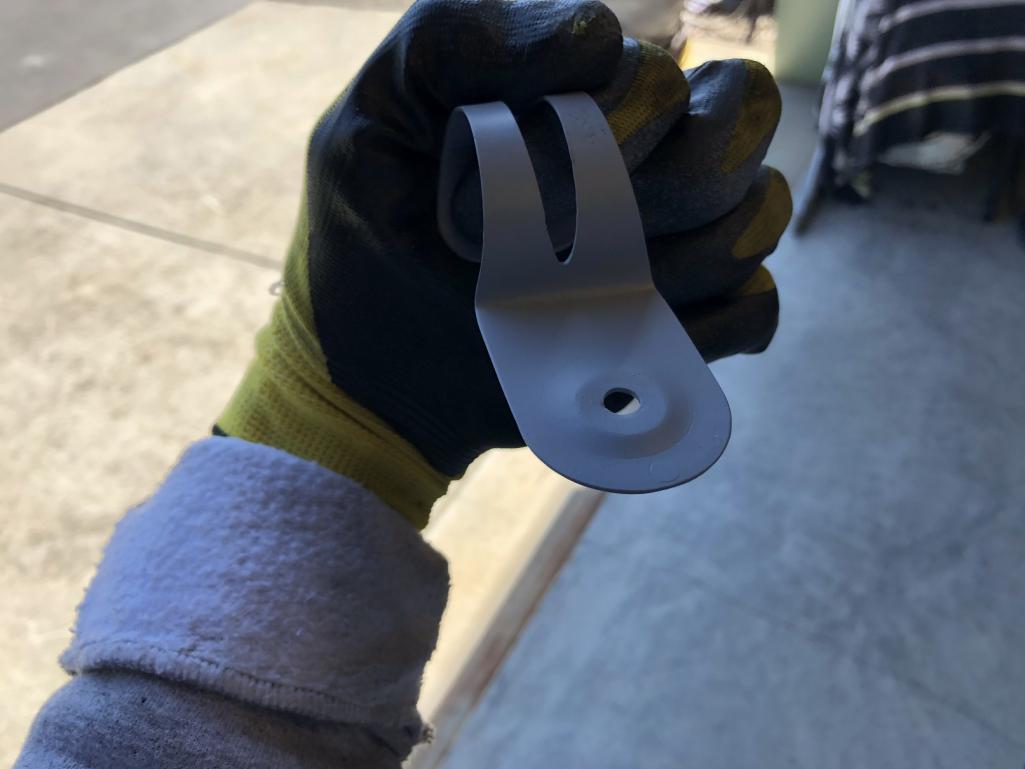
|
|
|
|
| tygaboy |
Mar 21 2020, 03:01 PM
Post
#2394
|
|
914 Guru Group: Members Posts: 5,844 Joined: 6-October 15 From: Petaluma, CA Member No.: 19,241 Region Association: Northern California |
The first two done!
And you can see that the left one's "Rivnut clearance dome" is sorta messy. That was the first one I did and the washer set I used created too deep a depression. So I did the best I could to hammer it back to flat, then gave it a do-over. Not the prettiest, but as Edd says, "with a lick of paint", it should do just fine. To quote @bbrock "if anyone says anything about it, I'll call them a dick..." And best of all, the hose seems well supported so I'm feeling good about this approach. Onward to the rest of them! Attached thumbnail(s) 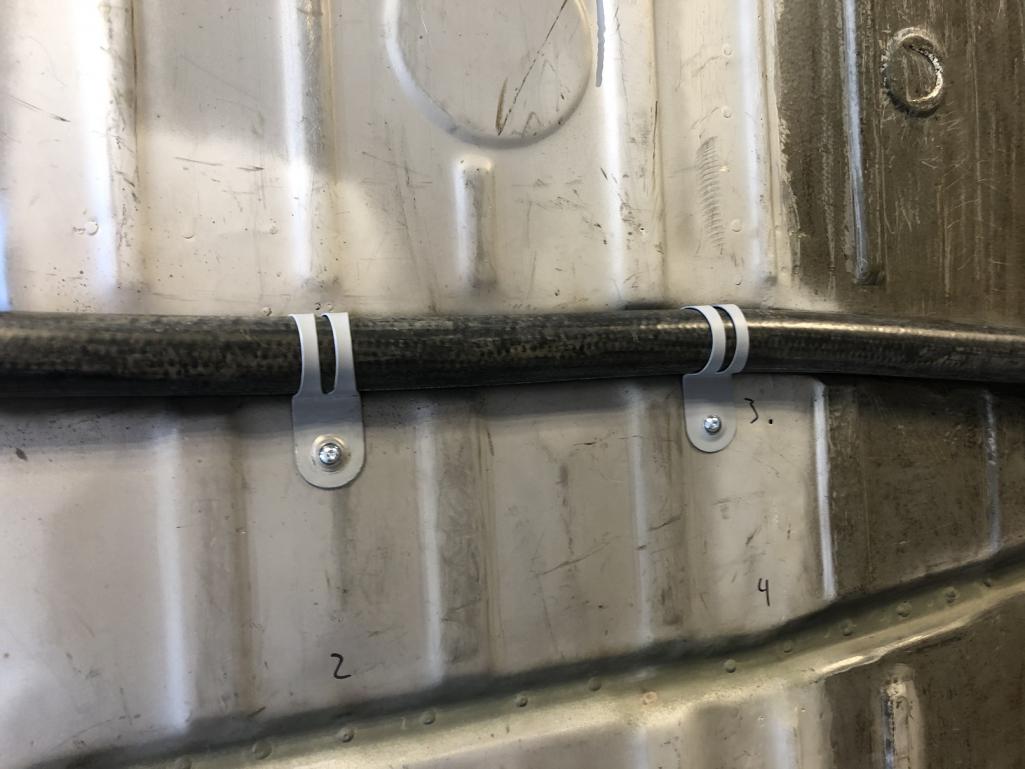
|
|
|
|
| tygaboy |
Mar 21 2020, 04:29 PM
Post
#2395
|
|
914 Guru Group: Members Posts: 5,844 Joined: 6-October 15 From: Petaluma, CA Member No.: 19,241 Region Association: Northern California |
And.... done! Well, almost. I'm going to relocate the Rivnut for the upper, left clamp. I wrongly mounted it on the small peak in that area of the floor. The clamps mount noticeably firmer when they are on a full flat.
Anyway, here are things with the front of the hoses connected to the hard lines, too. I think this clamp design is going to work. Attached thumbnail(s) 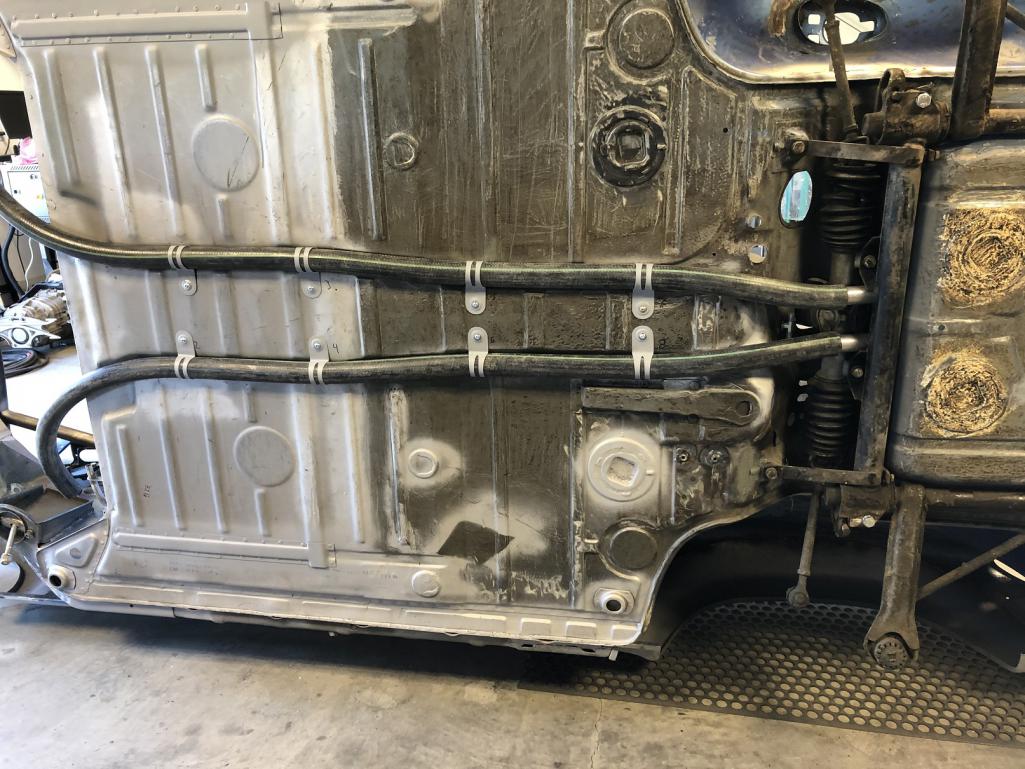
|
|
|
|
| djway |
Mar 21 2020, 05:08 PM
Post
#2396
|
|
Senior Member Group: Members Posts: 787 Joined: 16-October 15 From: Riverside Member No.: 19,266 Region Association: Southern California |
|
|
|
|
| Cairo94507 |
Mar 21 2020, 05:15 PM
Post
#2397
|
|
Michael Group: Members Posts: 10,716 Joined: 1-November 08 From: Auburn, CA Member No.: 9,712 Region Association: Northern California |
Looking great Chris. (IMG:style_emoticons/default/beerchug.gif)
|
|
|
|
| tygaboy |
Mar 23 2020, 10:02 AM
Post
#2398
|
|
914 Guru Group: Members Posts: 5,844 Joined: 6-October 15 From: Petaluma, CA Member No.: 19,241 Region Association: Northern California |
With my current focus seemingly "all things radiator", I went back to thinking about venting. I really don't want to open up the fenders so I figured I'd better prove out the hood vent, one way or the other.
No offense to the approach of "cut the front and sides then bend down the flap to create the vent". I just wanted something different from that so it was back to CAD to see what I could come up with. The first pic is a piece I made just to get a REALLY rough idea of what things might look like. The CAD drawing is what I'm going to cut later today. Note the vents remain attached to the frame via those small-ish connections on each side. The vents will be twisted at those points and set to the proper angle. The small notches at the front edge of the vents is where a piece will fit in that locks them to the desired angle and adds stability. The whole contraption will attach to the underside of the hood. Let's see how this works out. Attached thumbnail(s)  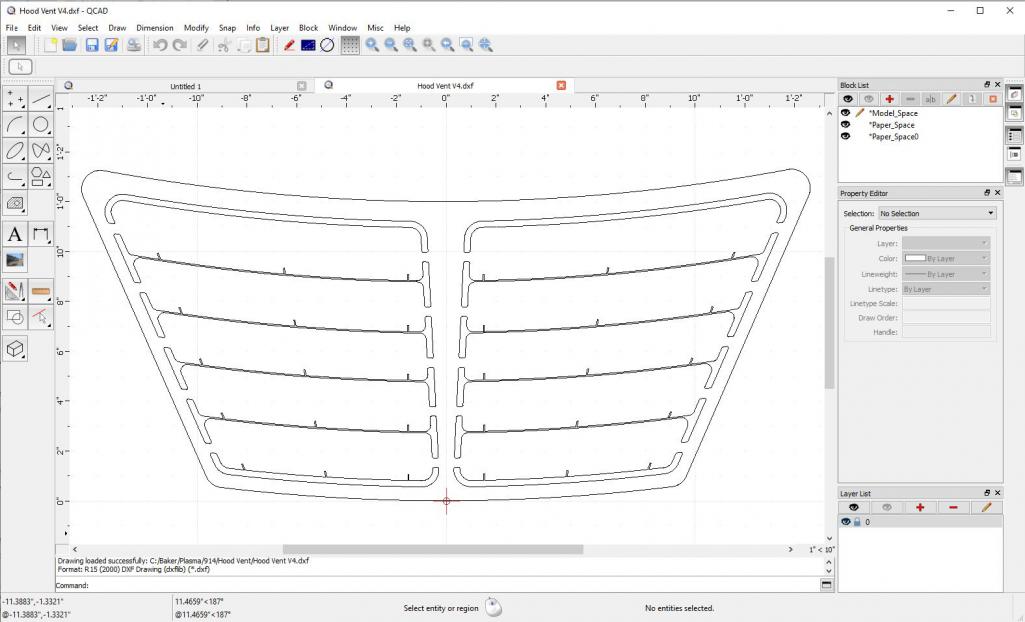
|
|
|
|
| Mueller |
Mar 23 2020, 10:21 AM
Post
#2399
|
|
914 Freak! Group: Members Posts: 17,155 Joined: 4-January 03 From: Antioch, CA Member No.: 87 Region Association: None |
Those hose clamps are next level parts. I dig.
I'll be following your hood mod and radiator install for sure. Every time I look at the holes I cut in my fender wells I cry a little. (I did keep the sheet metal so I could more easily reverse my decision) |
|
|
|
| tygaboy |
Mar 23 2020, 10:44 AM
Post
#2400
|
|
914 Guru Group: Members Posts: 5,844 Joined: 6-October 15 From: Petaluma, CA Member No.: 19,241 Region Association: Northern California |
QUOTE(Mueller @ Mar 23 2020, 09:21 AM) Those hose clamps are next level parts. I dig. I'll be following your hood mod and radiator install for sure. Every time I look at the holes I cut in my fender wells I cry a little. (I did keep the sheet metal so I could more easily reverse my decision) @Mueller - Mike, if the hood vent works out, I think it'll be a part I can easily make for others. Cost of materials and you buy me lunch! |
|
|
|
|
1 User(s) are reading this topic (1 Guests and 0 Anonymous Users)
0 Members:

|
Lo-Fi Version | Time is now: 21st July 2026 - 05:34 AM |
Invision Power Board
v9.1.4 © 2026 IPS, Inc.