|
|

|
Porsche, and the Porsche crest are registered trademarks of Dr. Ing. h.c. F. Porsche AG.
This site is not affiliated with Porsche in any way. Its only purpose is to provide an online forum for car enthusiasts. All other trademarks are property of their respective owners. |
|
|
  |
| tygaboy |
 Apr 9 2020, 01:20 PM Apr 9 2020, 01:20 PM
Post
#2481
|
|
914 Guru      Group: Members Posts: 5,724 Joined: 6-October 15 From: Petaluma, CA Member No.: 19,241 Region Association: Northern California 
|
Rear brake lines mostly done. Lots of fun getting all the bends right and have the ends end up where they need to be! You don't have to look too closely to see where I could have done better.
I suspect all these will become practice pieces as I really got much better as I went. And now that I know where the tricky spots are, and where bend order matters, I think I can do a much tidier job. Not that you'll really be able to see much of this. Attached thumbnail(s) 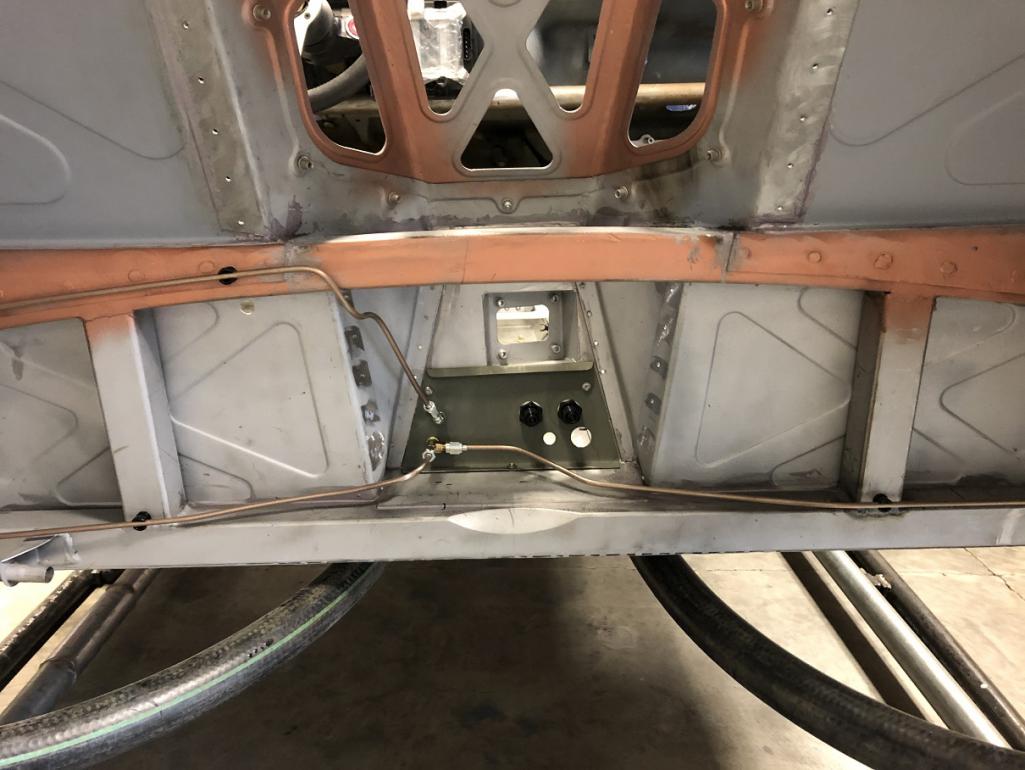 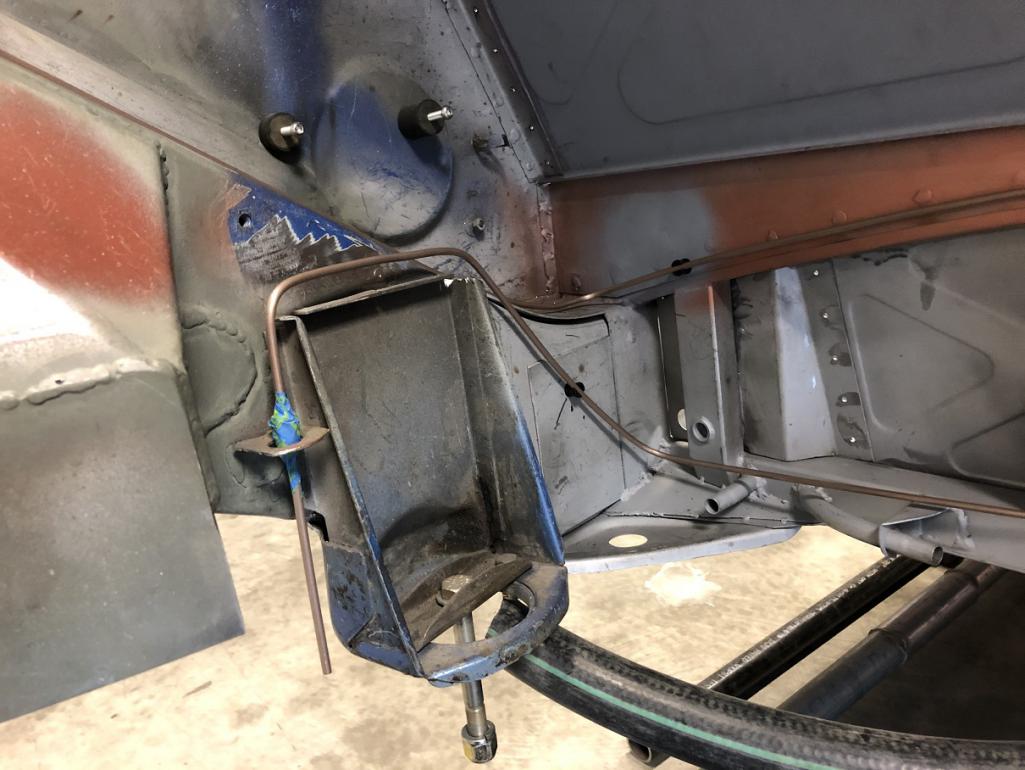 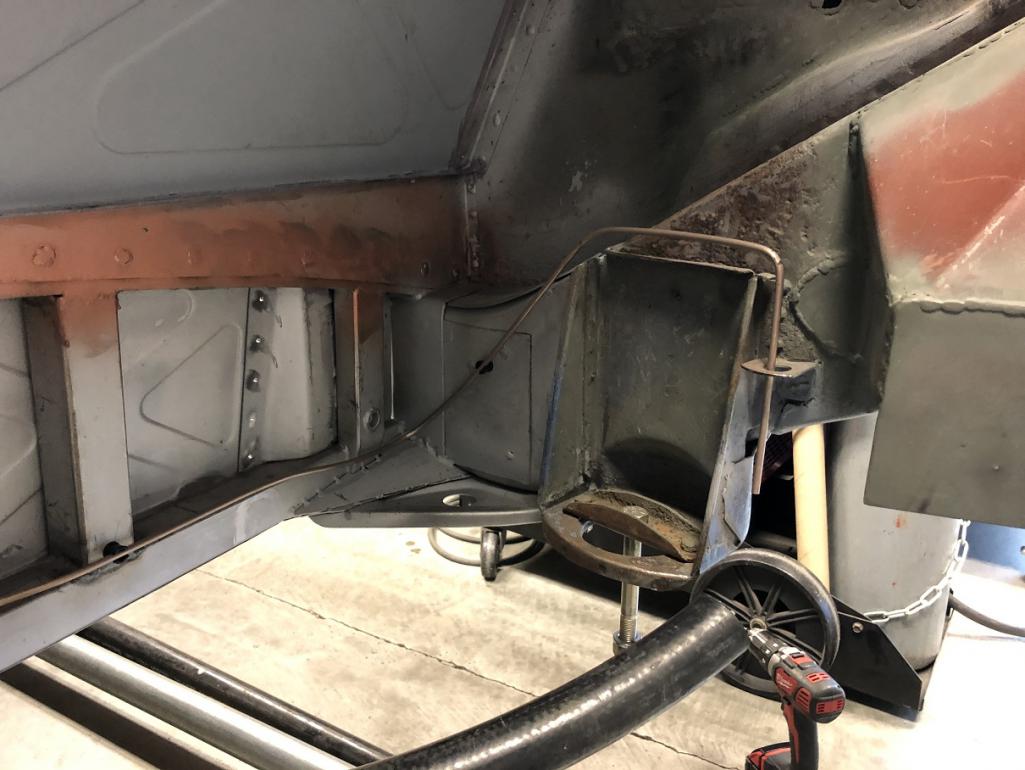
|
| djway |
 Apr 9 2020, 01:29 PM Apr 9 2020, 01:29 PM
Post
#2482
|
|
Senior Member    Group: Members Posts: 787 Joined: 16-October 15 From: Riverside Member No.: 19,266 Region Association: Southern California |
Another for the tool whores: Eastwood flaring tool. This thing is pretty awesome. It comes with the 45 degree set up but I have a combo of AN (37 degree) and DIN bubble flares throughout the car so I had to get the AN die set, too. Anyone local to me that needs to make lines is welcome to borrow. Have you tried this flare tool on stainless tubing yet? I have the master cool hydraulic flare and it will not hold stainless except for the very finished wall. The tubing just pushes out of the clamp and will not take the flare. |
| tygaboy |
 Apr 9 2020, 01:36 PM Apr 9 2020, 01:36 PM
Post
#2483
|
|
914 Guru      Group: Members Posts: 5,724 Joined: 6-October 15 From: Petaluma, CA Member No.: 19,241 Region Association: Northern California 
|
Another for the tool whores: Eastwood flaring tool. This thing is pretty awesome. It comes with the 45 degree set up but I have a combo of AN (37 degree) and DIN bubble flares throughout the car so I had to get the AN die set, too. Anyone local to me that needs to make lines is welcome to borrow. Have you tried this flare tool on stainless tubing yet? I have the master cool hydraulic flare and it will not hold stainless except for the very finished wall. The tubing just pushes out of the clamp and will not take the flare. @djway - The Eastwood site says it'll work with stainless but I've never tried. I will say that the die blocks REALLY clamp the tubing. Well enough that I've used them as press blocks to straighten the very ends of tubes. Again, not stainless, but... |
| tygaboy |
 Apr 13 2020, 08:49 AM Apr 13 2020, 08:49 AM
Post
#2484
|
|
914 Guru      Group: Members Posts: 5,724 Joined: 6-October 15 From: Petaluma, CA Member No.: 19,241 Region Association: Northern California 
|
I spent a LOT of time finishing up the final TIGing on the last flare.
Certainly more time consuming than MIG but SOOOO much nicer, cleaner, quieter. Attached thumbnail(s) 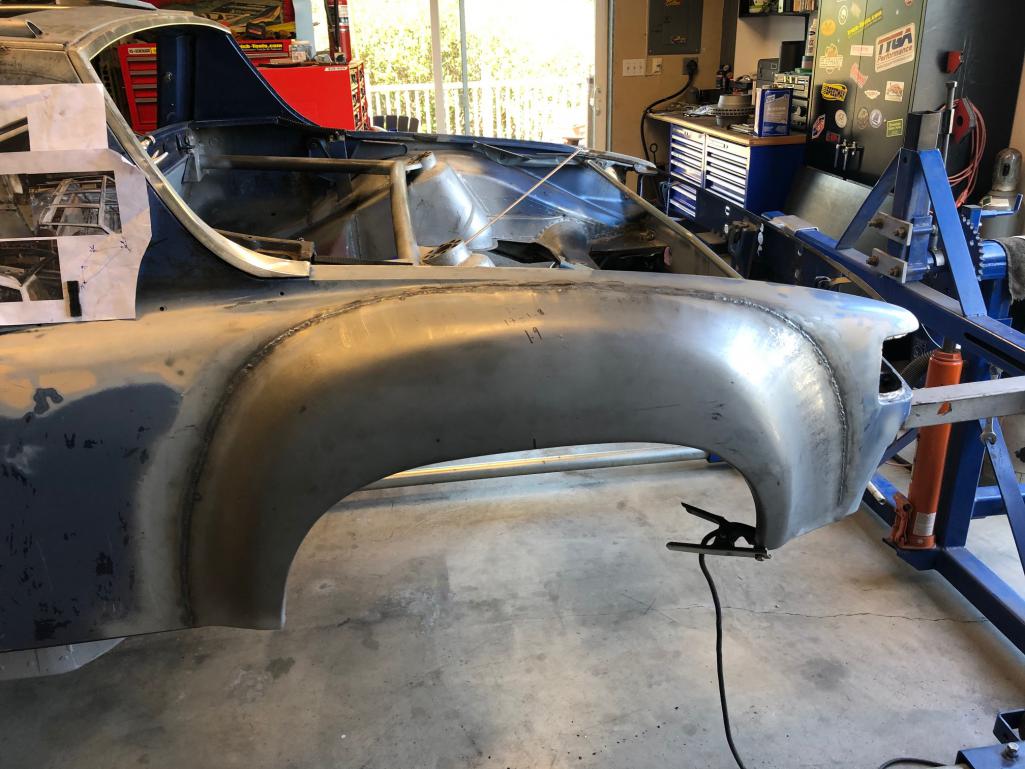
|
| Cairo94507 |
 Apr 13 2020, 11:33 AM Apr 13 2020, 11:33 AM
Post
#2485
|
|
Michael           Group: Members Posts: 10,528 Joined: 1-November 08 From: Auburn, CA Member No.: 9,712 Region Association: Northern California 
|
Very nice. I can't wait to see that car in color. (IMG:style_emoticons/default/beerchug.gif)
|
| tygaboy |
 Apr 13 2020, 12:39 PM Apr 13 2020, 12:39 PM
Post
#2486
|
|
914 Guru      Group: Members Posts: 5,724 Joined: 6-October 15 From: Petaluma, CA Member No.: 19,241 Region Association: Northern California 
|
@Cairo94507 Michael - You and me both!
I'm chipping away at all the little things I need to do ahead of sending it to media blasting and epoxy primer sealer. I have no idea what the current situation means to when that might happen. I'm back to thinking I should put it all together, get it running then blow it apart for all the body and paint work. We'll see how fast I get to that point. |
| tygaboy |
 Apr 13 2020, 12:49 PM Apr 13 2020, 12:49 PM
Post
#2487
|
|
914 Guru      Group: Members Posts: 5,724 Joined: 6-October 15 From: Petaluma, CA Member No.: 19,241 Region Association: Northern California 
|
Speaking of the little things, I final mounted the door bar trim plates.
These couldn't be riveted on due to impossible access to the lower rivet locations. (And yes, it was absolutely required those rivets be placed RIGHT THERE! (IMG:style_emoticons/default/happy11.gif) ) So I ended up adding the rivets to the plates, then bonding them in place using the same structural adhesive as was used on the firewall panels. I used hand shears to cut them at the bottom, twisted then open to fit around the bar, then TIG brazed and metal finished the cut. It's pretty neat how it now appears I planned ahead and added them before welding in the door bar. Someday, I hope to be able to plan that well! Anyway, I think I'll paint these plates and the door bars in the same color (black? Anthracite like the wheels?) and the rest of the interior metal in body color. I think a bit of contrast like that will look nice. Attached thumbnail(s) 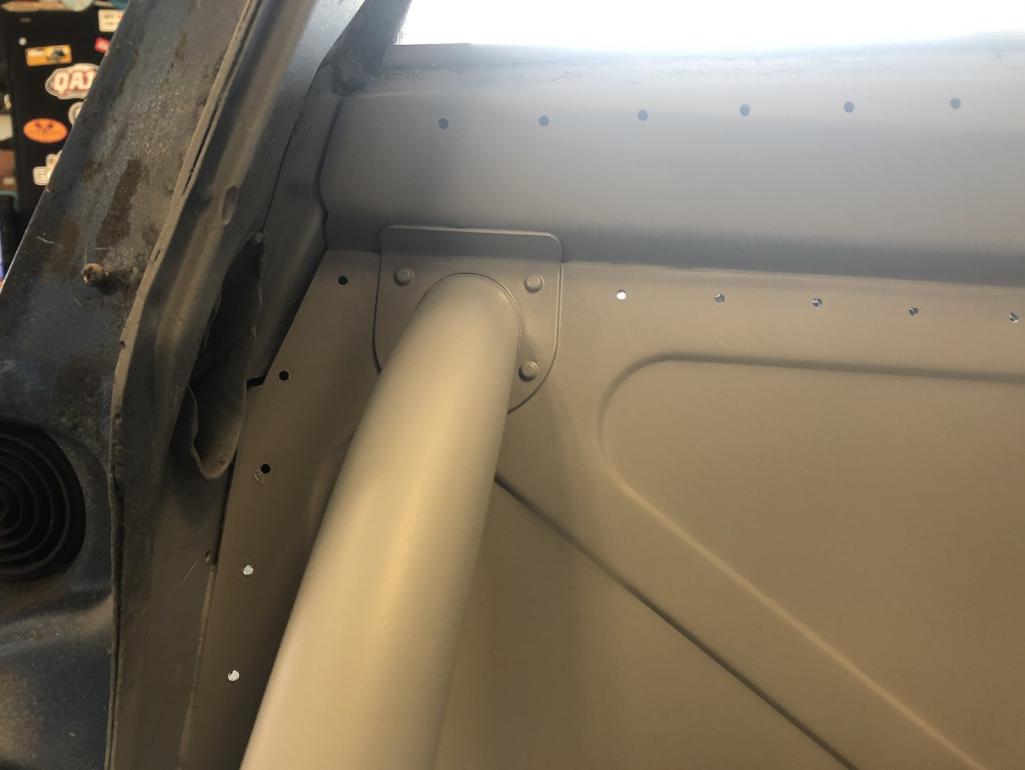 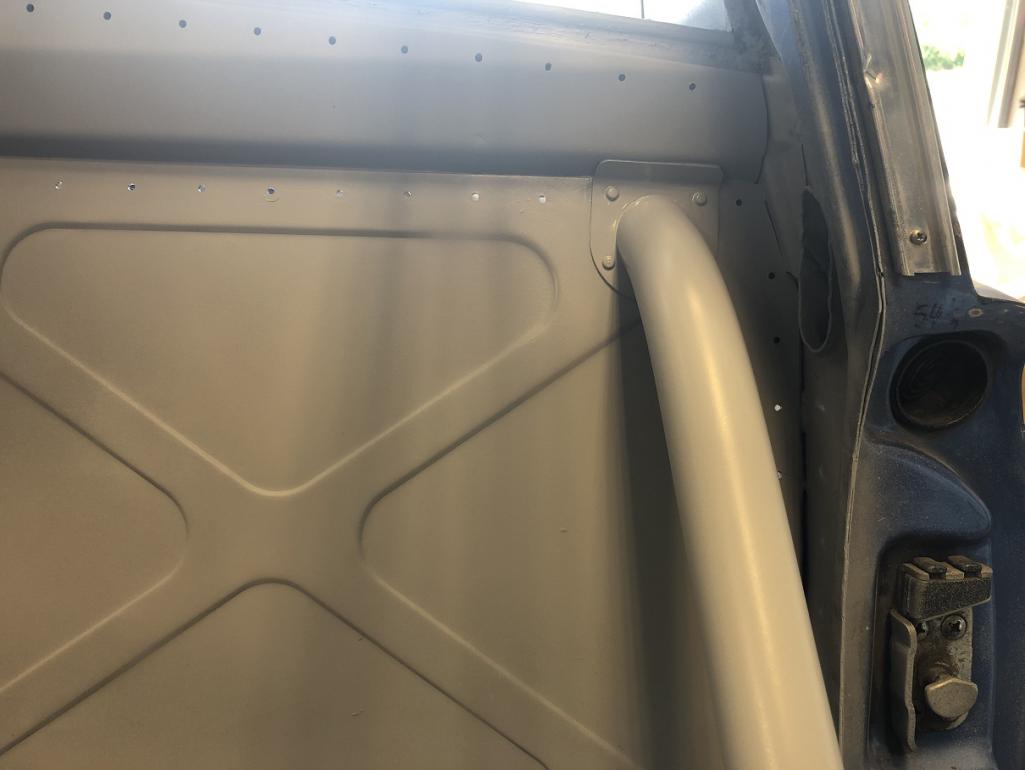
|
| Superhawk996 |
 Apr 13 2020, 01:13 PM Apr 13 2020, 01:13 PM
Post
#2488
|
|
914 Guru      Group: Members Posts: 7,594 Joined: 25-August 18 From: Woods of N. Idaho Member No.: 22,428 Region Association: Galt's Gulch 
|
I spent a LOT of time finishing up the final TIGing on the last flare. Certainly more time consuming than MIG but SOOOO much nicer, cleaner, quieter. (IMG:style_emoticons/default/aktion035.gif) So far I've found that the slowness of TIG works to my advantage by keeping me from overheating and warping. With this past week off my local gas supplier things I've developed an Argon addiction. |
| jd74914 |
 Apr 13 2020, 01:21 PM Apr 13 2020, 01:21 PM
Post
#2489
|
|
Its alive     Group: Members Posts: 4,864 Joined: 16-February 04 From: CT Member No.: 1,659 Region Association: North East States |
Another for the tool whores: Eastwood flaring tool. This thing is pretty awesome. It comes with the 45 degree set up but I have a combo of AN (37 degree) and DIN bubble flares throughout the car so I had to get the AN die set, too. Anyone local to me that needs to make lines is welcome to borrow. Have you tried this flare tool on stainless tubing yet? I have the master cool hydraulic flare and it will not hold stainless except for the very finished wall. The tubing just pushes out of the clamp and will not take the flare. @djway - The Eastwood site says it'll work with stainless but I've never tried. I will say that the die blocks REALLY clamp the tubing. Well enough that I've used them as press blocks to straighten the very ends of tubes. Again, not stainless, but... I've used the Eastwood tool for stainless (annealed 304, 37 degree AN flare-never tried a double flare). Works better than the hydraulic Mastercool in my experience due to better clamping like Chris noted. I thought the Mastercool stuff was nice [coming from the standard cheapo tools], but after using the Eastwood tool much prefer it. (IMG:style_emoticons/default/smile.gif) Chris-It's looking great!! |
| 914forme |
 Apr 13 2020, 03:33 PM Apr 13 2020, 03:33 PM
Post
#2490
|
|
Times a wastin', get wrenchin'!     Group: Members Posts: 3,896 Joined: 24-July 04 From: Dayton, Ohio Member No.: 2,388 Region Association: None 
|
@djway Used the Master Cool to modify the PMB SS line kits on my 914-6, I mounted Alpha Front Calipers on it, and needed to shorten the line or something that required a new double flare. I had no issue, love that tool, does everything I asked of it. I use it for more than my Porsche work. Went with it over the Eastwood tool, as it has al the flaring dies I needed for my work, beyond break, and AN flaring.
I did lots of work on large equipment and trucks for our farm. Never let me down, in the shop or in the field. |
| 914forme |
 Apr 13 2020, 03:38 PM Apr 13 2020, 03:38 PM
Post
#2491
|
|
Times a wastin', get wrenchin'!     Group: Members Posts: 3,896 Joined: 24-July 04 From: Dayton, Ohio Member No.: 2,388 Region Association: None 
|
@Tygaboy , Chris to bring this back to your thread great work as always, I will say seeing Gates hoses hanging down under the car, even with custom mounts just lowered it a bit for me. SS tubes ran down that huge center tunnel, with roll flared ends or better yet, all AN fittings. (IMG:style_emoticons/default/drooley.gif)
I know I preach that its your build, but man, just seeing it........ Okay distract me with more fabrication quick, maybe I'll forget about it. (IMG:style_emoticons/default/poke.gif) You know lots of 60s racers used frame tubing to transport, oil and water to various parts of the chassis. (IMG:style_emoticons/default/poke.gif) (IMG:style_emoticons/default/poke.gif) Even in the 2000 Buell did it to make the cycle that much lighter....... Okay sorry..... It is your build I will get off my high horse |
| tygaboy |
 Apr 13 2020, 05:35 PM Apr 13 2020, 05:35 PM
Post
#2492
|
|
914 Guru      Group: Members Posts: 5,724 Joined: 6-October 15 From: Petaluma, CA Member No.: 19,241 Region Association: Northern California 
|
@Tygaboy , Chris to bring this back to your thread great work as always, I will say seeing Gates hoses hanging down under the car, even with custom mounts just lowered it a bit for me. SS tubes ran down that huge center tunnel, with roll flared ends or better yet, all AN fittings. (IMG:style_emoticons/default/drooley.gif) I know I preach that its your build, but man, just seeing it........ Okay distract me with more fabrication quick, maybe I'll forget about it. (IMG:style_emoticons/default/poke.gif) You know lots of 60s racers used frame tubing to transport, oil and water to various parts of the chassis. (IMG:style_emoticons/default/poke.gif) (IMG:style_emoticons/default/poke.gif) Even in the 2000 Buell did it to make the cycle that much lighter....... Okay sorry..... It is your build I will get off my high horse @914forme Stephen - Believe me, I looked at it for a long time. There's not nearly enough room in the tunnel, I didn't want to risk the whole "adding heat inside the car", and the Gates lines, boring as they may be, are proven to work. I happily confess that for some items, particularly things that are essentially never going to be seen, like the rad lines, I'm going with what's proven vs trying to invent something new. Yea, yea, hard to believe... So sue me! (IMG:style_emoticons/default/poke.gif) |
| 914forme |
 Apr 13 2020, 07:07 PM Apr 13 2020, 07:07 PM
Post
#2493
|
|
Times a wastin', get wrenchin'!     Group: Members Posts: 3,896 Joined: 24-July 04 From: Dayton, Ohio Member No.: 2,388 Region Association: None 
|
Oh believe me they will be seen (IMG:style_emoticons/default/shades.gif) If I ever get to see this car, I will be crawling all over it. (IMG:style_emoticons/default/drooley.gif) I'll bring my own micro fiber to clean it up.
|
| djway |
 Apr 13 2020, 11:12 PM Apr 13 2020, 11:12 PM
Post
#2494
|
|
Senior Member    Group: Members Posts: 787 Joined: 16-October 15 From: Riverside Member No.: 19,266 Region Association: Southern California |
@djway Used the Master Cool to modify the PMB SS line kits on my 914-6, I mounted Alpha Front Calipers on it, and needed to shorten the line or something that required a new double flare. I had no issue, love that tool, does everything I asked of it. I use it for more than my Porsche work. Went with it over the Eastwood tool, as it has al the flaring dies I needed for my work, beyond break, and AN flaring. I did lots of work on large equipment and trucks for our farm. Never let me down, in the shop or in the field. I was making some stainless fuel lines for my Notchback to feed the orphaned 914 motor. I don't remember the wall thickness but I could not get it to hold. It was also a bit larger than the standard stainless lines if I recall correctly. I found some thinner wall stainless in a coil from a Still parts supplier that was thinner but same tube size and I was barely able to get a flare. What size of stainless did you use |
| djway |
 Apr 15 2020, 12:55 AM Apr 15 2020, 12:55 AM
Post
#2495
|
|
Senior Member    Group: Members Posts: 787 Joined: 16-October 15 From: Riverside Member No.: 19,266 Region Association: Southern California |
Hey Tygaboy I was thinking about your car today and the radiator hoses under the car and an image of some modern car undercarriages crossed my mind. Many of the high speed cruisers have a completely smooth undercarriage for aero and noise reduction. It occured to me if you run the hoses in the middle recess you could then fabricate a cover that runs the length. I am sure it would reduce drag and give you another 1/10th mph on the top end (IMG:style_emoticons/default/rolleyes.gif)
|
| tygaboy |
 Apr 15 2020, 04:09 PM Apr 15 2020, 04:09 PM
Post
#2496
|
|
914 Guru      Group: Members Posts: 5,724 Joined: 6-October 15 From: Petaluma, CA Member No.: 19,241 Region Association: Northern California 
|
Sinking to new lows, in terms of what others may find interesting:
I sliced up the factory Boxster clutch tube so I could use the part that attaches to the slave cylinder. I flared the other end and added a reducer so I can get from the factory tube size to the -3 (3/16) hard line. I'm running a 7/8" clutch M/C. This is the same set up @Cracker runs and it works fine for him. Anyone else running a Boxster S trans and if so, what did you use M/C, line size and connection to the slave cyl? Sharp eyes will notice I "adjusted" the holes in that factory bracket so I could mount it in a slightly different spot and still use that cool little line clip. Attached thumbnail(s) 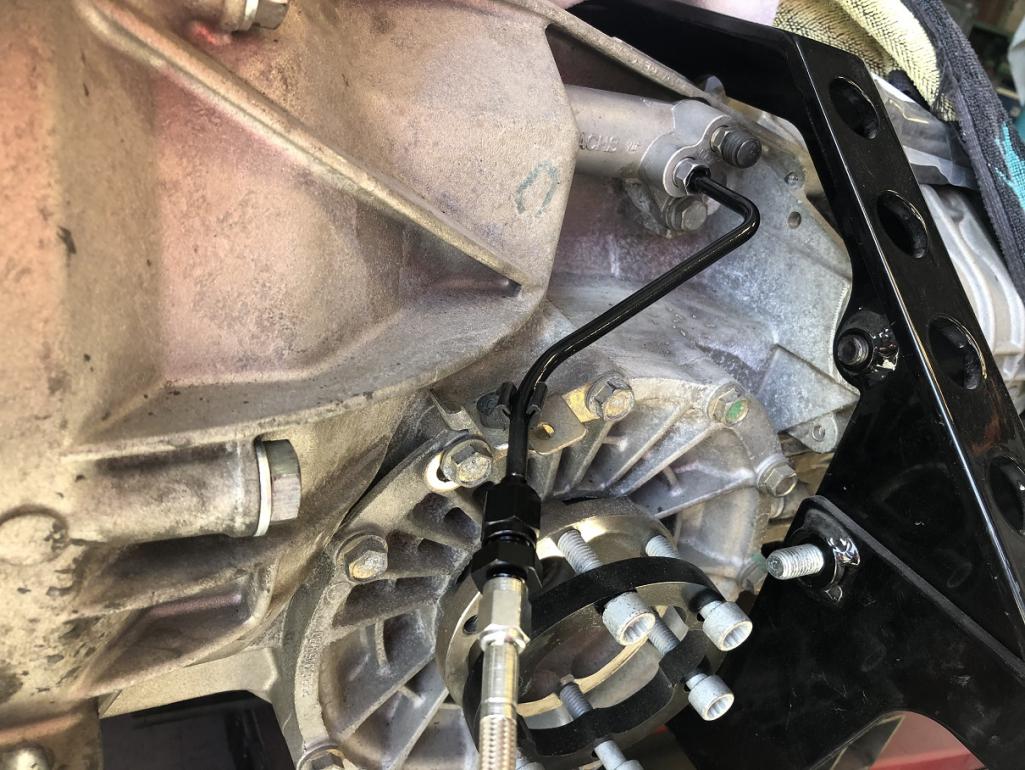
|
| tygaboy |
 Apr 15 2020, 04:14 PM Apr 15 2020, 04:14 PM
Post
#2497
|
|
914 Guru      Group: Members Posts: 5,724 Joined: 6-October 15 From: Petaluma, CA Member No.: 19,241 Region Association: Northern California 
|
I decided I needed to see the new vent design on the car.
"old" design in the upper pic, new one in the lower. I think I like the new one better! The upper one has a "soft" look to it. The new one's slight backward slope on the rear edge, along with the straight-across vents, seems to better integrate with the 914's lines. At least to my eye. I may need to add a bit more radius to the center rear edge. Again, I need to look at this a while. Attached thumbnail(s) 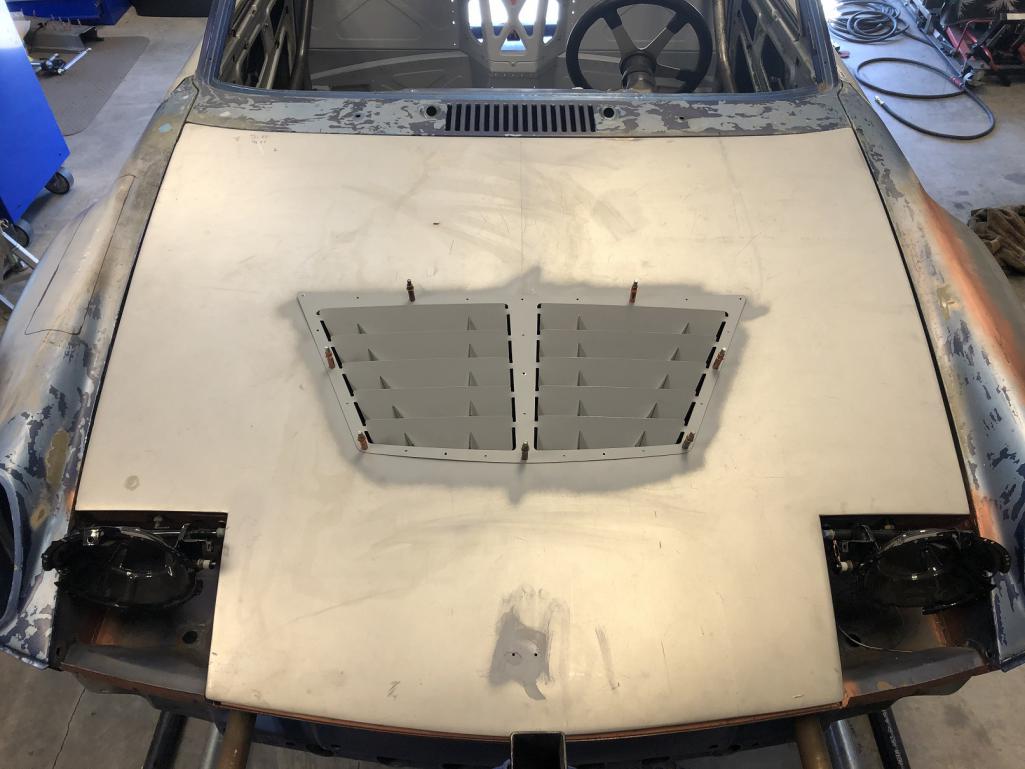 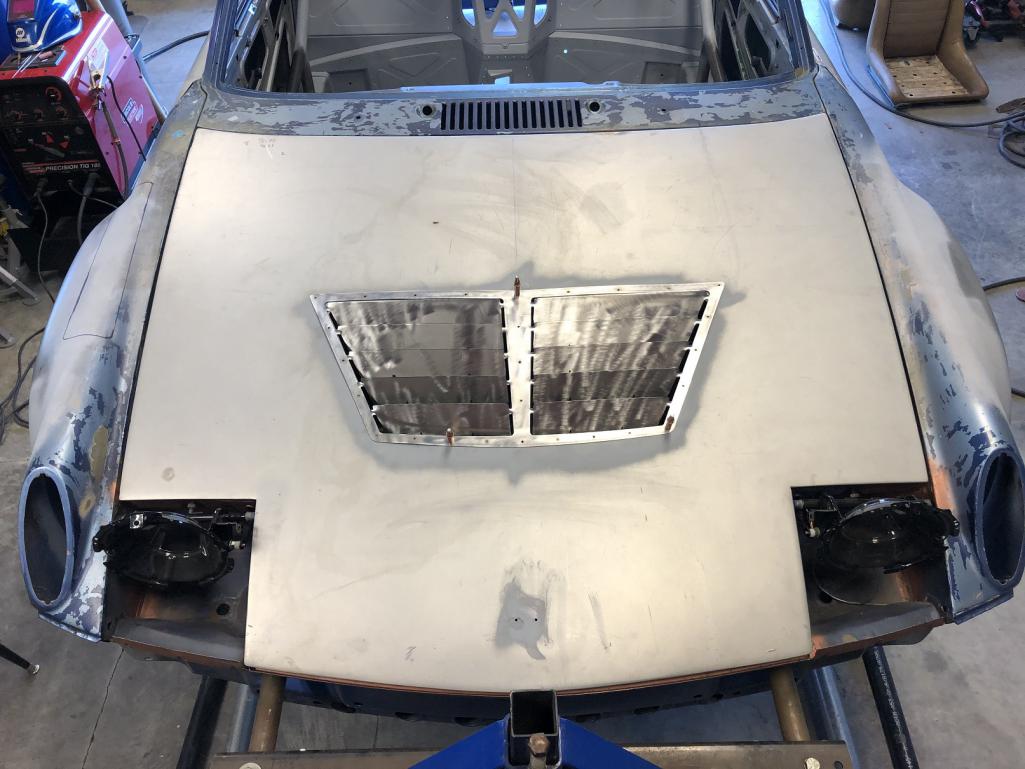
|
| tygaboy |
 Apr 15 2020, 04:18 PM Apr 15 2020, 04:18 PM
Post
#2498
|
|
914 Guru      Group: Members Posts: 5,724 Joined: 6-October 15 From: Petaluma, CA Member No.: 19,241 Region Association: Northern California 
|
Other views. Note that I haven't spent any time tuning the shape to get it to sit down better. Also, the opening in the hood is now too small and that's causing part of the vent to ride up.
Attached thumbnail(s) 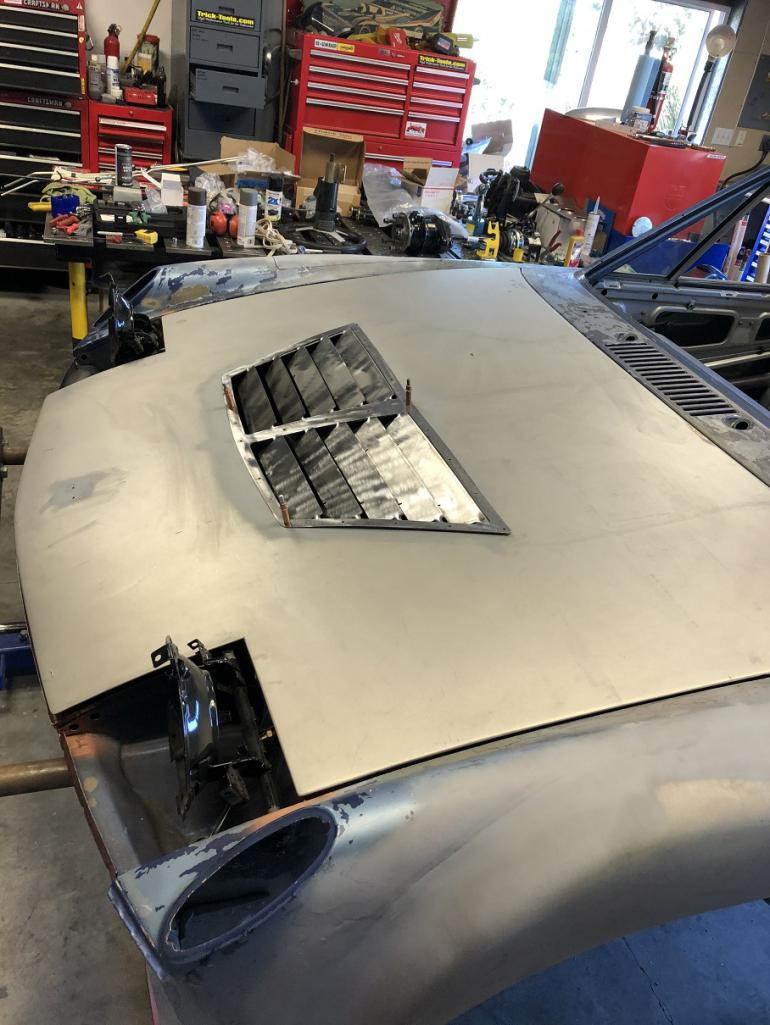 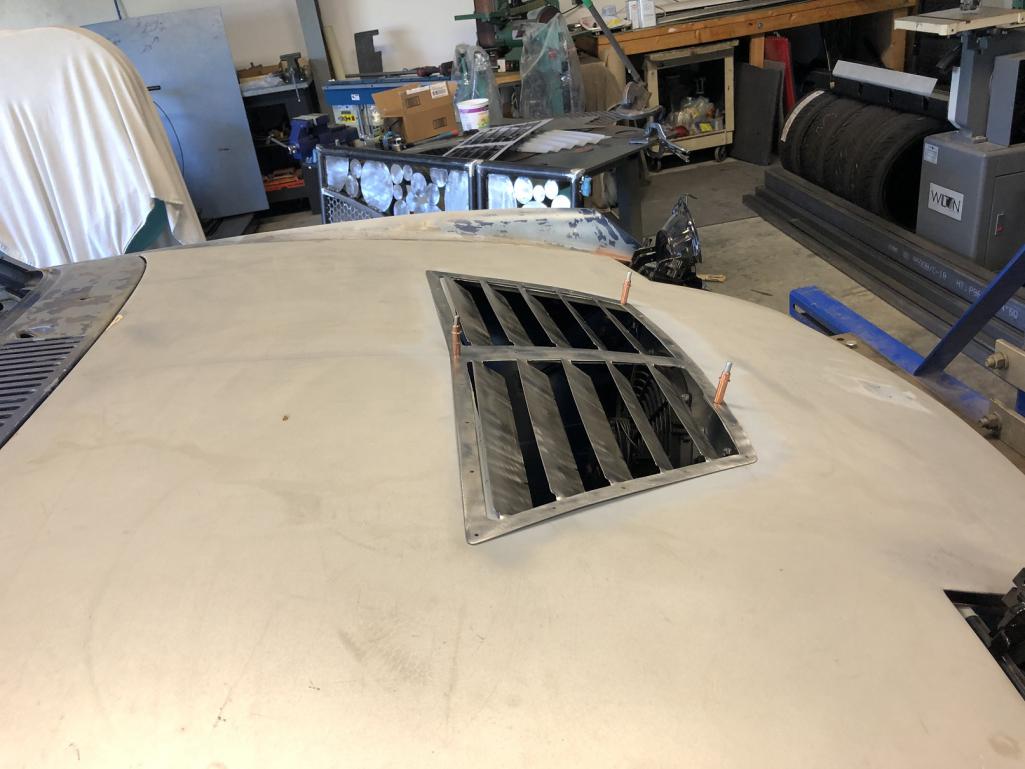
|
| 914forme |
 Apr 15 2020, 04:19 PM Apr 15 2020, 04:19 PM
Post
#2499
|
|
Times a wastin', get wrenchin'!     Group: Members Posts: 3,896 Joined: 24-July 04 From: Dayton, Ohio Member No.: 2,388 Region Association: None 
|
No idea on what PMB used for their SS line kit. Just know it worked perfectly to do the task at hand.
I like the idea of the under body cover. Carbon Fiber (IMG:style_emoticons/default/confused24.gif) I know Titanium, then if you drag it at speed it makes a wonderfully nice show for the people behind you. Attached image(s) 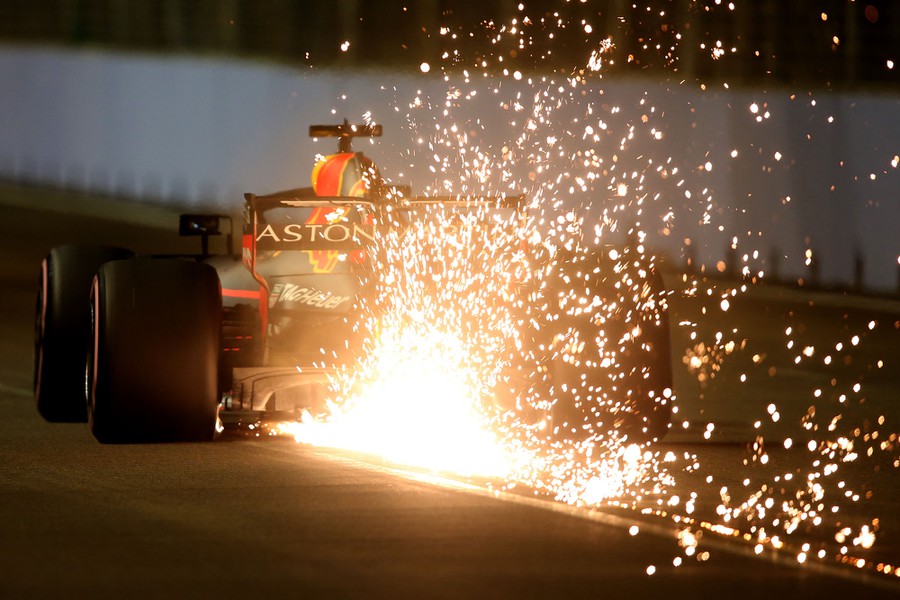
|
| tygaboy |
 Apr 15 2020, 04:22 PM Apr 15 2020, 04:22 PM
Post
#2500
|
|
914 Guru      Group: Members Posts: 5,724 Joined: 6-October 15 From: Petaluma, CA Member No.: 19,241 Region Association: Northern California 
|
I like the idea of the under body cover. Carbon Fiber (IMG:style_emoticons/default/confused24.gif) I know Titanium, then if you drag it at speed it makes a wonderfully nice show for the people behind you. @djway and @914forme - I'm going commando: No underwear for this car. I don't want anything that could cause damage to the hoses. One last time: the Gates hose approach is proven and about as low risk as it gets. I think I've got plenty of unproven/risky stuff on this build already! (IMG:style_emoticons/default/happy11.gif) (IMG:style_emoticons/default/poke.gif) |
  |
2 User(s) are reading this topic (2 Guests and 0 Anonymous Users)
0 Members:

|
Lo-Fi Version | Time is now: 18th December 2025 - 10:53 PM |
Invision Power Board
v9.1.4 © 2025 IPS, Inc.


