|
|
|
Porsche, and the Porsche crest are registered trademarks of Dr. Ing. h.c. F. Porsche AG.
This site is not affiliated with Porsche in any way. Its only purpose is to provide an online forum for car enthusiasts. All other trademarks are property of their respective owners. |
|
|

  |

| tygaboy |
 May 1 2020, 02:16 PM May 1 2020, 02:16 PM
Post
#2561
|
|
914 Guru  Group: Members Posts: 5,827 Joined: 6-October 15 From: Petaluma, CA Member No.: 19,241 Region Association: Northern California |
I dubbed today "Repurposed Friday".
With the car off the rotisserie, I can now get at the front panel to cut it for the radiator inlet. But since I plan to keep the hood latch, I want to retain a section of the panel from below the latch, connected to the lower area. And I wanted to reinforce that area before cutting the openings. A bent channel section of sheet metal would be best but that area has a lovely slight curve and making the needed piece would be fiddly. What to do? I've noticed that there are a lot if similarly curved pieces on these cars. I wonder if I can repurpose a part from somewhere else. (IMG:style_emoticons/default/idea.gif) I had a trashed engine lid and noticed this wonderful, curved sheet metal channel! Would it? Could it? Slice, slice, shape, shape. Attached thumbnail(s) 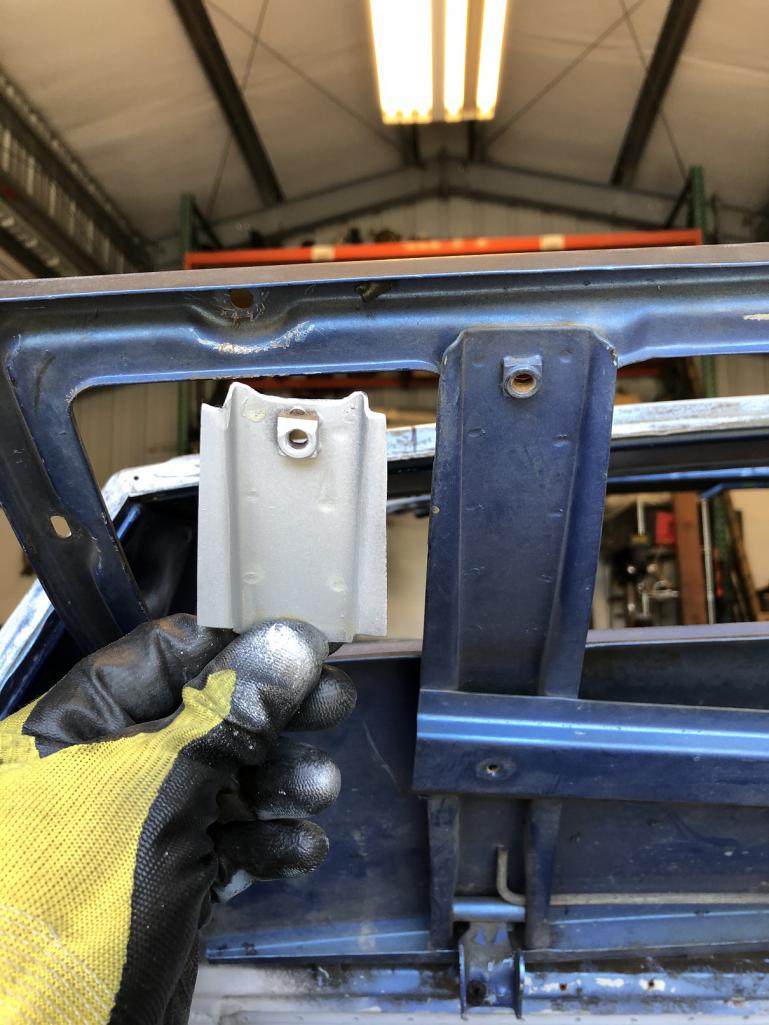 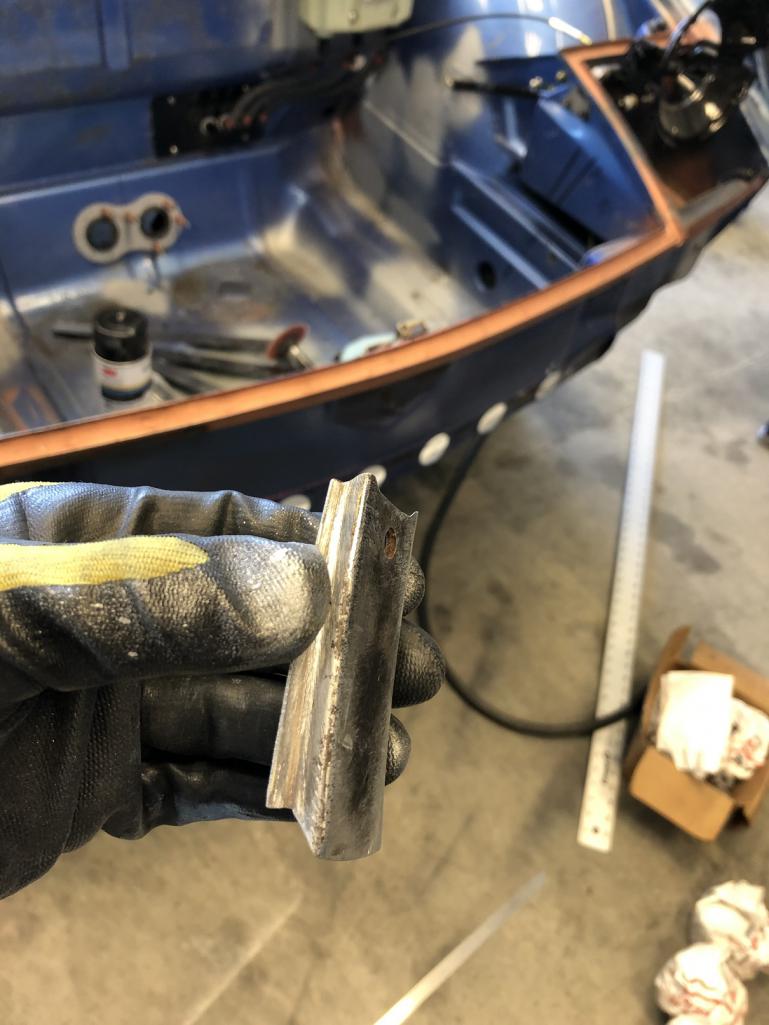
|
   |

 
|
| tygaboy |
May 1 2020, 02:20 PM
Post
#2562
|
|
914 Guru Group: Members Posts: 5,827 Joined: 6-October 15 From: Petaluma, CA Member No.: 19,241 Region Association: Northern California |
Yep, that'll do it. Still a bit of final shaping but yet another interesting "looky there" moment.
So if anyone asks: Yes, you can use a trashed engine lid to make a hood latch support for your water-cooled conversion! And it's all Porsche metal so you gotta love that. I need to order longer arms for my spot welder in order to reach in far enough so it'll be a few days before this get's welded in. Attached thumbnail(s) 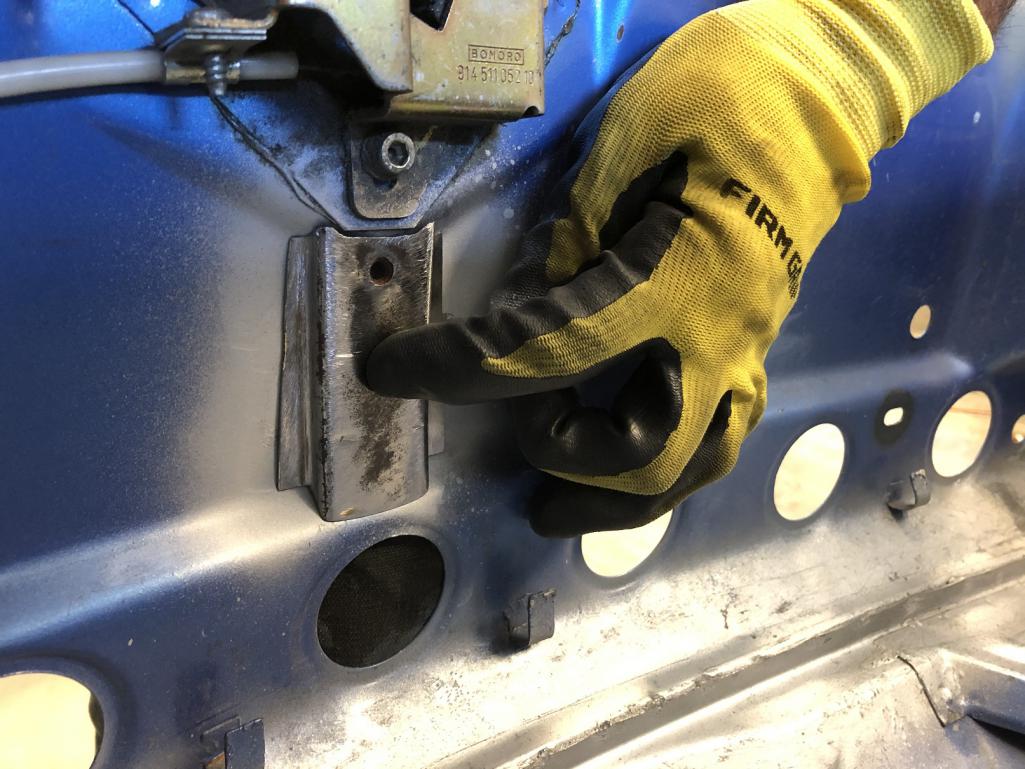
|
|
|
|
| tygaboy |
May 2 2020, 01:33 PM
Post
#2563
|
|
914 Guru Group: Members Posts: 5,827 Joined: 6-October 15 From: Petaluma, CA Member No.: 19,241 Region Association: Northern California |
I tacked on yesterday's support brace, doodled out a shape that I thought made sense and cut the main radiator openings.
Sharp eyes may have noticed I had drawn a couple other hole locations on the angled areas just outside where the main openings are. To @Rand 's point, it's another unneeded mod but I always wanted to do it so... Here's the before and after drilling the pilot holes. Attached thumbnail(s) 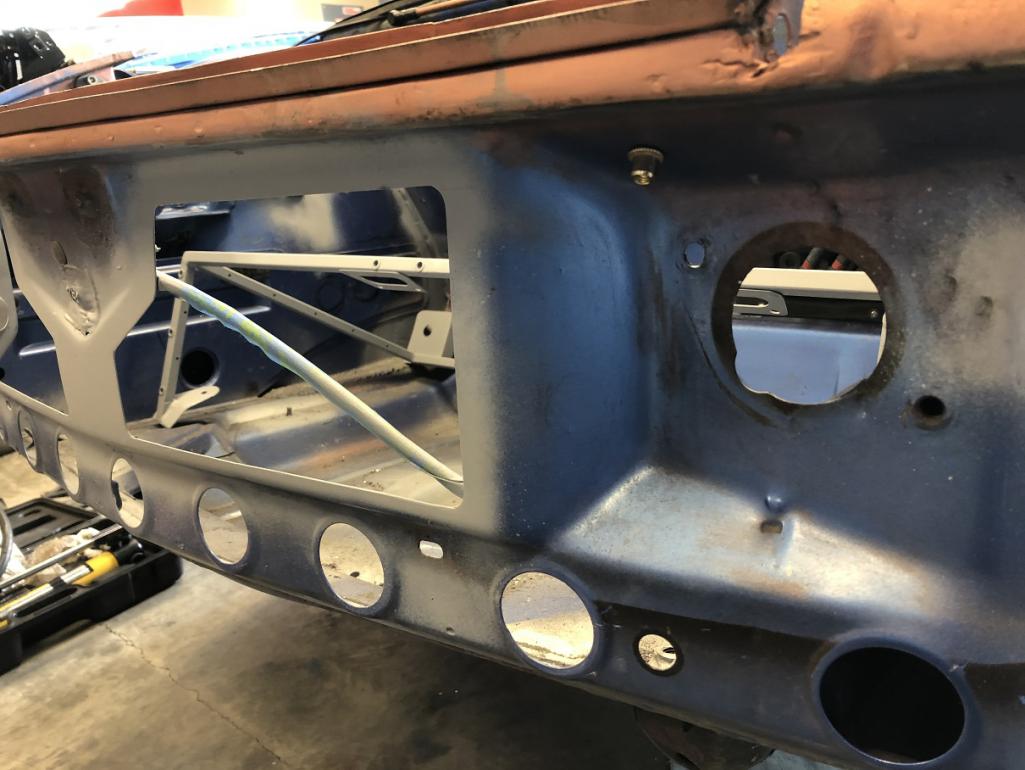 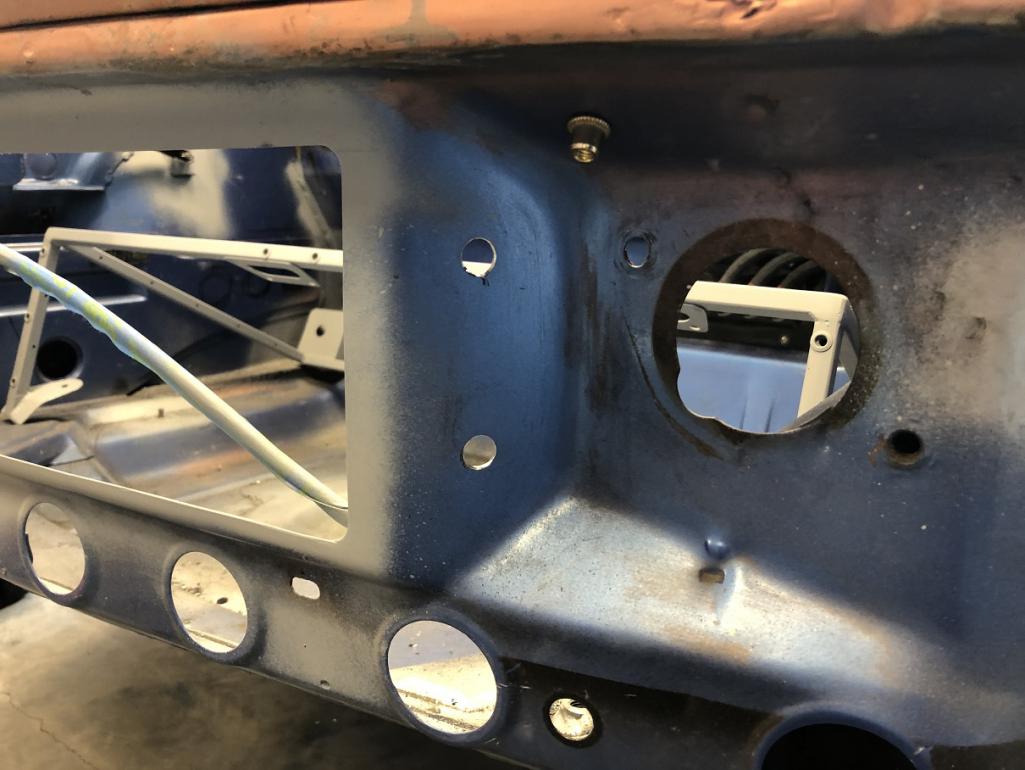
|
|
|
|
| tygaboy |
May 2 2020, 01:36 PM
Post
#2564
|
|
914 Guru Group: Members Posts: 5,827 Joined: 6-October 15 From: Petaluma, CA Member No.: 19,241 Region Association: Northern California |
Then I use a knock-out punch to cut the appropriate hole needed for the dimple die. I use a Harbor Freight hydraulic pump set up. It works wonderfully. The knock-out punch set as well as the dimple dies are from SWAG Off Road in Oregon. Great stuff!
Attached thumbnail(s) 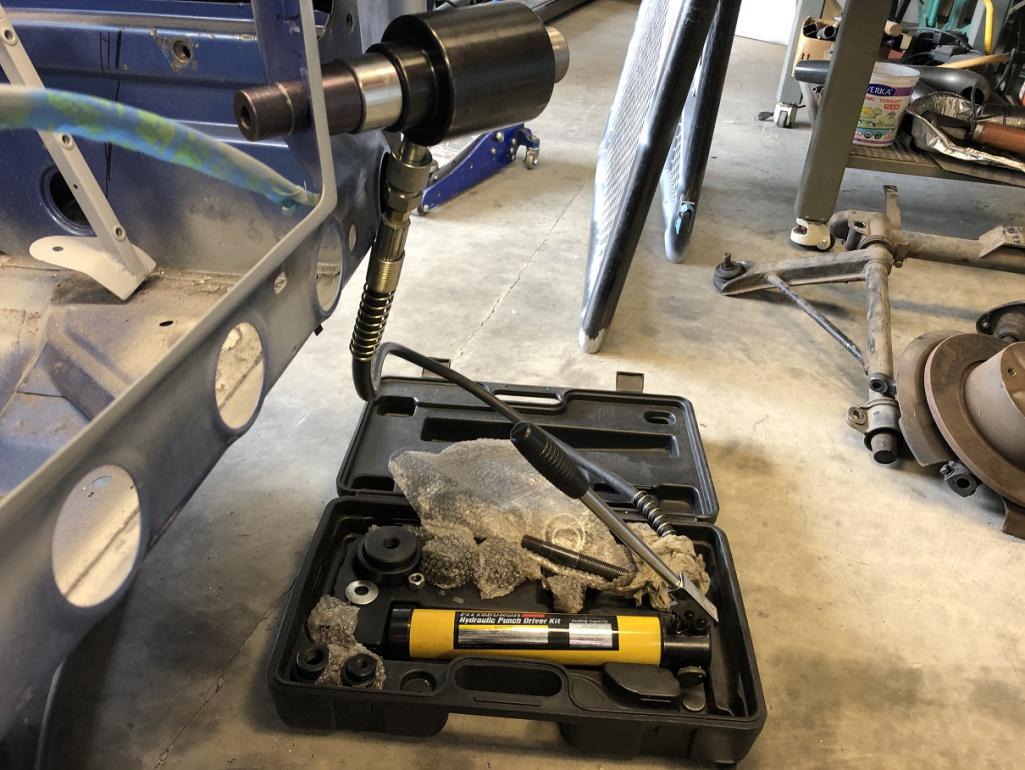
|
|
|
|
| tygaboy |
May 2 2020, 01:37 PM
Post
#2565
|
|
914 Guru Group: Members Posts: 5,827 Joined: 6-October 15 From: Petaluma, CA Member No.: 19,241 Region Association: Northern California |
With the holes punched, the same press is used to stamp the dimple.
Here you can see the amount of metal that gets moved to make the dimple. Attached thumbnail(s) 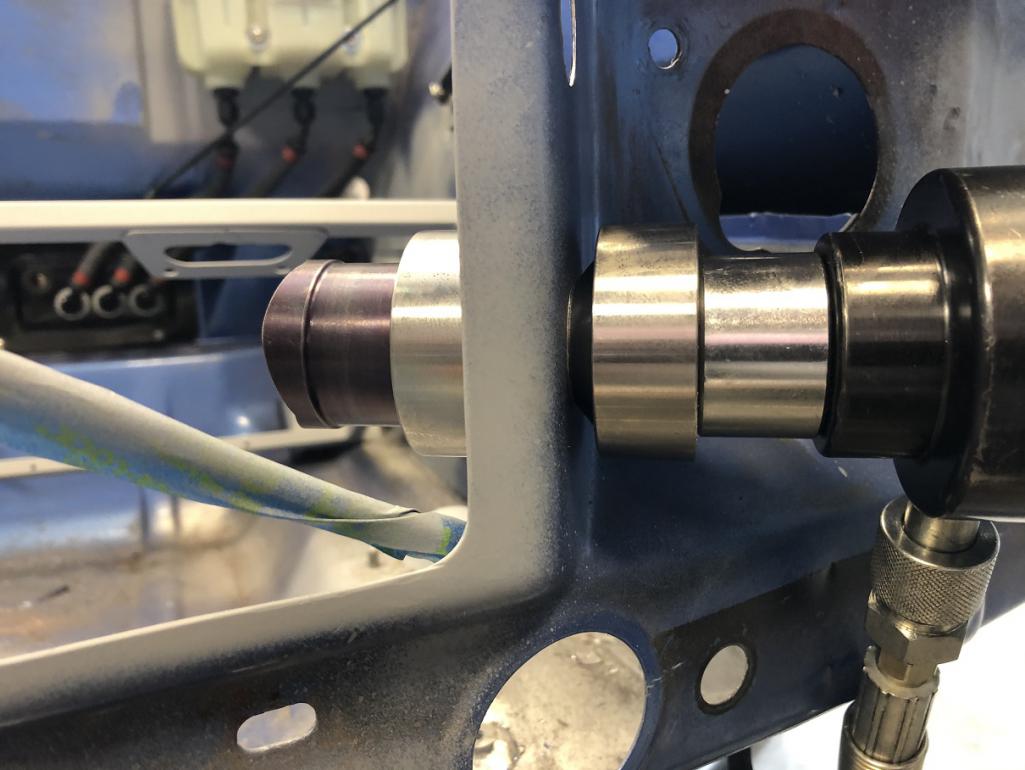
|
|
|
|
| tygaboy |
May 2 2020, 01:38 PM
Post
#2566
|
|
914 Guru Group: Members Posts: 5,827 Joined: 6-October 15 From: Petaluma, CA Member No.: 19,241 Region Association: Northern California |
Done and done. Stamping all four took maybe 20 minutes.
No, you'll never see these. Yes, I'll know they're there. Attached thumbnail(s) 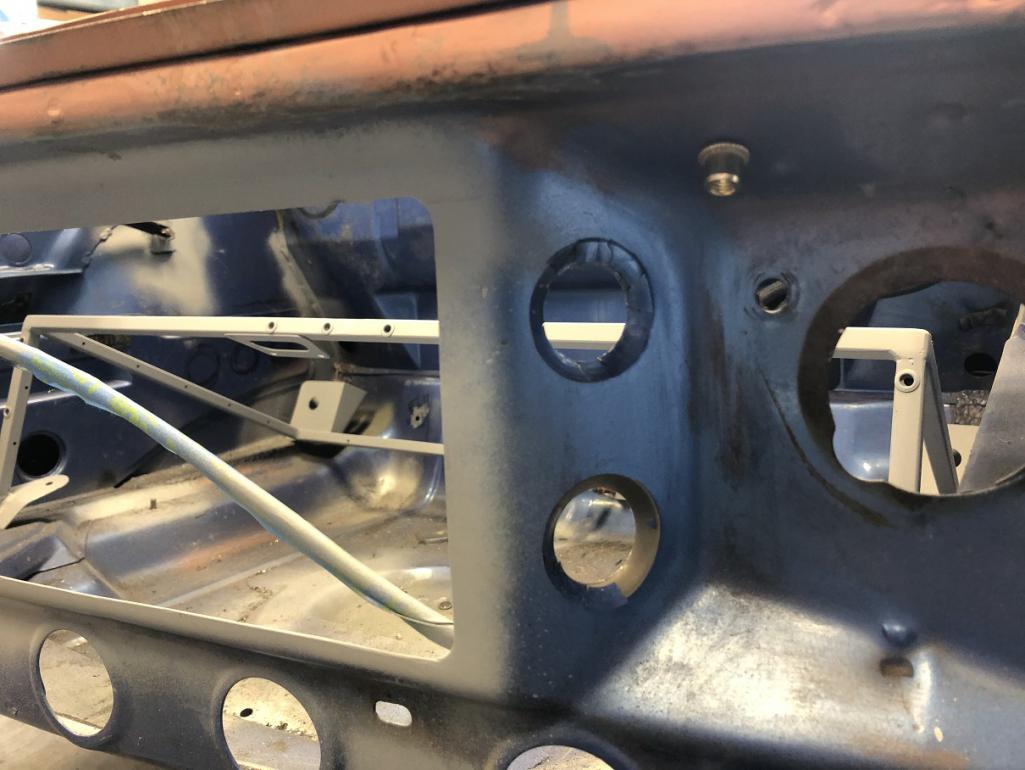
|
|
|
|
| tygaboy |
May 2 2020, 01:39 PM
Post
#2567
|
|
914 Guru Group: Members Posts: 5,827 Joined: 6-October 15 From: Petaluma, CA Member No.: 19,241 Region Association: Northern California |
My take on a water-cooled front opening.
Maybe I'll work up a frame and add some grill work... Attached thumbnail(s) 
|
|
|
|
| djway |
May 2 2020, 02:17 PM
Post
#2568
|
|
Senior Member Group: Members Posts: 787 Joined: 16-October 15 From: Riverside Member No.: 19,266 Region Association: Southern California |
You have all the coolest toys. (IMG:style_emoticons/default/smash.gif) (IMG:style_emoticons/default/smash.gif) (IMG:style_emoticons/default/sawzall-smiley.gif)
|
|
|
|
| Andyrew |
May 2 2020, 02:44 PM
Post
#2569
|
|
Spooling.... Please wait Group: Members Posts: 13,380 Joined: 20-January 03 From: Riverbank, Ca Member No.: 172 Region Association: Northern California |
Very clean!! I love it.
|
|
|
|
| tygaboy |
May 2 2020, 04:28 PM
Post
#2570
|
|
914 Guru Group: Members Posts: 5,827 Joined: 6-October 15 From: Petaluma, CA Member No.: 19,241 Region Association: Northern California |
Thanks for all the nice words, guys.
And back to today's work: I should have waited until I was "done", before posting pics. I drew up and cut a quick set of covers for the BUB mount holes as they would otherwise bleed off some air that should flow to the radiator. If anyone wants a set of these covers, PM me. Yours for the cost of shipping from 94952. Well, OK. And you can buy me a coffee, should we ever meet! (IMG:style_emoticons/default/laugh.gif) Attached thumbnail(s) 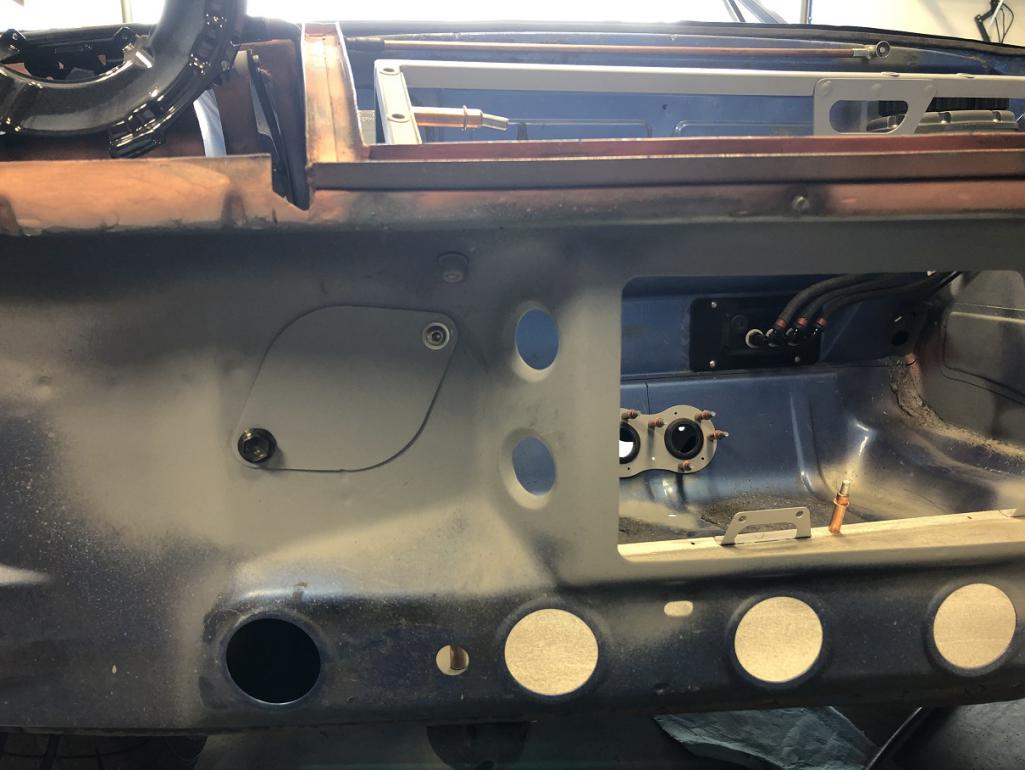
|
|
|
|
| Cairo94507 |
May 2 2020, 05:34 PM
Post
#2571
|
|
Michael Group: Members Posts: 10,671 Joined: 1-November 08 From: Auburn, CA Member No.: 9,712 Region Association: Northern California |
Love the cut-out for the radiator and the extra dimple-die cutouts for additional airflow. What kind of screen or mesh covering are you going to use to protect the radiator? As low as our cars are everything on the road gets thrown at them. (IMG:style_emoticons/default/beerchug.gif)
|
|
|
|
| tazz9924 |
May 3 2020, 07:54 AM
Post
#2572
|
|
Senior Member Group: Members Posts: 755 Joined: 31-May 15 From: Mooresville NC Member No.: 18,779 Region Association: None |
QUOTE(tygaboy @ May 2 2020, 02:28 PM)  Thanks for all the nice words, guys. And back to today's work: I should have waited until I was "done", before posting pics. I drew up and cut a quick set of covers for the BUB mount holes as they would otherwise bleed off some air that should flow to the radiator. If anyone wants a set of these covers, PM me. Yours for the cost of shipping from 94952. Well, OK. And you can buy me a coffee, should we ever meet! (IMG:style_emoticons/default/laugh.gif) The build is ruined! You used two different types of hardware to mount the block off plates?! (IMG:style_emoticons/default/lol-2.gif) |
|
|
|
| tygaboy |
May 3 2020, 04:42 PM
Post
#2573
|
|
914 Guru Group: Members Posts: 5,827 Joined: 6-October 15 From: Petaluma, CA Member No.: 19,241 Region Association: Northern California |
QUOTE(Cairo94507 @ May 2 2020, 04:34 PM) Love the cut-out for the radiator and the extra dimple-die cutouts for additional airflow. What kind of screen or mesh covering are you going to use to protect the radiator? As low as our cars are everything on the road gets thrown at them. (IMG:style_emoticons/default/beerchug.gif) @Cairo94507 Michael - I have some light-ish expanded material that I think will work for the screen. More a question of if I mount it on the nose panel, where it'd be essentially hidden, or in the bumper cutout, where I could make it more of a feature. I'll play around with it and make that call when the time comes. |
|
|
|
| tygaboy |
May 3 2020, 04:45 PM
Post
#2574
|
|
914 Guru Group: Members Posts: 5,827 Joined: 6-October 15 From: Petaluma, CA Member No.: 19,241 Region Association: Northern California |
QUOTE(tazz9924 @ May 3 2020, 06:54 AM) QUOTE(tygaboy @ May 2 2020, 02:28 PM) Thanks for all the nice words, guys. And back to today's work: I should have waited until I was "done", before posting pics. I drew up and cut a quick set of covers for the BUB mount holes as they would otherwise bleed off some air that should flow to the radiator. If anyone wants a set of these covers, PM me. Yours for the cost of shipping from 94952. Well, OK. And you can buy me a coffee, should we ever meet! (IMG:style_emoticons/default/laugh.gif) The build is ruined! You used two different types of hardware to mount the block off plates?! (IMG:style_emoticons/default/lol-2.gif) Hold on now, @tazz9924 ! I should actually get credit. The large bolt uses the factory threaded insert. I "added lightness" by using that smaller sized fastener! (IMG:style_emoticons/default/lol-2.gif) |
|
|
|
| tygaboy |
May 3 2020, 04:48 PM
Post
#2575
|
|
914 Guru Group: Members Posts: 5,827 Joined: 6-October 15 From: Petaluma, CA Member No.: 19,241 Region Association: Northern California |
Yesterday was all about the front. Today, the back. The drive train is back in and should stay in until this thing sees the road! It's been months since I saw this view.
On the down side: Ugh...now to see what I can do to tidy up the wiring... (IMG:style_emoticons/default/barf.gif) The fun part is that the Holley ECU comes with a wiring harness that expects the engine to be in the front of the car so almost all the connection points are "backwards". Hence the extra lengths everywhere, except where things are way too short and I have to use extensions... (IMG:style_emoticons/default/dry.gif) I am not well practiced with wiring but I suspect I'm about to learn all about it. (IMG:style_emoticons/default/blink.gif) Attached thumbnail(s) 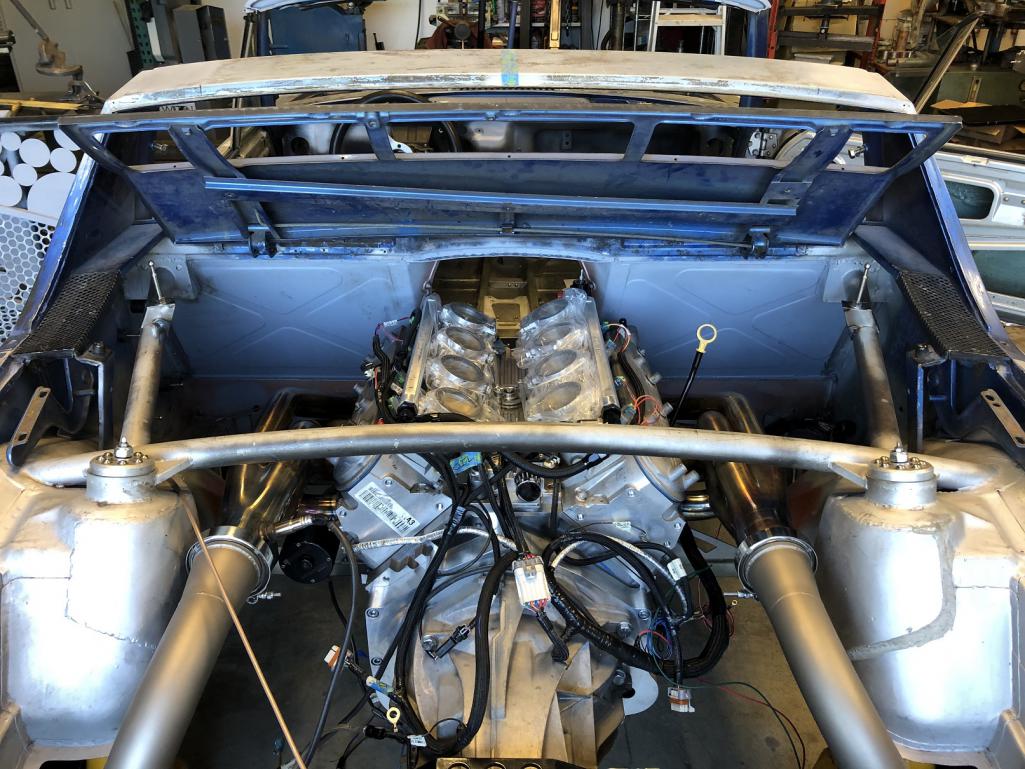
|
|
|
|
| djway |
May 3 2020, 04:53 PM
Post
#2576
|
|
Senior Member Group: Members Posts: 787 Joined: 16-October 15 From: Riverside Member No.: 19,266 Region Association: Southern California |
QUOTE(tygaboy @ May 3 2020, 03:42 PM) QUOTE(Cairo94507 @ May 2 2020, 04:34 PM) Love the cut-out for the radiator and the extra dimple-die cutouts for additional airflow. What kind of screen or mesh covering are you going to use to protect the radiator? As low as our cars are everything on the road gets thrown at them. (IMG:style_emoticons/default/beerchug.gif) @Cairo94507 Michael - I have some light-ish expanded material that I think will work for the screen. More a question of if I mount it on the nose panel, where it'd be essentially hidden, or in the bumper cutout, where I could make it more of a feature. I'll play around with it and make that call when the time comes. Make your own mesh out of aluminum by programming your cutter to cut hundreds of little 914 and Porsche emblems. (IMG:style_emoticons/default/poke.gif) (IMG:style_emoticons/default/poke.gif) |
|
|
|
| tygaboy |
May 3 2020, 04:56 PM
Post
#2577
|
|
914 Guru Group: Members Posts: 5,827 Joined: 6-October 15 From: Petaluma, CA Member No.: 19,241 Region Association: Northern California |
And for anyone running/considering running the Boxster S 6-speed, here's the axle angle you get when you move the drive train forward 1.5 inches, like I did. I'm still running the Renegade 1/2" spacers between the output flanges and the inner CV.
In all, I think I reduced the axle angle by about 1/2 of what it would otherwise have been. Attached thumbnail(s) 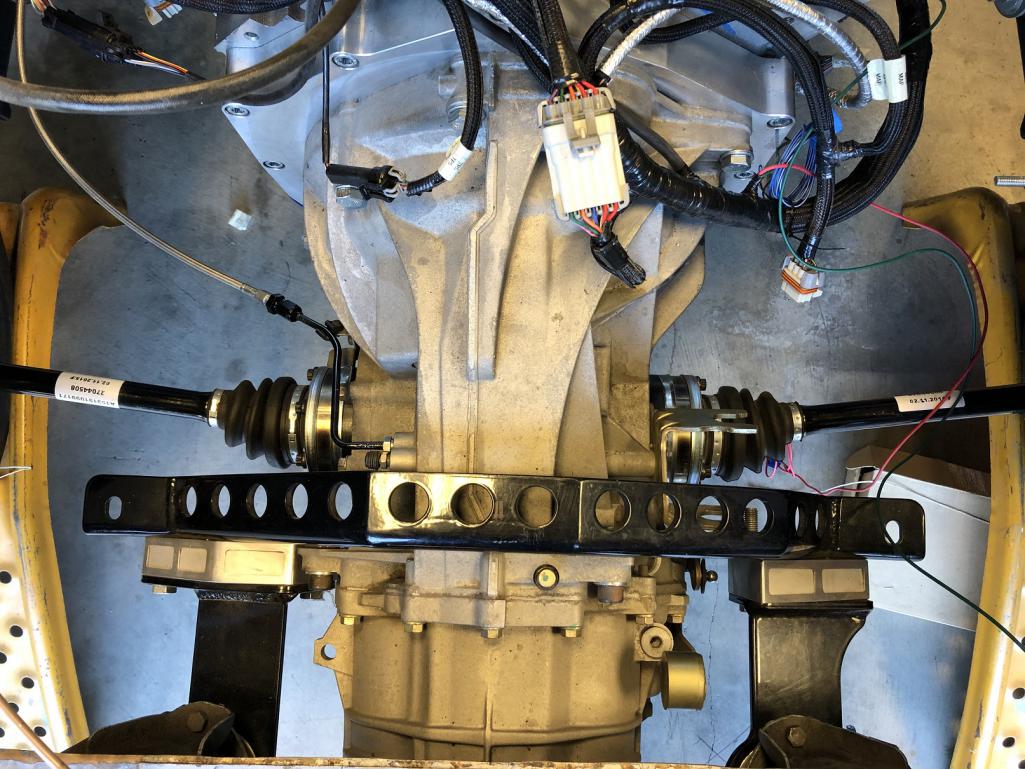
|
|
|
|
| djway |
May 3 2020, 07:48 PM
Post
#2578
|
|
Senior Member Group: Members Posts: 787 Joined: 16-October 15 From: Riverside Member No.: 19,266 Region Association: Southern California |
QUOTE(tygaboy @ May 3 2020, 03:56 PM) And for anyone running/considering running the Boxster S 6-speed, here's the axle angle you get when you move the drive train forward 1.5 inches, like I did. I'm still running the Renegade 1/2" spacers between the output flanges and the inner CV. In all, I think I reduced the axle angle by about 1/2 of what it would otherwise have been. Is the angle due to the LS and adapter or the transmission or both? |
|
|
|
| Cairo94507 |
May 4 2020, 06:44 AM
Post
#2579
|
|
Michael Group: Members Posts: 10,671 Joined: 1-November 08 From: Auburn, CA Member No.: 9,712 Region Association: Northern California |
Wow! That is a great shot with the engine and headers. I can't wait to see and hear that engine running. (IMG:style_emoticons/default/beerchug.gif)
|
|
|
|
| tygaboy |
May 4 2020, 08:35 AM
Post
#2580
|
|
914 Guru Group: Members Posts: 5,827 Joined: 6-October 15 From: Petaluma, CA Member No.: 19,241 Region Association: Northern California |
QUOTE(djway @ May 3 2020, 06:48 PM) QUOTE(tygaboy @ May 3 2020, 03:56 PM) And for anyone running/considering running the Boxster S 6-speed, here's the axle angle you get when you move the drive train forward 1.5 inches, like I did. I'm still running the Renegade 1/2" spacers between the output flanges and the inner CV. In all, I think I reduced the axle angle by about 1/2 of what it would otherwise have been. Is the angle due to the LS and adapter or the transmission or both? @djway - the Renegade kit assumes a stock chassis and in order to fit the LS with the Boxster 6-speed, the axle output shafts end up where they end up. Tony @Cracker suggested addressing the high-ish axle angle, if possible to help reduce CV stress. I figured I'd just move the lower firewall a bit and scoot everything as far forward as I could. Those aluminum blocks between the black components of the trans mount are the distance things went to the front. |
|
|
|
|
1 User(s) are reading this topic (1 Guests and 0 Anonymous Users)
0 Members:

|
Lo-Fi Version | Time is now: 16th June 2026 - 12:21 AM |
Invision Power Board
v9.1.4 © 2026 IPS, Inc.