|
|

|
Porsche, and the Porsche crest are registered trademarks of Dr. Ing. h.c. F. Porsche AG.
This site is not affiliated with Porsche in any way. Its only purpose is to provide an online forum for car enthusiasts. All other trademarks are property of their respective owners. |
|
|
  |
| tygaboy |
 Jun 7 2020, 06:01 PM Jun 7 2020, 06:01 PM
Post
#2681
|
|
914 Guru      Group: Members Posts: 5,724 Joined: 6-October 15 From: Petaluma, CA Member No.: 19,241 Region Association: Northern California 
|
Where possible (and reasonably practical), I want to eliminate traditional hose clamp connections in favor of AN fittings. So on the expansion tank, the hose barb fittings were lopped off and AN bungs welded in. Martin's TIG work is just incredible...
Yes, it's true; I often go for form over function. So sue me... (IMG:style_emoticons/default/poke.gif) Attached thumbnail(s) 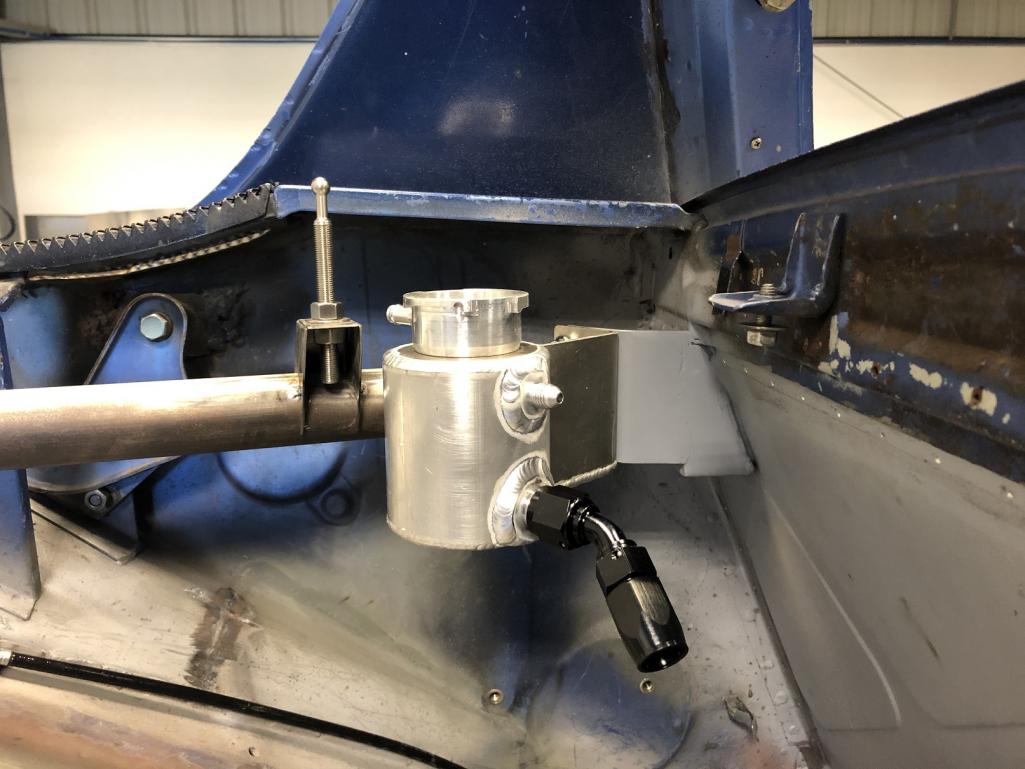
|
| Andyrew |
 Jun 8 2020, 08:30 AM Jun 8 2020, 08:30 AM
Post
#2682
|
|
Spooling.... Please wait           Group: Members Posts: 13,380 Joined: 20-January 03 From: Riverbank, Ca Member No.: 172 Region Association: Northern California 
|
Pretty!
Overkill, but Pretty! Return style system, right? Thats the way it looks. Is it higher than any other point in the system? Looks a tad low as I know those water jackets on the LS are bit high. |
| tygaboy |
 Jun 8 2020, 08:36 AM Jun 8 2020, 08:36 AM
Post
#2683
|
|
914 Guru      Group: Members Posts: 5,724 Joined: 6-October 15 From: Petaluma, CA Member No.: 19,241 Region Association: Northern California 
|
Pretty! Overkill, but Pretty! Return style system, right? Thats the way it looks. Is it higher than any other point in the system? Looks a tad low as I know those water jackets on the LS are bit high. Hey @Andyrew - You know one of my favorite sayings is "There's no kill like OVERKILL!" (IMG:style_emoticons/default/happy11.gif) And yes, the tank is the highest point by a fair bit. |
| sixnotfour |
 Jun 8 2020, 09:17 AM Jun 8 2020, 09:17 AM
Post
#2684
|
|
914 Wizard           Group: Members Posts: 11,068 Joined: 12-September 04 From: Life Elevated..planet UT. Member No.: 2,744 Region Association: Rocky Mountains 

|
QUOTE "There's no kill like OVERKILL!" That explains the decklid pivot weld build up.. (IMG:style_emoticons/default/blink.gif) (IMG:style_emoticons/default/beer.gif) (IMG:style_emoticons/default/av-943.gif) |
| tygaboy |
 Jun 9 2020, 05:37 PM Jun 9 2020, 05:37 PM
Post
#2685
|
|
914 Guru      Group: Members Posts: 5,724 Joined: 6-October 15 From: Petaluma, CA Member No.: 19,241 Region Association: Northern California 
|
QUOTE "There's no kill like OVERKILL!" That explains the decklid pivot weld build up.. (IMG:style_emoticons/default/blink.gif) (IMG:style_emoticons/default/beer.gif) (IMG:style_emoticons/default/av-943.gif) @sixnotfour - I feel compelled to mention that was a PO or PO's "buddy who has a welder" repair... Once I finalize the modified hinge set up, I'll be removing the stock hinges, mounts and that pile of steel boogers. |
| tygaboy |
 Jun 9 2020, 05:52 PM Jun 9 2020, 05:52 PM
Post
#2686
|
|
914 Guru      Group: Members Posts: 5,724 Joined: 6-October 15 From: Petaluma, CA Member No.: 19,241 Region Association: Northern California 
|
This seems like it'll take a while. While the chassis harness wires are labelled along their entire length, that's not the case with the engine harness; there are nothing to ID the wires except the diagram.
There are situations where the same colored wire is used for different inputs and some sensors share the same 5v output wire and ground wire. This is my first attempt at wiring a car, too. (IMG:style_emoticons/default/wacko.gif) I can't efficiently do the physical routing without being able to easily ID each wire so I'm labeling each one after first verifying it's connectivity from its end to its pin location in the connector that plugs into the ECU. I figure it'll take me another few hours to complete that step. My wife thought she was quite funny when she came out to the shop, watched what I was up to and asked, "Wire you doing all that?" (IMG:style_emoticons/default/shades.gif) Good thing she's cute. Attached thumbnail(s) 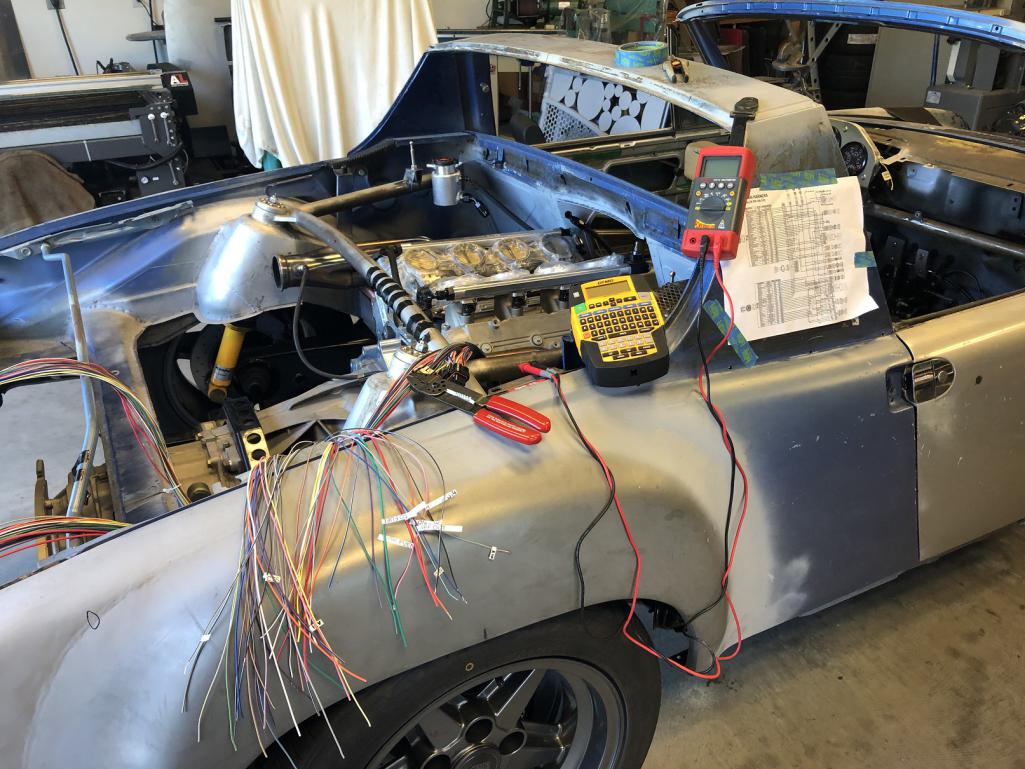
|
| 914forme |
 Jun 9 2020, 06:09 PM Jun 9 2020, 06:09 PM
Post
#2687
|
|
Times a wastin', get wrenchin'!     Group: Members Posts: 3,896 Joined: 24-July 04 From: Dayton, Ohio Member No.: 2,388 Region Association: None 
|
Time to invest in some printable heat shrink
|
| tygaboy |
 Jun 11 2020, 06:00 PM Jun 11 2020, 06:00 PM
Post
#2688
|
|
914 Guru      Group: Members Posts: 5,724 Joined: 6-October 15 From: Petaluma, CA Member No.: 19,241 Region Association: Northern California 
|
The chassis harness arrived earlier this week. The first order of business is mounting the fuse panel. I figured since I'd already created a panel mount location in the passenger foot well for the V1 electronics, I'd fab a quick mount and see if this location might work.
It turns out this assembly protrudes a bit more than the earlier components so I'm going to redesign the mounting plate to move it up as high as possible. If I don't like that, I'll figure out a different spot. Attached thumbnail(s) 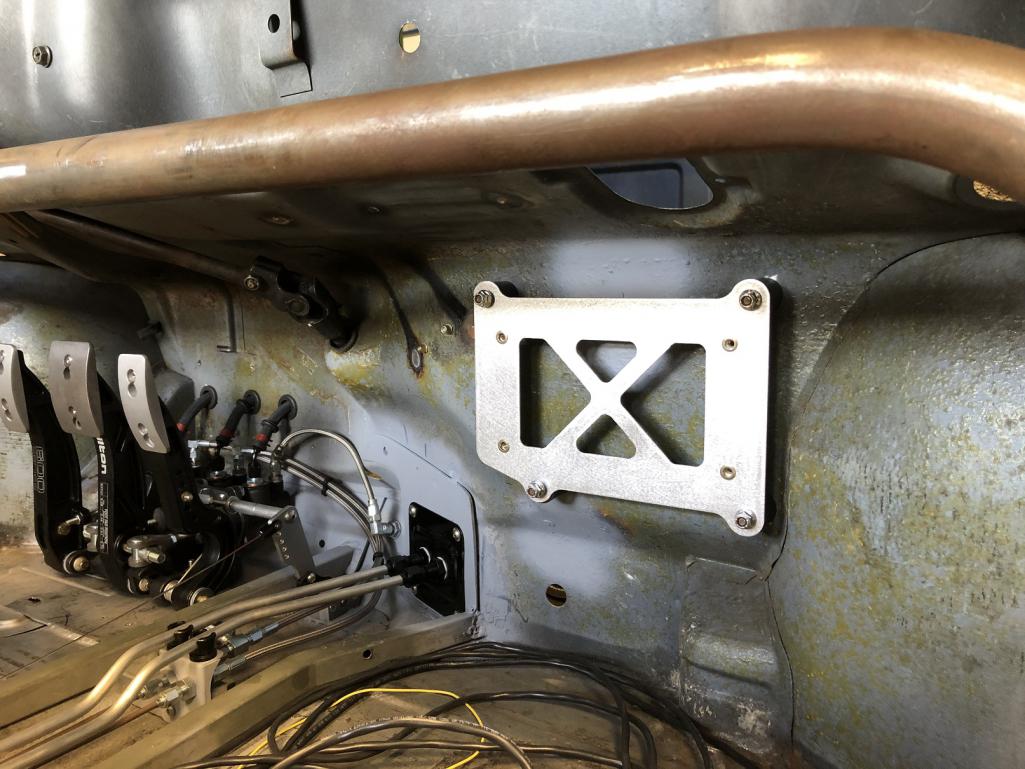 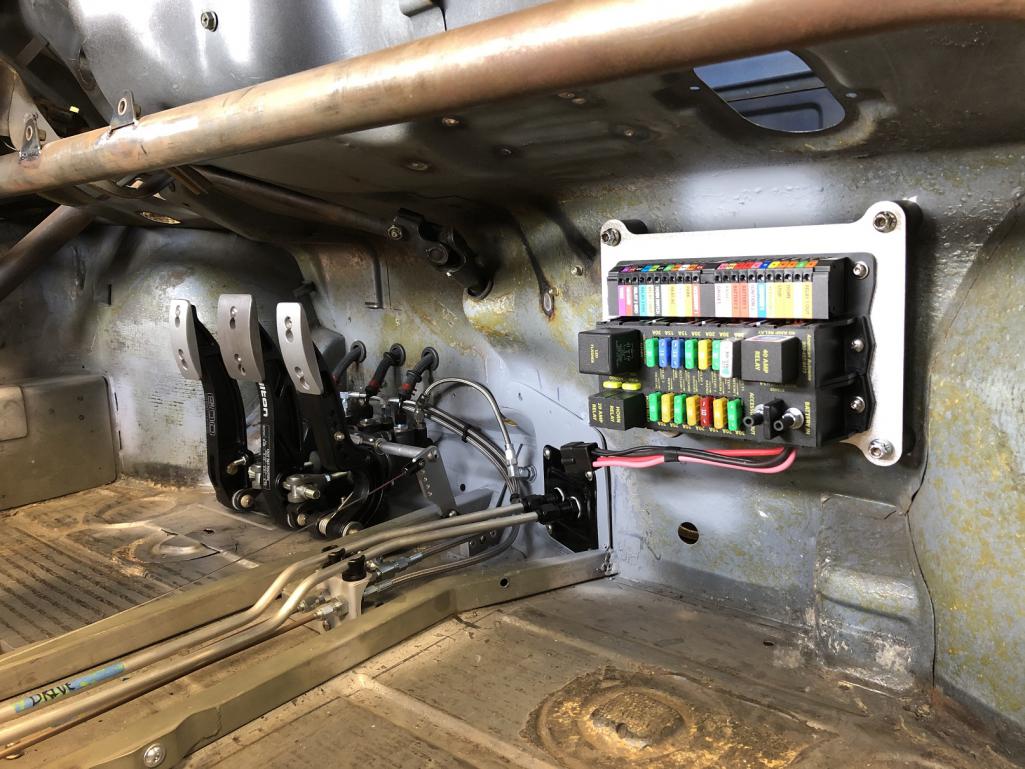
|
| Andyrew |
 Jun 11 2020, 06:55 PM Jun 11 2020, 06:55 PM
Post
#2689
|
|
Spooling.... Please wait           Group: Members Posts: 13,380 Joined: 20-January 03 From: Riverbank, Ca Member No.: 172 Region Association: Northern California 
|
Make sure you save room for your ducts and venting for any future AC/heat components.
|
| Andyrew |
 Jun 11 2020, 06:57 PM Jun 11 2020, 06:57 PM
Post
#2690
|
|
Spooling.... Please wait           Group: Members Posts: 13,380 Joined: 20-January 03 From: Riverbank, Ca Member No.: 172 Region Association: Northern California 
|
Also you've got the right idea on labeling the wires now... Makes it so much easier to group and organize!
|
| Krieger |
 Jun 12 2020, 12:42 AM Jun 12 2020, 12:42 AM
Post
#2691
|
|
Advanced Member     Group: Members Posts: 4,829 Joined: 24-May 04 From: Santa Rosa CA Member No.: 2,104 Region Association: None 
|
How about mounting it on the underside of the dash with a couple of hinges so it could fold down vertically?
|
| tygaboy |
 Jun 12 2020, 05:40 PM Jun 12 2020, 05:40 PM
Post
#2692
|
|
914 Guru      Group: Members Posts: 5,724 Joined: 6-October 15 From: Petaluma, CA Member No.: 19,241 Region Association: Northern California 
|
Better. The new mount moves the panel up so there's very little encroachment into the foot well. And to @Andyrew 's earlier point, it does look like I'll have to modify that plastic heat/air duct in order to fit it.
I'll work up some sort quick releasable foot rest/cover for the fuse panel so it'll be nice and hidden. Attached thumbnail(s) 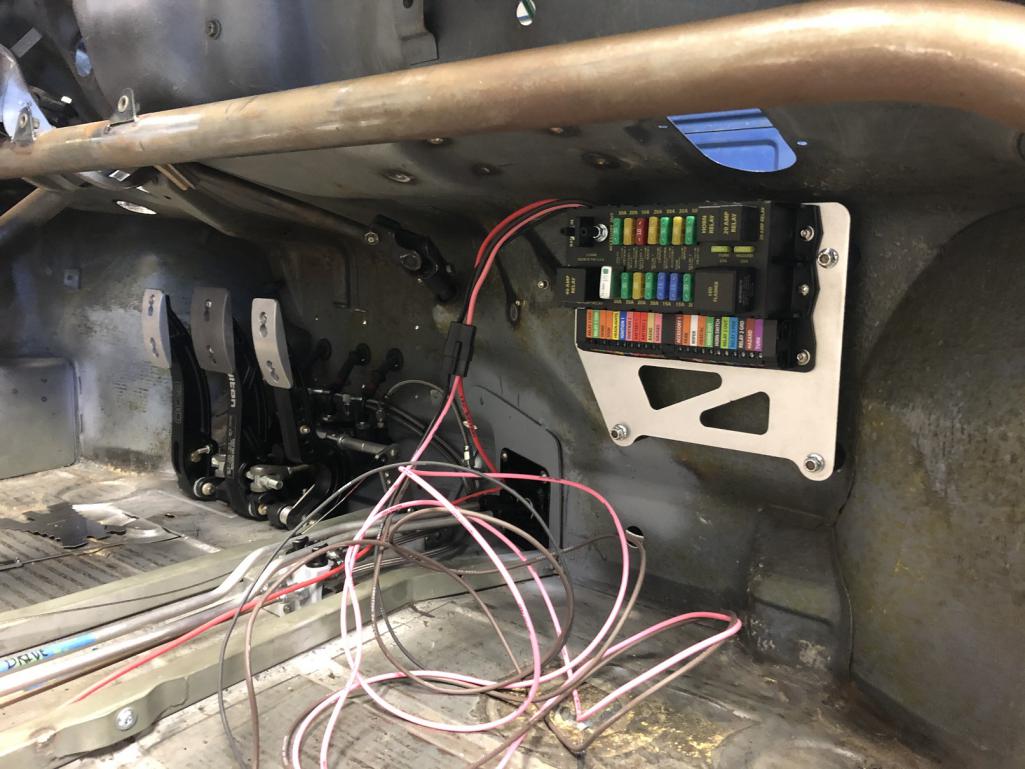
|
| tygaboy |
 Jun 12 2020, 05:41 PM Jun 12 2020, 05:41 PM
Post
#2693
|
|
914 Guru      Group: Members Posts: 5,724 Joined: 6-October 15 From: Petaluma, CA Member No.: 19,241 Region Association: Northern California 
|
How about mounting it on the underside of the dash with a couple of hinges so it could fold down vertically? @Krieger - Andy - Great minds... I thought about some sort of fold up mount but abandoned it for the simpler fixed set up. |
| Krieger |
 Jun 12 2020, 05:53 PM Jun 12 2020, 05:53 PM
Post
#2694
|
|
Advanced Member     Group: Members Posts: 4,829 Joined: 24-May 04 From: Santa Rosa CA Member No.: 2,104 Region Association: None 
|
I cannot believe you opted for a simpler way of doing something. Who is this posting in my friend Chris's place and what have you done with him? (IMG:style_emoticons/default/lol-2.gif)
|
| tygaboy |
 Jun 16 2020, 01:13 PM Jun 16 2020, 01:13 PM
Post
#2695
|
|
914 Guru      Group: Members Posts: 5,724 Joined: 6-October 15 From: Petaluma, CA Member No.: 19,241 Region Association: Northern California 
|
I need to merge the H2O lines coming from each cylinder bank back into one and get it routed down to the radiator return hose. After messing with a couple different commercially available Y-blocks, neither of which "did it" for me, I went ahead and designed up exactly what I need.
Take two 90 degree, 1.25" .065 wall aluminum tubes, same stuff I used for the hard lines in the frunk, do a bit of slicing and dicing, weld on the AN bungs and BOOM: a custom water line collector! I'm no fluid dynamicist but I have to believe this is better for flow than inlets that are 45 or 90 degrees to each other. Plus, it looks pretty cool. Attached thumbnail(s) 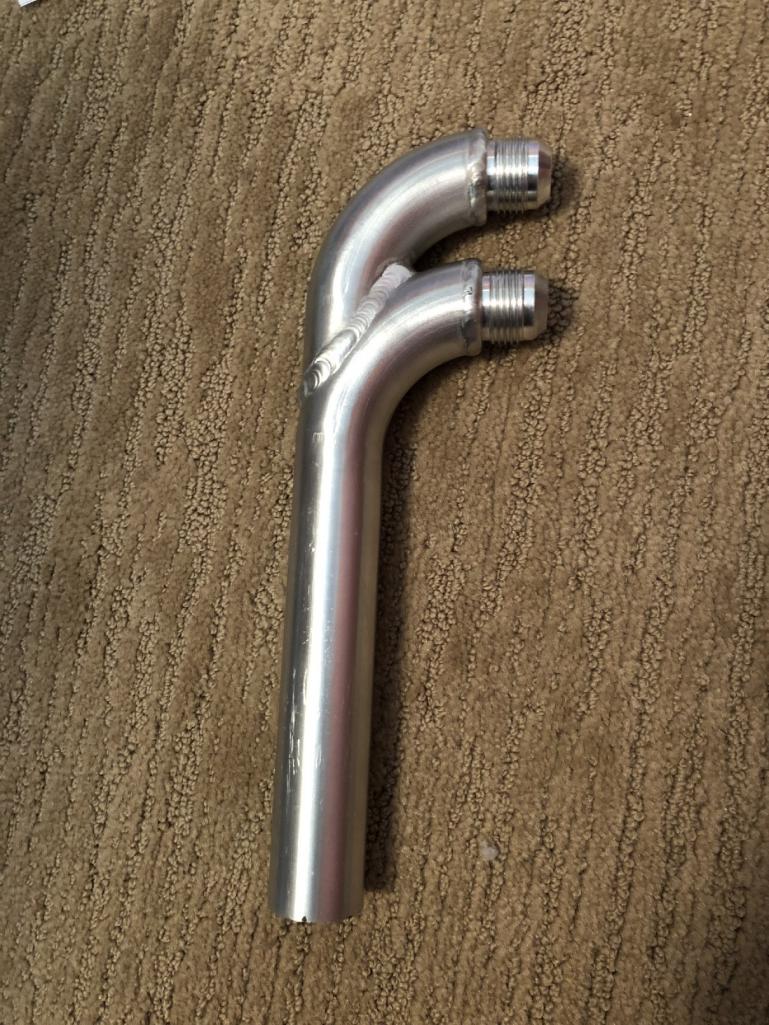 Attached image(s) 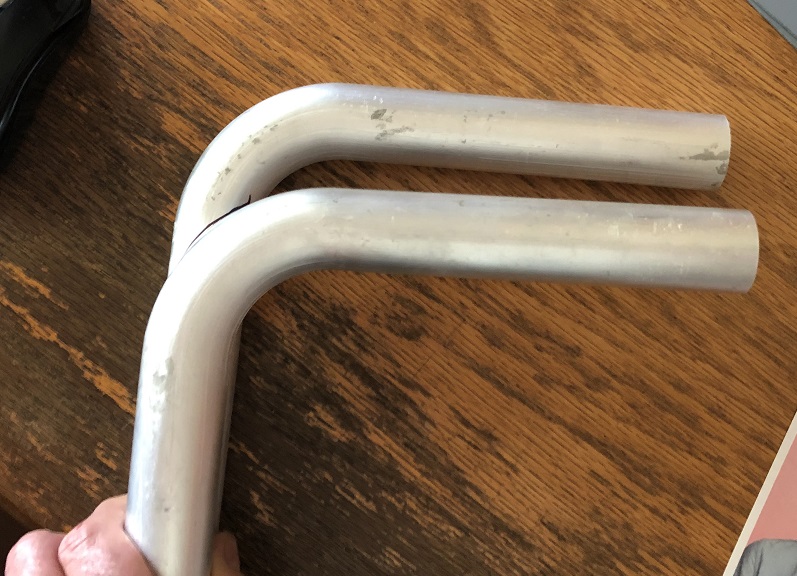
|
| Andyrew |
 Jun 16 2020, 01:56 PM Jun 16 2020, 01:56 PM
Post
#2696
|
|
Spooling.... Please wait           Group: Members Posts: 13,380 Joined: 20-January 03 From: Riverbank, Ca Member No.: 172 Region Association: Northern California 
|
Niiiice. Also is that your tig welds??
|
| tygaboy |
 Jun 16 2020, 02:40 PM Jun 16 2020, 02:40 PM
Post
#2697
|
|
914 Guru      Group: Members Posts: 5,724 Joined: 6-October 15 From: Petaluma, CA Member No.: 19,241 Region Association: Northern California 
|
Niiiice. Also is that your tig welds?? Whoops - my design but nope, that's all Martin on the welds, just like on the overflow tank. I forgot to add a "thanks to Martin for his continued support and F-ing awesome TIG work!" My TIG is coming along but when an expert is poking you saying "I'll do that for you...", it's hard to say no! |
| tygaboy |
 Jun 16 2020, 02:48 PM Jun 16 2020, 02:48 PM
Post
#2698
|
|
914 Guru      Group: Members Posts: 5,724 Joined: 6-October 15 From: Petaluma, CA Member No.: 19,241 Region Association: Northern California 
|
It seems today was all about the al-U-minium. First, with Martin helping on the water collector, then me finishing up the radiator support and shrouding.
While I will be temporarily installing some of the rivets ahead of paint, it'll only be those I can easily get behind to remove. I can't install any that attach panels to the tubing as if I removed them, the back side rivet parts would rattle around inside the tubes forever. But some items must (and can) be "finished" as separate assemblies, so long as they get their finish done before the rivets go on. Here's the powder coated and all finished rad mount with associated shrouding. I think it turned out really nicely. Sharp eyes will notice these aren't pop rivets. They are the CherryMax structural rivets mentioned dozens of pages back. They retain their steel core and are WAAAAY stronger than the typical pop rivets. Overkill, as usual, but I have them for the fire wall and figured I'd use them here, too. The tabs on the mount are for the AC condenser. Attached thumbnail(s) 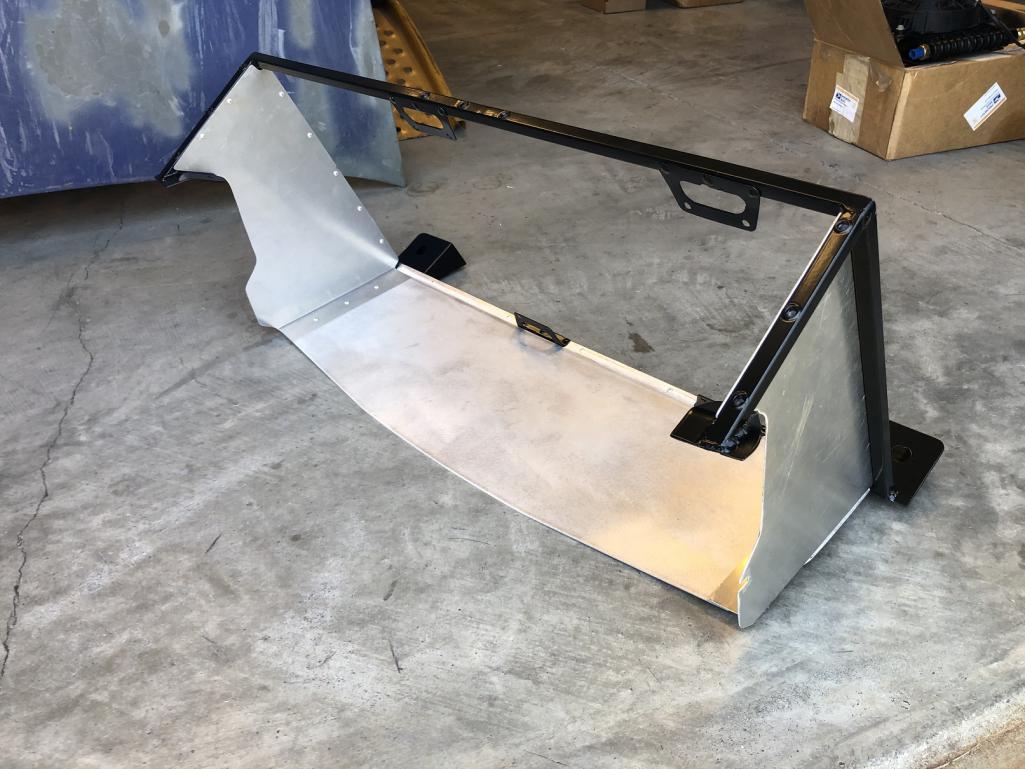 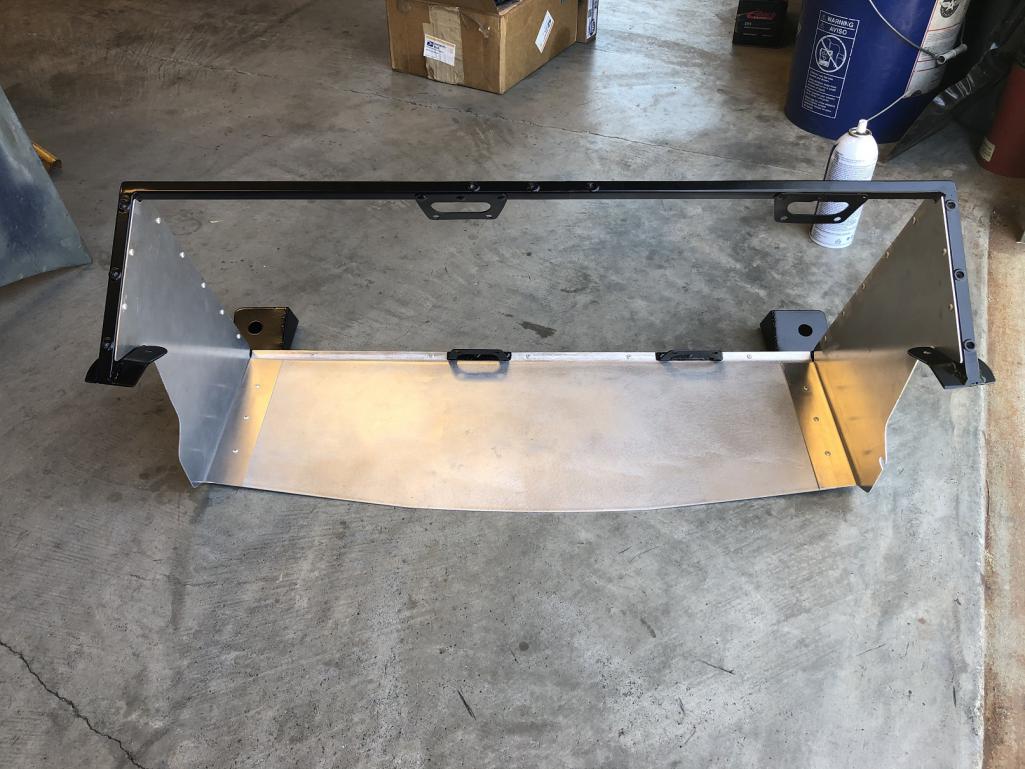
|
| tygaboy |
 Jun 16 2020, 02:54 PM Jun 16 2020, 02:54 PM
Post
#2699
|
|
914 Guru      Group: Members Posts: 5,724 Joined: 6-October 15 From: Petaluma, CA Member No.: 19,241 Region Association: Northern California 
|
A tool whore recommendation: If you have more than a few rivets to install, get yourself a pneumatic rivet gun.
This is a cheapie HF model but, holey moley, does it make quick work of this process. Note that I'm holding the phone with one hand and completing the riveting with the other. Try that with a manual gun... https://www.youtube.com/watch?v=BbGJB818HY8 |
| 76-914 |
 Jun 16 2020, 03:18 PM Jun 16 2020, 03:18 PM
Post
#2700
|
|
Repeat Offender & Resident Subaru Antagonist           Group: Members Posts: 13,829 Joined: 23-January 09 From: Temecula, CA Member No.: 9,964 Region Association: Southern California 
|
I wondered whether or not you opted for a hydraulic squeezer. Those Cherry Max rivets are difficult to pull w/o one.
|
  |
6 User(s) are reading this topic (6 Guests and 0 Anonymous Users)
0 Members:

|
Lo-Fi Version | Time is now: 18th December 2025 - 12:54 PM |
Invision Power Board
v9.1.4 © 2025 IPS, Inc.


