|
|
|
Porsche, and the Porsche crest are registered trademarks of Dr. Ing. h.c. F. Porsche AG.
This site is not affiliated with Porsche in any way. Its only purpose is to provide an online forum for car enthusiasts. All other trademarks are property of their respective owners. |
|
|

  |

| jd74914 |
 Jul 20 2020, 06:33 PM Jul 20 2020, 06:33 PM
Post
#2781
|
|
Its alive  Group: Members Posts: 4,880 Joined: 16-February 04 From: CT Member No.: 1,659 Region Association: North East States |
QUOTE(tygaboy @ Jul 20 2020, 06:56 PM)  As I mentioned, this is my first go at wiring an entire car. Someone please tell me that at this point, it's OK that it looks like this! (IMG:style_emoticons/default/blink.gif) Looks good to me! (IMG:style_emoticons/default/beerchug.gif) The only way to really make a one off neater is using string and they making a story board, but since you aren’t planning on shrink wrapping or concentric twisting the whole thing that’s kinda over board. The Summit indicator module is pretty cool btw! I’ve had them on my radar for a while, nice to seem their stuff in use somewhere! |
   |

 
|
| Curbandgutter |
Jul 20 2020, 08:20 PM
Post
#2782
|
|
Senior Member Group: Members Posts: 566 Joined: 8-March 13 From: Murrieta CA Member No.: 15,637 Region Association: Southern California |
I was thinking of using that same wireless setup. Didn't know it was that cool with that 4 blink set up. Also, in looking at the Tilton pedal I now see how far out I will need to hang that throttle cable out there. Nice to see how you're doing it so that I get a sneak peek of what I'll have to deal with. I'll be calling you on all that electrical stuff since I'm pretty much a novice.
|
|
|
|
| tygaboy |
Jul 21 2020, 02:26 PM
Post
#2783
|
|
914 Guru Group: Members Posts: 5,827 Joined: 6-October 15 From: Petaluma, CA Member No.: 19,241 Region Association: Northern California |
@Mueller
OK Mike, the gauntlet has been thrown! Who will have their wiring completed first? Place your bets! - Mueller and his fancy, high-tech system (yes, it was me Mike bought it from!) - Tygaboy and his old school, universal hot rod "mess o' wiring" system Seriously though, what I'm after with this wireless set up is ZERO switches in the car. Note that I have no turn signal or wiper stalks on the column. I also plan to switch the fresh air / heater blower from one of the buttons as well as wipers, headlights and hi-beam so again, NOTHING anywhere on the dash. Let's see if I can pull it off... https://www.youtube.com/watch?v=h_MHa-LbfKQ |
|
|
|
| Andyrew |
Jul 21 2020, 04:04 PM
Post
#2784
|
|
Spooling.... Please wait Group: Members Posts: 13,380 Joined: 20-January 03 From: Riverbank, Ca Member No.: 172 Region Association: Northern California |
(IMG:style_emoticons/default/popcorn[1].gif) (IMG:style_emoticons/default/cheer.gif)
I dont know who to root for! |
|
|
|
| burton73 |
Jul 21 2020, 05:02 PM
Post
#2785
|
|
Senior member, and old dude Group: Members Posts: 4,028 Joined: 2-January 07 From: Los Angeles Member No.: 7,414 Region Association: Southern California |
You guys have all the cool stuff.
Bob B |
|
|
|
| tygaboy |
Jul 21 2020, 05:36 PM
Post
#2786
|
|
914 Guru Group: Members Posts: 5,827 Joined: 6-October 15 From: Petaluma, CA Member No.: 19,241 Region Association: Northern California |
Here's the current "button map" plan.
Mostly self explanatory but that fan icon doesn't switch the radiator fans, it triggers the fresh air/heater blower fan. After consulting with Tony @RetroRacer , I took his advice that since the Low and Medium speeds don't move much air, why not simplify things and go with a high speed-only blower. OK then. If I can't live with it, I'll figure something out at that point. The seats are heated, too, so I should be OK on cold days. Coming back to the radiator fans, I plan to use the engine ECU and have it start/stop them at particular temps. Attached thumbnail(s) 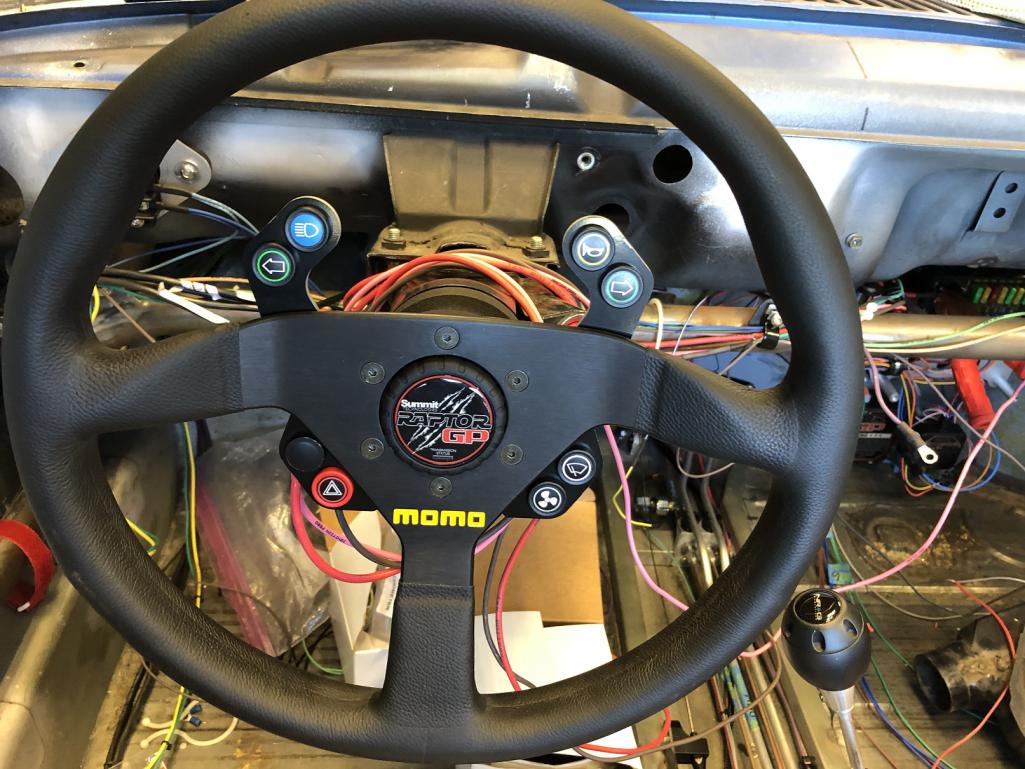
|
|
|
|
| Rand |
Jul 21 2020, 06:05 PM
Post
#2787
|
|
Cross Member Group: Members Posts: 7,415 Joined: 8-February 05 From: OR Member No.: 3,573 Region Association: None |
QUOTE(burton73 @ Jul 21 2020, 04:02 PM) You guys have all the cool stuff. Bob B Skill + money. |
|
|
|
| Rand |
Jul 21 2020, 06:06 PM
Post
#2788
|
|
Cross Member Group: Members Posts: 7,415 Joined: 8-February 05 From: OR Member No.: 3,573 Region Association: None |
QUOTE(tygaboy @ Jul 21 2020, 01:26 PM) Let's see if I can pull it off... I have no doubt. (IMG:style_emoticons/default/beerchug.gif) |
|
|
|
| Retroracer |
Jul 21 2020, 07:34 PM
Post
#2789
|
|
Senior Member Group: Members Posts: 660 Joined: 7-July 13 From: Bend OR Member No.: 16,100 Region Association: Pacific Northwest |
@Tygaboy - so the unmarked switch will be main/low beam toggle? and the upper left switch is side/rear/head lights on / off...?
No ejector seat then. - Tony |
|
|
|
| tygaboy |
Jul 21 2020, 07:42 PM
Post
#2790
|
|
914 Guru Group: Members Posts: 5,827 Joined: 6-October 15 From: Petaluma, CA Member No.: 19,241 Region Association: Northern California |
QUOTE(Retroracer @ Jul 21 2020, 06:34 PM) @Tygaboy - so the unmarked switch will be main/low beam toggle? and the upper left switch is side/rear/head lights on / off...? No ejector seat then. - Tony @RetroRacer Tony - close only backwards, I think. I wasn't sure how the multi-relay model would work so I didn't label that lower button. The plan is the lower will turn on the running/tail lights and low beam, the upper will be high/low beam toggle. It's entirely possible I've misunderstood how it's supposed to work so just point me at what I need to do and I'll make it so! |
|
|
|
| tygaboy |
Jul 30 2020, 08:27 AM
Post
#2791
|
|
914 Guru Group: Members Posts: 5,827 Joined: 6-October 15 From: Petaluma, CA Member No.: 19,241 Region Association: Northern California |
In keeping with "virtually no usable 914 content", here's the latest:
I've opted to use an Arduino plus a few other goodies to add specific functionality to the Raptor wireless system. As delivered, the Raptor buttons can be set to momentary, latch or flash. Meaning that to trigger any "complex" behavior, I'd need to add something. Arduino to the rescue! With less than $100 in resistors, diodes and relays, I can do the following: Headlights: Press the "Lights" button for 2 seconds and the low beam, tail and running lights come on. Now, a quick click of the Lights button switches between low/high beam as many times as needed. Hold the button for 2 seconds and all lights switch off. Heater/fresh air blower: The first press turns the fan on low, next one switches it to medium, next one to high, next one turns it off. Wipers: The first click turns them on low, the next turns them to high, the next turns them off. Press and hold at any time and the squirters squirt! It looks like I will achieve the goal of no switches other than the Raptor AND no loss of desired functionality. Plus, I can expand and program the Arduino to do other things I may think up! Or, change the behavior of the above listed items. Attached thumbnail(s) 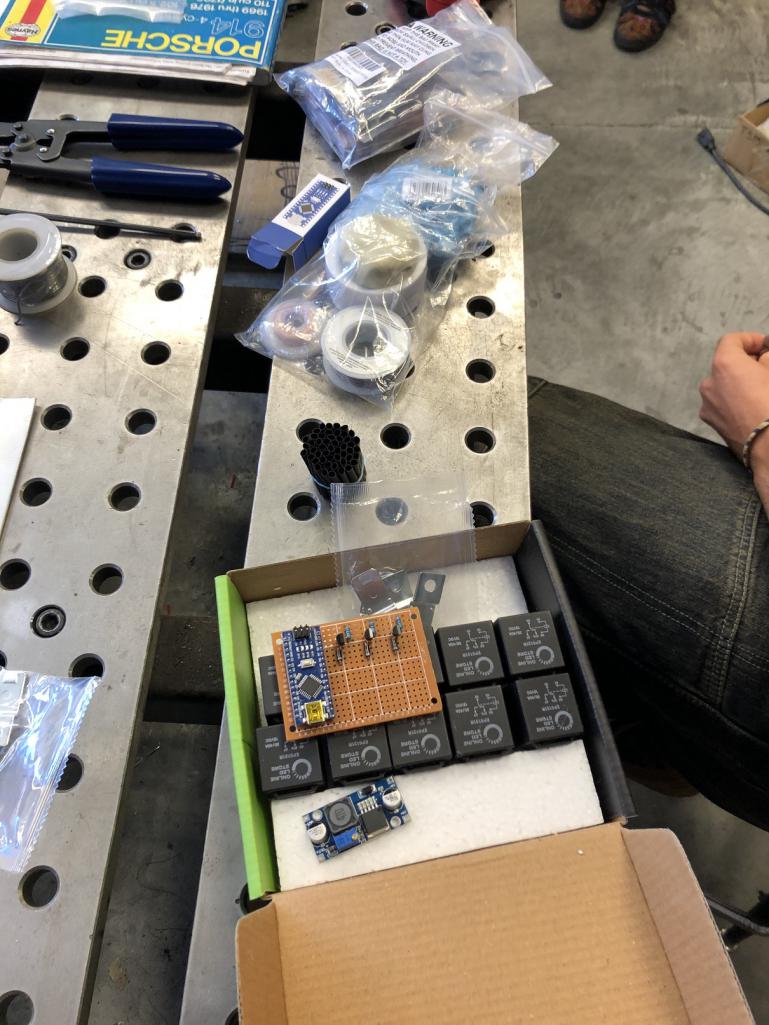
|
|
|
|
| 76-914 |
Jul 30 2020, 08:45 AM
Post
#2792
|
|
Repeat Offender & Resident Subaru Antagonist Group: Members Posts: 13,896 Joined: 23-January 09 From: Temecula, CA Member No.: 9,964 Region Association: Southern California |
Great theft deterrent Chris. Your common thief would never figure out how to operate your car. Anyway, it's an improvement over Porsche's matrix technique they used in wiring the 914. Looks good, stay after it. (IMG:style_emoticons/default/beerchug.gif)
|
|
|
|
| Nogoodwithusernames |
Jul 30 2020, 09:31 AM
Post
#2793
|
|
Member Group: Members Posts: 307 Joined: 31-May 16 From: Sutter, CA Member No.: 20,051 Region Association: None |
That is incredibly cool, you get much more on that steering wheel you'll have a F1 car (IMG:style_emoticons/default/biggrin.gif)
|
|
|
|
| jd74914 |
Jul 30 2020, 10:32 AM
Post
#2794
|
|
Its alive Group: Members Posts: 4,880 Joined: 16-February 04 From: CT Member No.: 1,659 Region Association: North East States |
QUOTE(tygaboy @ Jul 30 2020, 09:27 AM) I've opted to use an Arduino plus a few other goodies to add specific functionality to the Raptor wireless system. ... Headlights: Press the "Lights" button for 2 seconds and the low beam, tail and running lights come on. Now, a quick click of the Lights button switches between low/high beam as many times as needed. Hold the button for 2 seconds and all lights switch off. Please be careful with that one... Arduino's are not hardened devices in the least and in my experience tend to fail at inopportune times, especially when exposed to vibration/heat. Never used one on a production car (only racecars), but we learned to have a second programmed and ready to go just in case. |
|
|
|
| Dion |
Jul 30 2020, 01:07 PM
Post
#2795
|
|
RN Group: Members Posts: 2,927 Joined: 16-September 04 From: Audubon,PA Member No.: 2,766 Region Association: MidAtlantic Region |
I could not begin to comment what electrical switching system to use.
Just want to say what an adventure this build is with the twists and turns and evolution of this project. I personally like that wheel set up. It’s like the simple early GTP & F1 Steering wheels. I hope you can make it work Chris. Keep at it! |
|
|
|
| tygaboy |
Jul 30 2020, 05:43 PM
Post
#2796
|
|
914 Guru Group: Members Posts: 5,827 Joined: 6-October 15 From: Petaluma, CA Member No.: 19,241 Region Association: Northern California |
QUOTE(jd74914 @ Jul 30 2020, 09:32 AM) QUOTE(tygaboy @ Jul 30 2020, 09:27 AM) I've opted to use an Arduino plus a few other goodies to add specific functionality to the Raptor wireless system. ... Headlights: Press the "Lights" button for 2 seconds and the low beam, tail and running lights come on. Now, a quick click of the Lights button switches between low/high beam as many times as needed. Hold the button for 2 seconds and all lights switch off. Please be careful with that one... Arduino's are not hardened devices in the least and in my experience tend to fail at inopportune times, especially when exposed to vibration/heat. Never used one on a production car (only racecars), but we learned to have a second programmed and ready to go just in case. @jd74914 Good to know. I do plan to isolate mount and otherwise protect it as best I can. Thanks for the heads up! |
|
|
|
| tygaboy |
Jul 30 2020, 06:03 PM
Post
#2797
|
|
914 Guru Group: Members Posts: 5,827 Joined: 6-October 15 From: Petaluma, CA Member No.: 19,241 Region Association: Northern California |
And..... it WORKS! At least on the bench. Today was just getting things mocked together and programming the Headlight function. The relays trigger as needed to support the "long press" to turn things on and off and the "short press" to toggle between low and high beams.
And here are the raw components ahead of any attempt at clean up, final wire length, packaging or mounting. The 5V signals flow from the Raptor box into the 6-pin connector at the top of the pic. Then it's into the Arduino which runs the program and controls that 2nd board's components, which are essentially low voltage relays that in turn trigger the 12V relays on the right. The Headlight function works like this: - after a press over 2 seconds long is released, Relay 1 (running lights) and Relay 2 (low beams) are turned on. - With Relay 1 on, a press of any duration under 2 seconds will turn off Relay 2 and turn on Relay 3 (high beams). - the next short press shuts off Relay 3 and turns on Relay 2. - continued short presses are simply toggling between low and high beam. - when the next press of over 2 seconds is detected, all relays turn off. That little board to the left is a voltage regulator that takes the car's 12v down to the 5V the Arduino needs. And it's working just as planned. Now to get it packaged, installed and wired. I can then program the remaining functions for the wipers and blower motor and upload via USB cable. Attached thumbnail(s) 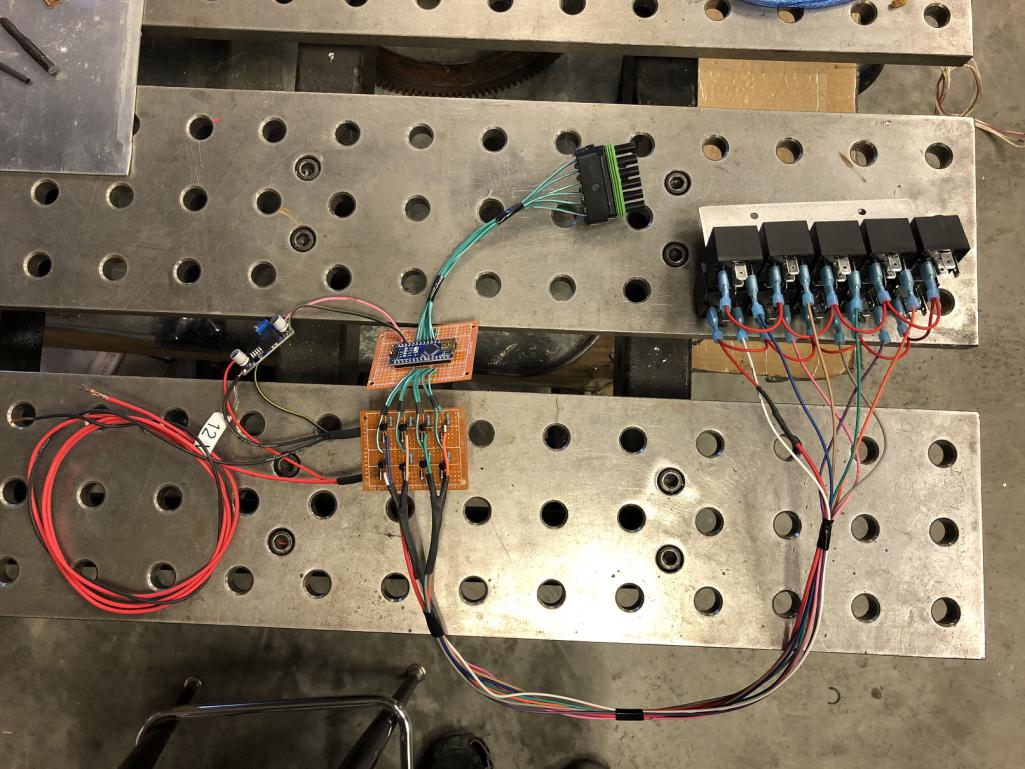
|
|
|
|
| djway |
Jul 31 2020, 12:10 AM
Post
#2798
|
|
Senior Member Group: Members Posts: 787 Joined: 16-October 15 From: Riverside Member No.: 19,266 Region Association: Southern California |
I have a box full of relays in a box with the same colors. Great minds.
So will you name the car Kitt? |
|
|
|
| Andyrew |
Jul 31 2020, 08:47 AM
Post
#2799
|
|
Spooling.... Please wait Group: Members Posts: 13,380 Joined: 20-January 03 From: Riverbank, Ca Member No.: 172 Region Association: Northern California |
Super awesome!!
|
|
|
|
| tygaboy |
Aug 1 2020, 05:46 PM
Post
#2800
|
|
914 Guru Group: Members Posts: 5,827 Joined: 6-October 15 From: Petaluma, CA Member No.: 19,241 Region Association: Northern California |
V1 of the relay mount was too plain. So in keeping with "no kill like overkill!", I made this one.
I still need to weld up the seams and no, you won't be able to see it once the dash is installed, but it's another of those items I'll know is there. Oh, and don't ever hook up the 12V lead to the wrong end of your Arduino's voltage regulator, else you'll fry your Arduino and have to sorta start over. (IMG:style_emoticons/default/headbang.gif) Apparently this is my version of "the next version" when it comes to electronics. Good thing these little units are only like $25. Attached thumbnail(s) 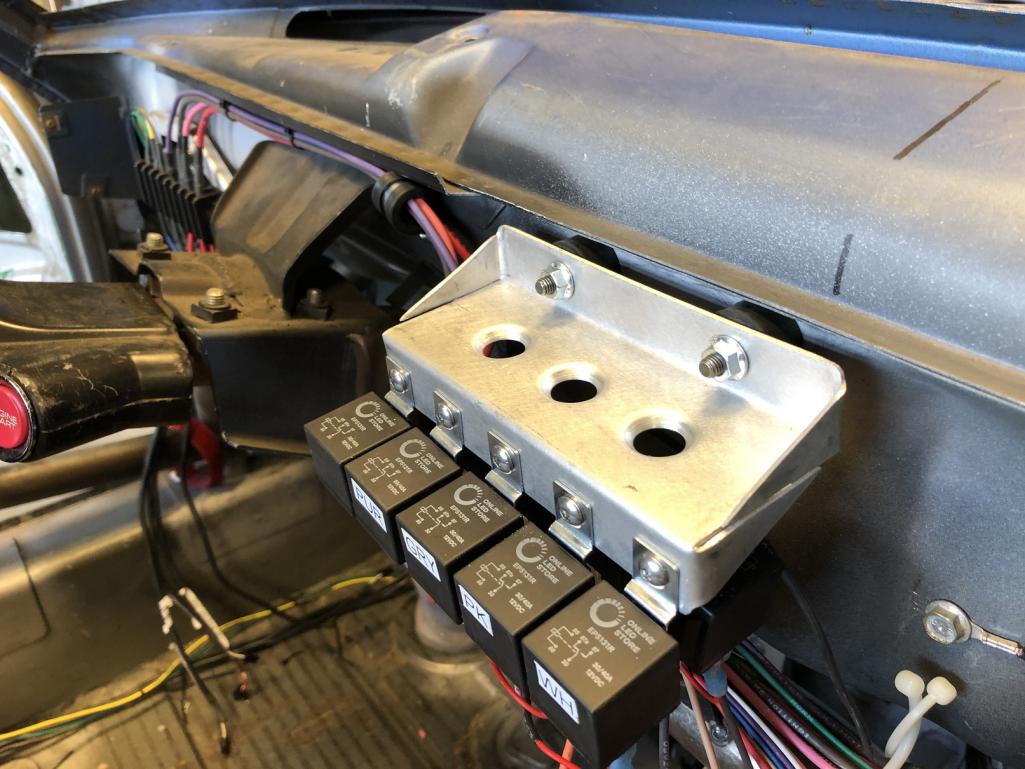
|
|
|
|
|
1 User(s) are reading this topic (1 Guests and 0 Anonymous Users)
0 Members:

|
Lo-Fi Version | Time is now: 16th June 2026 - 03:21 AM |
Invision Power Board
v9.1.4 © 2026 IPS, Inc.