|
|
|
Porsche, and the Porsche crest are registered trademarks of Dr. Ing. h.c. F. Porsche AG.
This site is not affiliated with Porsche in any way. Its only purpose is to provide an online forum for car enthusiasts. All other trademarks are property of their respective owners. |
|
|

  |

| tygaboy |
 Nov 15 2020, 05:04 PM Nov 15 2020, 05:04 PM
Post
#3161
|
|
914 Guru  Group: Members Posts: 5,727 Joined: 6-October 15 From: Petaluma, CA Member No.: 19,241 Region Association: Northern California |
Next I hacked together an initial mock up of a vent slat, just to get a feel for what this multi-part model might be like.
I'm thinking I can shape the slats to overlap the frame, add some style points and help create a bit of Gurney flap effect. For a first go at what I might really use for slats, I've ordered some 3/16" X 2" balsa wood strips that I'll shape into the individual vent slats, then cover with fiberglass. I think a slat with some dimension to it will address the issue I have with the sheet metal slat look. Attached thumbnail(s) 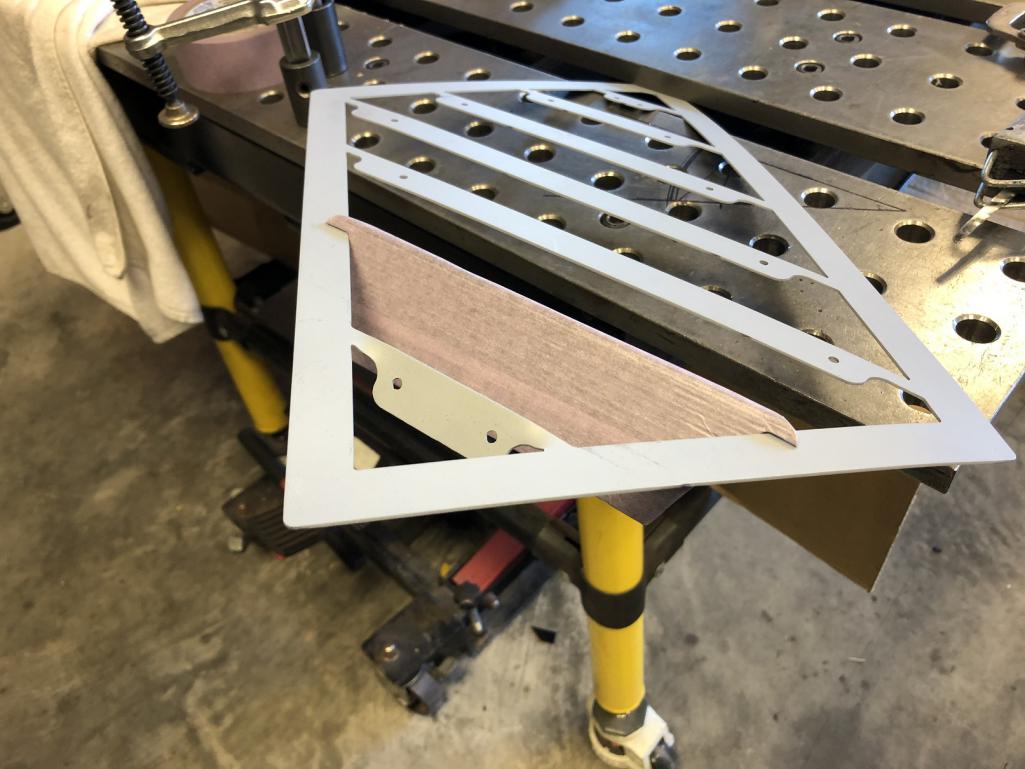 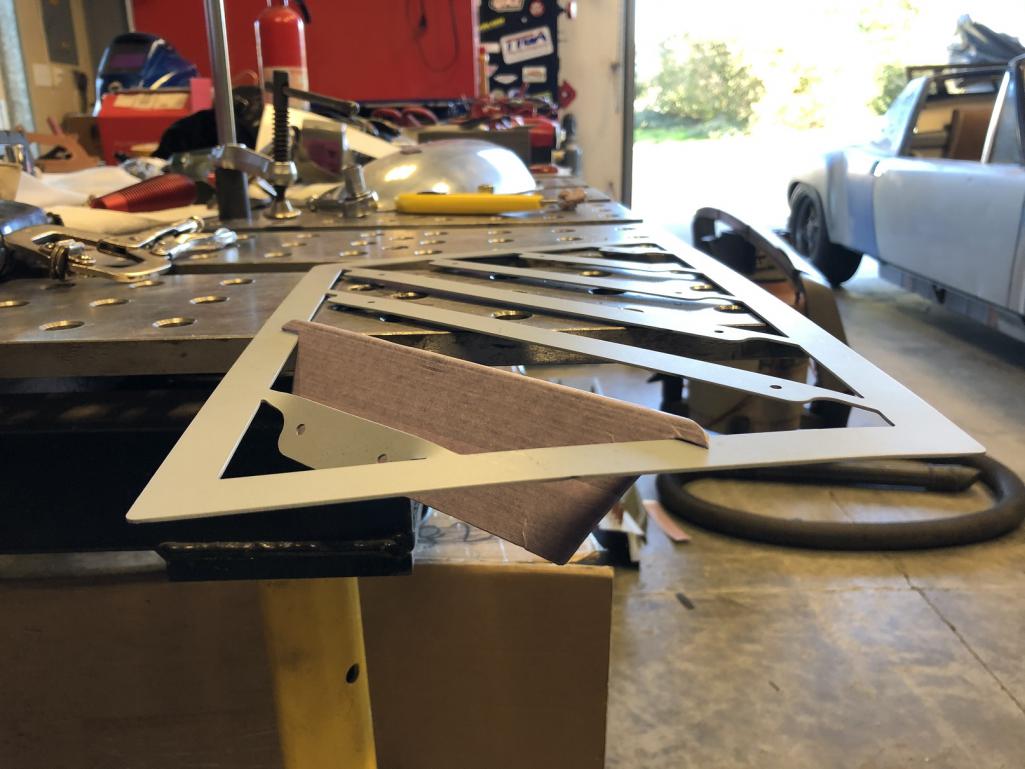
|
   |

 
|
| Cairo94507 |
Nov 15 2020, 05:18 PM
Post
#3162
|
|
Michael Group: Members Posts: 10,530 Joined: 1-November 08 From: Auburn, CA Member No.: 9,712 Region Association: Northern California |
|
|
|
|
| AZBanks |
Nov 16 2020, 01:19 AM
Post
#3163
|
|
Senior Member Group: Members Posts: 1,069 Joined: 7-December 05 From: New River, AZ Member No.: 5,245 Region Association: Southwest Region |
Balsa wood and fiberglass -5HP
Carbon Fiber +15HP |
|
|
|
| 914forme |
Nov 16 2020, 08:20 PM
Post
#3164
|
|
Times a wastin', get wrenchin'! Group: Members Posts: 3,896 Joined: 24-July 04 From: Dayton, Ohio Member No.: 2,388 Region Association: None |
Like it, also added the fact that was bugging me, you where not generating low pressure behind the flaps. Would have worked, but this should help draw the air out the vents at speed. Even though you should not have an issue with high pressure of the nose.
Every little bit helps. BTW, I like it, but would do carbon as you have built that them in the rest of the car. Paint it and show the weave or just keep it black with UV protection. Enbed som captive nuts in the balsa flaps and then use some bolts, Machine screws, etc... You do know with this design, you could change the stationary flaps for mechanical flaps or servo operated flaps that would open and close as needed. |
|
|
|
| KELTY360 |
Nov 16 2020, 11:06 PM
Post
#3165
|
|
914 Neferati Group: Members Posts: 5,172 Joined: 31-December 05 From: Pt. Townsend, WA Member No.: 5,344 Region Association: Pacific Northwest |
QUOTE(914forme @ Nov 16 2020, 07:20 PM)  You do know with this design, you could change the stationary flaps for mechanical flaps or servo operated flaps that would open and close as needed. ...and lights! You could put lights underneath that would show when you open the vents. (IMG:style_emoticons/default/smile.gif) |
|
|
|
| altitude411 |
Nov 16 2020, 11:32 PM
Post
#3166
|
|
I drove my 6 into a tree Group: Members Posts: 1,306 Joined: 21-September 14 From: montana Member No.: 17,932 Region Association: Rocky Mountains |
QUOTE(KELTY360 @ Nov 16 2020, 10:06 PM) QUOTE(914forme @ Nov 16 2020, 07:20 PM) You do know with this design, you could change the stationary flaps for mechanical flaps or servo operated flaps that would open and close as needed. ...and lights! You could put lights underneath that would show when you open the vents. (IMG:style_emoticons/default/smile.gif) (IMG:style_emoticons/default/idea.gif) ...and sensors with thermal resistors hooked to the servos that would automatically open them when needed. (IMG:style_emoticons/default/popcorn[1].gif) * and of coarse obviously turn on the lights... (IMG:style_emoticons/default/piratenanner.gif) |
|
|
|
| mb911 |
Nov 17 2020, 07:20 AM
Post
#3167
|
|
914 Guru Group: Members Posts: 7,703 Joined: 2-January 09 From: Burlington wi Member No.: 9,892 Region Association: Upper MidWest |
Impressive work. Great job
|
|
|
|
| tygaboy |
Nov 17 2020, 10:31 AM
Post
#3168
|
|
914 Guru Group: Members Posts: 5,727 Joined: 6-October 15 From: Petaluma, CA Member No.: 19,241 Region Association: Northern California |
Thanks for the suggestions re: heat-sensing, auto-opening, self-lighting vents. I'll see if I can figure out all that... (IMG:style_emoticons/default/blink.gif)
But for now: I want to do my best to keep a consistent design theme. Well, at least one that makes sense to me. The interior and other aspects of the car are sorta industrial, what with the stampings and rivets and I think the vents need to avoid looking too refined. What to do? I put the V1 vent back in place and tried to understand what it was I didn't like and why it looked crude. I'd already decided the overall shape would change and that I wanted to try a total of 7 vents. Then I zeroed in on the vent's upper edge as needing to be softened; the corners were too abrupt and it had that dead flat upper edge. Neither of those shapes seem to fit. A minute with the snips and I have a proof of concept re: different corner radii. I didn't even try to address the flat edge. (Pay no attention to the horrid Sharpie lines. I was messing with the idea of a center strake.) A big improvement, IMO. Certainly worth making one to see it in real life. Attached thumbnail(s) 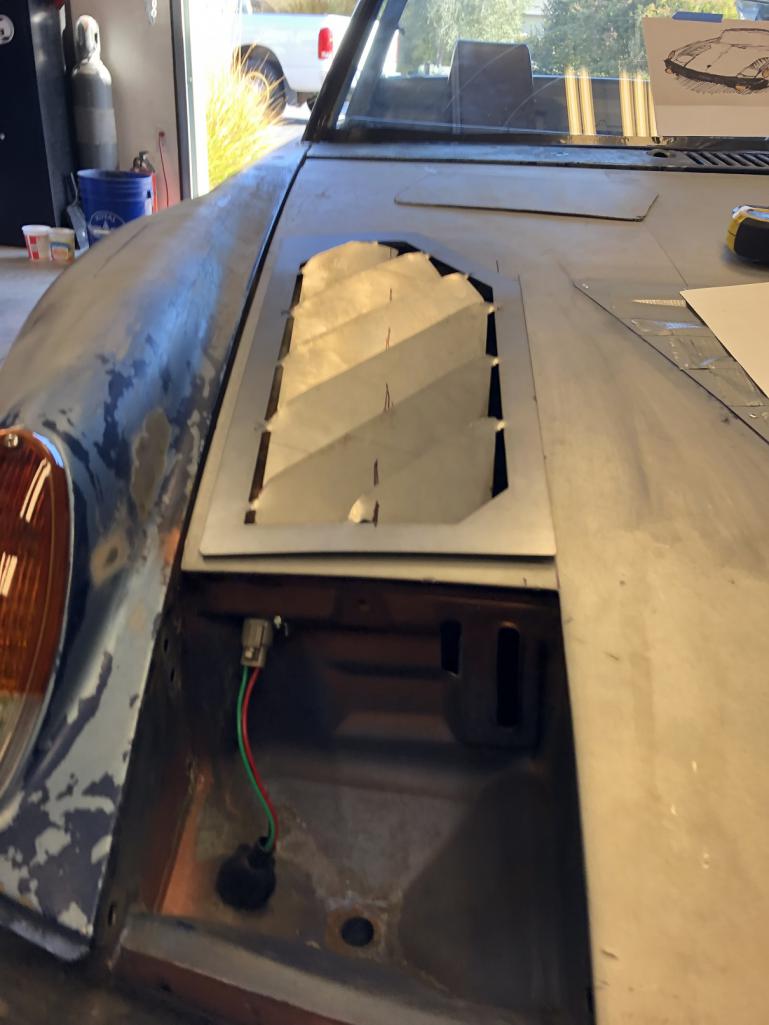 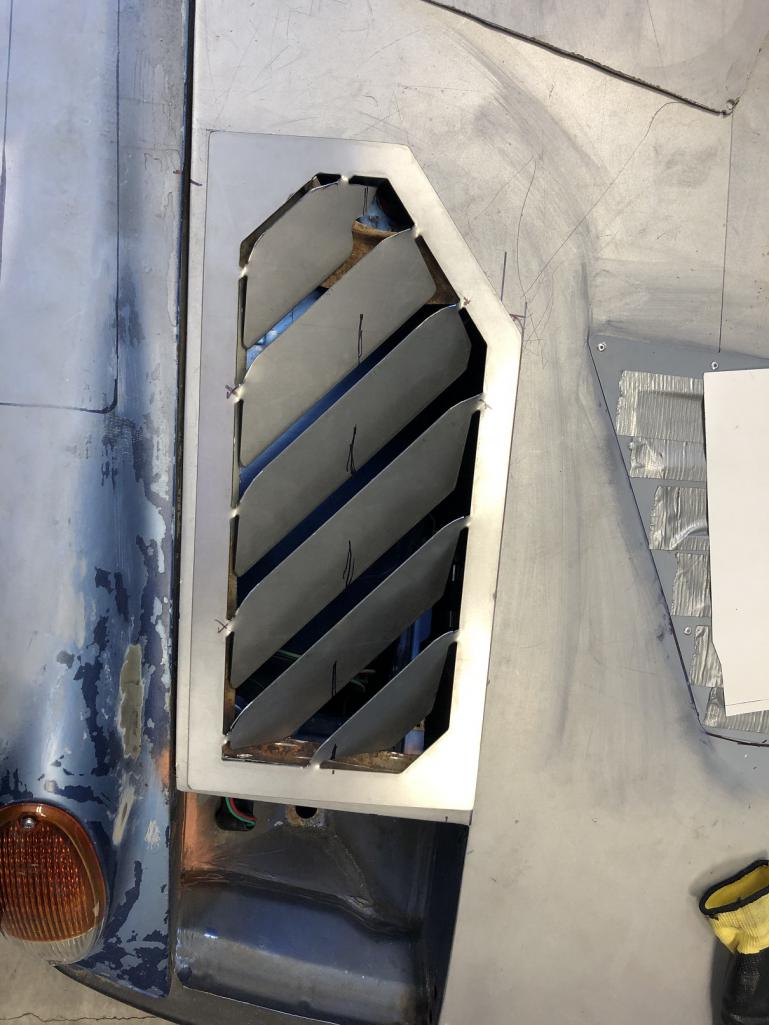
|
|
|
|
| tygaboy |
Nov 17 2020, 10:40 AM
Post
#3169
|
|
914 Guru Group: Members Posts: 5,727 Joined: 6-October 15 From: Petaluma, CA Member No.: 19,241 Region Association: Northern California |
Back to the electronic drawing board. It would be perfect if I ended up with this design, what with it being V8! (IMG:style_emoticons/default/laugh.gif)
And to add a slight curve to the vent's upper edge, I couldn't help trying out a radius that pays homage to the car! Note this version also narrows the gap between the vents' outer edges and the frame and retains a corner notch that could be used to locate a hood pin, should that become a thing I need to consider. Now to see if I like it in real life. Attached image(s) 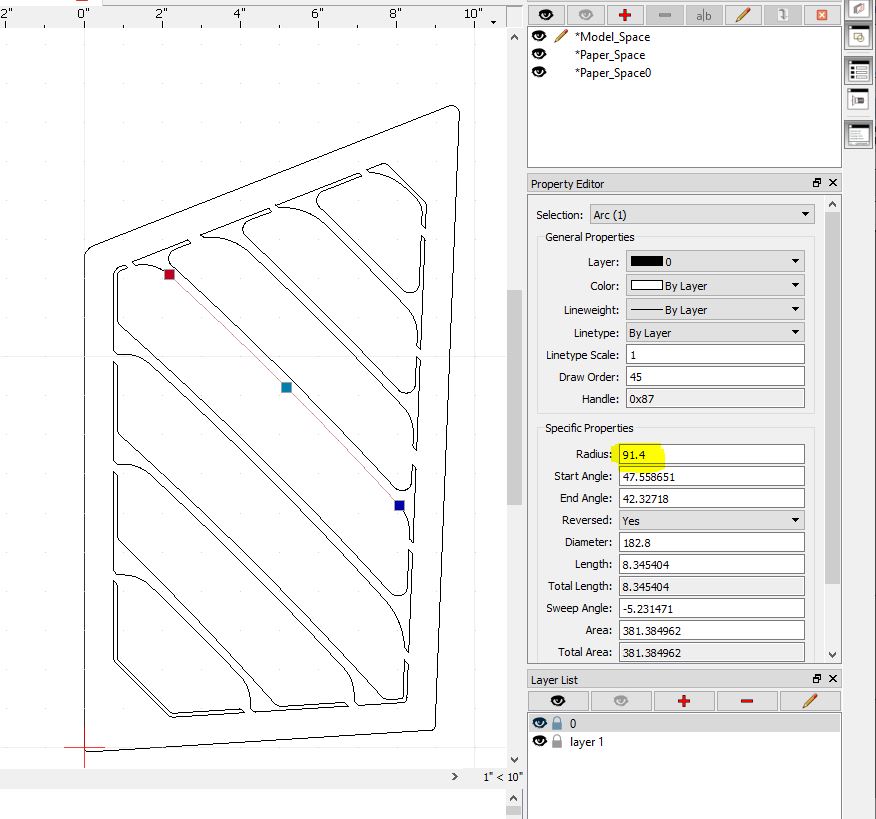
|
|
|
|
| tygaboy |
Nov 17 2020, 02:21 PM
Post
#3170
|
|
914 Guru Group: Members Posts: 5,727 Joined: 6-October 15 From: Petaluma, CA Member No.: 19,241 Region Association: Northern California |
The latest design just cut. For those who may be interested, here are a couple pics to show what level of detail can be cut with plasma. That's a .1" gap between the frame and vent. That said, it's not like laser cut, but for my purposes, I'm really happy with its performance.
Attached image(s) 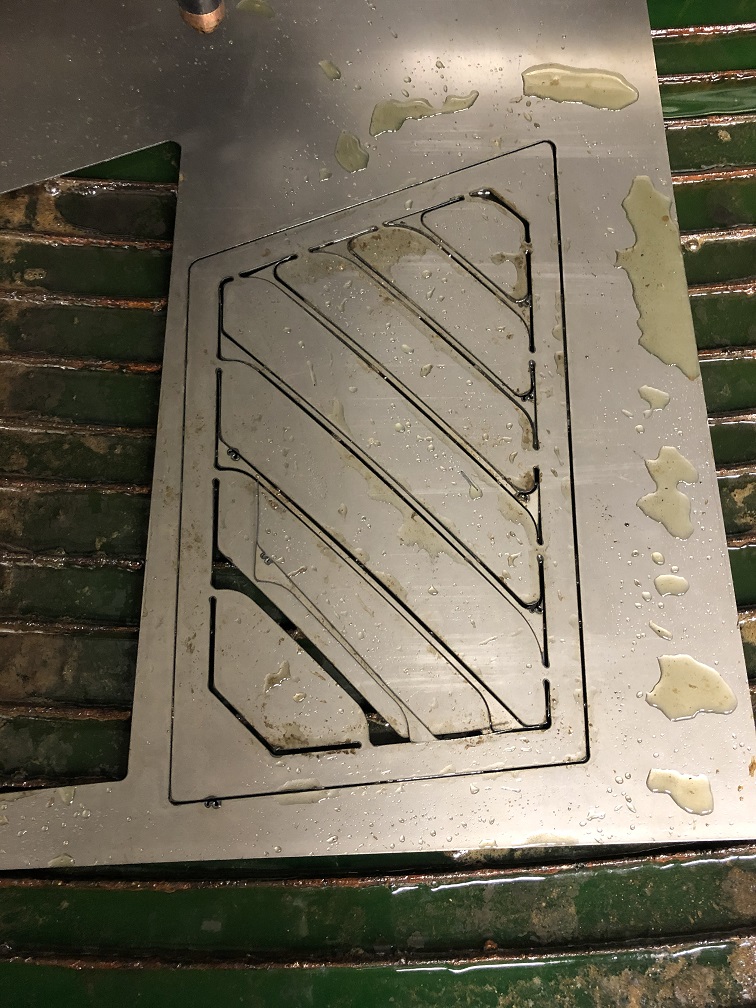 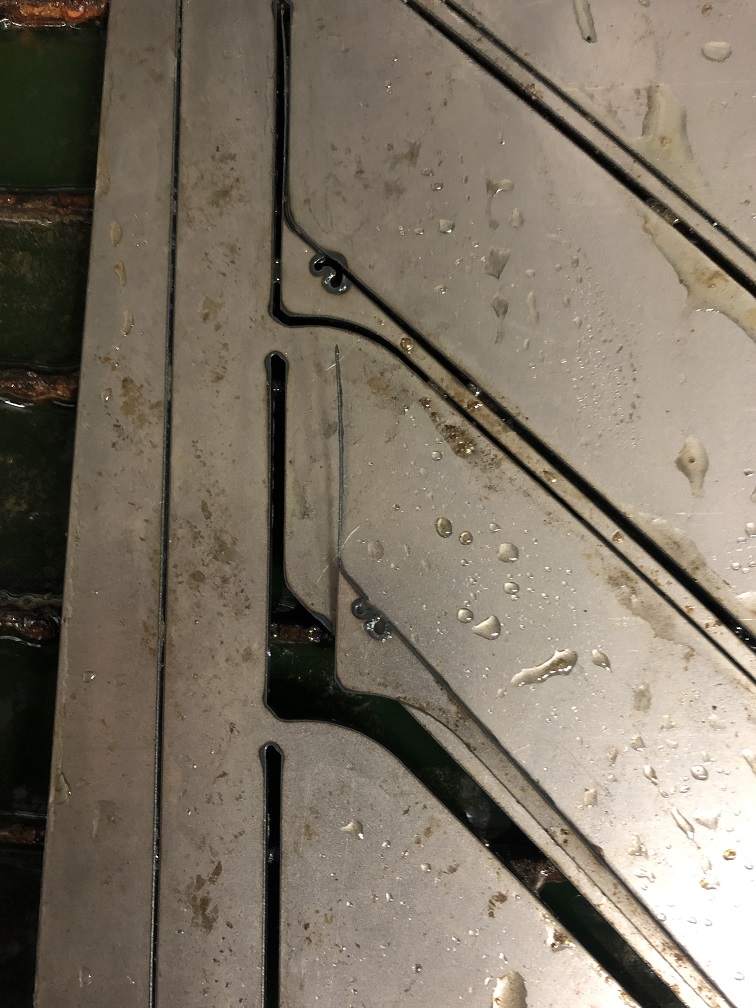
|
|
|
|
| tygaboy |
Nov 17 2020, 02:24 PM
Post
#3171
|
|
914 Guru Group: Members Posts: 5,727 Joined: 6-October 15 From: Petaluma, CA Member No.: 19,241 Region Association: Northern California |
In place. Aaaaaaaand, it's a no! What's wrong this time?
- too large a radius on the vent corners - too much vent blade above the bend - I think they look a bit tall The good news is the 91.4 radius looks like it'll work! Of course I'll have to point that out anytime I'm asked about the vents but, how cool is that? (IMG:style_emoticons/default/shades.gif) Attached thumbnail(s) 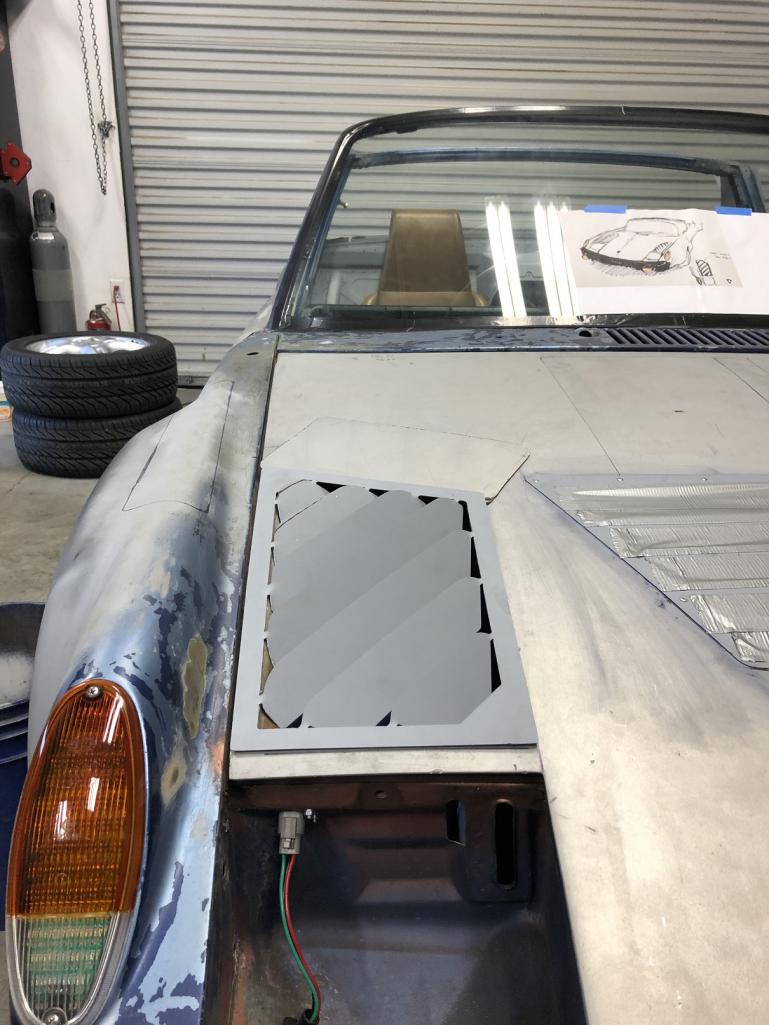 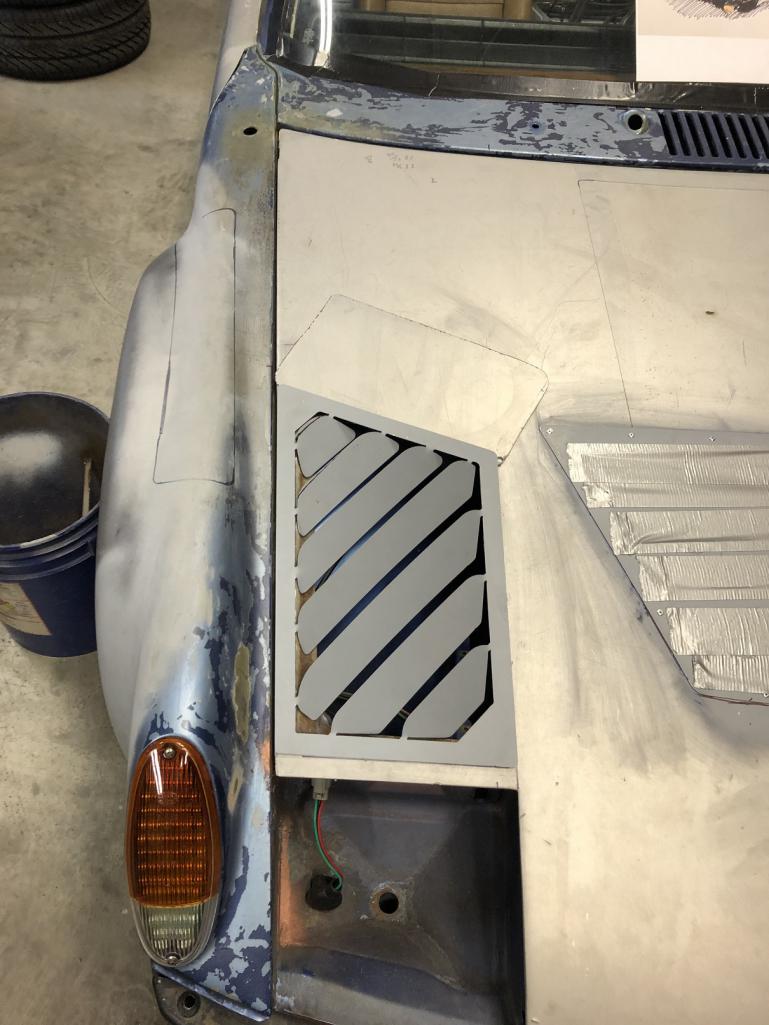
|
|
|
|
| tygaboy |
Nov 17 2020, 02:30 PM
Post
#3172
|
|
914 Guru Group: Members Posts: 5,727 Joined: 6-October 15 From: Petaluma, CA Member No.: 19,241 Region Association: Northern California |
I think I do like the 7 vent look. It's maybe hard to tell in the pics but, overall, I think the scale looks good with the rest of the car. They look pretty cool from most angles, very cool from some!
And just so you know, all these trial pieces have been cut from one piece of 18 ga cold rolled scrap that I picked up for $10. Pretty inexpensive prototyping! Back to CAD and V9... Attached thumbnail(s) 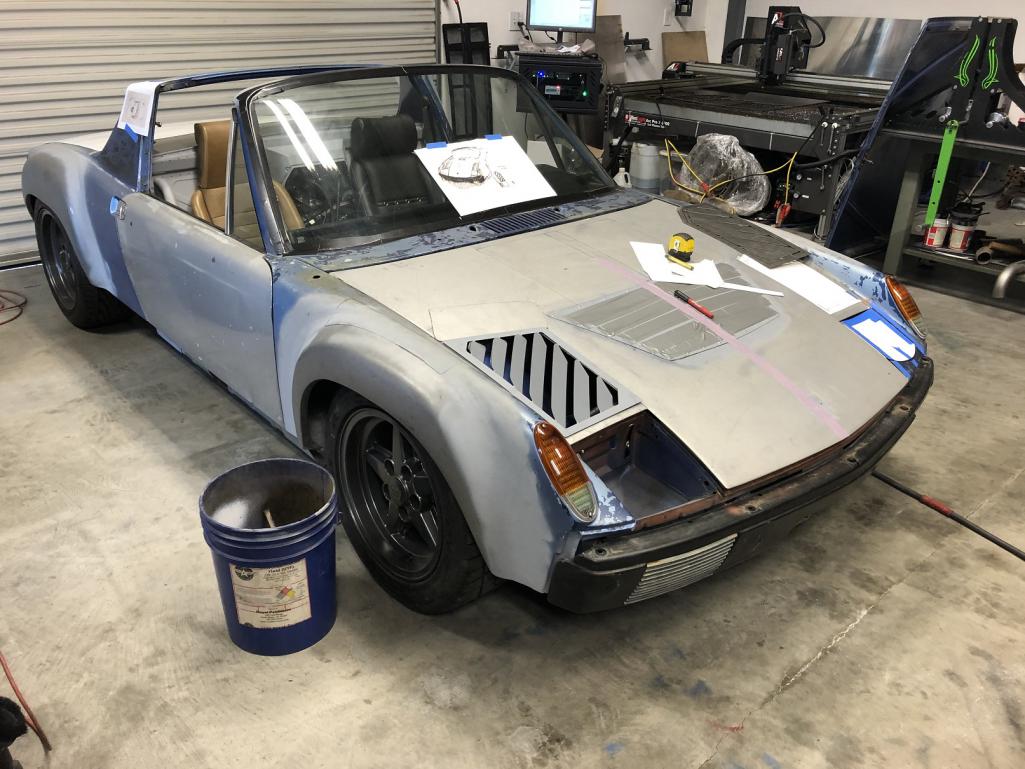 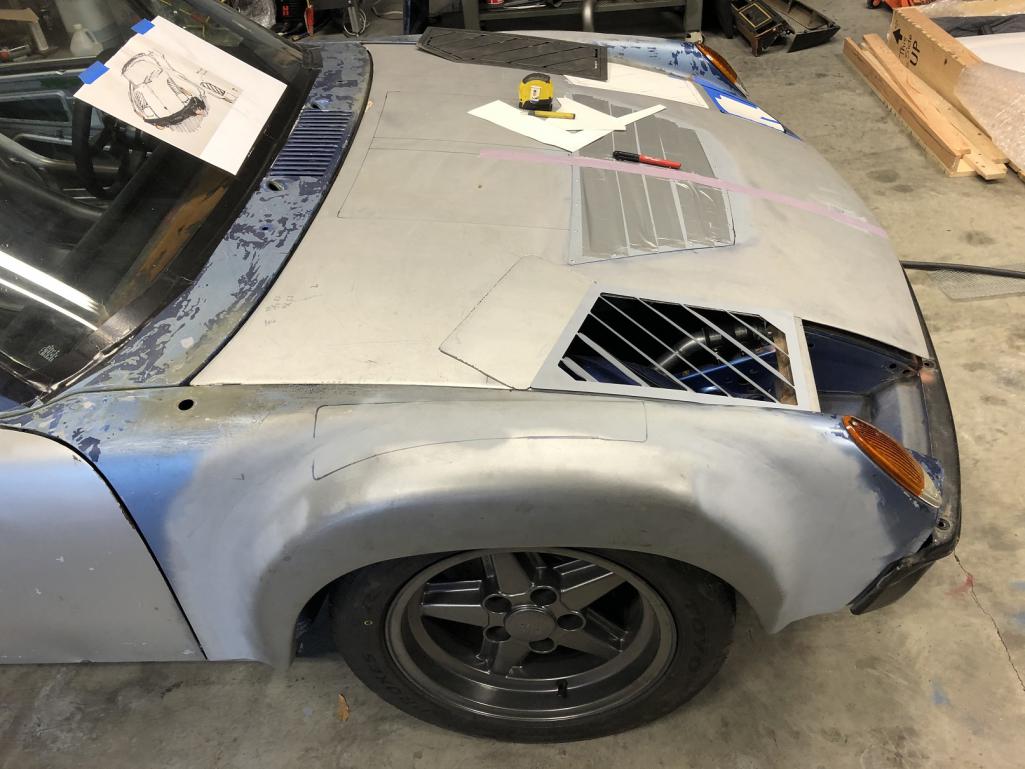 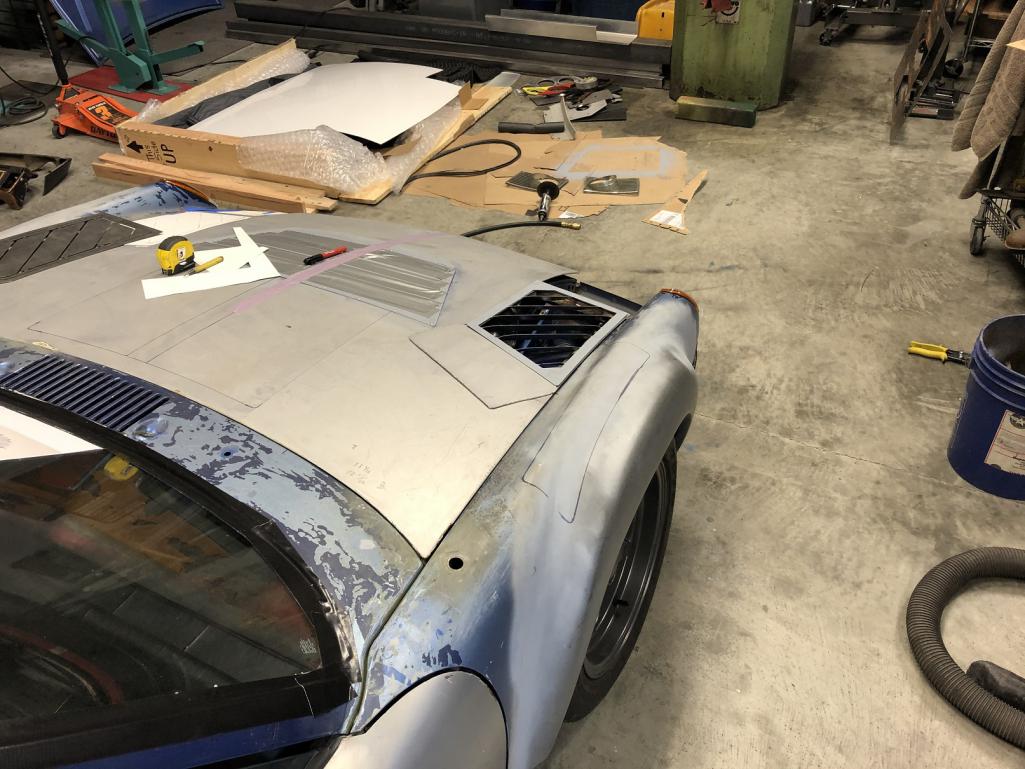 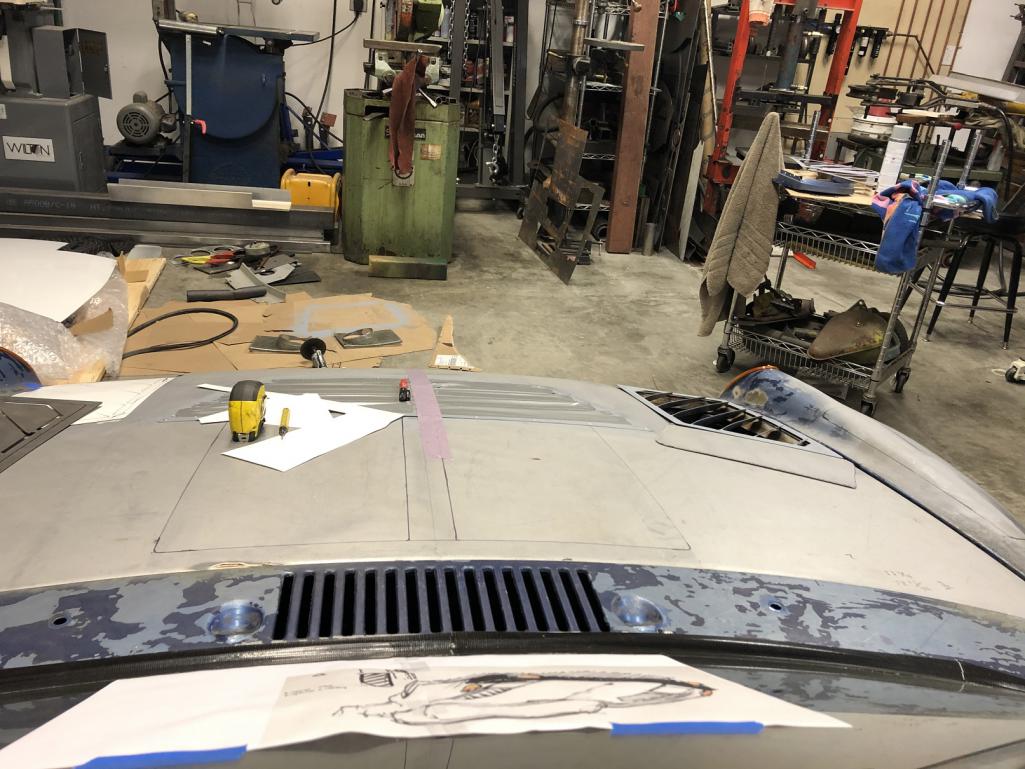
|
|
|
|
| djway |
Nov 17 2020, 03:20 PM
Post
#3173
|
|
Senior Member Group: Members Posts: 787 Joined: 16-October 15 From: Riverside Member No.: 19,266 Region Association: Southern California |
I vote for 1 vent per cylinder:)
|
|
|
|
| tygaboy |
Nov 17 2020, 03:44 PM
Post
#3174
|
|
914 Guru Group: Members Posts: 5,727 Joined: 6-October 15 From: Petaluma, CA Member No.: 19,241 Region Association: Northern California |
QUOTE(djway @ Nov 17 2020, 01:20 PM) I vote for 1 vent per cylinder:) @djway - Well, there are 8 openings in the vent... (IMG:style_emoticons/default/poke.gif) (IMG:style_emoticons/default/shades.gif) |
|
|
|
| Cairo94507 |
Nov 17 2020, 04:44 PM
Post
#3175
|
|
Michael Group: Members Posts: 10,530 Joined: 1-November 08 From: Auburn, CA Member No.: 9,712 Region Association: Northern California |
I think this is a bitchin' look from this angle. It's almost there. (IMG:style_emoticons/default/beerchug.gif)
 |
|
|
|
| 914forme |
Nov 17 2020, 05:24 PM
Post
#3176
|
|
Times a wastin', get wrenchin'! Group: Members Posts: 3,896 Joined: 24-July 04 From: Dayton, Ohio Member No.: 2,388 Region Association: None |
I'll give you a new idea that fits the theme of the car.
I do not think the gills are adding anything to the look, this gives you a bit more detail, while maintaining a stubble details that make this build so much fun to watch. 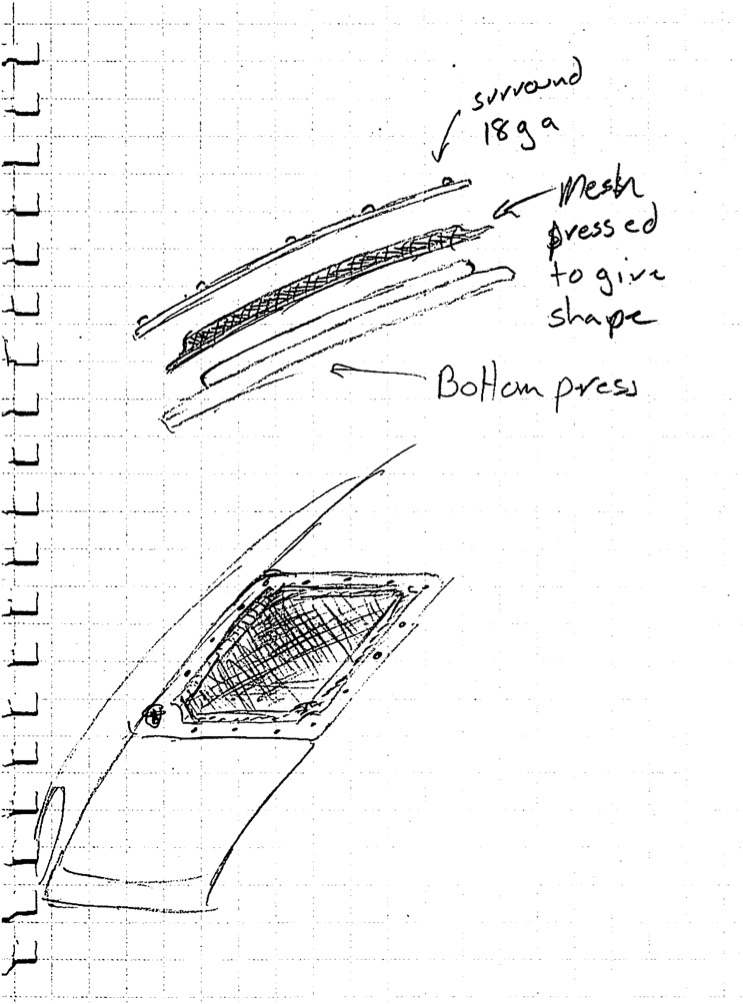 Gladly grant you rights to this IP |
|
|
|
| 914forme |
Nov 17 2020, 05:25 PM
Post
#3177
|
|
Times a wastin', get wrenchin'! Group: Members Posts: 3,896 Joined: 24-July 04 From: Dayton, Ohio Member No.: 2,388 Region Association: None |
And working on a new medium should provide a bit of frustration to make it worth your while.
|
|
|
|
| bbrock |
Nov 17 2020, 05:32 PM
Post
#3178
|
|
914 Guru Group: Members Posts: 5,269 Joined: 17-February 17 From: Montana Member No.: 20,845 Region Association: Rocky Mountains |
QUOTE(altitude411 @ Nov 16 2020, 11:32 PM) QUOTE(KELTY360 @ Nov 16 2020, 10:06 PM) QUOTE(914forme @ Nov 16 2020, 07:20 PM) You do know with this design, you could change the stationary flaps for mechanical flaps or servo operated flaps that would open and close as needed. ...and lights! You could put lights underneath that would show when you open the vents. (IMG:style_emoticons/default/smile.gif) (IMG:style_emoticons/default/idea.gif) ...and sensors with thermal resistors hooked to the servos that would automatically open them when needed. (IMG:style_emoticons/default/popcorn[1].gif) * and of coarse obviously turn on the lights... (IMG:style_emoticons/default/piratenanner.gif) Screw that. Let's just have them open and have machine guns pop up... better yet, launch rockets out of them. (IMG:style_emoticons/default/fighting19.gif) On a less serious note - I'm pretty sure the rule is that 3 or more votes for an idea means you have to do it. I count 4 for motorized doors. Like it or not, you have some servo shopping to do. (IMG:style_emoticons/default/av-943.gif) Servos or not, I love watching your process. You are a true master and a good sport for putting up with us knuckleheads. (IMG:style_emoticons/default/pray.gif) |
|
|
|
| tygaboy |
Nov 17 2020, 06:23 PM
Post
#3179
|
|
914 Guru Group: Members Posts: 5,727 Joined: 6-October 15 From: Petaluma, CA Member No.: 19,241 Region Association: Northern California |
@914forme Stephen - I'm not ready to give up on the vents. I do like the mesh look, as you know from my earlier pic in post #3120. But give me a few more tries at the vents. Heck, I'm only up to version 9! (IMG:style_emoticons/default/lol-2.gif)
@bbrock - To your "votes" comment: You're a dick. (IMG:style_emoticons/default/happy11.gif) (IMG:style_emoticons/default/shades.gif) Seriously, thanks for the kind words, but please, don't you have a car to get running? (IMG:style_emoticons/default/poke.gif) |
|
|
|
| tygaboy |
Nov 17 2020, 06:32 PM
Post
#3180
|
|
914 Guru Group: Members Posts: 5,727 Joined: 6-October 15 From: Petaluma, CA Member No.: 19,241 Region Association: Northern California |
Version 9 ready to cut and here's the V8 (on the left) to V9 comparo.
- tighter corner radii - less vent height once bent (the bend location was moved up the vent blades) - increased vent size (height) - outer vent edges clipped so once they're bent into place, they clear the hood's support structure Hopefully, I'm getting close to something that'll work. Attached image(s) 
|
|
|
|
|
3 User(s) are reading this topic (3 Guests and 0 Anonymous Users)
0 Members:

|
Lo-Fi Version | Time is now: 21st December 2025 - 03:21 AM |
Invision Power Board
v9.1.4 © 2025 IPS, Inc.