|
|
|
Porsche, and the Porsche crest are registered trademarks of Dr. Ing. h.c. F. Porsche AG.
This site is not affiliated with Porsche in any way. Its only purpose is to provide an online forum for car enthusiasts. All other trademarks are property of their respective owners. |
|
|

  |

| Cracker |
 Dec 5 2020, 05:01 AM Dec 5 2020, 05:01 AM
Post
#3301
|
|
Advanced Member  Group: Members Posts: 2,148 Joined: 2-February 10 From: Atlanta (area) Member No.: 11,316 Region Association: South East States |
Bravo. (IMG:style_emoticons/default/beerchug.gif)
Consider closing the space/gap on the plate in front of the first vane. Then either lower the subsequent units (3/8" or so) or increase the height of the first, likewise. I cannot tell from your pictures but they all appear to be similar in height and there is an opening in front of the first vane (maybe not, though). I doubt you will want to do this from an aesthetic position but also consider increasing the angle (>vertically) of the first unit or alternatively add a slight radius (up) to the top of it (swell). This would create the low pressure zone needed to exhaust the frunk with greater efficiency. You can explain all of these oddities to those "at car shows or WCR" as an actual "functional" design; not just a design. (IMG:style_emoticons/default/shades.gif) |
   |

 
|
| 914forme |
Dec 5 2020, 08:38 AM
Post
#3302
|
|
Times a wastin', get wrenchin'! Group: Members Posts: 3,896 Joined: 24-July 04 From: Dayton, Ohio Member No.: 2,388 Region Association: None |
(IMG:style_emoticons/default/agree.gif) Another way around the issue, but also solves the issue with out adding a piece of angle in front of the vanes.
If it does not work you can always do it again, and again. |
|
|
|
| mikey63 |
Dec 5 2020, 01:44 PM
Post
#3303
|
|
Member Group: Members Posts: 130 Joined: 30-March 10 From: Windsor,Ca Member No.: 11,529 Region Association: Northern California |
Pics don't do justice to the real thing. After seeing the "live" versions I'm liking the straight version even more in black. Chris is a talented craftsman and whatever version he decides on will be great. Thanks for letting me visit the workshop and see the ever evolving car!
|
|
|
|
| tygaboy |
Dec 5 2020, 02:05 PM
Post
#3304
|
|
914 Guru Group: Members Posts: 5,680 Joined: 6-October 15 From: Petaluma, CA Member No.: 19,241 Region Association: Northern California |
Credit where credit is due: @RetroRacer @Rand @AzBanks @914forme @Cracker @bbrock Sorry if I've left you off the list. I'm working from my (failing) memory.
Presenting the TonyVents, RandAzBanks Black Edition ™ design, ready to be cut. This also incorporates some changes I decided to try after seeing everything painted black. - extended the front of the panel so the vent starts right behind the headlight bucket. Seeing things painted caused that area to jump out at me. Tony (Cracker) also mentioned this one. - lengthened the "bend channel" on the first vane so that once bent, it'll be a bit taller than the rest. It's about all I'm willing to do to create a dam to help create high pressure at the front of the vent. Is this ideal? Dunno, doubt it. But it should help while still meeting my goal of looking the way I want it look. Back in a bit with pics of it installed. Fingers crossed! Attached image(s) 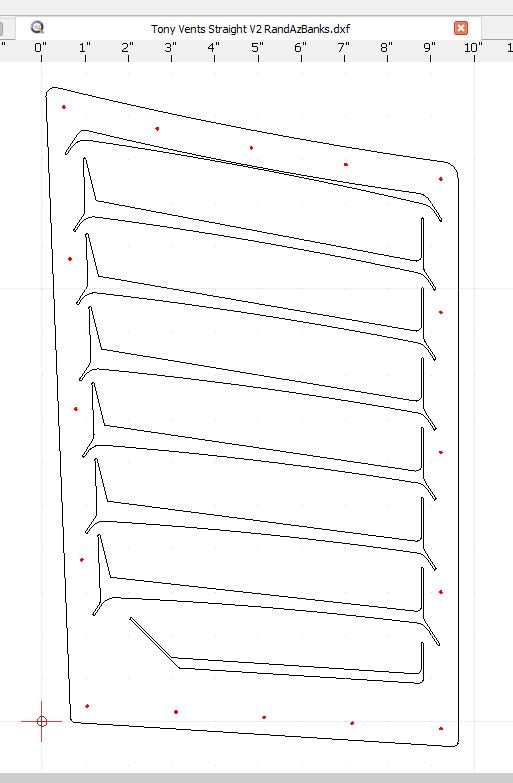
|
|
|
|
| AZBanks |
Dec 5 2020, 02:11 PM
Post
#3305
|
|
Senior Member Group: Members Posts: 1,069 Joined: 7-December 05 From: New River, AZ Member No.: 5,245 Region Association: Southwest Region |
I like the black but I think it would look even better if it matched the color of your wheels.
But then again, I am a sucker for dark grey metallic. |
|
|
|
| altitude411 |
Dec 5 2020, 02:13 PM
Post
#3306
|
|
I drove my 6 into a tree Group: Members Posts: 1,306 Joined: 21-September 14 From: montana Member No.: 17,932 Region Association: Rocky Mountains |
|
|
|
|
| tygaboy |
Dec 5 2020, 07:38 PM
Post
#3307
|
|
914 Guru Group: Members Posts: 5,680 Joined: 6-October 15 From: Petaluma, CA Member No.: 19,241 Region Association: Northern California |
QUOTE(AZBanks @ Dec 5 2020, 12:11 PM)  I like the black but I think it would look even better if it matched the color of your wheels. But then again, I am a sucker for dark grey metallic. Holy Jebus, man! First it's the angles and now you're complaining about color? (IMG:style_emoticons/default/ar15.gif) No Christmas card for you... (IMG:style_emoticons/default/santa_smiley.gif) |
|
|
|
| tygaboy |
Dec 5 2020, 07:43 PM
Post
#3308
|
|
914 Guru Group: Members Posts: 5,680 Joined: 6-October 15 From: Petaluma, CA Member No.: 19,241 Region Association: Northern California |
OK, here we go. Let's tease this one, shall we? (IMG:style_emoticons/default/happy11.gif)
Cut but not yet bent. So far, I think I'm liking that "no gap" at the back of the headlight cover. Attached thumbnail(s) 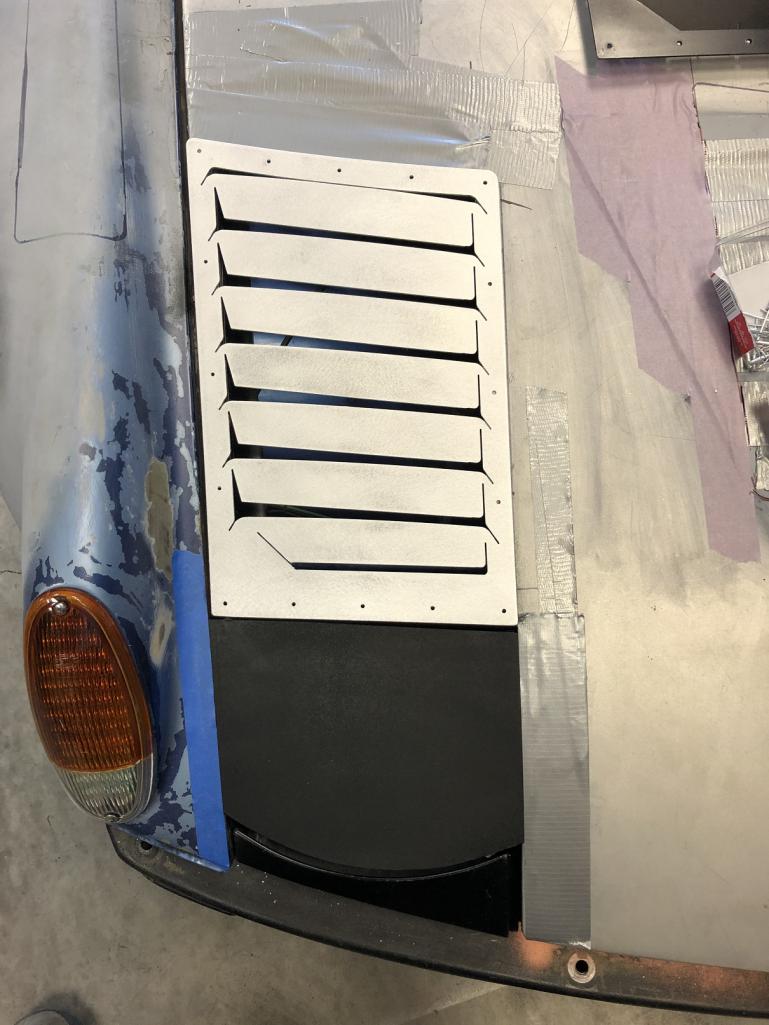
|
|
|
|
| tygaboy |
Dec 5 2020, 07:45 PM
Post
#3309
|
|
914 Guru Group: Members Posts: 5,680 Joined: 6-October 15 From: Petaluma, CA Member No.: 19,241 Region Association: Northern California |
Hey, all you critics - Be like my vents: Get BENT! (IMG:style_emoticons/default/av-943.gif)
Looking good to me so far... Attached thumbnail(s) 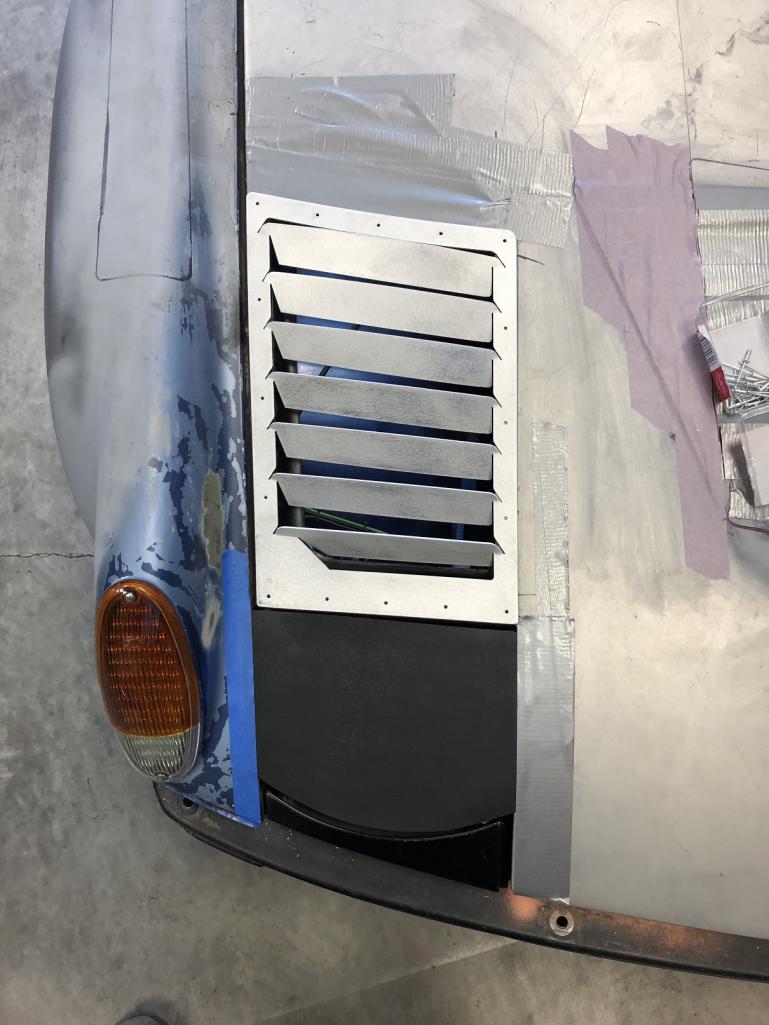
|
|
|
|
| tygaboy |
Dec 5 2020, 07:50 PM
Post
#3310
|
|
914 Guru Group: Members Posts: 5,680 Joined: 6-October 15 From: Petaluma, CA Member No.: 19,241 Region Association: Northern California |
And I'm giving a go to @Cracker Tony's comment that I try varying the angle of attack from more to less across the vanes. This is only eyeballed at this point so no comments about lack of uniformity of change.
Attached thumbnail(s) 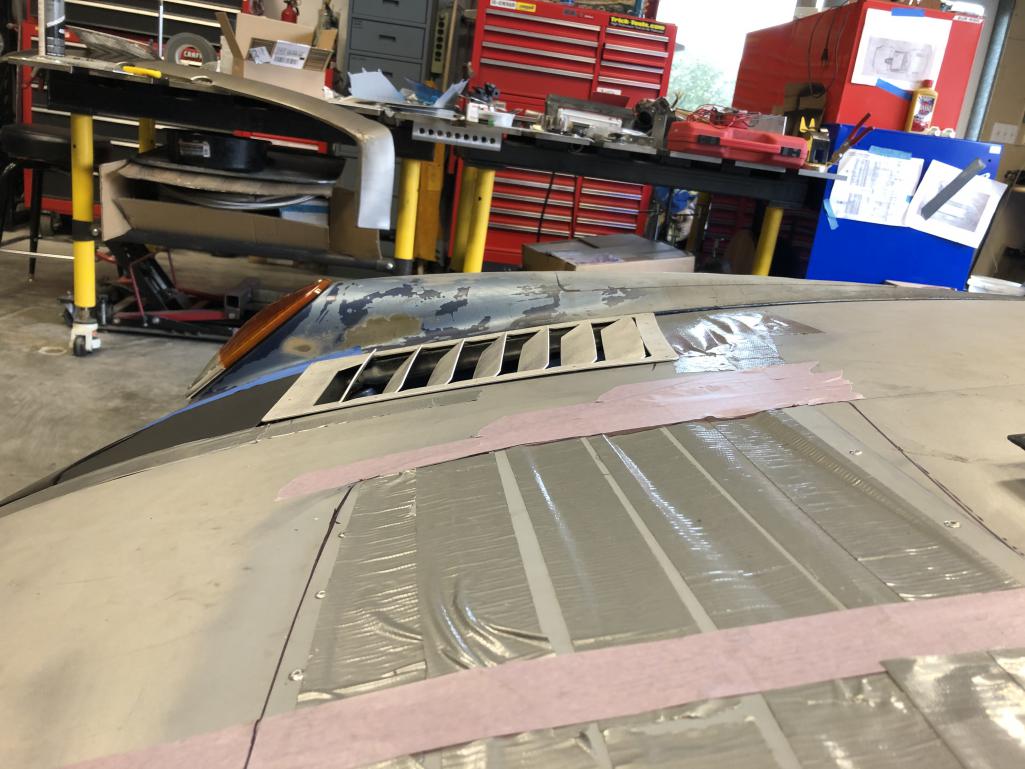
|
|
|
|
| Cracker |
Dec 5 2020, 08:07 PM
Post
#3311
|
|
Advanced Member Group: Members Posts: 2,148 Joined: 2-February 10 From: Atlanta (area) Member No.: 11,316 Region Association: South East States |
I must have miscommunicated, Chris - same angle but decreasing height (slightly) from front to rear. Here it is...
 QUOTE(tygaboy @ Dec 5 2020, 09:50 PM) And I'm giving a go to @Cracker Tony's comment that I try varying the angle of attack from more to less across the vanes. This is only eyeballed at this point so no comments about lack of uniformity of change. |
|
|
|
| Krieger |
Dec 5 2020, 09:32 PM
Post
#3312
|
|
Advanced Member Group: Members Posts: 4,825 Joined: 24-May 04 From: Santa Rosa CA Member No.: 2,104 Region Association: None |
Chris, I'm coming over to your place tomorrow to VENT! (IMG:style_emoticons/default/lol-2.gif)
|
|
|
|
| John |
Dec 5 2020, 09:51 PM
Post
#3313
|
|
member? what's a member? Group: Members Posts: 3,393 Joined: 30-January 04 From: Evansville, IN (SIRPCA) Member No.: 1,615 Region Association: None |
Apparently late to the game, and not understanding where the internal supports/stiffeners of the hood are, I would suggest only one thing and it is aesthetics in my opinion only.
Get the "inside" edge of the louvers to match up with the headlight cutout of the hood or eliminate the headlight cutout. I could draw it if you wish, but I think you could figure it out. Just my $0.02, but you didn't ask. |
|
|
|
| tygaboy |
Dec 6 2020, 09:33 AM
Post
#3314
|
|
914 Guru Group: Members Posts: 5,680 Joined: 6-October 15 From: Petaluma, CA Member No.: 19,241 Region Association: Northern California |
It was really damp when I rattle canned yesterday and the finish is a bit uneven - it doesn't look too good in these pics.
In any case, here are the TonyVents RandAzBanks Black Edition ™ in the metal. Turns out that that minor rotation of the each vent really does change the look. I no longer see "floor heater vent"! On the vane angle, after reviewing the yarn test and how it shows the major evacuation happening at the rear of the vent, I opted to open up those at the back, sorta giving up on the graduated angle idea. There may be a couple very minor tweaks yet to come (I need to add a center strake to stabilize each vane) but this is the going-forward straight version design. For all intents and purposes, I'm calling these DONE! Thanks again to you Gallery members for (most of (IMG:style_emoticons/default/laugh.gif) ) your input! What a community... (IMG:style_emoticons/default/smilie_pokal.gif) As to next steps, I was honored by a visit from Andy @Krieger yesterday! He stopped by to do an in-person critique and gave me some great input for how I might address adding the screen/mesh. Let's see how this part goes. Attached thumbnail(s) 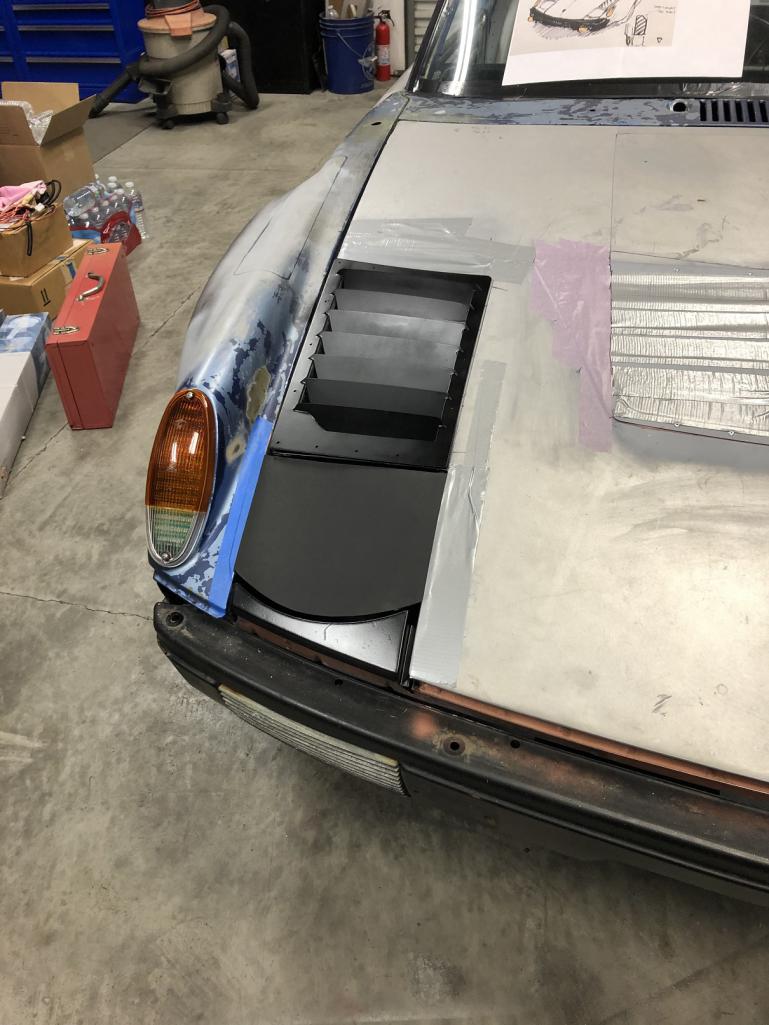 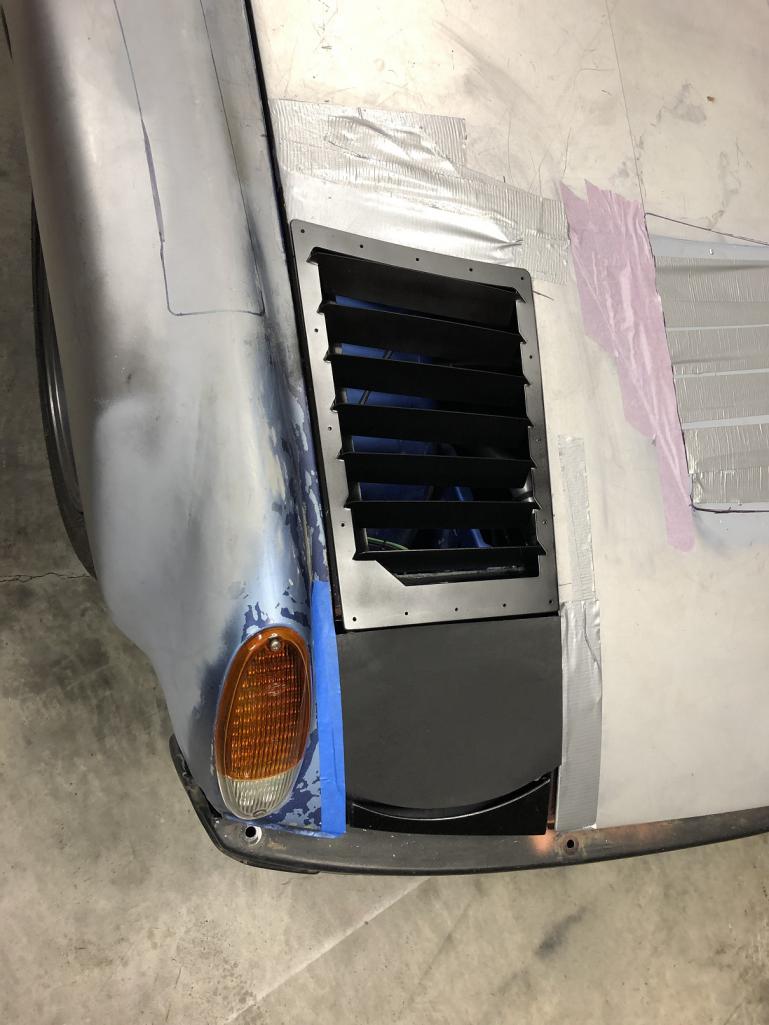 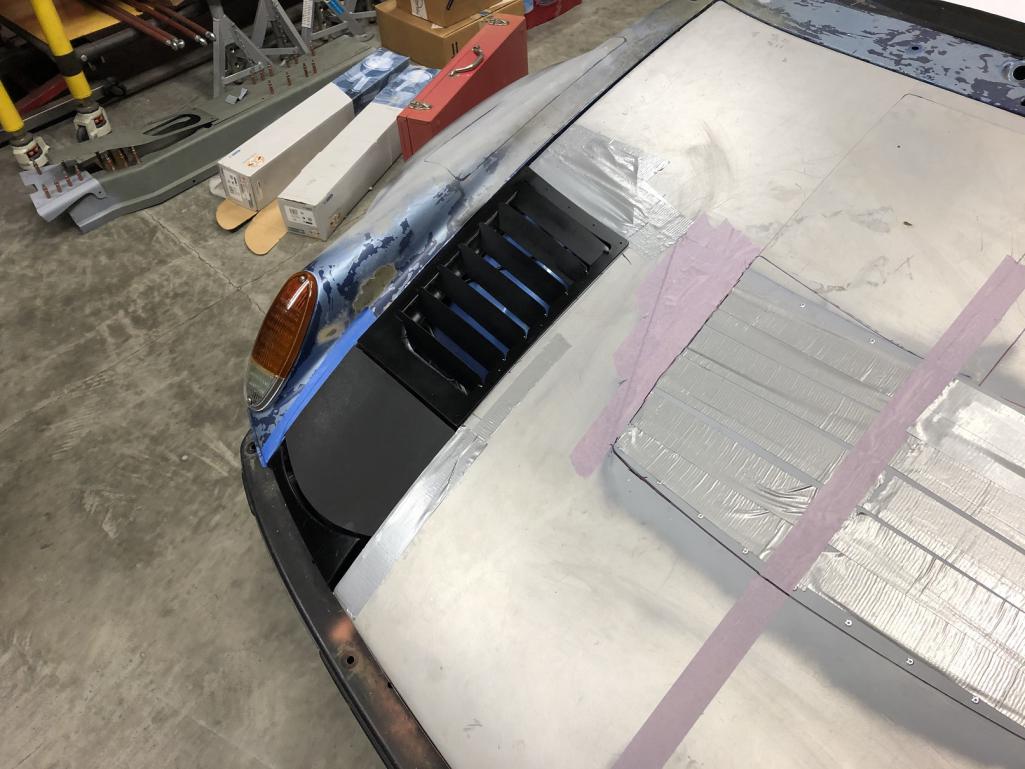 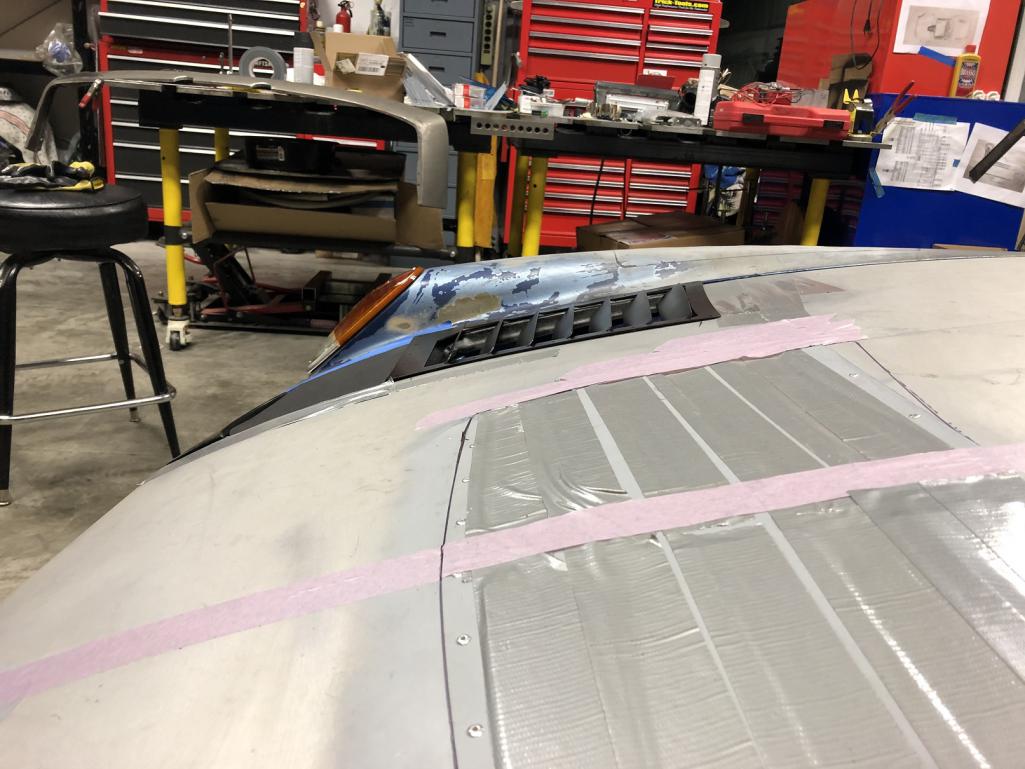 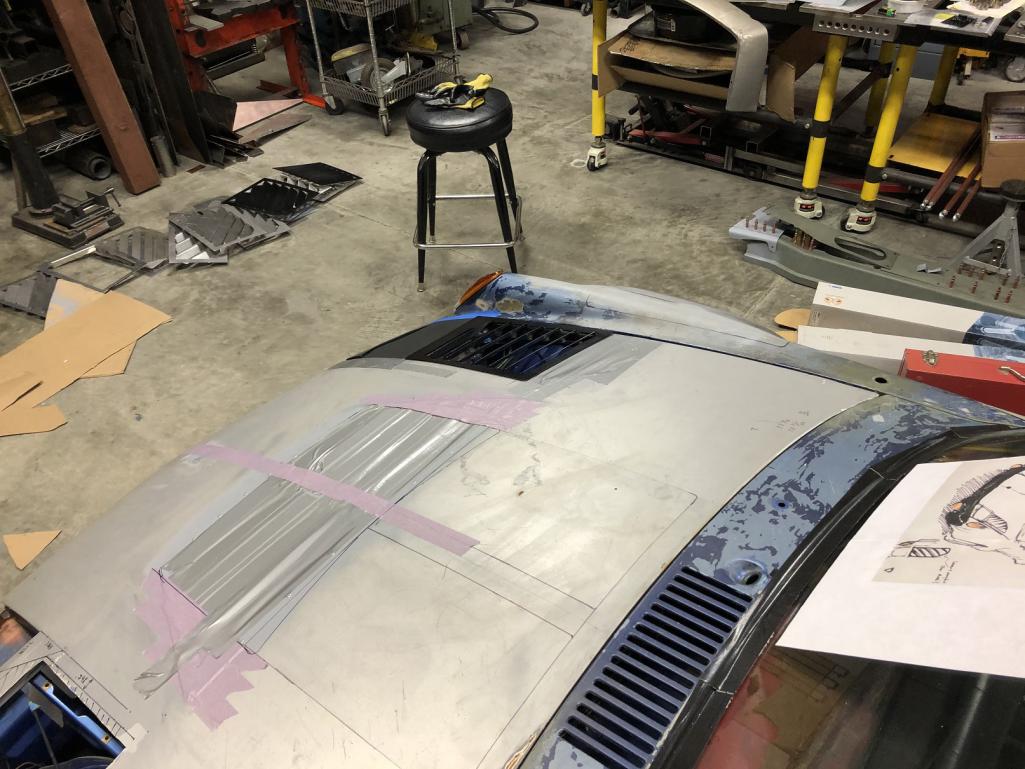 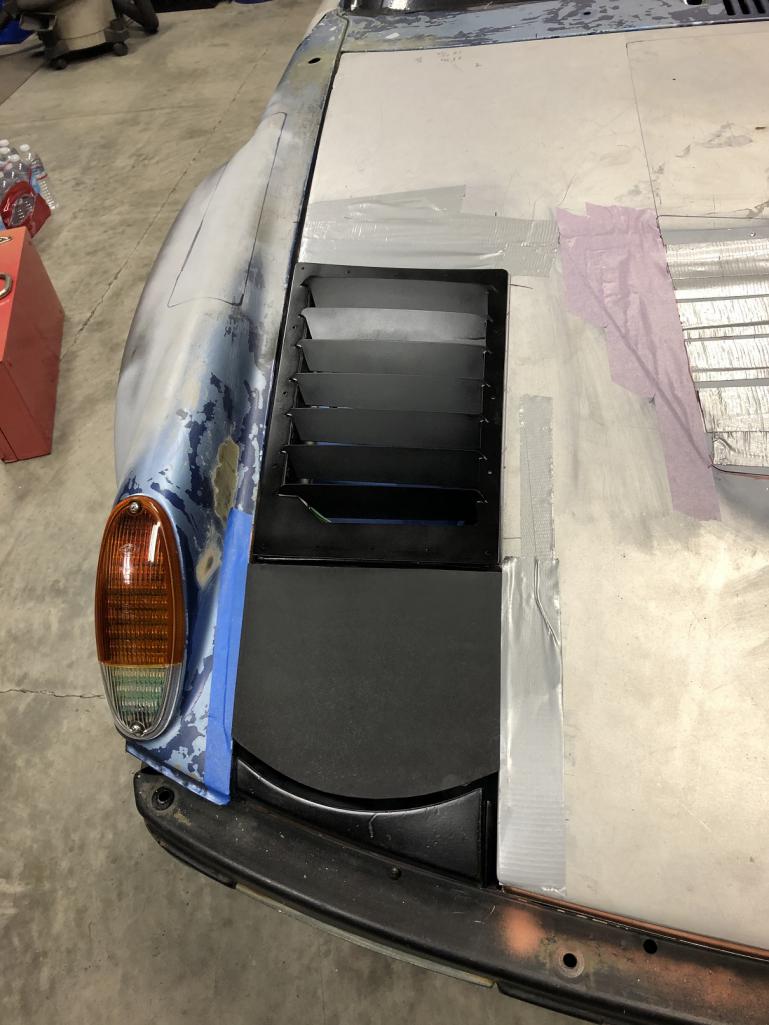 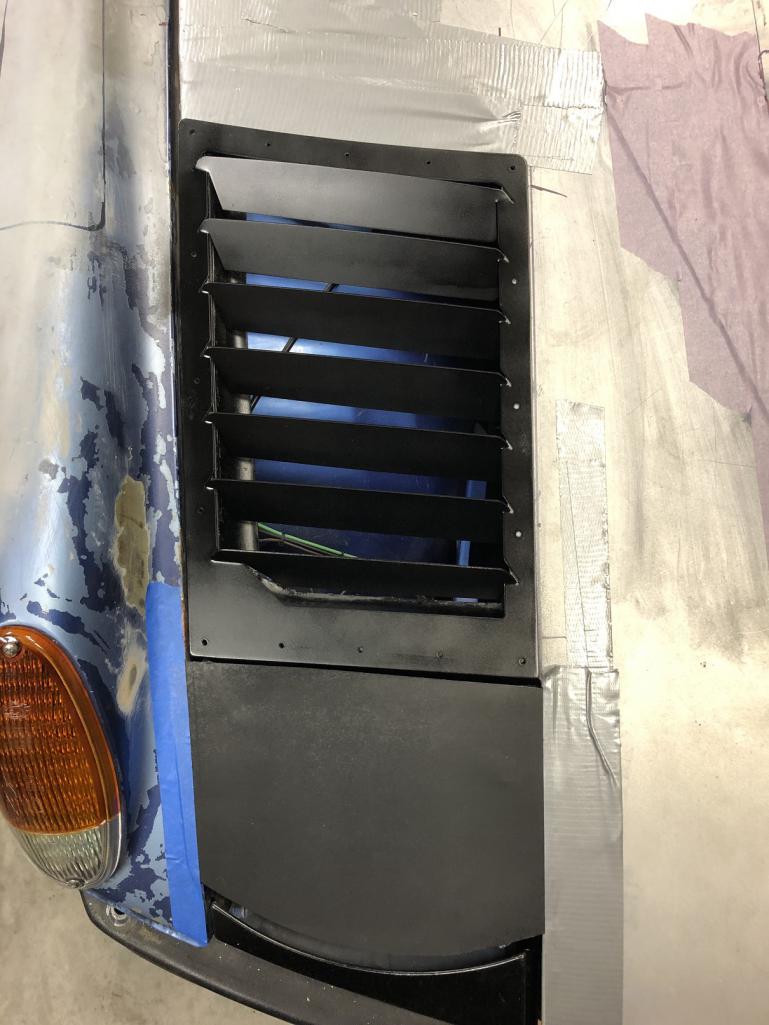
|
|
|
|
| tygaboy |
Dec 6 2020, 11:11 AM
Post
#3315
|
|
914 Guru Group: Members Posts: 5,680 Joined: 6-October 15 From: Petaluma, CA Member No.: 19,241 Region Association: Northern California |
On to the strake notch. Warning that this may get boring.
I'm no geometry expert but I have learned that when things bend at other than 90 degrees, especially in relationship to other things that aren't bending at 90, stuff ends up in places I didn't expect. Each vane is bending at a different angle from all others and none are 90 to the frame. The goal is that once each vane is bent into position, these notches will align, the stabilizer strake will lock into them and run straight up the center of the vent, splitting the angle between the left and right sides of the frame. Previous experience says this means I need to uniquely offset each strake's notch some magical amount and vary the angle of the each notch to take into account the angle of each vane. But how much? And what angle? (IMG:style_emoticons/default/blink.gif) Here's my first go, with a temp center line, just to show how each offset moves out a bit more to account for that vane's increasing angle. There is actually some method to what I ended up with. I won't bore you with how I came up with it but we'll soon see if my thinking was even in the ball park. And if anyone knows of some formula that I could use for all this, please let me know! Attached image(s) 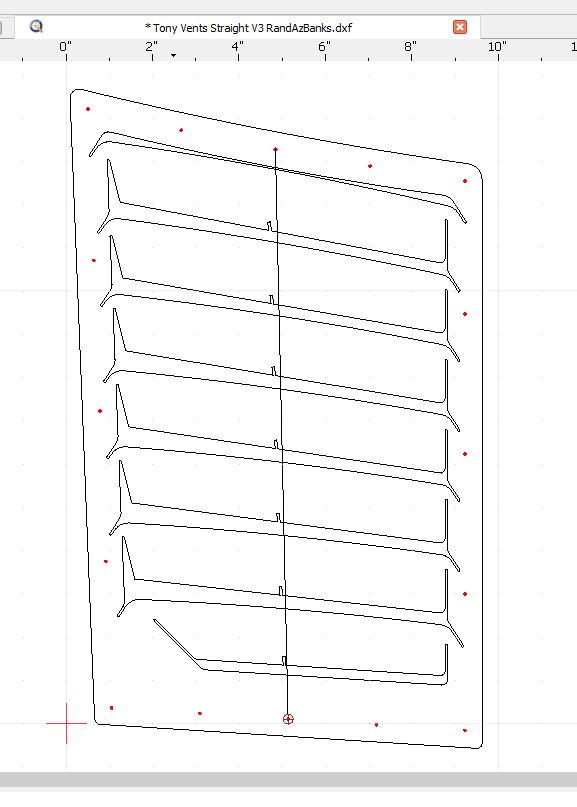
|
|
|
|
| sixnotfour |
Dec 6 2020, 11:57 AM
Post
#3316
|
|
914 Wizard Group: Members Posts: 11,017 Joined: 12-September 04 From: Life Elevated..planet UT. Member No.: 2,744 Region Association: Rocky Mountains |
silver solder in place...
|
|
|
|
| BillC |
Dec 6 2020, 12:49 PM
Post
#3317
|
|
Senior Member Group: Members Posts: 693 Joined: 24-April 15 From: Silver Spring, MD Member No.: 18,667 Region Association: MidAtlantic Region |
Well, I'm finding this thread vastly entertaining. Even though the vents should really be painted blue ... no, green ... no, red ... no, yellow ... no, plaid ... no, polka-dots ... errr, whatever you feel like.
|
|
|
|
| 914forme |
Dec 6 2020, 02:34 PM
Post
#3318
|
|
Times a wastin', get wrenchin'! Group: Members Posts: 3,896 Joined: 24-July 04 From: Dayton, Ohio Member No.: 2,388 Region Association: None |
Getting closer Chris,
Only thing I see is the first vent needs to be filled and just have the tip up on the front. then you follow Tony's suggestion of decreasing hight of the tips. Angles are really getting good about mid way up your variable angle. I am away from my paper and pen otherwise I would draw it out. Most of all have fun with the build. |
|
|
|
| tygaboy |
Dec 6 2020, 03:14 PM
Post
#3319
|
|
914 Guru Group: Members Posts: 5,680 Joined: 6-October 15 From: Petaluma, CA Member No.: 19,241 Region Association: Northern California |
Here's the basic idea I'm after. This is, as usual, the initial mock up to see what's what.
Also as usual, I have a ways to go. Attached thumbnail(s) 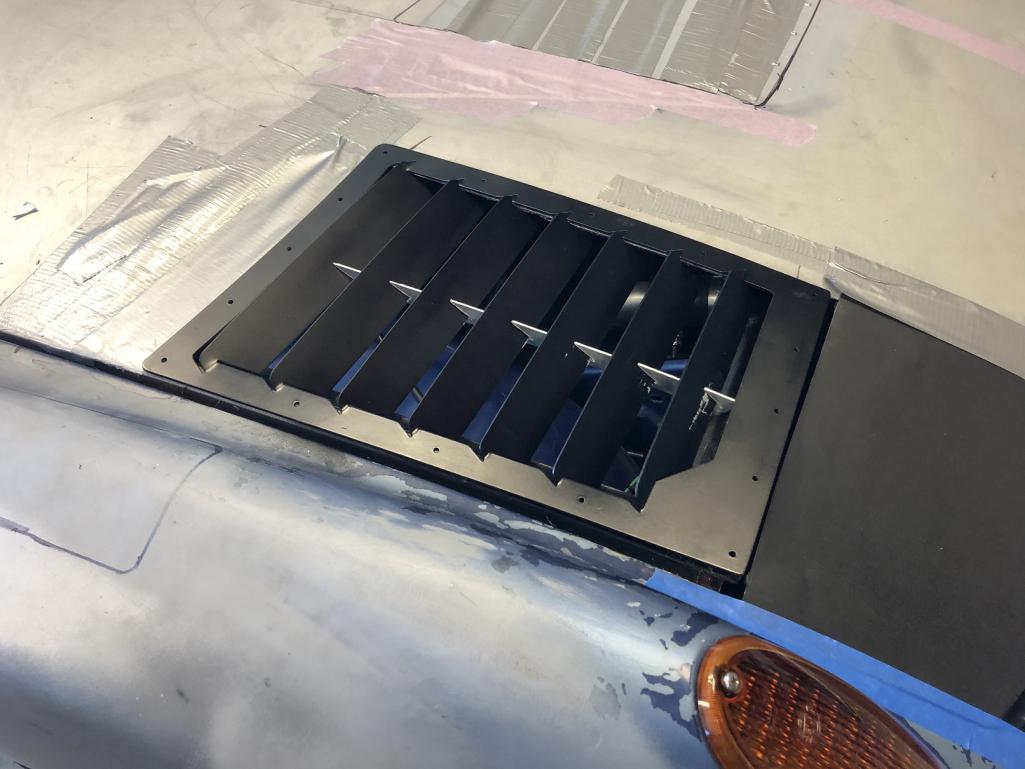 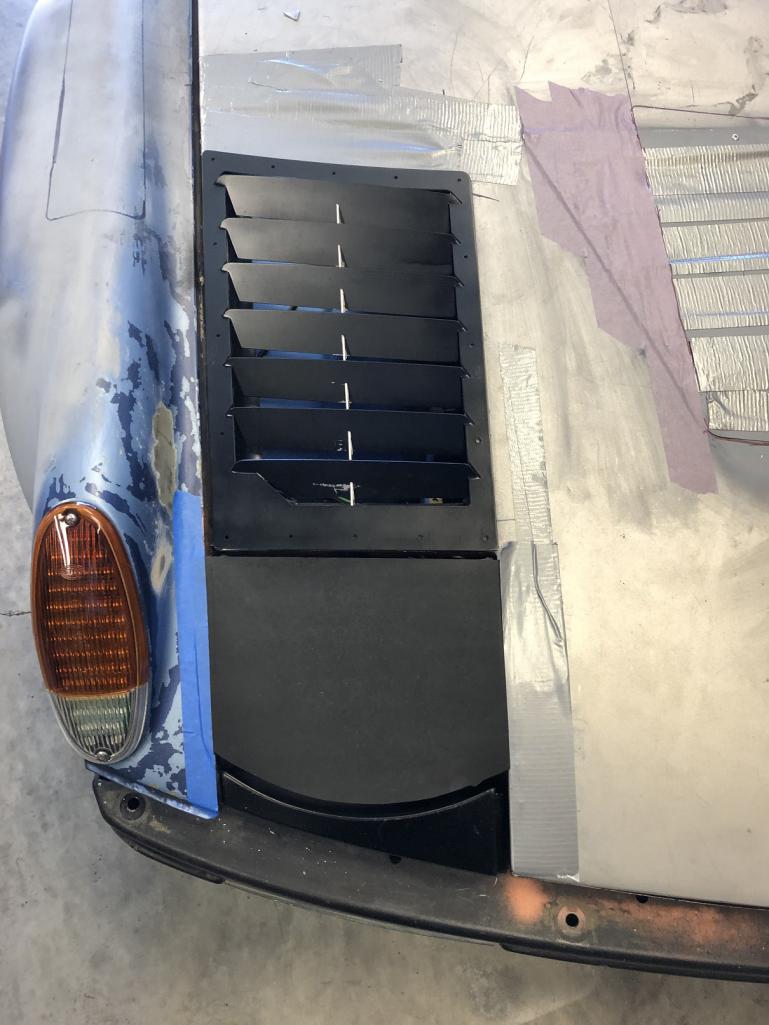 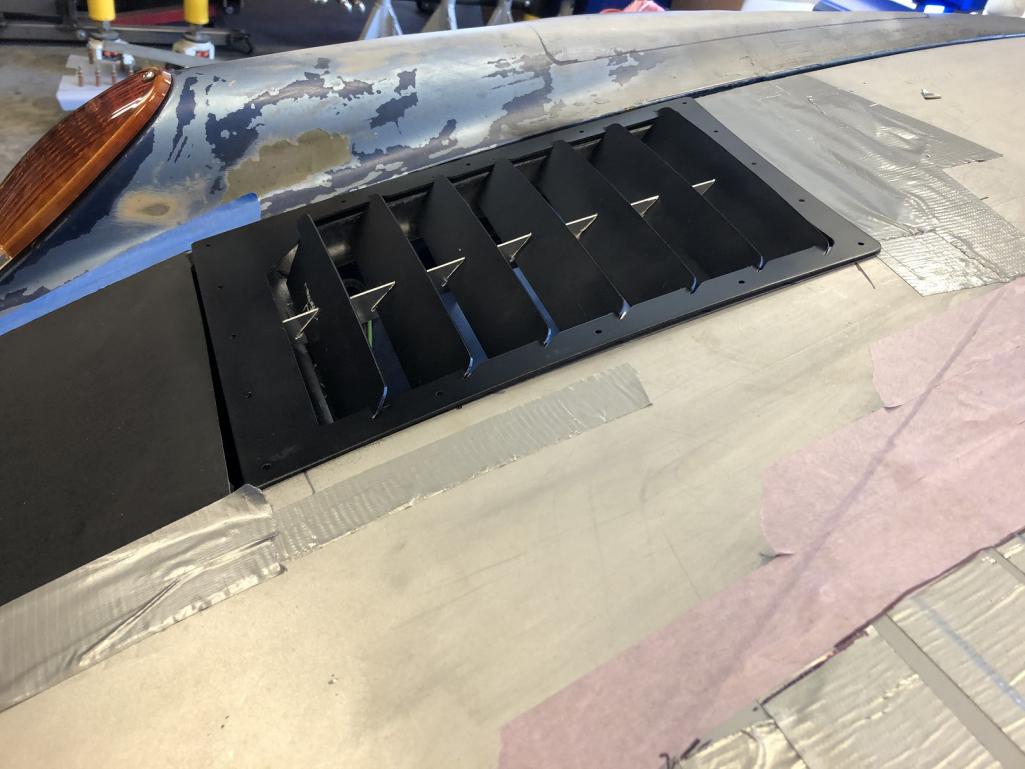
|
|
|
|
| mb911 |
Dec 6 2020, 03:22 PM
Post
#3320
|
|
914 Guru Group: Members Posts: 7,667 Joined: 2-January 09 From: Burlington wi Member No.: 9,892 Region Association: Upper MidWest |
I like that look the best.
|
|
|
|
|
2 User(s) are reading this topic (2 Guests and 0 Anonymous Users)
0 Members:

|
Lo-Fi Version | Time is now: 4th November 2025 - 09:19 PM |
Invision Power Board
v9.1.4 © 2025 IPS, Inc.