|
|
|
Porsche, and the Porsche crest are registered trademarks of Dr. Ing. h.c. F. Porsche AG.
This site is not affiliated with Porsche in any way. Its only purpose is to provide an online forum for car enthusiasts. All other trademarks are property of their respective owners. |
|
|

  |

| mbseto |
 Jan 22 2021, 03:40 PM Jan 22 2021, 03:40 PM
Post
#3421
|
|
Senior Member  Group: Members Posts: 1,257 Joined: 6-August 14 From: Cincy Member No.: 17,743 Region Association: North East States |
QUOTE(tygaboy @ Jan 21 2021, 07:28 PM)  HOLY. MOTHER. OF. GOD. This thing is now scary quick. Hemingway said there are only three sports: Motor-racing, mountaineering, and bullfighting. All the rest are merely games. |
   |

 
|
| tygaboy |
Jan 29 2021, 05:12 PM
Post
#3422
|
|
914 Guru Group: Members Posts: 5,680 Joined: 6-October 15 From: Petaluma, CA Member No.: 19,241 Region Association: Northern California |
A week or so out from getting the car back to the tuner.
With nothing better to do (IMG:style_emoticons/default/screwy.gif) , I decided I didn't like the QuikLatch set up on the engine lid - it required popping one side, walking to the other side of the car and popping the other. I figured I could do better. This design will use a single latch in the center - or slightly offset to the driver side, like stock. But because I no longer have a trunk wall that can serve as a mounting location, I have to cantilever a bracket out to reach the cross bar between the shock towers. And since that's the case, I "needed" to add another mounting location to the engine lid. What to do? (IMG:style_emoticons/default/idea.gif) How about adding another captured nut set up to the lid, just like what the stock set up uses? Sounds good to me! So I sliced that part off a crap engine lid I had and welded it to the mirrored location on the lid I'll be using. Then I used some neat-o, recessed fastener bungs, roll bent some .5" 065 wall square tube to match the curve of the engine lid and welded up a part that will serve as the base for the cantilever bracket. Here's how things look so far. Next, it's working up a bracket on the crossbar, then "connecting the dots". How hard can that be? (IMG:style_emoticons/default/laugh.gif) Attached thumbnail(s) 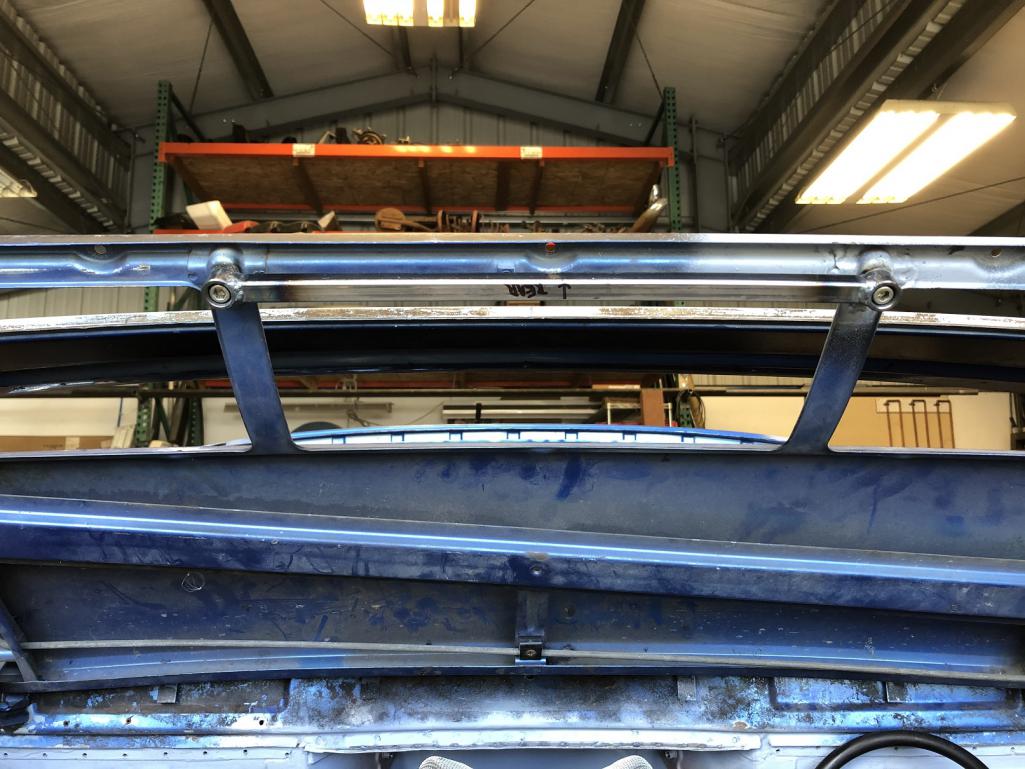 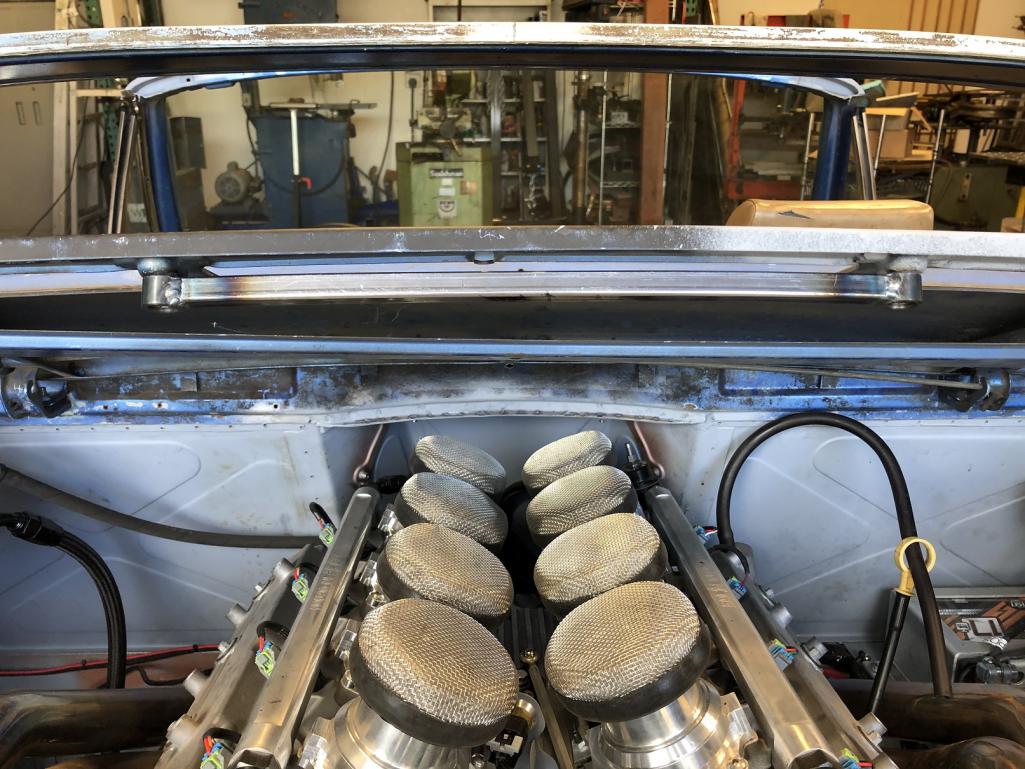
|
|
|
|
| tazz9924 |
Jan 30 2021, 10:39 AM
Post
#3423
|
|
Senior Member Group: Members Posts: 744 Joined: 31-May 15 From: Mooresville NC Member No.: 18,779 Region Association: None |
QUOTE(tygaboy @ Jan 29 2021, 03:12 PM) A week or so out from getting the car back to the tuner. With nothing better to do (IMG:style_emoticons/default/screwy.gif) , I decided I didn't like the QuikLatch set up on the engine lid - it required popping one side, walking to the other side of the car and popping the other. I figured I could do better. This design will use a single latch in the center - or slightly offset to the driver side, like stock. But because I no longer have a trunk wall that can serve as a mounting location, I have to cantilever a bracket out to reach the cross bar between the shock towers. And since that's the case, I "needed" to add another mounting location to the engine lid. What to do? (IMG:style_emoticons/default/idea.gif) How about adding another captured nut set up to the lid, just like what the stock set up uses? Sounds good to me! So I sliced that part off a crap engine lid I had and welded it to the mirrored location on the lid I'll be using. Then I used some neat-o, recessed fastener bungs, roll bent some .5" 065 wall square tube to match the curve of the engine lid and welded up a part that will serve as the base for the cantilever bracket. Here's how things look so far. Next, it's working up a bracket on the crossbar, then "connecting the dots". How hard can that be? (IMG:style_emoticons/default/laugh.gif) I love the hose routed through the eye of the dipstick. Reminds me of something id do XD |
|
|
|
| FL000 |
Jan 30 2021, 01:04 PM
Post
#3424
|
|
Member Group: Members Posts: 476 Joined: 31-January 12 From: Lancaster, CA Member No.: 14,076 Region Association: Southern California |
QUOTE(tygaboy @ Jan 21 2021, 04:28 PM) (IMG:style_emoticons/default/blink.gif) (IMG:style_emoticons/default/screwy.gif) and a little bit of (IMG:style_emoticons/default/headbang.gif) Let's start with the "bad" news: In testing out the new exhaust, I uncovered an issue I created that, surprisingly, went unnoticed not just by me, but by everyone who has heard the car run. Turns out I had switched two of the coil connector harness plugs: # 6 and #8. This error was in play in each of the driving videos I've posted. I'm certainly not saying someone should have noticed, it's totally on me but, can you believe it? Go back and watch those videos... And a few of you heard it run when you were at my shop during WCR. I would have thought it'd have run like total crap. Note that I have a single O2 sensor that happens to be on the 1-3-5-7 header so the tune wasn't aware of the problem. Now the good news: With everything correctly connected, I took it out for another test drive. HOLY. MOTHER. OF. GOD. This thing is now scary quick. Well, when it hooks up, anyway. I wasn't even hard on the gas, more rolling into it and it's breaking loose easily through 3rd. I decided not to try 4th. Remember, this is still with a tune that isn't optimized for the new throttle bodies, throttle cam, correct firing order ( (IMG:style_emoticons/default/chair.gif) ) or the new exhaust. Am I happy? Yes. Am I a little afraid? Yes to that, too. Late to the party, but funny how such a simple mistake can go overlooked right? Good find that added at least 33% more power by my simple math. Plus with a couple more switched you may have identified a valet mode (IMG:style_emoticons/default/smile.gif) I know you would have something much more sophisticated for this build. |
|
|
|
| tygaboy |
Feb 2 2021, 05:54 PM
Post
#3425
|
|
914 Guru Group: Members Posts: 5,680 Joined: 6-October 15 From: Petaluma, CA Member No.: 19,241 Region Association: Northern California |
Essentially finished the new version of the engine lid latching system. It's a "one and done" button set up using just a single of the same, small Quik Latch buttons.
I decided to offset it, sorta like the stock location. Mostly, just so I don't have to lean in as far to get to the button. Rattle canned black to see how it'd look. As you hear me say, the design is a little busy but it's all bolt on so I didn't REALLY have to commit to it! We'll see if I decide I like it. But it works for now. https://www.youtube.com/watch?v=SyPenChvYDQ |
|
|
|
| tygaboy |
Feb 2 2021, 06:01 PM
Post
#3426
|
|
914 Guru Group: Members Posts: 5,680 Joined: 6-October 15 From: Petaluma, CA Member No.: 19,241 Region Association: Northern California |
Getty 914-6 GT hood is here!
And yes, I'll be cutting it up to add the hood vents. Attached thumbnail(s)  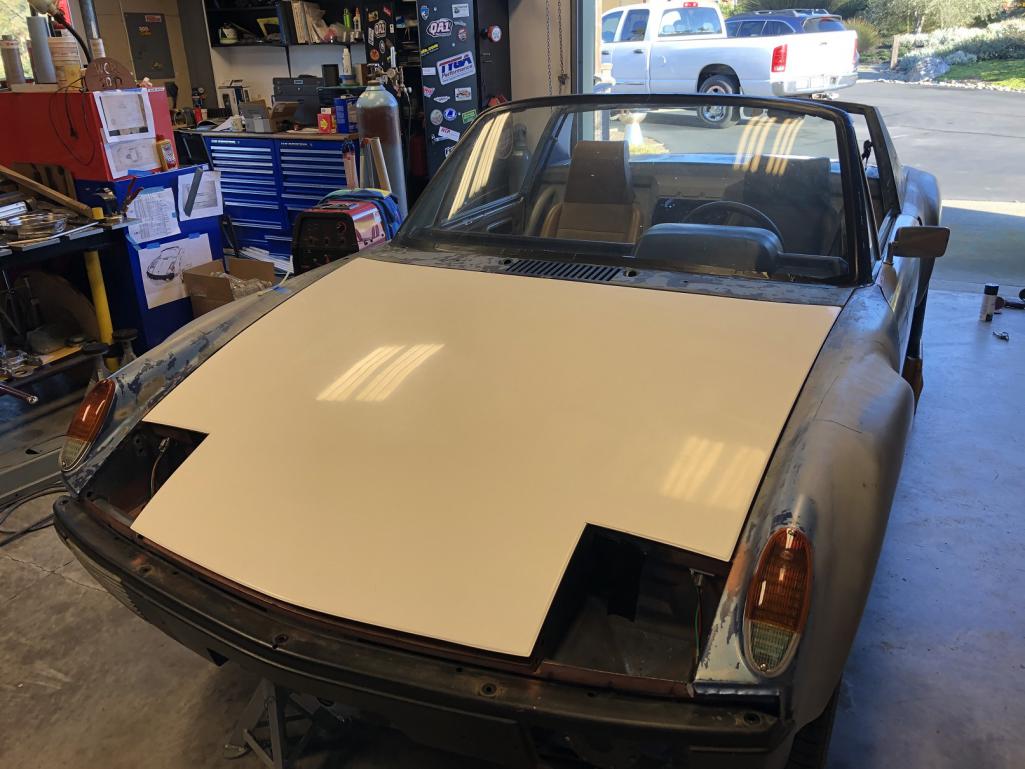
|
|
|
|
| AZBanks |
Feb 2 2021, 07:19 PM
Post
#3427
|
|
Senior Member Group: Members Posts: 1,069 Joined: 7-December 05 From: New River, AZ Member No.: 5,245 Region Association: Southwest Region |
With a new hood, you need a new vent design.
The design commitee will come to order! Who would like to submit the first suggestion?? |
|
|
|
| 914forme |
Feb 2 2021, 08:05 PM
Post
#3428
|
|
Times a wastin', get wrenchin'! Group: Members Posts: 3,896 Joined: 24-July 04 From: Dayton, Ohio Member No.: 2,388 Region Association: None |
Out the inner fender and be done, the GT hoods are just to nice to put a set of vents in.
|
|
|
|
| ajracer |
Feb 2 2021, 09:56 PM
Post
#3429
|
|
Member Group: Members Posts: 204 Joined: 18-April 04 From: Toronto, Canada Member No.: 1,945 |
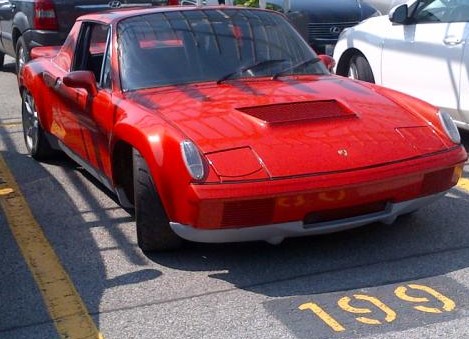
Nice build and just checked out a few areas, LS3 will be great and I think a nice Hood Vent is functional; similar to mine on an LS6 build, which was updated from the original build in 2006. Add a little class with some black mesh, carbon fiber louvers, etc. (Photo is several years old and lots of changes in past few years but still retained the Hood Venting with Carbon fiber radiator shroud.
 |
|
|
|
| Krieger |
Feb 2 2021, 11:46 PM
Post
#3430
|
|
Advanced Member Group: Members Posts: 4,825 Joined: 24-May 04 From: Santa Rosa CA Member No.: 2,104 Region Association: None |
I like the engine lid latching set up you came up with. It is simple and looks good. That front lid looks pretty dang good right out of the box! Does it need much work to meet your standards?
|
|
|
|
| Andyrew |
Feb 3 2021, 06:17 AM
Post
#3431
|
|
Spooling.... Please wait Group: Members Posts: 13,380 Joined: 20-January 03 From: Riverbank, Ca Member No.: 172 Region Association: Northern California |
QUOTE(Krieger @ Feb 2 2021, 09:46 PM) I like the engine lid latching set up you came up with. It is simple and looks good. That front lid looks pretty dang good right out of the box! Does it need much work to meet your standards? (IMG:style_emoticons/default/agree.gif) Thats a nice engine lid catch! Such a simple yet elegant solution. |
|
|
|
| tygaboy |
Feb 3 2021, 09:10 AM
Post
#3432
|
|
914 Guru Group: Members Posts: 5,680 Joined: 6-October 15 From: Petaluma, CA Member No.: 19,241 Region Association: Northern California |
QUOTE(Krieger @ Feb 2 2021, 09:46 PM) I like the engine lid latching set up you came up with. It is simple and looks good. That front lid looks pretty dang good right out of the box! Does it need much work to meet your standards? @Krieger Andy, I bought the Getty hood and trunk lid and have to say, the fit and finish are really good. There are a couple spots along the edges that could use a little fine tuning but not much. I'd bet that all these will need is some high-build primer and a quick sand and they'll be good to go. Stop by and see what you think. |
|
|
|
| Krieger |
Feb 3 2021, 02:59 PM
Post
#3433
|
|
Advanced Member Group: Members Posts: 4,825 Joined: 24-May 04 From: Santa Rosa CA Member No.: 2,104 Region Association: None |
Saweeeet! Glad to hear that. I will have to come by and check it out.
|
|
|
|
| tygaboy |
Feb 3 2021, 06:52 PM
Post
#3434
|
|
914 Guru Group: Members Posts: 5,680 Joined: 6-October 15 From: Petaluma, CA Member No.: 19,241 Region Association: Northern California |
QUOTE(Krieger @ Feb 3 2021, 12:59 PM) Saweeeet! Glad to hear that. I will have to come by and check it out. @Krieger - Andy - Here's another great thing about my experience with these Getty products: I got an email this morning from Mark, the guy who did the actual layup on my parts asking if they arrived OK. I replied that they did and sent him that same pic of their hood on my car. About 5 mins later I get another email with a comment about how he leaves about 1/8" extra on the width, along with hand-drawn pic and a comment about how to sand off or fill in (and a recommendation of what to use) to get the exact width needed to best fit a particular car. I have to say, REALLY impressive customer service. (IMG:style_emoticons/default/aktion035.gif) |
|
|
|
| tygaboy |
Feb 8 2021, 09:37 AM
Post
#3435
|
|
914 Guru Group: Members Posts: 5,680 Joined: 6-October 15 From: Petaluma, CA Member No.: 19,241 Region Association: Northern California |
I'll be doing a GT version of the engine lid and was thinking I'd remove the lid cross-brace. The lids get a bit noodle-y without it and the stock springs can cause the passenger rear corner to lift a bit. So I removed the springs and came up with a prop rod set up.
I'll be adding a clip on that main latch bracket to hold the rod when the lid is closed. It's just sitting there at this point. Attached thumbnail(s) 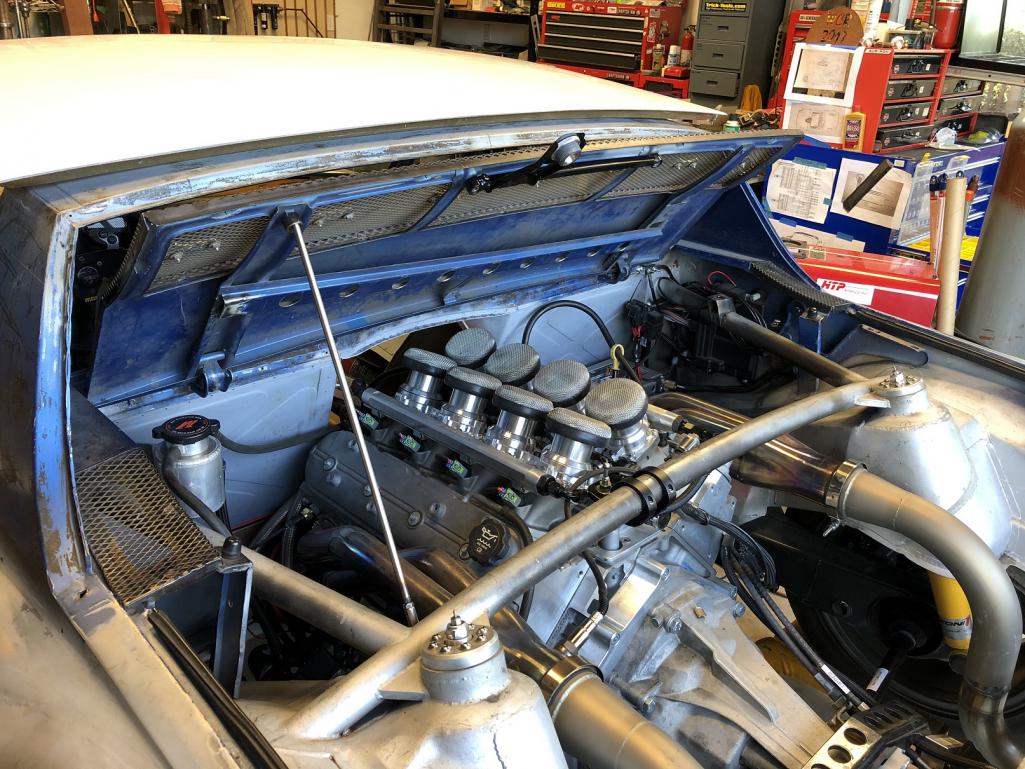 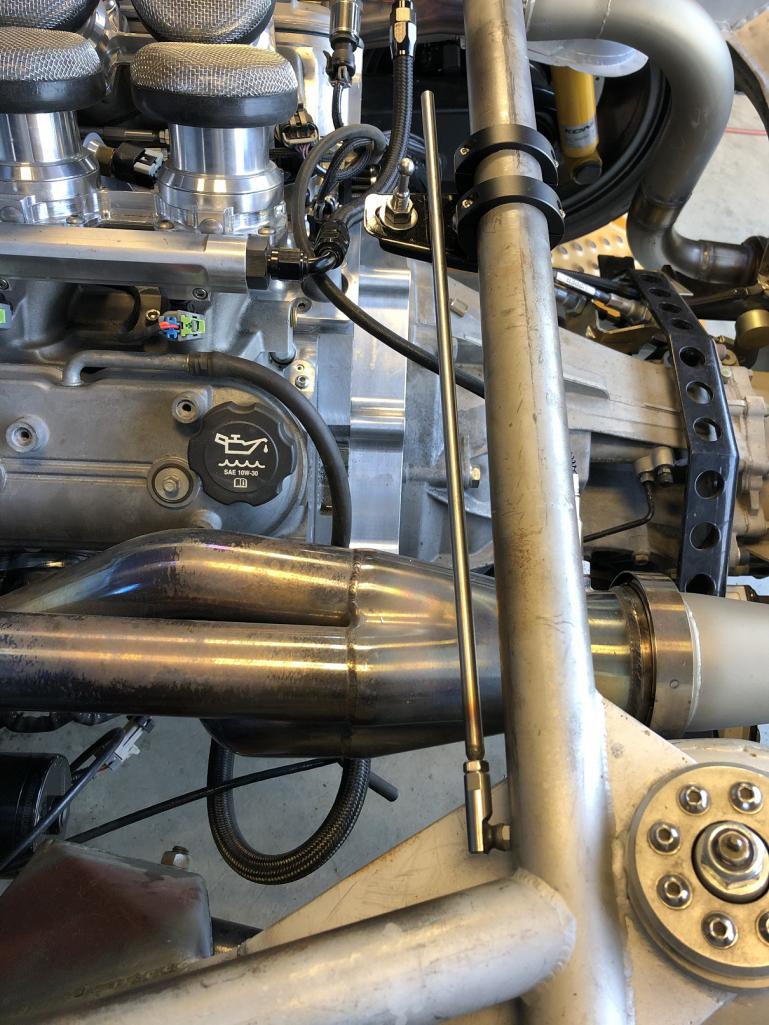
|
|
|
|
| bob164 |
Feb 8 2021, 11:26 AM
Post
#3436
|
|
Member Group: Members Posts: 101 Joined: 10-February 18 From: Seal Beach Member No.: 21,877 Region Association: Southern California |
Chris,
Looks good, why not put the pivot near the center of the cross brace? This way it won't interfere with any work from the drivers or passenger sides. Just a thought, there may be other factors I'm not aware of in your choice of location. Bob |
 |
|
| tygaboy |
Feb 8 2021, 12:43 PM
Post
#3437
|
|
914 Guru Group: Members Posts: 5,680 Joined: 6-October 15 From: Petaluma, CA Member No.: 19,241 Region Association: Northern California |
QUOTE(bob164 @ Feb 8 2021, 09:26 AM) Chris, Looks good, why not put the pivot near the center of the cross brace? This way it won't interfere with any work from the drivers or passenger sides. Just a thought, there may be other factors I'm not aware of in your choice of location. Bob @bob164 - Good point - and I considered it. Most all service items are easily accessed even with the prop rod in place. Plus, I slotted the hinge brackets so for any serious work, or if it does become an issue, it's loosen the two bolts and off comes the lid. |
|
|
|
| Andyrew |
Feb 8 2021, 01:00 PM
Post
#3438
|
|
Spooling.... Please wait Group: Members Posts: 13,380 Joined: 20-January 03 From: Riverbank, Ca Member No.: 172 Region Association: Northern California |
I like the prop rod. One thought.
Why not pivot it off the center of the car vs the outboard? That way you can prop it in the middle of the engine lid and it wont get in the way of working on the engine from the drivers side? You could probably put the same ball catch as what you have for the engine lid so it catches and wont fall with wind? |
|
|
|
| Curbandgutter |
Feb 8 2021, 01:11 PM
Post
#3439
|
|
Senior Member Group: Members Posts: 565 Joined: 8-March 13 From: Murrieta CA Member No.: 15,637 Region Association: Southern California |
QUOTE(914forme @ Feb 2 2021, 06:05 PM) Out the inner fender and be done, the GT hoods are just to nice to put a set of vents in. I agree |
|
|
|
| AZBanks |
Feb 19 2021, 10:32 AM
Post
#3440
|
|
Senior Member Group: Members Posts: 1,069 Joined: 7-December 05 From: New River, AZ Member No.: 5,245 Region Association: Southwest Region |
Page 4??? How can this thread be on page 4??
|
|
|
|
|
1 User(s) are reading this topic (1 Guests and 0 Anonymous Users)
0 Members:

|
Lo-Fi Version | Time is now: 4th November 2025 - 06:43 PM |
Invision Power Board
v9.1.4 © 2025 IPS, Inc.