|
|
|
Porsche, and the Porsche crest are registered trademarks of Dr. Ing. h.c. F. Porsche AG.
This site is not affiliated with Porsche in any way. Its only purpose is to provide an online forum for car enthusiasts. All other trademarks are property of their respective owners. |
|
|

  |

| andys |
 Jun 19 2021, 10:40 AM Jun 19 2021, 10:40 AM
Post
#3601
|
|
Advanced Member  Group: Members Posts: 2,165 Joined: 21-May 03 From: Valencia, CA Member No.: 721 Region Association: None |
QUOTE(tygaboy @ Jun 18 2021, 12:22 PM)  QUOTE(andys @ Jun 18 2021, 10:35 AM) Chris, That Holley fill cap, is it located in the same place as the original Porsche fill cap? Are you going to add a vent and expansion tank? What are you doing for the fuel pump and its location? I'm currently adding a small Holley fill cap, but in the same position as you did with your original large flat fill cap. The tank surface is not very flat in this area, so I'm not sure how to get a good seal with the Holley o-ring. I'll probably machine a steel split ring to back it up. In the stock fill cap location, I'm installing a FiTech drop in fuel pump module with an adapter ring for a bolt in configuration (no welding). I'll shoot some photos to share. Andys @andys I tried that same, small Holley cap set up but REALLY didn't like how small the base was. I ended up buying a cap assembly from BAM. Here's the link on Amazon. Looks out of stock now but... https://www.amazon.com/Aluminum-Bolt-Tank-F...d/dp/B019H6M8YI The good news is the base uses the same thread pitch so the Holley cap swaps right in and you get the super cool, SEMA winning, silver/black contrast! (IMG:style_emoticons/default/lol-2.gif) Agreed, the small base is a bit flimsy. Since the larger one you used is NA, I'll go with the small one for now. Andys |
   |

 
|
| tygaboy |
Jun 21 2021, 12:47 PM
Post
#3602
|
|
914 Guru Group: Members Posts: 5,679 Joined: 6-October 15 From: Petaluma, CA Member No.: 19,241 Region Association: Northern California |
The dash panel, painted w/SEM Trim Black and ready to install. So stealthy! I love it.
Attached thumbnail(s) 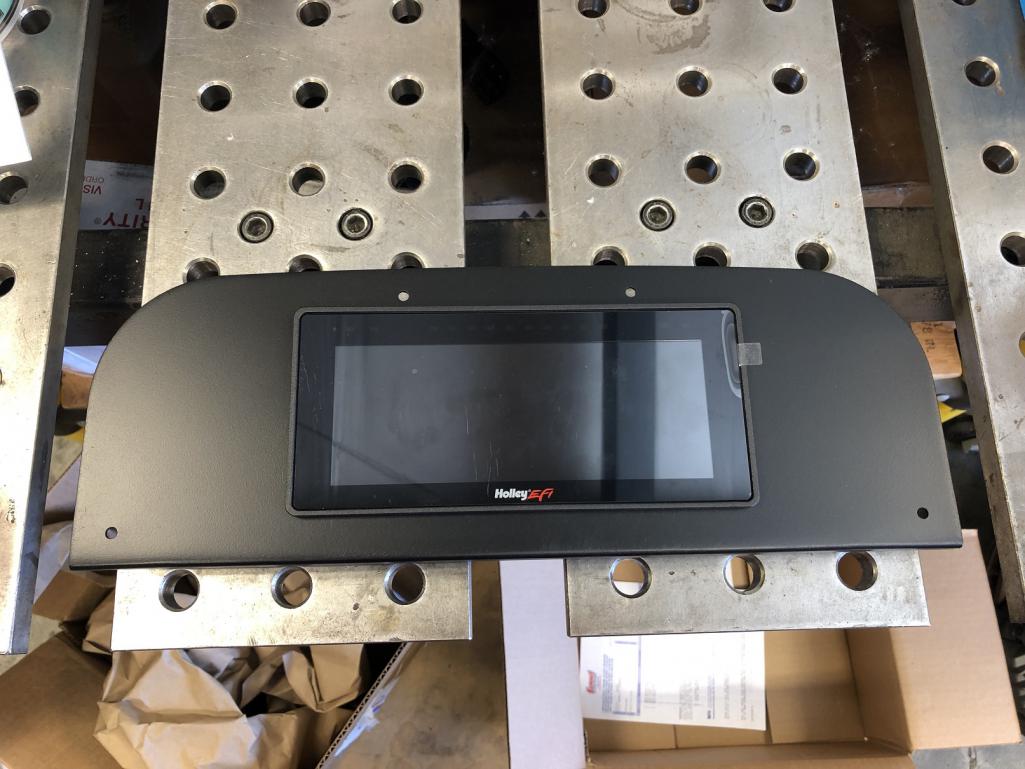
|
|
|
|
| AZBanks |
Jun 21 2021, 01:16 PM
Post
#3603
|
|
Senior Member Group: Members Posts: 1,069 Joined: 7-December 05 From: New River, AZ Member No.: 5,245 Region Association: Southwest Region |
I have to say that, despite your egregious failure to get approval from the 914world design team, it looks really good.
|
|
|
|
| tygaboy |
Jun 21 2021, 04:00 PM
Post
#3604
|
|
914 Guru Group: Members Posts: 5,679 Joined: 6-October 15 From: Petaluma, CA Member No.: 19,241 Region Association: Northern California |
QUOTE(AZBanks @ Jun 21 2021, 12:16 PM) I have to say that, despite your egregious failure to get approval from the 914world design team, it looks really good. @AZBanks - Well, then I suppose I'm really pushing my luck proceeding with the bracket design and finish with no input, eh? (IMG:style_emoticons/default/poke.gif) I went for added lightness on these, as well as rubber mounting. Another component no one will ever see... Interesting that if you go with the flush mount approach, you have to fabricate your own brackets - Holley doesn't offer any. Thank the gods of fab for plasma tables! (IMG:style_emoticons/default/shades.gif) These may be the smallest parts I've made on the table - at least that I'm using on my build. Attached thumbnail(s) 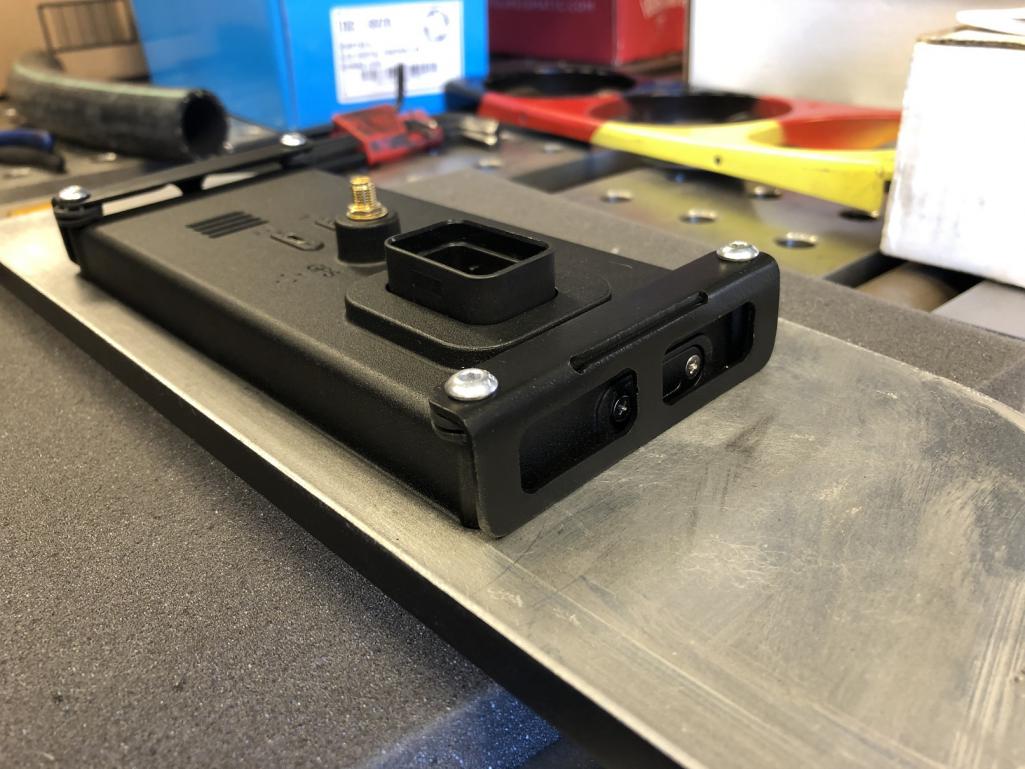
|
|
|
|
| Nogoodwithusernames |
Jun 21 2021, 04:16 PM
Post
#3605
|
|
Member Group: Members Posts: 292 Joined: 31-May 16 From: Sutter, CA Member No.: 20,051 Region Association: None |
Those brackets look as though they could have come with the kit, top notch work.
|
|
|
|
| AZBanks |
Jun 21 2021, 04:47 PM
Post
#3606
|
|
Senior Member Group: Members Posts: 1,069 Joined: 7-December 05 From: New River, AZ Member No.: 5,245 Region Association: Southwest Region |
QUOTE(tygaboy @ Jun 21 2021, 03:00 PM) QUOTE(AZBanks @ Jun 21 2021, 12:16 PM) I have to say that, despite your egregious failure to get approval from the 914world design team, it looks really good. @AZBanks - Well, then I suppose I'm really pushing my luck proceeding with the bracket design and finish with no input, eh? (IMG:style_emoticons/default/poke.gif) I went for added lightness on these, as well as rubber mounting. Another component no one will ever see... Interesting that if you go with the flush mount approach, you have to fabricate your own brackets - Holley doesn't offer any. Thank the gods of fab for plasma tables! (IMG:style_emoticons/default/shades.gif) These may be the smallest parts I've made on the table - at least that I'm using on my build. You know it's just jealousy talking. I'd love to have your tools and your skills. (IMG:style_emoticons/default/pray.gif) |
|
|
|
| tygaboy |
Jun 21 2021, 05:52 PM
Post
#3607
|
|
914 Guru Group: Members Posts: 5,679 Joined: 6-October 15 From: Petaluma, CA Member No.: 19,241 Region Association: Northern California |
Initial fitting of the ashtray-delete fiberglass dash top with the Holley dash in place. Silver fasteners? Black fasteners? Oh! Maybe rivets all around the outside, to echo the fire wall? I'll have to see how I feel as I look at it a bit more.
I plan a glove box delete, too, so the entire dash, everywhere, will be filled with as much nothingness as I can add. I'm loving the way this latest set of updates is coming together. Attached thumbnail(s) 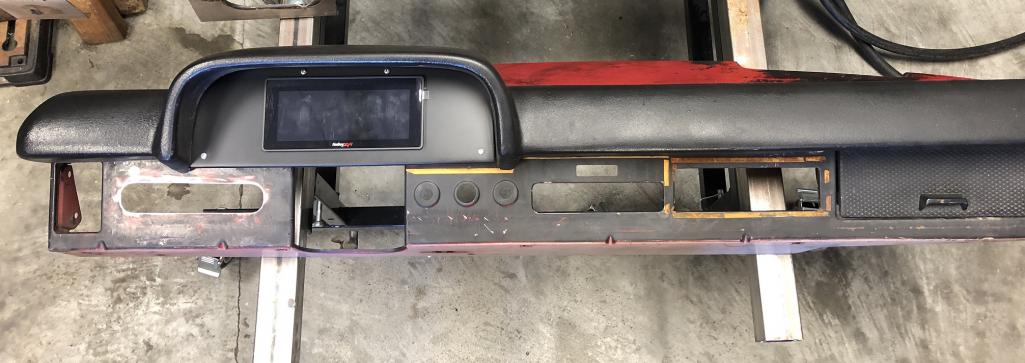
|
|
|
|
| Rand |
Jun 21 2021, 09:29 PM
Post
#3608
|
|
Cross Member Group: Members Posts: 7,413 Joined: 8-February 05 From: OR Member No.: 3,573 Region Association: None |
QUOTE filled with as much nothingness as I can add Perfect. Love the way you think. |
|
|
|
| Rand |
Jun 21 2021, 09:31 PM
Post
#3609
|
|
Cross Member Group: Members Posts: 7,413 Joined: 8-February 05 From: OR Member No.: 3,573 Region Association: None |
That stock shroud above the gauges isn't ideal for shading them. Hmm.
:scratching chin: (IMG:style_emoticons/default/rolleyes.gif) Lol, freakin' peanut gallery. |
|
|
|
| Andyrew |
Jun 23 2021, 10:29 AM
Post
#3610
|
|
Spooling.... Please wait Group: Members Posts: 13,380 Joined: 20-January 03 From: Riverbank, Ca Member No.: 172 Region Association: Northern California |
OH thats niiiice!!
|
|
|
|
| tygaboy |
Jun 23 2021, 01:58 PM
Post
#3611
|
|
914 Guru Group: Members Posts: 5,679 Joined: 6-October 15 From: Petaluma, CA Member No.: 19,241 Region Association: Northern California |
Today, it's wiring the Holley dash. The CAN technology is SOOOO nice in that everything the ECU monitors can be displayed on the dash via a couple wires. No more wires running to the dash from every sensor!
The only additional wires needed are for anything the ECU doesn't know about. In my case, that's: - fuel level - oil temp - left and right turn indicators - high beam indicator - 5v sensor power (for the "added" fuel and oil temp sensors) - sensor ground (again, for these "added" sensors) I employed that wire junction block so I could have sections of the overall harness that could be more easily installed and removed from the chassis without having to fish more/longer wiring and/or large connectors through holes in the body. In all, I'm pretty happy with how this area of the wiring is turning out. Attached thumbnail(s) 
|
|
|
|
| tygaboy |
Jun 23 2021, 05:25 PM
Post
#3612
|
|
914 Guru Group: Members Posts: 5,679 Joined: 6-October 15 From: Petaluma, CA Member No.: 19,241 Region Association: Northern California |
Some progress setting up the dash. So far, this thing is proving to be super cool. Tons of configurability and pretty easy to work with it.
https://www.youtube.com/watch?v=DbgRANGETJM |
|
|
|
| tygaboy |
Jun 24 2021, 04:45 PM
Post
#3613
|
|
914 Guru Group: Members Posts: 5,679 Joined: 6-October 15 From: Petaluma, CA Member No.: 19,241 Region Association: Northern California |
Playing with dash configuration. I deleted a couple digital read outs that I wasn't going to use and figured I put the clock down there. Then I remembered: I hadn't yet drilled holes for the seat heater switches...
A really neat feature of this dash is that you can add "switches" to it. These can be set to do a number of things but in this case, it'll trigger the relay that powers the seat heat. The switch style is configurable but I went with the "small silver toggle". When you touch the switch, the toggle "flips up". It's pretty cool. And I redid the high beam indicator. That dark dot just above / left of the tach? That's a "gauge" that I set to be an indicator, set to dull blue and triggered with the high beam. It's visible but far less bright than the LED set up in the earlier video. So. Many. Options. Attached thumbnail(s) 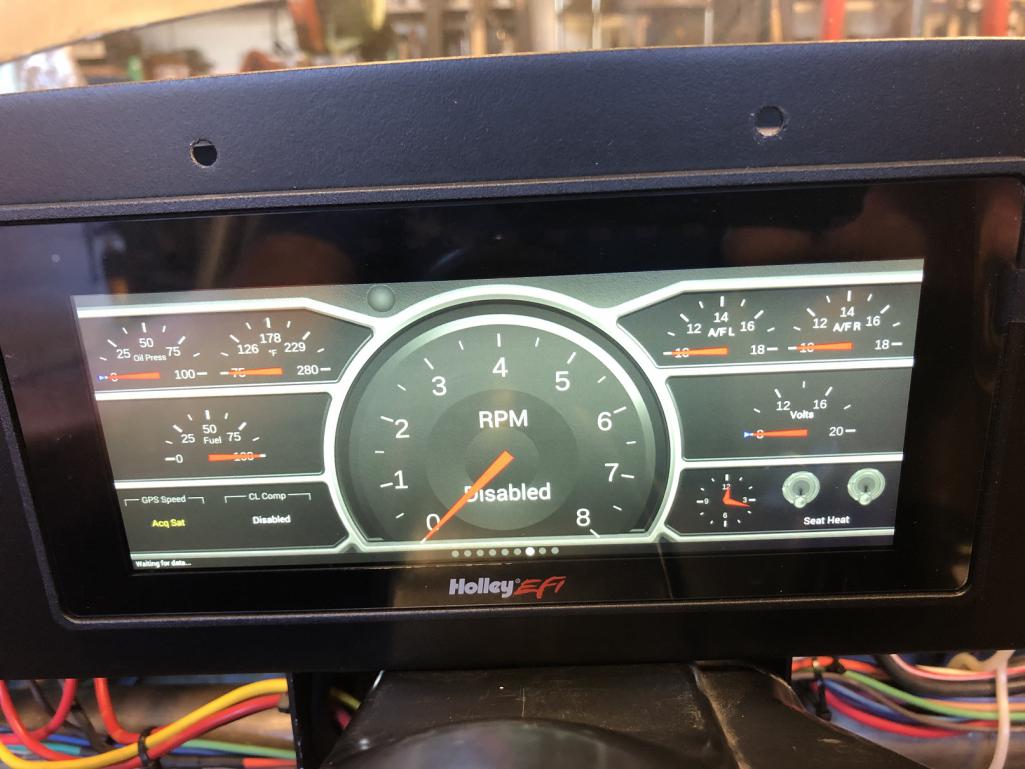
|
|
|
|
| djway |
Jun 25 2021, 12:27 AM
Post
#3614
|
|
Senior Member Group: Members Posts: 787 Joined: 16-October 15 From: Riverside Member No.: 19,266 Region Association: Southern California |
QUOTE(tygaboy @ Jun 24 2021, 03:45 PM) Playing with dash configuration. I deleted a couple digital read outs that I wasn't going to use and figured I put the clock down there. Then I remembered: I hadn't yet drilled holes for the seat heater switches... A really neat feature of this dash is that you can add "switches" to it. These can be set to do a number of things but in this case, it'll trigger the relay that powers the seat heat. The switch style is configurable but I went with the "small silver toggle". When you touch the switch, the toggle "flips up". It's pretty cool. And I redid the high beam indicator. That dark dot just above / left of the tach? That's a "gauge" that I set to be an indicator, set to dull blue and triggered with the high beam. It's visible but far less bright than the LED set up in the earlier video. So. Many. Options. Wow |
|
|
|
| Andyrew |
Jun 25 2021, 12:33 AM
Post
#3615
|
|
Spooling.... Please wait Group: Members Posts: 13,380 Joined: 20-January 03 From: Riverbank, Ca Member No.: 172 Region Association: Northern California |
That is way to trick!!! Can you make the gauge glow red for a shift light or something?
|
|
|
|
| tygaboy |
Jul 4 2021, 05:25 PM
Post
#3616
|
|
914 Guru Group: Members Posts: 5,679 Joined: 6-October 15 From: Petaluma, CA Member No.: 19,241 Region Association: Northern California |
I got the dash installed with a basic layout and configuration that I liked and today, I took the car to the Novato Cars & Coffee. We were well represented with @Krieger Andy, @buddyV Robert and @markhoward Mark in attendance, as well.
The car got a fair bit of attention and I received a lot of nice comments about the overall vibe of the build. I'll admit, it was gratifying to hear positive feedback from pretty serious car folks who'd never seen it before. Anyway - If you're not into this digital dash stuff, this will be pretty boring. But if you are? This thing is so dang cool! I worked out a way to get a more obvious visual indication that my seat heater switches are on. Take a watch, if you're curious. It's just over a minute long. @andyrew - it has a set of LEDs along the top border that serve as a programmable, sequential shift light. And did I say how much I like this dash? (IMG:style_emoticons/default/aktion035.gif) https://www.youtube.com/watch?v=O5nbmZuQZ_U |
|
|
|
| Cairo94507 |
Jul 4 2021, 06:26 PM
Post
#3617
|
|
Michael Group: Members Posts: 10,485 Joined: 1-November 08 From: Auburn, CA Member No.: 9,712 Region Association: Northern California |
Very cool layout and I like all of the information you can get out of that setup. Hayy 4th Chris. (IMG:style_emoticons/default/beerchug.gif)
|
|
|
|
| sixnotfour |
Jul 4 2021, 07:03 PM
Post
#3618
|
|
914 Wizard Group: Members Posts: 11,017 Joined: 12-September 04 From: Life Elevated..planet UT. Member No.: 2,744 Region Association: Rocky Mountains |
QUOTE ashtray-delete fiberglass dash top (IMG:style_emoticons/default/cheer.gif) So Happy you got one,,,and not mine.. (IMG:style_emoticons/default/beer.gif) |
|
|
|
| tygaboy |
Jul 8 2021, 04:31 PM
Post
#3619
|
|
914 Guru Group: Members Posts: 5,679 Joined: 6-October 15 From: Petaluma, CA Member No.: 19,241 Region Association: Northern California |
I removed the sump from the fuel tank I've been running. Moving to the new fuel tank that isn't getting welded on means I needed to update the in-tank pump bracket so it drops into the sump. A little bend... bend... and it's done and slides right in.
Yes, this moves the pump up a bit so I lose access to maybe 3/8" of fuel level. Famous last words but if I let the fuel level get that low, I deserve to run out! (IMG:style_emoticons/default/happy11.gif) Attached thumbnail(s) 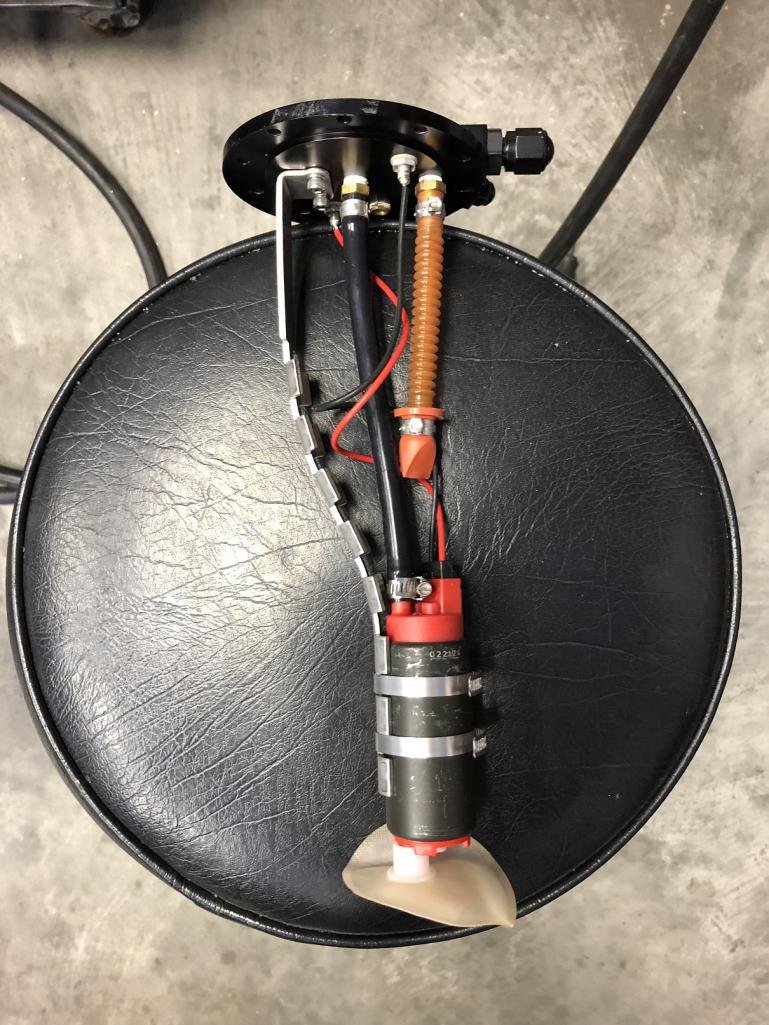
|
|
|
|
| tygaboy |
Jul 10 2021, 04:49 PM
Post
#3620
|
|
914 Guru Group: Members Posts: 5,679 Joined: 6-October 15 From: Petaluma, CA Member No.: 19,241 Region Association: Northern California |
Today's post may be boring, but at least it's actually sorta 914 related! (IMG:style_emoticons/default/biggrin.gif)
New tank all done. This version is all "no welding", as far as the filler cap and fuel pump fitment. I did spot weld the fuel filter bracket to the tank flange. Everything sure turned out nicely, IMO. When it's apart for paint, I'll powder coat the hold-down strap and redo all the hardware cad plating. Attached thumbnail(s) 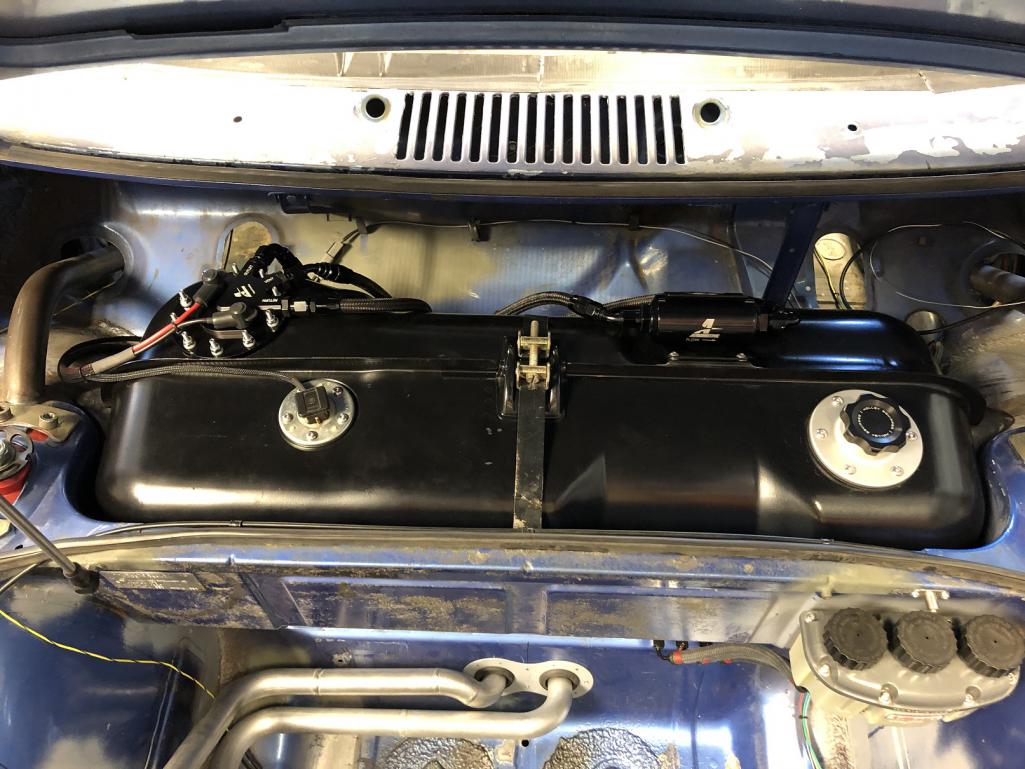 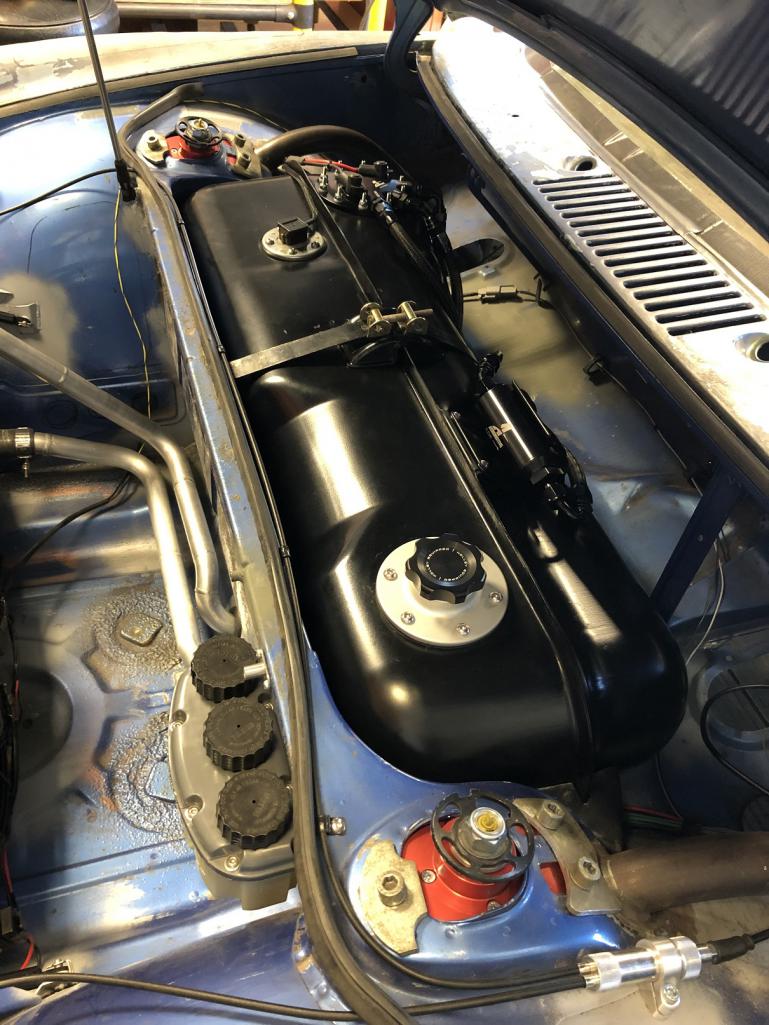
|
|
|
|
|
2 User(s) are reading this topic (2 Guests and 0 Anonymous Users)
0 Members:

|
Lo-Fi Version | Time is now: 4th November 2025 - 04:20 AM |
Invision Power Board
v9.1.4 © 2025 IPS, Inc.