|
|
|
Porsche, and the Porsche crest are registered trademarks of Dr. Ing. h.c. F. Porsche AG.
This site is not affiliated with Porsche in any way. Its only purpose is to provide an online forum for car enthusiasts. All other trademarks are property of their respective owners. |
|
|

  |

| tygaboy |
 Dec 26 2021, 06:46 PM Dec 26 2021, 06:46 PM
Post
#3821
|
|
914 Guru  Group: Members Posts: 5,844 Joined: 6-October 15 From: Petaluma, CA Member No.: 19,241 Region Association: Northern California |
Given all the "non-914" stuff I'm up to with this build, I'm sure some of you think I'm a bit twisted. Well so is this next version of the intake! (IMG:style_emoticons/default/shades.gif) Thanks, I'm here all week...
Just playing with the untrimmed tubing components and it's only on the one side but this shows the basic idea: get the tubes pointed forward and connected to twin air boxes, one on each side, just outboard of the heads. Note that rubber connector is just helping position things and those tubes will likely get welded - pending proof I can get the final part in/out of the car! But so far, it looks like it'll work. Quite a ways to go still, clearly. Plus, this intake means I'll need to build a different exhaust that just runs down and back. But this set up gets me all sorts of room to build a removable trunk floor/sealed carrier box so if I really wanted, I could transport a long weekend's worth of luggage. Attached thumbnail(s) 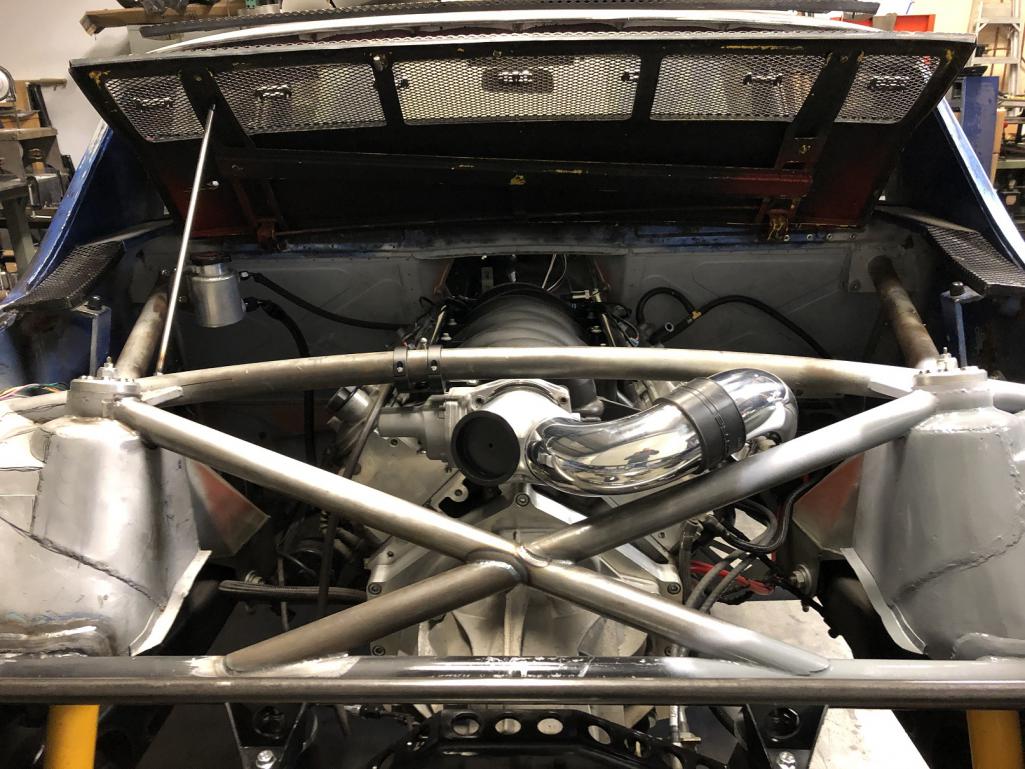 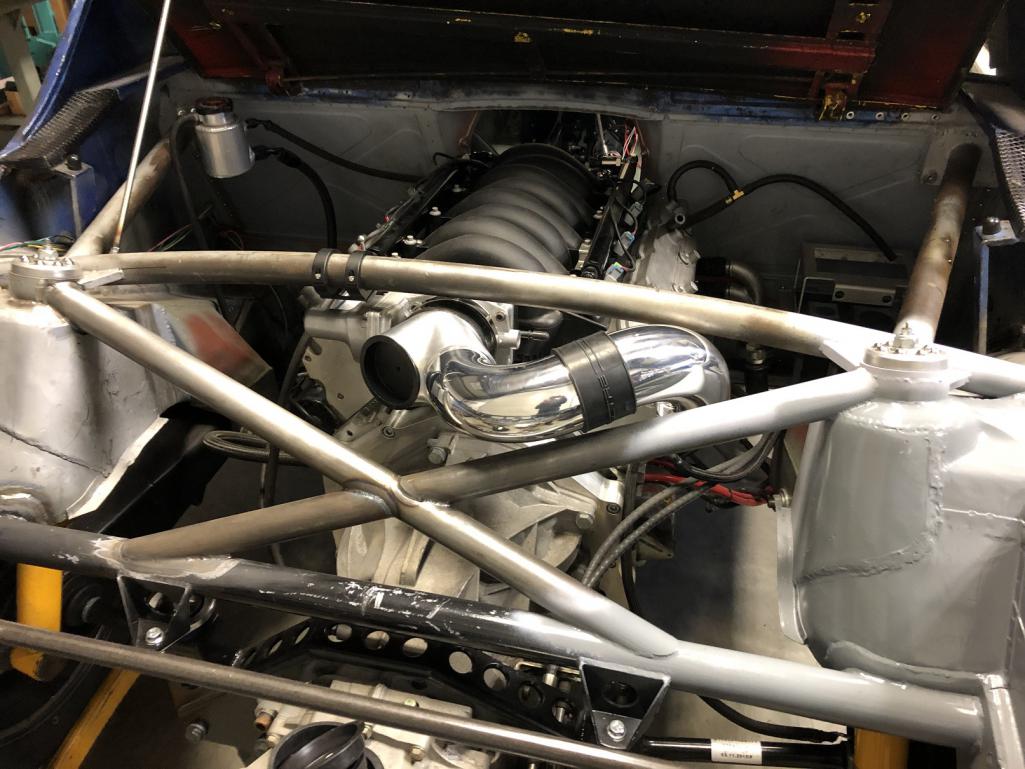 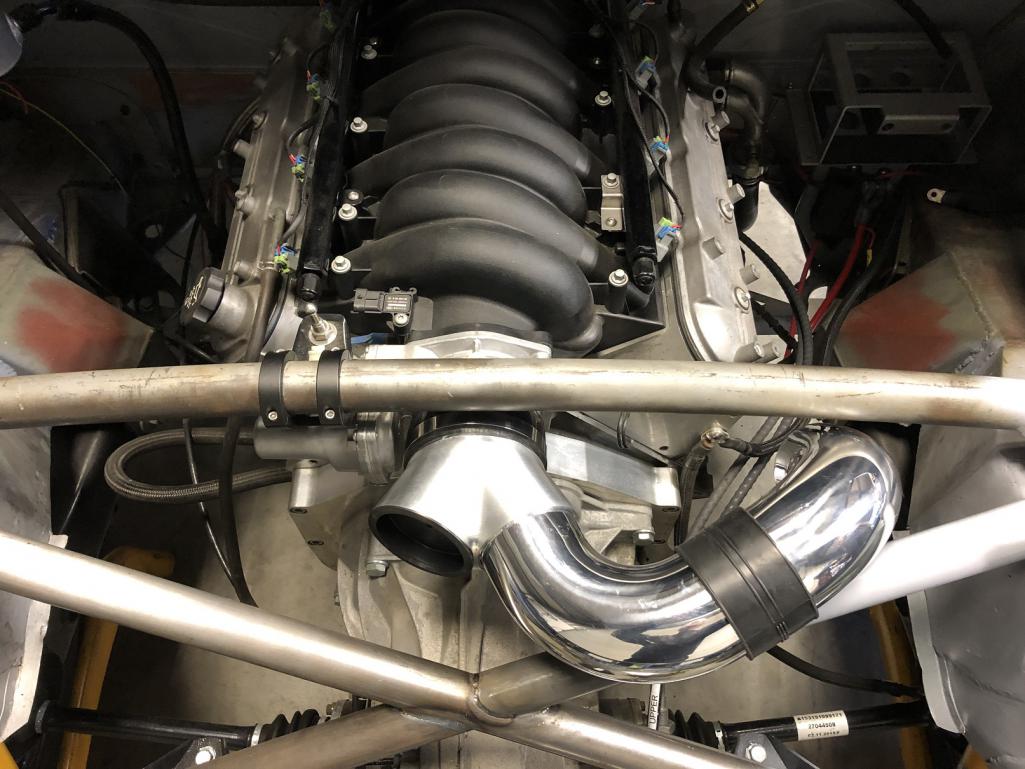 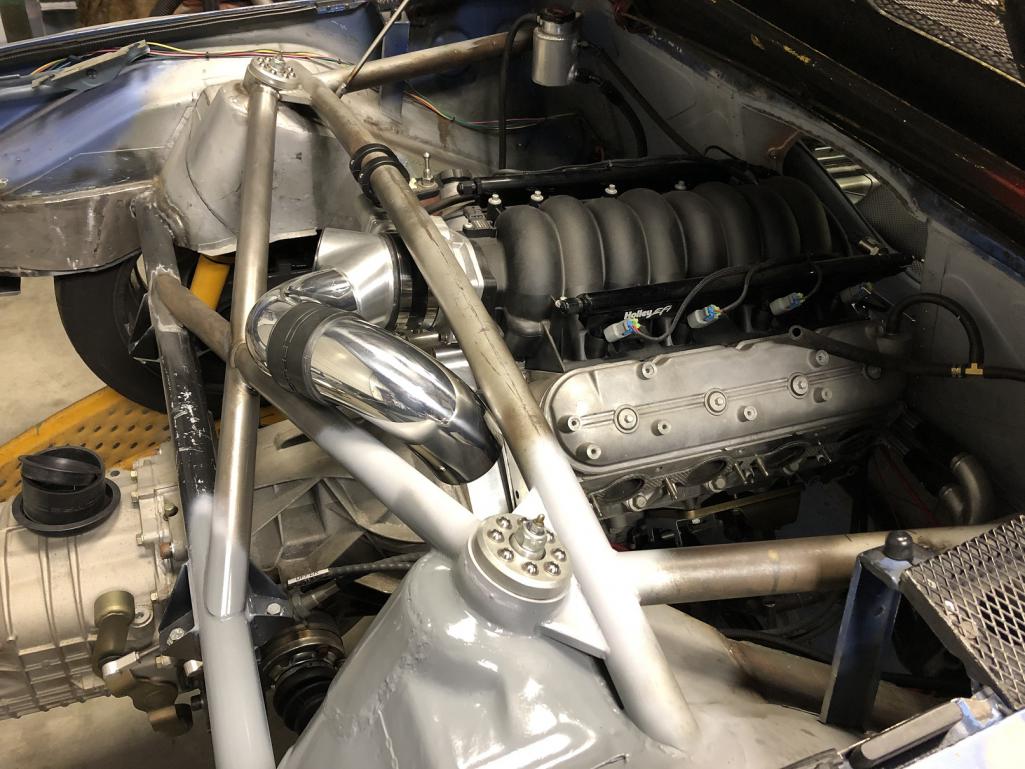
|
   |

 
|
| AZBanks |
Dec 26 2021, 07:57 PM
Post
#3822
|
|
Senior Member Group: Members Posts: 1,080 Joined: 7-December 05 From: New River, AZ Member No.: 5,245 Region Association: Southwest Region |
You wouldn't have these issues with ITB's.
(IMG:style_emoticons/default/poke.gif) (IMG:style_emoticons/default/stirthepot.gif) (IMG:style_emoticons/default/happy11.gif) |
|
|
|
| Cracker |
Dec 26 2021, 09:07 PM
Post
#3823
|
|
Advanced Member Group: Members Posts: 2,148 Joined: 2-February 10 From: Atlanta (area) Member No.: 11,316 Region Association: South East States |
He's heard this before... (IMG:style_emoticons/default/rolleyes.gif)
Cracker QUOTE(AZBanks @ Dec 26 2021, 08:57 PM)  You wouldn't have these issues with ITB's. (IMG:style_emoticons/default/poke.gif) (IMG:style_emoticons/default/stirthepot.gif) (IMG:style_emoticons/default/happy11.gif) |
|
|
|
| djway |
Dec 26 2021, 10:57 PM
Post
#3824
|
|
Senior Member Group: Members Posts: 787 Joined: 16-October 15 From: Riverside Member No.: 19,266 Region Association: Southern California |
Sweet
|
|
|
|
| tygaboy |
Jan 4 2022, 08:28 PM
Post
#3825
|
|
914 Guru Group: Members Posts: 5,844 Joined: 6-October 15 From: Petaluma, CA Member No.: 19,241 Region Association: Northern California |
More not even remotely 914 stuff! (IMG:style_emoticons/default/happy11.gif)
The PMU (power management unit) and wireless receiver harnesses are ready to go in the car. I opted to go with the PMU vendor's flying lead harness so most of that wiring will be trimmed away as it's only about 4' from the PMU to the connection point for all but a few of them. Attached thumbnail(s) 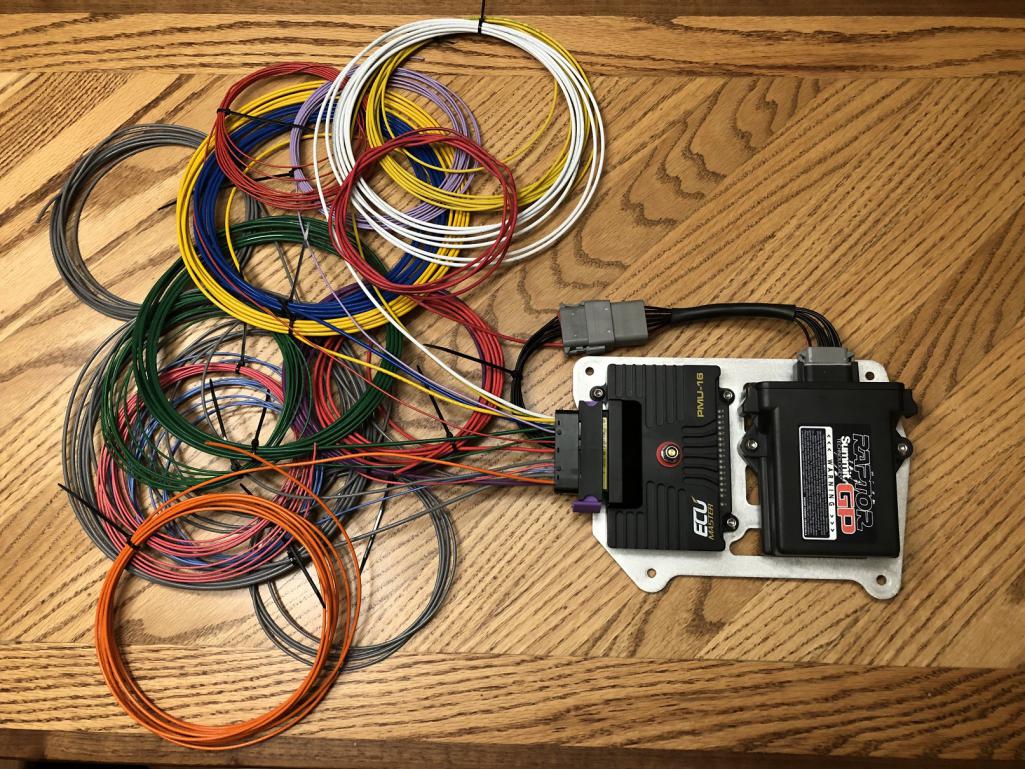
|
|
|
|
| dakotaewing |
Jan 4 2022, 09:16 PM
Post
#3826
|
|
Senior Member Group: Members Posts: 1,167 Joined: 8-July 03 From: DeSoto, Tx Member No.: 897 Region Association: Southwest Region |
... and the exhaust is off...
|
|
|
|
| tygaboy |
Jan 5 2022, 06:49 PM
Post
#3827
|
|
914 Guru Group: Members Posts: 5,844 Joined: 6-October 15 From: Petaluma, CA Member No.: 19,241 Region Association: Northern California |
And so it begins... again. (IMG:style_emoticons/default/laugh.gif)
I will say, I'm getting pretty comfortable with all things wiring. Still lots to learn but I'm at the point where I really enjoy doing this sort of work. It appeals to my sense of order - at least trying to get it in some sort of order! Attached thumbnail(s) 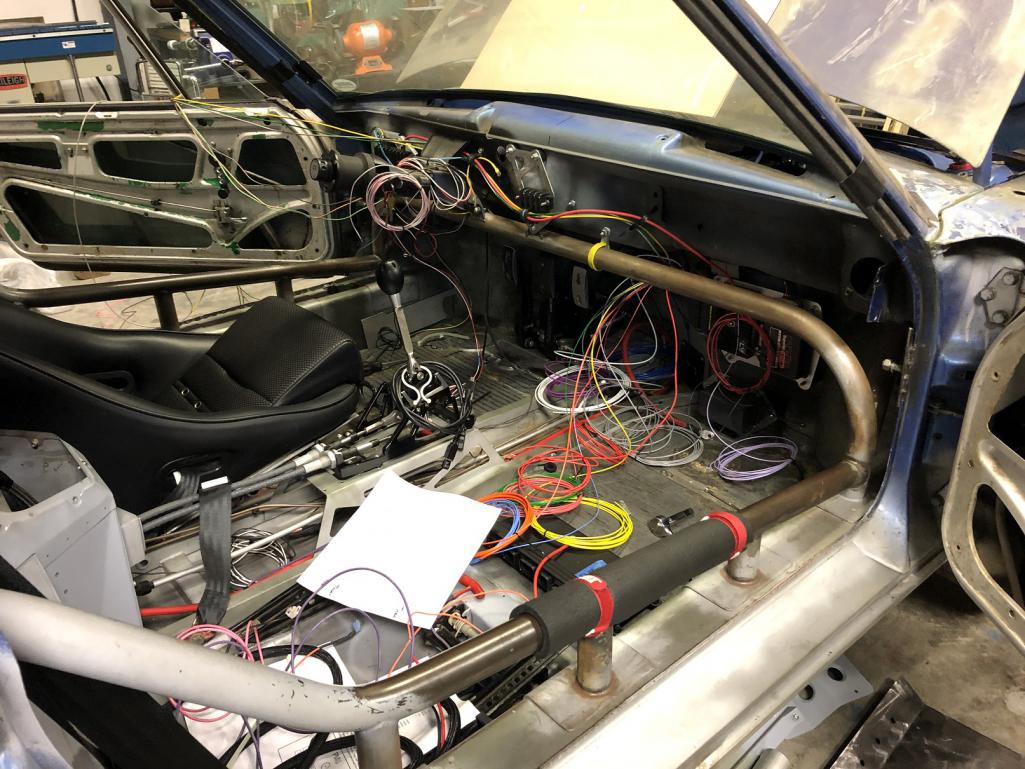
|
|
|
|
| cassmcentee |
Jan 5 2022, 07:49 PM
Post
#3828
|
|
Member Group: Members Posts: 243 Joined: 12-July 18 From: Squaw Valley, CA Member No.: 22,304 Region Association: Central California |
I see the most important tool of the day besides wire strippers...
The "Red Taped Chest Rest" (IMG:style_emoticons/default/smile.gif) |
|
|
|
| tygaboy |
Jan 14 2022, 06:40 PM
Post
#3829
|
|
914 Guru Group: Members Posts: 5,844 Joined: 6-October 15 From: Petaluma, CA Member No.: 19,241 Region Association: Northern California |
A few of you asked that I post details about the wiring work. OK, here's some fun stuff:
I want to add reliability to everything - and in the case of wiring, that means sealing every connection that I can. Today was my first go at potting a factory sensor. This is the transmission reverse light sensor from the Boxster 6-speed. Normally, it has a rather standard plug-in connector. I opted to make it a fully sealed sensor with a short pig tail that terminates with a Deutsch DT series connector. First, tin a couple suitable wires - these are 20 AWG conductors. Color doesn't matter as they'll be fully sheathed in Raychem DR25 heat shrink. Plus, this sensor is just an "on/off" switch so it doesn't matter which terminal gets power. When that sort of thing matters, I'll be paying attention and testing each connection before pinning the connector... Anyway. Next, tin the terminals in the sensor then solder the tinned end of the wires to a terminal. Note I'd folded the stripped wire back on itself before soldering so a bit of the insulated portion of the wire is already down in the body of the sensor. Even still, once the wires are soldered, you push a bit more of the wire into the sensor body to provide a bit more strain relief. Here's that work all done. Attached thumbnail(s) 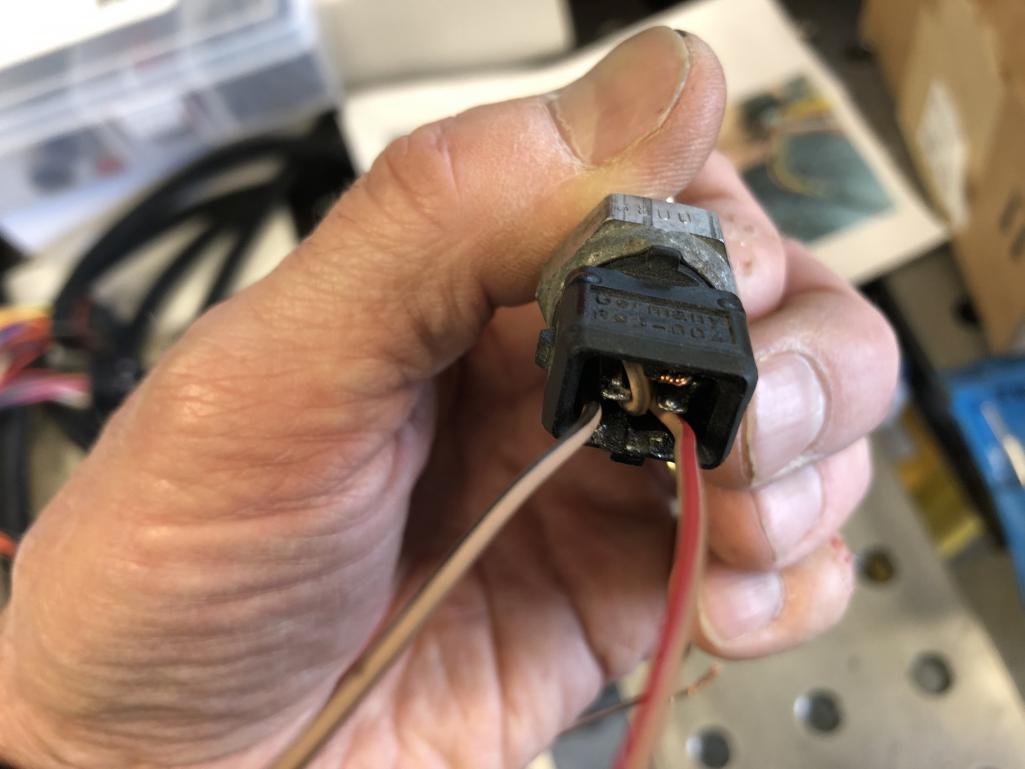
|
|
|
|
| tygaboy |
Jan 14 2022, 06:43 PM
Post
#3830
|
|
914 Guru Group: Members Posts: 5,844 Joined: 6-October 15 From: Petaluma, CA Member No.: 19,241 Region Association: Northern California |
Next, I slipped the heat shrink over the wires and set up a support contraption to keep the wire oriented as the potting epoxy cures.
This little portable, rubber jawed vice is just the ticket! Attached thumbnail(s) 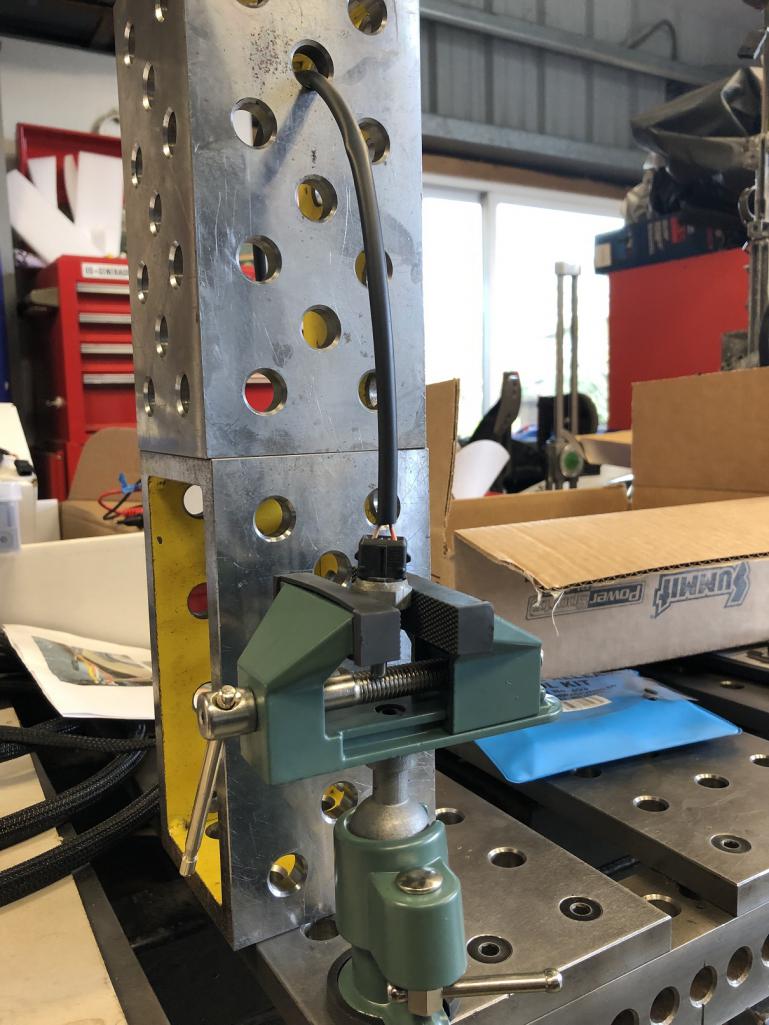
|
|
|
|
| tygaboy |
Jan 14 2022, 06:46 PM
Post
#3831
|
|
914 Guru Group: Members Posts: 5,844 Joined: 6-October 15 From: Petaluma, CA Member No.: 19,241 Region Association: Northern California |
Then, it's potting time! I'm using a 3M product as it's readily available and I've had such good experiences with their other products.
That first pic: I found it's easier to pump the potting epoxy (gently!) into the syringe vs dispensing it onto a surface and using the syringe to suck it up. Attached thumbnail(s) 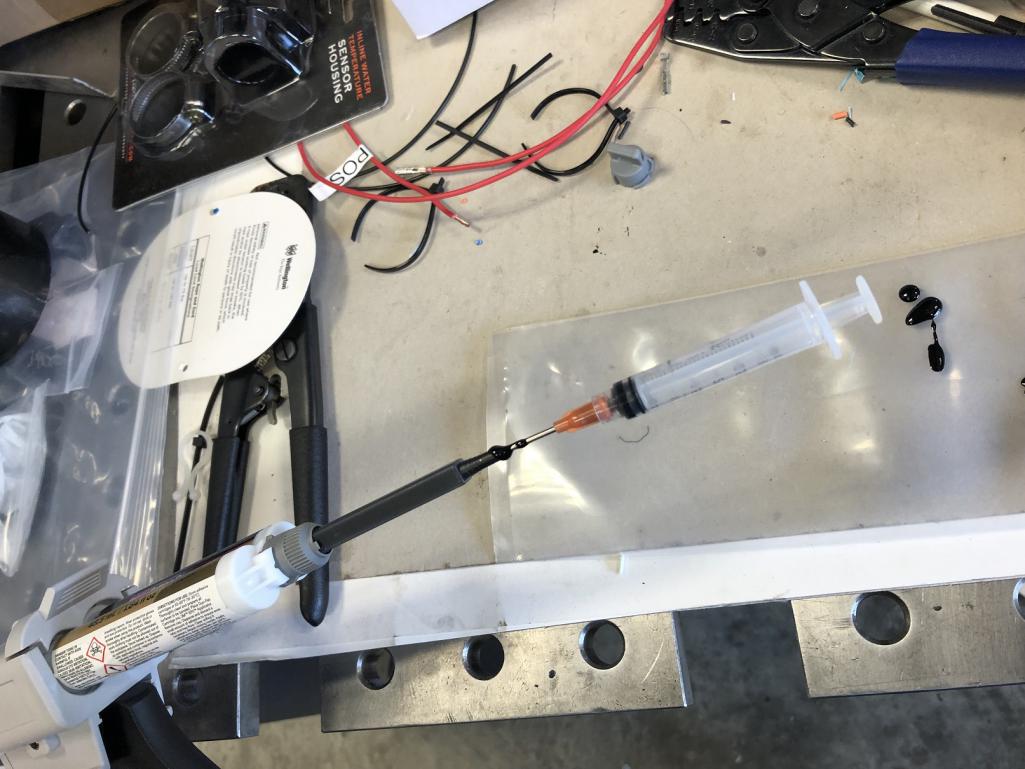 Attached image(s) 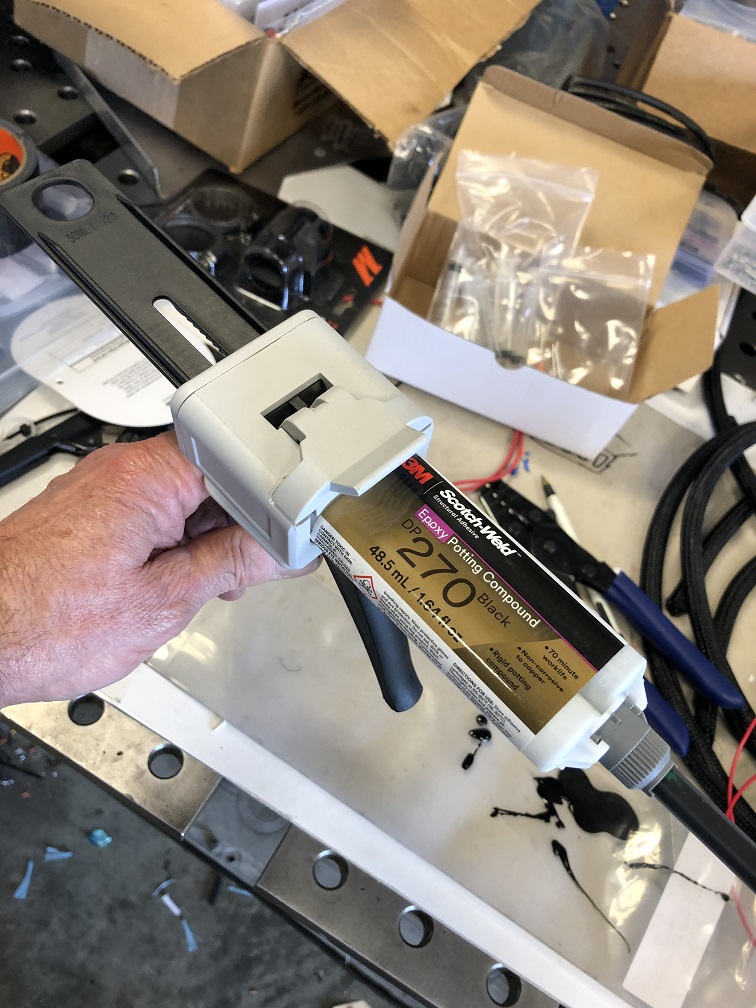
|
|
|
|
| tygaboy |
Jan 14 2022, 06:48 PM
Post
#3832
|
|
914 Guru Group: Members Posts: 5,844 Joined: 6-October 15 From: Petaluma, CA Member No.: 19,241 Region Association: Northern California |
Use the syringe and work around in all the cavities to carefully fill the sensor body with epoxy. Take your time and be sure to avoid creating any air pockets.
Attached thumbnail(s) 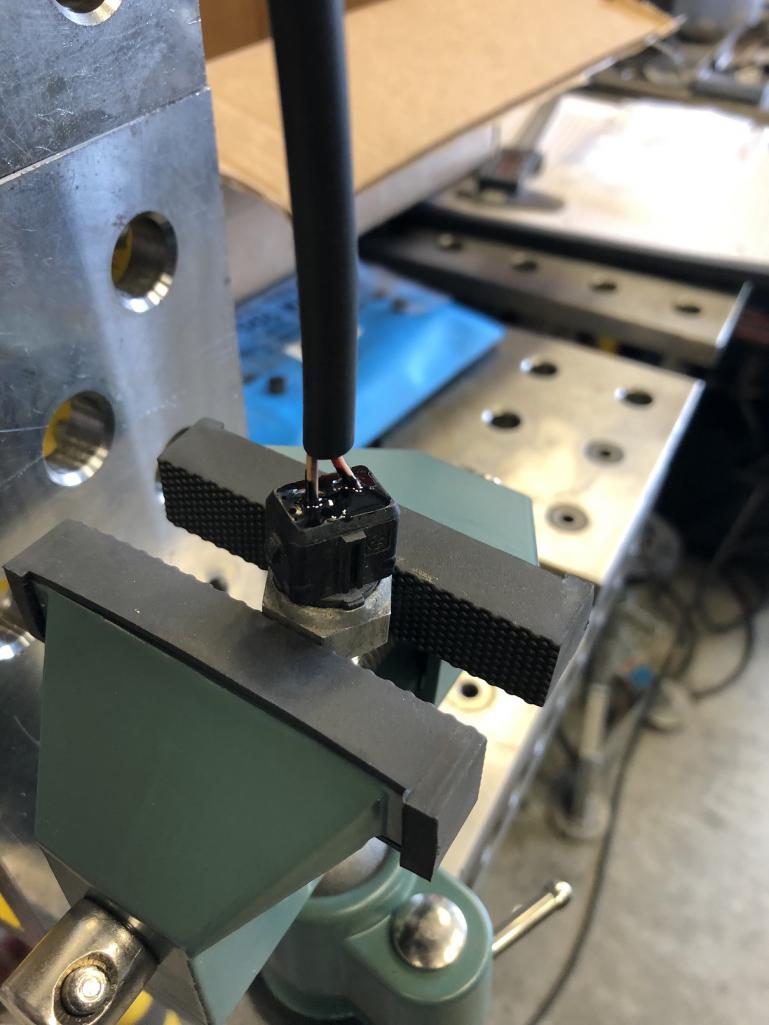
|
|
|
|
| tygaboy |
Jan 14 2022, 06:49 PM
Post
#3833
|
|
914 Guru Group: Members Posts: 5,844 Joined: 6-October 15 From: Petaluma, CA Member No.: 19,241 Region Association: Northern California |
Once the sensor body is filled, gently slide the heat shrink down into the epoxy.
Attached thumbnail(s) 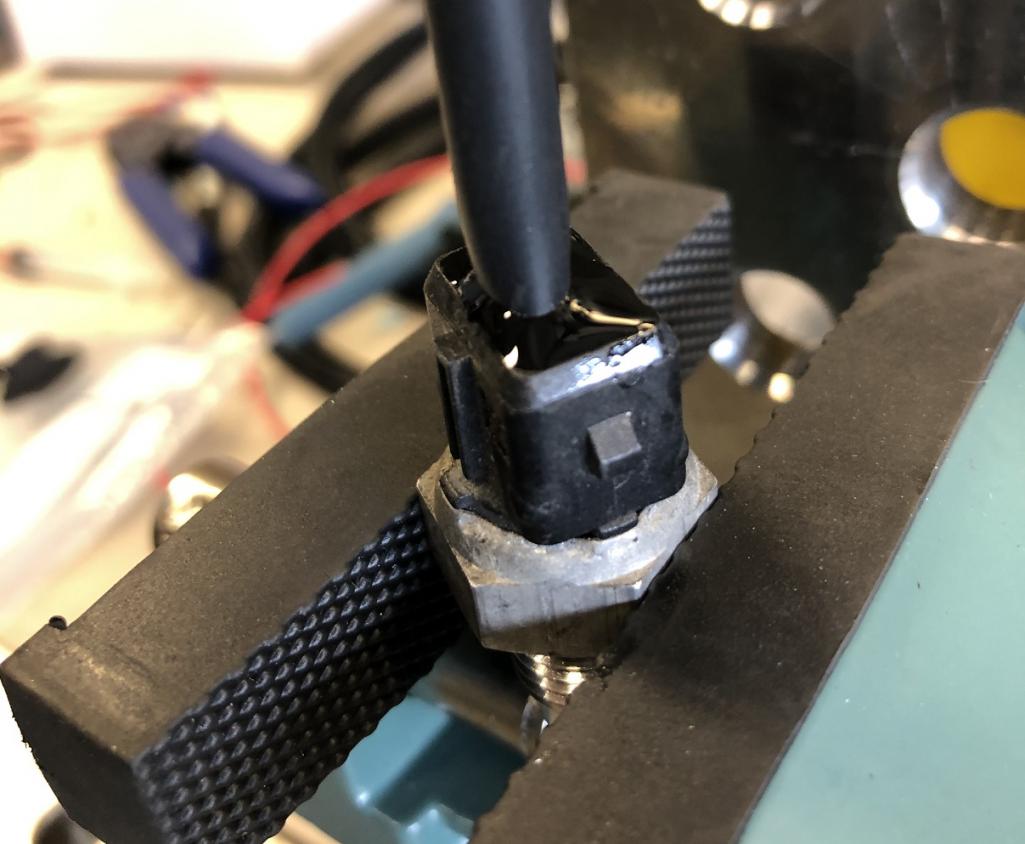
|
|
|
|
| tygaboy |
Jan 14 2022, 06:50 PM
Post
#3834
|
|
914 Guru Group: Members Posts: 5,844 Joined: 6-October 15 From: Petaluma, CA Member No.: 19,241 Region Association: Northern California |
Be sure everything is aligned and secure!
Once the potting compound is cured, I'll fully shrink the heat shrink then add a heat shrink boot that goes over the plastic part of the sensor and seals to it and the heat shrink you see here. That makes for one seriously reliable sensor! Attached thumbnail(s) 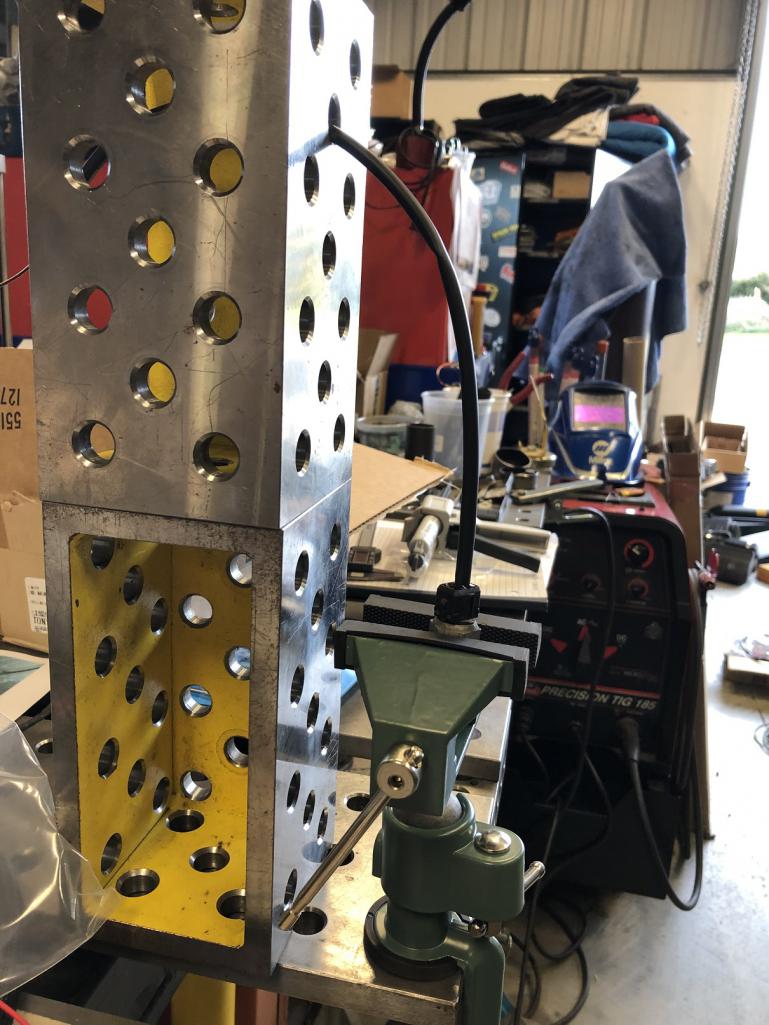
|
|
|
|
| tygaboy |
Jan 14 2022, 06:51 PM
Post
#3835
|
|
914 Guru Group: Members Posts: 5,844 Joined: 6-October 15 From: Petaluma, CA Member No.: 19,241 Region Association: Northern California |
I plan to do the same thing with my tail light housings. Remember, I have no trunk floor and those tail light wires are exposed to whatever the tires may toss up at them.
|
|
|
|
| tygaboy |
Jan 15 2022, 03:07 PM
Post
#3836
|
|
914 Guru Group: Members Posts: 5,844 Joined: 6-October 15 From: Petaluma, CA Member No.: 19,241 Region Association: Northern California |
Done! Fully booted at the sensor and ready to go back in. On to the rest of the rear lighting harness.
Not that I'm fast at anything but making the mods to this sensor was probably a couple hours. And I'm using the "inexpensive" Deutsch DT series connectors. The two pin connector kit I used here is about $7. A 6-pin DT is about $15. A 5-pin Deutsch AutoSport connector kit is ~$140. Yes, like 10x the cost. (IMG:style_emoticons/default/blink.gif) So when you hear that costs for a full-on motorsports harnesses can get well past $20K, you'll know why! Attached image(s) 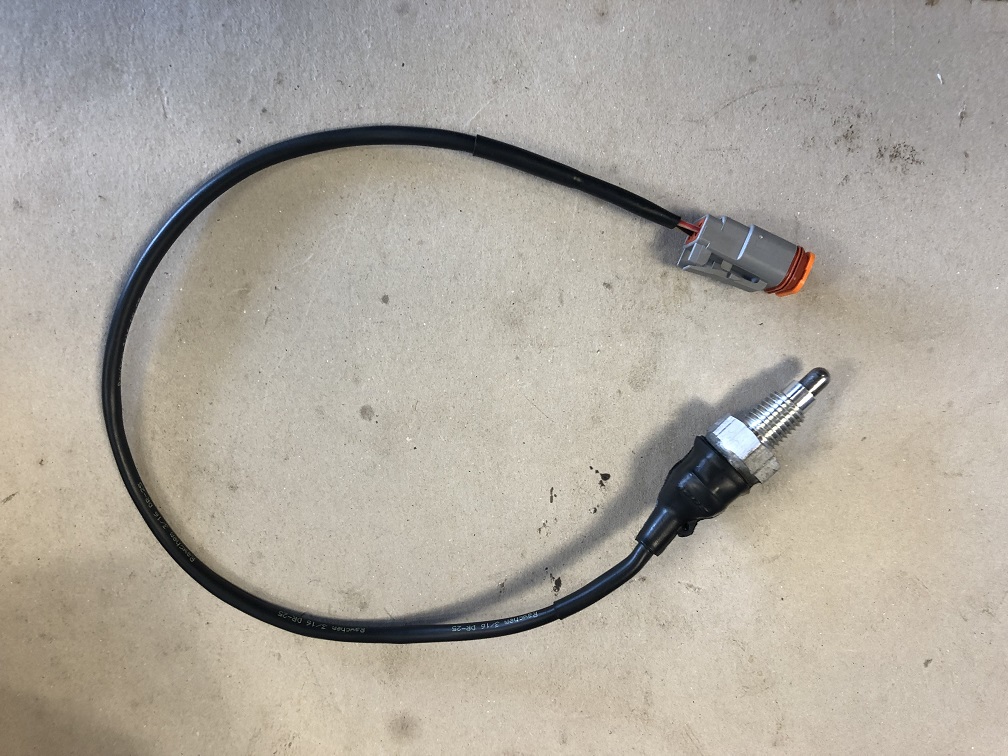
|
|
|
|
| willieg |
Jan 15 2022, 04:32 PM
Post
#3837
|
|
Member Group: Members Posts: 147 Joined: 13-August 18 From: Pleasant Hill Member No.: 22,389 Region Association: Northern California |
Chris
About a year and a half ago, you recommended Deutsch connectors to me. And then I rewired a lot of my 914 using Deutsch connectors. Initially I was concerned about their durability but after many connects and disconnects, they have held up very well. Thanks for the tip. |
|
|
|
| Cracker |
Jan 15 2022, 05:54 PM
Post
#3838
|
|
Advanced Member Group: Members Posts: 2,148 Joined: 2-February 10 From: Atlanta (area) Member No.: 11,316 Region Association: South East States |
I know... (IMG:style_emoticons/default/biggrin.gif)
I do recall a conversation regarding wiring in which you said, "I don't want motorsports level wiring in the car..." Just say'n... (IMG:style_emoticons/default/shades.gif) Cracker QUOTE(tygaboy @ Jan 15 2022, 04:07 PM) So when you hear that costs for a full-on motorsports harnesses can get well past $20K, you'll know why! |
|
|
|
| Andyrew |
Jan 15 2022, 09:02 PM
Post
#3839
|
|
Spooling.... Please wait Group: Members Posts: 13,380 Joined: 20-January 03 From: Riverbank, Ca Member No.: 172 Region Association: Northern California |
Well that’s a far better method than my hot glue gun option!
Very nice work as usual Chris! |
|
|
|
| tygaboy |
Jan 17 2022, 07:43 PM
Post
#3840
|
|
914 Guru Group: Members Posts: 5,844 Joined: 6-October 15 From: Petaluma, CA Member No.: 19,241 Region Association: Northern California |
Back to chassis harness wiring. I'm replacing all the screw terminal blocks with Deutsch connectors. Here's the stock 914 ignition switch connector sheathed in DR25, sealed at the connector with a short section of adhesive lined heat shrink. This is a product called Raychem ATUM, for those who might be interested.
This particular connector is a DTP series - the P standing for "power". These have far larger terminals that can each handle 25 amps. Attached thumbnail(s) 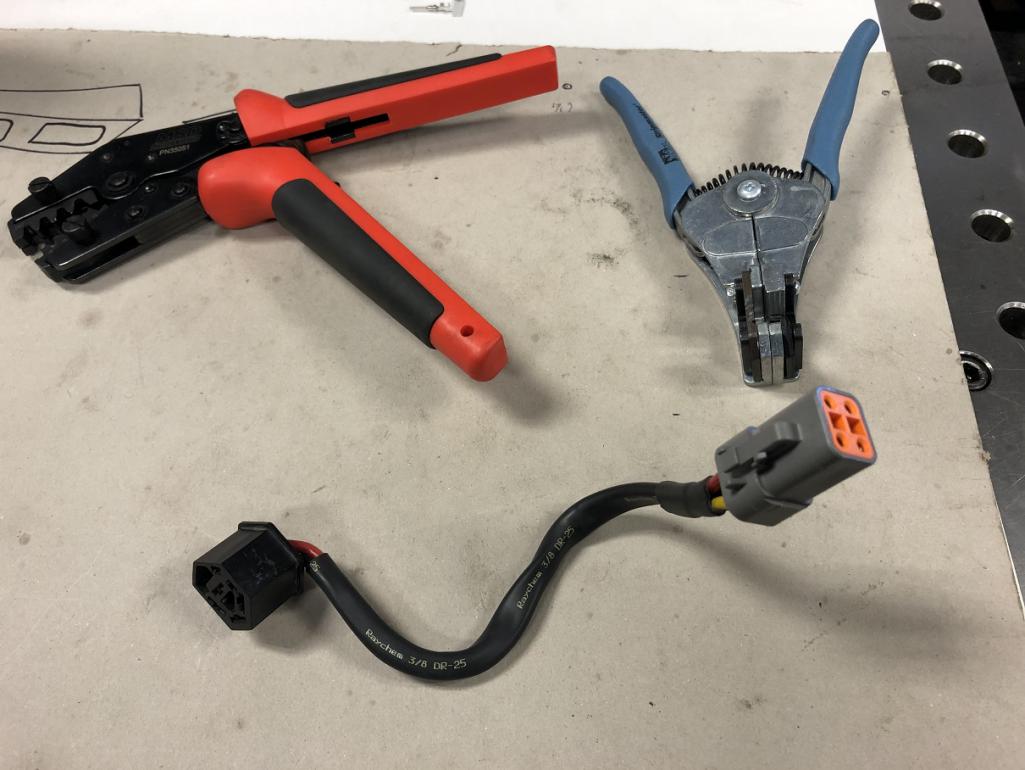
|
|
|
|
|
5 User(s) are reading this topic (5 Guests and 0 Anonymous Users)
0 Members:

|
Lo-Fi Version | Time is now: 19th July 2026 - 12:12 PM |
Invision Power Board
v9.1.4 © 2026 IPS, Inc.