|
|

|
Porsche, and the Porsche crest are registered trademarks of Dr. Ing. h.c. F. Porsche AG.
This site is not affiliated with Porsche in any way. Its only purpose is to provide an online forum for car enthusiasts. All other trademarks are property of their respective owners. |
|
|
  |
| Cairo94507 |
 Jan 23 2022, 10:13 AM Jan 23 2022, 10:13 AM
Post
#3861
|
|
Michael           Group: Members Posts: 10,531 Joined: 1-November 08 From: Auburn, CA Member No.: 9,712 Region Association: Northern California 
|
Man....this wiring is the bomb! I really need to get my butt up to Petaluma to see Chris. I want to talk to him about a really small wiring project.....
|
| tygaboy |
 Jan 23 2022, 10:45 AM Jan 23 2022, 10:45 AM
Post
#3862
|
|
914 Guru      Group: Members Posts: 5,727 Joined: 6-October 15 From: Petaluma, CA Member No.: 19,241 Region Association: Northern California 
|
Man....this wiring is the bomb! I really need to get my butt up to Petaluma to see Chris. I want to talk to him about a really small wiring project..... @Cairo94507 - Michael, The Red Barn is always open for you, my friend! Happy to help in any way I can, just let me know when and what you need. Hope you're quickly and happily settling in to your new place. |
| tygaboy |
 Jan 24 2022, 12:03 PM Jan 24 2022, 12:03 PM
Post
#3863
|
|
914 Guru      Group: Members Posts: 5,727 Joined: 6-October 15 From: Petaluma, CA Member No.: 19,241 Region Association: Northern California 
|
For fellow Wordle fans, I'm no spoiler so I waited a day, but yesterday's word was about as timely as they come!
Attached image(s) 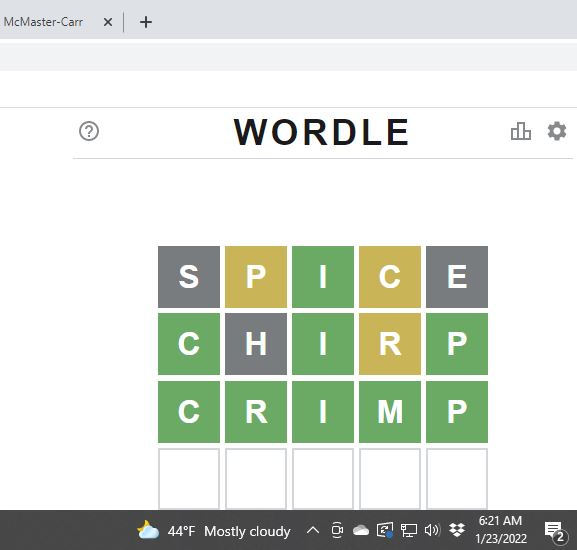
|
| tazz9924 |
 Jan 26 2022, 07:50 PM Jan 26 2022, 07:50 PM
Post
#3864
|
|
Senior Member    Group: Members Posts: 753 Joined: 31-May 15 From: Mooresville NC Member No.: 18,779 Region Association: None |
@tygaboy have you touched racerbenz lately?
|
| tygaboy |
 Jan 27 2022, 02:22 PM Jan 27 2022, 02:22 PM
Post
#3865
|
|
914 Guru      Group: Members Posts: 5,727 Joined: 6-October 15 From: Petaluma, CA Member No.: 19,241 Region Association: Northern California 
|
|
| tazz9924 |
 Jan 27 2022, 08:27 PM Jan 27 2022, 08:27 PM
Post
#3866
|
|
Senior Member    Group: Members Posts: 753 Joined: 31-May 15 From: Mooresville NC Member No.: 18,779 Region Association: None |
@tazz9924 - No RacerBenz work. The Red Barn only has room for one car at a time so the Benz is in the house garage until the 914 is back running. I'll post on the GrassRoots build thread as soon as I get back to it. I just started posting stuff on grm and i remembered you had racerbenz on there. |
| tygaboy |
 Jan 28 2022, 05:03 PM Jan 28 2022, 05:03 PM
Post
#3867
|
|
914 Guru      Group: Members Posts: 5,727 Joined: 6-October 15 From: Petaluma, CA Member No.: 19,241 Region Association: Northern California 
|
Well, it's done. My fire wall has a hole in it. Measured a lot, used a 1.5" RotaBroach hole cutter. Great tool. Highly recommended for cutting holes in sheet.
That said, the bulkhead connector needs a hole that's just over 1.5" and has a flat spot at the top that helps prevent the connector from spinning in the hole - the connector has a flat spot, too. Anyway, I cut the 1.5" hole, used a file to create the needed flat spot then carefully opened up the hole with a barrel sander attachment on a pneumatic right angle grinder. Open the hole but keep it flat at the top... (IMG:style_emoticons/default/wacko.gif) It worked! I aged 3 years doing it, but it worked. Here's the hole and the connector in place, along with a brand new ECU harness that I chopped to rough length. This had better work! Attached thumbnail(s) 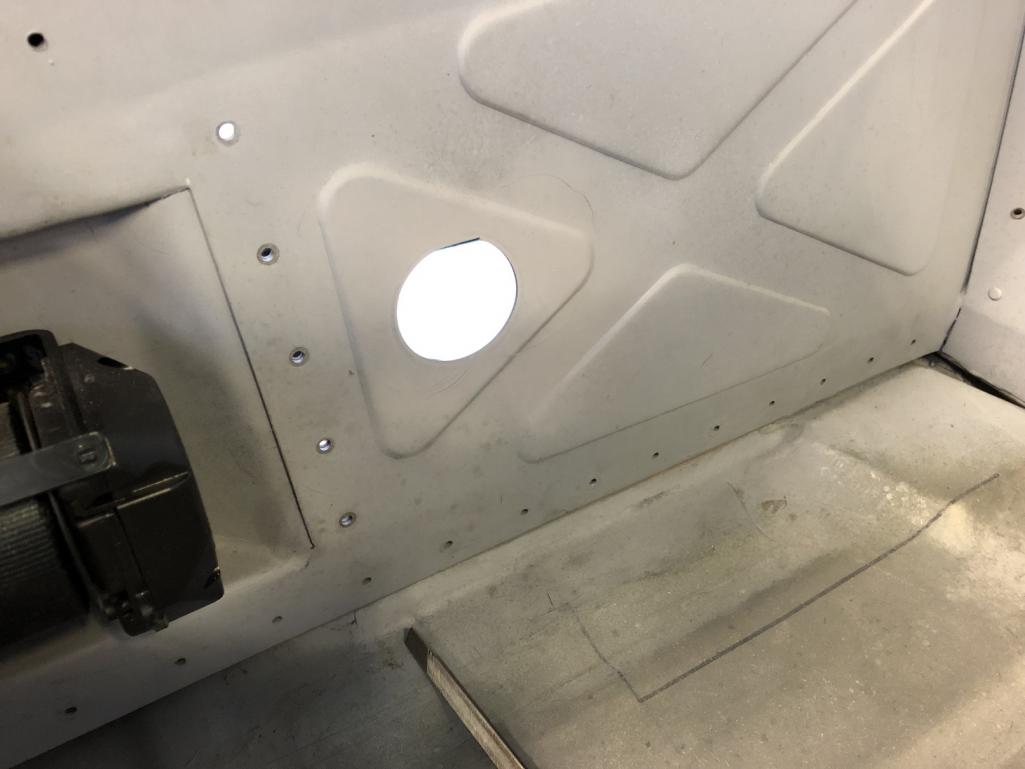 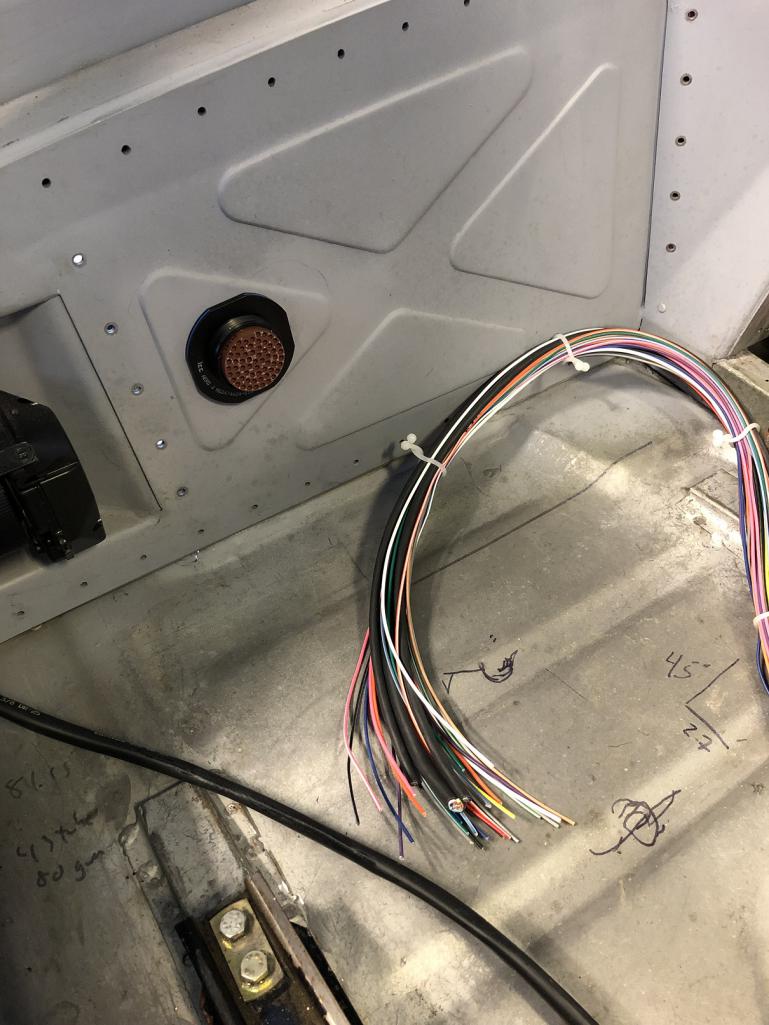
|
| tygaboy |
 Jan 28 2022, 05:14 PM Jan 28 2022, 05:14 PM
Post
#3868
|
|
914 Guru      Group: Members Posts: 5,727 Joined: 6-October 15 From: Petaluma, CA Member No.: 19,241 Region Association: Northern California 
|
Before I can sheath the various sections of wiring, I first need to have all the wires run to/from the appropriate locations. This means EVERYTHING has to be in place. One of the things I've been putting off is the seat heater wiring.
It's fun because I have to work out a way to disconnect the wiring from the seats in order to install/remove and make sure nothing gets pinched doing that - or simply adjusting them when they're in the car. Then there're the heater switches. I ordered the seats with remote heater switches and wanted them to go in the removable console cover. After noodling on it for what seemed like hours, I realized they'd fit in the cup holder. This works out great because to remove the console cover, I just lift out the cup holder, unplug the lead to each switch and out comes the console. (IMG:style_emoticons/default/smilie_pokal.gif) I need to figure out a way to see these simple solutions sooner in my design process. And if anyone asks, that's a cup holder from the back seat of a 2004 Ram pickup. I have one and in looking at the cup holder, I thought, "that looks like it'd work in the 914 console..." It did! Attached thumbnail(s) 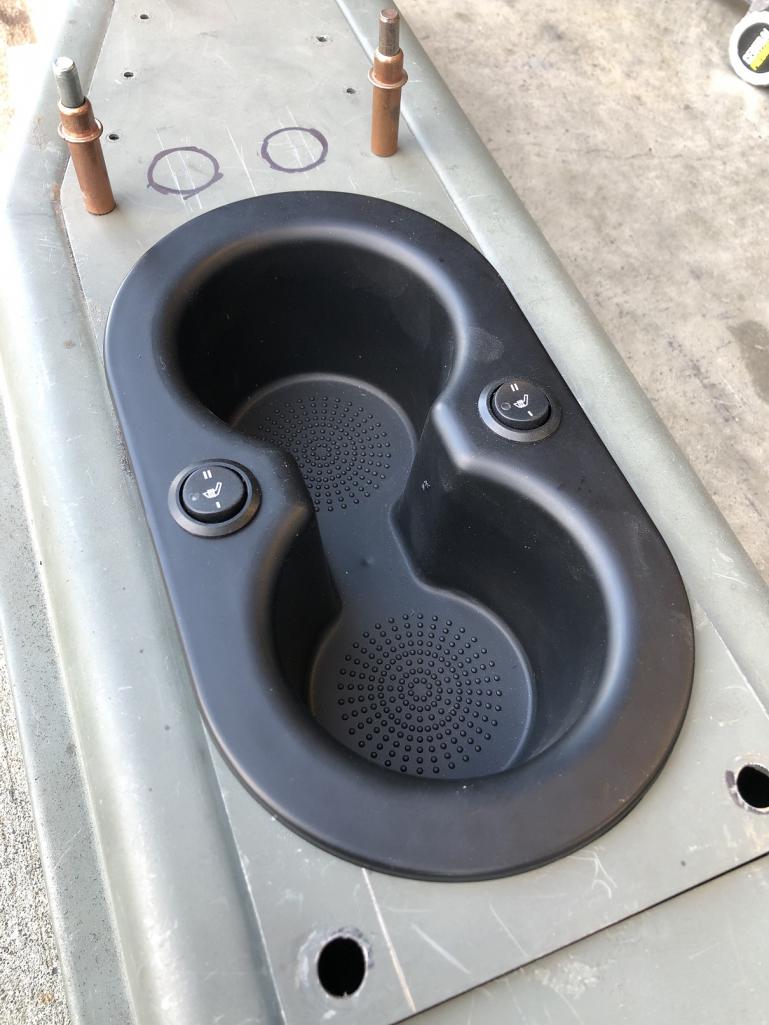
|
| Cairo94507 |
 Jan 29 2022, 08:05 AM Jan 29 2022, 08:05 AM
Post
#3869
|
|
Michael           Group: Members Posts: 10,531 Joined: 1-November 08 From: Auburn, CA Member No.: 9,712 Region Association: Northern California 
|
Hey Chris- Love the seat heater switches in the cup holder. Very clean. (IMG:style_emoticons/default/beerchug.gif)
|
| tygaboy |
 Jan 29 2022, 03:10 PM Jan 29 2022, 03:10 PM
Post
#3870
|
|
914 Guru      Group: Members Posts: 5,727 Joined: 6-October 15 From: Petaluma, CA Member No.: 19,241 Region Association: Northern California 
|
Tool Whore ALERT:
These are Ideal StripMaster "Standard" strippers. Yes, I cheaped out and went with their least expensive model (still a bit pricey). Don't pick on me, they work really well. They also support the adjustable stop you see on the right side. This is a must have when it comes to the Mil-Spec and AutoSport connectors as the terminals require a very precise strip length. A couple test strips to get it set correctly and from then on, it's like a production line! (IMG:style_emoticons/default/aktion035.gif) I'll say it again: Having the right tool(s) makes all the difference. Attached thumbnail(s) 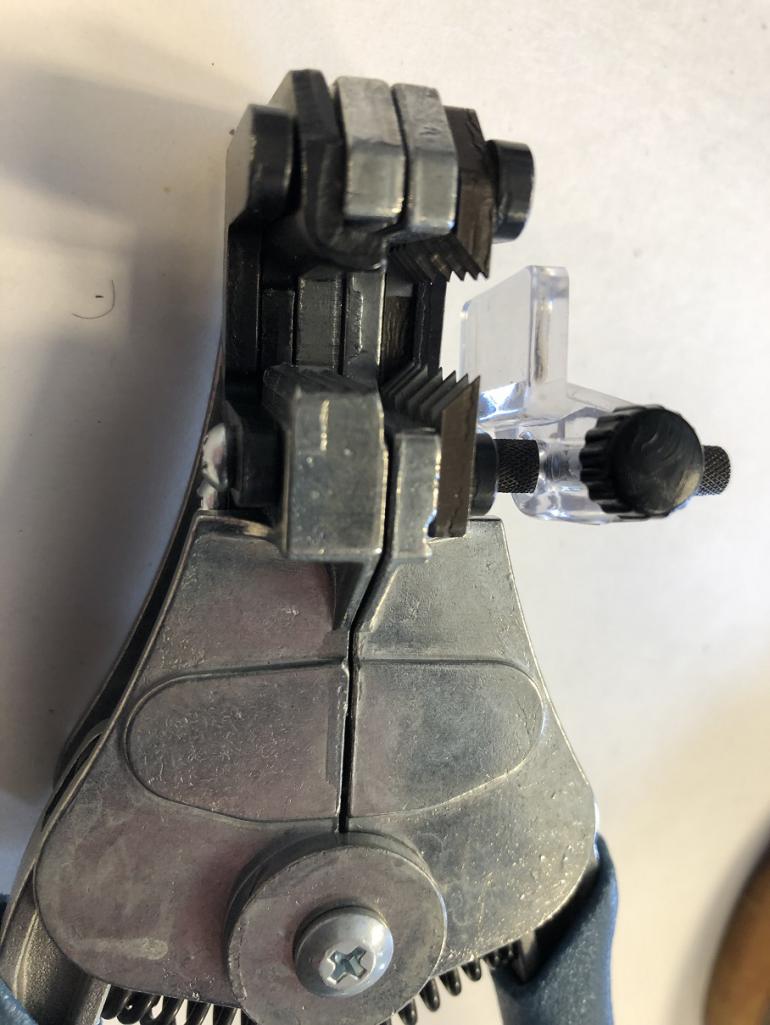
|
| tygaboy |
 Jan 30 2022, 05:10 PM Jan 30 2022, 05:10 PM
Post
#3871
|
|
914 Guru      Group: Members Posts: 5,727 Joined: 6-October 15 From: Petaluma, CA Member No.: 19,241 Region Association: Northern California 
|
Some sensors must use shielded cable to protect the signal from any interference. I have shielded cable for the cam, crank and O2 sensors and the DBW throttle body. When using a bulkhead connector, the shield itself must be terminated to an appropriate wire and contact at the connector. Then on the other side, the reverse needs to happen: wire back to shield.
The short bit of unshielded wire this creates doesn't introduce a significant risk of corrupting the signal, particularly in my case, where the connector isn't close to anything that generates electrical noise. Anyway, the technique for this is to crimp the shield to a wire that points "backwards", then flip things around, trim off the excess shield and seal the crimp joint with a length of SCL. I took a few tries to get that tiny, tiny open barrel crimp into the tool and both bits of conductor into it... old eyes aren't the best for this sort of work! (IMG:style_emoticons/default/wacko.gif) One side of one cable done, the rest to go. Attached image(s) 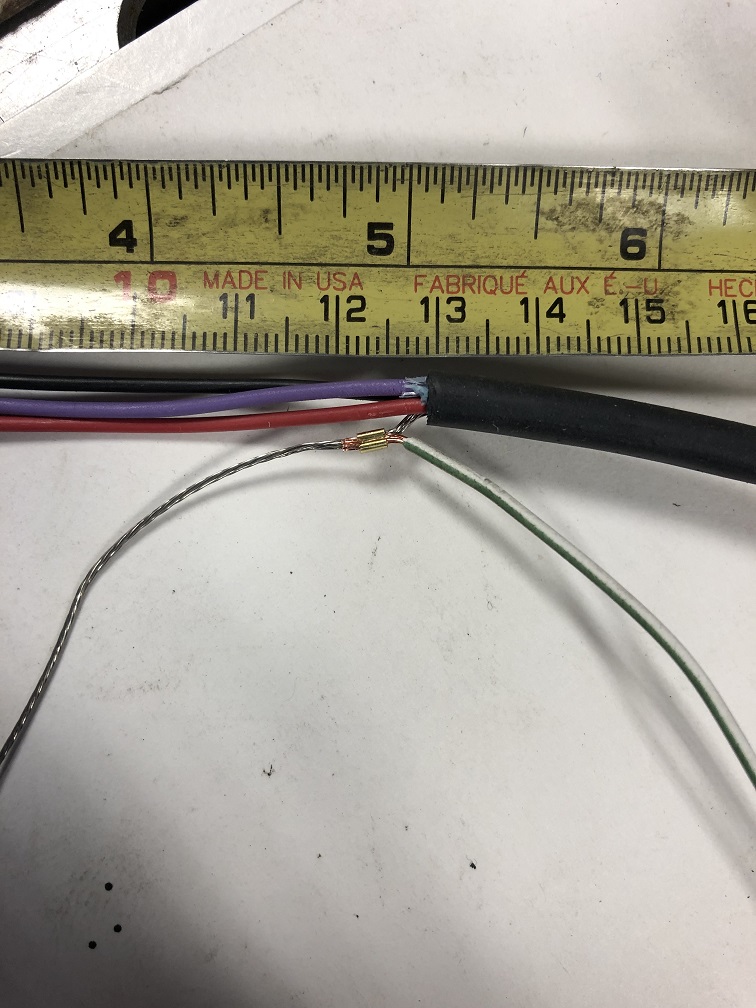 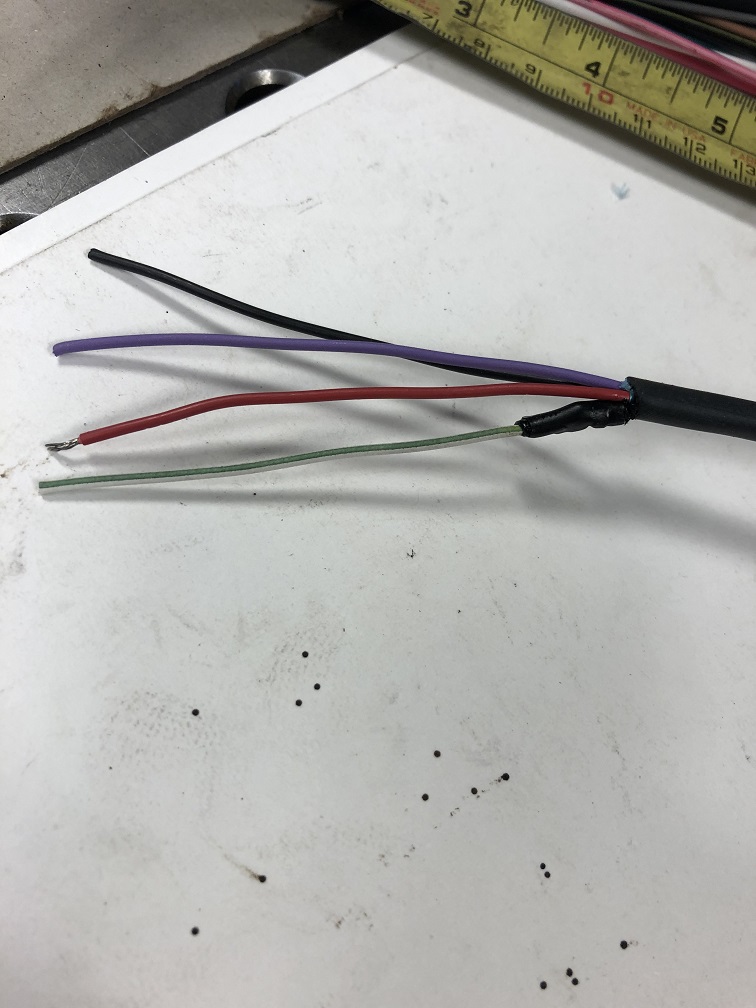
|
| tygaboy |
 Jan 30 2022, 05:21 PM Jan 30 2022, 05:21 PM
Post
#3872
|
|
914 Guru      Group: Members Posts: 5,727 Joined: 6-October 15 From: Petaluma, CA Member No.: 19,241 Region Association: Northern California 
|
I'm waiting on a few parts before I can finish the PMU/interior wiring harness routing so decided I'd try my hand at sheathing a section of harness that was ready for that step. In this case, it's the forward section of the chassis harness that runs the headlights, fog lights, running lights, signals and horn.
First, get the wires nice and tidily organized. There's a product called Kapton tape that works wonders. It's very thin yet incredibly strong and leaves no residue when/if you need to remove it. You can see some there in various places on the exposed wires. Once organized, measure the harness for diameter and use the closest sized DR-25 heat shrink. In this case, things measured out to use 3/8". Get the DR-25 over the wires. This is eased greatly by using isopropyl alcohol. I had none. (IMG:style_emoticons/default/wacko.gif) (IMG:style_emoticons/default/blink.gif) It took a bit but I got it done. Attached thumbnail(s) 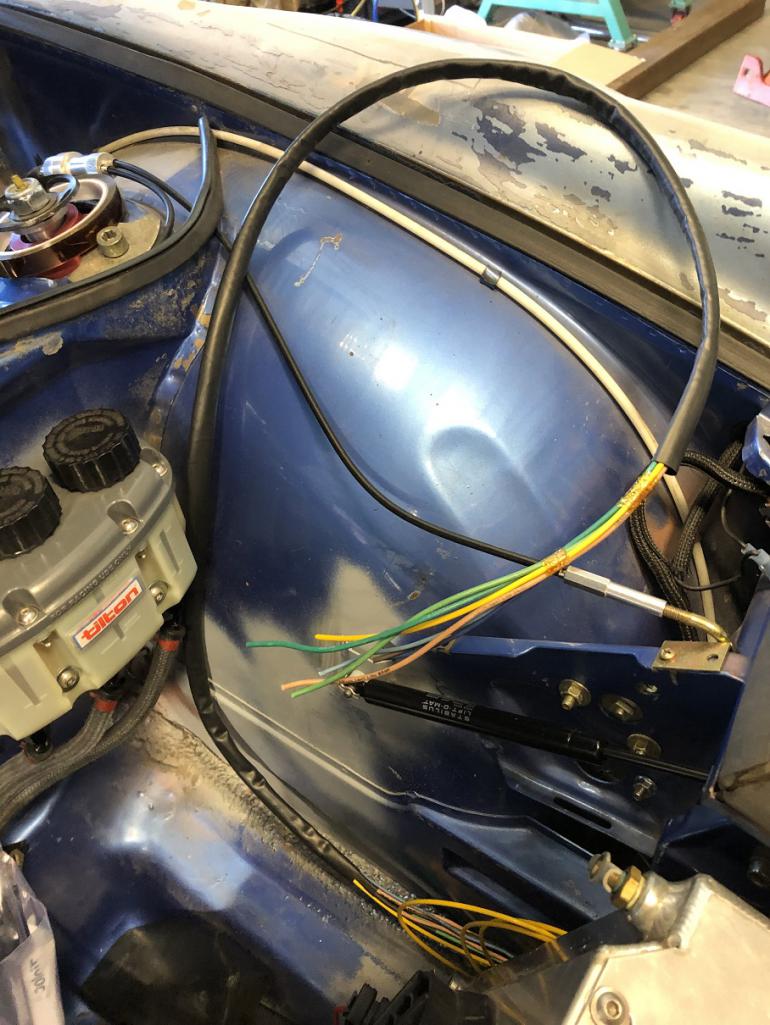 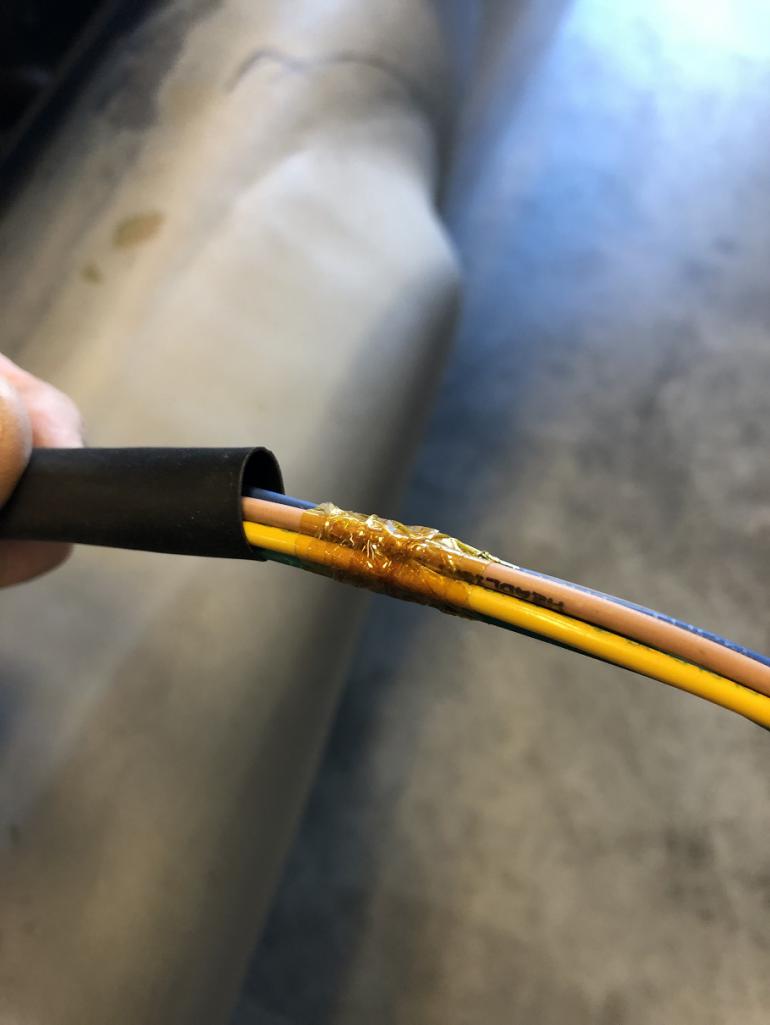
|
| tygaboy |
 Jan 30 2022, 05:25 PM Jan 30 2022, 05:25 PM
Post
#3873
|
|
914 Guru      Group: Members Posts: 5,727 Joined: 6-October 15 From: Petaluma, CA Member No.: 19,241 Region Association: Northern California 
|
Then it's sheath any separate branches that are ready, as well as the branch point itself.
Attached thumbnail(s) 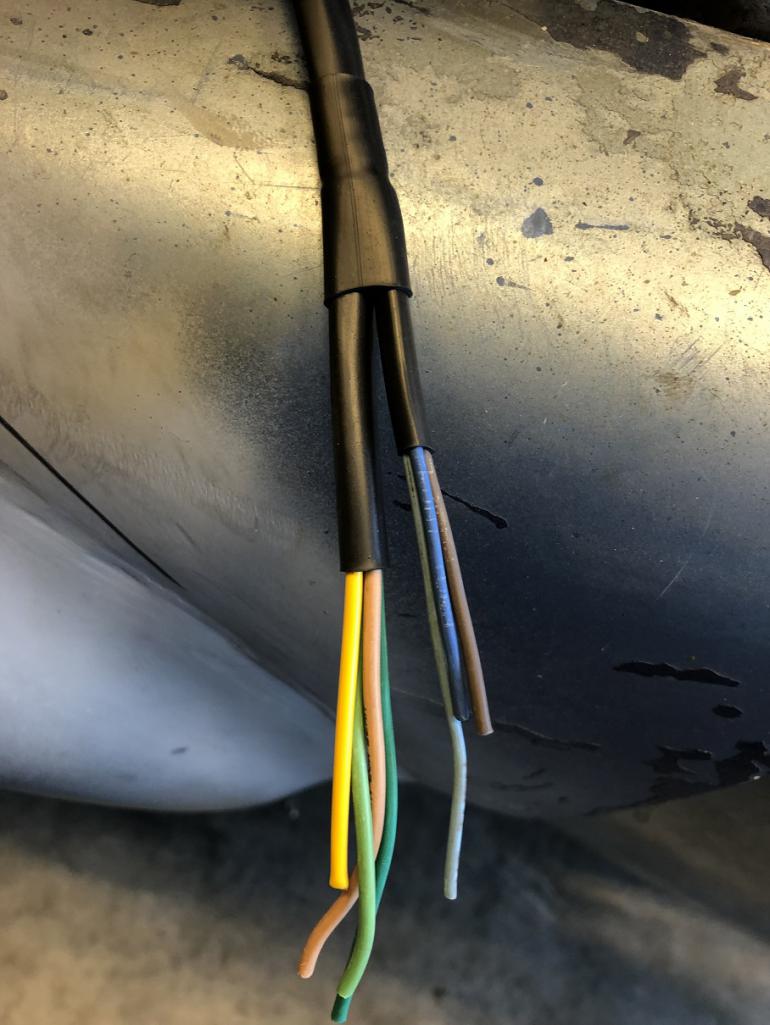
|
| tygaboy |
 Jan 30 2022, 05:34 PM Jan 30 2022, 05:34 PM
Post
#3874
|
|
914 Guru      Group: Members Posts: 5,727 Joined: 6-October 15 From: Petaluma, CA Member No.: 19,241 Region Association: Northern California 
|
Route the covered harness through the chassis, terminate/pin the wires and complete that side of each connector. It's best practice to add a cable tie at any branch point as a final bit of strain relief insurance.
Final point, in case you noticed: You can see I stopped the DR-25 just behind the radiator. That's because there is a branch point where the harness splits for the right/left side of the car's circuits. I'll feed the sheathing up each side's wiring to meet where I ended it today. Attached thumbnail(s) 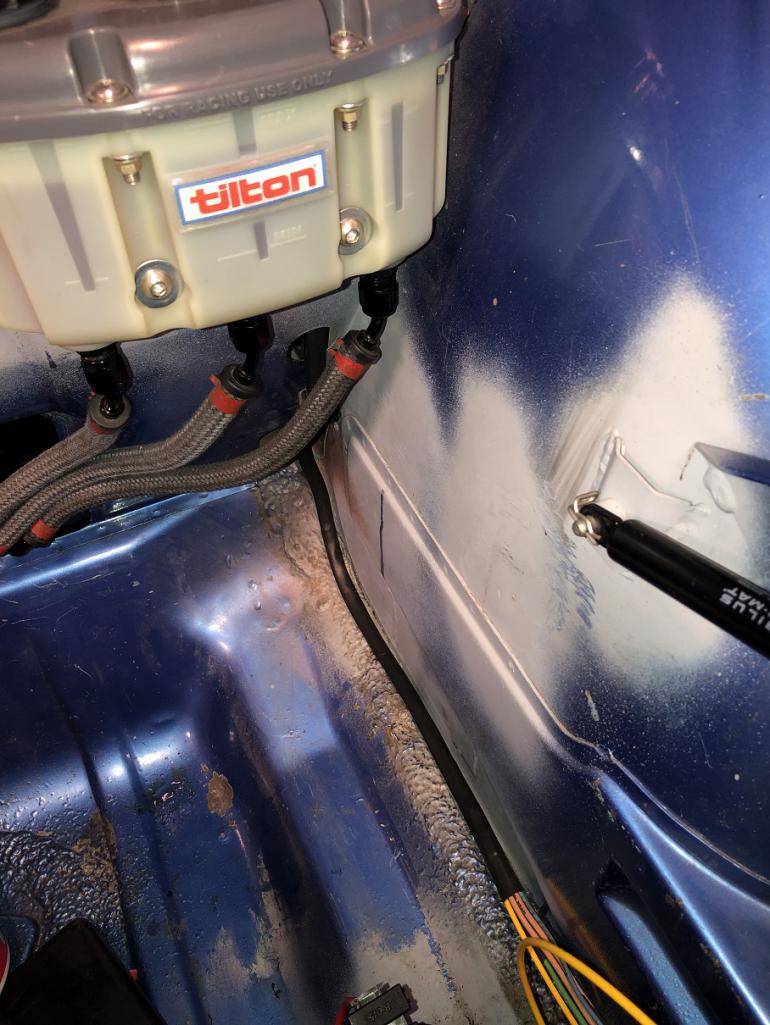 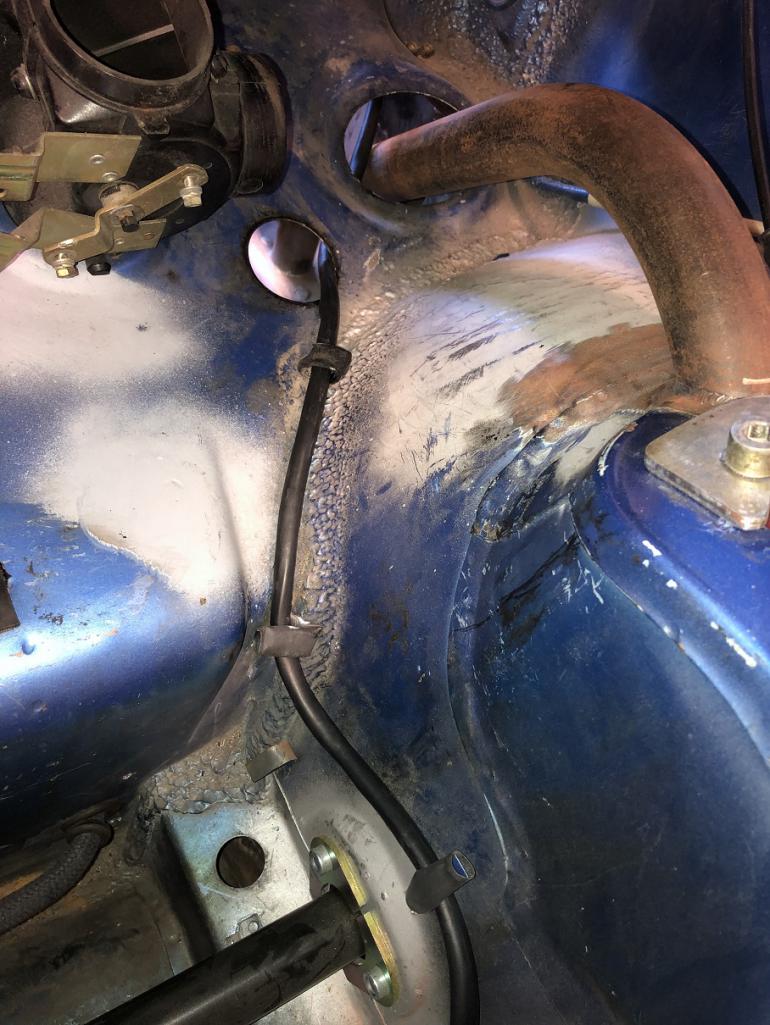 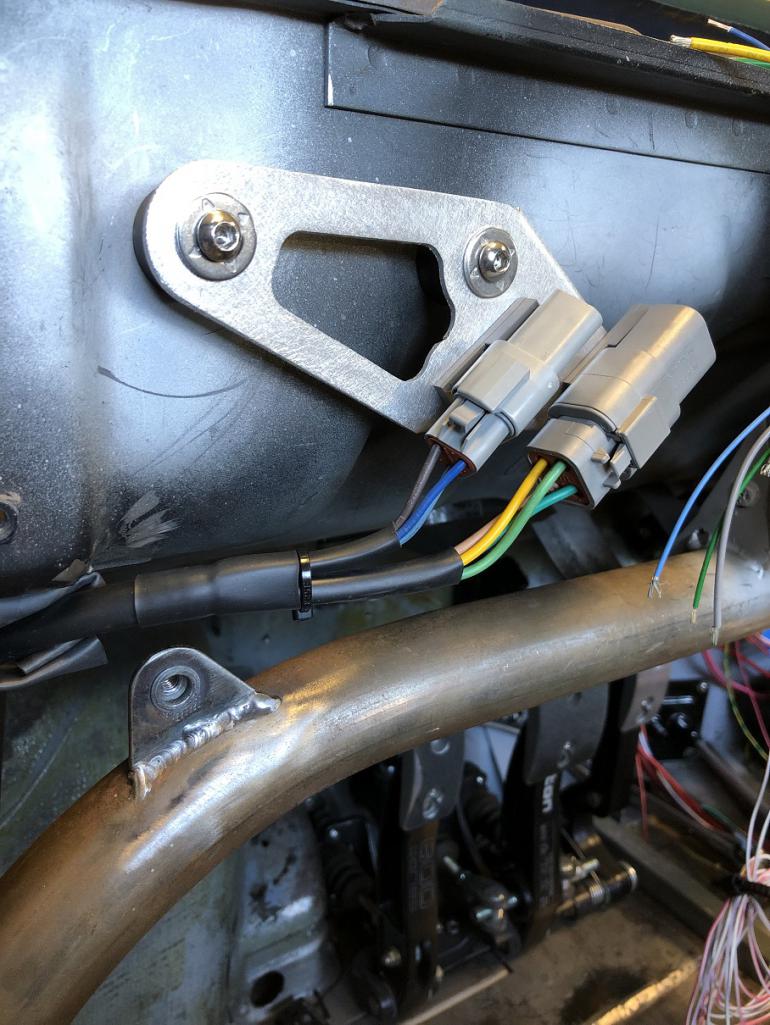
|
| Andyrew |
 Jan 30 2022, 05:49 PM Jan 30 2022, 05:49 PM
Post
#3875
|
|
Spooling.... Please wait           Group: Members Posts: 13,380 Joined: 20-January 03 From: Riverbank, Ca Member No.: 172 Region Association: Northern California 
|
Awesome stuff! The seat heaters are just perfect.
I’m real curious how those strippers function, does it slice the wire lengthways like it looks or is it something else? |
| Superhawk996 |
 Jan 30 2022, 07:03 PM Jan 30 2022, 07:03 PM
Post
#3876
|
|
914 Guru      Group: Members Posts: 7,595 Joined: 25-August 18 From: Woods of N. Idaho Member No.: 22,428 Region Association: Galt's Gulch 
|
Nice job with the sheathing. So many folks try to create strain relief out of the stuff and then it does exactly the opposite by actually stressing the transition into the connector.
Well done! (IMG:style_emoticons/default/smilie_pokal.gif) |
| jd74914 |
 Jan 30 2022, 08:57 PM Jan 30 2022, 08:57 PM
Post
#3877
|
|
Its alive     Group: Members Posts: 4,864 Joined: 16-February 04 From: CT Member No.: 1,659 Region Association: North East States |
I’m real curious how those strippers function, does it slice the wire lengthways like it looks or is it something else? They cut circumferentially like conventional stoppers they grip and pull away the wire leaving only the waste jacket. Really awesome products, albeit a bit expensive. Cheaper than the circular barrel DMV crimper though. Looking great Chris!! |
| tygaboy |
 Jan 31 2022, 09:16 AM Jan 31 2022, 09:16 AM
Post
#3878
|
|
914 Guru      Group: Members Posts: 5,727 Joined: 6-October 15 From: Petaluma, CA Member No.: 19,241 Region Association: Northern California 
|
Awesome stuff! The seat heaters are just perfect. I’m real curious how those strippers function, does it slice the wire lengthways like it looks or is it something else? @Andyrew - Quick demo of how this style stripper works starts at 3:00. https://www.youtube.com/watch?v=PbvxskRNoe0 |
| Shivers |
 Jan 31 2022, 09:30 AM Jan 31 2022, 09:30 AM
Post
#3879
|
|
Senior Member     Group: Members Posts: 3,214 Joined: 19-October 20 From: La Quinta, CA Member No.: 24,781 Region Association: Southern California |
Awesome stuff! The seat heaters are just perfect. I’m real curious how those strippers function, does it slice the wire lengthways like it looks or is it something else? @Andyrew - Quick demo of how this style stripper works starts at 3:00. https://www.youtube.com/watch?v=PbvxskRNoe0 All of it has been first rate work. Your whole build has been like educational TV. Can't wait to see how it comes out, but it will be like the end of M.A.S.H. |
| tygaboy |
 Feb 1 2022, 07:53 PM Feb 1 2022, 07:53 PM
Post
#3880
|
|
914 Guru      Group: Members Posts: 5,727 Joined: 6-October 15 From: Petaluma, CA Member No.: 19,241 Region Association: Northern California 
|
All of it has been first rate work. Your whole build has been like educational TV. Can't wait to see how it comes out, but it will be like the end of M.A.S.H. @Shivers - Thanks for the compliment. I've said it before and will repeat here: Virtually everything I've done on this build has been a "first time" attempt for me. This wiring stuff is no exception. I mentioned earlier that I signed up for HP Academy's online training courses and have poured over all their wiring offerings. Invaluable, to say the least. Hopefully, I've helped others be a bit less apprehensive about trying something new on their builds. |
  |
2 User(s) are reading this topic (2 Guests and 0 Anonymous Users)
0 Members:

|
Lo-Fi Version | Time is now: 21st December 2025 - 02:32 PM |
Invision Power Board
v9.1.4 © 2025 IPS, Inc.


