|
|
|
Porsche, and the Porsche crest are registered trademarks of Dr. Ing. h.c. F. Porsche AG.
This site is not affiliated with Porsche in any way. Its only purpose is to provide an online forum for car enthusiasts. All other trademarks are property of their respective owners. |
|
|

  |

| tygaboy |
 Feb 1 2022, 07:56 PM Feb 1 2022, 07:56 PM
Post
#3881
|
|
914 Guru  Group: Members Posts: 5,844 Joined: 6-October 15 From: Petaluma, CA Member No.: 19,241 Region Association: Northern California |
Ahead of pinning the bulkhead connector, I configured/verified and tested all the connections from the ECU plugs to the wire ends. This was also a chance to start preparing some of the formal ECU-to-bulkhead-connector wiring documentation.
I figured this will help ease any concerns the next owner may have about what's what, harness-wise. Attached thumbnail(s) 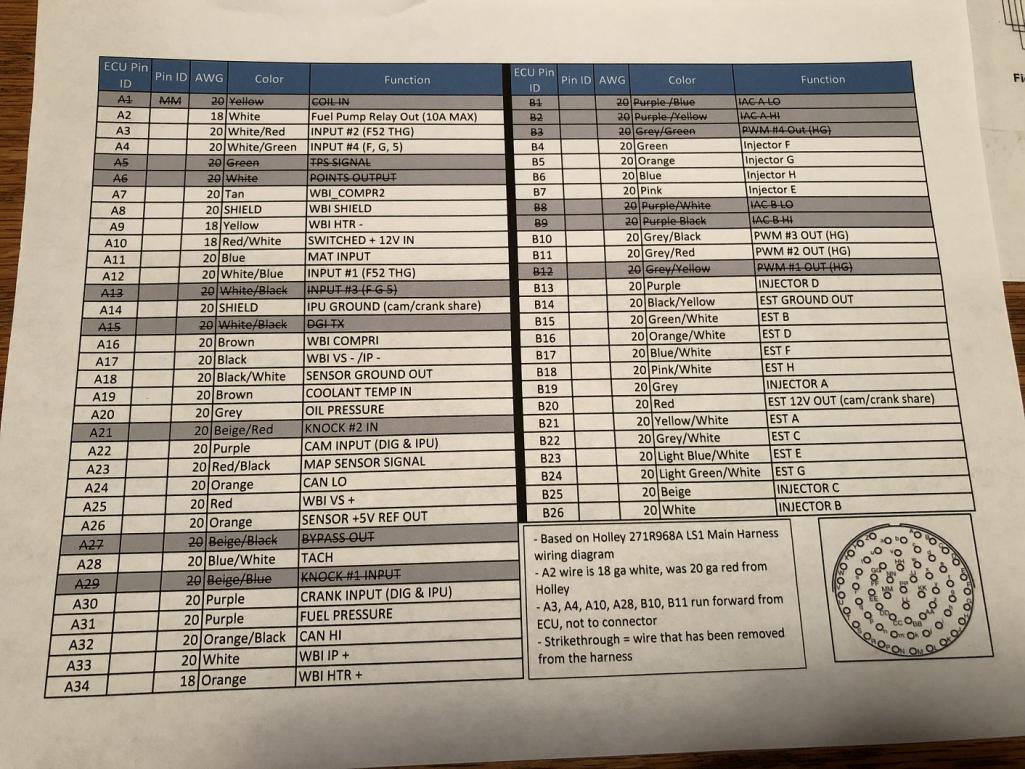
|
   |

 
|
| Andyrew |
Feb 2 2022, 04:24 PM
Post
#3882
|
|
Spooling.... Please wait Group: Members Posts: 13,381 Joined: 20-January 03 From: Riverbank, Ca Member No.: 172 Region Association: Northern California |
QUOTE(tygaboy @ Jan 31 2022, 07:16 AM)  QUOTE(Andyrew @ Jan 30 2022, 03:49 PM) Awesome stuff! The seat heaters are just perfect. I’m real curious how those strippers function, does it slice the wire lengthways like it looks or is it something else? @Andyrew - Quick demo of how this style stripper works starts at 3:00. https://www.youtube.com/watch?v=PbvxskRNoe0 Ahhhh got it. Your pic made it look like just blades vertically but they are circular cutouts for the wire. Makes sense (IMG:style_emoticons/default/smile.gif) |
|
|
|
| tygaboy |
Feb 4 2022, 07:04 PM
Post
#3883
|
|
914 Guru Group: Members Posts: 5,844 Joined: 6-October 15 From: Petaluma, CA Member No.: 19,241 Region Association: Northern California |
The Holley engine harness is wrapped with the split nylon covering but has nothing going on right at the connectors. These are the two main plugs for the ECU and you can see it's just wire into the connector. Not bad... but certainly not good enough! (IMG:style_emoticons/default/laugh.gif)
Attached thumbnail(s) 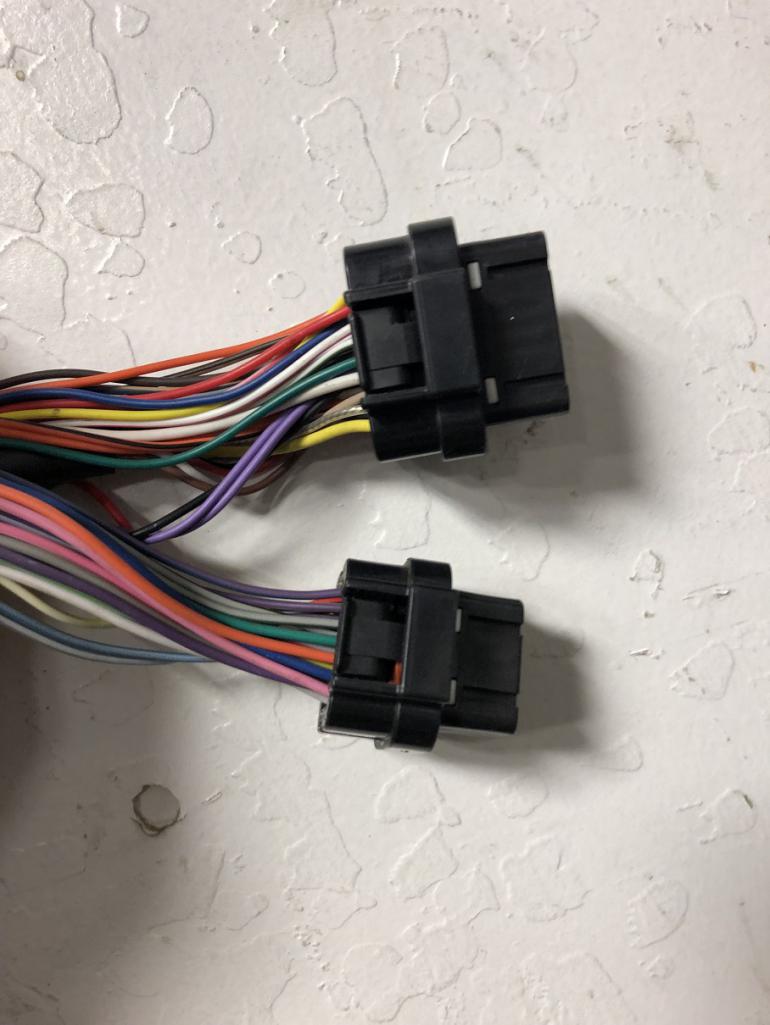
|
|
|
|
| tygaboy |
Feb 4 2022, 07:08 PM
Post
#3884
|
|
914 Guru Group: Members Posts: 5,844 Joined: 6-October 15 From: Petaluma, CA Member No.: 19,241 Region Association: Northern California |
So I sourced what's called a "backshell" that fits quite snugly over the back of each connector and provides a lip for heat shrink boots. These connectors are now all but sealed and the wires are fully strain relieved and far more protected.
Way mo' betta. (IMG:style_emoticons/default/aktion035.gif) Attached thumbnail(s) 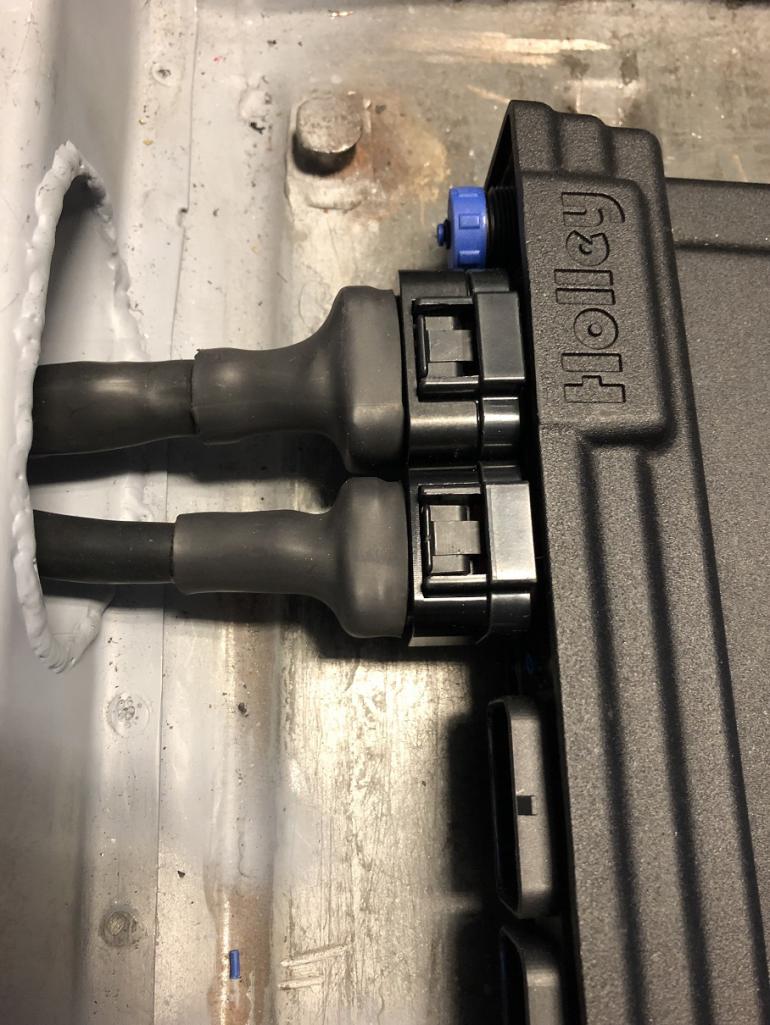
|
|
|
|
| tygaboy |
Feb 4 2022, 07:15 PM
Post
#3885
|
|
914 Guru Group: Members Posts: 5,844 Joined: 6-October 15 From: Petaluma, CA Member No.: 19,241 Region Association: Northern California |
What's taking me far longer than I'd expected is working out the routing for each section of harness. In the end, I opted to poke a hole in the corner of the console cover and route all the "front of car" ECU-related circuits down and out the side of the tunnel.
The two white connectors you see there power the seat heater. I still have a few more wires to run and then it's on to sheathing/pinning/testing/booting the ECU-to-bulkhead connector. Completing that will be a major milestone. Gotta admit, I'm a little nervous. (IMG:style_emoticons/default/unsure.gif) Attached thumbnail(s) 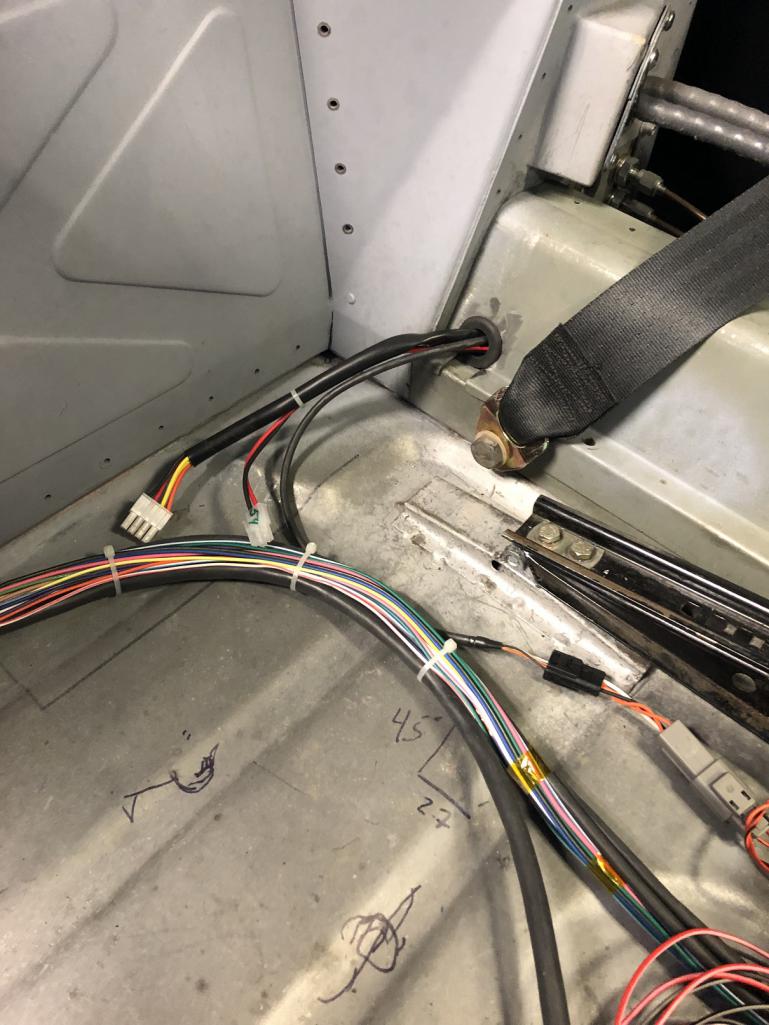
|
|
|
|
| tygaboy |
Feb 5 2022, 07:03 PM
Post
#3886
|
|
914 Guru Group: Members Posts: 5,844 Joined: 6-October 15 From: Petaluma, CA Member No.: 19,241 Region Association: Northern California |
Ahead of pinning the bulkhead connector, I decided to review a specific HP Academy training module about the process. Glad I did because they called out a situation I was going to face: multiple shield-to-insulated wire splices at the bulkhead connector. I'll have four of them. One each for the DBW throttle body, O2 sensor, cam and crank sensors.
This can be problematic in that things get pretty crowded in that area so (as they say!) size matters! (IMG:style_emoticons/default/laugh.gif) There's a product that helps in a case like this: a solder sleeve. It's just what it sounds like: a bit of heat shrink with a low-melt solder built in! Simply prep the wire ends, slip them in and use the heat gun to heat shrink and melt the solder. It's nice because the red color around the solder dissipates to show it's been appropriately melted. So OK, I lied. Turns out there will be a bit of solder in the harness. The good news is that this is "approved" at the motorsport level because the product is well proven and with the Kapton tape AND sealed boot, the chances of a failure are almost zero. Well past what I need for my application, in any case. For your viewing pleasure, here's a solder sleeve "before and after: Attached thumbnail(s) 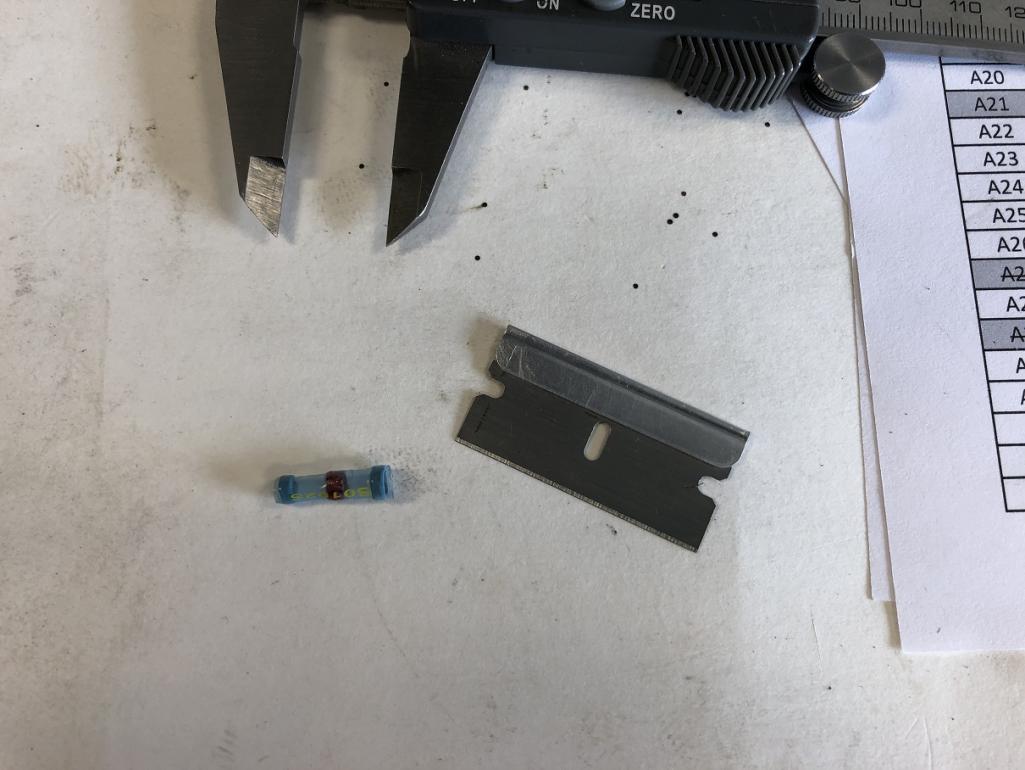 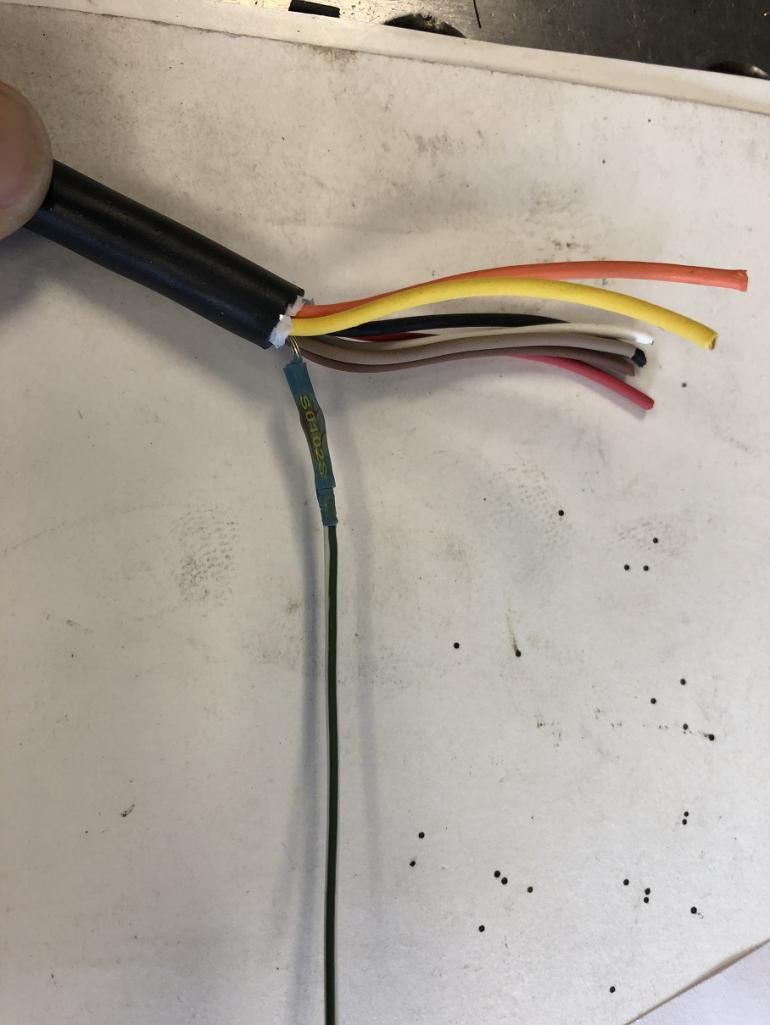
|
|
|
|
| tygaboy |
Feb 5 2022, 07:05 PM
Post
#3887
|
|
914 Guru Group: Members Posts: 5,844 Joined: 6-October 15 From: Petaluma, CA Member No.: 19,241 Region Association: Northern California |
I decided to start with pinning the DBW cable. It's seven conductors plus the shield.
It was also the first time using the DMC crimp tool. I'll get a video of that later but it works a treat! But for now, here's my first foray into the world of mil-spec. So far, so good. Attached thumbnail(s) 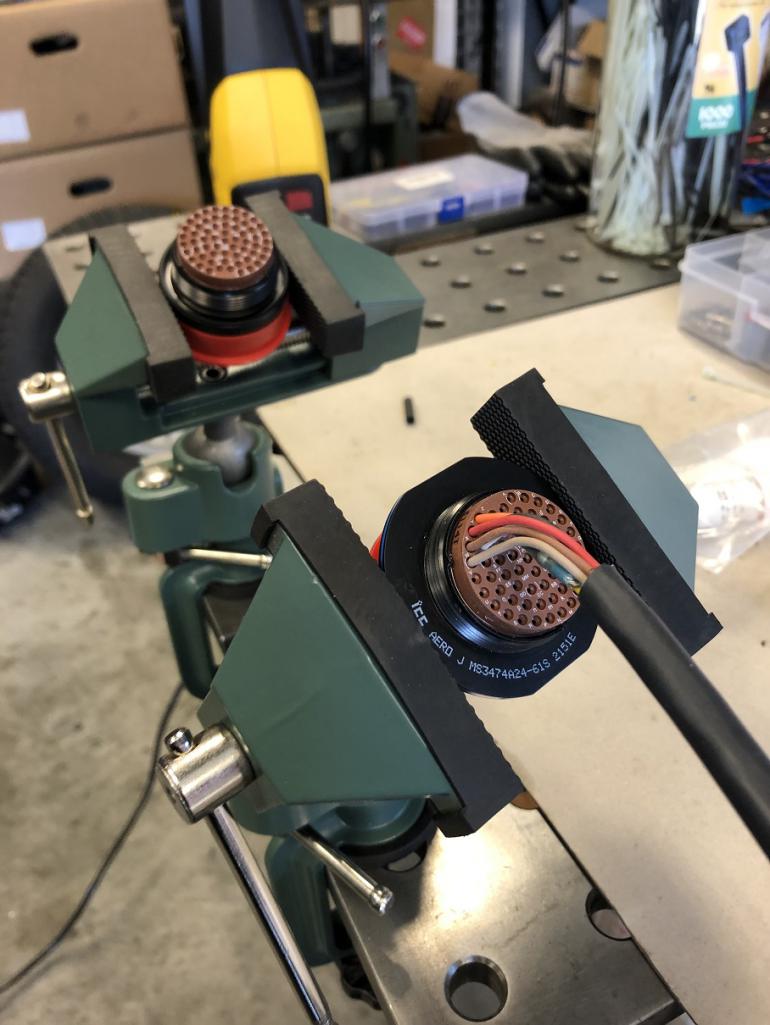
|
|
|
|
| tygaboy |
Feb 5 2022, 07:14 PM
Post
#3888
|
|
914 Guru Group: Members Posts: 5,844 Joined: 6-October 15 From: Petaluma, CA Member No.: 19,241 Region Association: Northern California |
But then things got a bit messier. (IMG:style_emoticons/default/wacko.gif)
I'm getting better with every "strip, wire into terminal, crimp, test, insert into connector" and it's satisfying if not tedious work. Here, I got the all the crank sensor connections pinned. Only about 45 more wires to go! And if you're anywhere near the age of most of us typical 914 owners, keep a magnifying glass handy! Everything about this is TINY, from the pinout labeling on the connectors to the terminals, to the 20 and 22 ga wires... Attached thumbnail(s) 
|
|
|
|
| bkrantz |
Feb 5 2022, 10:11 PM
Post
#3889
|
|
914 Guru Group: Members Posts: 8,739 Joined: 3-August 19 From: SW Colorado Member No.: 23,343 Region Association: Rocky Mountains |
At my age, as soon as I start working with small bits, I put one of these on.
https://www.amazon.com/Donegan-OptiVisor-He...776071&th=1 |
|
|
|
| Cairo94507 |
Feb 6 2022, 08:39 AM
Post
#3890
|
|
Michael Group: Members Posts: 10,716 Joined: 1-November 08 From: Auburn, CA Member No.: 9,712 Region Association: Northern California |
|
|
|
|
| tygaboy |
Feb 6 2022, 07:31 PM
Post
#3891
|
|
914 Guru Group: Members Posts: 5,844 Joined: 6-October 15 From: Petaluma, CA Member No.: 19,241 Region Association: Northern California |
One side of the connector complete! I learned a lot and thankfully, got pretty efficient at the process by the time I was done with what you see here. It still took me the better part of today to get to this point.
I made a couple mistakes and had a few do-overs but overall, I'm happy with this first effort. I'll get better from here! Next is a full pin-to-pin test and documentation validation for this section of the harness. Assuming all is well, it's time to recover the sheathing (that's the official term for heat shrinking the heat shrink!), recover the 90 degree boot and seal this thing up! And yes, I could have just used a grommet and passed the uncut harness through that hole in the fire wall. But what fun would that have been? (IMG:style_emoticons/default/av-943.gif) Attached thumbnail(s) 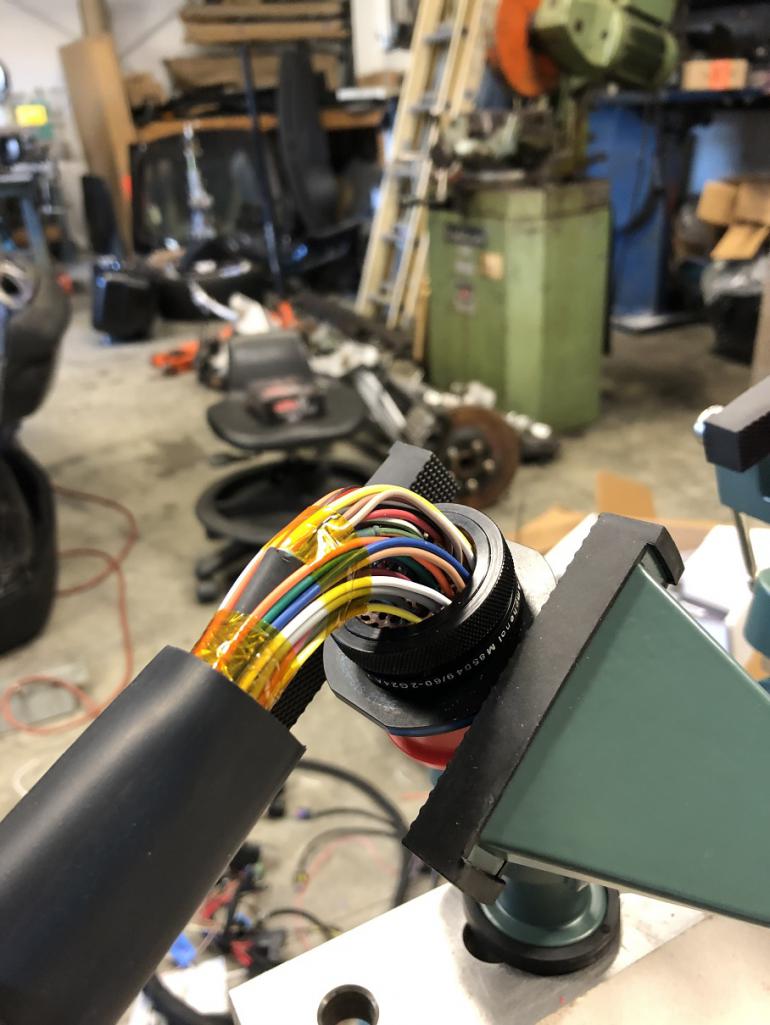 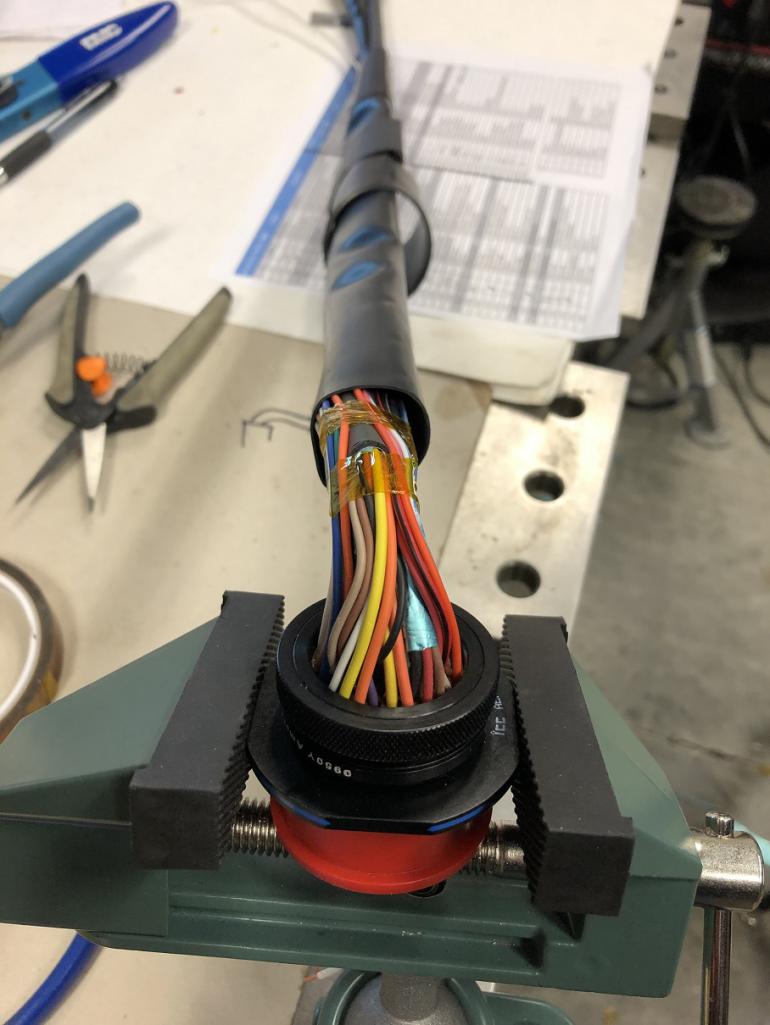 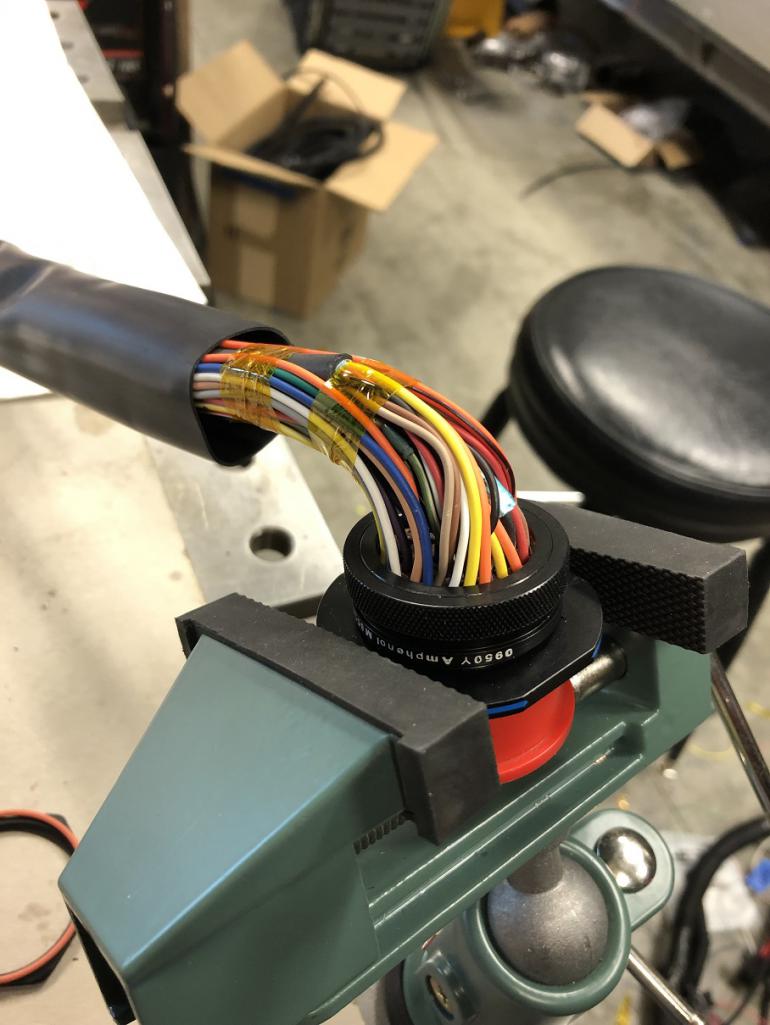
|
|
|
|
| cassmcentee |
Feb 6 2022, 07:43 PM
Post
#3892
|
|
Member Group: Members Posts: 243 Joined: 12-July 18 From: Squaw Valley, CA Member No.: 22,304 Region Association: Central California |
Awesome!
Learning keeps us Young |
|
|
|
| tygaboy |
Feb 7 2022, 04:24 PM
Post
#3893
|
|
914 Guru Group: Members Posts: 5,844 Joined: 6-October 15 From: Petaluma, CA Member No.: 19,241 Region Association: Northern California |
All needed connections complete and tested. No issues with any of the connections! (IMG:style_emoticons/default/cheer.gif)
Next, I worked out the angle I wanted the wires to exit the connector and used Kapton tape to secure and support everything. Attached thumbnail(s) 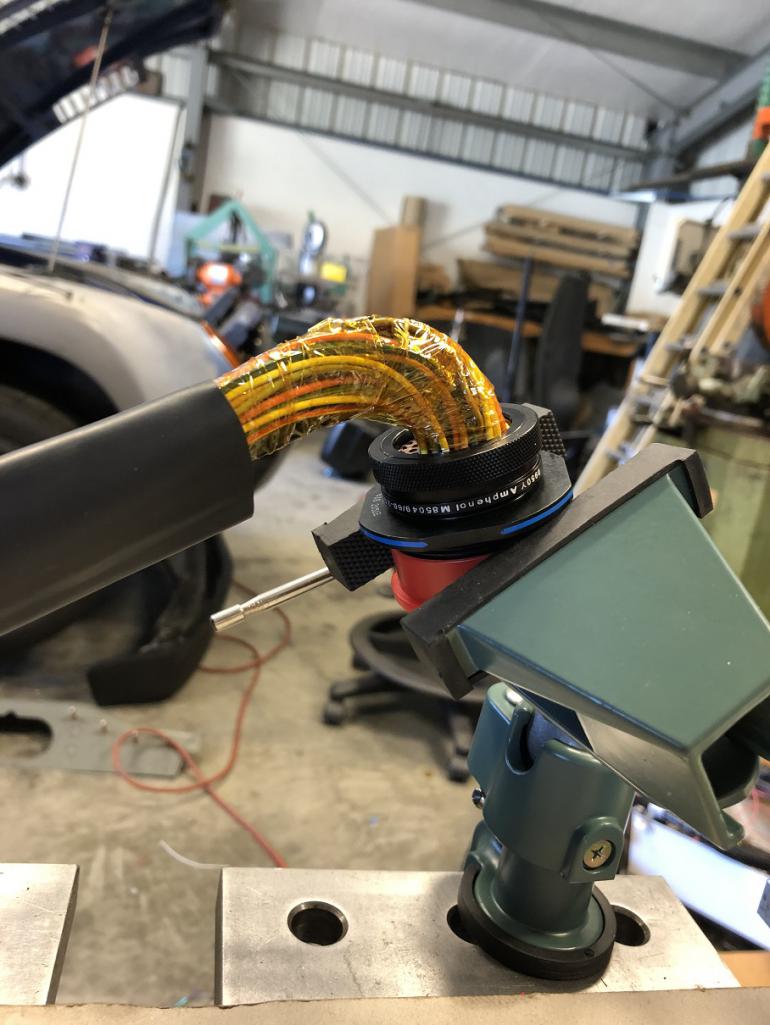 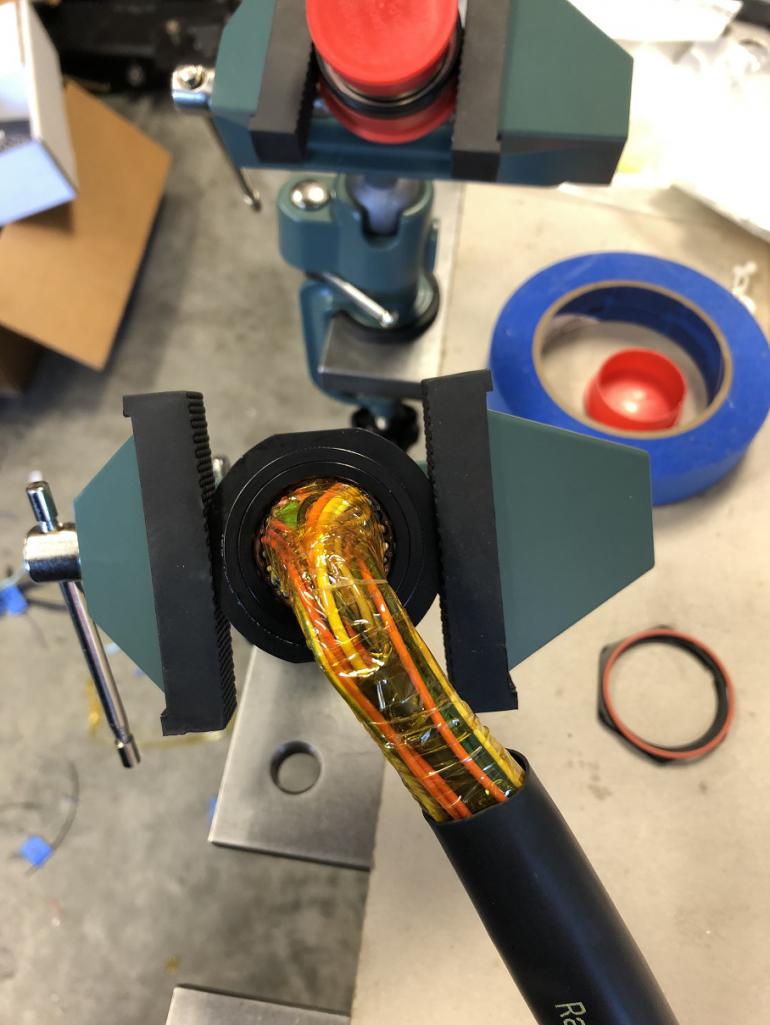
|
|
|
|
| tygaboy |
Feb 7 2022, 04:37 PM
Post
#3894
|
|
914 Guru Group: Members Posts: 5,844 Joined: 6-October 15 From: Petaluma, CA Member No.: 19,241 Region Association: Northern California |
Next was to recover the DR-25 sheathing and the 90 degree boot. I probably should have video'd the process but to be honest, this was my first time and I decided I'd just focus on the process. There will be other opportunities to capture this stuff so until then, here's what it looks like when it's done and installed. I have to say, it's crazy how tidy this makes things. It really looks the business! (IMG:style_emoticons/default/wub.gif)
Overall, I'm pretty happy with this first effort. I'll admit that this level of wiring and "finish work" had me a little intimidated when I started. Turns out that, like most other stuff, it's not too bad once you get a bit of experience. So, if you're thinking of trying something new, I vote "go for it!" Attached image(s) 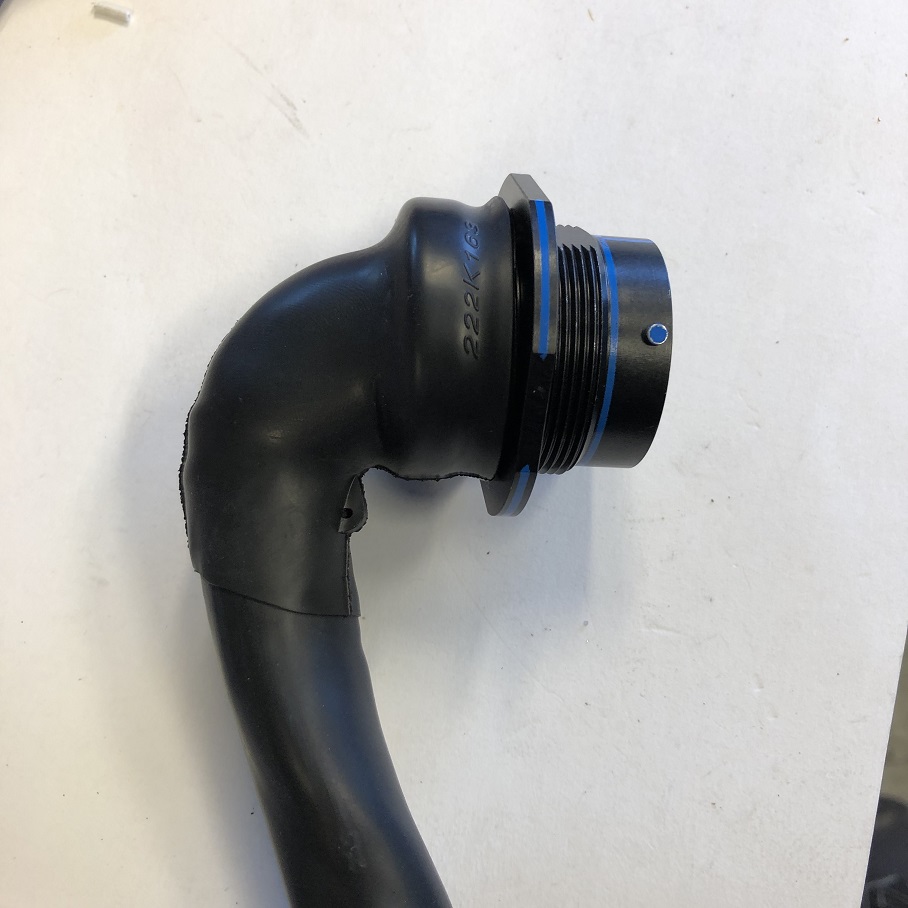 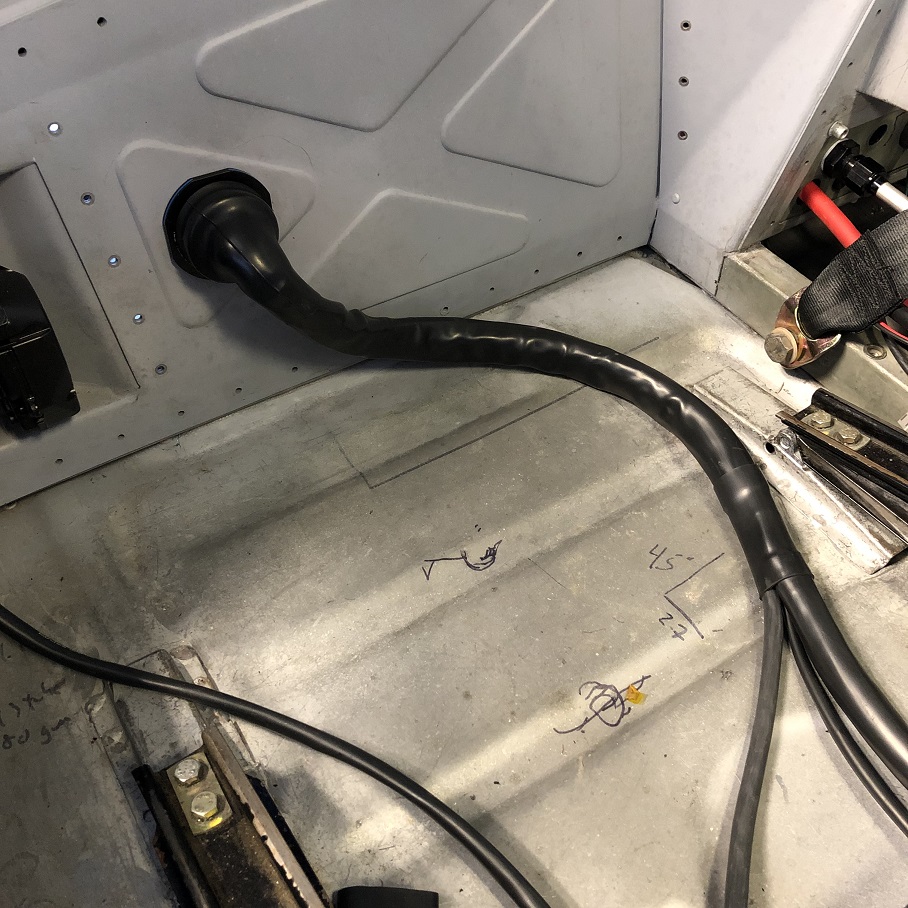
|
|
|
|
| tygaboy |
Feb 7 2022, 04:39 PM
Post
#3895
|
|
914 Guru Group: Members Posts: 5,844 Joined: 6-October 15 From: Petaluma, CA Member No.: 19,241 Region Association: Northern California |
A bit hard to see but with the seat all the way back, it's all good. No interfernce, just like I'd measured/planned! (IMG:style_emoticons/default/smilie_pokal.gif)
Attached thumbnail(s) 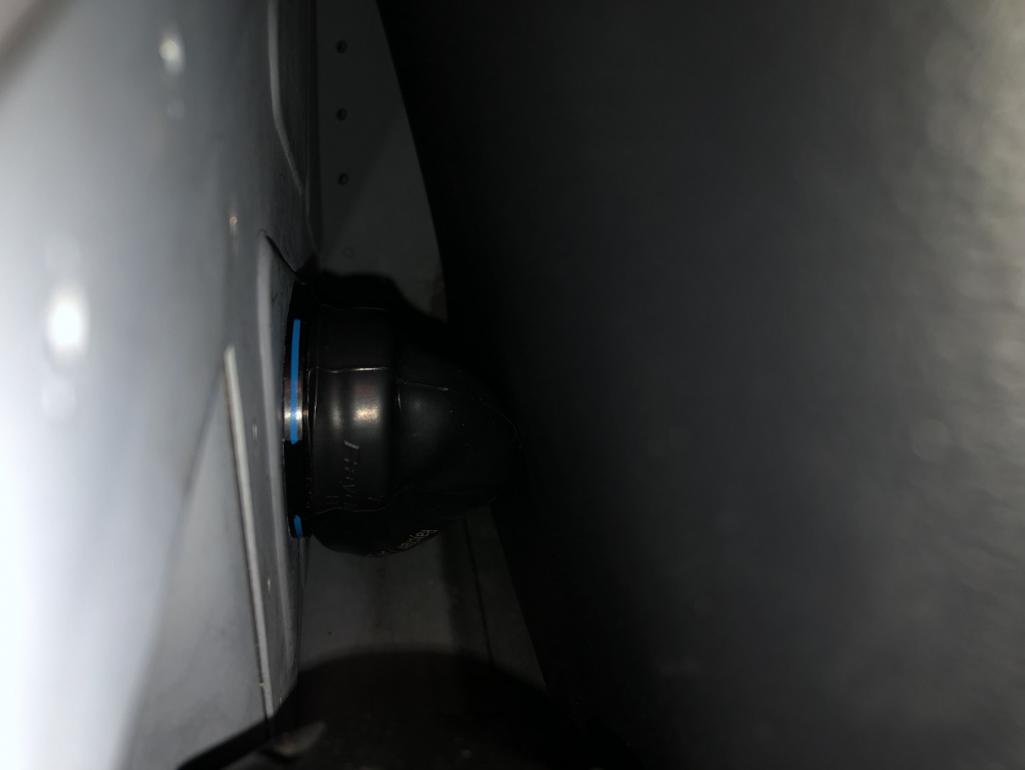
|
|
|
|
| Cairo94507 |
Feb 8 2022, 09:20 AM
Post
#3896
|
|
Michael Group: Members Posts: 10,716 Joined: 1-November 08 From: Auburn, CA Member No.: 9,712 Region Association: Northern California |
Beautiful work Chris. (IMG:style_emoticons/default/beerchug.gif)
|
|
|
|
| tygaboy |
Feb 8 2022, 07:03 PM
Post
#3897
|
|
914 Guru Group: Members Posts: 5,844 Joined: 6-October 15 From: Petaluma, CA Member No.: 19,241 Region Association: Northern California |
I am exhausted. I've learned that wiring requires absolutely 100% of my attention, at least given where I am on the learning curve. After nearly two back-to-back days of effort, I finished the ECU-to-bulkhead harness, including the DBW cable to the pedal.
Everything is tested, fully sheathed and booted. And I'm BEAT. Amazing how sitting in one place can be so tiring! (IMG:style_emoticons/default/laugh.gif) That said, I'm pretty happy with how it all turned out, especially since this was my first go at all of this. I have a number of lessons learned and I'd do a couple things differently, were I to do it again. But in all, I'm calling it a success. (IMG:style_emoticons/default/beerchug.gif) Attached thumbnail(s) 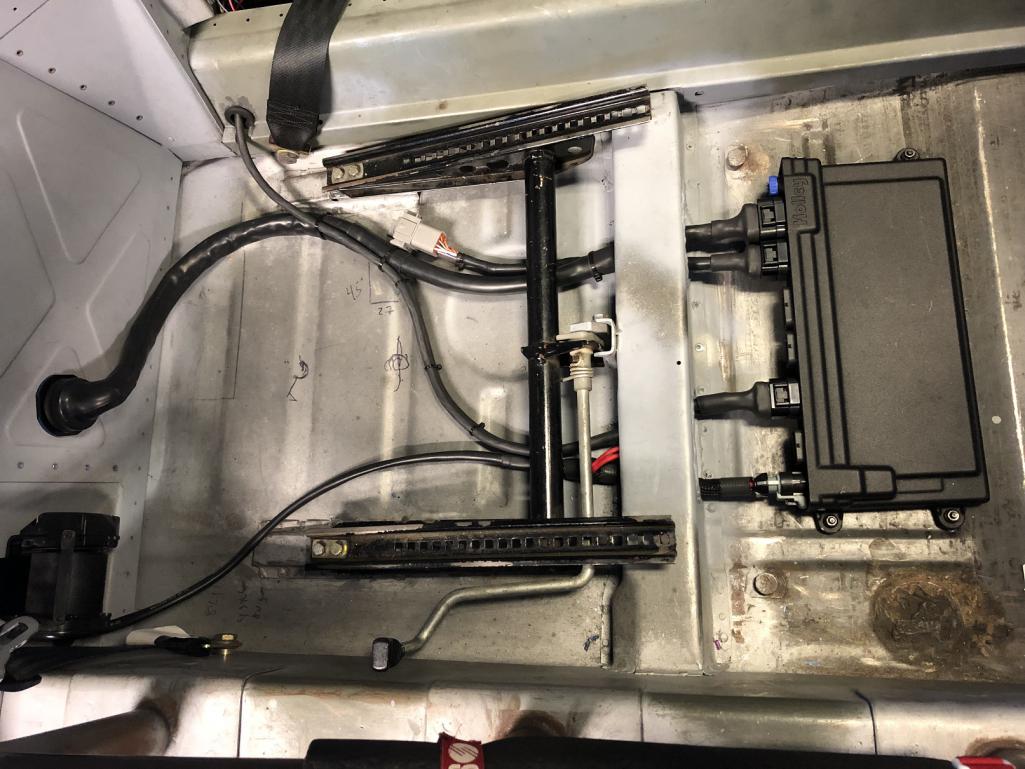
|
|
|
|
| tygaboy |
Feb 8 2022, 07:07 PM
Post
#3898
|
|
914 Guru Group: Members Posts: 5,844 Joined: 6-October 15 From: Petaluma, CA Member No.: 19,241 Region Association: Northern California |
And the best part? After all's said and done, this is what everyone will be able to see of all that work... (IMG:style_emoticons/default/laugh.gif) And even the ECU is getting a cover so that'll be hidden, too.
But as with a lot of other areas on this build, it may not be obvious or visible, but I'll know it's there! (IMG:style_emoticons/default/shades.gif) Attached thumbnail(s) 
|
|
|
|
| 76-914 |
Feb 8 2022, 10:05 PM
Post
#3899
|
|
Repeat Offender & Resident Subaru Antagonist Group: Members Posts: 13,917 Joined: 23-January 09 From: Temecula, CA Member No.: 9,964 Region Association: Southern California |
Very tidy and professional Chris. (IMG:style_emoticons/default/beerchug.gif)
|
 |
|
| Cairo94507 |
Feb 9 2022, 07:06 AM
Post
#3900
|
|
Michael Group: Members Posts: 10,716 Joined: 1-November 08 From: Auburn, CA Member No.: 9,712 Region Association: Northern California |
Great looking seat! If I was 30 years younger I would put them in my car. (IMG:style_emoticons/default/beerchug.gif)
|
|
|
|
|
5 User(s) are reading this topic (5 Guests and 0 Anonymous Users)
0 Members:

|
Lo-Fi Version | Time is now: 20th July 2026 - 07:49 PM |
Invision Power Board
v9.1.4 © 2026 IPS, Inc.