|
|
|
Porsche, and the Porsche crest are registered trademarks of Dr. Ing. h.c. F. Porsche AG.
This site is not affiliated with Porsche in any way. Its only purpose is to provide an online forum for car enthusiasts. All other trademarks are property of their respective owners. |
|
|

  |

| tygaboy |
 Jul 4 2017, 06:00 PM Jul 4 2017, 06:00 PM
Post
#401
|
|
914 Guru  Group: Members Posts: 5,818 Joined: 6-October 15 From: Petaluma, CA Member No.: 19,241 Region Association: Northern California |
I'm finding that being away from the car for a couple months has me rethinking some of the stuff I thought was done. I've always had a niggling "I think that could look better..." about the rear shock tower. The top cross bar didn't feel well integrated to me. So I started playing around with how I might box things in. The red outlines where that piece will actually sit.
This design eliminates the "wings" in the stiffening panel and, to my eye, nicely cleans up that whole area. Plus, it ties the long to the bar to the tower even more. Attached thumbnail(s) 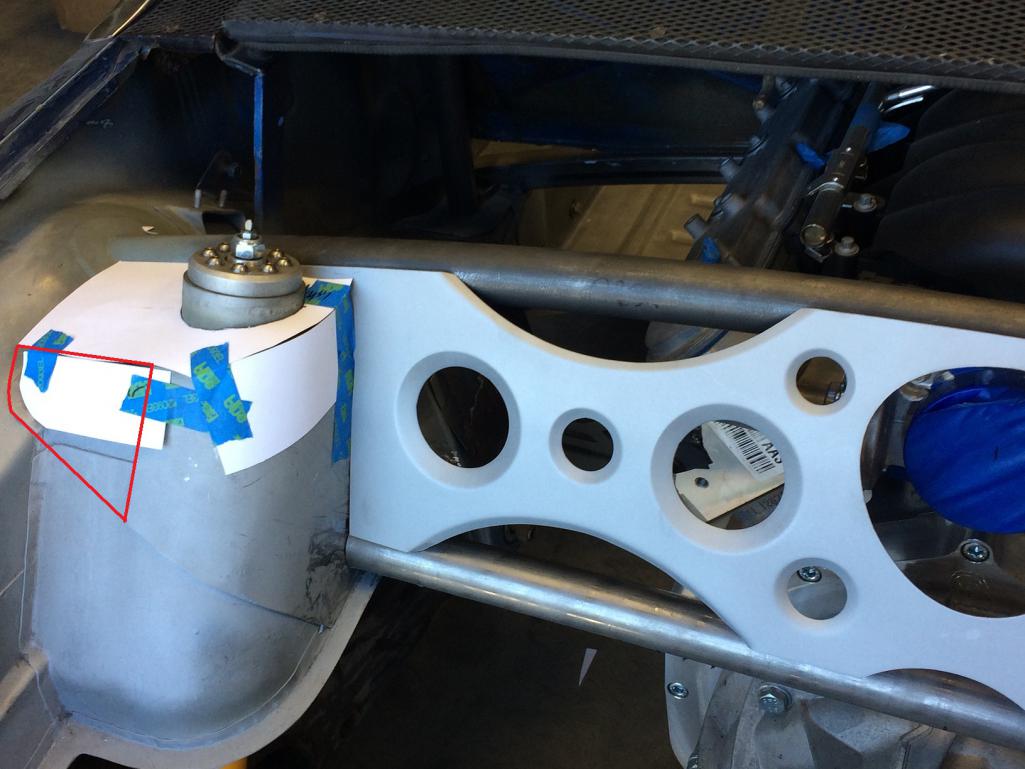
|
   |

 
|
| Rand |
Jul 4 2017, 06:14 PM
Post
#402
|
|
Cross Member Group: Members Posts: 7,415 Joined: 8-February 05 From: OR Member No.: 3,573 Region Association: None |
Get it driving. Then nail down the fancy details. (IMG:style_emoticons/default/wink.gif)
|
 |
|
| tygaboy |
Jul 4 2017, 09:59 PM
Post
#403
|
|
914 Guru Group: Members Posts: 5,818 Joined: 6-October 15 From: Petaluma, CA Member No.: 19,241 Region Association: Northern California |
|
|
|
|
| Cracker |
Jul 5 2017, 07:03 AM
Post
#404
|
|
Advanced Member Group: Members Posts: 2,148 Joined: 2-February 10 From: Atlanta (area) Member No.: 11,316 Region Association: South East States |
With most projects that would be reasonable but not this one. Also, and perhaps most important, Chris enjoys the "creative strategizing" process more than the actual finishef product itself. Going slightly out on the limb here but I believe I know him well enough to wtite this about him. This project will take time...allot of time (and that is ok). Keep it up Chris, integrate all of these wild plans as you go - in the order you think best. I always (erll, almost always) enjoy the new posts! (IMG:style_emoticons/default/biggrin.gif)
Tony QUOTE(Rand @ Jul 4 2017, 08:14 PM)  |
|
|
|
| tygaboy |
Jul 5 2017, 06:45 PM
Post
#405
|
|
914 Guru Group: Members Posts: 5,818 Joined: 6-October 15 From: Petaluma, CA Member No.: 19,241 Region Association: Northern California |
Tony is mostly accurate - I'm about the journey, not the destination.
That said, I do want to get it on the road. It'll be interesting to see how well/not well I balance my propensity for neat new ideas with the boring "gotta do this" work. Speaking of "gotta do" stuff, here's the final position of the front hoop. With the dash in place, it all but disappears, just like I want. In the second pic, you can see how I plan to tie the hoop to the steering column support. To get the hoop forward to where I wanted it, I had to notch the steering support sheet metal. You can see my little paper template of the bracket I'll fab to reinforce the support. There will be one of them on each side. Final pic is the bracket translated into the plasma software. Oh, and best of all, as you can see, I don't need to relocate the front hood latch! One less thing to do! Getting there with this chassis stuff...! (IMG:style_emoticons/default/cheer.gif) Attached thumbnail(s)  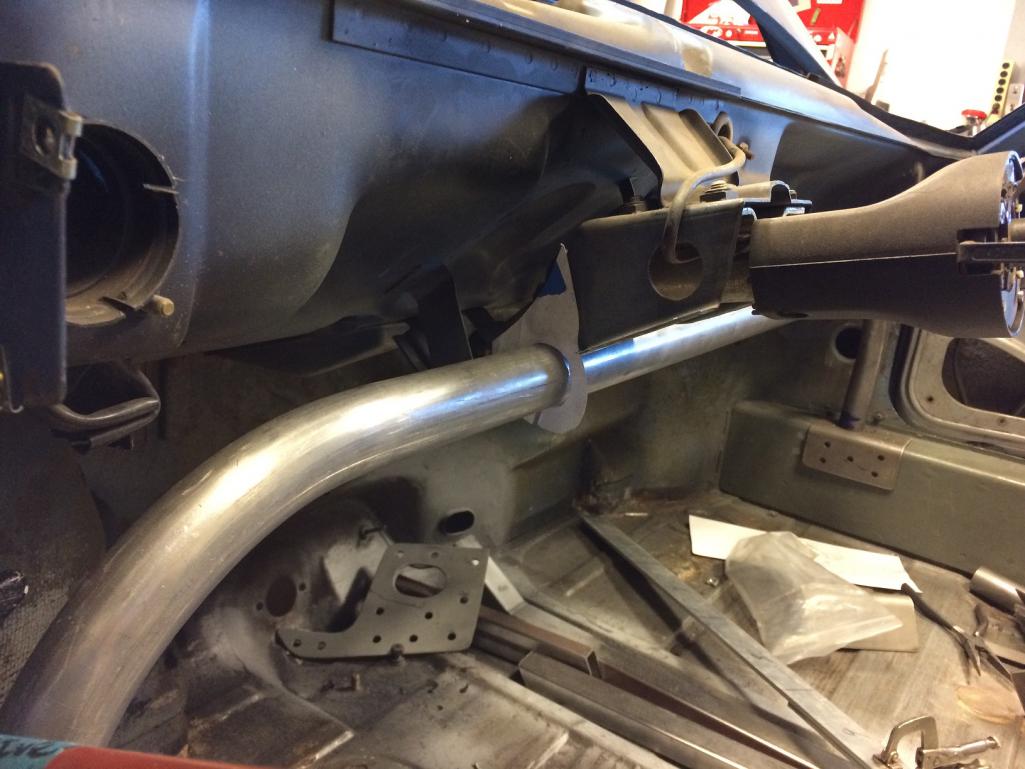 Attached image(s) 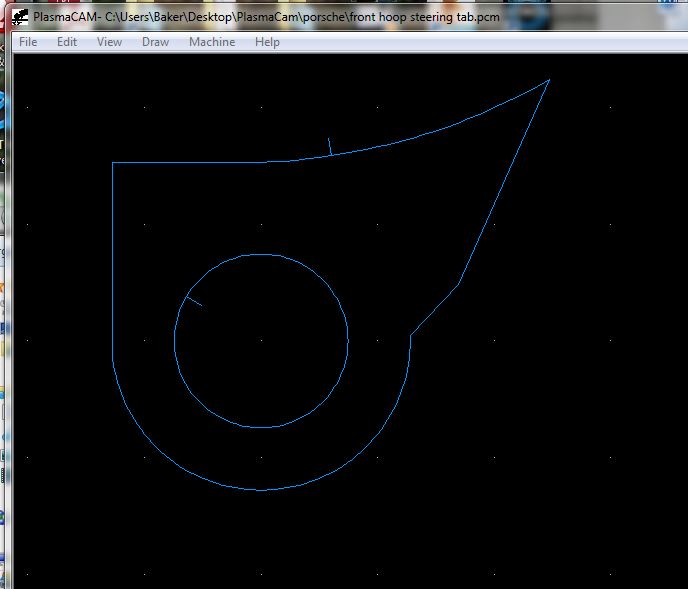
|
|
|
|
| ConeDodger |
Jul 5 2017, 06:49 PM
Post
#406
|
|
Apex killer! Group: Members Posts: 24,422 Joined: 31-December 04 From: Tahoe Area Member No.: 3,380 Region Association: Northern California |
Progress! (IMG:style_emoticons/default/evilgrin.gif)
|
|
|
|
| Rand |
Jul 6 2017, 04:15 PM
Post
#407
|
|
Cross Member Group: Members Posts: 7,415 Joined: 8-February 05 From: OR Member No.: 3,573 Region Association: None |
QUOTE(Cracker @ Jul 5 2017, 06:03 AM) With most projects that would be reasonable but not this one. Also, and perhaps most important, Chris enjoys the "creative strategizing" process more than the actual finishef product itself. Going slightly out on the limb here but I believe I know him well enough to wtite this about him. This project will take time...allot of time (and that is ok). Keep it up Chris, integrate all of these wild plans as you go - in the order you think best. I always (erll, almost always) enjoy the new posts! (IMG:style_emoticons/default/biggrin.gif) Tony QUOTE(Rand @ Jul 4 2017, 08:14 PM) For sure Tony. I was only poking fun. Seeing Chris' artwork is a joy and we will all love seeing it. |
|
|
|
| Cracker |
Jul 6 2017, 04:20 PM
Post
#408
|
|
Advanced Member Group: Members Posts: 2,148 Joined: 2-February 10 From: Atlanta (area) Member No.: 11,316 Region Association: South East States |
Yikes! Just seeing my post for the first time from the other day...I typed that out from my phone in transit back to the East coast (as a passenger!). Spell checker should've kicked in... (IMG:style_emoticons/default/blink.gif)
T QUOTE(Rand @ Jul 6 2017, 06:15 PM) QUOTE(Cracker @ Jul 5 2017, 06:03 AM) With most projects that would be reasonable but not this one. Also, and perhaps most important, Chris enjoys the "creative strategizing" process more than the actual finishef product itself. Going slightly out on the limb here but I believe I know him well enough to wtite this about him. This project will take time...allot of time (and that is ok). Keep it up Chris, integrate all of these wild plans as you go - in the order you think best. I always (erll, almost always) enjoy the new posts! (IMG:style_emoticons/default/biggrin.gif) Tony QUOTE(Rand @ Jul 4 2017, 08:14 PM) For sure Tony. I was only poking fun. Seeing Chris' artwork is a joy and we will all love seeing it. |
|
|
|
| tygaboy |
Jul 6 2017, 05:17 PM
Post
#409
|
|
914 Guru Group: Members Posts: 5,818 Joined: 6-October 15 From: Petaluma, CA Member No.: 19,241 Region Association: Northern California |
Man, it feels sooooooo nice to be back working on this! Such fun...
Got the front hoop/steering support brackets cut and mocked in. Should work just fine. I'm still kicking around how I might tie this hoop in to the front of the car. Whatever I decide, I hope to get the hoop fully welded in this weekend. (IMG:style_emoticons/default/welder.gif) Attached thumbnail(s) 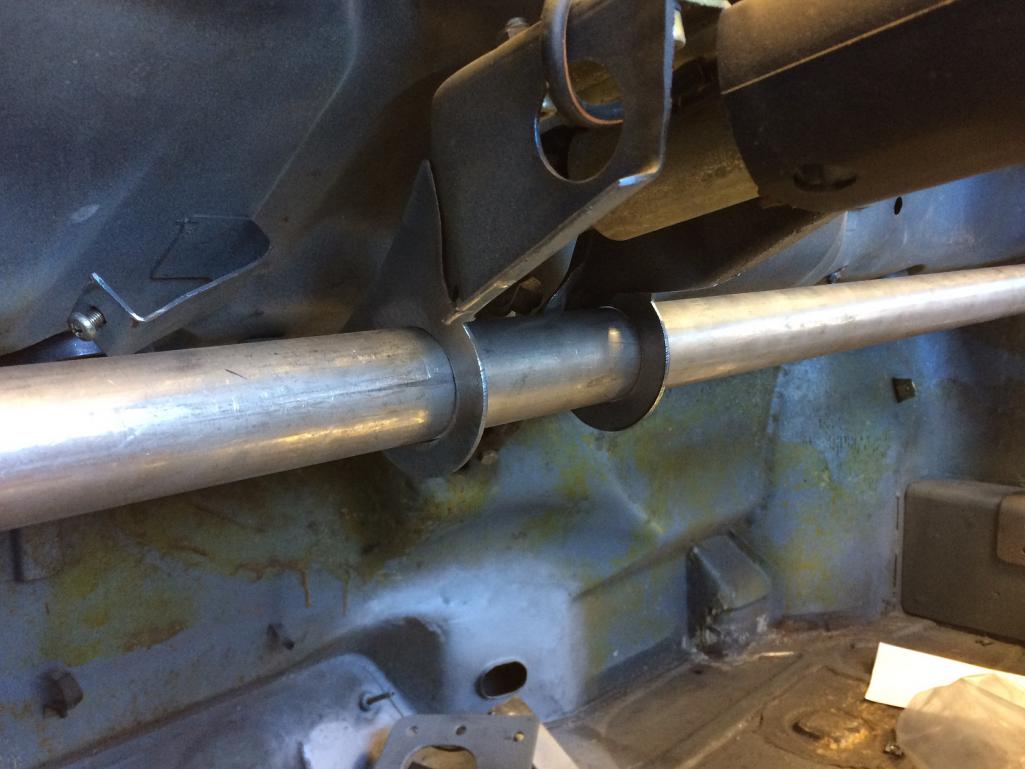 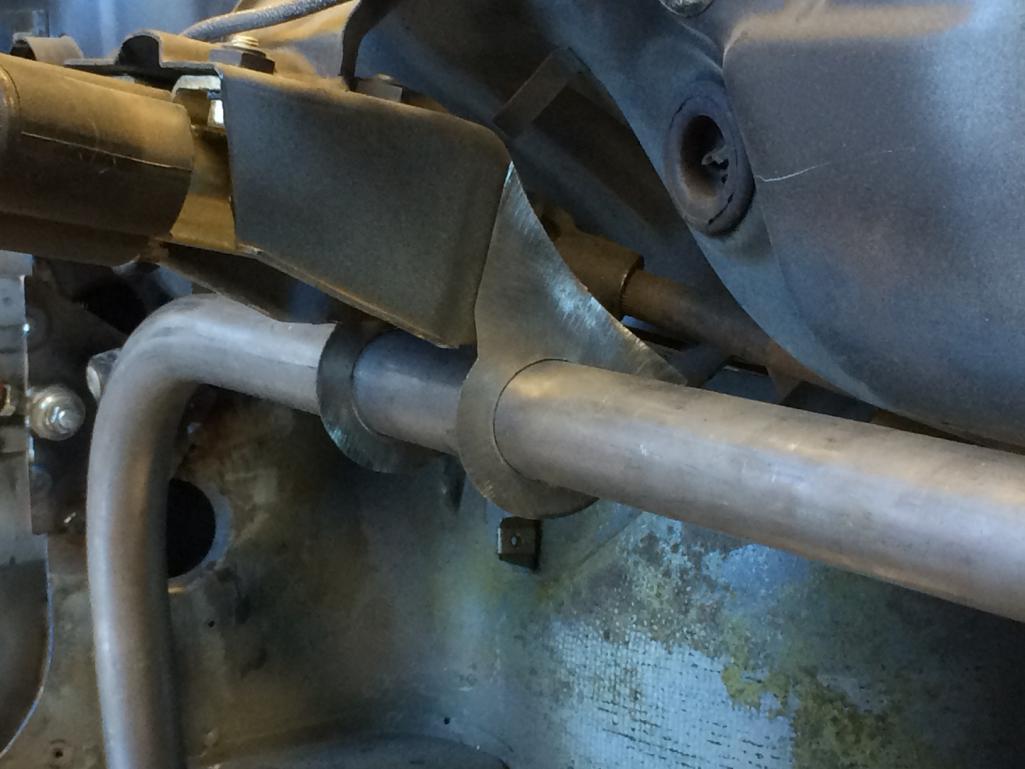
|
|
|
|
| Curbandgutter |
Jul 7 2017, 03:06 PM
Post
#410
|
|
Senior Member Group: Members Posts: 566 Joined: 8-March 13 From: Murrieta CA Member No.: 15,637 Region Association: Southern California |
QUOTE(tygaboy @ Jul 4 2017, 05:00 PM) I'm finding that being away from the car for a couple months has me rethinking some of the stuff I thought was done. I've always had a niggling "I think that could look better..." about the rear shock tower. The top cross bar didn't feel well integrated to me. So I started playing around with how I might box things in. The red outlines where that piece will actually sit. This design eliminates the "wings" in the stiffening panel and, to my eye, nicely cleans up that whole area. Plus, it ties the long to the bar to the tower even more. Here is something that you may want to consider. This will make your chassis stiffer. Sheet metal is horrible in punching shear. It is better to transfer loads into it through shear . In this case in order for you to accomplish that I would do as shown in the picture. 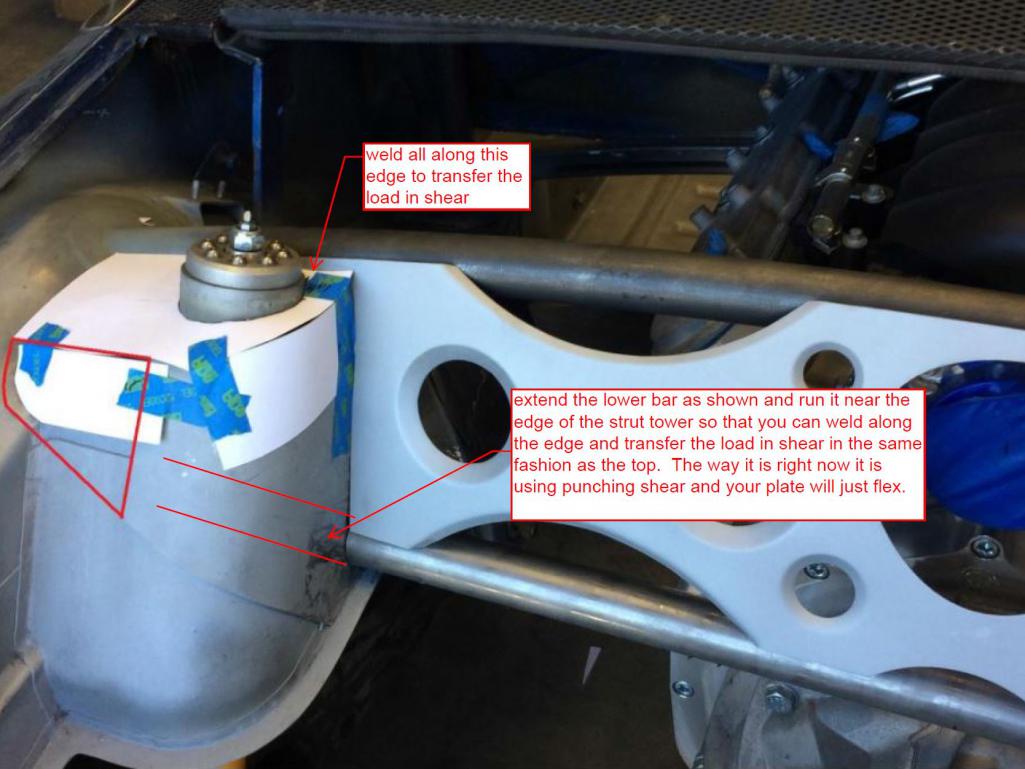 |
|
|
|
| tygaboy |
Jul 7 2017, 04:31 PM
Post
#411
|
|
914 Guru Group: Members Posts: 5,818 Joined: 6-October 15 From: Petaluma, CA Member No.: 19,241 Region Association: Northern California |
Rudy - Thanks for the input. I'd planned to weld all the seams of the suspension tower boxing so no worries there.
On that lower bar: I'm rethinking my induction/exhaust systems and am close to a decision that will require I redo that entire back panel... At this point, I won't be finalizing anything other than the top cross bar and the aforementioned boxing. Once I do start back on that area, let me know what you think of what I come up with? Thanks again! (IMG:style_emoticons/default/aktion035.gif) |
|
|
|
| tygaboy |
Jul 7 2017, 04:34 PM
Post
#412
|
|
914 Guru Group: Members Posts: 5,818 Joined: 6-October 15 From: Petaluma, CA Member No.: 19,241 Region Association: Northern California |
I decided to take today off and was able to get the front hoop mostly done. My buddy Martin needed some welding done on his car so he TIG'd for me while I MIG'd for him. (I think I got the better of THAT deal!)
How f-ing beautiful is his work? (IMG:style_emoticons/default/welder.gif) (IMG:style_emoticons/default/smilie_pokal.gif) (IMG:style_emoticons/default/cheer.gif) (IMG:style_emoticons/default/first.gif) Attached thumbnail(s) 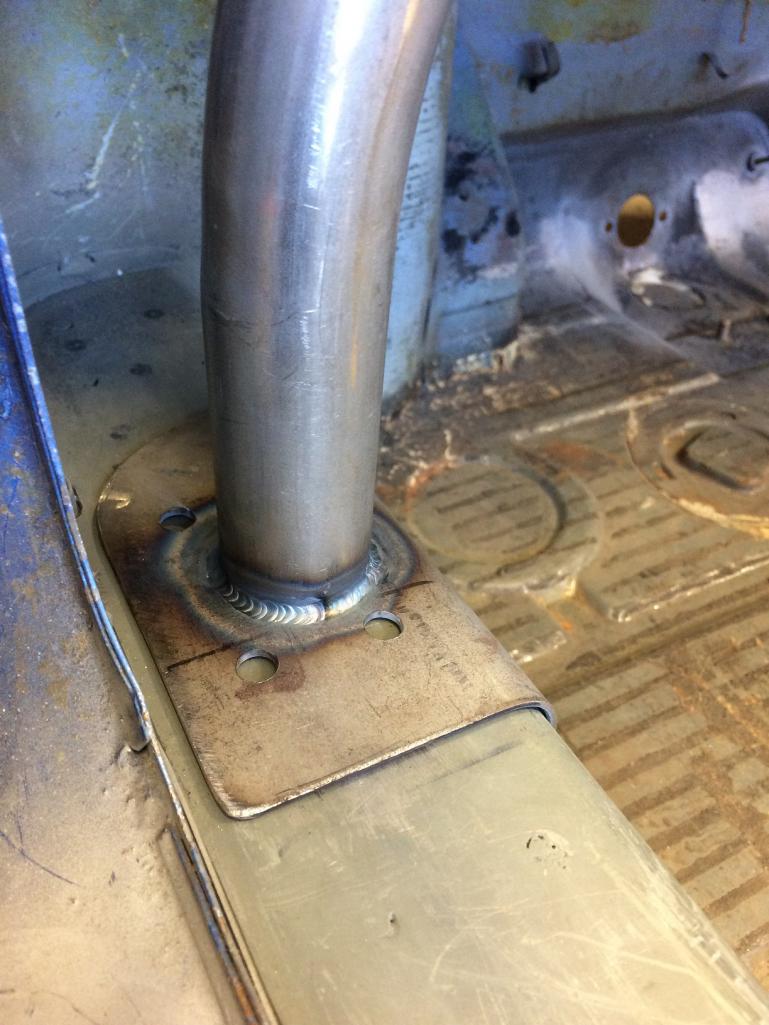
|
|
|
|
| tygaboy |
Jul 7 2017, 04:39 PM
Post
#413
|
|
914 Guru Group: Members Posts: 5,818 Joined: 6-October 15 From: Petaluma, CA Member No.: 19,241 Region Association: Northern California |
And it turned out GREAT! Just what I wanted: The rear edge of the hoop sits even with the front of the door opening and it all but disappears under the dash. Exactly as I wanted it. Very happy with this result.
And seeing it all in place has me thinking I'll trim off most all of the lower part of those brackets that tie the hoop to the steering column support. Looks a little scary as is. Attached thumbnail(s) 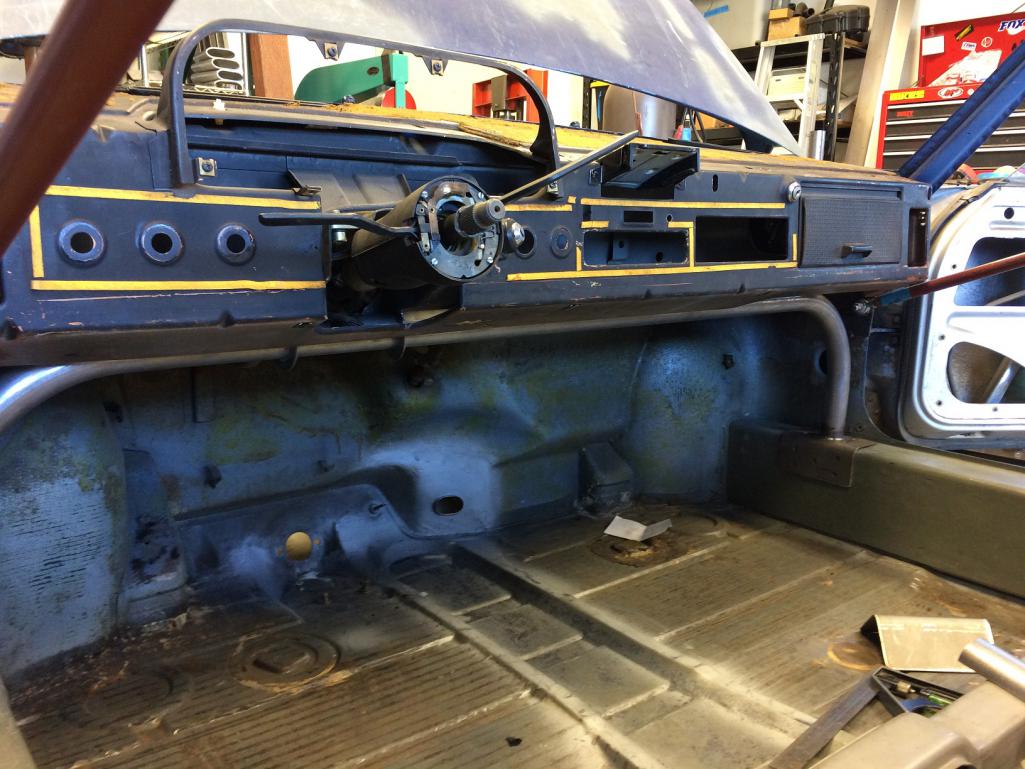 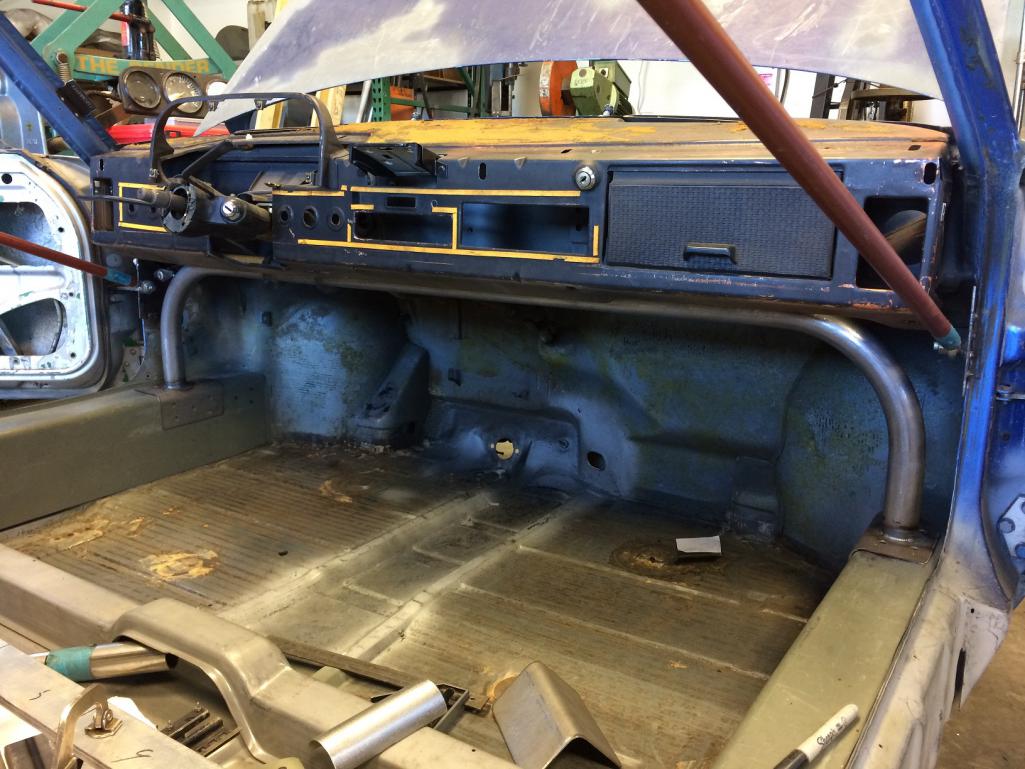
|
|
|
|
| Cracker |
Jul 7 2017, 04:44 PM
Post
#414
|
|
Advanced Member Group: Members Posts: 2,148 Joined: 2-February 10 From: Atlanta (area) Member No.: 11,316 Region Association: South East States |
|
|
|
|
| Rand |
Jul 7 2017, 04:55 PM
Post
#415
|
|
Cross Member Group: Members Posts: 7,415 Joined: 8-February 05 From: OR Member No.: 3,573 Region Association: None |
Beautiful scales. (IMG:style_emoticons/default/smilie_pokal.gif) Amateur welders blob. Skilled welders scale. Very nice.
|
|
|
|
| tygaboy |
Jul 8 2017, 04:04 PM
Post
#416
|
|
914 Guru Group: Members Posts: 5,818 Joined: 6-October 15 From: Petaluma, CA Member No.: 19,241 Region Association: Northern California |
I got the front hoop fully welded down then trimmed and tacked in the hoop-to-steering column support tabs. As I mentioned, I opted to lose the lower part that captured the hoop as it extended down below the dash and sorta felt like a potential future leg bitter...
I'm pretty psyched at just how well it all fits together. Here's the dash back in place. How's that for tidy clearance?! Less than 1/4" gap all the way across. (IMG:style_emoticons/default/sheeplove.gif) All that's left is to fabricate a replacement lower dash mount/tab of some sort to replace the factory one. That had to come off as it ran smack into the hoop. Attached thumbnail(s) 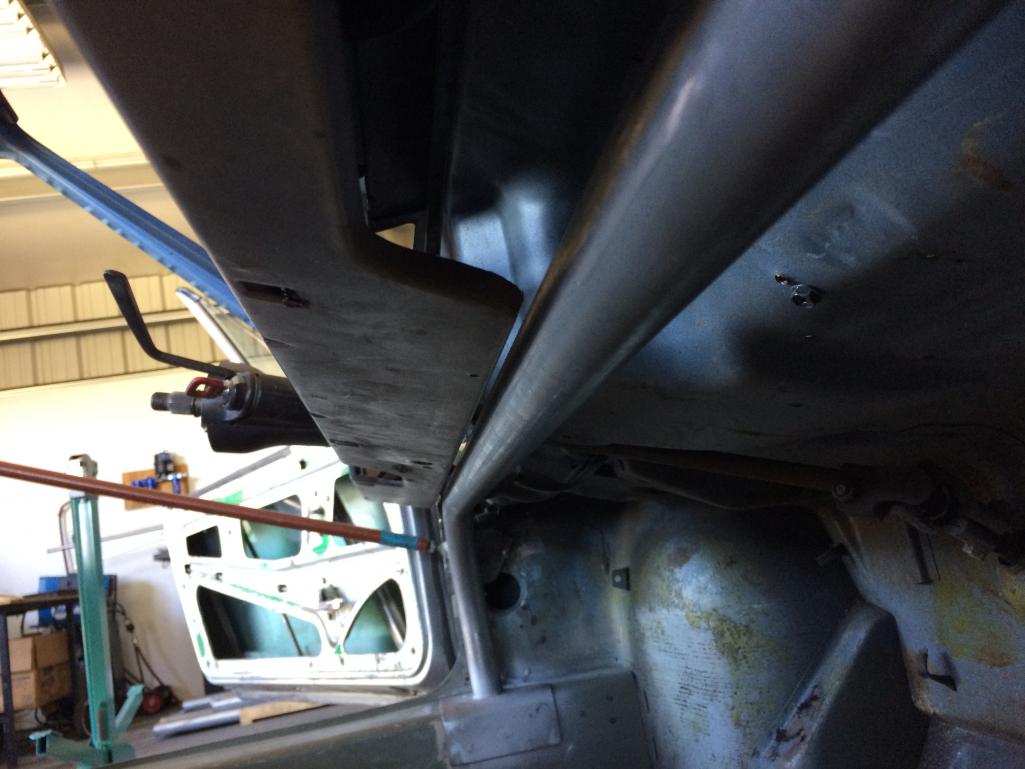
|
|
|
|
| tygaboy |
Jul 9 2017, 05:28 PM
Post
#417
|
|
914 Guru Group: Members Posts: 5,818 Joined: 6-October 15 From: Petaluma, CA Member No.: 19,241 Region Association: Northern California |
A bit all over the place today. I need to get the seats mounted because I want to have the tube that braces the door bar to the main hoop match the angle of the seat bolsters. Hey, it's the little things. Anyway, I had a couple spots to weld up to finish the rear floor install so I did that then started on the seat mounts.
Attached thumbnail(s) 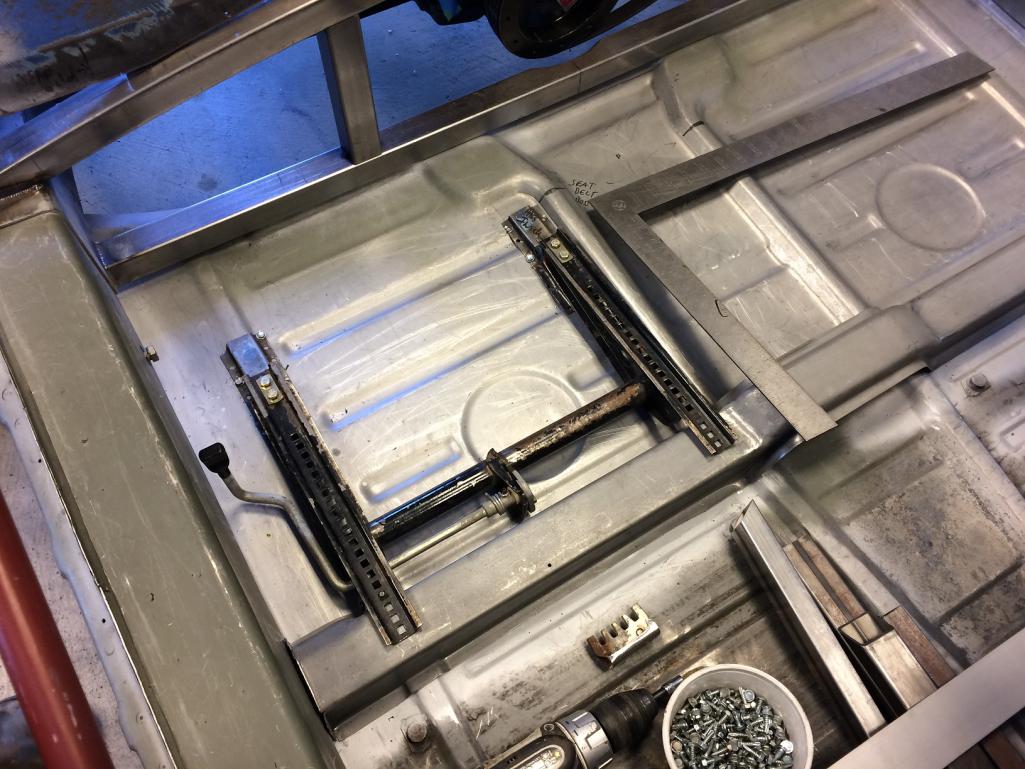
|
|
|
|
| tygaboy |
Jul 9 2017, 05:34 PM
Post
#418
|
|
914 Guru Group: Members Posts: 5,818 Joined: 6-October 15 From: Petaluma, CA Member No.: 19,241 Region Association: Northern California |
Then I figured I may as well get the final templates made for the rear suspension tower boxes. I'm always amazed when things go to plan and it all fits just like I want. Here's the same template fit to both sides. It flexes a little but is a good indicator of how matchy match I got things. I'm really pleased at the side-to-side symmetry. Even that little notch for the cross bar pad weld on the outside edge is exactly right side to side.
I've said it before: This is the first time I've tackled a project like this and sometimes it's hard for me to believe it's turning out this well. I'm happy, if you couldn't tell. Attached thumbnail(s) 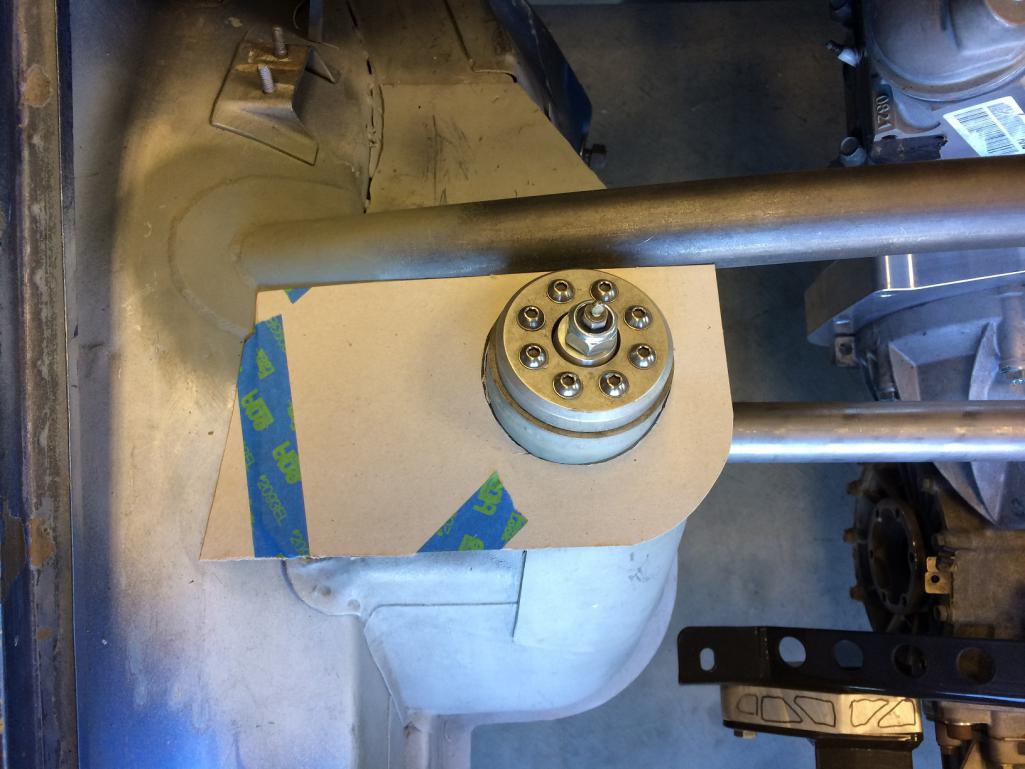 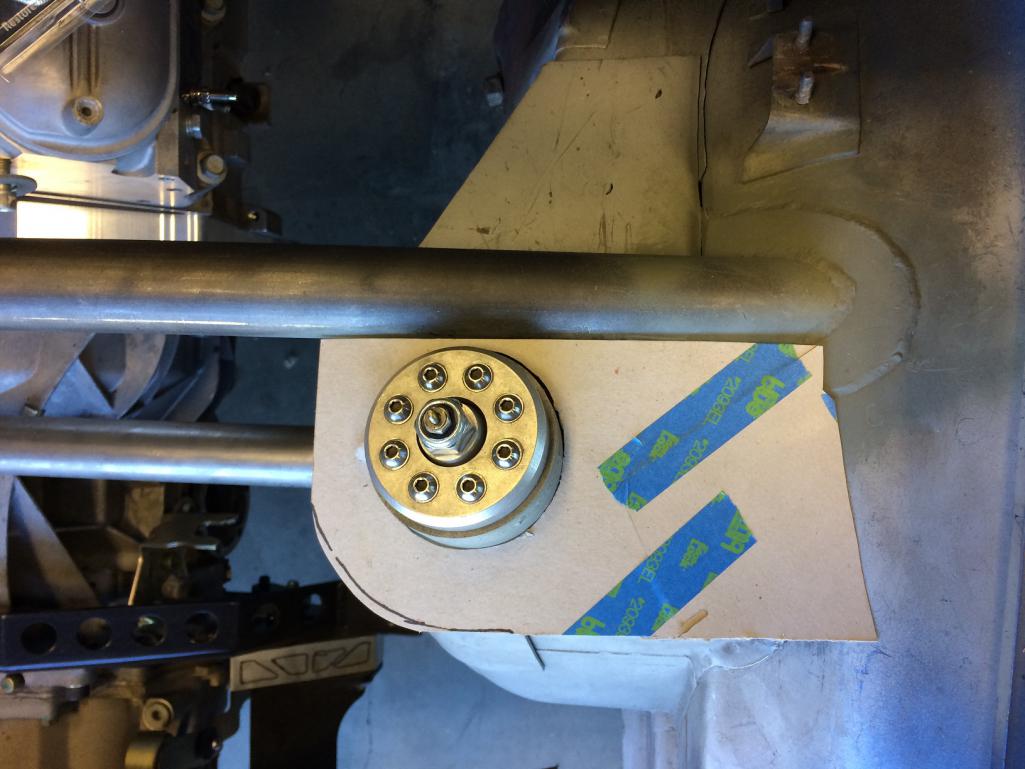
|
|
|
|
| tygaboy |
Jul 11 2017, 03:16 PM
Post
#419
|
|
914 Guru Group: Members Posts: 5,818 Joined: 6-October 15 From: Petaluma, CA Member No.: 19,241 Region Association: Northern California |
Talk about something not important to getting this project running...
As I was pulling the dash so I could work on the cage, the gauge surround caught my eye as something that might be fun to play with. I've always like the idea of running a small, diagonal set of German flag colored stripes from the front fender opening up over the fender, at some jaunty angle. I figured I'd see what it'd look like on the gauge surround. Well, it looks like this. At least with no gauges or any other interior components! Not quite the right color yellow/gold but it's all I had. Anyone else done something like this? I'd be interested to see how it looks "finished". Attached thumbnail(s) 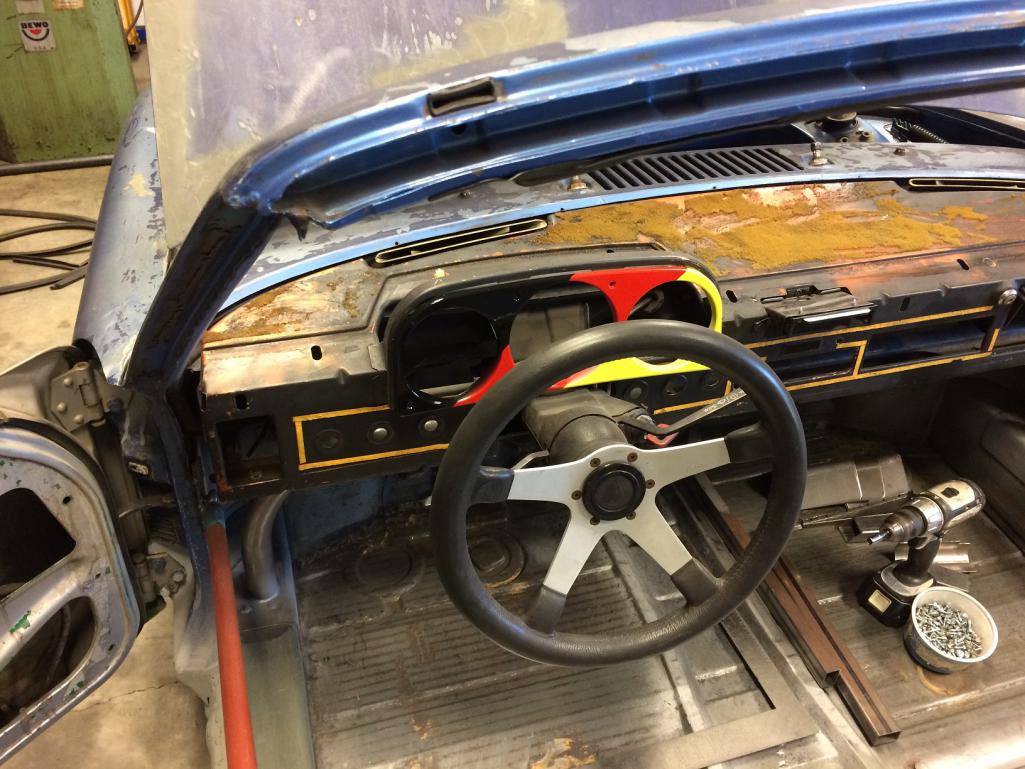
|
|
|
|
| Cracker |
Jul 11 2017, 03:31 PM
Post
#420
|
|
Advanced Member Group: Members Posts: 2,148 Joined: 2-February 10 From: Atlanta (area) Member No.: 11,316 Region Association: South East States |
|
|
|
|
|
1 User(s) are reading this topic (1 Guests and 0 Anonymous Users)
0 Members:

|
Lo-Fi Version | Time is now: 28th April 2026 - 11:35 AM |
Invision Power Board
v9.1.4 © 2026 IPS, Inc.