|
|
|
Porsche, and the Porsche crest are registered trademarks of Dr. Ing. h.c. F. Porsche AG.
This site is not affiliated with Porsche in any way. Its only purpose is to provide an online forum for car enthusiasts. All other trademarks are property of their respective owners. |
|
|

  |

| tygaboy |
 Nov 13 2016, 03:47 PM Nov 13 2016, 03:47 PM
Post
#81
|
|
914 Guru  Group: Members Posts: 5,845 Joined: 6-October 15 From: Petaluma, CA Member No.: 19,241 Region Association: Northern California |
Well this was a "long" weekend! (IMG:style_emoticons/default/lol-2.gif)
Got both carbon long covers done and drilled the stiffeners in prep for installation. Having installed an Engman kit in another car, I have a new appreciation for parts that come with all the holes in them. Attached thumbnail(s) 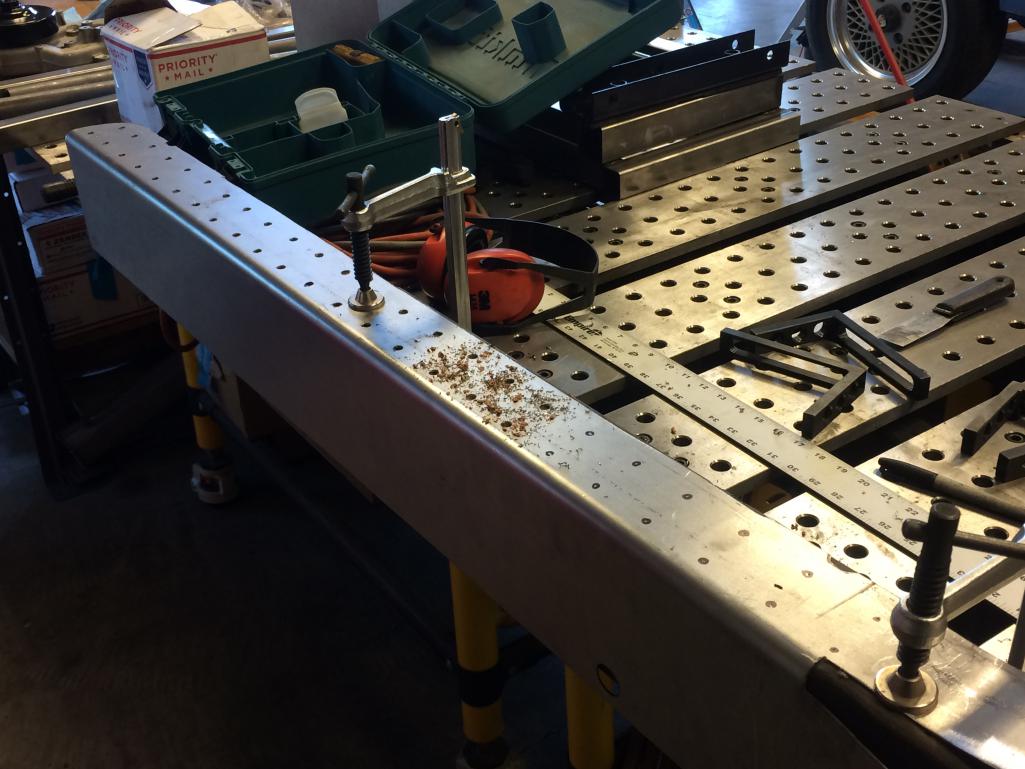 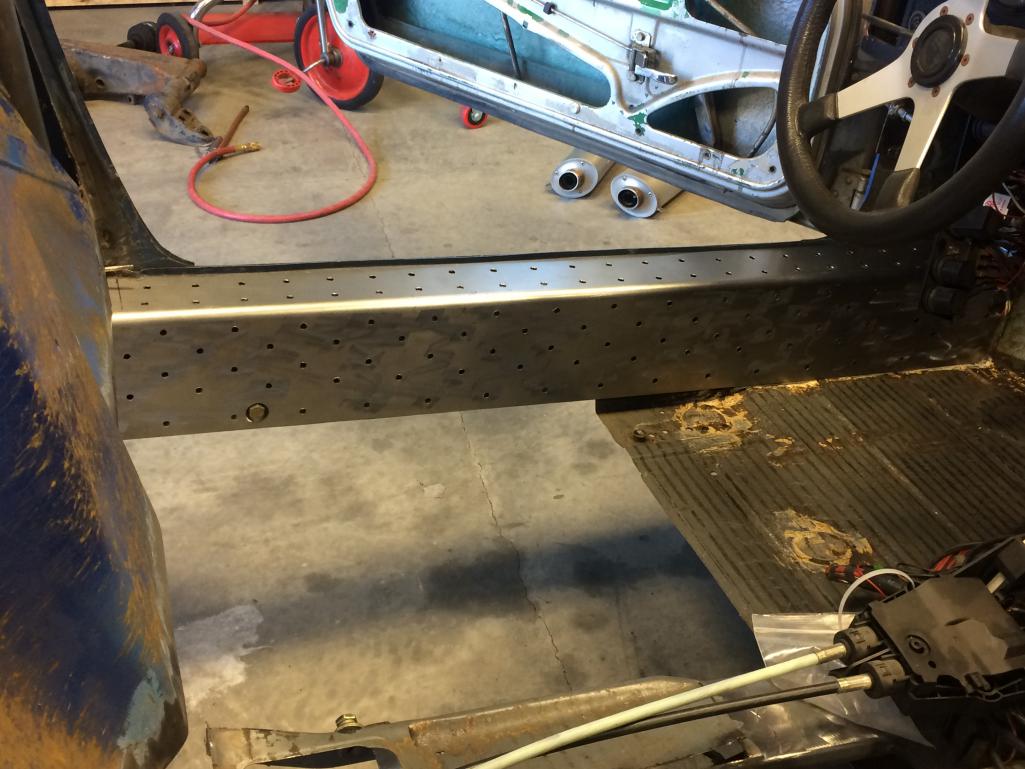
|
   |

 
|
| Dion |
Nov 13 2016, 04:05 PM
Post
#82
|
|
RN Group: Members Posts: 2,931 Joined: 16-September 04 From: Shepherdstown, WV Member No.: 2,766 Region Association: MidAtlantic Region |
Fantastic work Chris.
|
 |
|
| Curbandgutter |
Nov 13 2016, 04:22 PM
Post
#83
|
|
Senior Member Group: Members Posts: 566 Joined: 8-March 13 From: Murrieta CA Member No.: 15,637 Region Association: Southern California |
I like your carbon fiber idea. I just may shamelessly steal it.
|
|
|
|
| tygaboy |
Nov 13 2016, 04:57 PM
Post
#84
|
|
914 Guru Group: Members Posts: 5,845 Joined: 6-October 15 From: Petaluma, CA Member No.: 19,241 Region Association: Northern California |
QUOTE(Curbandgutter @ Nov 13 2016, 02:22 PM)  I like your carbon fiber idea. I just may shamelessly steal it. Please do! I'm convinced there are no new ideas (well, OK, very few...) so it's not like I thought this one up. Plus, then I can do the same to you, which with your crazy ass build ( (IMG:style_emoticons/default/w00t.gif) !) I'm sure I will. I will ask that you don't copy what I have planned for my doors, though...! (IMG:style_emoticons/default/biggrin.gif) |
|
|
|
| tygaboy |
Nov 13 2016, 04:59 PM
Post
#85
|
|
914 Guru Group: Members Posts: 5,845 Joined: 6-October 15 From: Petaluma, CA Member No.: 19,241 Region Association: Northern California |
QUOTE(Dion @ Nov 13 2016, 02:05 PM) Fantastic work Chris. Thanks for the kind words. It's certainly nice to hear. (IMG:style_emoticons/default/beerchug.gif) |
|
|
|
| tygaboy |
Nov 18 2016, 06:30 PM
Post
#86
|
|
914 Guru Group: Members Posts: 5,845 Joined: 6-October 15 From: Petaluma, CA Member No.: 19,241 Region Association: Northern California |
Before I install the long stiffeners, I need to close all the heater tube holes that are no longer needed as well as address the hand brake cut out. So this evening I fabbed up all the pieces to get a bit of a head start on the weekend's work.
For the hand brake area, I used a section of the long stiffener blank and trimmed it to fit. These are just sitting for the pic, not fully fit. All these filler pieces will be flush with the long surface so as to give me full contact under the entire length of stiffener! Boring, I know. But necessary. Attached thumbnail(s) 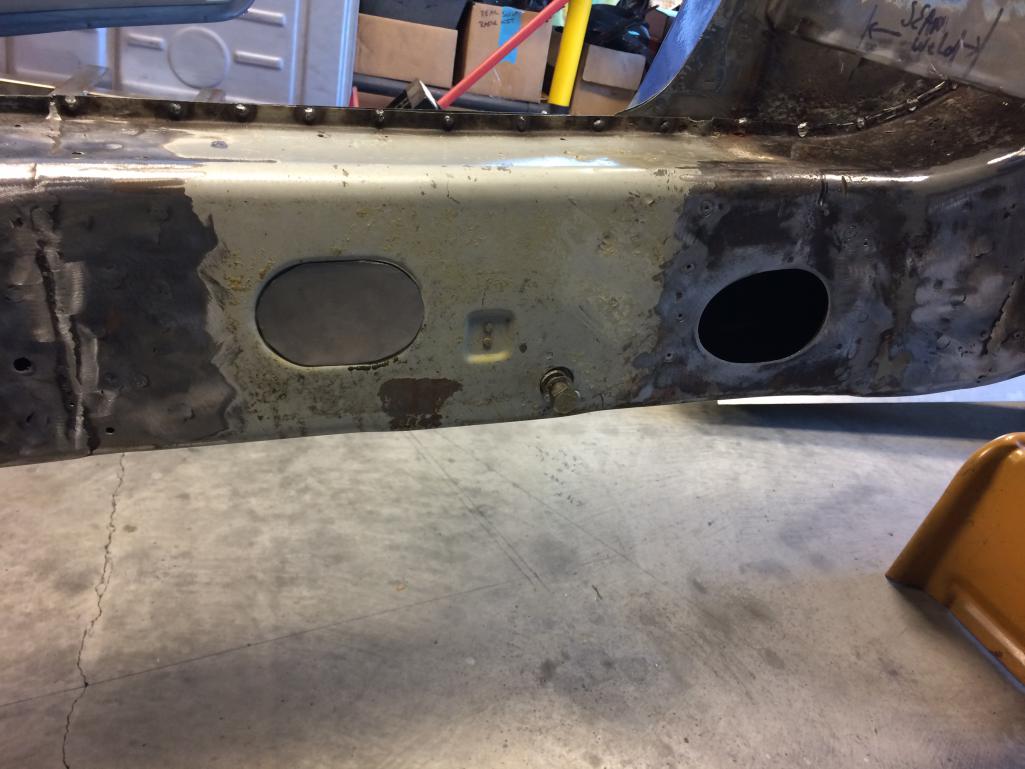 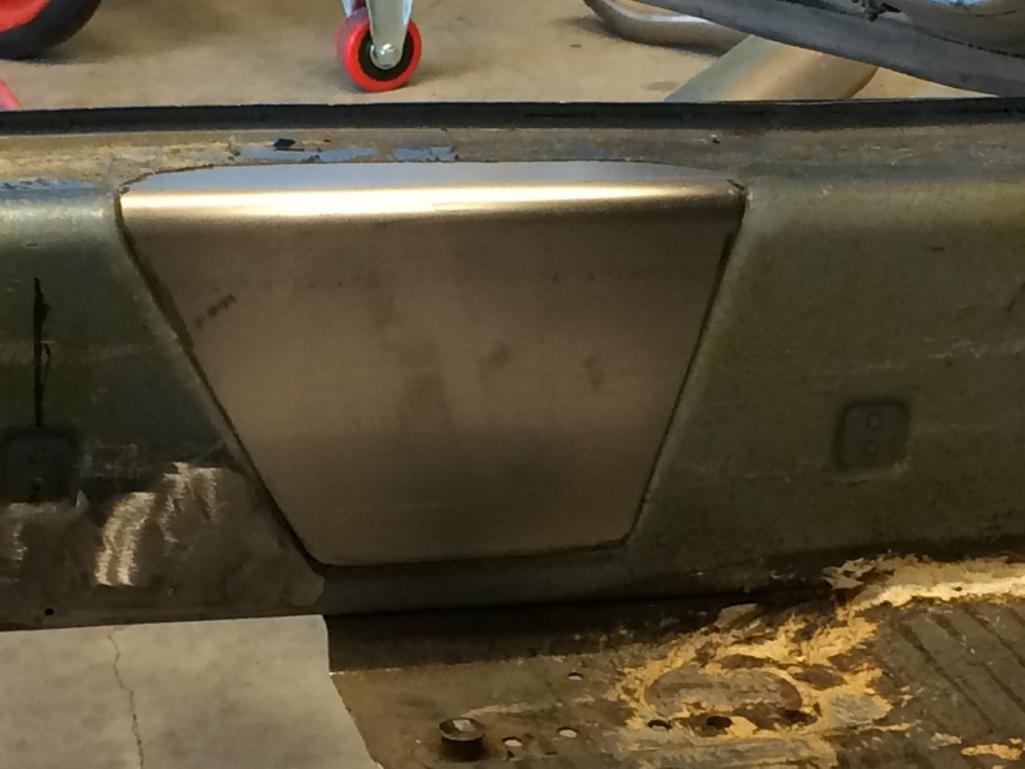
|
|
|
|
| Rand |
Nov 18 2016, 10:03 PM
Post
#87
|
|
Cross Member Group: Members Posts: 7,415 Joined: 8-February 05 From: OR Member No.: 3,573 Region Association: None |
The ebrake void I get. But, don't bother welding sheet metal into the oval holes if you are putting that badass long overlay on. The ebrake shape void into the long is a compromise, but holes aren't so much when you are overlaying such a strong piece.
|
|
|
|
| tygaboy |
Nov 18 2016, 10:58 PM
Post
#88
|
|
914 Guru Group: Members Posts: 5,845 Joined: 6-October 15 From: Petaluma, CA Member No.: 19,241 Region Association: Northern California |
QUOTE(Rand @ Nov 18 2016, 08:03 PM) The ebrake void I get. But, don't bother welding sheet metal into the oval holes if you are putting that badass long overlay on. The ebrake shape void into the long is a compromise, but holes aren't so much when you are overlaying such a strong piece. Hi Rand - I hear you but there are a few holes in the stiffener that happen to be right where those heater holes are. I figure why not...? |
|
|
|
| Rand |
Nov 19 2016, 12:34 AM
Post
#89
|
|
Cross Member Group: Members Posts: 7,415 Joined: 8-February 05 From: OR Member No.: 3,573 Region Association: None |
QUOTE(tygaboy @ Nov 18 2016, 08:58 PM) QUOTE(Rand @ Nov 18 2016, 08:03 PM) The ebrake void I get. But, don't bother welding sheet metal into the oval holes if you are putting that badass long overlay on. The ebrake shape void into the long is a compromise, but holes aren't so much when you are overlaying such a strong piece. Hi Rand - I hear you but there are a few holes in the stiffener that happen to be right where those heater holes are. I figure why not...? I get you. Easy work "while you're in there." So much easier to do it now than regret it later. Loving your build. |
|
|
|
| tygaboy |
Nov 19 2016, 01:59 PM
Post
#90
|
|
914 Guru Group: Members Posts: 5,845 Joined: 6-October 15 From: Petaluma, CA Member No.: 19,241 Region Association: Northern California |
Well, if Rand is concerned I'm overdoing it re: stiffening, this may just send him over the edge! (IMG:style_emoticons/default/biggrin.gif)
"While I'm in there", I figured "why not?" and fabbed up this simple support for the hand brake filler. Even drilled if extra weight savings. (I want to be like like Rudy Curbandgutter when I grow up! (IMG:style_emoticons/default/lol-2.gif) ) This actually turned out to be a tricky/fun part to fab. I had to get it measured and fitted so that it would support the filler in line with the top and sides of the long. Lots of fit, cut, fit, grind, straight edge, trim, fit, straight egde. But it turned out nicely and supports the stiffener exactly as planned. You'd think I actually knew what I was doing! So here's today's progress. All this just so I can FINALLY install the long stiffeners... Attached thumbnail(s) 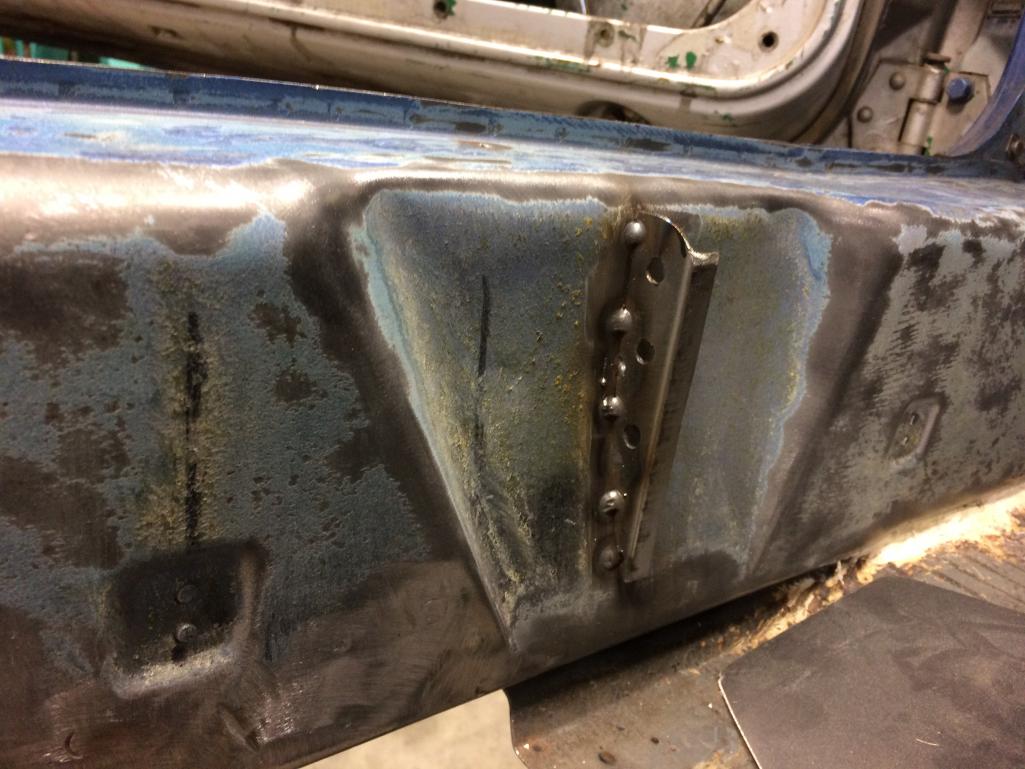 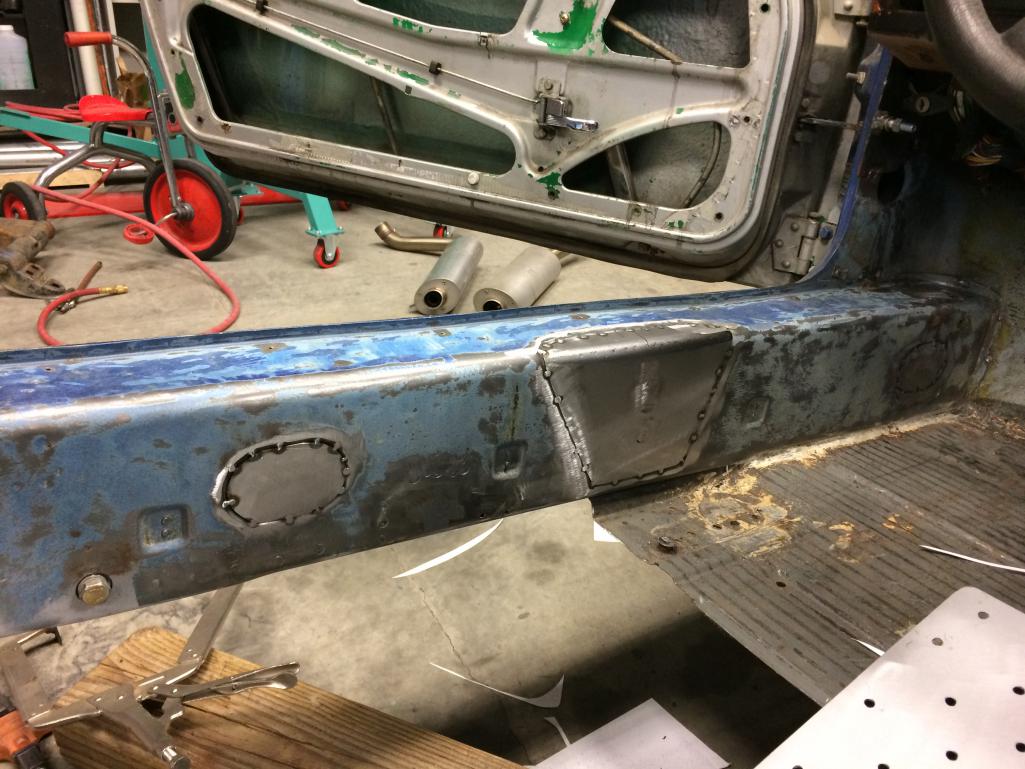
|
|
|
|
| Rand |
Nov 19 2016, 02:02 PM
Post
#91
|
|
Cross Member Group: Members Posts: 7,415 Joined: 8-February 05 From: OR Member No.: 3,573 Region Association: None |
No concerns, lol. Just banter. (IMG:style_emoticons/default/smilie_pokal.gif)
|
|
|
|
| tygaboy |
Nov 20 2016, 06:41 PM
Post
#92
|
|
914 Guru Group: Members Posts: 5,845 Joined: 6-October 15 From: Petaluma, CA Member No.: 19,241 Region Association: Northern California |
Major milestone! Got the engine and trans mocked in! (IMG:style_emoticons/default/piratenanner.gif)
The throttle body isn't installed (clearly) so now it's time to formalize plans for mods to the trunk to get the needed clearance. I've got a couple different ideas and I need to choose one pretty soon. But for now, I can finish the lower firewall and get the floor installed knowing I have all the space needed. I've been feeling a bit stuck but after today, it's full speed ahead. A good feeling. Attached thumbnail(s) 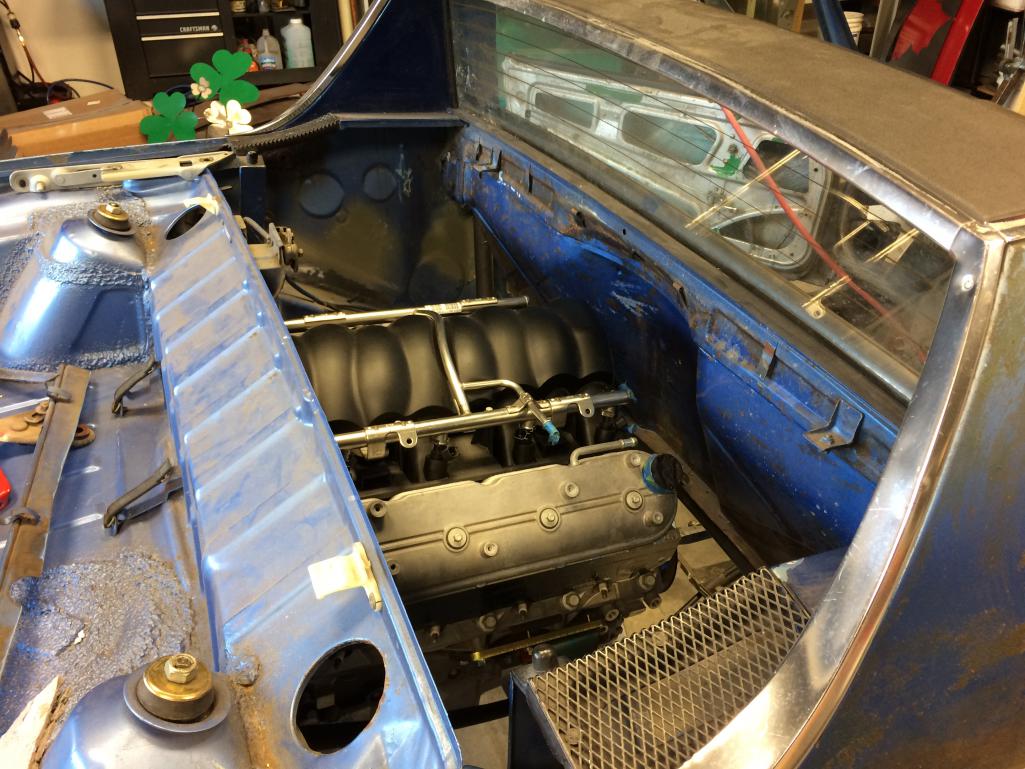
|
|
|
|
| Wew |
Nov 20 2016, 08:20 PM
Post
#93
|
|
Member Group: Members Posts: 240 Joined: 17-January 15 From: Novato, ca Member No.: 18,335 Region Association: None |
Wow, well done Chris! (IMG:style_emoticons/default/beer.gif)
|
|
|
|
| tygaboy |
Nov 22 2016, 12:57 PM
Post
#94
|
|
914 Guru Group: Members Posts: 5,845 Joined: 6-October 15 From: Petaluma, CA Member No.: 19,241 Region Association: Northern California |
With the trans located, I could verify the shifter cable length and order up the Numeric shifter and cables. Gotta say, I think it sure is pretty. (IMG:style_emoticons/default/wub.gif)
And I got a Black Friday deal on the shifter/cable package! Hope to get the firewall and floor bracing mocked in over the coming holiday weekend. Attached image(s) 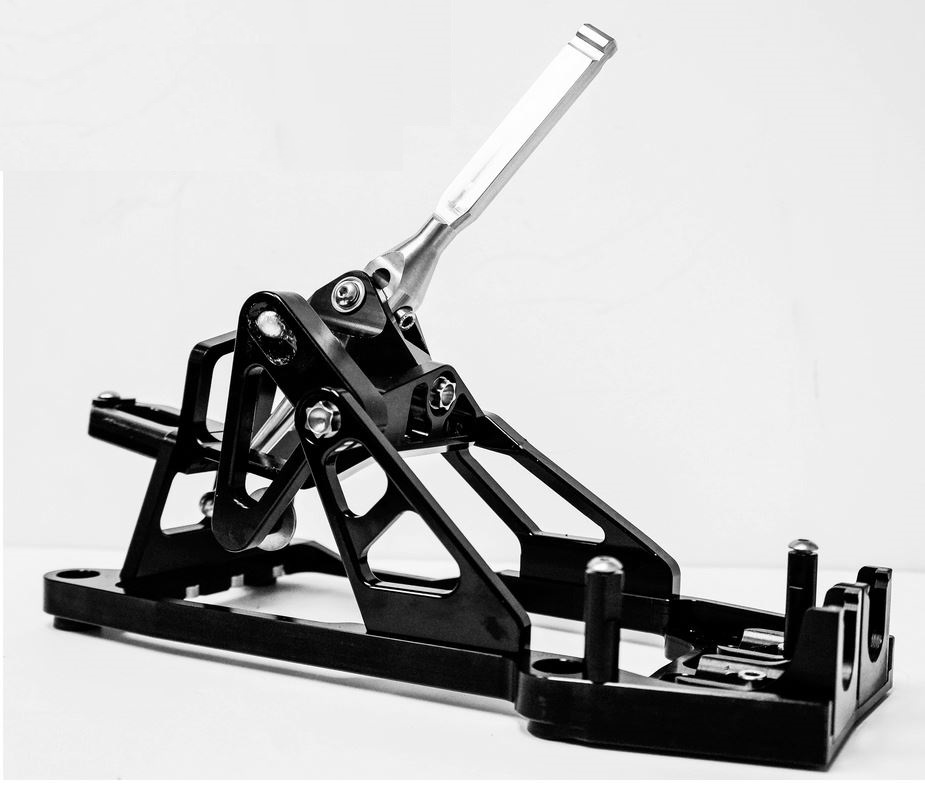
|
|
|
|
| tygaboy |
Nov 23 2016, 07:04 PM
Post
#95
|
|
914 Guru Group: Members Posts: 5,845 Joined: 6-October 15 From: Petaluma, CA Member No.: 19,241 Region Association: Northern California |
OK, even I'm getting tired of pictures of this part of the car! I took today off and got the long stiffeners screwed in place and all set for welding. Then I figured I may as well beef up the foundation for the firewall arch and rear floor cross brace so I fabbed up a set of 90 degree bent 'pads'.
First step was to cut them using the plasma table. A few quick measurements and about a minute with the drawing program and I have the blanks. The hydraulic unit that powers the tubing bender has dry break connectors that plug into the H press. Position the blanks and hit the Go button! It all makes quick work of making and shaping these one-off parts. (IMG:style_emoticons/default/smash.gif) The goal is that by the end of the weekend, I'll have the stiffeners and firewall frame welded in. Ideally, the floor will be at least partially in. Fit, cut and screwed in place for welding, if all goes well. Attached thumbnail(s) 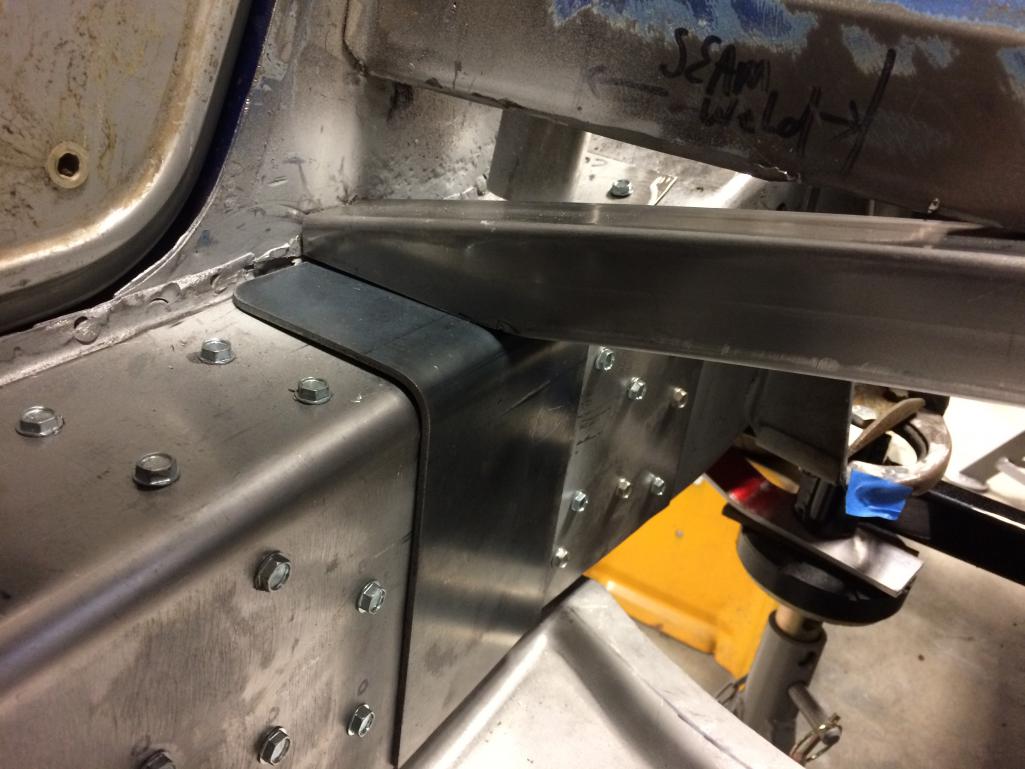 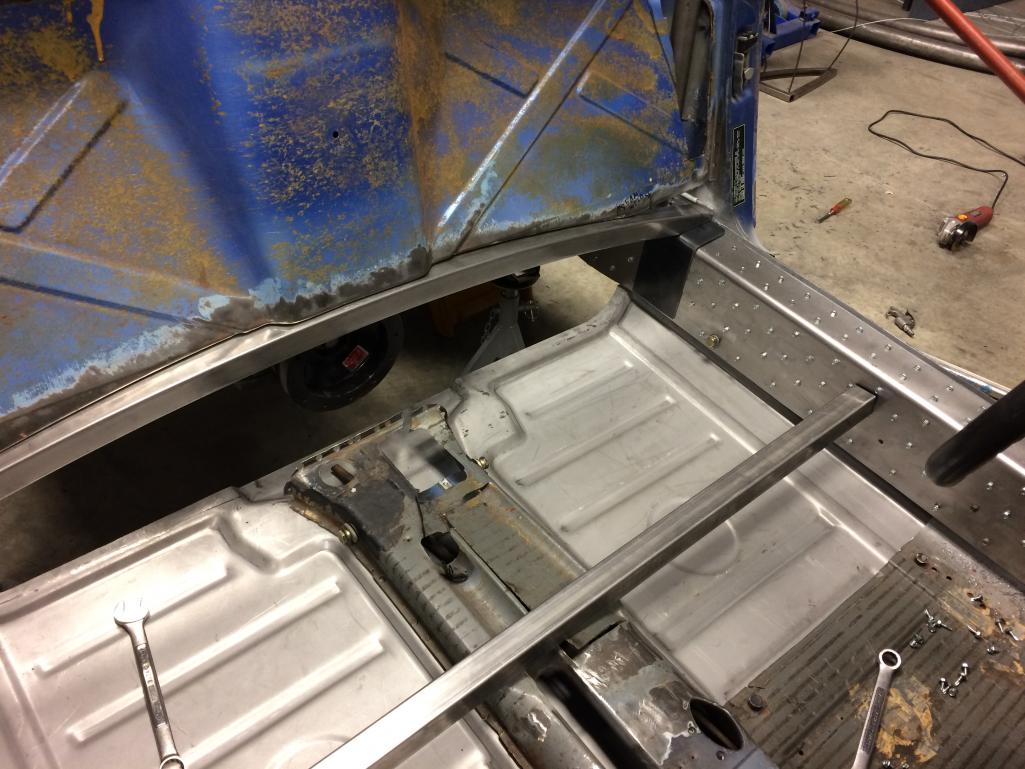
|
|
|
|
| tygaboy |
Nov 24 2016, 09:41 AM
Post
#96
|
|
914 Guru Group: Members Posts: 5,845 Joined: 6-October 15 From: Petaluma, CA Member No.: 19,241 Region Association: Northern California |
A little holiday video of the H press in use bending the support plates.
https://www.youtube.com/watch?v=fRBt1pYlS-I |
|
|
|
| tygaboy |
Nov 25 2016, 07:30 PM
Post
#97
|
|
914 Guru Group: Members Posts: 5,845 Joined: 6-October 15 From: Petaluma, CA Member No.: 19,241 Region Association: Northern California |
Some of this fab work isn't the most exciting but it needs doing. Tony (Cracker) has suggested moving the engine as far forward as possible to improve the CV angles. The stock engine mounts allow for a bit of movement but not as much as is actually possible. All I need is a set of custom mounts.
Plasma table to the rescue again! 1/4" plate cut to shape. Next I position the drive train where I want it, mount these plates and transfer punch the Renegade engine mount hole location. The trans mount has some slots that I may be able to lengthen but I suspect there isn't enough material. It's a multi-part mount so if need be, I'll have to make new rear tabs that are 1" or so longer. It's the sort of mod that will improve reliability so I think it's worth the effort. Attached thumbnail(s) 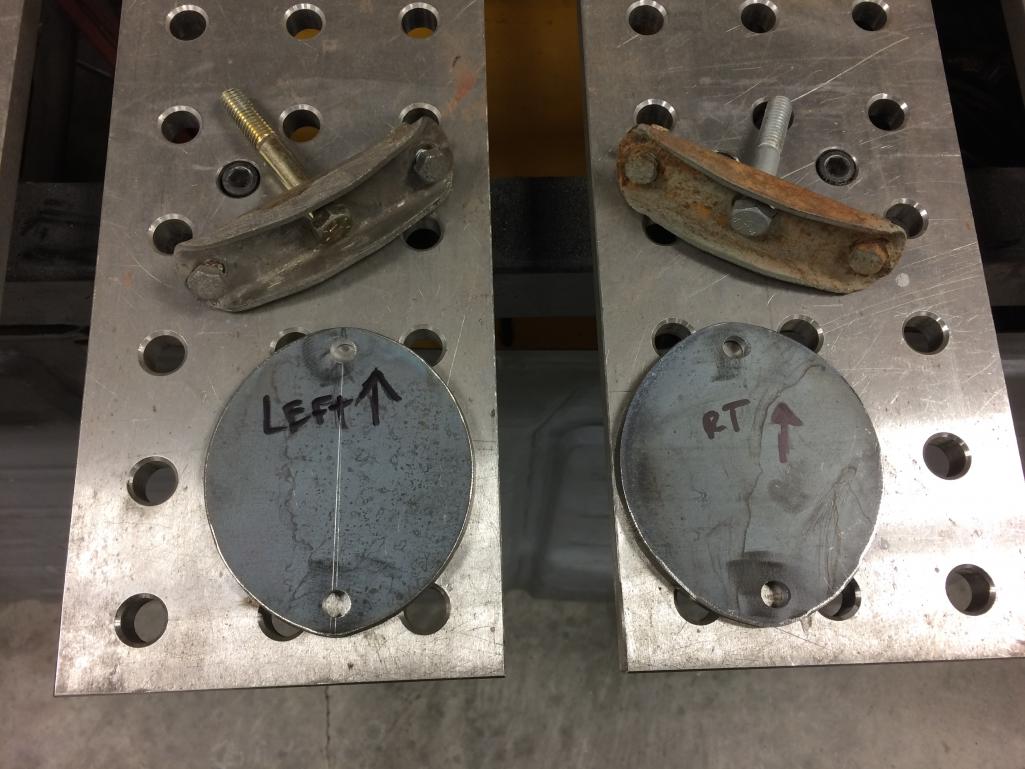
|
|
|
|
| 914forme |
Nov 27 2016, 05:59 PM
Post
#98
|
|
Times a wastin', get wrenchin'! Group: Members Posts: 3,899 Joined: 24-July 04 From: Dayton, Ohio Member No.: 2,388 Region Association: None |
(IMG:style_emoticons/default/agree.gif) It is very easy to push your mounts forward in the stock -4 mount brakes if that is what you are using.
|
|
|
|
| tygaboy |
Nov 27 2016, 06:23 PM
Post
#99
|
|
914 Guru Group: Members Posts: 5,845 Joined: 6-October 15 From: Petaluma, CA Member No.: 19,241 Region Association: Northern California |
My optimism regarding how much I'd get done this weekend was, well, optimistic.
I was only able to get the stiffeners welded in and the welds ground. Took WAY longer than I expected. I did get the lower fire wall support pads fit and welded in and the upper brace fit and ready for welding. CHANGES OF PLAN: 1. I'm tossing those motor mount plates in favor of modifying the Renegade motor mount. It has an offset at the ends to allow for the use of the stock engine mount location while pushing the engine back to clear all the stock sheet metal. I've decided to modify the ends of the mount to move the mounting points to be in line with the mount. That'll get me a bit more than an inch and I think it's a tidier modification. 2. I'm also tossing the existing front hoop in favor of a taller one that will sit in a different location. It'll be way easier to show pics than to explain it. I hope to get the new hoop bent up this week. Attached thumbnail(s)  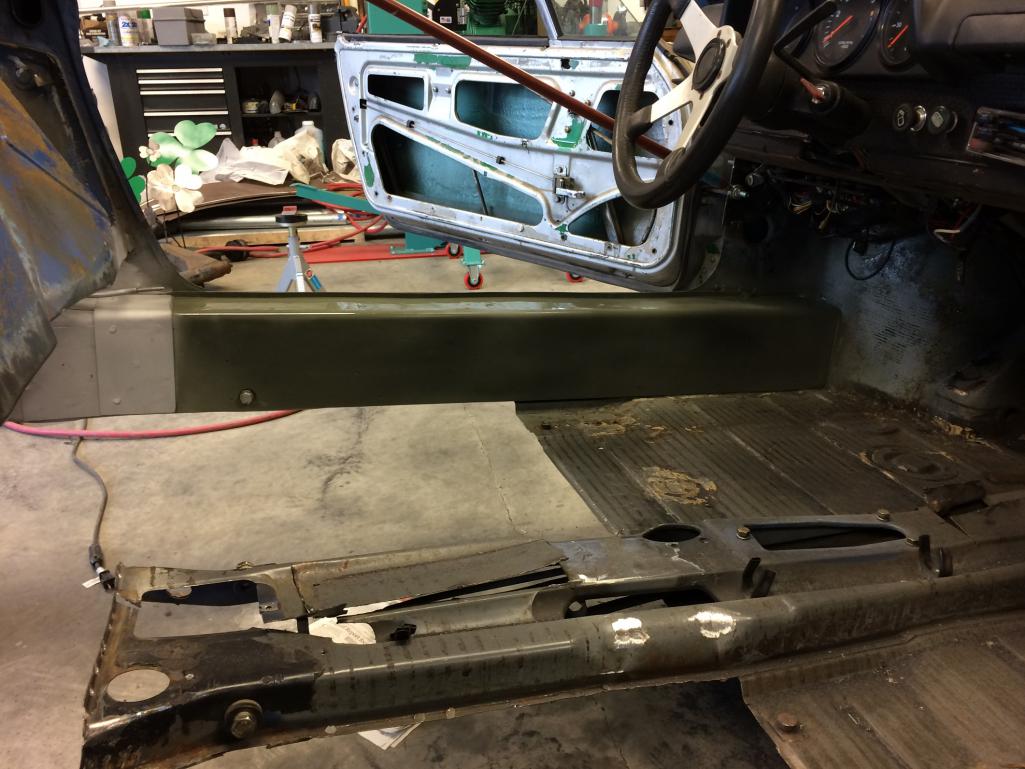 
|
|
|
|
| tygaboy |
Nov 27 2016, 06:25 PM
Post
#100
|
|
914 Guru Group: Members Posts: 5,845 Joined: 6-October 15 From: Petaluma, CA Member No.: 19,241 Region Association: Northern California |
QUOTE(914forme @ Nov 27 2016, 03:59 PM) (IMG:style_emoticons/default/agree.gif) It is very easy to push your mounts forward in the stock -4 mount brakes if that is what you are using. I've decided to go a different way that will allow me to use the stock mounts as they are. More on that as I get to it. |
|
|
|
|
1 User(s) are reading this topic (1 Guests and 0 Anonymous Users)
0 Members:

|
Lo-Fi Version | Time is now: 26th July 2026 - 10:21 PM |
Invision Power Board
v9.1.4 © 2026 IPS, Inc.