|
|
|
Porsche, and the Porsche crest are registered trademarks of Dr. Ing. h.c. F. Porsche AG.
This site is not affiliated with Porsche in any way. Its only purpose is to provide an online forum for car enthusiasts. All other trademarks are property of their respective owners. |
|
|

  |

| McMark |
 Oct 17 2016, 05:21 PM Oct 17 2016, 05:21 PM
Post
#1
|
|
914 Freak!  Group: Retired Admin Posts: 20,179 Joined: 13-March 03 From: Grand Rapids, MI Member No.: 419 Region Association: None |
One of my winter tasks is to build a stock 2.0 with my MicroSquirt fuel injection that I can install in my car and get it dyno tuned. That's been the missing piece of my MicroSquirt setup for the last few years.
Since there isn't much demand for a stock 2.0, I just plan on doing the minimum to build a solid motor. I plan on having the valves reground, cylinder surfaces machined and reringing the pistons. Regrinding the cam and rebuilding the rods and all new bearings as well. This should give me a motor that will last through the testing, and be worth something when I'm done to pass on to a new owner at a nice price. This thread does not represent my standard procedures for rebuilding engines. This is a special case and special circumstances. For those of you on a budget, but looking to refresh their motor should appreciate this writeup. Starting off with a core engine. The previous owner mentioned this engine had a 'knock', so I'll be on the lookout for what might have caused that. This is a 'GC' code engine with air injection ports in the heads. Attached image(s) 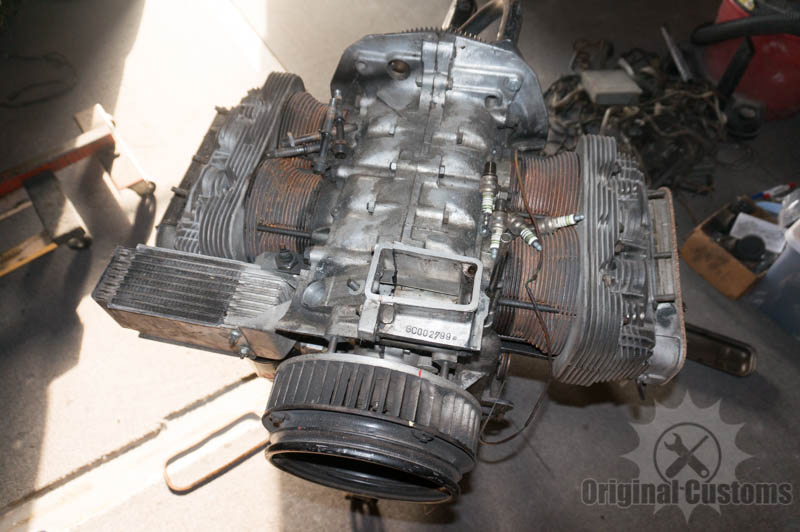 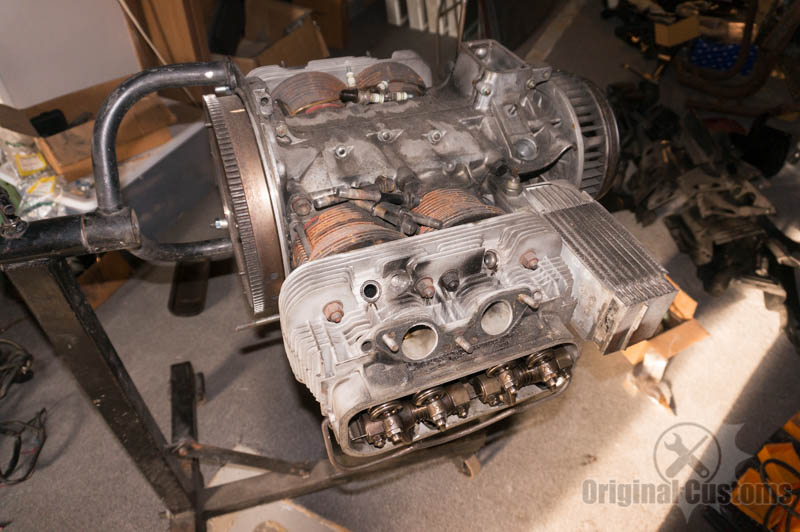
|
   |

 
|
| McMark |
Oct 17 2016, 05:28 PM
Post
#2
|
|
914 Freak! Group: Retired Admin Posts: 20,179 Joined: 13-March 03 From: Grand Rapids, MI Member No.: 419 Region Association: None |
Pulled the heads and found the first issue. I think the previous owner knew about this. Might have mentioned a screw down the intake? It's all a bit fuzzy.
The damage to the face of the head and the piston crown isn't much of an issue. These could be smoothed out and run. But there is a bigger issue. Because the piston impact is so close to the edge is deformed the first and second ring grooves. Notice the light spot on the side of the piston. So those rings weren't floating loose like they should be. The rings normally help center the piston in the bore, so this would leave the piston slightly loose and could have been the 'knock' the PO mentioned. Big piston slap. Attached image(s) 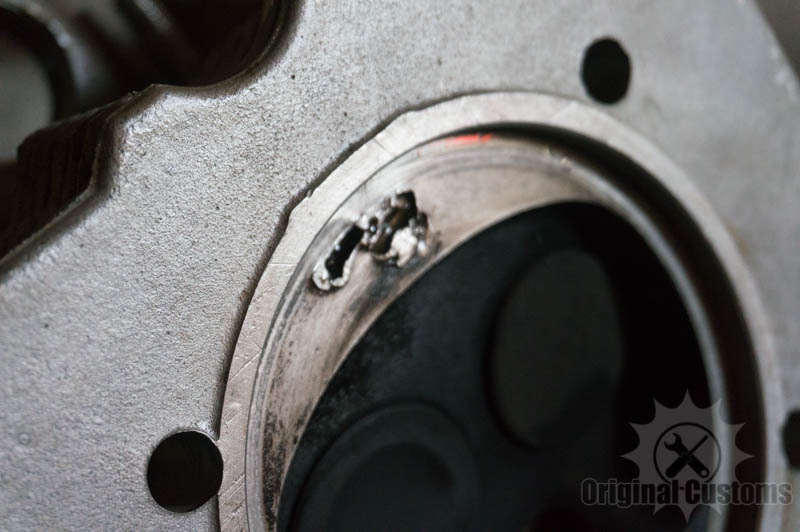 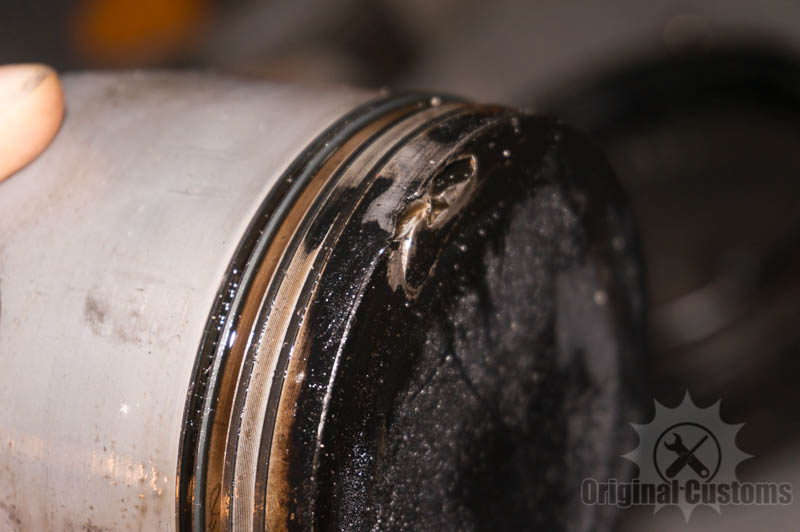
|
|
|
|
| Bartlett 914 |
Oct 17 2016, 05:29 PM
Post
#3
|
|
Advanced Member Group: Members Posts: 2,214 Joined: 30-August 05 From: South Elgin IL Member No.: 4,707 Region Association: Upper MidWest |
|
|
|
|
| McMark |
Oct 17 2016, 05:33 PM
Post
#4
|
|
914 Freak! Group: Retired Admin Posts: 20,179 Joined: 13-March 03 From: Grand Rapids, MI Member No.: 419 Region Association: None |
Another issue that I found was that the cam install was pretty much wrong every way possible. The grinding on the bolts is atrocious, but I can ignore the lack of concern for aesthetics. One of the bolts holding the cam gear on was left a little too long and was contacting the oil pump. This could have been another source of noise. The cam has slight movement front to back, so so it can make noise under some conditions and not others.
Attached image(s) 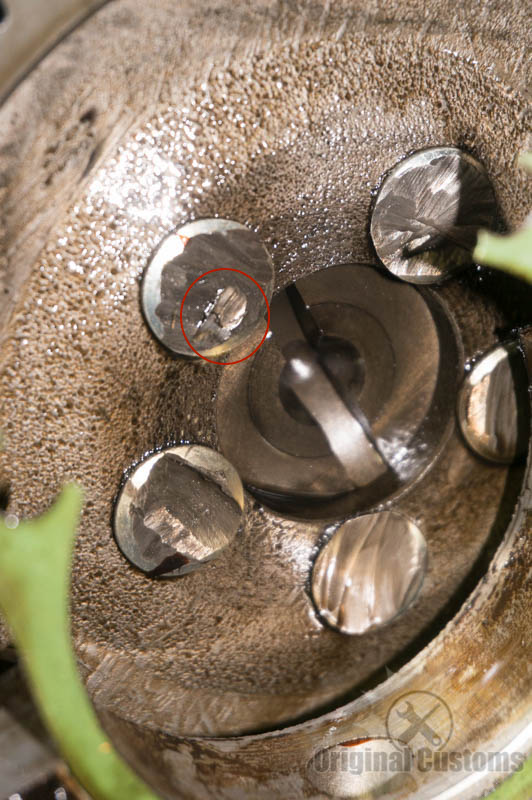 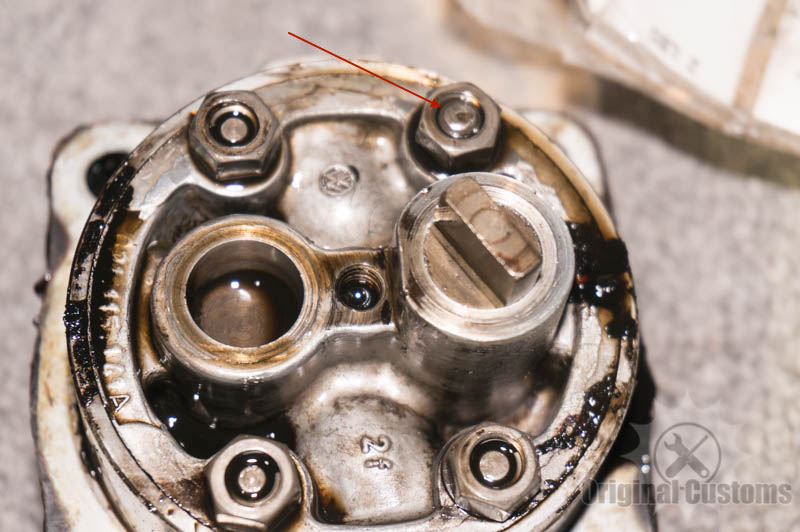
|
|
|
|
| McMark |
Oct 17 2016, 05:35 PM
Post
#5
|
|
914 Freak! Group: Retired Admin Posts: 20,179 Joined: 13-March 03 From: Grand Rapids, MI Member No.: 419 Region Association: None |
Still on the cam, the end plug was installed backwards. Which cause the cam to rub on the plug. This wasn't allowing the cam to float fore-aft like it should. This would cause premature wear of the bearings and could eventually wear through the plug leaking massive amounts of oil.
Attached image(s) 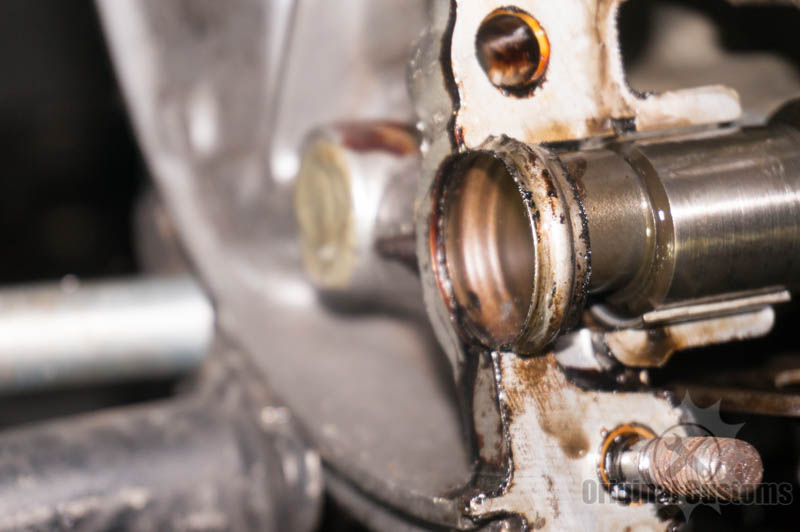 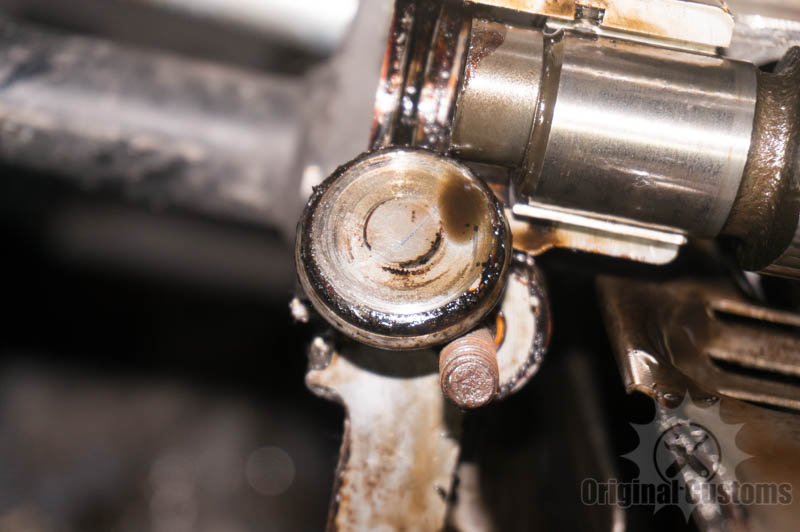
|
|
|
|
| McMark |
Oct 17 2016, 05:37 PM
Post
#6
|
|
914 Freak! Group: Retired Admin Posts: 20,179 Joined: 13-March 03 From: Grand Rapids, MI Member No.: 419 Region Association: None |
And finally, it appears the cam was beginning to go flat. It was a reground stock cam (as far as I can tell), but this lobe has a very rough wear pattern on the nose and the associated lifters were looking pretty rough.
Attached image(s) 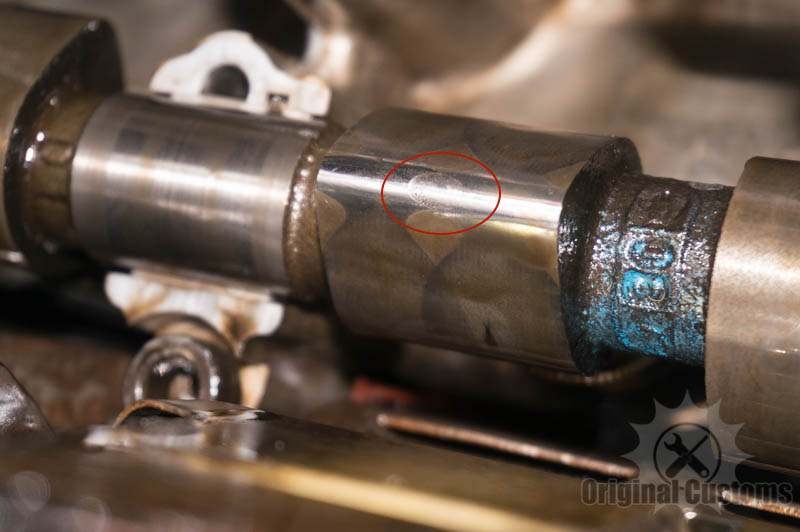
|
|
|
|
| McMark |
Oct 17 2016, 05:42 PM
Post
#7
|
|
914 Freak! Group: Retired Admin Posts: 20,179 Joined: 13-March 03 From: Grand Rapids, MI Member No.: 419 Region Association: None |
So now that my quickie 2.0 rebuild is torn down, I'm left wondering how to proceed. This is not a bad core motor, because usually I toss the pistons/cylinders and cam/lifters. And the PO provided a set of good heads along with these. But the plan I laid out in the first post can't really work now. I need to think a bit about if I should seek out a set of decent used 2.0 pistons. If I should buy new ones. Or maybe bump it to 2056.
The whole point was to not really spend any money on this build because it's only purpose was supposed to allow me to tune a 100% stock engine on MicroSquirt. If I start changing things (cam grind/piston size) I can't really do that anymore. If anyone wants to commit to buying this engine after I'm done with it we can talk about making a deal. Just keep in mind I'm looking to build a stock 2.0 with no upgrades. |
|
|
|
| napasteve |
Oct 17 2016, 07:26 PM
Post
#8
|
|
914 driving winemaker Group: Members Posts: 501 Joined: 2-January 13 From: Napa, CA Member No.: 15,327 Region Association: Northern California |
As Chance the gardener said "I like to watch".
|
|
|
|
| 76-914 |
Oct 17 2016, 08:15 PM
Post
#9
|
|
Repeat Offender & Resident Subaru Antagonist Group: Members Posts: 13,494 Joined: 23-January 09 From: Temecula, CA Member No.: 9,964 Region Association: Southern California |
(IMG:style_emoticons/default/popcorn[1].gif) I'm sure this isn't the first time you've opened up someone else's "can of worms". Just curious Mark; what are the most common mistakes made by rookies that you've witnessed?
|
|
|
|
| VaccaRabite |
Oct 19 2016, 11:50 AM
Post
#10
|
|
En Garde! Group: Admin Posts: 13,437 Joined: 15-December 03 From: Dallastown, PA Member No.: 1,435 Region Association: MidAtlantic Region |
I would not worry about the cam bolt to oil pump contact. It was a self-machining problem. It clearanced itself!
(come tune my engine) ;-) |
|
|
|
| Mueller |
Oct 19 2016, 11:54 AM
Post
#11
|
|
914 Freak! Group: Members Posts: 17,146 Joined: 4-January 03 From: Antioch, CA Member No.: 87 Region Association: None |
thanks for the thread Mark, always nice to learn from someones mistakes (not yours, the previous motor owner! )
bummer you have to spend a little more time and money on it! |
|
|
|
| ottox914 |
Oct 19 2016, 01:09 PM
Post
#12
|
|
The glory that once was. Group: Members Posts: 1,302 Joined: 15-December 03 From: Mahtomedi, MN Member No.: 1,438 Region Association: Upper MidWest |
I have a set of 2.0 flat top pistons and cyls that are in great shape if you need/want them. I think you were going to give me a ring tonight about some other things? We could talk p/c's then too. They would need rings, but any reasonable re-build, "quickie" or not, should probably have those anyway.
|
|
|
|
| JOEPROPER |
Oct 19 2016, 02:43 PM
Post
#13
|
|
The answer is "no" unless you ask... Group: Members Posts: 1,184 Joined: 21-November 15 From: White Plains New York Member No.: 19,387 Region Association: North East States |
(IMG:style_emoticons/default/popcorn[1].gif) This looks to be the makings of a great thread. I'm sure many will be watching. (IMG:style_emoticons/default/smoke.gif)
|
|
|
|
| Kansas 914 |
Oct 20 2016, 08:12 AM
Post
#14
|
|
Advanced Member Group: Members Posts: 2,999 Joined: 1-March 03 From: Durango, Colorado Member No.: 373 Region Association: Rocky Mountains |
QUOTE(JOEPROPER @ Oct 19 2016, 02:43 PM)  (IMG:style_emoticons/default/popcorn[1].gif) This looks to be the makings of a great thread. I'm sure many will be watching. (IMG:style_emoticons/default/smoke.gif) Subscribed! (IMG:style_emoticons/default/popcorn[1].gif) |
|
|
|
| McMark |
Oct 20 2016, 08:55 AM
Post
#15
|
|
914 Freak! Group: Retired Admin Posts: 20,179 Joined: 13-March 03 From: Grand Rapids, MI Member No.: 419 Region Association: None |
Got a PM from a member who has stock 2.0 pistons to send me and wants to make this their engine when I'm done. So we're gonna proceed! (IMG:style_emoticons/default/thumb3d.gif)
Just gotta finish cleaning the parts and start shipping stuff out that needs it. I found a lightly used Webcam stock grind camshaft in my pile. I'll send that back to Webcam for inspection, resurfacing and I'll get new lifters from them as well. |
|
|
|
| blackmoon |
Oct 20 2016, 09:20 AM
Post
#16
|
|
Member Group: Members Posts: 153 Joined: 27-May 08 From: Cal Bay Area Member No.: 9,106 Region Association: None |
(IMG:style_emoticons/default/piratenanner.gif) I appreciated the build with the explanations and review of the parts
|
|
|
|
| McMark |
Aug 20 2017, 01:49 PM
Post
#17
|
|
914 Freak! Group: Retired Admin Posts: 20,179 Joined: 13-March 03 From: Grand Rapids, MI Member No.: 419 Region Association: None |
FINALLY got caught up enough to jump back into this a bit. (IMG:style_emoticons/default/wacko.gif)
This is an alternate set of pistons I mentioned. Better shape, but still a few warts. These make a pretty good example of typical used pistons. I first hit these with my portable soda-blaster from Harbor Freight. Soda is soft enough to not damage the surface of the aluminum. No other media should be used on pistons. The soda was extremely effective at cleaning out the collected deposits in the ring grooves. The small divots and the valve impact crescent aren't really a big deal for a budget build engine. The two big factors to watch out for when evaluating these pistons was making sure any divots near the edge of the piston weren't deforming outward and pressing against the cylinder wall. Small imperfections can be carefully and lightly filed and sanded smooth. The rings are what rides against the cylinder walls, so filing/sanding a tiny area is okay. It's also important to make sure there are no 'peaks' from the damage. Peaks sit higher than the piston and collect more heat. These hot-peaks can, in some cases, cause detonation/pinging by igniting the air/fuel mixture before the intended time. Knock down any peaks with sandpaper, small file, or a razor blade. No need to get it perfectly flat, and nothing pictured here is peaky. Also, these pistons illustate why you ALWAYS knock wrist pins out with a brass drift. I had to carefully file and sand all four wrist pin bores. This takes a light touch and some skill to know when to stop filing. The idea is to remove only the high spots, and bring the wrist pin bore back to it's original size. So here's the wrap up the piston evaluation: Remember the scope of this build is targeted at the home builder just looking to breathe a little life back into a tired motor. These pistons took a fair amount of labor to get right, but you save a few hundred dollars. These will work well for this engine, regardless of their imperfections. Attached image(s) 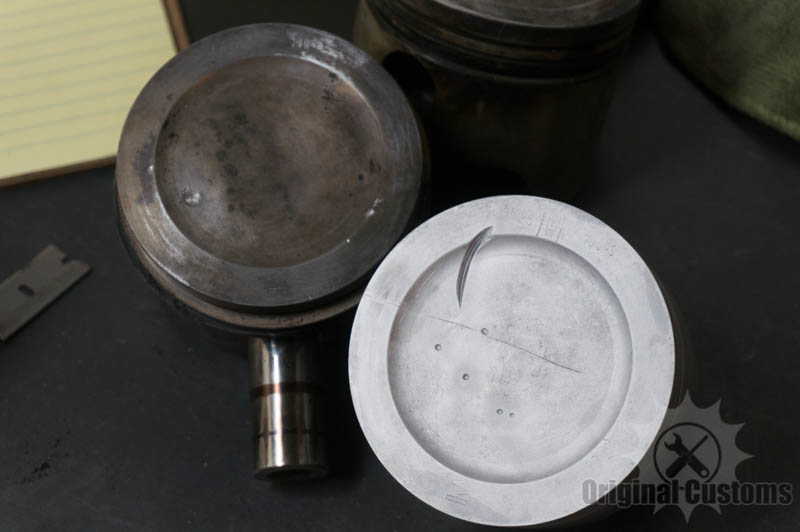 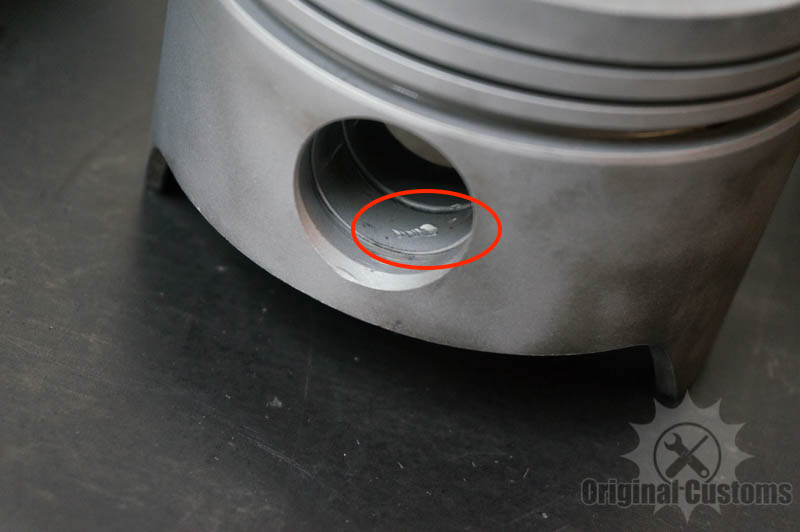
|
|
|
|
| pichu |
Aug 21 2017, 10:34 PM
Post
#18
|
|
Newbie Group: Members Posts: 1 Joined: 23-July 17 From: Alberta, Canada Member No.: 21,278 Region Association: None |
Nice thread and idea! Not all of us are rich and I want to take out and 'refresh' my engine for education (and winter fun) (IMG:style_emoticons/default/smile.gif)
|
|
|
|
| Mblizzard |
Aug 22 2017, 06:55 AM
Post
#19
|
|
Advanced Member Group: Members Posts: 3,033 Joined: 28-January 13 From: Knoxville Tn Member No.: 15,438 Region Association: South East States |
QUOTE(McMark @ Oct 20 2016, 06:55 AM) Got a PM from a member who has stock 2.0 pistons to send me and wants to make this their engine when I'm done. So we're gonna proceed! (IMG:style_emoticons/default/thumb3d.gif) Just gotta finish cleaning the parts and start shipping stuff out that needs it. I found a lightly used Webcam stock grind camshaft in my pile. I'll send that back to Webcam for inspection, resurfacing and I'll get new lifters from them as well. Can't go wrong there. I know from experience! I even did the same drop the screw in but with less dramatic results. i think going to the 96 mm pistons is a must and if the budget allows big valves. It will never make a huge difference but the changes are notable in normal driving and a bit of hard driving. |
|
|
|
| cary |
Aug 22 2017, 06:59 AM
Post
#20
|
|
Advanced Member Group: Members Posts: 3,900 Joined: 26-January 04 From: Sherwood Oregon Member No.: 1,608 Region Association: Pacific Northwest |
subscribed
|
|
|
|
|
1 User(s) are reading this topic (1 Guests and 0 Anonymous Users)
0 Members:

|
Lo-Fi Version | Time is now: 5th May 2024 - 07:20 PM |
Invision Power Board
v9.1.4 © 2024 IPS, Inc.