|
|
|
Porsche, and the Porsche crest are registered trademarks of Dr. Ing. h.c. F. Porsche AG.
This site is not affiliated with Porsche in any way. Its only purpose is to provide an online forum for car enthusiasts. All other trademarks are property of their respective owners. |
|
|

  |

| Ross |
 Nov 21 2016, 07:57 AM Nov 21 2016, 07:57 AM
Post
#1
|
|
Member  Group: Members Posts: 90 Joined: 17-August 16 From: Charlotte, NC Member No.: 20,304 Region Association: South East States |
Hi 914 World,
Does anyone have experience with replacing the rear trunk plastic rollers? (These are the rollers in the engine compartment that are "tensioned" by a bar that pushes against them for raising the rear trunk. Unfortunately, my rollers are gone and I only have two bars that rub against each other...and make a lot of noise). Do you all know if someone has documented this job or where I could find some advice? I started to take it apart this weekend, but then stopped as I didn't want to end up with a mess or an unfinished job. Thank you very much in advance, Ross |
   |

 
|
| rhodyguy |
Nov 21 2016, 08:39 AM
Post
#2
|
|
Chimp Sanctuary NW. Check it out. Group: Members Posts: 22,081 Joined: 2-March 03 From: Orion's Bell. The BELL! Member No.: 378 Region Association: Galt's Gulch |
Open engine lid. Fully raise trunk lid and prop it up (helps with load on springs). Grab 10mm (or 9?) deep socket and long extension. Thin wall 1/4" drive works swell. Persuade socket firmly on to spring end. PUT ON GLOVES. Lever spring down to the point where you can get the old roller off. Clean the roller post and lightly lube. Put on new roller and lever the spring back in to place. Repeat for the other side. Should take 15 minutes to 1/2 hour.
|
|
|
|
| sb914 |
Nov 21 2016, 08:41 AM
Post
#3
|
|
Surf Guru Group: Members Posts: 4,304 Joined: 25-November 12 From: Brookings,Oregon Member No.: 15,191 Region Association: Southern California |
And be carefull
|
|
|
|
| rhodyguy |
Nov 21 2016, 09:30 AM
Post
#4
|
|
Chimp Sanctuary NW. Check it out. Group: Members Posts: 22,081 Joined: 2-March 03 From: Orion's Bell. The BELL! Member No.: 378 Region Association: Galt's Gulch |
GLOVES! Don't mess around with the spring retaining clips. They are your friends with my method.
|
|
|
|
| malcolm2 |
Nov 21 2016, 10:54 AM
Post
#5
|
|
Advanced Member Group: Members Posts: 2,745 Joined: 31-May 11 From: Nashville Member No.: 13,139 Region Association: South East States |
QUOTE(rhodyguy @ Nov 21 2016, 08:39 AM)  Open engine lid. Fully raise trunk lid and prop it up (helps with load on springs). Grab 10mm (or 9?) deep socket and long extension. Thin wall 1/4" drive works swell. Persuade socket firmly on to spring end. PUT ON GLOVES. Lever spring down to the point where you can get the old roller off. Clean the roller post and lightly lube. Put on new roller and lever the spring back in to place. Repeat for the other side. Should take 15 minutes to 1/2 hour. I remember using this method. And after 25,000 miles 1 of my plastic rollers has broken. I bought some aluminum ones and I am ready to install. But with all the trunks open, how do you get to the end of the spring. I think I originally did mine with both trunks off the car, prior to complete assembly. |
|
|
|
| rhodyguy |
Nov 21 2016, 11:25 AM
Post
#6
|
|
Chimp Sanctuary NW. Check it out. Group: Members Posts: 22,081 Joined: 2-March 03 From: Orion's Bell. The BELL! Member No.: 378 Region Association: Galt's Gulch |
You need to lightly drive the socket on the roller end of the spring with a hammer. Then stick the extension in the socket. I removed my springs long ago. Trying to remember. You may need tap the socket on when lid is in the closed position. Don't worry, you won't hurt the old rollers. (IMG:style_emoticons/default/smile.gif)
|
|
|
|
| Ross |
Nov 21 2016, 11:39 AM
Post
#7
|
|
Member Group: Members Posts: 90 Joined: 17-August 16 From: Charlotte, NC Member No.: 20,304 Region Association: South East States |
sounds like a plan, thanks Guys very much! You guys are awesome!
|
|
|
|
| Mikey914 |
Nov 21 2016, 11:40 AM
Post
#8
|
|
The rubber man Group: Members Posts: 12,670 Joined: 27-December 04 From: Hillsboro, OR Member No.: 3,348 Region Association: None |
I've used the socket method. There is actually a tool. It' basically a 1/2" x 1-1/2" piece of rectangular steel bar that's about 12" long (guessing from pictures I've seen). It has a notch about the thickness of the spring. It will slide down the gap and allow you to easily replace the roller safely. You can see the gap here (note we now only sell the white delrin rollers- black shown).
You may be able to fabricate one pretty easily from some scrap steel laying around. Just out of curiosity where did you get the rollers that broke. Glass reinforced Delrin shouldn't break down that easily? Attached image(s) 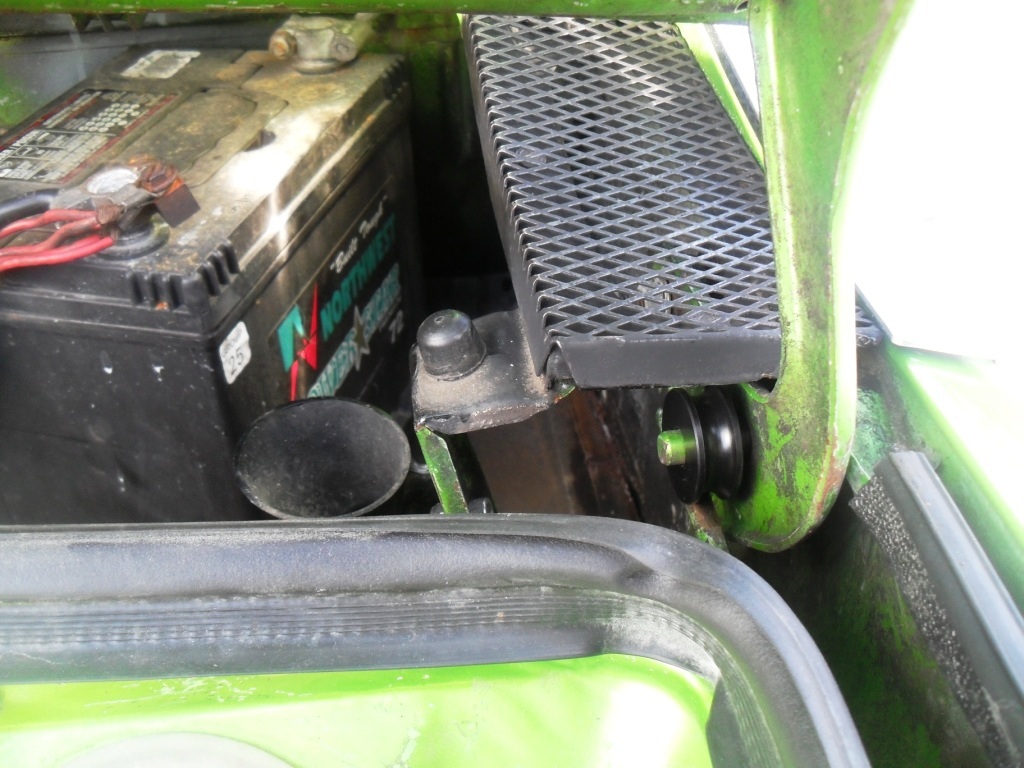
|
|
|
|
| Jeffs9146 |
Nov 21 2016, 11:45 AM
Post
#9
|
|
Ski Bum Group: Members Posts: 4,062 Joined: 10-January 03 From: Discovery Bay, Ca Member No.: 128 |
Here are a few photos of the tool!
Attached image(s) 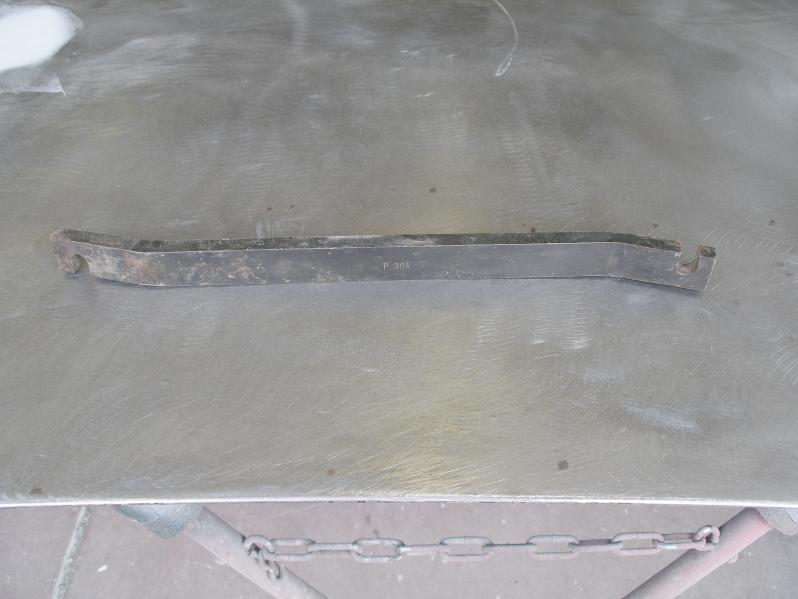 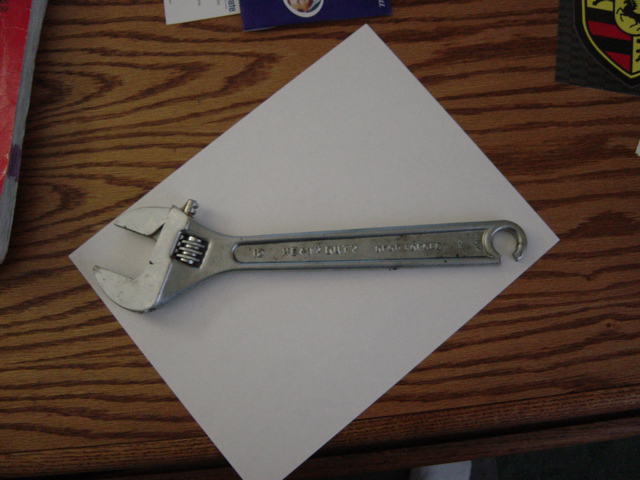
|
|
|
|
| Mikey914 |
Nov 21 2016, 11:51 AM
Post
#10
|
|
The rubber man Group: Members Posts: 12,670 Joined: 27-December 04 From: Hillsboro, OR Member No.: 3,348 Region Association: None |
I like the custom wrench. Much safer, and easier.
|
|
|
|
| malcolm2 |
Nov 21 2016, 11:54 AM
Post
#11
|
|
Advanced Member Group: Members Posts: 2,745 Joined: 31-May 11 From: Nashville Member No.: 13,139 Region Association: South East States |
The battery side plastic roller is still operating. However....
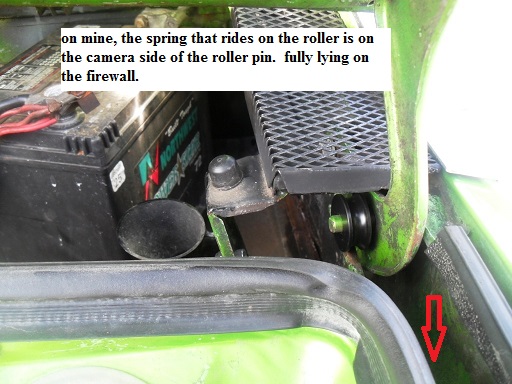 Since my spring has sprung, anyone think I can get it back to the other side of the roller pin with the trunk lid attached? |
|
|
|
| Mikey914 |
Nov 21 2016, 12:03 PM
Post
#12
|
|
The rubber man Group: Members Posts: 12,670 Joined: 27-December 04 From: Hillsboro, OR Member No.: 3,348 Region Association: None |
Only safe way is to reposition the springs by disassembling the spring assembly.
Attached image(s) 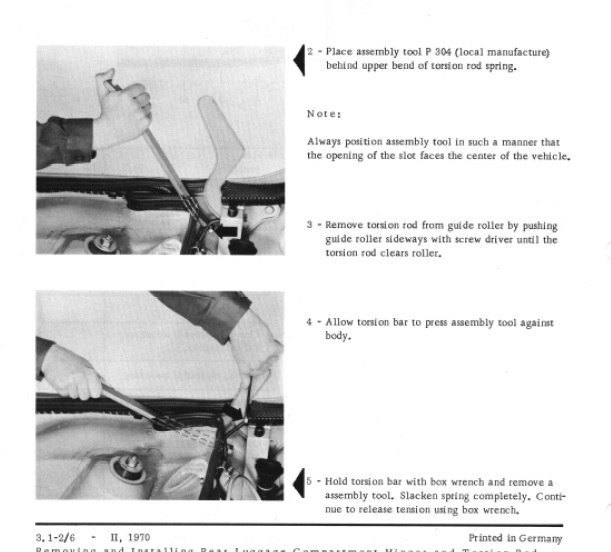 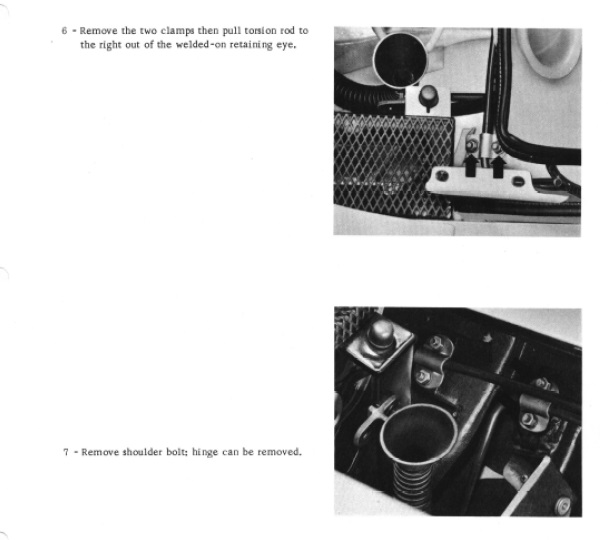 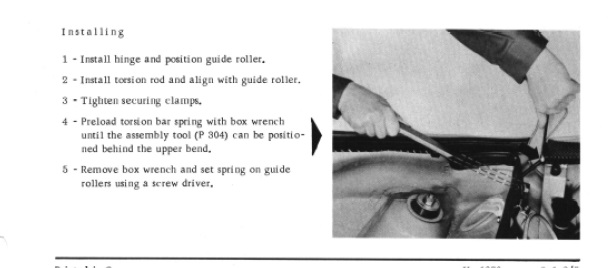
|
|
|
|
| Mikey914 |
Nov 21 2016, 12:05 PM
Post
#13
|
|
The rubber man Group: Members Posts: 12,670 Joined: 27-December 04 From: Hillsboro, OR Member No.: 3,348 Region Association: None |
From your comment on the spring. I wonder if the hinges were put on backwards????
|
|
|
|
| malcolm2 |
Nov 21 2016, 12:11 PM
Post
#14
|
|
Advanced Member Group: Members Posts: 2,745 Joined: 31-May 11 From: Nashville Member No.: 13,139 Region Association: South East States |
QUOTE(Mikey914 @ Nov 21 2016, 12:05 PM) From your comment on the spring. I wonder if the hinges were put on backwards???? You mean my comment? Well I was the one that put them on, so they could be backwards and upside down. (IMG:style_emoticons/default/drunk.gif) But seriously, I don't see how they could be backwards. The pin that the roller sits on has to point into the engine bay. And when opened the hinge bracket "wraps" around the little side grill. I am just gonna have to start taking stuff apart again. (IMG:style_emoticons/default/barf.gif) |
|
|
|
| Mikey914 |
Nov 21 2016, 12:15 PM
Post
#15
|
|
The rubber man Group: Members Posts: 12,670 Joined: 27-December 04 From: Hillsboro, OR Member No.: 3,348 Region Association: None |
I was thinking the "spring on the wall" was the pins were oriented out. Didn't think it would be possible, but I've seen some strange things.
You may not need a full disassembly here. If you can prop the hood up that would save some time. Try that 1st. Then if you have to you can remove. |
|
|
|
| rhodyguy |
Nov 21 2016, 12:36 PM
Post
#16
|
|
Chimp Sanctuary NW. Check it out. Group: Members Posts: 22,081 Joined: 2-March 03 From: Orion's Bell. The BELL! Member No.: 378 Region Association: Galt's Gulch |
Pins are on the engine side of the arms. Have a look and try the socket method. It will work. Take the bat out. Once you start removing the torsion rod keepers, it's a whole new game plan. The rod end in ? Is still on the pin side, yes? I don't recall having to remove the rear lid for the roller replacement. Def a 2 person job for that one.
|
|
|
|
| North Coast Jim |
Nov 22 2016, 01:05 PM
Post
#17
|
|
Member Group: Members Posts: 323 Joined: 11-December 15 From: Northern Ohio Member No.: 19,450 Region Association: MidAtlantic Region |
QUOTE(Ross @ Nov 21 2016, 08:57 AM) Hi 914 World, Does anyone have experience with replacing the rear trunk plastic rollers? (These are the rollers in the engine compartment that are "tensioned" by a bar that pushes against them for raising the rear trunk. Unfortunately, my rollers are gone and I only have two bars that rub against each other...and make a lot of noise). Do you all know if someone has documented this job or where I could find some advice? I started to take it apart this weekend, but then stopped as I didn't want to end up with a mess or an unfinished job. Thank you very much in advance, Ross I built the attached tool to do this job. I had no rollers at all as they were removed for the complete paint job on the body. Tried the socket method and almost took off my head. Not safe. This tool worked like a charm. Attached thumbnail(s) 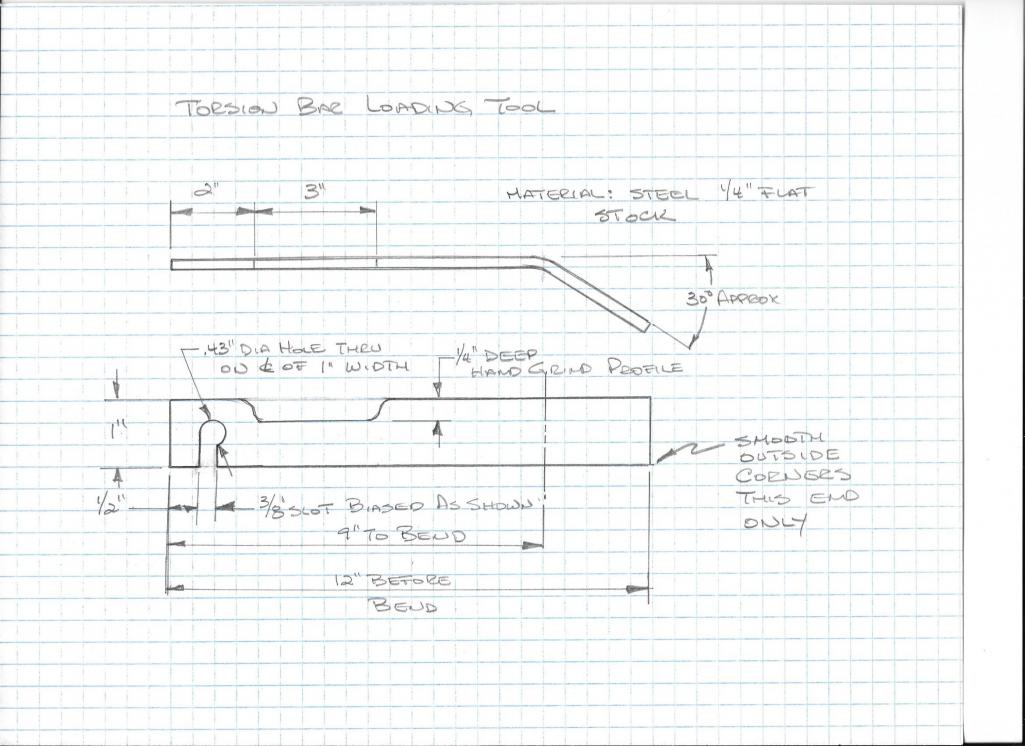
|
|
|
|
| Sea Dragon 914 |
Nov 23 2016, 05:51 PM
Post
#18
|
|
Member Group: Members Posts: 114 Joined: 26-February 03 Member No.: 358 Region Association: Northern California |
I have one of the tools and it works great. Much safer than the socket/crescent wrench method.
If anyone in my area needs to borrow it to replace a roller, let me know. Much safer than losing fingers or an eye. |
|
|
|
|
1 User(s) are reading this topic (1 Guests and 0 Anonymous Users)
0 Members:

|
Lo-Fi Version | Time is now: 20th May 2024 - 05:03 PM |
Invision Power Board
v9.1.4 © 2024 IPS, Inc.