|
|
|
Porsche, and the Porsche crest are registered trademarks of Dr. Ing. h.c. F. Porsche AG.
This site is not affiliated with Porsche in any way. Its only purpose is to provide an online forum for car enthusiasts. All other trademarks are property of their respective owners. |
|
|

  |

| vintage914racer |
 Nov 24 2016, 12:25 PM Nov 24 2016, 12:25 PM
Post
#1
|
|
Member  Group: Members Posts: 429 Joined: 28-December 03 From: Minneapolis, MN Member No.: 1,473 |
While some people were out drinking Thanksgiving eve I was in the garage replacing a rear wheel bearing in my track car. In process I noticed a lot of lateral play in the trailing arm. I tightened the mounting nuts, but it didn't change the lateral movement. I only assume that movement isn' t normal? I'm running polybrionze bushings. They were installed 6 or 7 years ago, or roughly 50-60 track hours.
Next step check for ovalling of the mounting holes? Obligatory bearing and beer photo below. 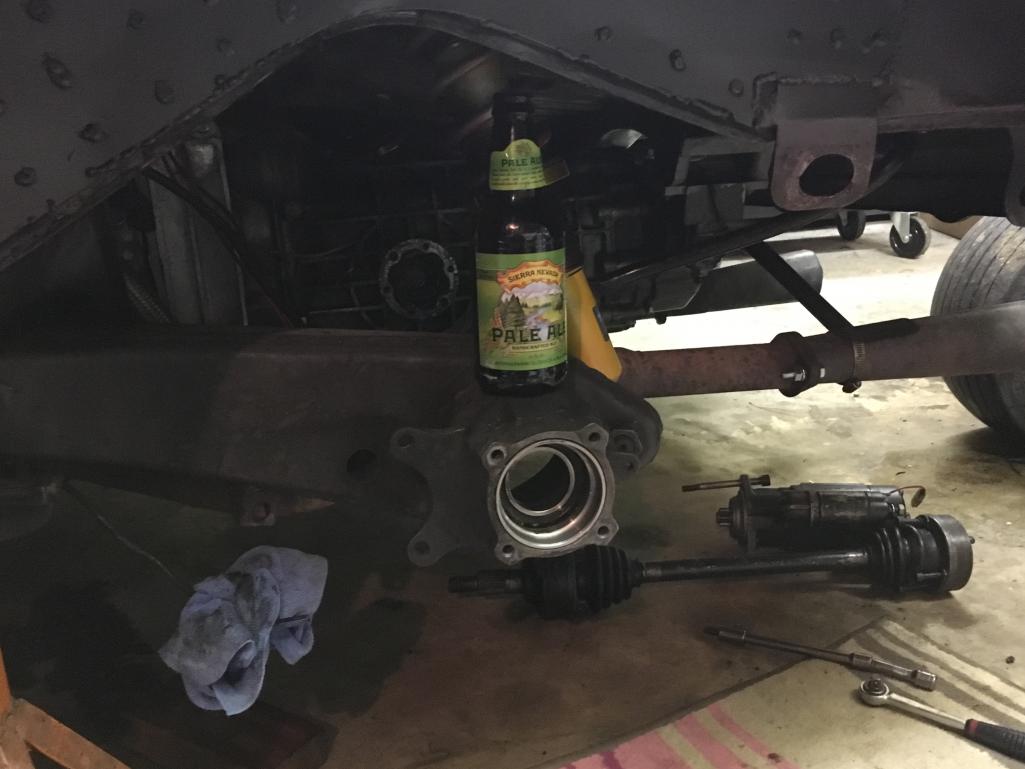 |
   |

 
|
| 914_teener |
Nov 24 2016, 12:41 PM
Post
#2
|
|
914 Guru Group: Members Posts: 5,197 Joined: 31-August 08 From: So. Cal Member No.: 9,489 Region Association: Southern California |
Agree....could have ovaled the hole.
You are at the point there where you might as well just take the whole arm off..... and have another Thanksgiving beer. Also could be the bushing. Have they been replaced ever? Happy Thanksgiving....waiting for my crew to come over. |
|
|
|
| 914_teener |
Nov 24 2016, 12:43 PM
Post
#3
|
|
914 Guru Group: Members Posts: 5,197 Joined: 31-August 08 From: So. Cal Member No.: 9,489 Region Association: Southern California |
Oh....and I hope it isn't...but:
Take the control arm off and make sure the suspension console isn't cracked. |
|
|
|
| vintage914racer |
Nov 24 2016, 01:30 PM
Post
#4
|
|
Member Group: Members Posts: 429 Joined: 28-December 03 From: Minneapolis, MN Member No.: 1,473 |
QUOTE(914_teener @ Nov 24 2016, 10:43 AM)  Oh....and I hope it isn't...but: Take the control arm off and make sure the suspension console isn't cracked. Yeah, my next plan is to take the arm off. I'm going to take both off this winter to install the tangerine suspension ear reinforcement kit so I guess you could say I'm just getting an early start now. Coincidentally the bearing install was smooth as butter. |
|
|
|
| ConeDodger |
Nov 24 2016, 01:33 PM
Post
#5
|
|
Apex killer! Group: Members Posts: 23,586 Joined: 31-December 04 From: Tahoe Area Member No.: 3,380 Region Association: Northern California |
QUOTE(914_teener @ Nov 24 2016, 03:41 PM) Agree....could have ovaled the hole. You are at the point there where you might as well just take the whole arm off..... and have another Thanksgiving beer. Also could be the bushing. Have they been replaced ever? Happy Thanksgiving....waiting for my crew to come over. Oval bolt holes. (IMG:style_emoticons/default/agree.gif) (IMG:style_emoticons/default/sad.gif) |
|
|
|
| vintage914racer |
Nov 24 2016, 01:52 PM
Post
#6
|
|
Member Group: Members Posts: 429 Joined: 28-December 03 From: Minneapolis, MN Member No.: 1,473 |
QUOTE I've searched but not found the preffered approach to fix an oval led bolt hole. Simply weld and file? I recall someone talking about welding a washer... |
|
|
|
| vintage914racer |
Dec 10 2016, 01:14 PM
Post
#7
|
|
Member Group: Members Posts: 429 Joined: 28-December 03 From: Minneapolis, MN Member No.: 1,473 |
So I got the driver's side trailing arm removed. Once I got the shocks, brakes, etc, unbolted from the arm my unscientific wiggling did suggest that the inner ear bolt hole was the source of the wiggle. I was surprised, however, to get the arm removed and not see much by way of oval-ing.
Could even a small amount of out of roundness cause the noticeable wiggle? Is there a best practice for bringing the hole back to round? 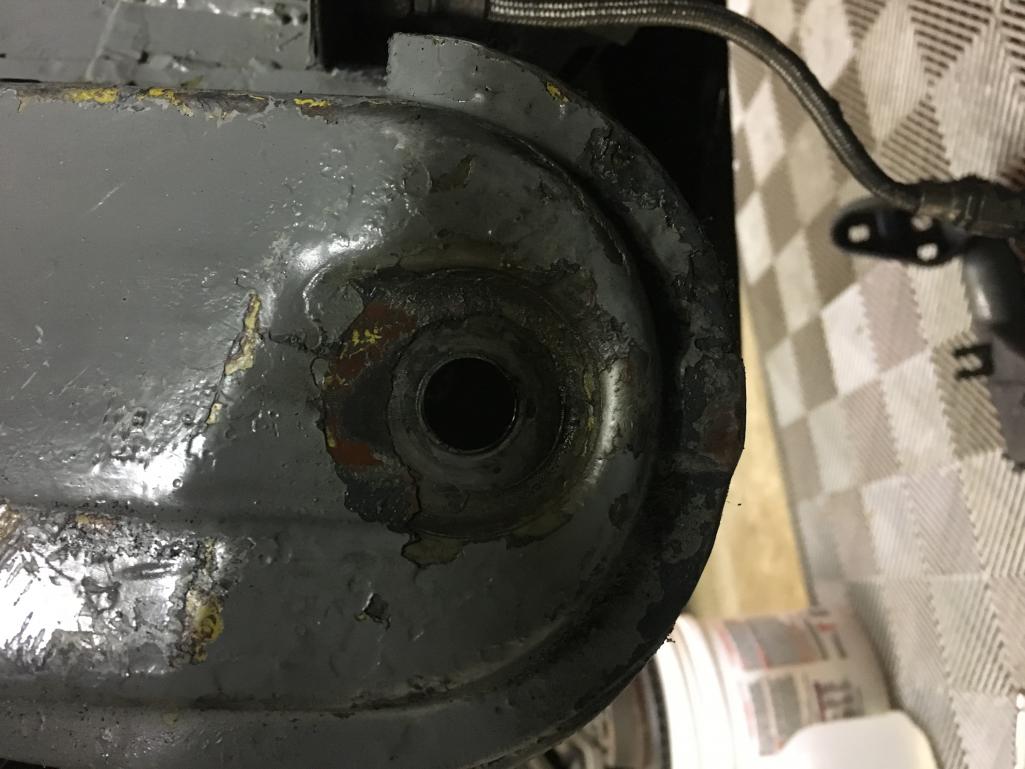 |
|
|
|
| 914forme |
Dec 10 2016, 02:04 PM
Post
#8
|
|
Times a wastin', get wrenchin'! Group: Members Posts: 3,896 Joined: 24-July 04 From: Dayton, Ohio Member No.: 2,388 Region Association: None |
Weld a washer in there, easy.
Over drill the hold and build a new seat by machine and welding in a piece, that replaces your washer, it would be a step washer. Weld in different rear inner ears. Replace the arm mounts with a Tangerine Racing Pieces, and fix it for ever! Obviously price goes up from cheap to $$$$.$$ for the solutions. Also how are your bearings? |
|
|
|
| vintage914racer |
Dec 10 2016, 08:11 PM
Post
#9
|
|
Member Group: Members Posts: 429 Joined: 28-December 03 From: Minneapolis, MN Member No.: 1,473 |
QUOTE(914forme @ Dec 10 2016, 12:04 PM) Weld a washer in there, easy. Over drill the hold and build a new seat by machine and welding in a piece, that replaces your washer, it would be a step washer. Weld in different rear inner ears. Replace the arm mounts with a Tangerine Racing Pieces, and fix it for ever! Obviously price goes up from cheap to $$$$.$$ for the solutions. Also how are your bearings? Thanks for the input. I actually have the tangerine reinforcement that just showed up in the mail today, so that is going to supplement my repairs. The washer repair method seemed a little too easy to me, but I suppose if that works it's a good ways to fix quick. |
|
|
|
| 914forme |
Dec 11 2016, 06:20 AM
Post
#10
|
|
Times a wastin', get wrenchin'! Group: Members Posts: 3,896 Joined: 24-July 04 From: Dayton, Ohio Member No.: 2,388 Region Association: None |
Some time easy is the way to go (IMG:style_emoticons/default/dry.gif)
BTW, you can also move the positions around if you need to to dial in a bit more camber or toe if you are finding you are limited in you adjustments. Don't worry about loosing the heat treating of the washer either, as the factory ear hole was not heat treated. Ihave done my number 1 solution several times. I now have access to a lathe so number 2 would get my vote, just to allow the German in me to come out and play. Also a stronger repair, maybe (IMG:style_emoticons/default/dry.gif) Number 3 is the solution I am going to use on my conversion car. As it allows me to be a perfectionist, and over engineer a solution with a minimalistic approach while spending the most $$$ to complete a task. (IMG:style_emoticons/default/confused24.gif) And Chris' parts are so (IMG:style_emoticons/default/drooley.gif) |
|
|
|
| injunmort |
Dec 11 2016, 04:48 PM
Post
#11
|
|
Senior Member Group: Members Posts: 1,024 Joined: 12-April 10 From: sugarloaf ny Member No.: 11,604 Region Association: North East States |
the hole does not look ovaled, the console looks compromised and cracked around the hole. that would cause plenty of movement until it fails completely. i would grind down to bare metal and check the integrity of the console.
|
|
|
|
| Jeff Hail |
Dec 11 2016, 04:58 PM
Post
#12
|
|
Senior Member Group: Members Posts: 1,141 Joined: 3-May 07 From: LA/ CA Member No.: 7,712 |
So lets see here.... The trailing arms have play and the hardware was tight on both sides of the pivot shaft with no load? Sounds like the bushings are worn or not properly shimmed. Pretty common for the arms to be out of spec in the bushing sleeves when using poly bronze. Can shim with copper sheet or bond with JB.
Clean off the paint on the console check for cracks. If no cracks return to bushings/arms. |
|
|
|
| vintage914racer |
Dec 11 2016, 09:53 PM
Post
#13
|
|
Member Group: Members Posts: 429 Joined: 28-December 03 From: Minneapolis, MN Member No.: 1,473 |
Despite how it may have looked in the metal the ear did not appear cracked or compromised in person. Regardless I ground it down to bare metal and confirmed there's I cracks, tears, etc.
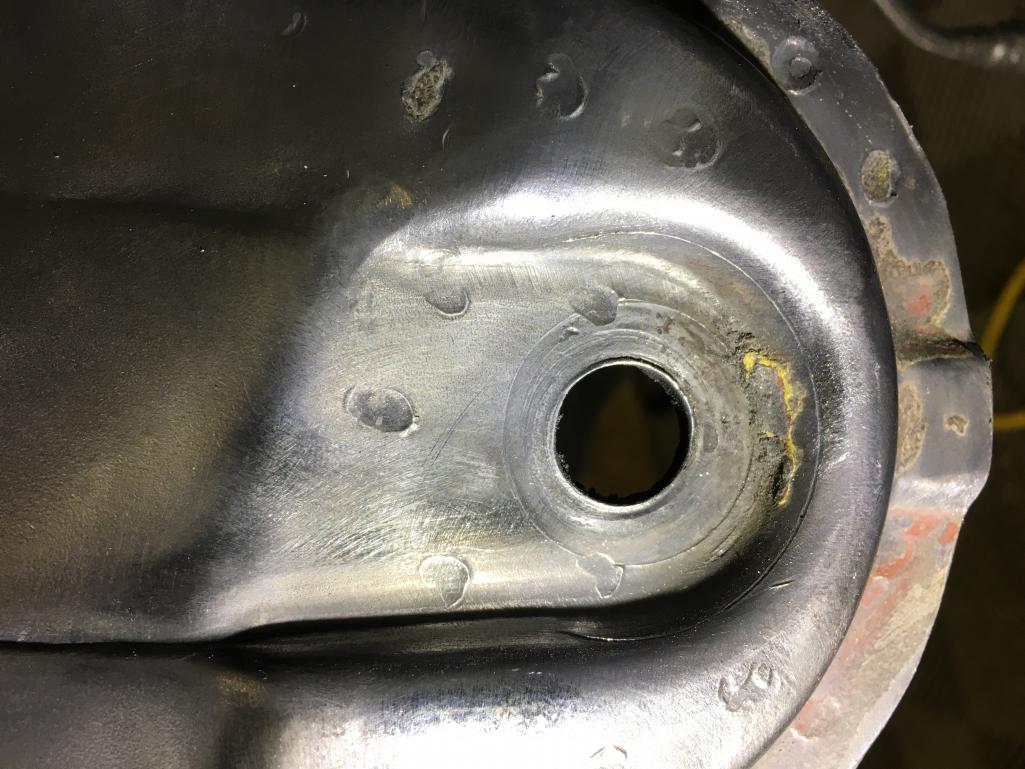 I have the tangerine reinforcement I'm going to add. While the hole doesn't look too ovaled I'm going to repair it and investigate whether the PB bushing end needs to get shimmed. This side should be pretty easy. I found a lot of work on the other side, however.... |
|
|
|
| 914_teener |
Dec 11 2016, 10:16 PM
Post
#14
|
|
914 Guru Group: Members Posts: 5,197 Joined: 31-August 08 From: So. Cal Member No.: 9,489 Region Association: Southern California |
QUOTE(vintage914racer @ Dec 11 2016, 07:53 PM) Despite how it may have looked in the metal the ear did not appear cracked or compromised in person. Regardless I ground it down to bare metal and confirmed there's I cracks, tears, etc. I have the tangerine reinforcement I'm going to add. While the hole doesn't look too ovaled I'm going to repair it and investigate whether the PB bushing end needs to get shimmed. This side should be pretty easy. I found a lot of work on the other side, however.... It looks like the pivot shaft is spinning against the mounting ear. I vote for shimming is the issue. I'd put Chris kit in anyways and weld the washer in. |
|
|
|
| vintage914racer |
Dec 11 2016, 10:24 PM
Post
#15
|
|
Member Group: Members Posts: 429 Joined: 28-December 03 From: Minneapolis, MN Member No.: 1,473 |
QUOTE(914_teener @ Dec 11 2016, 08:16 PM) QUOTE(vintage914racer @ Dec 11 2016, 07:53 PM) Despite how it may have looked in the metal the ear did not appear cracked or compromised in person. Regardless I ground it down to bare metal and confirmed there's I cracks, tears, etc. I have the tangerine reinforcement I'm going to add. While the hole doesn't look too ovaled I'm going to repair it and investigate whether the PB bushing end needs to get shimmed. This side should be pretty easy. I found a lot of work on the other side, however.... It looks like the pivot shaft is spinning against the mounting ear. I vote for shimming is the issue. I'd put Chris kit in anyways and weld the washer in. You're right, it looks like the shaft is machining the ear. |
|
|
|
| McMark |
Dec 12 2016, 09:03 AM
Post
#16
|
|
914 Freak! Group: Retired Admin Posts: 20,179 Joined: 13-March 03 From: Grand Rapids, MI Member No.: 419 Region Association: None |
Did nobody mention bushings yet? Or did I miss something in the thread that addressed this.
The rubber bushings inside the trailing arm could be disintegrating. |
|
|
|
| 914_teener |
Dec 12 2016, 09:35 AM
Post
#17
|
|
914 Guru Group: Members Posts: 5,197 Joined: 31-August 08 From: So. Cal Member No.: 9,489 Region Association: Southern California |
QUOTE(McMark @ Dec 12 2016, 07:03 AM) Did nobody mention bushings yet? Or did I miss something in the thread that addressed this. The rubber bushings inside the trailing arm could be disintegrating. Missed it me thinks. He posted that he had installed polybronze so assumed he had replaced them. I.d post a picture of the ends of the bushing to see what is going on. |
|
|
|
| eeyore |
Dec 12 2016, 11:54 AM
Post
#18
|
|
Senior Member Group: Members Posts: 889 Joined: 8-January 04 From: meridian, id Member No.: 1,533 Region Association: None |
The poly part of the bushing could be worn out and moving inside the trailing arm. Perhaps they need to be re-seated in the arm.
The outboard mount / adjuster 'plate' could be ovaled. You might need to loosen the mount / adjuster, then tighten the shaft nuts. |
|
|
|
| vintage914racer |
Dec 12 2016, 04:57 PM
Post
#19
|
|
Member Group: Members Posts: 429 Joined: 28-December 03 From: Minneapolis, MN Member No.: 1,473 |
QUOTE(McMark @ Dec 12 2016, 07:03 AM) Did nobody mention bushings yet? Or did I miss something in the thread that addressed this. The rubber bushings inside the trailing arm could be disintegrating. Car has polybronze bushings that we're installed less than 1,000 miles ago. |
|
|
|
| 914_teener |
Dec 12 2016, 08:17 PM
Post
#20
|
|
914 Guru Group: Members Posts: 5,197 Joined: 31-August 08 From: So. Cal Member No.: 9,489 Region Association: Southern California |
So the money shot would be what the pivot shaft and the polybronze bushing look like and how installed.
Pics would be helpful. |
|
|
|
|
1 User(s) are reading this topic (1 Guests and 0 Anonymous Users)
0 Members:

|
Lo-Fi Version | Time is now: 15th May 2024 - 09:20 PM |
Invision Power Board
v9.1.4 © 2024 IPS, Inc.