|
|
|
Porsche, and the Porsche crest are registered trademarks of Dr. Ing. h.c. F. Porsche AG.
This site is not affiliated with Porsche in any way. Its only purpose is to provide an online forum for car enthusiasts. All other trademarks are property of their respective owners. |
|
|

  |

| 80cap |
 Dec 5 2016, 01:46 PM Dec 5 2016, 01:46 PM
Post
#1
|
|
Member  Group: Members Posts: 317 Joined: 6-February 15 From: ohio Member No.: 18,405 Region Association: None |
Before I install my fuel tank is there a way to bench test the fuel level sending unit?
Thanks Brian |
   |

 
|
| Dave_Darling |
Dec 5 2016, 02:18 PM
Post
#2
|
|
914 Idiot Group: Members Posts: 14,980 Joined: 9-January 03 From: Silicon Valley / Kailua-Kona Member No.: 121 Region Association: Northern California |
There should be three (possibly four) electrical contacts in the plug for the sender. One will be a ground, one will be for the gauge, and one will be for the warning light. The ground contact should have a "three parallel lines" ground logo; the wire from the light should be labeled "WK", and the wire from the gauge should be labeled "G".
The ground connection would have a brown wire that plugs into it, the warning light a black wire, and the gauge signal a green wire. So, with the sender out of the fuel tank and held upright: - Resistance between WK and ground should be about zero - Resistance between G and ground should be about 70-100 ohms With the sender turned upside down: - Resistance between WK and ground should be infinite (no connection) - Resistance between G and ground should be ~1-10 ohms The float inside the sender should slide up and down relatively freely when the sender is turned upside down and rightside up. --DD |
|
|
|
| 80cap |
Dec 5 2016, 03:07 PM
Post
#3
|
|
Member Group: Members Posts: 317 Joined: 6-February 15 From: ohio Member No.: 18,405 Region Association: None |
Thanks Dave!
Well like most things so far on my restoration it is shot. Just ordered a new VDO sender on the inter web. Brian (IMG:style_emoticons/default/headbang.gif) |
|
|
|
| 914Bryan |
Dec 6 2016, 10:03 AM
Post
#4
|
|
Member Group: Members Posts: 190 Joined: 6-June 11 From: Orange County Member No.: 13,162 Region Association: Southern California |
Does anyone have pictures of this?
|
|
|
|
| jim_hoyland |
Dec 6 2016, 09:49 PM
Post
#5
|
|
Get that VIN ? Group: Members Posts: 9,255 Joined: 1-May 03 From: Sunset Beach, CA Member No.: 643 Region Association: Southern California |
(IMG:style_emoticons/default/agree.gif) Just went through this. The inside of the sender has a float that "rides" on two wire strands, a third wire, usually 25 gauge copper, connects the top and bottom of the sender. This wire frequently breaks; don't know why. If it is broken, the low-fuel light will not function. It is easily replaced and only needs a drop of solder at each end to repair or replace
|
|
|
|
| HansJan |
Jan 25 2017, 09:59 PM
Post
#6
|
|
Member Group: Members Posts: 394 Joined: 5-April 16 From: Sugar Land TX Member No.: 19,860 Region Association: Southwest Region |
Just ran out of gas this evening. The reserve light was on (I thought it to be a malfunction of the light), but the gauge was pointing to 1/2 full.
After filling up (approx. 13 Gallon) the gauge points to full. So I guess the gauge gets stuck at 50%. How can this be corrected? PS: This is the only thread I could find with the search, Br, Hans jan |
|
|
|
| Dave_Darling |
Jan 25 2017, 10:29 PM
Post
#7
|
|
914 Idiot Group: Members Posts: 14,980 Joined: 9-January 03 From: Silicon Valley / Kailua-Kona Member No.: 121 Region Association: Northern California |
The warning light contacts are on the same float as the gauge sender stuff, so it is unlikely that the float is getting stuck.
It could be that there is a short or problem in the resistance wire inside the sender, or it could be that the gauge is wonky. We tell people to always trust the light over the needle on the gauge. --DD |
|
|
|
| HansJan |
Jan 25 2017, 10:52 PM
Post
#8
|
|
Member Group: Members Posts: 394 Joined: 5-April 16 From: Sugar Land TX Member No.: 19,860 Region Association: Southwest Region |
QUOTE(Dave_Darling @ Jan 25 2017, 10:29 PM)  The warning light contacts are on the same float as the gauge sender stuff, so it is unlikely that the float is getting stuck. It could be that there is a short or problem in the resistance wire inside the sender, or it could be that the gauge is wonky. We tell people to always trust the light over the needle on the gauge. --DD Thanks Dave, I will start looking for a new/used gauge. Br, Hans Jan |
|
|
|
| bdstone914 |
Jan 26 2017, 09:42 AM
Post
#9
|
|
bdstone914 Group: Members Posts: 4,508 Joined: 8-November 03 From: Riverside CA Member No.: 1,319 |
QUOTE(Hans Jan @ Jan 25 2017, 10:52 PM) QUOTE(Dave_Darling @ Jan 25 2017, 10:29 PM) The warning light contacts are on the same float as the gauge sender stuff, so it is unlikely that the float is getting stuck. It could be that there is a short or problem in the resistance wire inside the sender, or it could be that the gauge is wonky. We tell people to always trust the light over the needle on the gauge. --DD Thanks Dave, I will start looking for a new/used gauge. Br, Hans Jan I have several fuel tank gauges. Cheap. What year is the car ? Silver dot center? The connectors on the fuel gauge are different. You can just replace the fuel gauge portion. You can test the gauge by grounding the sending unit wire and it should peg the gauge. Bruce |
 |
|
| Dave_Darling |
Jan 26 2017, 02:23 PM
Post
#10
|
|
914 Idiot Group: Members Posts: 14,980 Joined: 9-January 03 From: Silicon Valley / Kailua-Kona Member No.: 121 Region Association: Northern California |
QUOTE(Hans Jan @ Jan 25 2017, 08:52 PM) I will start looking for a new/used gauge. I suggest checking the resistance of the sender both full and empty, before spending money on replacing the gauge. --DD |
|
|
|
| HansJan |
Jan 26 2017, 06:51 PM
Post
#11
|
|
Member Group: Members Posts: 394 Joined: 5-April 16 From: Sugar Land TX Member No.: 19,860 Region Association: Southwest Region |
Have not yet figured out how to read the resistance accros the sending unit (there are three wires).
Used the little time I had today to remove the unit and verify that it shows 50% on an empty tank (see pictures). 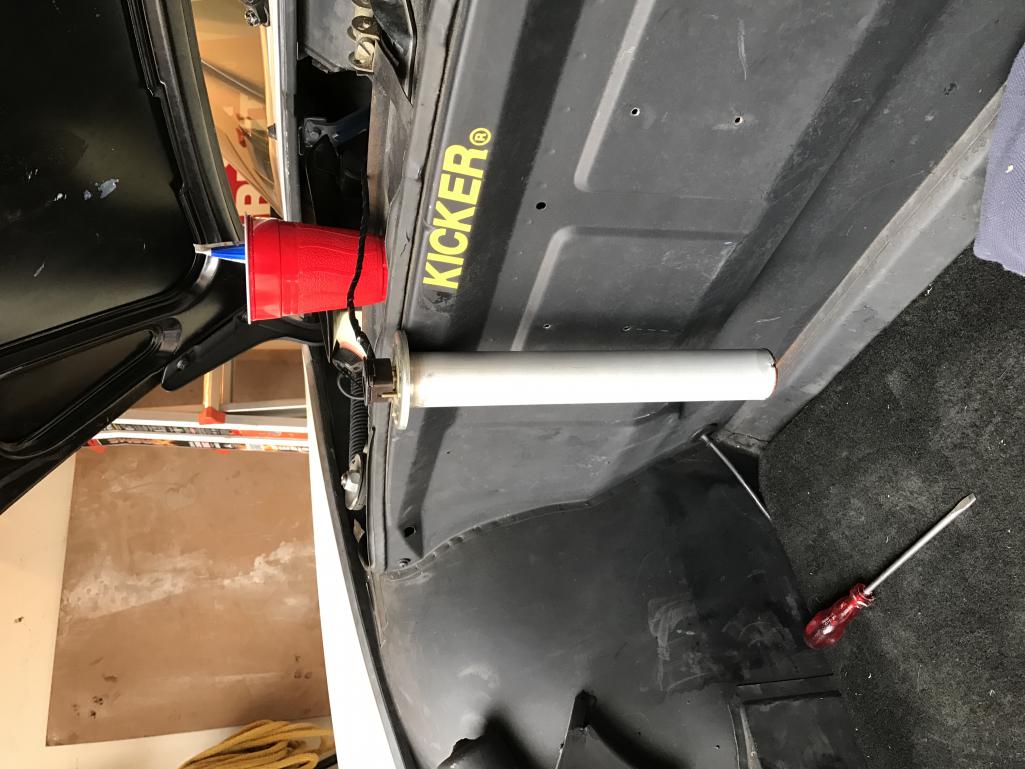 |
|
|
|
| HansJan |
Jan 26 2017, 06:51 PM
Post
#12
|
|
Member Group: Members Posts: 394 Joined: 5-April 16 From: Sugar Land TX Member No.: 19,860 Region Association: Southwest Region |
See pic
Attached thumbnail(s) 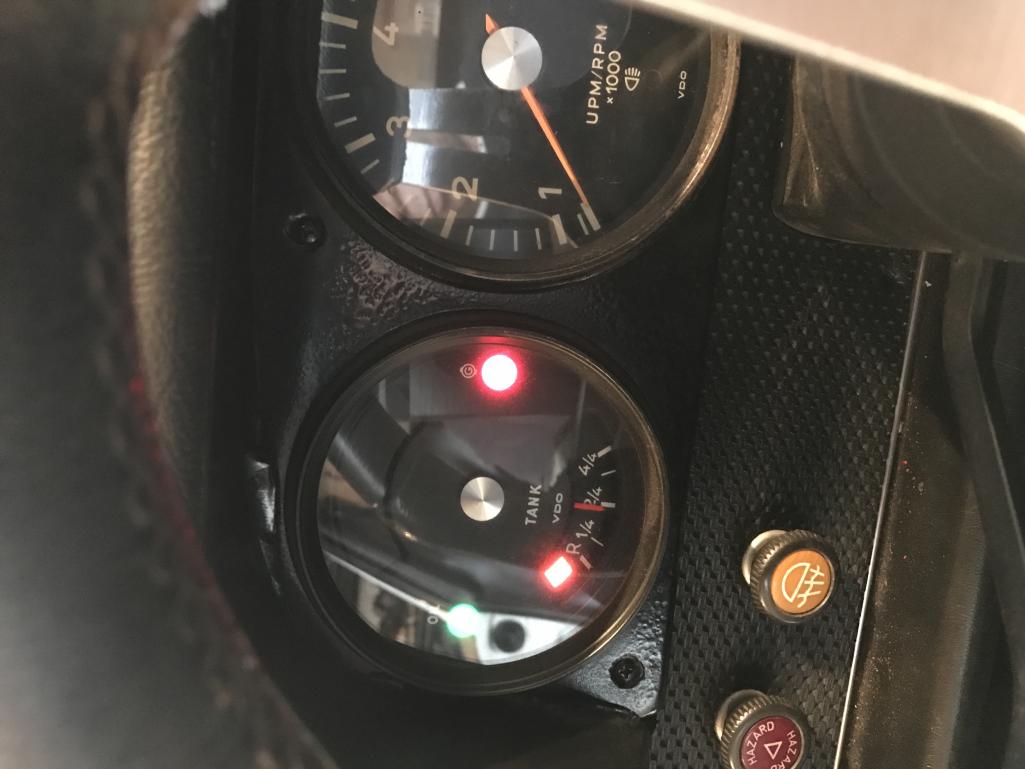
|
|
|
|
| Dave_Darling |
Jan 26 2017, 10:50 PM
Post
#13
|
|
914 Idiot Group: Members Posts: 14,980 Joined: 9-January 03 From: Silicon Valley / Kailua-Kona Member No.: 121 Region Association: Northern California |
One of the three pins is ground, one is the signal for the light, and one is the sender for the gauge. See my earlier post about what sorts of readings you would expect from the latter to to the ground pin.
--DD |
|
|
|
| HansJan |
Jan 27 2017, 03:10 PM
Post
#14
|
|
Member Group: Members Posts: 394 Joined: 5-April 16 From: Sugar Land TX Member No.: 19,860 Region Association: Southwest Region |
After removing I find the following readings:
Upside down (like a full tank) 4 Ohm. Straight down (like empty tank) 34 Ohm. Compared to figures needed (from eatlier post) it seems that the empty tank situation gives only halve the resistance needed (hence gauge shows halve full). Looks like I do not need a new gauge after all, but a new level sensor instead. Thanks for the help you'all. Ps: some one is offering a NOS level sensor (mine is VDO). Is this compatible? Attached thumbnail(s) 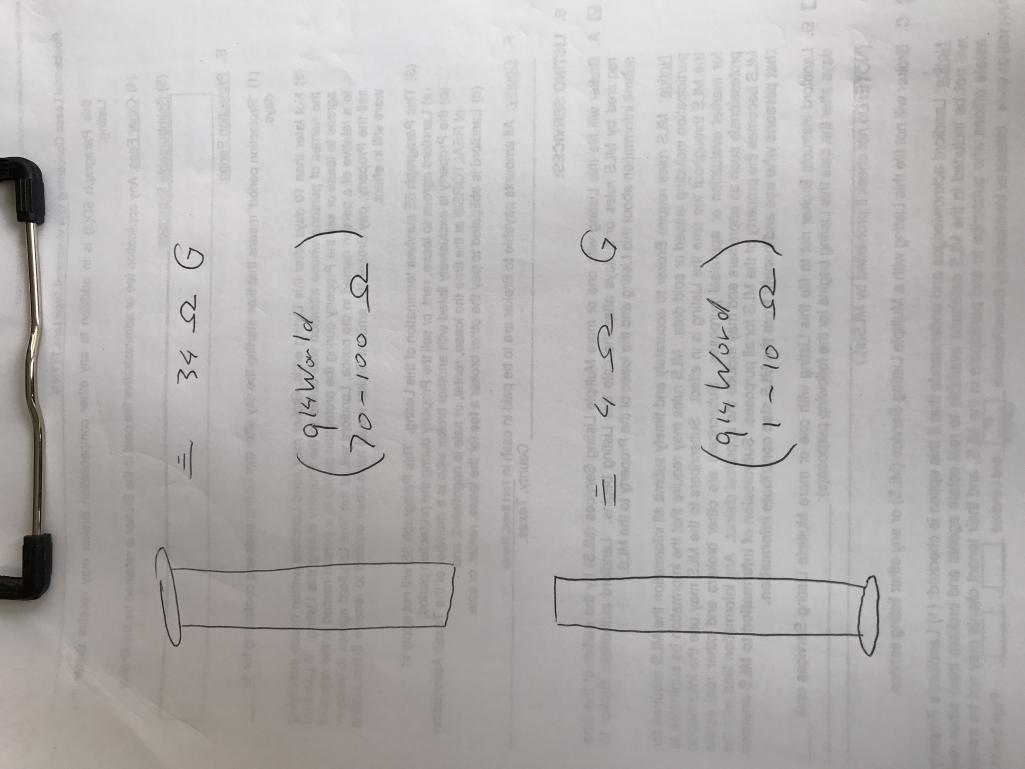
|
|
|
|
| fixer34 |
Feb 12 2017, 02:14 PM
Post
#15
|
|
Senior Member Group: Members Posts: 1,072 Joined: 16-September 14 From: Chicago area Member No.: 17,908 Region Association: Upper MidWest |
QUOTE(Dave_Darling @ Jan 25 2017, 10:29 PM) The warning light contacts are on the same float as the gauge sender stuff, so it is unlikely that the float is getting stuck. It could be that there is a short or problem in the resistance wire inside the sender, or it could be that the gauge is wonky. We tell people to always trust the light over the needle on the gauge. --DD In the 'ask me how I know' department, I will concur with DD's statement about trusting the light more then the gauge. Similar to Hans, gauge showed 1/4 full, but warning light was on. Sputtered to a stop about 2 miles from home, had to call wife to bring the gas can. Guess I'm pulling the sensor and doing a resistance check. |
|
|
|
| Dave_Darling |
Feb 12 2017, 09:15 PM
Post
#16
|
|
914 Idiot Group: Members Posts: 14,980 Joined: 9-January 03 From: Silicon Valley / Kailua-Kona Member No.: 121 Region Association: Northern California |
We had similar trouble when we bought the wife's SC. She called me on the way home (I was leading the two-car caravan) asking what the light in the gas gauge meant. I said she needed gas. She responded that the gauge showed a half-tank, and I said "We are getting more gas now."
Yup, the tank was just about empty. Needed a new gauge module. --DD |
|
|
|
| 914Sixer |
Feb 12 2017, 09:57 PM
Post
#17
|
|
914 Guru Group: Members Posts: 8,863 Joined: 17-January 05 From: San Angelo Texas Member No.: 3,457 Region Association: Southwest Region |
Take the sending unit and let it soak in a some lacquer thinner about half the length of the tube in a tall container. Make sure it seeps in the side hole. Let it fill up. Put your finger over the hole and shake the thinner in side the sender. Repeat several times. Drain thinner out. Turn up side down and listen for float movement. Repeat process until float moves freely.
|
|
|
|
| forrestkhaag |
Feb 13 2017, 11:52 AM
Post
#18
|
|
Senior Member Group: Members Posts: 935 Joined: 21-April 14 From: Scottsdale, Arizona Member No.: 17,273 Region Association: Southwest Region |
For what it is worth, I had to open my sender tube like a can of tuna.. Then very very gently clean each wire in the sender tube with lacquer thinner on a q-tip. Then I sprayed the whole shooting match with WD-40.
Once I had the float sliding up and down freely, I re-crimped the top "can" edge and it solved the low level light, the gauge accuracy, and for the past 18 months or so, everything works fine. fyi (IMG:style_emoticons/default/beerchug.gif) |
|
|
|
| Red76 |
Nov 3 2017, 02:11 PM
Post
#19
|
|
Newbie Group: Members Posts: 37 Joined: 28-December 16 From: East Tennessee Member No.: 20,703 Region Association: None |
The real thin wires on the outside edges of the float are.043 resistance wire. A spool of that 100 ft long is about $5 on ebay. Those wires are usually the first to break when you are cleaning things up. Just pay attention to the routing of them and how they attach to the float . If you dont get it back together right there will be no signal to the guage. Very easy to repair one of these units. 2 beers and a spool of wire. A lot cheaper than a new one!
|
|
|
|
| Costa05 |
Nov 30 2020, 11:46 PM
Post
#20
|
|
Member Group: Members Posts: 320 Joined: 27-October 16 From: Phoenix, Arizona Member No.: 20,535 Region Association: Southwest Region |
QUOTE(forrestkhaag @ Feb 13 2017, 12:52 PM) For what it is worth, I had to open my sender tube like a can of tuna.. Then very very gently clean each wire in the sender tube with lacquer thinner on a q-tip. Then I sprayed the whole shooting match with WD-40. Once I had the float sliding up and down freely, I re-crimped the top "can" edge and it solved the low level light, the gauge accuracy, and for the past 18 months or so, everything works fine. fyi (IMG:style_emoticons/default/beerchug.gif) Was getting a bench test 75 ohm reading full or empty. Popped it open via tiny nut on the bottom, cleaned the micro thin wires with Acetone and scotchbrite. Retest is 67 ohm empty, 7 full. Thanks @forresthaag !! Took 15 minutes. (IMG:style_emoticons/default/beerchug.gif) |
|
|
|
|
1 User(s) are reading this topic (1 Guests and 0 Anonymous Users)
0 Members:

|
Lo-Fi Version | Time is now: 19th April 2024 - 08:57 AM |
Invision Power Board
v9.1.4 © 2024 IPS, Inc.