|
|
|
Porsche, and the Porsche crest are registered trademarks of Dr. Ing. h.c. F. Porsche AG.
This site is not affiliated with Porsche in any way. Its only purpose is to provide an online forum for car enthusiasts. All other trademarks are property of their respective owners. |
|
|

  |

| Ncchany |
 Jan 6 2017, 02:38 PM Jan 6 2017, 02:38 PM
Post
#1
|
|
Newbie  Group: Members Posts: 36 Joined: 1-October 16 From: New york Member No.: 20,456 Region Association: None |
Hey guys i am going to try and remove the engine from my 914 today any advice? I am kinda scared to be honest. Is there any advice u guys can offer? I dont have a lift i am going to use a 3 ton floor jack and jackstands along with a furniture dolly. I think i am going to have trouble removing the cv joint.
|
   |

 
|
| bretth |
Jan 6 2017, 02:59 PM
Post
#2
|
|
Senior Member Group: Members Posts: 899 Joined: 23-June 15 From: Central TX Member No.: 18,882 Region Association: Southwest Region |
QUOTE(Ncchany @ Jan 6 2017, 03:38 PM)  Hey guys i am going to try and remove the engine from my 914 today any advice? I am kinda scared to be honest. Is there any advice u guys can offer? I dont have a lift i am going to use a 3 ton floor jack and jackstands along with a furniture dolly. I think i am going to have trouble removing the cv joint. There are plenty of threads here if you do search. There is also info on pelican parts site. What part of NY are you in? I am in the Albany area. Brett |
|
|
|
| michael7810 |
Jan 6 2017, 03:02 PM
Post
#3
|
|
Senior Member Group: Members Posts: 1,081 Joined: 6-June 11 From: Scottsdale, AZ Member No.: 13,164 Region Association: Southwest Region |
There's a do it yourself article on the bird site that covers engine removal. Engine Removal
It's best to have someone help observe when lowering the engine/trans to make sure everything is disconnected and does not hang up. It's not a hard job. Good luck |
|
|
|
| iankarr |
Jan 6 2017, 03:27 PM
Post
#4
|
|
The wrencher formerly known as Cuddy_K Group: Members Posts: 2,472 Joined: 22-May 15 From: Heber City, UT Member No.: 18,749 Region Association: Intermountain Region |
Pretty straightforward if you follow the Bird checklist.
Separating the CV joints isn't that difficult. You'll just put a screwdriver in the space between the flanges where the cardboard gasket is. The gasket will be destroyed as you tap it in and start wedging the sides apart, but that's supposed to happen. They're disposable and cheap. I keep extras on hand in case... |
|
|
|
| Porschef |
Jan 6 2017, 03:30 PM
Post
#5
|
|
How you doin' Group: Members Posts: 2,165 Joined: 7-September 10 From: LawnGuyland Member No.: 12,152 Region Association: North East States |
You won't have trouble with the CV joints if you use the proper tool. Read up on some of the threads and be methodical with your procedure and you'll be fine. Safety first!
Engine removal is fun!!! (IMG:style_emoticons/default/dry.gif) |
|
|
|
| GaroldShaffer |
Jan 6 2017, 04:10 PM
Post
#6
|
|
You bought another 914? Group: Benefactors Posts: 7,621 Joined: 27-June 03 From: Portage, IN Member No.: 865 Region Association: None |
(IMG:style_emoticons/default/agree.gif) what with has been said so far. Read the article on Pelican parts. I always start at the top of the engine disconnecting the cables & fuel lines. The CV's won't be an issue. Remember to check that you have the ground strap disconnected from the transmission and the cables that go to the heater flapper boxes.
|
|
|
|
| mramber |
Jan 6 2017, 04:37 PM
Post
#7
|
|
Member Group: Members Posts: 87 Joined: 14-April 13 From: Minneapolis, MN Member No.: 15,768 Region Association: Upper MidWest |
QUOTE(michael7810 @ Jan 6 2017, 03:02 PM) There's a do it yourself article on the bird site that covers engine removal. Engine Removal It's best to have someone help observe when lowering the engine/trans to make sure everything is disconnected and does not hang up. It's not a hard job. Good luck (IMG:style_emoticons/default/agree.gif) |
|
|
|
| Ncchany |
Jan 6 2017, 07:47 PM
Post
#8
|
|
Newbie Group: Members Posts: 36 Joined: 1-October 16 From: New york Member No.: 20,456 Region Association: None |
I think the only thing that really confuses me is what i need to remove from the engine in order to remove it. Like idk what harness belongs to what..
|
|
|
|
| ConeDodger |
Jan 6 2017, 07:55 PM
Post
#9
|
|
Apex killer! Group: Members Posts: 23,580 Joined: 31-December 04 From: Tahoe Area Member No.: 3,380 Region Association: Northern California |
QUOTE(michael7810 @ Jan 6 2017, 06:02 PM) There's a do it yourself article on the bird site that covers engine removal. Engine Removal It's best to have someone help observe when lowering the engine/trans to make sure everything is disconnected and does not hang up. It's not a hard job. Good luck What? We don't need no stinking Bird site! Top of the page, click on 914 Info. Then, look for the technical article drop down. Then, click on engine removal by Mark DeBernardi. Done... (IMG:style_emoticons/default/evilgrin.gif) |
|
|
|
| ntmatter |
Jan 6 2017, 10:19 PM
Post
#10
|
|
Newbie Group: Members Posts: 46 Joined: 10-May 11 From: Gig Harbor, WA Member No.: 13,049 Region Association: None |
The articles above helped me to remove mine last year, I did it entirely by myself without any particularly technical knowledge. Basically if you can unscrew stuff you can manage it as long as you follow the steps in order - use a checkmark to indicate when you've done something, and another to indicate when you've put it back while re-installing.
A point on the CV joints - BUY THE SPECIALIZED triple-square socket as suggested. You can get a full set for less than $20 off of Amazon and they will arrive in 2 days with Prime shipping. DO NOT try to get these off with a 6 point or hex socket, even if they fit because if you strip one of the bolts out you are going to be humped. This is the only specialized tool you need, and they do come in handy from time to time. If you have the car on jack stands rather than a lift, a motorcycle jack from Sears is handy for removing the motor because it sits very flat and will hold the motor/transmission more stably if you're going to work on it. You can use a regular floor jack to lower the assembly down, but I'd suggest attaching it with maybe some small tow straps or something to keep it from tipping off the jack. Next, take good pictures of all the emissions crap on the top of your motor if you're planning on keeping it on there. You'd think that this would be easy to re-route but nooooo - there are numerous ways these are configured and not all of them are easily findable. My 76 has hoses going into points that are not in the manual or online diagrams for '76 cars, no idea why. You will not remember where they all go, so lots of photos and maybe label the emission and other hose ends on each side just to be safe. When reassembling, get CV joint grease specifically. Regular grease will get churned into grout pretty fast. Personally I prefer to clean and re-grease everything, new gaskets (mandatory) and new CV bolts (these typically are stretch bolts and single use). I think there's little else that must be replaced just when pulling the motor, but I'm a bit proponent of respecting the CV joints. To that end, double-bag them with good plastic bags and strong rubber bands both at the axle and transmission, or you will get grease everywhere. You think you won't, but you will. Final thoughts: don't panic. The above guides are good, print them out and have them with you. Take notes on where stuff goes before pulling anything off, because you'll forget even where the big obvious stuff is supposed to go after a few days. Use good jack stands, and if you can get the wheels or wood blocks under the sills as well just to be extra safe. It took me about half a day to pull the motor the first time entirely by myself and with basic tools, I did it the second time in about 2 hours - you can too. |
|
|
|
| ntmatter |
Jan 6 2017, 10:30 PM
Post
#11
|
|
Newbie Group: Members Posts: 46 Joined: 10-May 11 From: Gig Harbor, WA Member No.: 13,049 Region Association: None |
One other thing - both my motor mount bolts were bent at the ends by about 5 degrees. While I have grade 8 standard bolts in a similar size, I went ahead and ordered replacements from AutoAtlanta so they'd be metric, but this was probably not all that necessary. What is necessary is using new lock washers - they are also single-use. I will say that the motor mounts in particular are a bitch to get at, as you need to get a socket on the top of the mount and it's very tight. I ended up having success using stubby metric wrenches on the top (one side is easier than the other), but what was interesting to discover was that one bolt was 17mm top and bottom, the other was 16mm top and 17mm bottom (I think, may have been the other way around). This is a risk on 40 year old cars, so if you can't seem to get a wrench or socket on something and can't see it, consider that it may be sized differently on one side versus the other.
Also, while we're on the subject of bolts, the exhaust bolts may well be rusted solid, so have some nut buster (e.g. PB Blaster) around and use it liberally. These also I replaced with new, though I kept the original transmission mount bolts as those were in good shape. So, new bolts I used on my replacement: 1. CV bolts (12?) 2. Engine mounts (2) 3. Exhaust: 9 |
|
|
|
| ntmatter |
Jan 6 2017, 10:50 PM
Post
#12
|
|
Newbie Group: Members Posts: 46 Joined: 10-May 11 From: Gig Harbor, WA Member No.: 13,049 Region Association: None |
Reading down through the comments, in terms of wiring that's considerably less complicated than hoses. Hoses come off altogether, wire harnesses are typically cut to size and hang right exactly where they need to go when the motor goes back in. Also, generally things are engineered so that if there are several harness connections in a single area, only one plug will fit in the right spot. Unlike a modern car, there's very little on these in the way of electronics so not much to fuss with.
|
|
|
|
| Ncchany |
Jan 6 2017, 11:46 PM
Post
#13
|
|
Newbie Group: Members Posts: 36 Joined: 1-October 16 From: New york Member No.: 20,456 Region Association: None |
QUOTE(ntmatter @ Jan 6 2017, 11:50 PM) Reading down through the comments, in terms of wiring that's considerably less complicated than hoses. Hoses come off altogether, wire harnesses are typically cut to size and hang right exactly where they need to go when the motor goes back in. Also, generally things are engineered so that if there are several harness connections in a single area, only one plug will fit in the right spot. Unlike a modern car, there's very little on these in the way of electronics so not much to fuss with. This is excellent i think i am ready Is this the special tool this is what i have http://m.harborfreight.com/9-pc-12-in-driv...-set-67887.html |
|
|
|
| iankarr |
Jan 7 2017, 01:06 AM
Post
#14
|
|
The wrencher formerly known as Cuddy_K Group: Members Posts: 2,472 Joined: 22-May 15 From: Heber City, UT Member No.: 18,749 Region Association: Intermountain Region |
No... that's Star drive. You'll need an M8 triple square like this....
https://www.jbtoolsales.com/cta-tools-8512-...CFQxWDQodwpAE4Q Assuming the PO hasn't switched the bolts to hex sockets like mine did... Make sure the socket is super clean so the tool can fully seat before attempting to unscrew. Shooting some brake cleaner will do the trick, but wear eye protection. |
|
|
|
| Porschef |
Jan 7 2017, 08:31 AM
Post
#15
|
|
How you doin' Group: Members Posts: 2,165 Joined: 7-September 10 From: LawnGuyland Member No.: 12,152 Region Association: North East States |
Great point about cleaning the socket on the CV bolts, just because the tool fits doesn't necessarily mean it's fully seated. Take the time to get in there with a pick, some solvent, and blow it out with compressed air. And yes, wear safety glasses!
Where abouts are you located here in NY? (IMG:style_emoticons/default/popcorn[1].gif) |
|
|
|
| TheCabinetmaker |
Jan 7 2017, 10:57 AM
Post
#16
|
|
I drive my car everyday Group: Members Posts: 8,300 Joined: 8-May 03 From: Tulsa, Ok. Member No.: 666 |
I'll add: use a hammer and tap it in to insure it's seated. If one is stuck or the head stripped, cut the head off
|
|
|
|
| wndsrfr |
Jan 7 2017, 11:46 AM
Post
#17
|
|
Senior Member Group: Members Posts: 1,428 Joined: 30-April 09 From: Rescue, Virginia Member No.: 10,318 Region Association: MidAtlantic Region |
QUOTE(cuddyk @ Jan 6 2017, 11:06 PM) No... that's Star drive. You'll need an M8 triple square like this.... https://www.jbtoolsales.com/cta-tools-8512-...CFQxWDQodwpAE4Q Assuming the PO hasn't switched the bolts to hex sockets like mine did... Make sure the socket is super clean so the tool can fully seat before attempting to unscrew. Shooting some brake cleaner will do the trick, but wear eye protection. You can usually find the triple square bit at NAPA stores also--it may have a hex back end that you put a 13mm socket on to turn it. Frankly, I hate the triple square bolts--way too easy to strip. Check some of the member vendors here for hex head bolts that are drilled for safety wire--'way worth the investment, and you'll get new schnorr washers also.... As to the wiring & hoses, I use blue painter's tape and a marker to number them on both ends--easy peasy going back together....even if it's a year later! |
|
|
|
| iankarr |
Jan 7 2017, 12:19 PM
Post
#18
|
|
The wrencher formerly known as Cuddy_K Group: Members Posts: 2,472 Joined: 22-May 15 From: Heber City, UT Member No.: 18,749 Region Association: Intermountain Region |
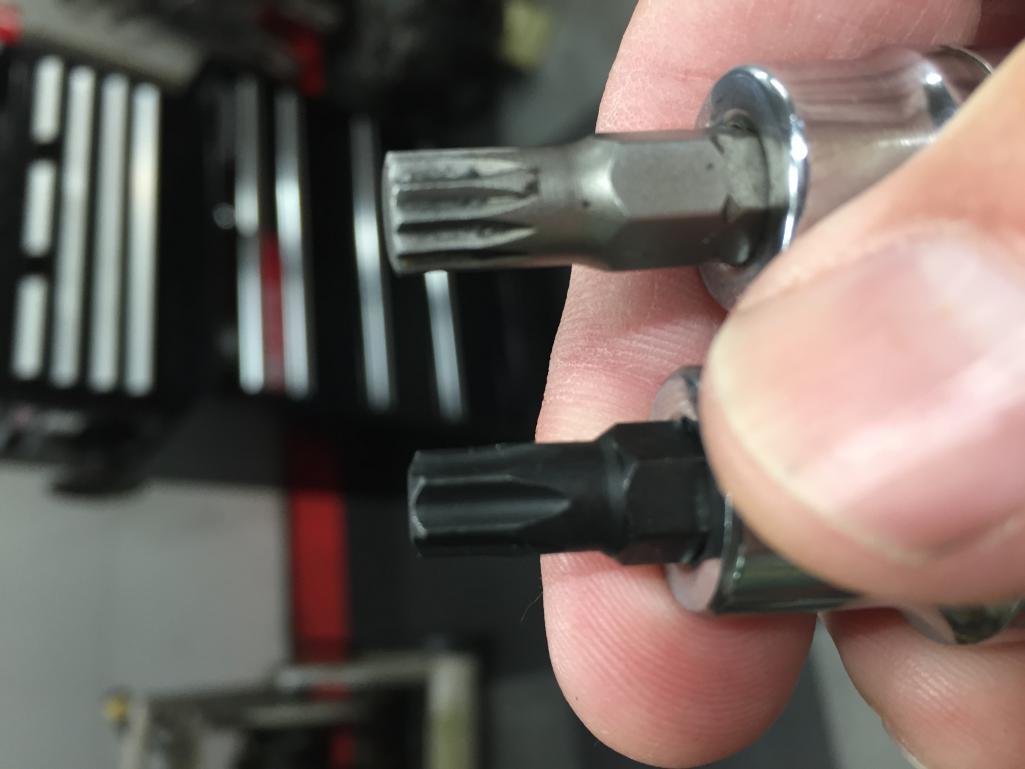
Since this question seems to come up a lot, I f figured I'd post a side by side of star drive (black) vs. triple square (silver) to show the differences.
 |
|
|
|
| SKL1 |
Jan 7 2017, 01:51 PM
Post
#19
|
|
Senior Member Group: Members Posts: 1,598 Joined: 19-February 11 From: north Scottsdale Member No.: 12,732 Region Association: Upper MidWest |
Good luck- it is not that hard. I've done it alone enuf times over the last 45+ years I think I could do it in my sleep...
Helped my son drop the engine/transaxle on our 993- definitely NOT a one man job!!! 914 a piece of cake next to that!!  |
|
|
|
|
1 User(s) are reading this topic (1 Guests and 0 Anonymous Users)
0 Members:

|
Lo-Fi Version | Time is now: 10th May 2024 - 06:40 AM |
Invision Power Board
v9.1.4 © 2024 IPS, Inc.