|
|
|
Porsche, and the Porsche crest are registered trademarks of Dr. Ing. h.c. F. Porsche AG.
This site is not affiliated with Porsche in any way. Its only purpose is to provide an online forum for car enthusiasts. All other trademarks are property of their respective owners. |
|
|

  |

| kupcar |
 Jan 24 2017, 05:46 PM Jan 24 2017, 05:46 PM
Post
#1
|
|
Member  Group: Members Posts: 95 Joined: 14-February 13 From: Chicago Member No.: 15,528 Region Association: None |
Hi Guys, It's time to do some routine off season maintenance on the 914. The car has a 2.2s spec motor. My question is, how do -6 owners adjust the ignition timing prior to a valve adjustment? It looks damn near impossible to get a timing light reading. I know cutting into the firewall is an option for ease of access but I'm not willing to get the cutoff wheel out yet. Does everyone drop the motor and tune at a shop that has a running motor stand? I'd just like to double check the ignition before setting the valves. Thanks in advance.
|
   |

 
|
| jcd914 |
Jan 24 2017, 05:50 PM
Post
#2
|
|
Advanced Member Group: Members Posts: 2,081 Joined: 7-February 08 From: Sacramento, CA Member No.: 8,684 Region Association: Northern California |
Smoke and Mirrors!
Well actually you don't want or need the smoke but a mirror works while the engine is in the car. Still not easy to do. Jim |
|
|
|
| toolguy |
Jan 24 2017, 05:59 PM
Post
#3
|
|
Senior Member Group: Members Posts: 1,268 Joined: 2-April 11 From: San Diego / El Cajon Member No.: 12,889 Region Association: Southern California |
That is why real six's have the timing marks on the flywheel,. . you don't use the
marks on the pulley. . . |
|
|
|
| fixer34 |
Jan 24 2017, 06:42 PM
Post
#4
|
|
Senior Member Group: Members Posts: 1,085 Joined: 16-September 14 From: Chicago area Member No.: 17,908 Region Association: Upper MidWest |
Your 'fun' has only begun. Wait until you pull the heat exchangers and crawl underneath to do the exhausts. And by way, you didn't put unmodified turbo valve covers on before installing the engine in the car, did you?
|
|
|
|
| kupcar |
Jan 24 2017, 07:07 PM
Post
#5
|
|
Member Group: Members Posts: 95 Joined: 14-February 13 From: Chicago Member No.: 15,528 Region Association: None |
I actually thought about the mirror. Then I envisioned myself either dropping the mirror into the rotating motor or getting the timing light caught up in the fan pulley assembly. Also thought about building a running motor stand. But that seems like a lot of work just to check the timing. Unfortunately not a real 6, so probably no marks on the flywheel unless the previous owner and engine builder were thinking ahead. I'll have to check on that.
Ok fixer, fill me in on the modified 930 valve covers. I opted for heater delete headers for the moment. I currently have the stock exhaust covers on with no leaks but was thinking of changing to the lower 930's. What am I in for? Thanks. |
|
|
|
| GeorgeRud |
Jan 24 2017, 07:37 PM
Post
#6
|
|
Advanced Member Group: Members Posts: 3,725 Joined: 27-July 05 From: Chicagoland Member No.: 4,482 Region Association: Upper MidWest |
You could always put paint marks on TDC and at the timing advance mark by using the opening on the engine tin over the flywheel while using a mirror to check the pulley with the engine off. Then use those for checking the timing in the future.
You need to shave down the ribs on the turbo covers to clear the rear suspension ears if you upgrade to them. I'm enclosing a picture to show the shaved ribs. BTW, I see you're in Chicagoland as well. We have some great 914-6 shops here in Illinois. 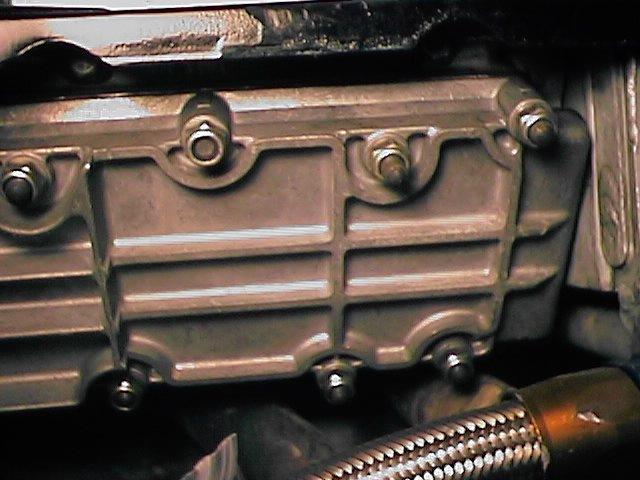 |
|
|
|
| mskala |
Jan 24 2017, 08:06 PM
Post
#7
|
|
R Group: Members Posts: 1,925 Joined: 2-January 03 From: Massachusetts Member No.: 79 Region Association: None |
If you really don't have any timing marks on the flywheel or possibly incorrect ones,
then get near TDC of #1 looking at the distributor and find true TDC through the spark plug hole and appropriate indicator (probably need top valve cover off ). Paint the TDC line on the flywheel. For timing measurement use a light that has a degree advance built in. |
|
|
|
| kupcar |
Jan 24 2017, 08:32 PM
Post
#8
|
|
Member Group: Members Posts: 95 Joined: 14-February 13 From: Chicago Member No.: 15,528 Region Association: None |
George, Thanks for the picture. I didn't even think about the clearance issue with the 930 valve covers. I'd love to hear who you'd recommend for 914 work locally. Let me know.
Mark, I do have access to a lift. I'm going to check to see if the flywheel is marked. That would be a nice surprise. If not, I'll get my paint out. Thanks. |
|
|
|
| porschetub |
Jan 24 2017, 08:41 PM
Post
#9
|
|
Advanced Member Group: Members Posts: 4,701 Joined: 25-July 15 From: New Zealand Member No.: 18,995 Region Association: None |
never seen the point in these exhaust valve covers ,folks mill the sh%t out of them then you have a cover weakened by this process,resurface what you have and use the right gaskets,problem over and save some $$$$.
Experts on Pelican say the turbo covers warp anyway so I see little point in using them. |
|
|
|
| '73-914kid |
Jan 24 2017, 09:37 PM
Post
#10
|
|
Senior Member Group: Members Posts: 1,473 Joined: 1-November 08 From: Vista, CA Member No.: 9,714 Region Association: Southern California |
I exclusively use the back side method as described on Pelican. Much much easier on a 914, where you can physically look down on the cam lobe. It also eliminates the need for a "feel" when using the standard 0.006" feeler gauge that always seems to get bent and folded.
1. Jack up one side of the car, using jack stands... put the car in a forward gear, with the parking brake off. I recommend chalking the wheel on the ground. I also pull out the spark plugs. When I do valves, I usually swap out spark plugs as the MSD box and hot coil are kinda tough on spark plugs, and they're cheap and easy. 2. Remove both the exhaust and intake cam covers. 3. Start the back side method described on Pelican. You rotate the tire FORWARD while looking down from the top and watch the exhaust cam lobe rotate so the top of the lobe is facing 180 degrees from the rocker arm. ( no lift) go underneath and adjust the valve using go, no-go feeler gauges. 4. Go underneath the car and watch the intake cam lobe rotate 180 degrees away from the rocker arm. Measure and adjust. Wash-rinse-repeat for all valves on one side. then go over and do the same for the other side. I can usually pull off a valve adjustment in about 90 minutes start to finish using this method. Oh, and you can replace the upper row of studs on the exhaust cam cover with socket head cap screws.. this allows an unmodified 930 cam cover to be R&R'd with the engine in the car..... |
|
|
|
| Peashooter |
Jan 25 2017, 08:21 AM
Post
#11
|
|
Member Group: Members Posts: 164 Joined: 17-December 11 From: SW Ohio Member No.: 13,903 Region Association: None |
That's a great idea on replacing the top row of studs. Thanks for that! I was just getting ready to mill down the turbo covers for my six. This way they will retain their strength, which is why people use them in the first place!
|
|
|
|
| mskala |
Jan 25 2017, 08:32 AM
Post
#12
|
|
R Group: Members Posts: 1,925 Joined: 2-January 03 From: Massachusetts Member No.: 79 Region Association: None |
QUOTE('73-914kid @ Jan 24 2017, 10:37 PM)  ... Oh, and you can replace the upper row of studs on the exhaust cam cover with socket head cap screws.. this allows an unmodified 930 cam cover to be R&R'd with the engine in the car..... If you do this you won't have the nyloc helping to avoid fasteners loosening. I don't think there is a lockwasher that would work at the low torque used to seat but not crush the gasket. |
|
|
|
| '73-914kid |
Jan 25 2017, 08:56 AM
Post
#13
|
|
Senior Member Group: Members Posts: 1,473 Joined: 1-November 08 From: Vista, CA Member No.: 9,714 Region Association: Southern California |
QUOTE(mskala @ Jan 25 2017, 06:32 AM) QUOTE('73-914kid @ Jan 24 2017, 10:37 PM) ... Oh, and you can replace the upper row of studs on the exhaust cam cover with socket head cap screws.. this allows an unmodified 930 cam cover to be R&R'd with the engine in the car..... If you do this you won't have the nyloc helping to avoid fasteners loosening. I don't think there is a lockwasher that would work at the low torque used to seat but not crush the gasket. I stack up a wave washer and aluminum washer underneath the bolt head, with the aluminum washer on the valve cover. I've never had one leak or loosen up. You have to tighten some of them by hand with an Allen key that is trimmed down once the engine is in the car. Just use good judgement when tightening down then down. |
|
|
|
| kupcar |
Jan 25 2017, 09:07 AM
Post
#14
|
|
Member Group: Members Posts: 95 Joined: 14-February 13 From: Chicago Member No.: 15,528 Region Association: None |
Great tips! I can't wait to dive into this. Was going to use the Kirk tool to adjust the valves. Never used it before. I've heard good things about its accuracy.
|
|
|
|
| mountainroads |
Jan 25 2017, 09:32 AM
Post
#15
|
|
Member Group: Members Posts: 210 Joined: 19-February 12 From: Seattle Member No.: 14,145 Region Association: Pacific Northwest |
QUOTE(toolguy @ Jan 24 2017, 03:59 PM) That is why real six's have the timing marks on the flywheel,. . you don't use the marks on the pulley. . . What he said. (IMG:style_emoticons/default/agree.gif) - MR |
|
|
|
| maxwelj |
Jan 25 2017, 11:32 AM
Post
#16
|
|
rebuilt member Group: Benefactors Posts: 278 Joined: 8-January 04 From: Owasso, OK Member No.: 1,532 Region Association: None |
QUOTE(kupcar @ Jan 24 2017, 08:32 PM) Mark, I do have access to a lift. I'm going to check to see if the flywheel is marked. That would be a nice surprise. If not, I'll get my paint out. Thanks. The timing mark on the flywheel would be visible trough a hole on the top of the engine/bell housing. No lift needed for that. |
|
|
|
| rudedude |
Jan 25 2017, 12:27 PM
Post
#17
|
|
Senior Member Group: Members Posts: 509 Joined: 1-January 05 From: minneapolis, mn Member No.: 3,387 Region Association: Upper MidWest |
Also the 6 cylinder valve spec is 0.01mm or .004" using the usual tool isn't that difficult once you get used to it
|
|
|
|
| 6freak |
Jan 25 2017, 12:38 PM
Post
#18
|
|
MR.C Group: Members Posts: 4,740 Joined: 19-March 08 From: Tacoma WA Member No.: 8,829 Region Association: Pacific Northwest |
QUOTE(toolguy @ Jan 24 2017, 03:59 PM) That is why real six's have the timing marks on the flywheel,. . you don't use the marks on the pulley. . . BINGO (IMG:style_emoticons/default/biggrin.gif) but thats a a 2.2 and dont know if the flywheels interchange like the 2.4 DONT |
|
|
|
| 6freak |
Jan 25 2017, 12:52 PM
Post
#19
|
|
MR.C Group: Members Posts: 4,740 Joined: 19-March 08 From: Tacoma WA Member No.: 8,829 Region Association: Pacific Northwest |
[quote
Just use good judgement when tightening down then down. [/quote] just use the proper torgue specs ...and you really dont need to shave any off the V/C if you put the left side of the motor in first ( kinda tilted) but it is tight #1 reason for leaky V/C is over tight 8 lbs PSI if i remember correct and use flat washers and nylock nuts.. valve adjustment is not hard just time consuming and let it drip for a few days before ya start or youll have oil drip n down your arms and in your face....good luck (IMG:style_emoticons/default/biggrin.gif) |
|
|
|
| fixer34 |
Jan 26 2017, 05:19 PM
Post
#20
|
|
Senior Member Group: Members Posts: 1,085 Joined: 16-September 14 From: Chicago area Member No.: 17,908 Region Association: Upper MidWest |
QUOTE(kupcar @ Jan 24 2017, 07:07 PM) I actually thought about the mirror. Then I envisioned myself either dropping the mirror into the rotating motor or getting the timing light caught up in the fan pulley assembly. Also thought about building a running motor stand. But that seems like a lot of work just to check the timing. Unfortunately not a real 6, so probably no marks on the flywheel unless the previous owner and engine builder were thinking ahead. I'll have to check on that. Ok fixer, fill me in on the modified 930 valve covers. I opted for heater delete headers for the moment. I currently have the stock exhaust covers on with no leaks but was thinking of changing to the lower 930's. What am I in for? Thanks. There have been some other answers on here, but basically the 'turbo' covers with the ribs/fins will hit the suspension mounts and won't clear the studs when trying to remove them. Some people have swapped out the upper studs for bolts, others have milled all the ribs down. Doing the entire cover is not necessary, there is only a section around 2 of the stud holes that needs to be done (have pictures of what I did around somewhere...). Just trying to head off a surprise for you. My original covers warped so bad that oil was leaking almost constantly. Bought a set of the turbo covers 4-5 years ago and aside from the 'surprise' trying to install them, they have been fine. Looks pretty cool down there although no one sees them... |
|
|
|
|
1 User(s) are reading this topic (1 Guests and 0 Anonymous Users)
0 Members:

|
Lo-Fi Version | Time is now: 20th May 2024 - 03:31 PM |
Invision Power Board
v9.1.4 © 2024 IPS, Inc.