|
|
|
Porsche, and the Porsche crest are registered trademarks of Dr. Ing. h.c. F. Porsche AG.
This site is not affiliated with Porsche in any way. Its only purpose is to provide an online forum for car enthusiasts. All other trademarks are property of their respective owners. |
|
|

  |

| db9146 |
 Jan 26 2017, 08:34 PM Jan 26 2017, 08:34 PM
Post
#1
|
|
Senior Member  Group: Members Posts: 953 Joined: 21-December 04 From: Atlanta, GA Member No.: 3,315 Region Association: None |
I'm sure this has probably been covered but I searched and couldn't find anything.
Anyone got any tips on the R&R of the rear trunk lid, hinges, and torsion bars? Going to replace the rollers while I'm at it. I think I've seen some bronze ones over the years ....anyone got a source? Thanks. |
   |

 
|
| 914_teener |
Jan 26 2017, 09:08 PM
Post
#2
|
|
914 Guru Group: Members Posts: 5,194 Joined: 31-August 08 From: So. Cal Member No.: 9,489 Region Association: Southern California |
It covered in the classic threads and here a couple of times if you search.
You can get the metal rollers from Pelican I think and also 914 rubber in metal and I think nylon. I think it is a two person job. |
|
|
|
| amfab |
Jan 26 2017, 10:36 PM
Post
#3
|
|
Member Group: Members Posts: 391 Joined: 17-May 16 From: Los Angeles Member No.: 20,004 Region Association: None |
The are a lot of threads and different techniques.
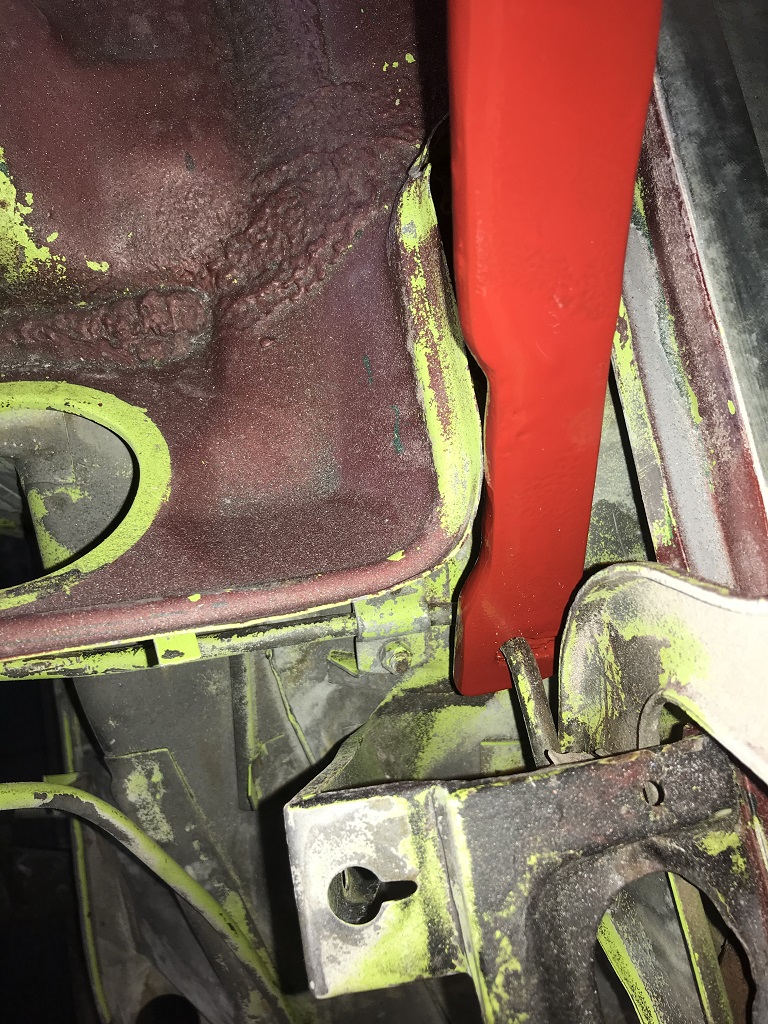
I did mine with a 30-inch piece of ¾ or 5/8 inch OD tube, maybe 11ga? and a cheap 1/2 in drive breaker bar and a packing blanket. I opened the trunk, folded the packing blanket, and stuffed it between the front edge of the trunk and the engine grill. I loosened all 4 bolts then took off one side. I rested it vertically on the folded blanket, crawled inside the trunk over to the other side while holding the unbolted side to keep it from slipping. I then unbolted the other side with one hand. Its probably easier—and safer to not do it alone, Then I took the screw out of the 1/2in breaker bar and removed the pivoting square drive piece. I held the breaker bar vertically and put the U-shaped end over the torsion bar between the roller and the torsion bar mount in the engine compartment (1). Then I put the screw back in. Levering the bar forward (2) allows you to lever the torsion bar off the bottom of the roller and move it slightly inward (3). Then I tilted it back toward the back of the car to release the tension (4). Once it was clear of the roller, I took the tube, fit it over the end of the torsion bar (5), and let it untwist all the way to the back until the tension was off (6). Then I repeated on the other side. Reverse to install. 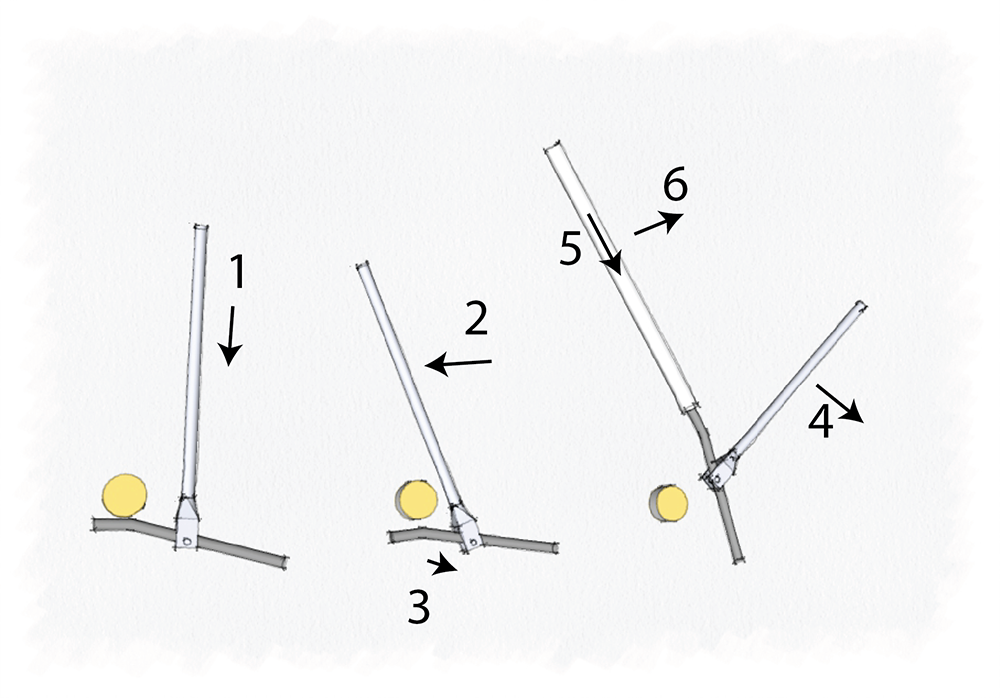 |
|
|
|
| stevend914 |
Jan 27 2017, 07:52 AM
Post
#4
|
|
Member Group: Members Posts: 376 Joined: 13-December 16 From: Saint Louis Member No.: 20,670 Region Association: Upper MidWest |
QUOTE(db9146 @ Jan 26 2017, 08:34 PM)  I'm sure this has probably been covered but I searched and couldn't find anything. Anyone got any tips on the R&R of the rear trunk lid, hinges, and torsion bars? Going to replace the rollers while I'm at it. I think I've seen some bronze ones over the years ....anyone got a source? Thanks. I have these: 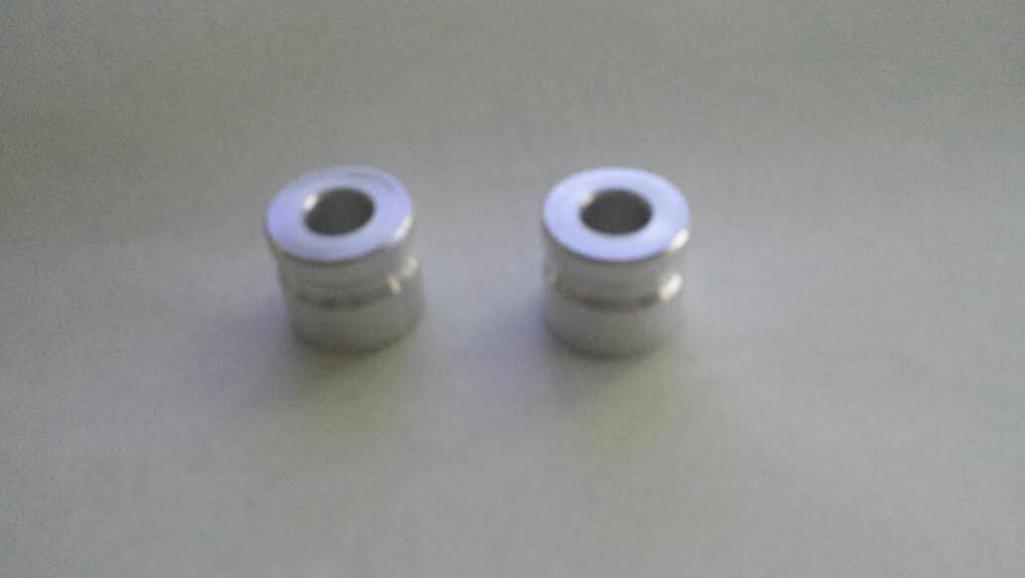 |
|
|
|
| IronHillRestorations |
Jan 27 2017, 08:07 AM
Post
#5
|
|
I. I. R. C. Group: Members Posts: 6,714 Joined: 18-March 03 From: West TN Member No.: 439 Region Association: None |
I've done a mod on the shoulder bolts. I wish I had pics. Drill down the center of the shoulder bolt and tap for grease fitting, chuck shoulder bolt and make groove to intersect, then drill small hole in the groove.
Now's a good time to make sure the welds on the pivots are good and the pivots aren't stress cracked. BTW, did you ever source an oil pipe? |
|
|
|
| North Coast Jim |
Jan 27 2017, 08:52 AM
Post
#6
|
|
Member Group: Members Posts: 323 Joined: 11-December 15 From: Northern Ohio Member No.: 19,450 Region Association: MidAtlantic Region |
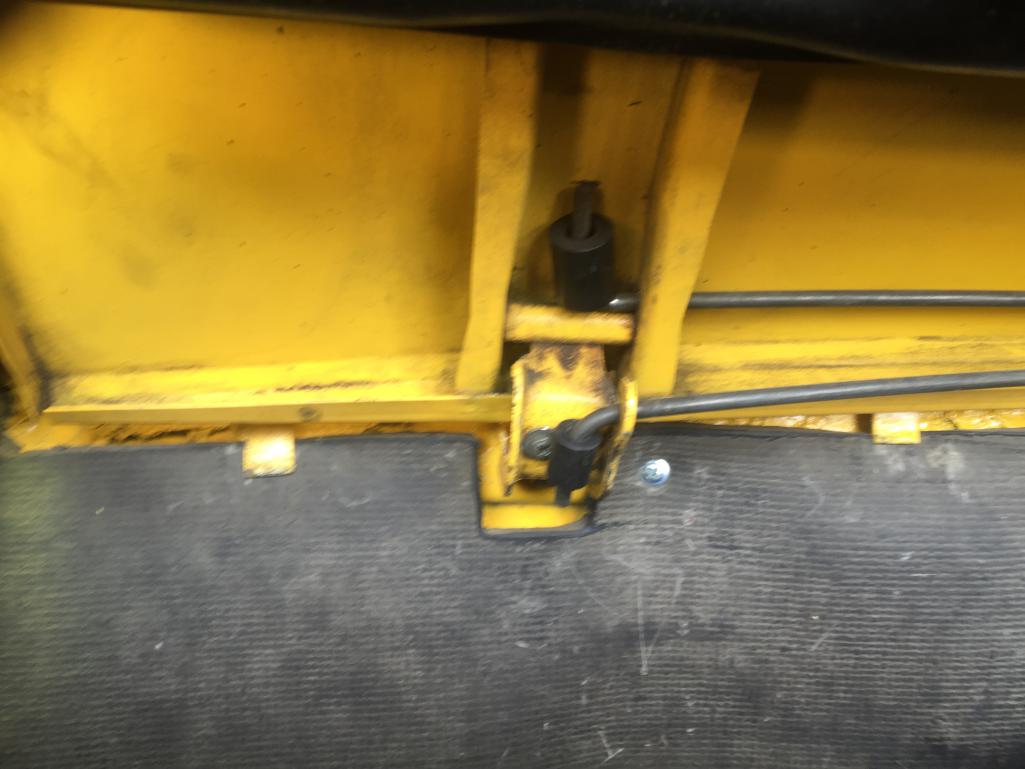
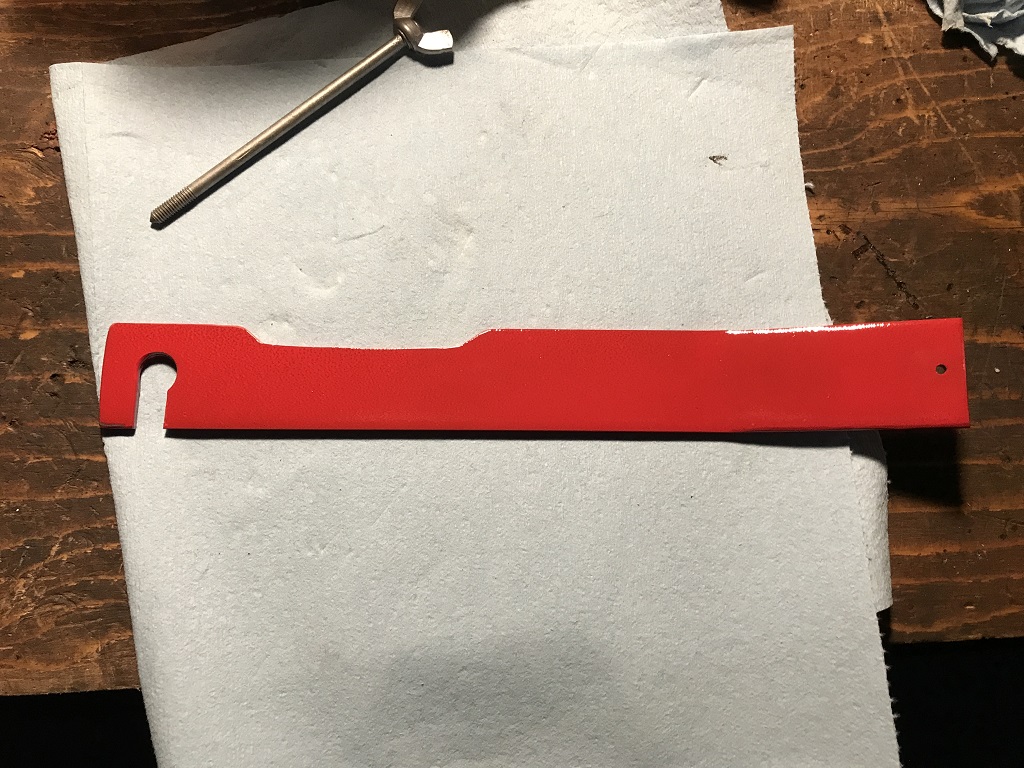
QUOTE(db9146 @ Jan 26 2017, 09:34 PM) I'm sure this has probably been covered but I searched and couldn't find anything. Anyone got any tips on the R&R of the rear trunk lid, hinges, and torsion bars? Going to replace the rollers while I'm at it. I think I've seen some bronze ones over the years ....anyone got a source? Thanks. Some time ago when I had this same job to do I researched the sight and did find a couple of threads on the subject. Try the Google search method rather than the internal search as it leaves much to be desired. Try "914 World Trunk torsion bar" for a start under a Google search. The threads I read involved methods of using small deep well sockets, can't remember the size, and a breaker bar inserted over the ends of the torsion bar to move them. The breaker bar to provide leverage. Tried it and almost lost a digit. Socket went flying - not safe. Took it upon myself to make the following tool. I did change the material to a hardened SS to improve it's strength. It improves the safety of this operation. It is still a two stage operation as the tool must load the torsion bar thru a rotating action. You only have so much room. The 30 degree bend was added to provide room for my hand as the trunk lid sheet metal was installed. Assemble the tool to the torsion bar fitting it in the .43" dia hole. Move the torsion bar putting tension on it by forcing the tool toward the front of the car. Secure the torsion bar in place, I used small pieces of 2 x 4 cut to fit, and then slide the tool further downward on the torsion bar to the big bend area. Rotate it until you can get the bar in place behind the roller shaft. It takes a fair amount of grunt. Don't use your hand in the area of the roller other than to add it to the shaft after the torsion bar end is successfully behind it. Use a screwdriver or some such tool to slide the roller over on the shaft after providing another loading of the torsion bar with the tool. Be safe. Relieve the tension. Done. I still have this tool and could let you borrow it if you want. PM me if you want to go this route. 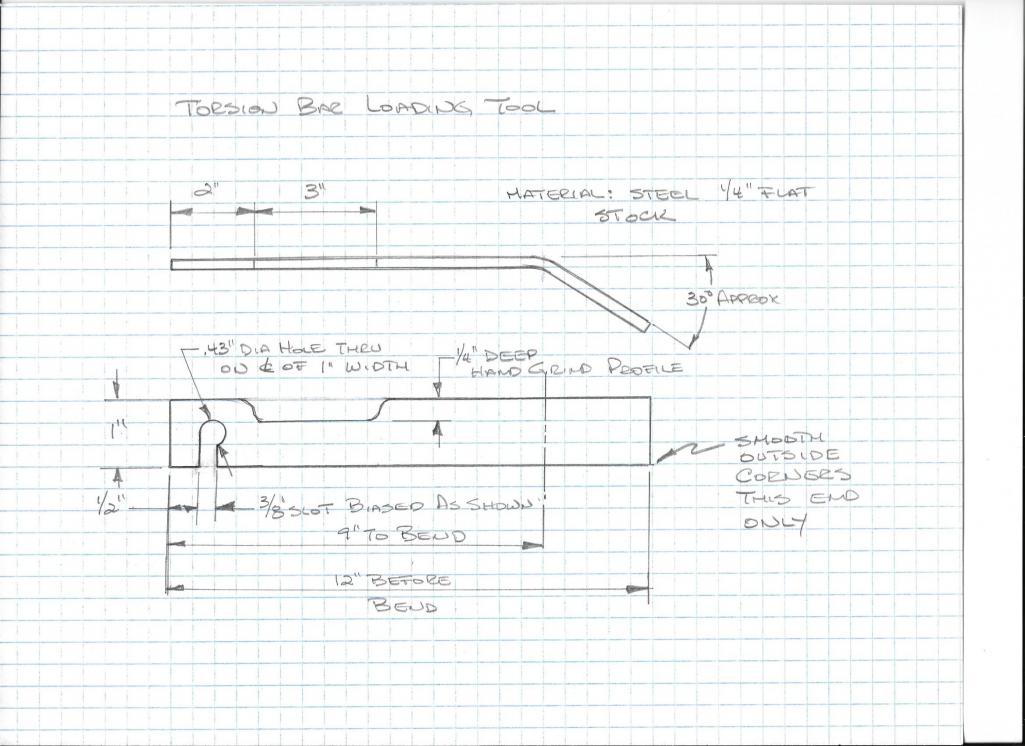 Attached thumbnail(s) 
|
|
|
|
| rhodyguy |
Jan 27 2017, 08:57 AM
Post
#7
|
|
Chimp Sanctuary NW. Check it out. Group: Members Posts: 22,060 Joined: 2-March 03 From: Orion's Bell. The BELL! Member No.: 378 Region Association: Galt's Gulch |
Is your intent to remove and replace, r&r, or delete the torsion rods entirely?
|
|
|
|
| db9146 |
Jan 27 2017, 09:44 AM
Post
#8
|
|
Senior Member Group: Members Posts: 953 Joined: 21-December 04 From: Atlanta, GA Member No.: 3,315 Region Association: None |
Thanks for the replies. Yes, I used the internal search and couldn't find what I was looking for. My intent is to check everything out and replace the rollers and the torsion rods. My brother-in-law came over last night to help me remove the decklid so I'll take the suggestions above and do the R&R on the other components as well. Once again, this forum is great!
|
|
|
|
| oakdalecurtis |
Jan 28 2017, 01:09 AM
Post
#9
|
|
Oakdalecurtis Group: Members Posts: 1,323 Joined: 5-June 15 From: Oakdale, Ca Member No.: 18,802 Region Association: Central California |
If your engine cover opens weakly with not enough torsion spring power, here's a simple and easy fix. Just take a one inch section of half inch diameter delron rod and drill a quarter inch hole through it. Then pry the end of the torsion bar up with a screwdriver and slide the plastic tube on it. The tension on the rod will keep the spacer in place, and you can sequentially add up to four spacers total, one on each end of both rods maximum. That way you can increase opening power as you add each spacer and decide when it's opening power is just right. This picture shows you the plan.
 |
|
|
|
| cary |
Jan 28 2017, 09:36 AM
Post
#10
|
|
Advanced Member Group: Members Posts: 3,900 Joined: 26-January 04 From: Sherwood Oregon Member No.: 1,608 Region Association: Pacific Northwest |
I built a tool like North Coast Jim many years ago. Can't reiterate enough, keep your fingers out of the way.
|
|
|
|
| bretth |
Jan 28 2017, 10:12 AM
Post
#11
|
|
Senior Member Group: Members Posts: 899 Joined: 23-June 15 From: Central TX Member No.: 18,882 Region Association: Southwest Region |
Wear a thick set of welding gloves when you take the tension out of the torsion bars. They still hold tension through about 180 degrees of rotation before they finally start to go slack. Can really eF up your hands if it slips.
|
|
|
|
| db9146 |
Jan 29 2017, 08:55 PM
Post
#12
|
|
Senior Member Group: Members Posts: 953 Joined: 21-December 04 From: Atlanta, GA Member No.: 3,315 Region Association: None |
amfab,
Thanks for the suggestion. It turns out that one of the breaker bars I have has a threaded pin so it was really easy to take it apart and use it as suggested. Worked like a charm! Thanks. |
|
|
|
| amfab |
Jan 29 2017, 11:11 PM
Post
#13
|
|
Member Group: Members Posts: 391 Joined: 17-May 16 From: Los Angeles Member No.: 20,004 Region Association: None |
QUOTE(db9146 @ Jan 29 2017, 06:55 PM) amfab, Thanks for the suggestion. It turns out that one of the breaker bars I have has a threaded pin so it was really easy to take it apart and use it as suggested. Worked like a charm! Thanks. Awesome. I took the trunk off and only had the 914 at the house that day. I couldn't run out and buy anything and didn't have any scrap around that would work. After 10 minutes of going round and round the garage I hit upon that one. |
|
|
|
| doug_b_928 |
Apr 21 2017, 09:56 PM
Post
#14
|
|
Senior Member Group: Members Posts: 692 Joined: 17-January 13 From: Winnipeg Member No.: 15,382 Region Association: Canada |
Many thanks to North Coast Jim for providing the plans for his 'Torsion Bar Loading Tool'. I'm not sure how soon I'll need it but I'm glad to have it ready for when the time comes.
 |
 |
|
| doug_b_928 |
Jul 29 2017, 12:14 PM
Post
#15
|
|
Senior Member Group: Members Posts: 692 Joined: 17-January 13 From: Winnipeg Member No.: 15,382 Region Association: Canada |
QUOTE(amfab @ Jan 26 2017, 11:36 PM) I loosened all 4 bolts then took off one side. I rested it vertically on the folded blanket, crawled inside the trunk over to the other side while holding the unbolted side to keep it from slipping. I then unbolted the other side with one hand I still have yet to remove these. I'm a bit unclear about the procedure quoted above. For each torsion bar there are two plates with Each plate having two bolts (one close to the roller and one on the other side of the car. So, to clarify, is the procedure to loosen all 4 bolts for a given torsion bar, then remove two of the bolts on one of the plates, then the next two bolts on the other plate. Having not done it I'd have thought that this could send the torsion bar flying. With both of the plates for a given torsion bar removed, then the torsion bar is levered out from the roller wheel as described in the post above. Is that correct? |
|
|
|
| doug_b_928 |
Jul 30 2017, 09:54 PM
Post
#16
|
|
Senior Member Group: Members Posts: 692 Joined: 17-January 13 From: Winnipeg Member No.: 15,382 Region Association: Canada |
Bump
|
|
|
|
| db9146 |
Aug 19 2017, 04:30 PM
Post
#17
|
|
Senior Member Group: Members Posts: 953 Joined: 21-December 04 From: Atlanta, GA Member No.: 3,315 Region Association: None |
Doug,
Before you remove the four plates, you need to use some sort of tool to lever the end of the torsion rods off the rollers and into their most relaxed state. Then you can remove the hold down plates safely. |
|
|
|
| doug_b_928 |
Aug 19 2017, 05:17 PM
Post
#18
|
|
Senior Member Group: Members Posts: 692 Joined: 17-January 13 From: Winnipeg Member No.: 15,382 Region Association: Canada |
Thanks so much for the clarification!!!
|
|
|
|
| doug_b_928 |
Apr 19 2018, 08:06 AM
Post
#19
|
|
Senior Member Group: Members Posts: 692 Joined: 17-January 13 From: Winnipeg Member No.: 15,382 Region Association: Canada |
Resurrecting this thread because when I tried the tool I made it was too thin and bent. So I finally had time last weekend to make a second one and weld the two together. It's now 5/16" thick and plenty solid to move the torsion bar without deforming. Just wanted to update for anyone else that decides to make the tool to ensure they get it thick enough.
 |
|
|
|
|
1 User(s) are reading this topic (1 Guests and 0 Anonymous Users)
0 Members:

|
Lo-Fi Version | Time is now: 25th April 2024 - 08:28 AM |
Invision Power Board
v9.1.4 © 2024 IPS, Inc.