|
|
|
Porsche, and the Porsche crest are registered trademarks of Dr. Ing. h.c. F. Porsche AG.
This site is not affiliated with Porsche in any way. Its only purpose is to provide an online forum for car enthusiasts. All other trademarks are property of their respective owners. |
|
|


| Olympic 914 |
 Feb 16 2017, 12:01 PM Feb 16 2017, 12:01 PM
Post
#1
|
 Group: Members Posts: 1,660 Joined: 7-July 11 From: Pittsburgh PA Member No.: 13,287 Region Association: North East States |
Ok I got the wiper mechanism cleaned up and lubed and was ready to install.. So I thought....
I wanted to be sure it ran and was in the park position before I replaced it. looked up the procedure in my Haynes manual, ( Clymer manual has same procedure) Connect a 12V Neg line to ground. Connect a 12V Pos line to both terminals 53 and 53a. When motor starts to run disconnect term 53 and allow motor to park. Doesn't happen. As soon as I disconnect 53 motor stops wherever it is. power to 53 runs low speed. power to 53b runs high speed. power to 53a alone does nothing. 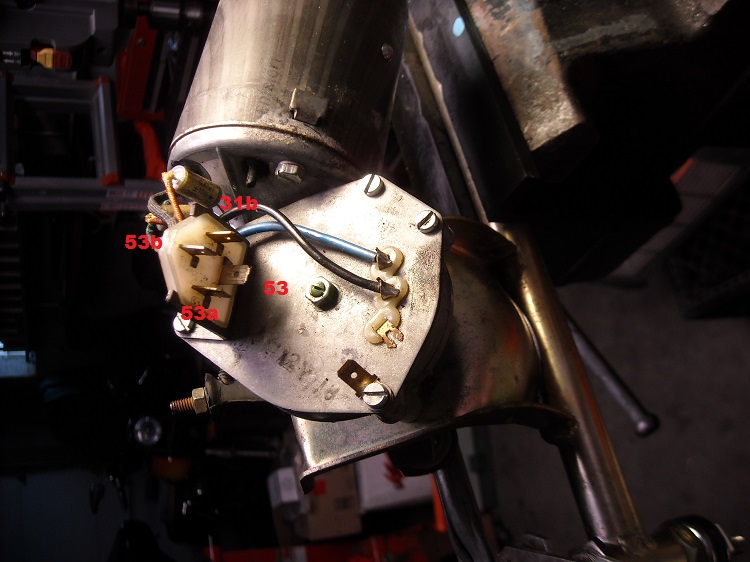 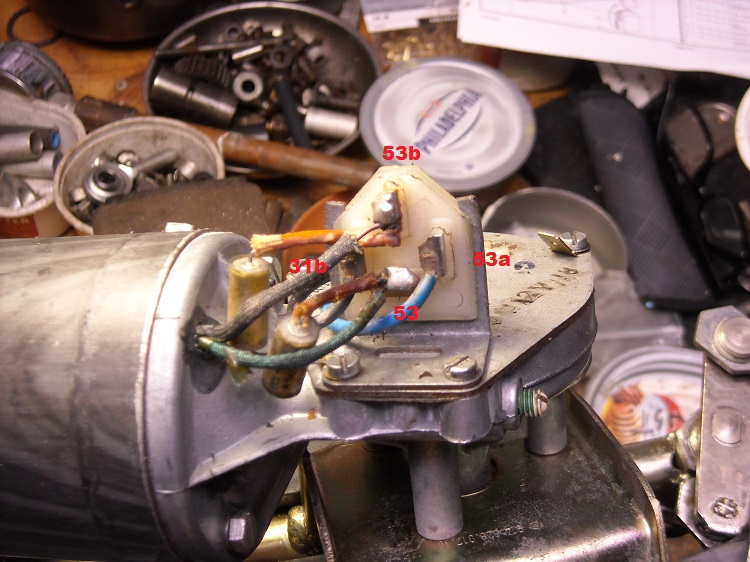 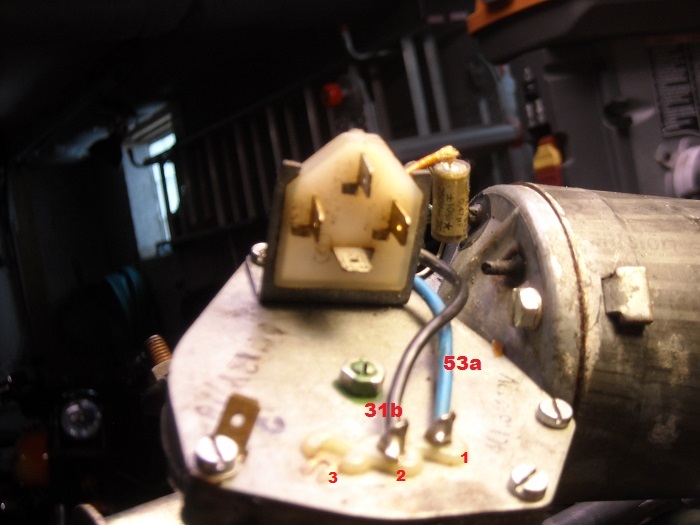 Although not in the instructions power to remaining terminal 31b also does nothing. Checked to be sure all the contacts were touching and they appear to be. Gave them a little brush with a points file to be sure. 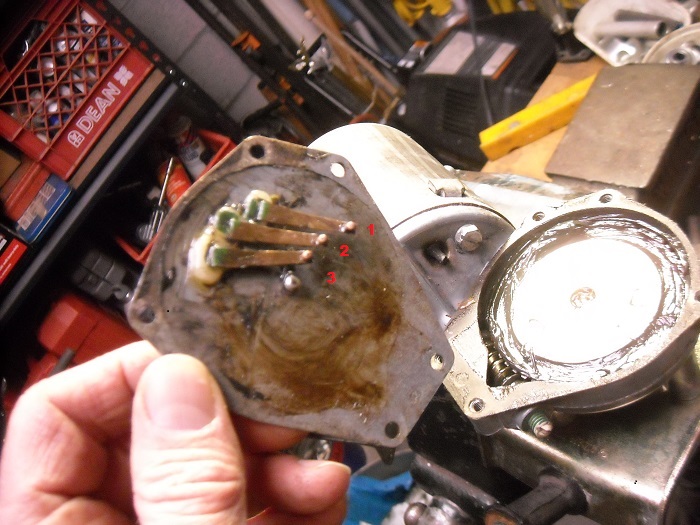 all three are making contact, you can see the tracks in the grease. 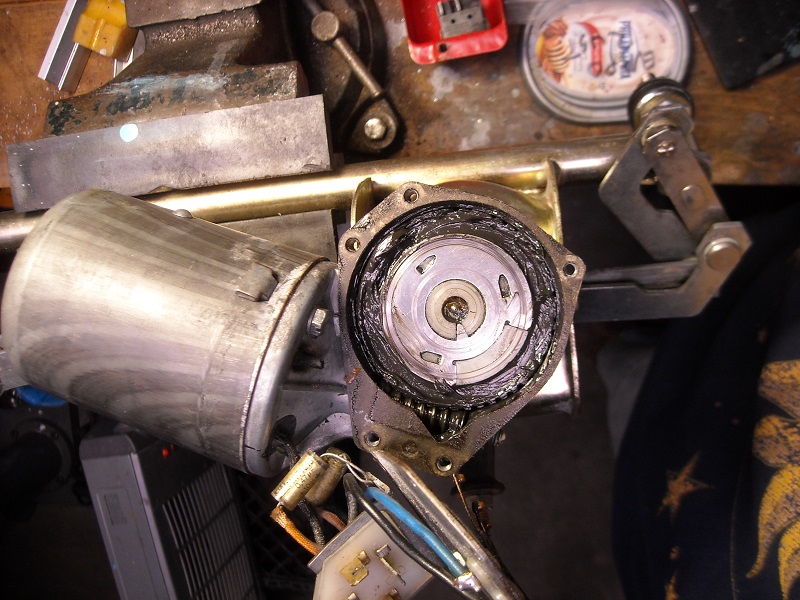 No sense in putting this thing back in until I get it sorted out. BTW if it makes a difference, car is an early 73. No intermittent wipers. all testing done on bench. Edit: Adding another picture, this was taken before I disassembled everything. two red/black wires go to pin 53a. ( on Prosperos wiring diagram it shows 2 red wires - no black trace) 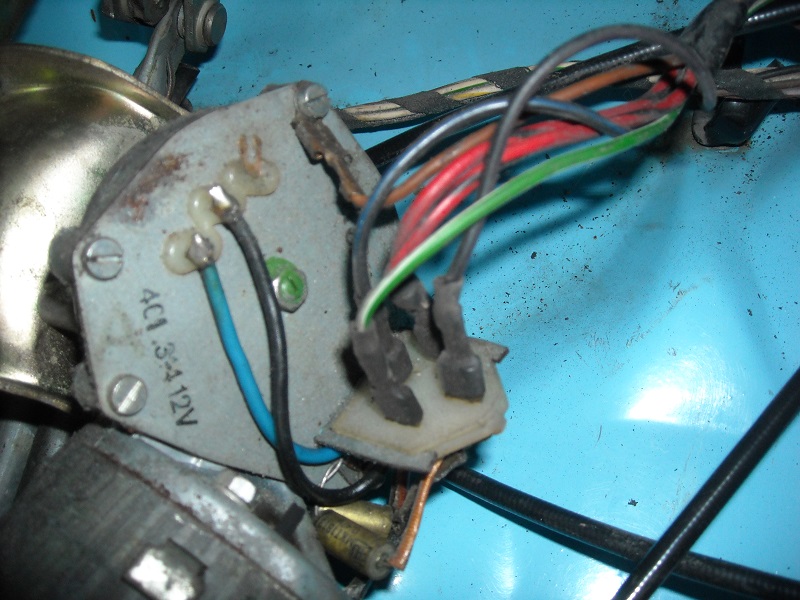 |
   |

 
|
  |
Replies(1 - 9)
| cn2800 |
Feb 16 2017, 12:20 PM
Post
#2
|
|
Member Group: Members Posts: 119 Joined: 11-August 14 From: Amarillo, Texas Member No.: 17,766 Region Association: None |
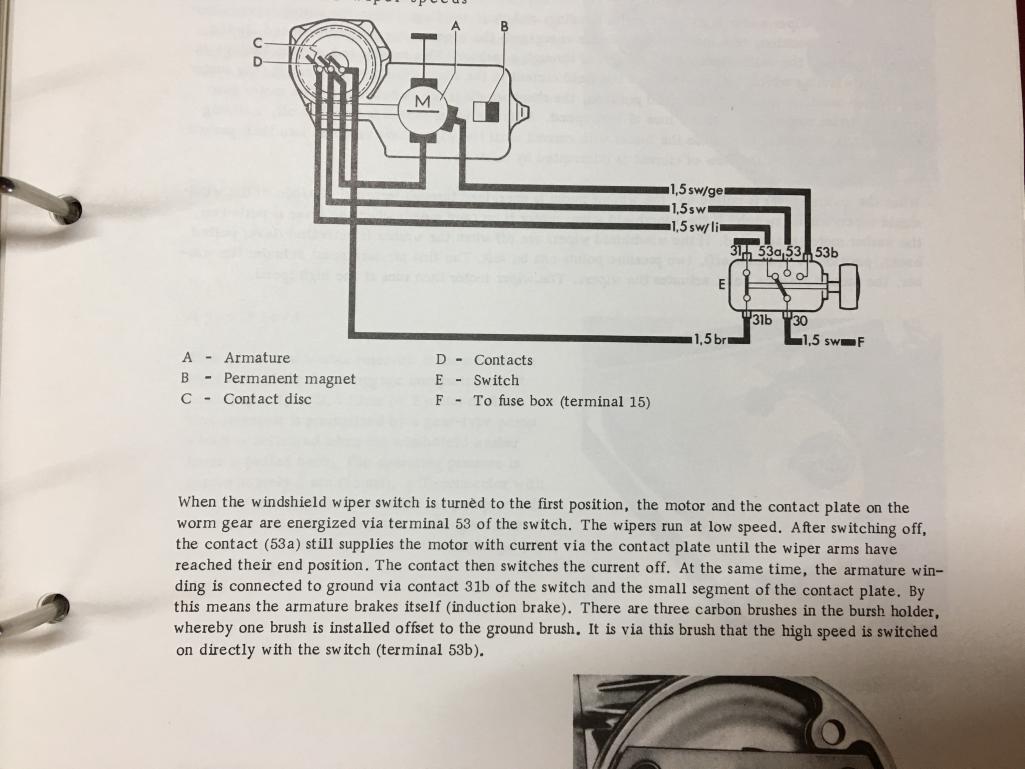
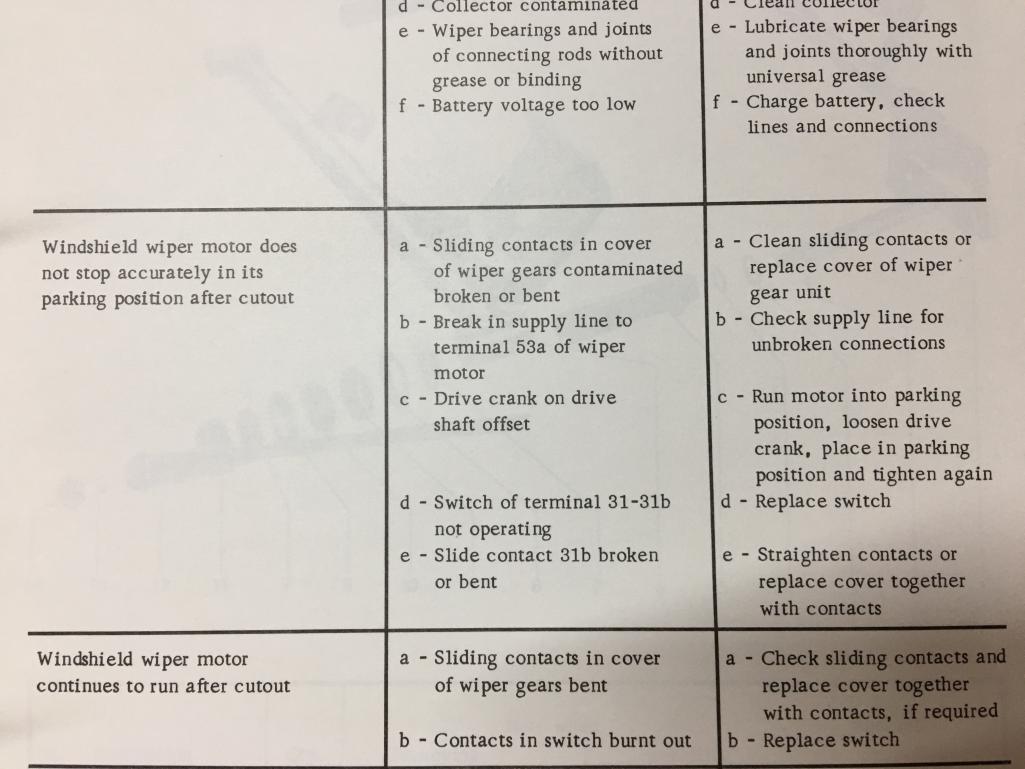
I don't know if this is duplicate information to what you already have, but here are a couple of pages from the service manual:
  |
|
|
|
| Olympic 914 |
Feb 16 2017, 01:15 PM
Post
#3
|
|
Group: Members Posts: 1,660 Joined: 7-July 11 From: Pittsburgh PA Member No.: 13,287 Region Association: North East States |
Thanks for that info but it must be a diagram for a different year.
on this motor, 31b terminal goes to the middle contact, 53a goes to outer ring contact and inner ring contact is grounded to the cover. I can't quite wrap my head around how this thing is supposed to work. I am looking at the Procperos (?) wiring diagram now but it still eludes me. |
|
|
|
| Olympic 914 |
Feb 16 2017, 02:32 PM
Post
#4
|
|
Group: Members Posts: 1,660 Joined: 7-July 11 From: Pittsburgh PA Member No.: 13,287 Region Association: North East States |
I am half tempted to just hook the bastard up and see what it does. (IMG:style_emoticons/default/confused24.gif)
Right now I have too many wires disconnected, Dash, head and tail lights, fresh air box, etc. I will have to put the dash back in anyway so that would take care of a lot of loose wires. and either install or tape up anything else that might ground out. It would suck if all my smoke leaked out though. |
|
|
|
| Olympic 914 |
Feb 17 2017, 08:28 AM
Post
#5
|
|
Group: Members Posts: 1,660 Joined: 7-July 11 From: Pittsburgh PA Member No.: 13,287 Region Association: North East States |
I found a wiring diagram that seems to make sense for this application, although its supposed to be for a 72+ beetle.
If you substitute the wiring numbers 31b for the 53e shown in this diagram, and disregard the "T" position on the switch, using only the 1+ 2 positions this seems the way it would work. 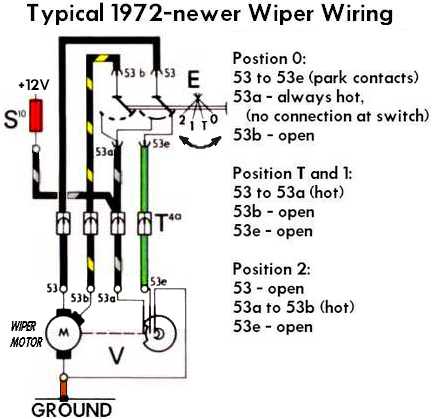 As I read this diagram the switch initiates the PARK function. In the diagram above power comes in through 53a and flows to the contact point 53a and also flows back to the switch out through 53 (when switch is in #1 position) and to the motor and the motor runs at low speed. 53a is hot through about 290 deg of rotation of the contact plate (shown in red) to 31b through the contact point but 31b (contact track shown in blue) is now open at the switch. When you turn the wiper switch off, now 53 is connected in the switch to 31b which continues to get power through the contact plate as long as contact point at 53a is within the 290 degrees, when the contact plate rotates to the plastic non-conductive section, the power supplied through 31b is broken and the motor stops. at about the same time the inner contact point (which is connected to ground on the case - shown in green )grounds the motor through 31b the switch and pin 53. that puts the wipers in the park position. 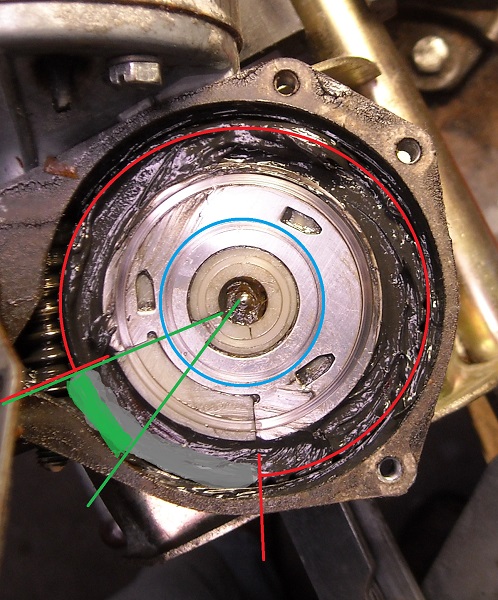 I hope this explanation works for you, but now I finally understand that the instructions on how to place the motor in park will not work. at least not in my application.. 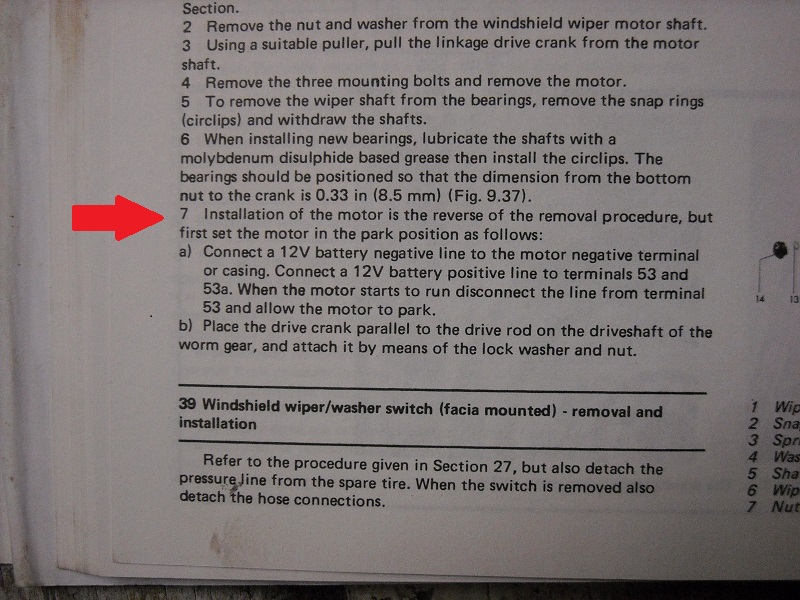 I think in order to activate the park function on a bench test you would have to connect up a DPST switch to mimic the wiper stalk switch. Whew... I though about this all day yesterday and in order to get away from it and rest my mind I did my TAXES. then woke up in the middle of the night still thinking about it. Think I'll have my breakfast now.. (IMG:style_emoticons/default/chowtime.gif) |
|
|
|
| jfort |
Feb 17 2017, 09:30 AM
Post
#6
|
|
Senior Member Group: Members Posts: 1,134 Joined: 5-May 03 From: Findlay, OH Member No.: 652 Region Association: Upper MidWest |
thanks for posting this. i hope i never have to do this, but if I do, you saved me time. as complicated as this is, i'd still rather have this than a computer or microprocessor doing it.
|
|
|
|
| 73914 |
Jun 6 2023, 08:10 PM
Post
#7
|
|
Newbie Group: Members Posts: 2 Joined: 10-May 23 From: London, Ontario Member No.: 27,349 Region Association: Canada |
My very first post...ready? I just dismantled my ‘73s non-functioning wiper motor and found heavy grease smeared thickly all over the electrical contact area on the ring gear. I cleaned the contact area and removed what I considered an excess of grease. (Noticed how clean this area was in your pics) Re-assembled and when tested the motor has both speeds and park function. (IMG:style_emoticons/default/smile.gif) Grease was the problem, or is there supposed to be a conductive lubricant there? The only other thing I did was bend two of the three contact arms a little for better contact. By the way, I found the wiper mechanism seized, with rust on one wiper “post”, which I have cleaned and lubricated.
|
|
|
|
| vitamin914 |
Jun 7 2023, 05:36 AM
Post
#8
|
|
Member Group: Members Posts: 202 Joined: 8-September 21 From: Toronto Canada Member No.: 25,893 Region Association: Canada |
QUOTE(73914 @ Jun 6 2023, 09:10 PM)  My very first post...ready? I just dismantled my ‘73s non-functioning wiper motor and found heavy grease smeared thickly all over the electrical contact area on the ring gear. I cleaned the contact area and removed what I considered an excess of grease. (Noticed how clean this area was in your pics) Re-assembled and when tested the motor has both speeds and park function. (IMG:style_emoticons/default/smile.gif) Grease was the problem, or is there supposed to be a conductive lubricant there? The only other thing I did was bend two of the three contact arms a little for better contact. By the way, I found the wiper mechanism seized, with rust on one wiper “post”, which I have cleaned and lubricated. (IMG:style_emoticons/default/welcome.png) @73914 Welcome to the best 914 forum around !!! And welcome to a fellow Canuck... (IMG:style_emoticons/default/cheer.gif) (IMG:style_emoticons/default/beerchug.gif) No to electrically conductive lubricant. It has to be a dielectric or insulating grease otherwise it would short everything out. Most likely the slight adjustment on the contacts did the trick. Excess grease could have added to the problem if the contact could not make an electrical connection through the grease. |
|
|
|
| 73914 |
Jun 7 2023, 06:14 AM
Post
#9
|
|
Newbie Group: Members Posts: 2 Joined: 10-May 23 From: London, Ontario Member No.: 27,349 Region Association: Canada |
Yes, enjoying the forum! So, should there be some dielectric grease on that contact surface?
|
|
|
|
| vitamin914 |
Jun 7 2023, 07:11 AM
Post
#10
|
|
Member Group: Members Posts: 202 Joined: 8-September 21 From: Toronto Canada Member No.: 25,893 Region Association: Canada |
QUOTE(73914 @ Jun 7 2023, 07:14 AM) Yes, enjoying the forum! So, should there be some dielectric grease on that contact surface? Whatever type of grease is already in there should be fine - just a thin film to prevent corrosion. There are special dielectric greases but that isn't needed. I would just use my finger to take some existing grease and smear on a thin light coating. At 12 VDC almost every plain old grease is more insulating (dielectric) than it is conductive. |
|
|
|
|
1 User(s) are reading this topic (1 Guests and 0 Anonymous Users)
0 Members:

|
Lo-Fi Version | Time is now: 17th April 2024 - 07:32 PM |
Invision Power Board
v9.1.4 © 2024 IPS, Inc.