|
|
|
Porsche, and the Porsche crest are registered trademarks of Dr. Ing. h.c. F. Porsche AG.
This site is not affiliated with Porsche in any way. Its only purpose is to provide an online forum for car enthusiasts. All other trademarks are property of their respective owners. |
|
|

  |

| doug_b_928 |
 Feb 17 2017, 09:33 AM Feb 17 2017, 09:33 AM
Post
#1
|
|
Senior Member  Group: Members Posts: 689 Joined: 17-January 13 From: Winnipeg Member No.: 15,382 Region Association: Canada |
I have the RD rear floor pan replacement piece. I'm looking for advice on how best to install it at the trans crossmember area.
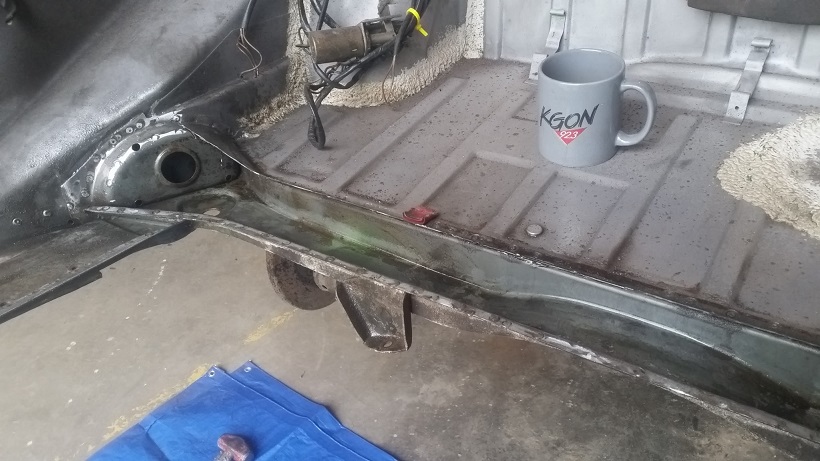
I cut out the area underneath the rear trunk reinforcement (because I butchered that area not realizing that it was spot welded on top and to see what it's like inside). I still need to remove the remaining spot welded bit of the original rear trunk floor (didn't have time to do that yet). Here's a pic: 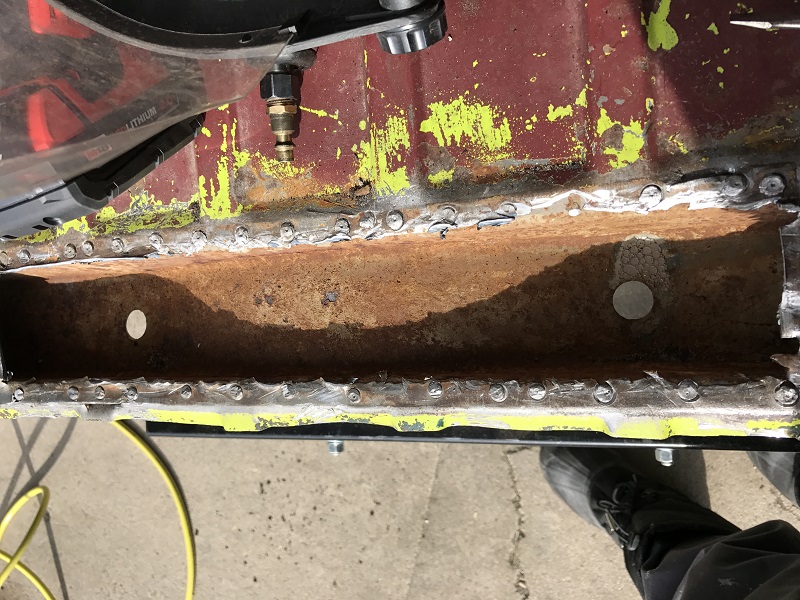 It would be nice to cut the whole thing to blast the inside and epoxy prime it. But, my concern is getting a nice finished edge on the weld seam on the crossmember. As it is now I can cut the RD piece to fit my current hole and most, if not all, of my repair work at the crossmember area would be covered by the new trunk reinforcement. In this scenario I'd just be replaceing the rear floor and the section of the crossmember under the trunk reinforement. I could spray some cavity wax or some other product into the crossmember to try to deal with the the rust in there. Though, I suspect the better option is to cut the whole thing, which raises another question. If I cut the whole crossmember, what is the best way to make the seam between the RD part and the existing? Here's a pic of the measurement of the existing crossmember (from where it starts to raise it's profile). From where the profile raises to where it lowers is about 2 3/4". 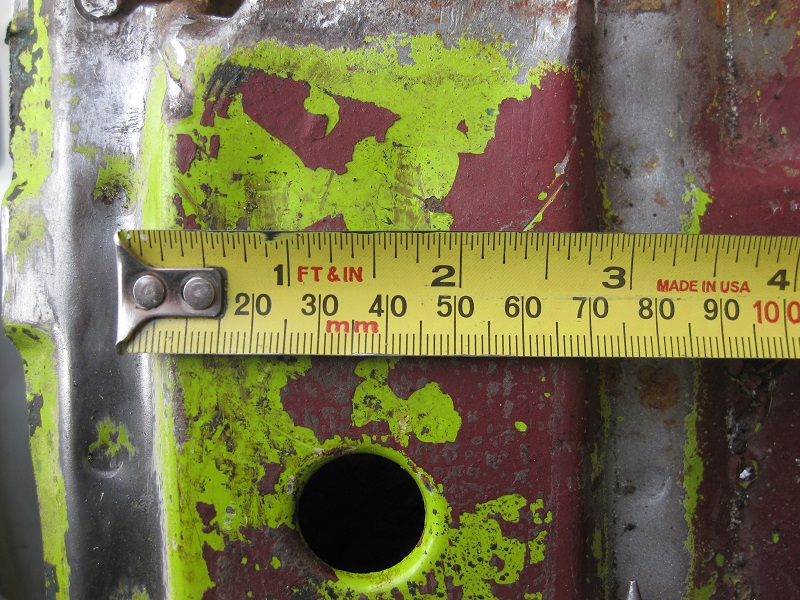 And here's a pic of the RD part measuring from the same spot. From where the profile raises to the end of the panel (It's just straight on the front end, so doesn't come back down) is about 3 5/16". 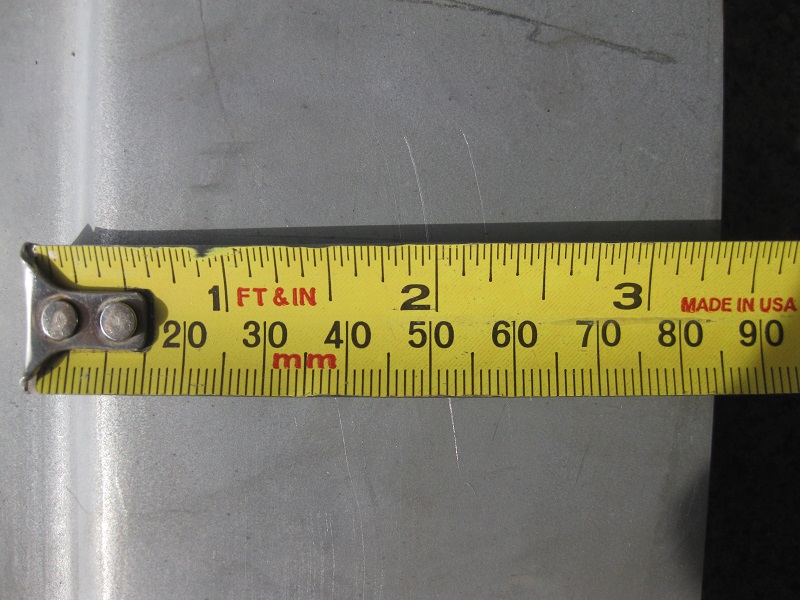 So, if I cut the whole crossmember, what's the best way to make the seam? Here's what I'm thinking: Cut the crossmember but leave enough to flange, flange it, then cut the RD piece to fit over the flange, spot weld to the flange and bead weld the seam, grind smooth as possible then a bit of filler to remove any imperfections. I don't want to spray seam sealer on these seams because it wouldn't look correct. I could leave the RD piece longer in the area of the trunk reinforcement and bend that area in a brake to meet the trunk floor in front of the crossmember. How would you guys do it? |
   |

 
|
| BeatNavy |
Feb 17 2017, 10:01 AM
Post
#2
|
|
Certified Professional Scapegoat Group: Members Posts: 2,924 Joined: 26-February 14 From: Easton, MD Member No.: 17,042 Region Association: MidAtlantic Region |
I'm kind of at the same point and have been struggling with fitment. It's been cold and dark in my garage during the winter, so I have been avoiding completion of this section for quite a while. Although you're in Winnipeg and doing this (hopefully with heat).
I spoke to a very experienced member here about it a couple of months back, and he normally liked to cut it across the support all the way from side to side. He likes to make his seam there because you can most easily blend in the join there. I tried to do something similar, but I cut around the holes as I didn't want to try to fabricate those. I'm struggling with what to do with the area I've highlighted with the black box which is kind of where you are as well. The reinforcing overlay on mine was really trashed, probably like yours. I suspect most of them are. Anyway, not much help, but I'm also interested in what others have done or are doing (I should probably go back and look at one of Cary's threads). 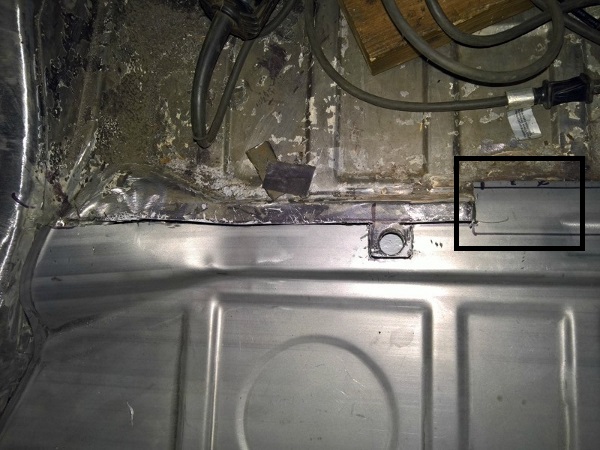 |
 |
|
| doug_b_928 |
Feb 17 2017, 10:51 AM
Post
#3
|
|
Senior Member Group: Members Posts: 689 Joined: 17-January 13 From: Winnipeg Member No.: 15,382 Region Association: Canada |
Was visiting my Mom on the farm and worked in a bit of 914 work because it was so nice outside (working with the shed door open and no gloves needed; though still needed snow boots to keep my feet warm from the cold concrete).
Interesting idea to leave the hole in place. I didn't think about those holes until I was posting my pics in this thread. But was thinking I'd use a hole saw smaller than the hole, then put a small piece of wood underneath with the right sized hole and press with a correct sized drift (maybe a socket) to get that rolled edge look. If you're being really fastidious you might want to consider putting the plates back in and stamping the chassis number in the correct location (see pics below). I didn't find it difficult to do with the piece uninstalled. 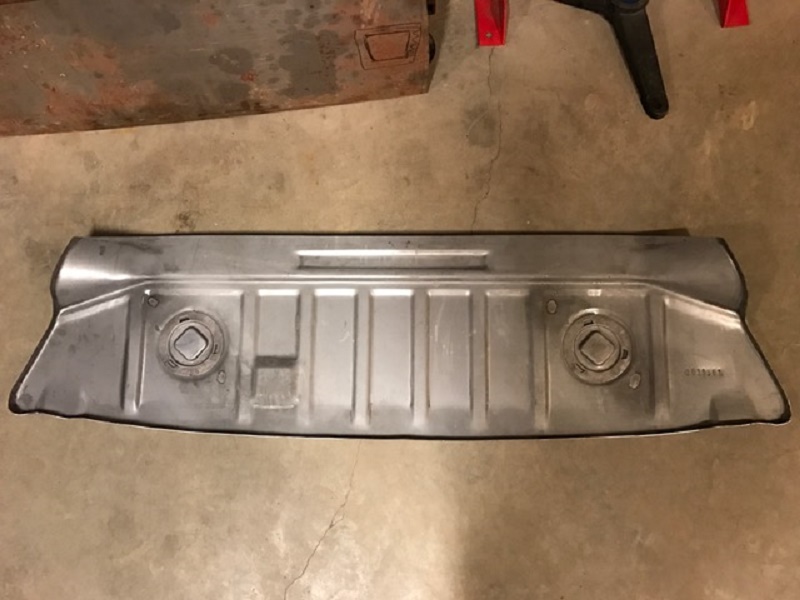 |
|
|
|
| cary |
Feb 17 2017, 10:19 PM
Post
#4
|
|
Advanced Member Group: Members Posts: 3,900 Joined: 26-January 04 From: Sherwood Oregon Member No.: 1,608 Region Association: Pacific Northwest |
Here's Mark's project car. I used the entire piece.
 On Doug's I didn't open up the transmission support. 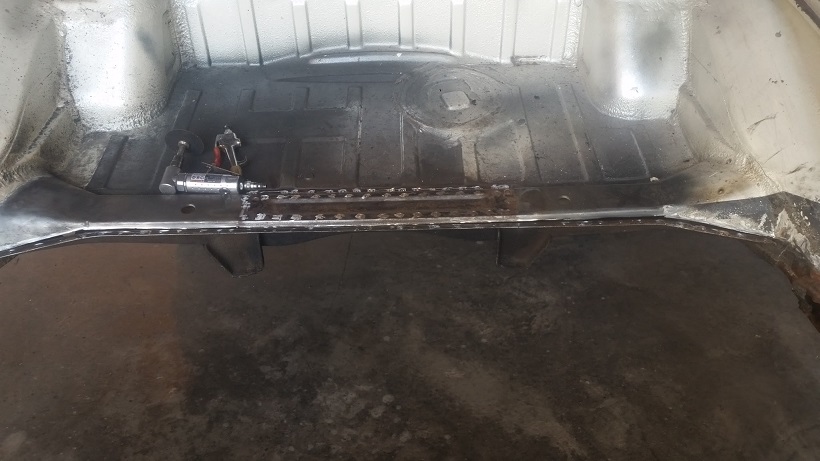 |
|
|
|
| doug_b_928 |
Feb 17 2017, 10:35 PM
Post
#5
|
|
Senior Member Group: Members Posts: 689 Joined: 17-January 13 From: Winnipeg Member No.: 15,382 Region Association: Canada |
Cary, what criteria do you use when making the decision as to which way to do it? Also, in the pic of Mark's car it looks like you cut the whole thing out. If so, did you use a brake to recreate the profile on the RD piece and then but weld to the front floor? What do you think of the idea of cutting on the top of the profile and then flanging the RD piece to fit under it and then plug and seam welding? Or, based on your experience do you advise to leave as much of the original in place as possible?
|
|
|
|
| cary |
Feb 17 2017, 11:19 PM
Post
#6
|
|
Advanced Member Group: Members Posts: 3,900 Joined: 26-January 04 From: Sherwood Oregon Member No.: 1,608 Region Association: Pacific Northwest |
First criteria is to remove all the cancer. On Mark's there were all kinds of holes punched in the rear section plus all kinds of rust under the rear trunk seal. But the metal under the reinforcement plate lead us to use the entire piece.
Here's my work on Mark's car. http://www.914world.com/bbs2/index.php?s=&...t&p=2316343 I didn't bend the back edge in a brake. I just didn't think I'd get the fit and look I'd like. So I cut it right at the top of the radius. This wasn't for the faint of heart. Make sure you get a nice tight fit. 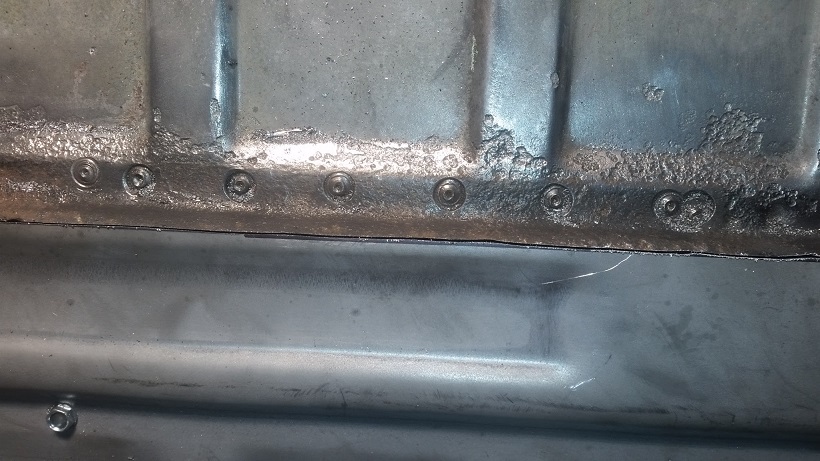 In answer to your last question. The answer is yes. Leave as much of the original as you can. But you also need to take into consideration as to where the welds are going to go. Hope this helps ................. |
|
|
|
| doug_b_928 |
Feb 18 2017, 05:49 AM
Post
#7
|
|
Senior Member Group: Members Posts: 689 Joined: 17-January 13 From: Winnipeg Member No.: 15,382 Region Association: Canada |
Thanks, Cary. There's only surface rust inside, the outside looks to be solid. Any thoughts on how I can deal with the surface rust inside the crossmember, especiallly where I won't be able to get to with my hands?
|
|
|
|
| cary |
Feb 18 2017, 06:39 AM
Post
#8
|
|
Advanced Member Group: Members Posts: 3,900 Joined: 26-January 04 From: Sherwood Oregon Member No.: 1,608 Region Association: Pacific Northwest |
Based on the first picture. I thought you had it opened up?
|
|
|
|
| doug_b_928 |
Feb 18 2017, 06:41 AM
Post
#9
|
|
Senior Member Group: Members Posts: 689 Joined: 17-January 13 From: Winnipeg Member No.: 15,382 Region Association: Canada |
It's only opened up under the trunk reinforcement piece (because I butchered that area when removing the original trunk reinforcement piece). So, I can repair what's opened and have it covered by the replacement trunk reinforcement piece.
|
|
|
|
| doug_b_928 |
Feb 18 2017, 06:42 AM
Post
#10
|
|
Senior Member Group: Members Posts: 689 Joined: 17-January 13 From: Winnipeg Member No.: 15,382 Region Association: Canada |
P.S. Guess we're both early risers (IMG:style_emoticons/default/smile.gif)
|
|
|
|
| Tbrown4x4 |
Feb 18 2017, 06:51 AM
Post
#11
|
|
Senior Member Group: Members Posts: 699 Joined: 13-May 14 From: Port Orchard, WA Member No.: 17,338 Region Association: None |
Tell me about it........
|
|
|
|
| doug_b_928 |
Feb 18 2017, 06:53 AM
Post
#12
|
|
Senior Member Group: Members Posts: 689 Joined: 17-January 13 From: Winnipeg Member No.: 15,382 Region Association: Canada |
|
|
|
|
| doug_b_928 |
Feb 18 2017, 07:38 AM
Post
#13
|
|
Senior Member Group: Members Posts: 689 Joined: 17-January 13 From: Winnipeg Member No.: 15,382 Region Association: Canada |
Would Eastwood's internal frame coating work with the level of surface rust that's present inside the crossmember?
|
|
|
|
| cary |
Feb 18 2017, 07:55 AM
Post
#14
|
|
Advanced Member Group: Members Posts: 3,900 Joined: 26-January 04 From: Sherwood Oregon Member No.: 1,608 Region Association: Pacific Northwest |
My go to is OSPHO. Hose it down with a spray bottle and let it set 24 hrs. It converts rust to iron. Then give it a light brushing with a red 3m pad to knock off the high points. Then 2 coats of black Rustoleum.
Go to Harbor Freight and get a tarp for the garage floor first. The OSPHO will stain/etch the concrete as it drips down. OSPHO is available at Ace Hardware. If you have to worry about kids and pets I'd go with the Eastwood Frame Coating. |
|
|
|
| cary |
Feb 18 2017, 08:02 AM
Post
#15
|
|
Advanced Member Group: Members Posts: 3,900 Joined: 26-January 04 From: Sherwood Oregon Member No.: 1,608 Region Association: Pacific Northwest |
QUOTE(doug_b_928 @ Feb 18 2017, 05:38 AM)  Would Eastwood's internal frame coating work with the level of surface rust that's present inside the crossmember? It should stick to the top and sides. |
|
|
|
| doug_b_928 |
Feb 18 2017, 08:02 AM
Post
#16
|
|
Senior Member Group: Members Posts: 689 Joined: 17-January 13 From: Winnipeg Member No.: 15,382 Region Association: Canada |
I haven't been able to find OSPHO up here (no Ace Hardware here). The other problem is I can't get my hands inside the portion of the crossmember that's still closed up to do the application and sanding (could use your technique or POR on the open spot though). Probably my best bet is to tape a brush to the stick and try to loosen as much of the surface rust up as possible, then blow it out, then use the eastwood product in the cavity. The pics on their website have rust that doesn't look unlike the level of rust inside the crossmember.
|
|
|
|
| cary |
Feb 18 2017, 08:21 AM
Post
#17
|
|
Advanced Member Group: Members Posts: 3,900 Joined: 26-January 04 From: Sherwood Oregon Member No.: 1,608 Region Association: Pacific Northwest |
http://www.caswellcanada.ca/shop/product.p...at=0&page=1
A little pricey. I think its $26 US off the shelf. Another place to look. https://www.google.com/webhp?sourceid=chrom...+store+winnipeg https://www.walmart.com/ip/RL-Flo-Master-1-...prayer/13376324 One must remember. Whatever we do is better than what the factory did 40 years ago. Raw Steel. And our cars wont see as much outside weather as the cars first 20 years. This is the Eastwood product I use in areas I can't get to. Sprayed in with a compressor and undercoating gun. |
|
|
|
| jmitro |
Feb 18 2017, 08:27 AM
Post
#18
|
|
Senior Member Group: Members Posts: 713 Joined: 23-July 15 From: Oklahoma Member No.: 18,986 Region Association: None |
I used Eastwood internal frame coating (with the attachment hose and nozzle) AFTER welding the trunk floor in place; my thought process was that trying to paint it BEFORE welding would just burn off the paint in the areas close to the welds. Use the access holes on the bottom to insert the nozzle.
my car is also on a rotisserie, so I can turn it upside down to let gravity do its work and coat the entire inside of the transmission support |
|
|
|
| cary |
Feb 18 2017, 08:55 AM
Post
#19
|
|
Advanced Member Group: Members Posts: 3,900 Joined: 26-January 04 From: Sherwood Oregon Member No.: 1,608 Region Association: Pacific Northwest |
QUOTE(jmitro @ Feb 18 2017, 06:27 AM) I used Eastwood internal frame coating (with the attachment hose and nozzle) AFTER welding the trunk floor in place; Afterwards is always preferred. Doug's going have burn back from the flange in the trunk. Then both sides of the support when he welds the bottom back on. Building the rally cars at Rothsport I'm seeing about and inch of burn back on painted or undercoated areas. I'd probably spray it all down with the nozzle only before. Weld. Then use the wand thru the holes and do it again after welding. |
|
|
|
| doug_b_928 |
Feb 18 2017, 09:02 AM
Post
#20
|
|
Senior Member Group: Members Posts: 689 Joined: 17-January 13 From: Winnipeg Member No.: 15,382 Region Association: Canada |
Excellent advice guys, and thanks for the links Cary. What's the Eastwood piece to which you are referring (I think you forgot one link). I'll follow your advice and definitely do this all after welding.
|
|
|
|
|
1 User(s) are reading this topic (1 Guests and 0 Anonymous Users)
0 Members:

|
Lo-Fi Version | Time is now: 19th April 2024 - 05:08 PM |
Invision Power Board
v9.1.4 © 2024 IPS, Inc.