|
|
|
Porsche, and the Porsche crest are registered trademarks of Dr. Ing. h.c. F. Porsche AG.
This site is not affiliated with Porsche in any way. Its only purpose is to provide an online forum for car enthusiasts. All other trademarks are property of their respective owners. |
|
|

  |

| gothspeed |
 Mar 7 2018, 09:59 AM Mar 7 2018, 09:59 AM
Post
#21
|
|
Senior Member  Group: Members Posts: 1,539 Joined: 3-February 09 From: SoCal Member No.: 10,019 Region Association: None |
QUOTE(mepstein @ Mar 7 2018, 07:55 AM)  QUOTE(gothspeed @ Mar 7 2018, 10:38 AM) Nice job doing the metal work for the ignition. That sheet metal piece looks new, where does one source such a piece? Restoration design. They also make the metal washer. It’s ~ $8 so buy it at the same time. cool, thank you for the info (IMG:style_emoticons/default/beerchug.gif) |
   |

 
|
| jkb944t |
Mar 7 2018, 11:59 AM
Post
#22
|
|
Member Group: Members Posts: 470 Joined: 17-January 05 From: Canton, OH Member No.: 3,459 Region Association: None |
Getting back to the modification….next step is modifying the steering shaft.
I used a cutoff wheel to remove the steering lock tabs off the steering shaft of the 914-4 shaft. This is needed since the 911 ignition switch mounts 3.00 inches further down on the steering tube. 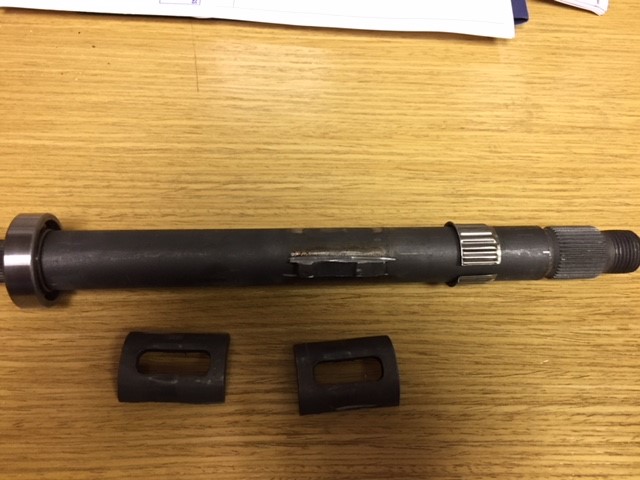 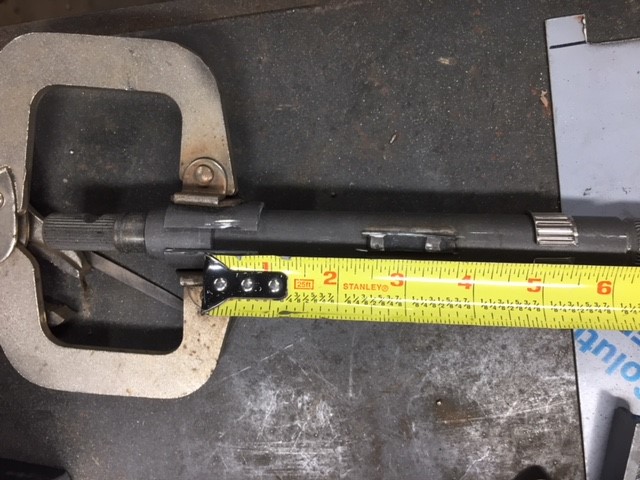  After assembling the modified shaft into the steering tube I test fit everything to make sure the steering lock worked correctly. This modification is progressing well without any major issues so far. 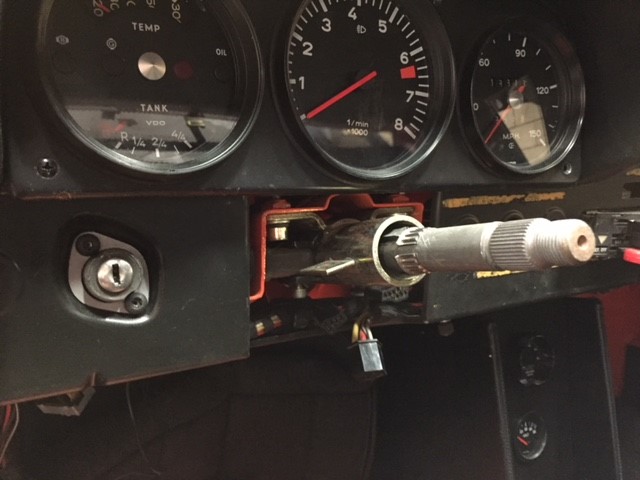 I have two problems to solve before I can move forward. The first small problem is the gray wire with a brown strip that I mentioned previously. The other problem is how to space the three switches (headlight, emergency flasher, and fog light) to the left of the ignition switch. On the earlier cars without the dash vents there was more room to locate the switches. Ideally I would move the emergency flasher to the right side of the steering column but this is somewhat difficult due to all the wires that attach to the back of the switch. Jeff B |
|
|
|
| gothspeed |
Mar 7 2018, 12:56 PM
Post
#23
|
|
Senior Member Group: Members Posts: 1,539 Joined: 3-February 09 From: SoCal Member No.: 10,019 Region Association: None |
QUOTE(jkb944t @ Mar 7 2018, 09:59 AM) I have two problems to solve before I can move forward. The first small problem is the gray wire with a brown strip that I mentioned previously. The other problem is how to space the three switches (headlight, emergency flasher, and fog light) to the left of the ignition switch. On the earlier cars without the dash vents there was more room to locate the switches. Ideally I would move the emergency flasher to the right side of the steering column but this is somewhat difficult due to all the wires that attach to the back of the switch. Jeff B |
|
|
|
| jkb944t |
Mar 8 2018, 06:46 AM
Post
#24
|
|
Member Group: Members Posts: 470 Joined: 17-January 05 From: Canton, OH Member No.: 3,459 Region Association: None |
QUOTE(gothspeed @ Mar 7 2018, 01:56 PM) QUOTE(jkb944t @ Mar 7 2018, 09:59 AM) I have two problems to solve before I can move forward. The first small problem is the gray wire with a brown strip that I mentioned previously. The other problem is how to space the three switches (headlight, emergency flasher, and fog light) to the left of the ignition switch. On the earlier cars without the dash vents there was more room to locate the switches. Ideally I would move the emergency flasher to the right side of the steering column but this is somewhat difficult due to all the wires that attach to the back of the switch. Jeff B I looked at the relay again last night and I think your idea will be easier than I originally though. There are multiple wires coming to each terminal on the emergency flasher switch but I only need to use single wires for each terminal connection on the extension harness. It makes more sense to me to have the emergency flasher switch to the right of the steering column than to try to squeeze it in on the left side. Jeff B |
|
|
|
| Rob-O |
Mar 8 2018, 12:56 PM
Post
#25
|
|
Senior Member Group: Members Posts: 1,288 Joined: 5-December 03 From: Mansfield, TX Member No.: 1,419 Region Association: Southwest Region |
Would it be easier to just make a harness for the fog switch. Less wires than the emergency flasher, aren’t there?
|
|
|
|
| ClayPerrine |
Mar 8 2018, 02:19 PM
Post
#26
|
|
Life's been good to me so far..... Group: Admin Posts: 16,526 Joined: 11-September 03 From: Hurst, TX. Member No.: 1,143 Region Association: NineFourteenerVille |
I moved my emergency flasher on my six conversion when I put in the 911 column and the key on the left. I just cut a long section with the plug out of an old scrap harness and spliced the wires together. Works great on the right.
|
|
|
|
| jkb944t |
Mar 8 2018, 04:06 PM
Post
#27
|
|
Member Group: Members Posts: 470 Joined: 17-January 05 From: Canton, OH Member No.: 3,459 Region Association: None |
QUOTE(Rob-O @ Mar 8 2018, 01:56 PM) Would it be easier to just make a harness for the fog switch. Less wires than the emergency flasher, aren’t there? I agree that it would be a lot easier to move the fog light but it just seems like it should be next to the headlight switch. Jeff B |
|
|
|
| jkb944t |
Mar 8 2018, 04:10 PM
Post
#28
|
|
Member Group: Members Posts: 470 Joined: 17-January 05 From: Canton, OH Member No.: 3,459 Region Association: None |
QUOTE(ClayPerrine @ Mar 8 2018, 03:19 PM) I moved my emergency flasher on my six conversion when I put in the 911 column and the key on the left. I just cut a long section with the plug out of an old scrap harness and spliced the wires together. Works great on the right. This is exactly what I plan to do. I looked last night at a spare wiring harness I have and the wires I need are in that harness. I’ll just have to get the male and female connectors. Jeff B |
|
|
|
| jkb944t |
Mar 8 2018, 04:16 PM
Post
#29
|
|
Member Group: Members Posts: 470 Joined: 17-January 05 From: Canton, OH Member No.: 3,459 Region Association: None |
Below is the modified steering housing next to the standard 914-4 steering housing for comparison purposes.
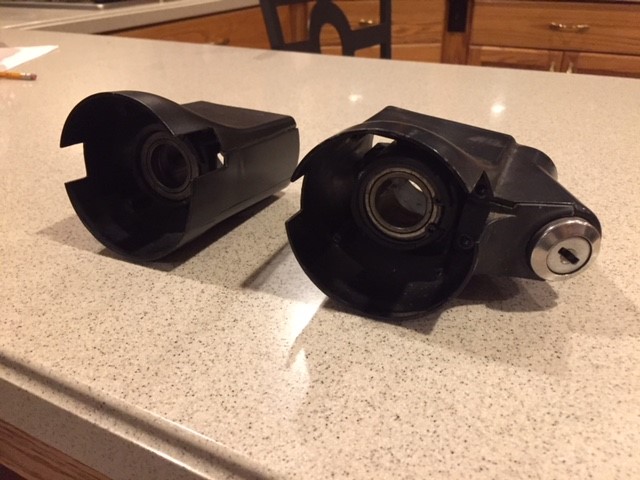 Jeff B |
|
|
|
| jkb944t |
Mar 9 2018, 07:02 AM
Post
#30
|
|
Member Group: Members Posts: 470 Joined: 17-January 05 From: Canton, OH Member No.: 3,459 Region Association: None |
Finished up the ignition switch wiring harness this week. The ignition switch wiring harness wasn’t as hard as I expected since the wire locations at each end are basically straight forward. The wire locations are marked clearly on both the 914 ignition switch and the 911 ignition switch connector.
The connections are: 30-large red wire for main battery power 50-large yellow wire for starter 15- medium diameter black wire for fuses X-medium diameter red wire for headlights P-small gray wire for turn signal switch ?-small gray wire with brown stripe for key in ignition switch I disassembled the 914-4 ignition switch to see if I could use the end of it to fabricate a connector. It would be much easier to just splice the wires into the existing wiring harness but I wanted to avoid cutting into the original wire harness. 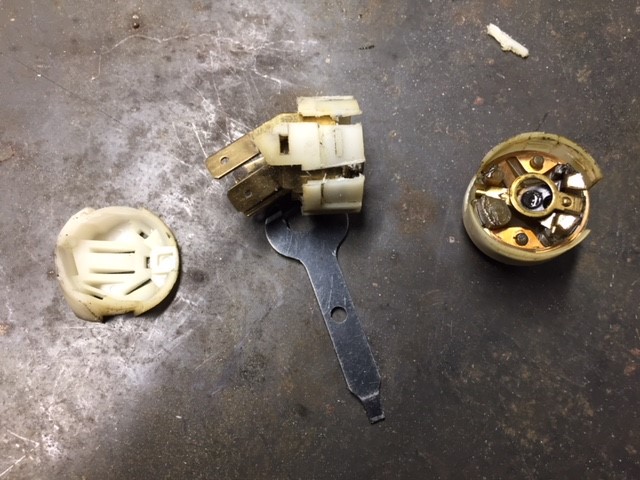 I was able to use two of the pieces of the 914-4 ignition switch to fabricate the male end of the harness. I used a Dremel to cut slots down the side of the connector so that I could solder the wires to the contact pins. Once the wires were all connected I used JB Weld to seal up the slots on the side and back of the connector. 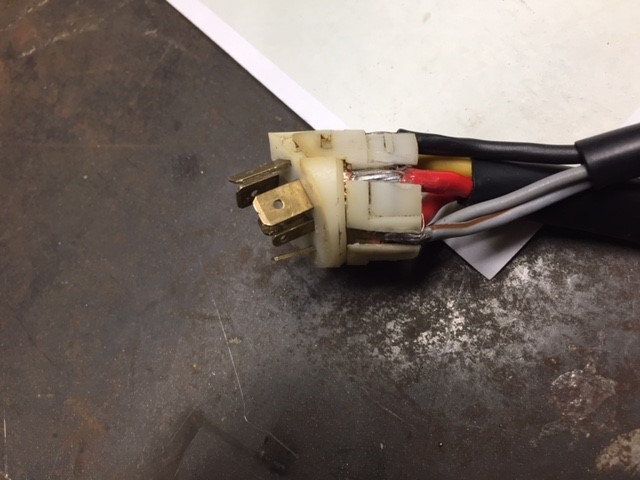 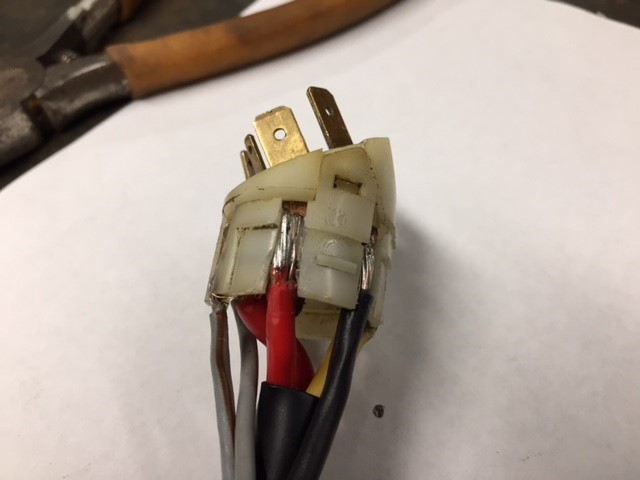 The next step was to disassemble the used 911 ignition switch connector. 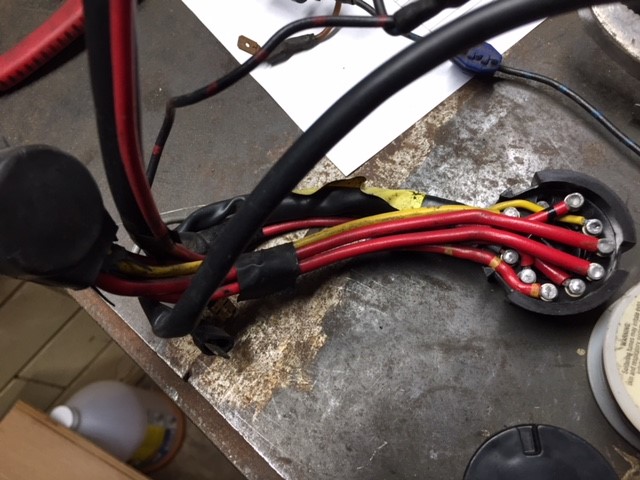 I pulled all the wires out of the connector and then soldered in the new wires. 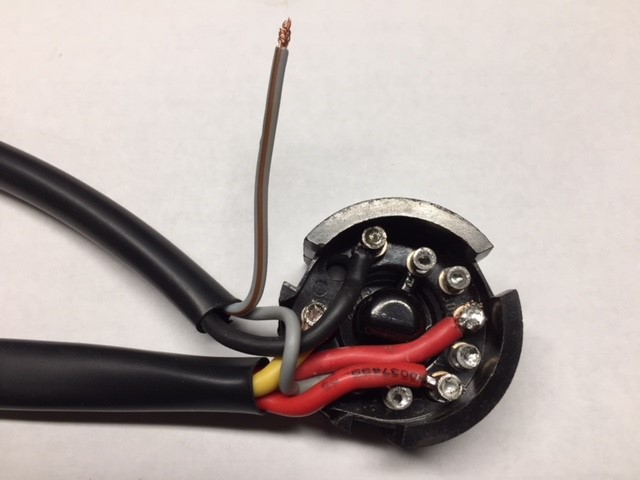 Below is the nearly finished wiring harness. I still have to figure out the gray wire with the brown stripe for the ignition buzzer. This isn’t real critical yet since I am not sure I even want the buzzer to work. 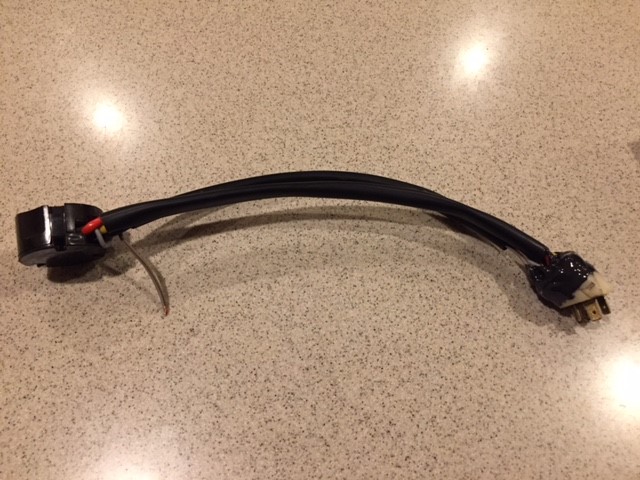 Jeff B |
|
|
|
| gothspeed |
Mar 9 2018, 08:17 AM
Post
#31
|
|
Senior Member Group: Members Posts: 1,539 Joined: 3-February 09 From: SoCal Member No.: 10,019 Region Association: None |
workmanship is looking awesome! I like the custom connector adapter idea (IMG:style_emoticons/default/smile.gif)
|
|
|
|
| jkb944t |
Mar 9 2018, 09:35 PM
Post
#32
|
|
Member Group: Members Posts: 470 Joined: 17-January 05 From: Canton, OH Member No.: 3,459 Region Association: None |
Thanks, just a few details to finish. Hopefully I’ll be able to finish it this weekend.
Jeff B |
|
|
|
| 914work |
Mar 9 2018, 09:38 PM
Post
#33
|
|
Member Group: Members Posts: 291 Joined: 9-November 11 Member No.: 13,762 Region Association: None |
This is a great thread! Thank you
|
|
|
|
| jkb944t |
Mar 12 2018, 11:11 AM
Post
#34
|
|
Member Group: Members Posts: 470 Joined: 17-January 05 From: Canton, OH Member No.: 3,459 Region Association: None |
I finished up the emergency flasher wiring harness extension as shown below. I used some wire from a spare wiring harness to make it look as factory as possible. Moving the flasher switch to the right of the steering column seemed like the most logical place for it. As others mentioned it would be easier to move the fog light switch so it is really a matter of preference.
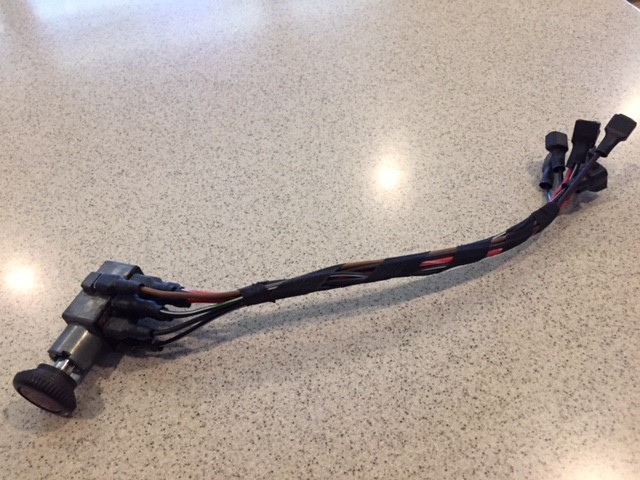 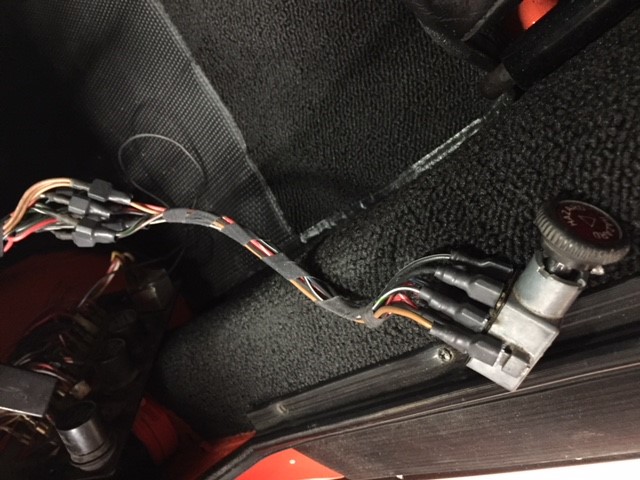 The wiper switch needs to have the washer tube assembly removed since it will interfere with the 911 ignition switch. This will require going to the electric washer pump which was on my list to do anyway. 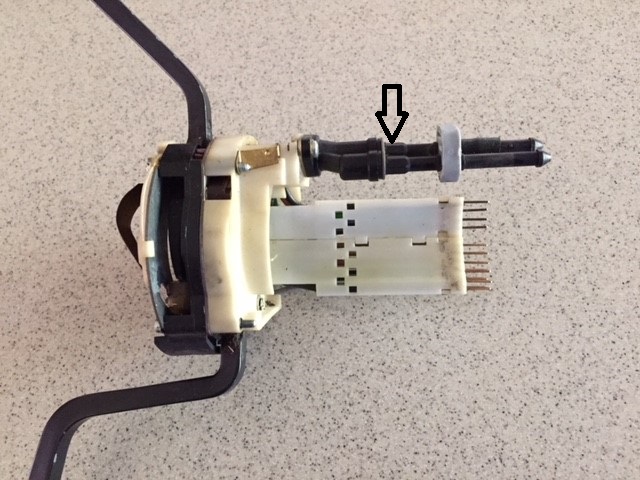 I also had to make a new sheet metal cover plate for the dashboard and cover it with some new vinyl sourced from 914 Rubber. This is needed since the modified steering column is smaller on the right side where the ignition switch used to be sticking out. Once everything is assembled the pictures show what the final conversion looks like. I just need to source an ignition switch trim cover to complete the conversion. 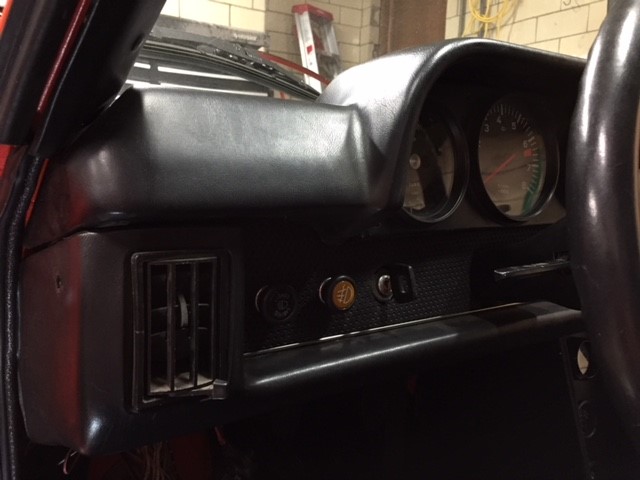 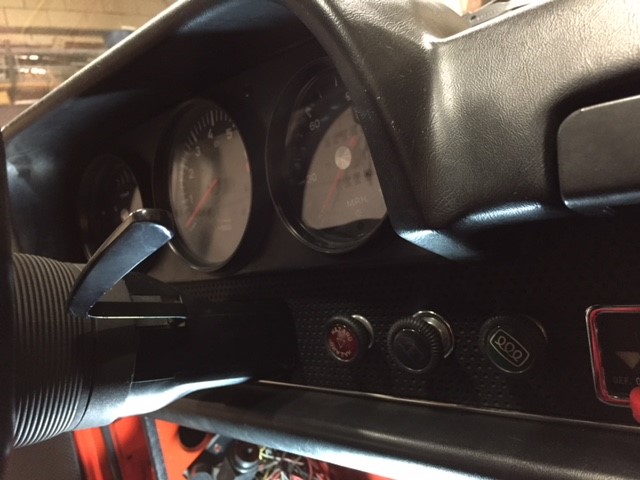 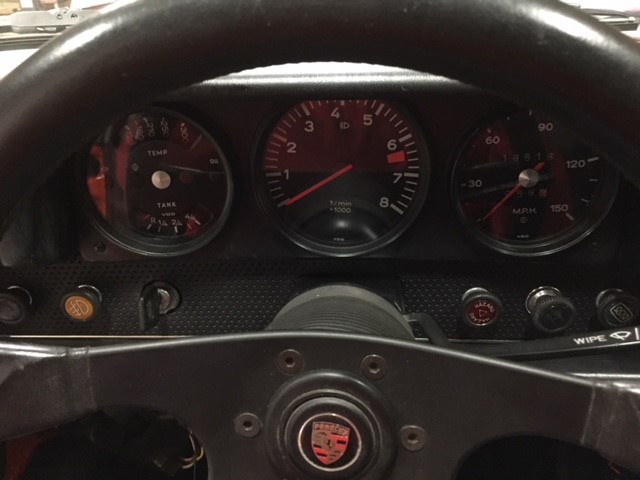 For me it was worth the effort since I really wanted a left-hand ignition switch. It was an interesting challenge that has a factory look and feel to it. Hopefully this thread will be helpful to someone else considering a similar conversion. Jeff B |
|
|
|
| Larmo63 |
Mar 12 2018, 11:59 AM
Post
#35
|
|
Advanced Member Group: Members Posts: 4,267 Joined: 3-March 14 From: San Clemente, Ca Member No.: 17,068 Region Association: Southern California |
Wow, that looks great.
Good info and step by step. Now go race at Le Mans........ (IMG:style_emoticons/default/smilie_pokal.gif) |
|
|
|
| sixnotfour |
Mar 12 2018, 01:34 PM
Post
#36
|
|
914 Wizard Group: Members Posts: 11,029 Joined: 12-September 04 From: Life Elevated..planet UT. Member No.: 2,744 Region Association: Rocky Mountains |
The plastic ones can be done with epoxy, and a filler piece..
for comparison , here is the one I did (IMG:style_emoticons/default/beerchug.gif) Attached image(s) 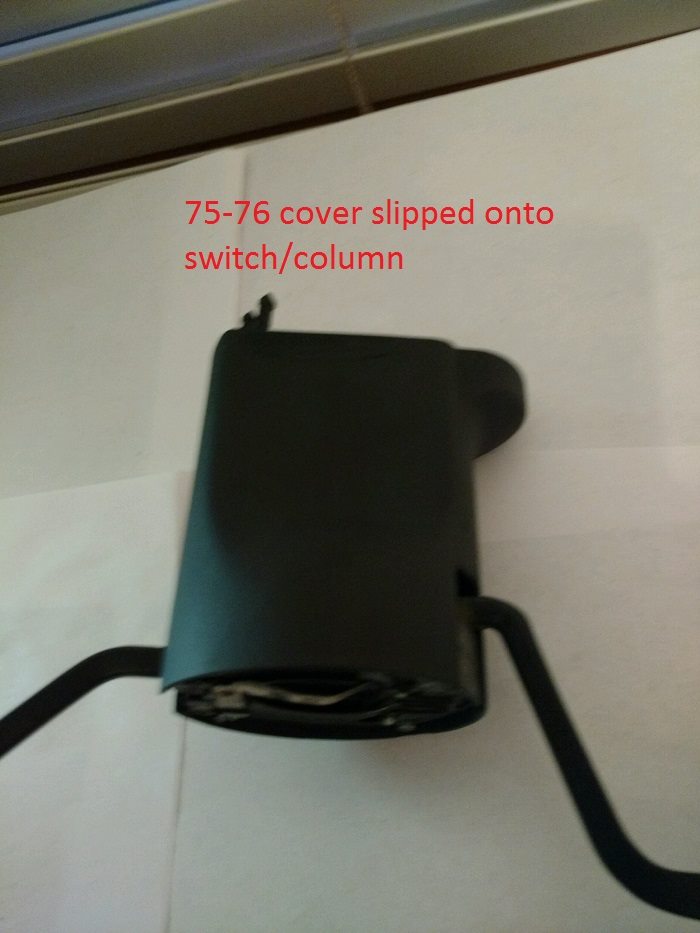
|
|
|
|
| gothspeed |
Mar 12 2018, 10:50 PM
Post
#37
|
|
Senior Member Group: Members Posts: 1,539 Joined: 3-February 09 From: SoCal Member No.: 10,019 Region Association: None |
Amazing results! Thank you for sharing these intricate details. (IMG:style_emoticons/default/beerchug.gif)
|
|
|
|
| jkb944t |
Mar 13 2018, 05:57 AM
Post
#38
|
|
Member Group: Members Posts: 470 Joined: 17-January 05 From: Canton, OH Member No.: 3,459 Region Association: None |
QUOTE(gothspeed @ Mar 12 2018, 11:50 PM) Amazing results! Thank you for sharing these intricate details. (IMG:style_emoticons/default/beerchug.gif) Thanks for all the compliments. (IMG:style_emoticons/default/beerchug.gif) Truthfully, I owe this 914 community for all the many helpful threads so many others have contributed over the years. I’m glad to be able to contribute something back. (IMG:style_emoticons/default/smile.gif) Jeff B |
|
|
|
| gothspeed |
Mar 13 2018, 02:31 PM
Post
#39
|
|
Senior Member Group: Members Posts: 1,539 Joined: 3-February 09 From: SoCal Member No.: 10,019 Region Association: None |
jkb944t if possible post pics when you get the final appearance bezel installed. (IMG:style_emoticons/default/smile.gif)
QUOTE(sixnotfour @ Mar 12 2018, 12:34 PM) The plastic ones can be done with epoxy, and a filler piece.. for comparison , here is the one I did (IMG:style_emoticons/default/beerchug.gif) Hmmm I didn't know there were plastic versions of this piece. Mod looks good! |
|
|
|
| jkb944t |
Mar 13 2018, 03:45 PM
Post
#40
|
|
Member Group: Members Posts: 470 Joined: 17-January 05 From: Canton, OH Member No.: 3,459 Region Association: None |
QUOTE(sixnotfour @ Mar 12 2018, 02:34 PM) The plastic ones can be done with epoxy, and a filler piece.. for comparison , here is the one I did (IMG:style_emoticons/default/beerchug.gif) The plastic body would certainly make the conversion easier. It looks great! (IMG:style_emoticons/default/beerchug.gif) Jeff B |
|
|
|
|
2 User(s) are reading this topic (2 Guests and 0 Anonymous Users)
0 Members:

|
Lo-Fi Version | Time is now: 12th November 2025 - 07:12 AM |
Invision Power Board
v9.1.4 © 2025 IPS, Inc.