|
|
|
Porsche, and the Porsche crest are registered trademarks of Dr. Ing. h.c. F. Porsche AG.
This site is not affiliated with Porsche in any way. Its only purpose is to provide an online forum for car enthusiasts. All other trademarks are property of their respective owners. |
|
|

  |

| LowBridge |
 Aug 22 2017, 02:33 PM Aug 22 2017, 02:33 PM
Post
#101
|
|
Member  Group: Members Posts: 370 Joined: 10-August 15 From: Lunenburg, MA Member No.: 19,045 Region Association: North East States |
what a great read and you really do remember the picture taking part, I always forget to take them along the way.
Super job and keep us posted... (IMG:style_emoticons/default/beerchug.gif) |
   |

 
|
| tygaboy |
Aug 22 2017, 02:42 PM
Post
#102
|
|
914 Guru Group: Members Posts: 5,810 Joined: 6-October 15 From: Petaluma, CA Member No.: 19,241 Region Association: Northern California |
Thanks for sharing!
It's all so funny/interesting. I've not worked with wood but I've always had beliefs like "heck, how hard can wood working be? You can do it with wimpy little tools that don't cost very much (e.g. wood lathe vs metal lathe), etc, etc." Shows how little I know. I appreciate gaining a new perspective! When people compliment my work, inside, I'm thinking, "man, if I can figure it out, anyone can." Not that I don't appreciate the kind words. I do. Lesson learned for me about all things in life is: Come on people! Jump in and give it a go. With a bit of practice, I bet you'll be surprised at how well you do. OK, back to work... |
 |
|
| bbrock |
Aug 22 2017, 04:35 PM
Post
#103
|
|
914 Guru Group: Members Posts: 5,269 Joined: 17-February 17 From: Montana Member No.: 20,845 Region Association: Rocky Mountains |
QUOTE(tygaboy @ Aug 22 2017, 02:42 PM)  Thanks for sharing! It's all so funny/interesting. I've not worked with wood but I've always had beliefs like "heck, how hard can wood working be? You can do it with wimpy little tools that don't cost very much (e.g. wood lathe vs metal lathe), etc, etc." Shows how little I know. I appreciate gaining a new perspective! There's some truth to that. But now we are getting outside of metal shaping and into machining. I think in many ways, machining and woodworking are more similar except one is with harder material that requires more expensive toys. And the need for precision down to 1/1000s with machining metal. Still, a good table saw will run in the $2K-$4K range, so it isn't chump change. And there don't seem to be many less expensive, weekend warrior, grade tools for setting up a home machine shop. Sheet metal shaping seems more comparable to woodworking in terms of tool requirements. You can accomplish a lot with simple hand tools, and there is a variety of price points for tools to fit budgets and skill. A few months ago, I thought to do quality work would require an expensive sheer, box brake, and all of that. Not that those wouldn't be nice... (IMG:style_emoticons/default/drooley.gif) |
|
|
|
| bbrock |
Aug 23 2017, 07:56 AM
Post
#104
|
|
914 Guru Group: Members Posts: 5,269 Joined: 17-February 17 From: Montana Member No.: 20,845 Region Association: Rocky Mountains |
Got the bottom inner long trimmed and tacked in last night. Took an hour and a half to put that many tacks in. I'm relieved to be putting structure back in rather than taking it out.
  |
|
|
|
| tygaboy |
Aug 23 2017, 08:11 AM
Post
#105
|
|
914 Guru Group: Members Posts: 5,810 Joined: 6-October 15 From: Petaluma, CA Member No.: 19,241 Region Association: Northern California |
QUOTE(bbrock @ Aug 23 2017, 06:56 AM) ...I'm relieved to be putting structure back in rather than taking it out. Congrats on a major milestone! (IMG:style_emoticons/default/first.gif) It really made a difference for me mentally to know I'd made that U-turn. It's very satisfying to see it made whole again. As others have said: Good on you for saving another of our little cars! |
|
|
|
| bbrock |
Sep 12 2017, 10:41 AM
Post
#106
|
|
914 Guru Group: Members Posts: 5,269 Joined: 17-February 17 From: Montana Member No.: 20,845 Region Association: Rocky Mountains |
Well, I lost two weekends of work on the car to travel. First was a trip to Boulder, CO to attend our nephew's wedding. The following weekend, I drove out to Seattle over Labor Day weekend to see friends. I logged over 3,000 driving miles in just over a week. I did manage to finish welding and grinding the inner long in between trips, but only took this crappy pic before moving on.
 The day after my return, this arrived (IMG:style_emoticons/default/piratenanner.gif) : 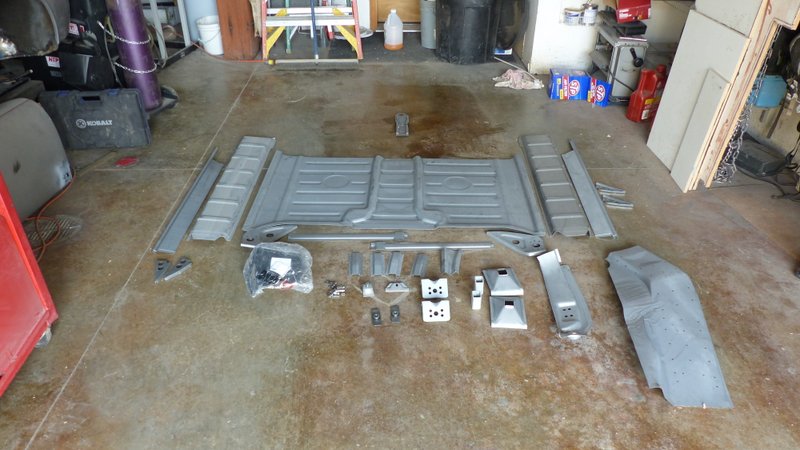 Back at it I didn't have a lot of time during the week, but managed to finish forming the front wheel well patch. 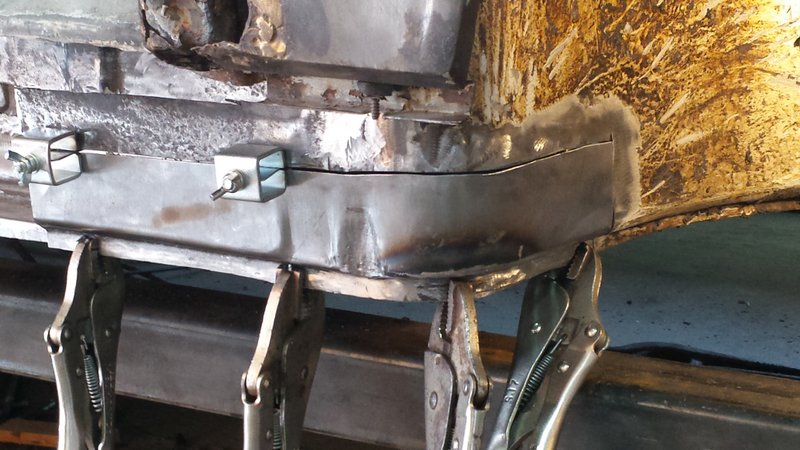 And trimming the outer long panel. 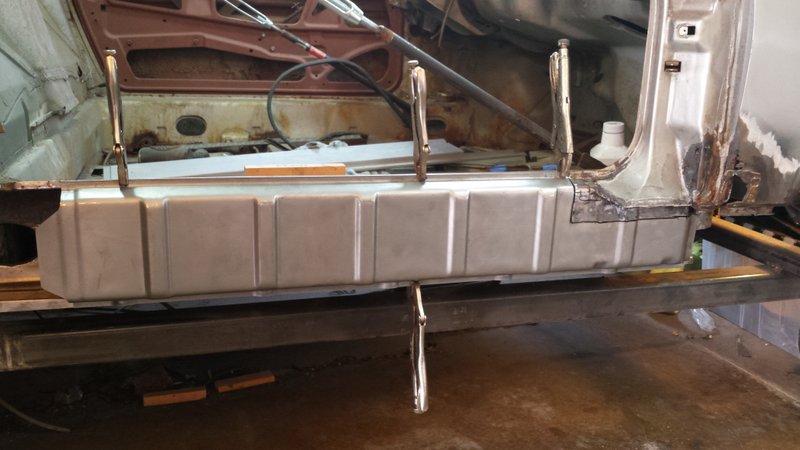 Just seeing that panel clamped on was a big psychological boost. The rest of the operation is going to require a carefully choreographed dance. First, I'm being careful not to remove too much metal at once. So, I'm trying to cut out a bit and get it structurally sound before moving on to the next piece. As added insurance, I added support for the chassis under the firewall to keep things aligned when I eventually have to remove that outer suspension console. Second, I'm going to paint all the internals with a rattle can of Eastwood's epoxy primer. Once activated, it only has a 48 hour open time so I need to have my ducks in a row to be able to paint and install all the parts within that window. Here are the planned dance steps:
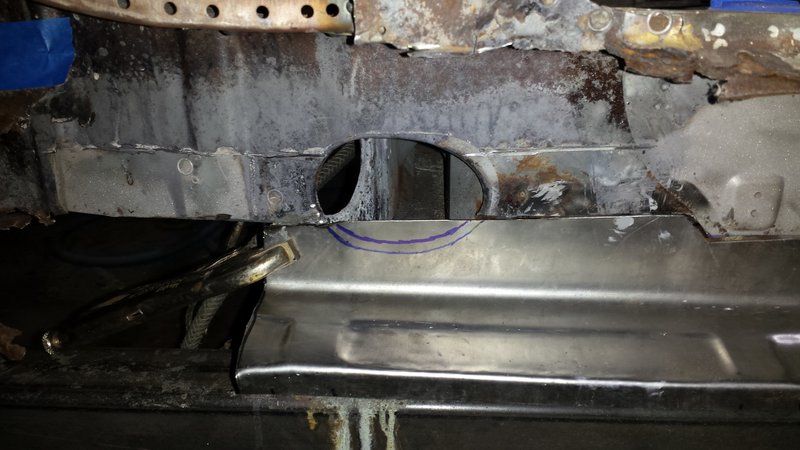
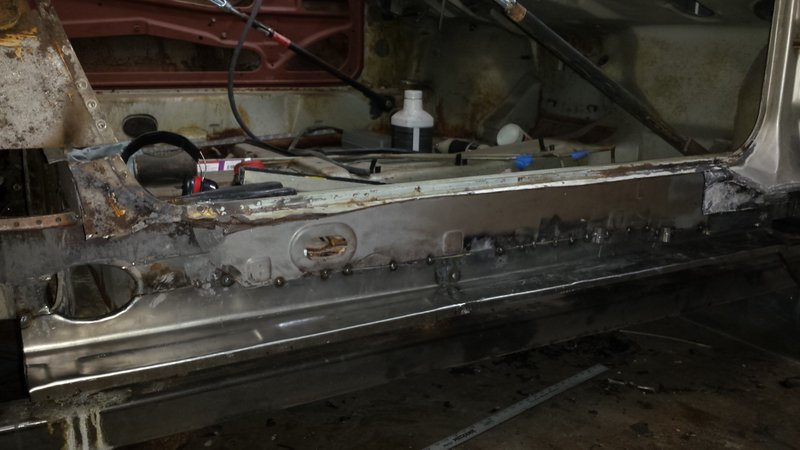
Of course, all flanges and weld points will be sprayed with weld-thru primer and then top coated with epoxy after welding is complete. The Big Challenge It was time to dig into the rear inner long, which I think will be the hardest part of the entire rustoration. (IMG:style_emoticons/default/ohmy.gif) Just to recap, here's what I was dealing with: 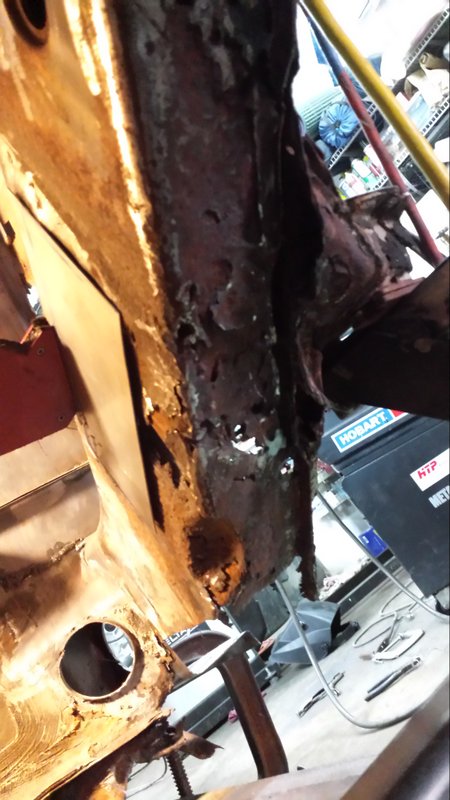 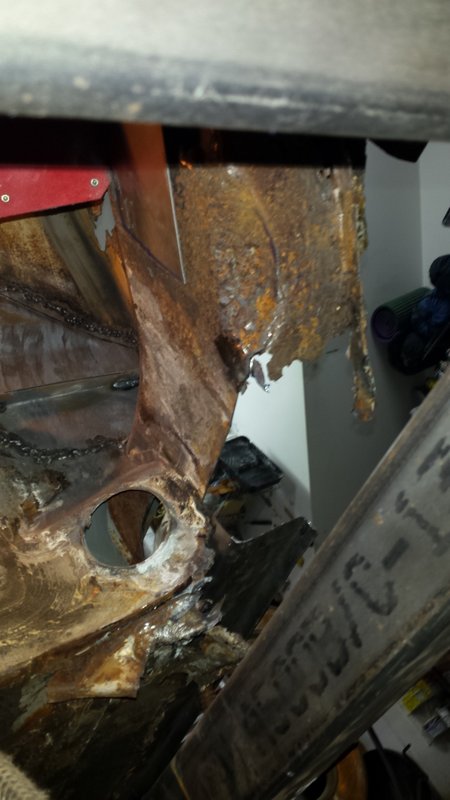 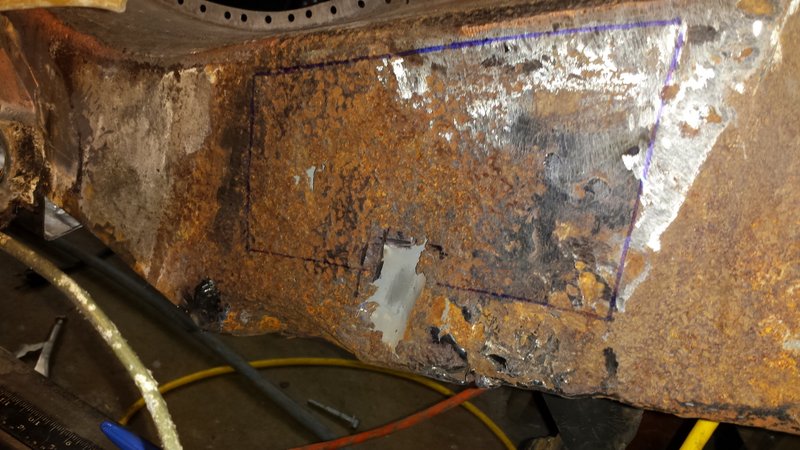 I spent Friday evening and most of Saturday fabbing the patch for the inner long. Because I was missing so much of the piece, it took some thinking to get the piece right and I failed to take pics of the progress. I started by trimming a piece of 18ga. sheet to the horizontal contour of the lower inner wheel house flange using the RD repair panel as the template. Next, I hand hammered a flange along the contour and used the shrinker and stretcher to match the vertical contour and get the flanges to mate perfectly. Then I was able to clamp the patch to the flange remnants on the car and trace the inner edge of the inner long onto the patch. Then, it was over to the vice and anvil for bending and hammering to form the bottom and inside wall. I had to make a couple relief cuts at the bend in the front section because trying to get that much 18ga. metal to tuck was not possible. After a few hours of bending, testing, and reshaping, I had the piece fitting well enough to weld and grind the relief cuts. Finally, I banged in the divot needed to accept the engine mount with a ball peen hammer. The surface of the divot has a hammer texture, but it will all be hidden once the mount is installed. After final trimming, the part looked acceptable. 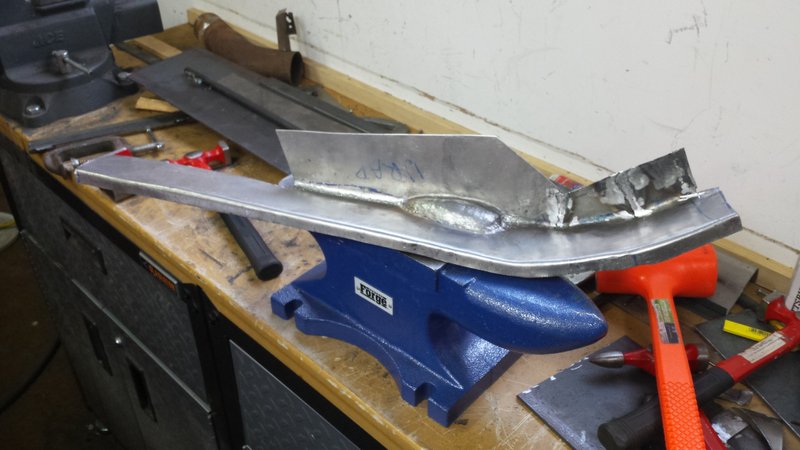 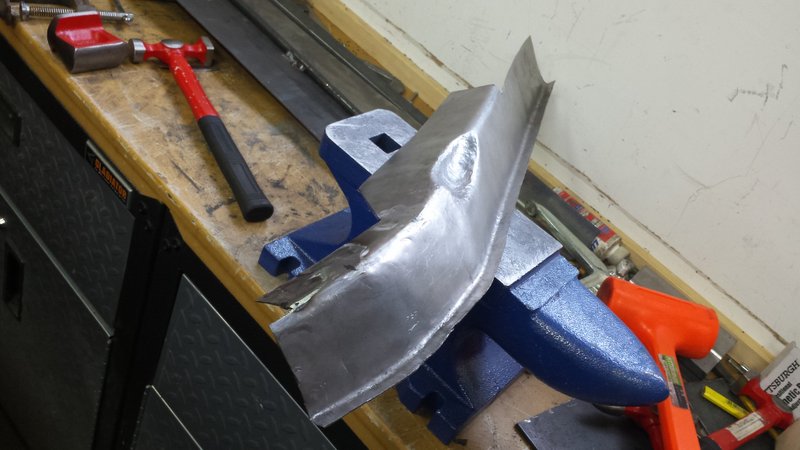 And still mates nicely to the RD panel. 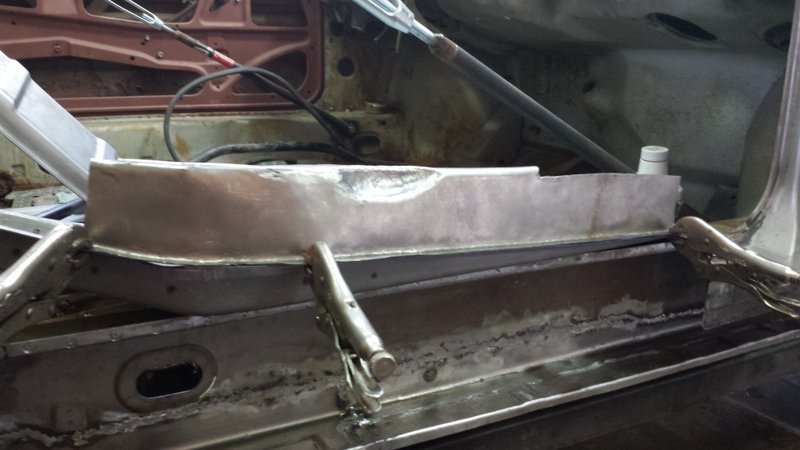  What rust? After welding and grinding, I now have a solid inner long for the first time since buying this car way back when Cindy Lauper was making me hate music. (IMG:style_emoticons/default/barf.gif) 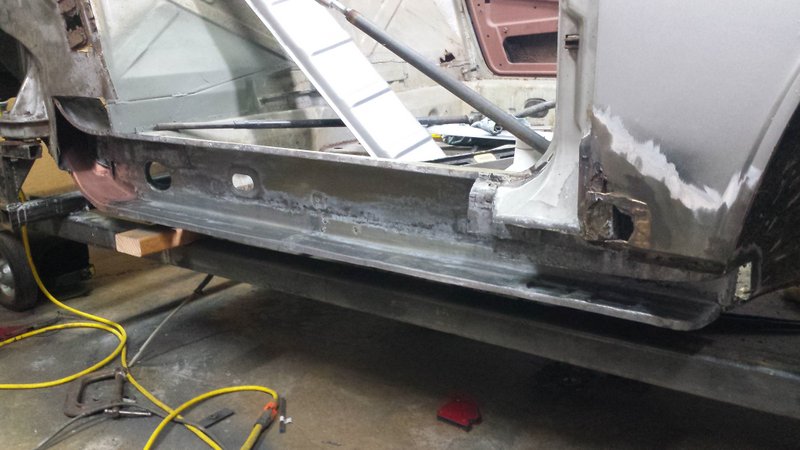 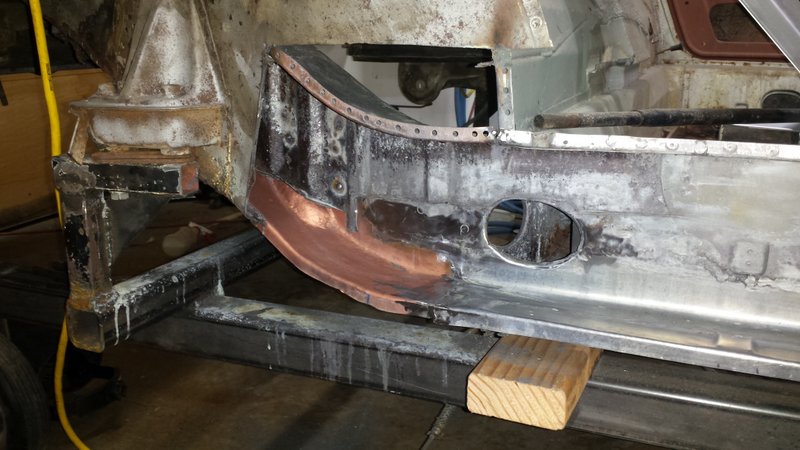 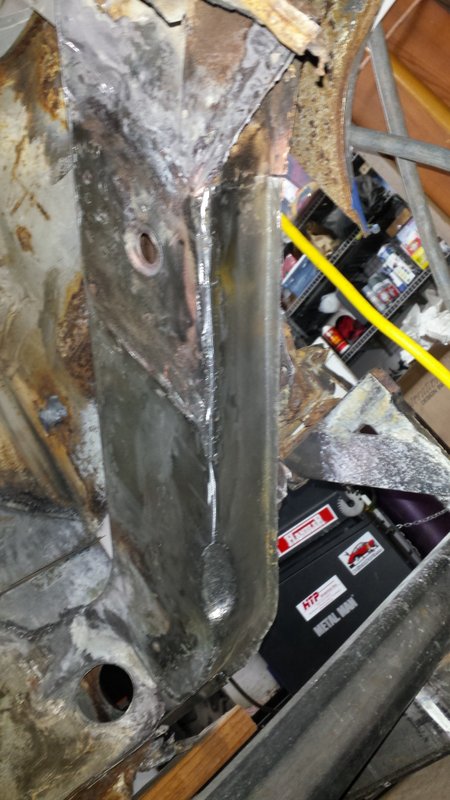 I need to run the magic shrinking disk over a few bumps left from my previous suspension console patch job, but what a relief to have this done. (IMG:style_emoticons/default/cool_shades.gif) It should be all downhill from here. (IMG:style_emoticons/default/lol-2.gif) |
|
|
|
| euro911 |
Sep 12 2017, 11:05 AM
Post
#107
|
|
Retired & living the dream. God help me if I wake up! Group: Members Posts: 8,937 Joined: 2-December 06 From: So.Cal. & No.AZ (USA) Member No.: 7,300 Region Association: Southern California |
(IMG:style_emoticons/default/thumb3d.gif)
Cindy Lauper (IMG:style_emoticons/default/cheer.gif) ... (IMG:style_emoticons/default/laugh.gif) |
|
|
|
| bbrock |
Sep 21 2017, 07:39 PM
Post
#108
|
|
914 Guru Group: Members Posts: 5,269 Joined: 17-February 17 From: Montana Member No.: 20,845 Region Association: Rocky Mountains |
I'm in between projects at work so was able to take a few days off to make some major progress on the Porsche. Things started moving pretty fast so I didn't do as well with taking pics of progress, but I think I captured the good stuff even if taken out of sequence.
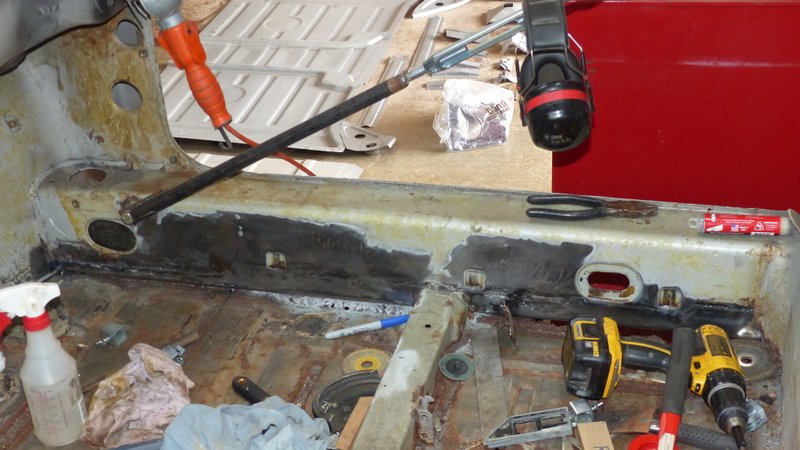
914 Day - fiddly stuff First up was fabbing this little patch for the rusty hole behind the door latch reinforcement. Easy peasy. 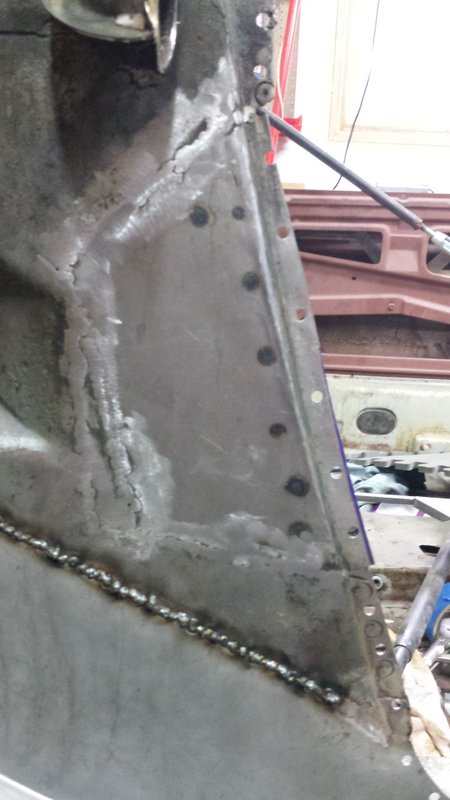 Next was fabbing the front section of the inner long, inner wall and prepping the long for installation. 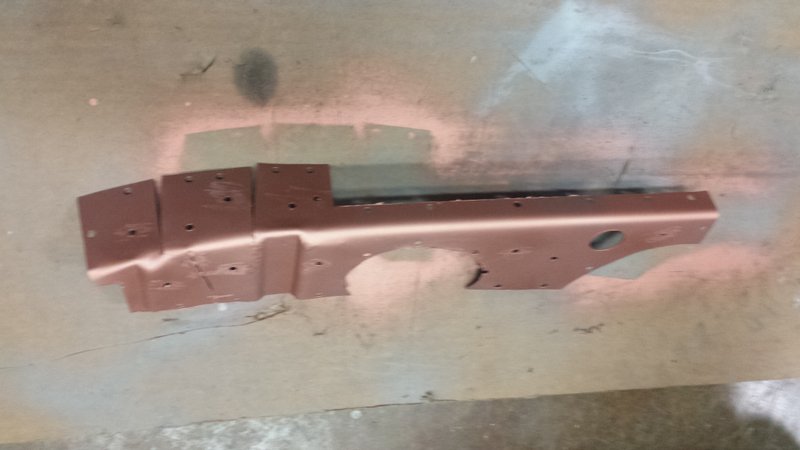 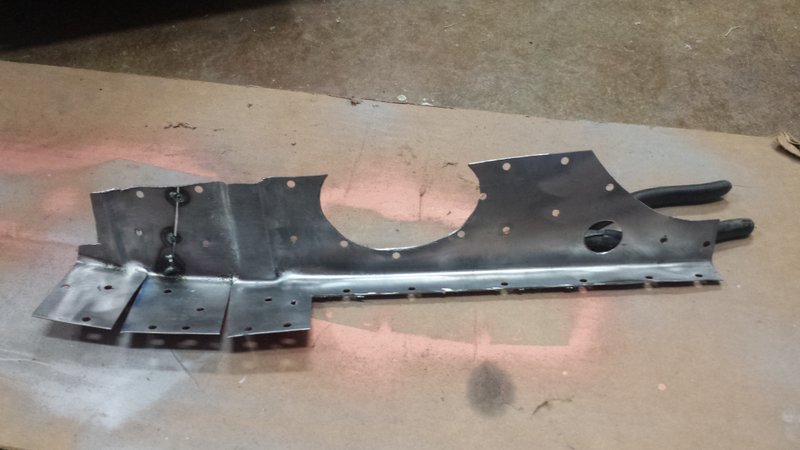 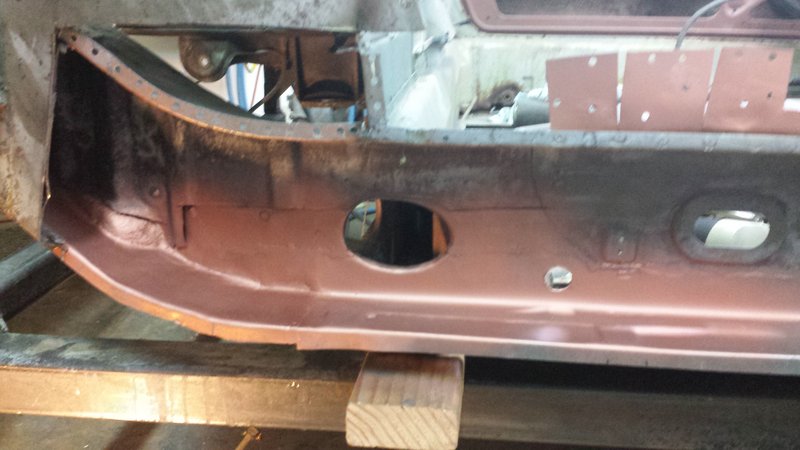 Saturday Sept. 16 Fabricated a new bracket for the front heater tube and bead blasted both tubes and the spring steel mounting clamps for the heater hose. Patched some rust on the bottom of the door hinge post that will be rewelded over the new rocker and gave that a good bead blasting. Again, no pics, but many thanks to my awesome neighbor Rachel for lending me her blasting cabinet. 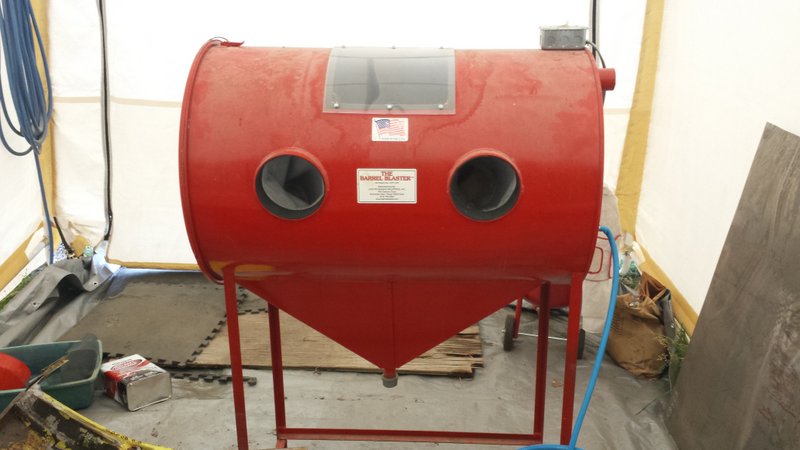 Sunday Sept. 17 Welded in the front section of inner wall and a new seat belt mounting bolt from RD. Then I tackled the rear section of inner wall. This was mostly just the flat bottom part so no pics. Most of the day was spent trimming and fitting the inner wheelhouse piece from RD. Late in the afternoon, all of the parts were ready for primer, so I activated a rattle can of Eastwood's epoxy primer and went to work prepping the long and assorted parts for final assembly. The heater hose mounting clamps got sprayed with Eastwood's rust encapsulator to give them a black finish to more closely match the original finish that looked like it might have been black zinc plating. Yep, I realize nobody will ever see those parts but I'm weird that way. (IMG:style_emoticons/default/screwy.gif) Here is the inner long with inner walls repaired, seat belt mount in place, and sealed with epoxy primer. 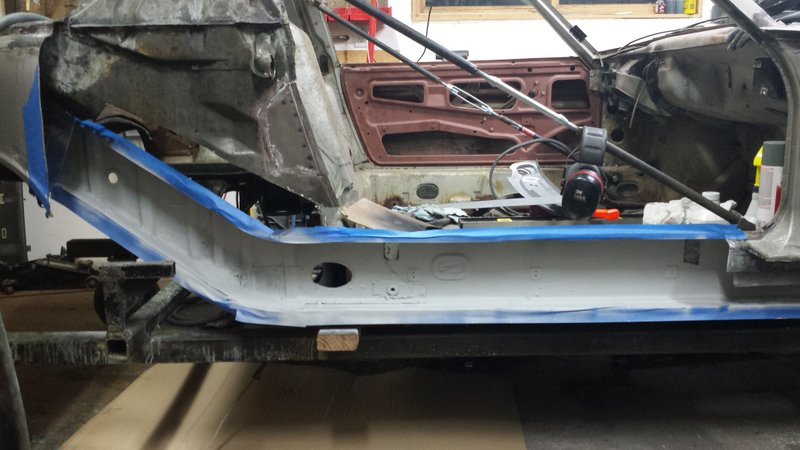 Monday Sept. 18 I didn't have much time to work on the car, but managed to weld in the heater tubes and rivet in the hose clamps. I chose to use solid rivets to more closely match the factory parts. The only rivets I could locally source had considerably larger heads than the factory rivets, but I still think they look better than pop rivets. But they were a PIA to install compared with pop rivets. Again, I'm screwy that way. (IMG:style_emoticons/default/screwy.gif) 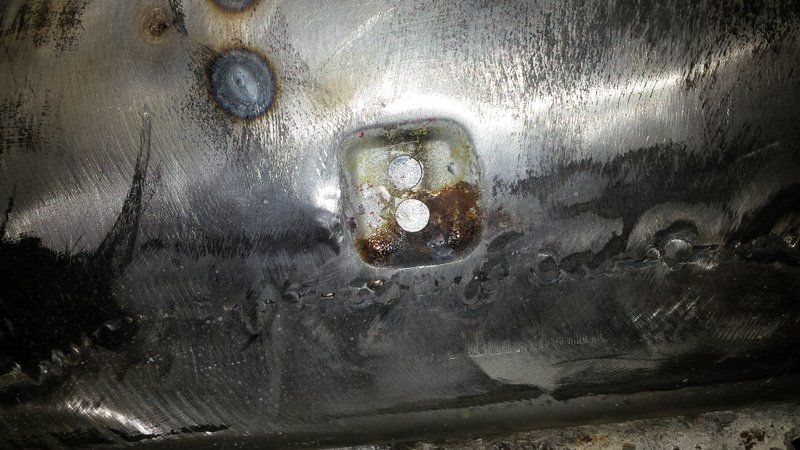 Lastly, I welded in the inner wheel well patch and sprayed with epoxy. Here is the inner long all assembled and ready to be buttoned up. Don't those black hose clamps look awesome? (IMG:style_emoticons/default/shades.gif) 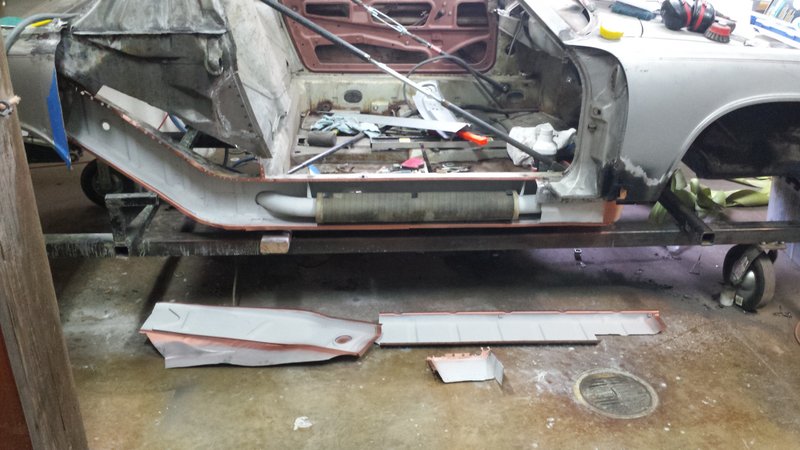 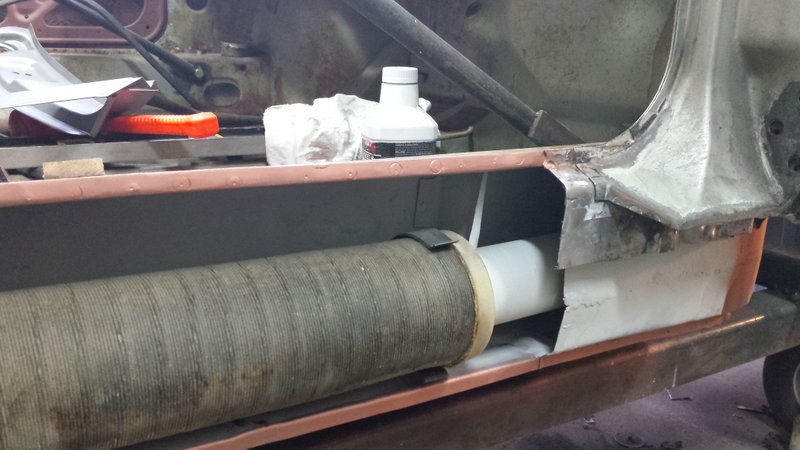 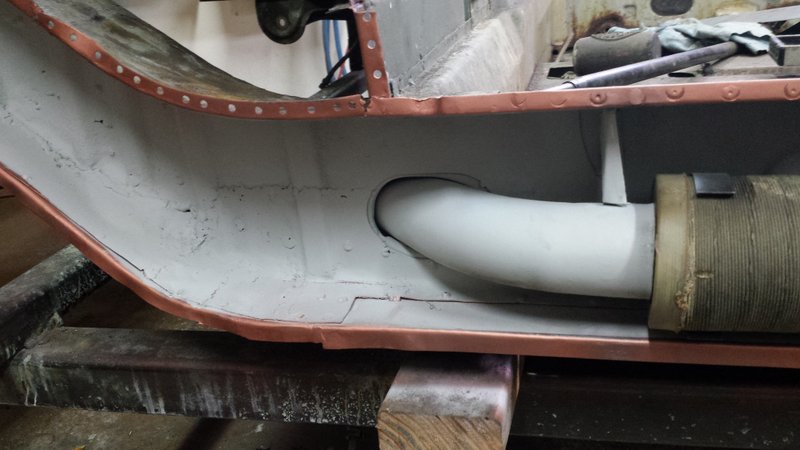 Houston, we have a problem! My last act of the day was to clamp the outer long on to see how things were fitting. Well shit. (IMG:style_emoticons/default/headbang.gif) Tuesday Sept. 19 First order of business was to fix my screw up on that front inner wheel well piece. The old one was cut out and a new one made. This time, I decided to make it easy on myself and simply fab the straight section. It was bending the curve around the front of the long that caused the radius to narrow and not fit the outer long properly. The new plan is to fabricate the curved section as a separate piece after everything else is buttoned down. Leaving that patch for later will also give me easier access for spraying in cavity wax that I hope to pick up from my local paint supplier tomorrow. This new patch will do. (IMG:style_emoticons/default/smile.gif) 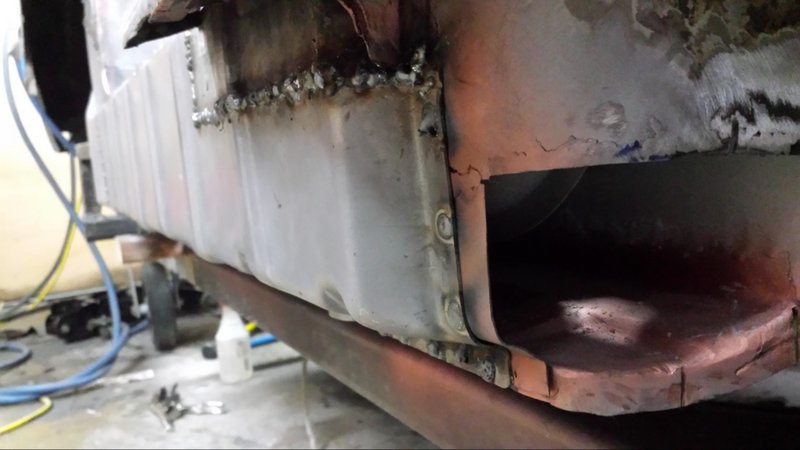 Spent the rest of the day rechecking measurements and tacking in the outer long and rear inner wheel house. Just enough to hold it in place to check final fitment but easy to remove if some adjustment was needed. The RD wheel house only needed some minor reshaping for perfect alignment. By the end of the day, it was starting to look like a car again. (IMG:style_emoticons/default/aktion035.gif) I took this pic a little late, but here's how it looked. 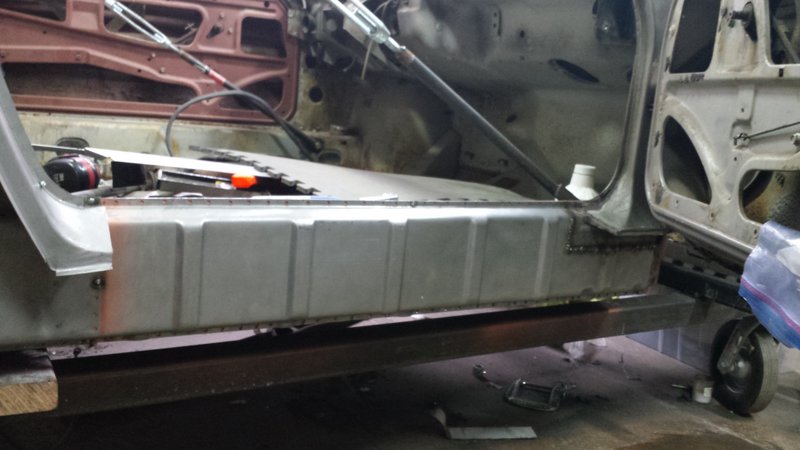 Thursday Sept. 21 - What Hell Hole? (IMG:style_emoticons/default/confused24.gif) With the main panels tacked in place, I screwed on the door jamb with zip screws and then bolted on the door to check the gap. Checked measurements again. Everything looked good. 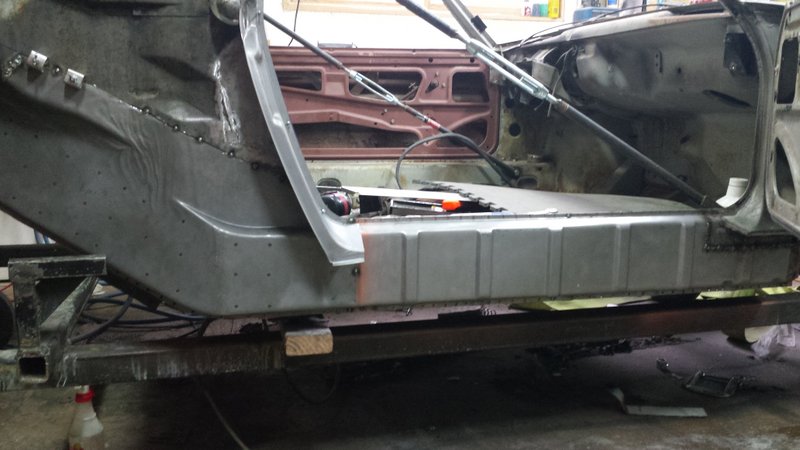 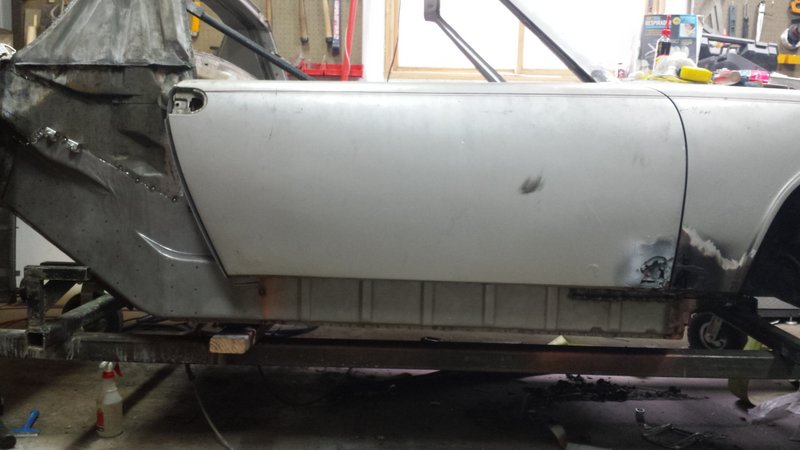 Time to weld things in place. (IMG:style_emoticons/default/welder.gif) First was the outer long. I picked up this tool from Eastwood a few years ago and love it for rosette welds. Not only does the clamp hold flanges tightly together, but the copper backing lets me crank up the welder to max voltage for better penetration to the bottom layer. 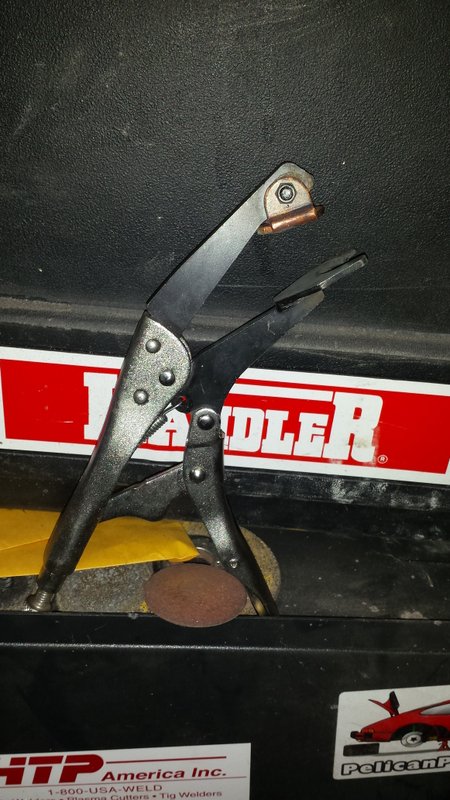 I did two rosettes spaced out on top, then two on the bottom; blowing with compressed air after each weld. I made sure everything stayed cool to the touch and checked the door gap after every set. It took a couple hours, but eventually was done. Next I tackled the long process of tacking up the butt weld on the wheel house. Again, just a few blips spaced out with air after each round. When all was finished, the door gap and measuresments were unchanged. (IMG:style_emoticons/default/monkeydance.gif) (IMG:style_emoticons/default/monkeydance.gif) (IMG:style_emoticons/default/monkeydance.gif) (IMG:style_emoticons/default/monkeydance.gif) (IMG:style_emoticons/default/monkeydance.gif) (IMG:style_emoticons/default/monkeydance.gif) 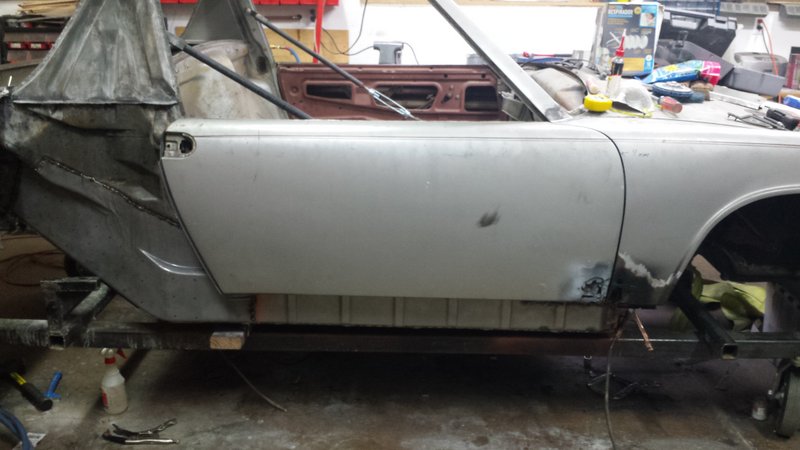 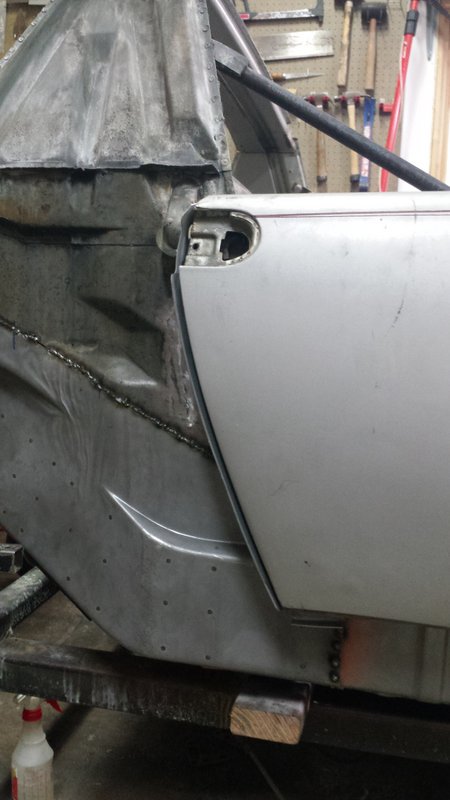 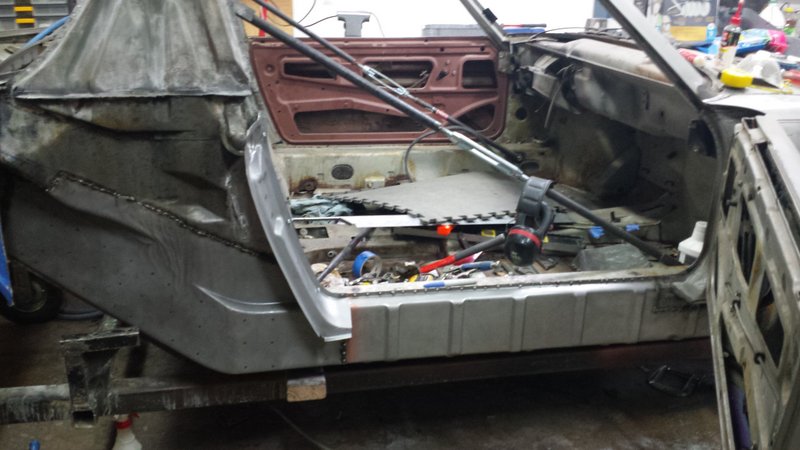 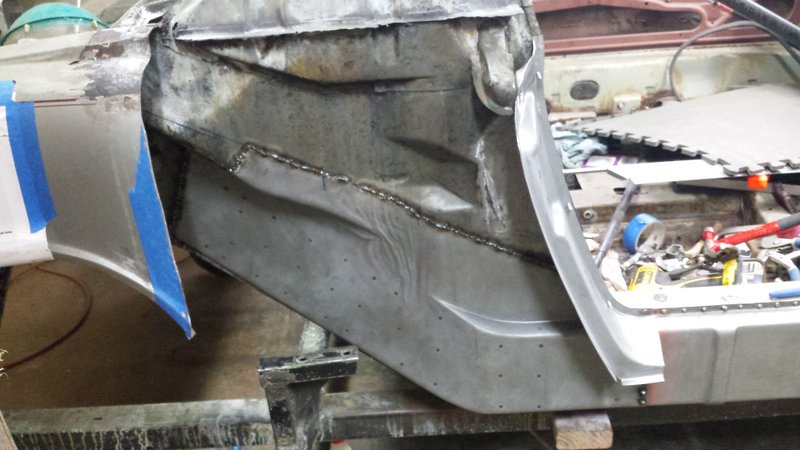 Not all is perfect though. The lower flange on part of the rear inner long will need some tuning to mate properly with the wheel house. I'm not surprised given the complex fabrication I had to do with a lot of the original piece missing. It isn't bad, but I think it will have to wait until I have the car on a rotisserie so I have better access to hammer things back into proper alignment. I'll just leave that portion unwelded until things can be made perfect. But it feels good to have this monumental part of the rustoration behind me! (IMG:style_emoticons/default/piratenanner.gif) |
|
|
|
| Bfstake |
Sep 21 2017, 08:21 PM
Post
#109
|
|
Newbie Group: Members Posts: 5 Joined: 21-February 16 From: Atlanta Member No.: 19,694 Region Association: South East States |
I enjoyed reading this, although some was painful to read. Good luck with your teener.
|
|
|
|
| burton73 |
Sep 21 2017, 09:12 PM
Post
#110
|
|
Senior member, and old dude Group: Members Posts: 3,994 Joined: 2-January 07 From: Los Angeles Member No.: 7,414 Region Association: Southern California |
Brent,
You really are doing a super job on restoring your car. I wanted to point out something. I see you have a new floor pan. It is a nice touch to cut the circle and 3 tabs out on the pan and use your old or you can buy NOS inserts so your car will look just like it did when it came from the factory. A lot of guys do not do this but it is a nice touch. I have seen some guys cut the hole with a circle saw but I did mine with a jigsaw and it went fine. This is my 6 from 6 years ago. Bob B 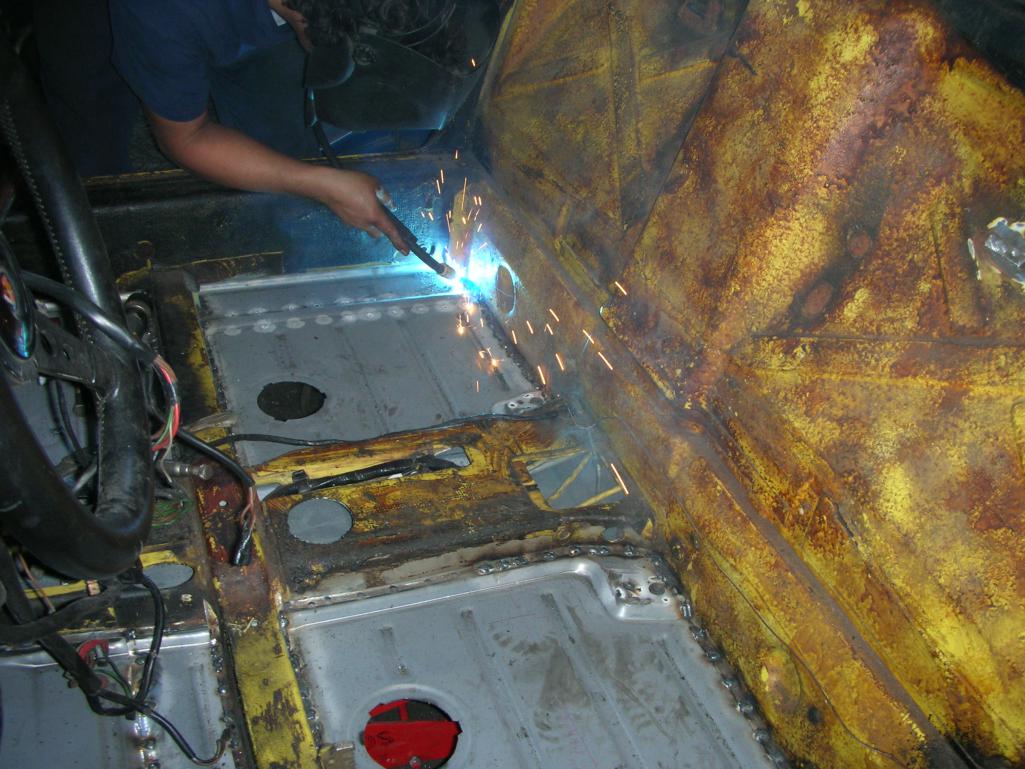 |
|
|
|
| bbrock |
Sep 21 2017, 09:31 PM
Post
#111
|
|
914 Guru Group: Members Posts: 5,269 Joined: 17-February 17 From: Montana Member No.: 20,845 Region Association: Rocky Mountains |
QUOTE(Bfstake @ Sep 21 2017, 08:21 PM) I enjoyed reading this, although some was painful to read. Good luck with your teener. Thanks! Some of it has been painful to live. But its mostly self-inflicted. (IMG:style_emoticons/default/beerchug.gif) |
|
|
|
| bbrock |
Sep 21 2017, 09:35 PM
Post
#112
|
|
914 Guru Group: Members Posts: 5,269 Joined: 17-February 17 From: Montana Member No.: 20,845 Region Association: Rocky Mountains |
QUOTE(burton73 @ Sep 21 2017, 09:12 PM) Brent, You really are doing a super job on restoring your car. I wanted to point out something. I see you have a new floor pan. It is a nice touch to cut the circle and 3 tabs out on the pan and use your old or you can buy NOS inserts so your car will look just like it did when it came from the factory. A lot of guys do not do this but it is a nice touch. I have seen some guys cut the hole with a circle saw but I did mine with a jigsaw and it went fine. This is my 6 from 6 years ago. Bob B Sweet! Yes, I definitely plan to replace the inserts. Glad to hear they can still be found since at least one of mine isn't usable. Nice to see an example of this being done. Thanks for sharing! (IMG:style_emoticons/default/thumb3d.gif) |
|
|
|
| bbrock |
Sep 24 2017, 12:05 AM
Post
#113
|
|
914 Guru Group: Members Posts: 5,269 Joined: 17-February 17 From: Montana Member No.: 20,845 Region Association: Rocky Mountains |
Saturday Sept 23 - A little frustrating
Well, today was a mixed bag. Yesterday I sprayed the inside of the lower door hinge post with Jasco and let it soak over night. Rinsed it out this morning and ran the heat gun to dry things out. Made final prep to reattach the lower part of the post. It took longer than expected because I had to include a patch for the back side that is inside the wheel well. There is a lot going on inside that space and access is very tight. The patch slips in behind a flange from the fender and also has to be attached to the back of the hinge mount support inside the box. But I eventually got it in, but still need to grind down the ugly welds and fabricate an end bracket for the rocker cover. 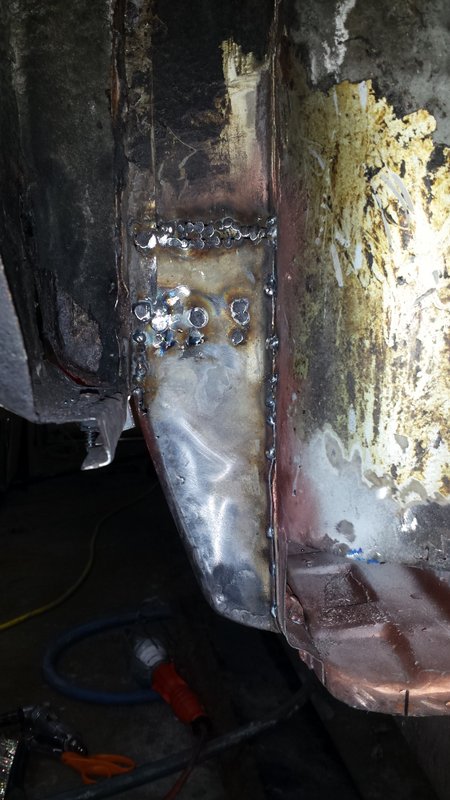 I saved that grinding for later though because I wanted to get the threshold on. I didn't go too nuts on grinding the weld around the front of the hinge post box since it will be buried under the threshold once it is attached. Here it is prepped with weld-thru primer and ready for the threshold. 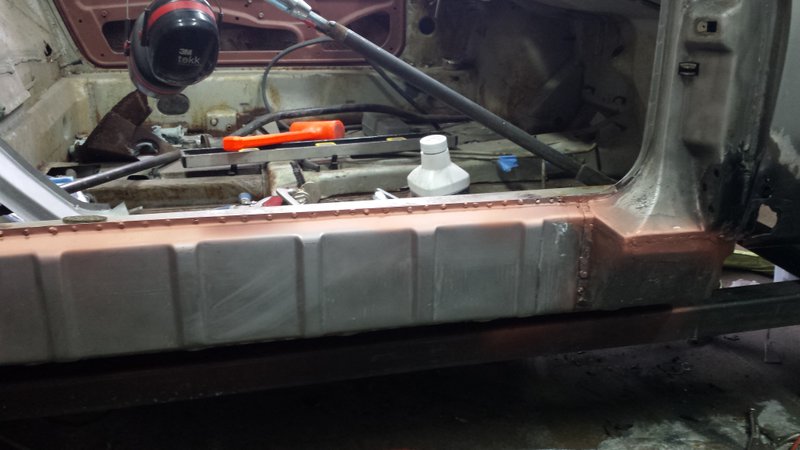 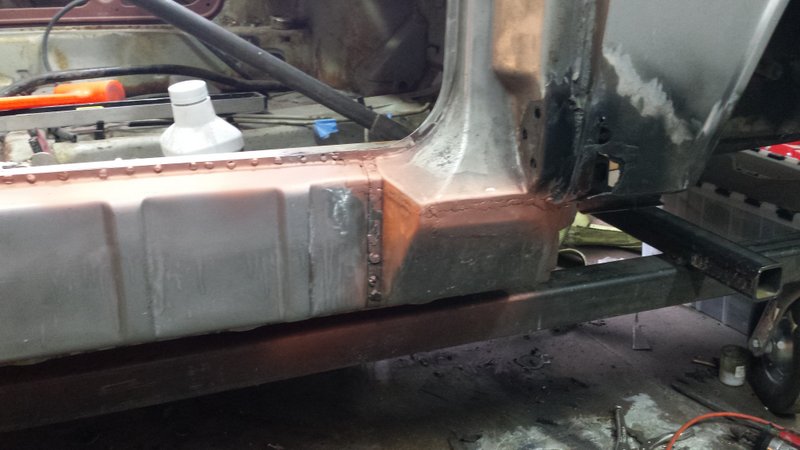 Putting on the threshold was going well until my welder took a shit and stopped feeding wire, which caused some crappy rosette welds that will require extra grinding.. After fiddling around for a half hour, I figured out the gun liner was toast. Luckily I had a spare that would work, but it took a good hour to get the old one out and the replacement in place. With the welder back in action, the threshold was looking really nice: 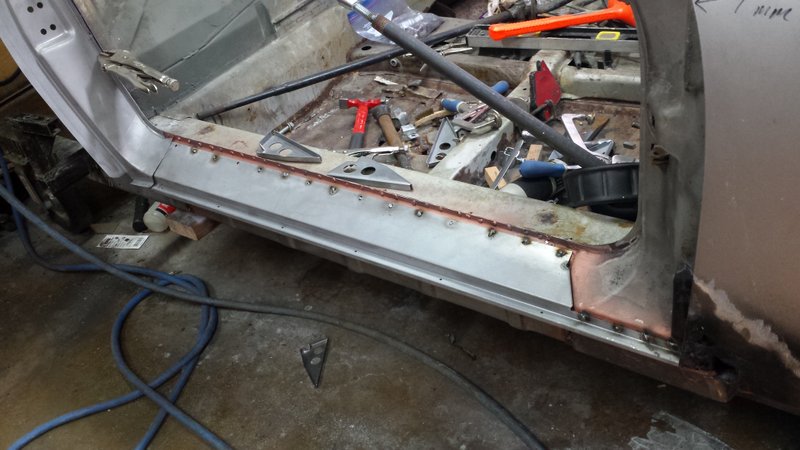 With just a little more welding left on the threshold, I decided to install the brackets to make sure everything was proper. Then I hit a significant problem when the bracket didn't fit right. There is about a 2mm gap at the top and front of the upper step (IMG:style_emoticons/default/mad.gif) 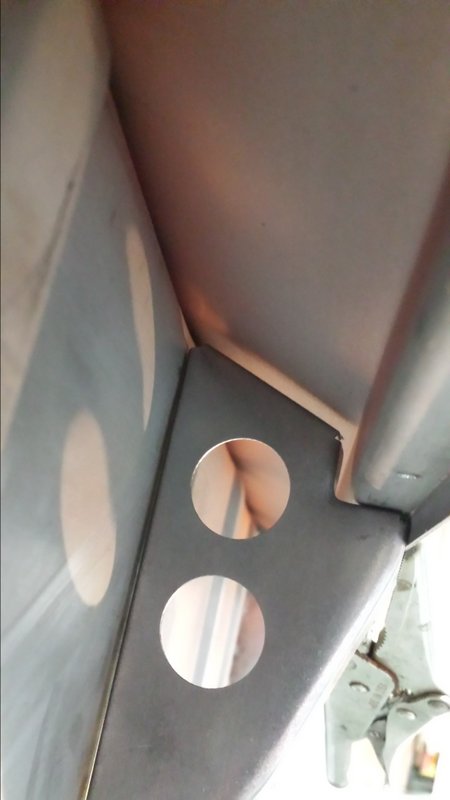 (IMG:style_emoticons/default/WTF.gif) I took the bracket over to the other side of the car to test it against an original threshold. Perfect fit. I checked the other three brackets, and they were all the same. 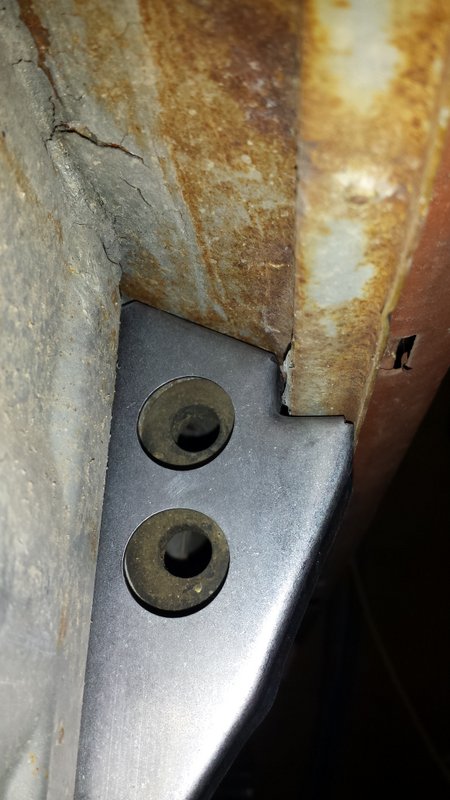 I grabbed the trusty tape measure and discovered that the RD threshold piece is about 2mm deeper, and 2mm wider in the step compared with the original piece. I checked the dimensions of my driver's side RD threshold piece and it's also tall and wide. Yet the RD bracket fits the original profile perfectly. (IMG:style_emoticons/default/confused24.gif) 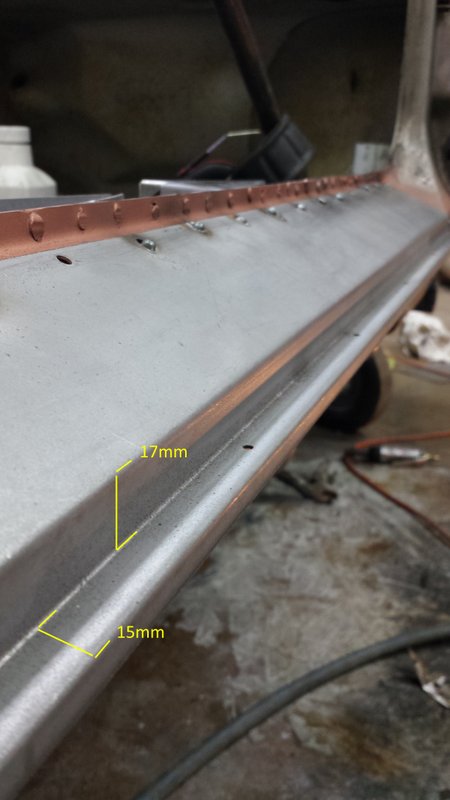 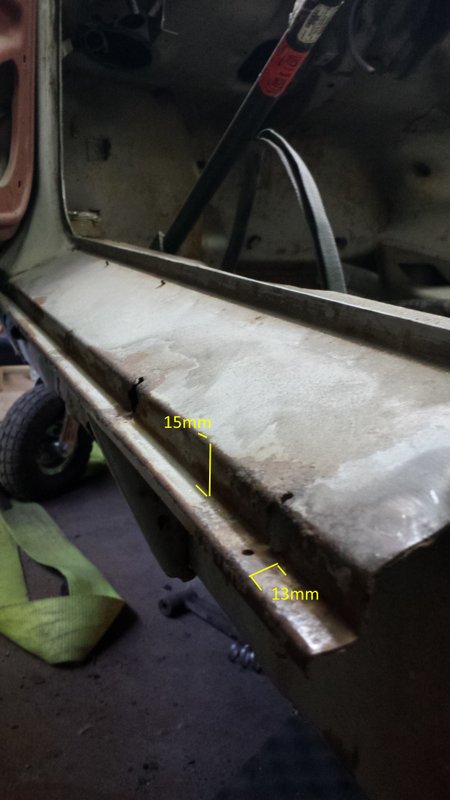 I sent a message with these pics to RD to figure out a path forward, but this wont do. I could fab my own brackets to fit, but I think that is going to put the outer rocker covers 2mm lower and 2mm farther out than they should be, which will throw off gaps and alignment. Has anyone else run into this problem? For now, I have abanidoned the threshold until I hear back from RD and moved on to the jack pyramids. Before installing them, I made a template of the recess in the mounting location because I'm pretty sure I'll need to fabricate a patch in that area on the other side. 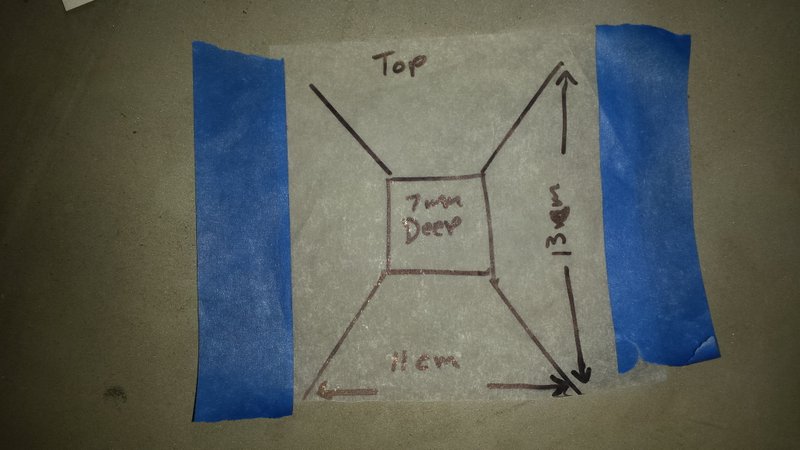 No real issues install the jack tube and plate except that my little 120v welder has a hard time with the thick steel of the tube, so the weld beads piled up like turkey shit around them. I did get a good stick though and will just have to dress those up a bit with the grinder. Overall, it came out pretty good but, of course, I need to knock those rosette welds down. 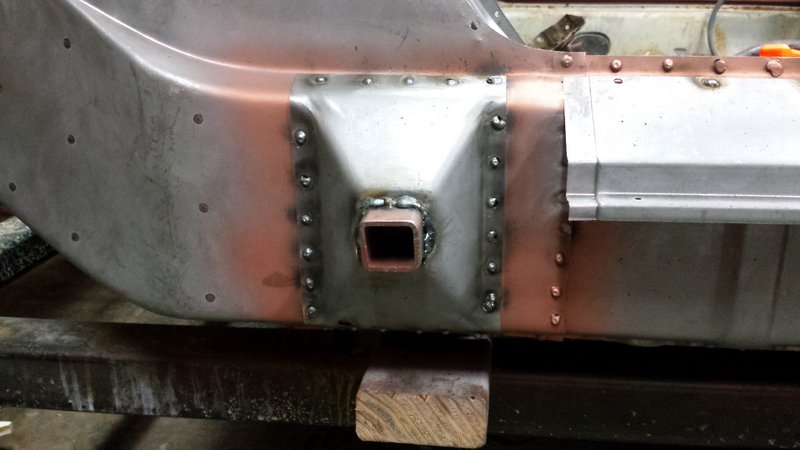 That's it for today. I was hoping to weld on the door jamb but the threshold SNAFU put a halt to that. |
|
|
|
| bbrock |
Sep 28 2017, 07:05 PM
Post
#114
|
|
914 Guru Group: Members Posts: 5,269 Joined: 17-February 17 From: Montana Member No.: 20,845 Region Association: Rocky Mountains |
In a jamb
Still plugging away on the project. Peter at RD got back to me right away about my threshold issue. He said they could retool to change the profile on the part, but it would be at least a full year before that could happen. But I figured out that the minor difference in profiles between the new RD threshold and the original wouldn't affect the final fit and alignment of the rocker covers. So I decided to move forward with what I had. This required a simple modification to the brackets to make them fit, but no biggie. 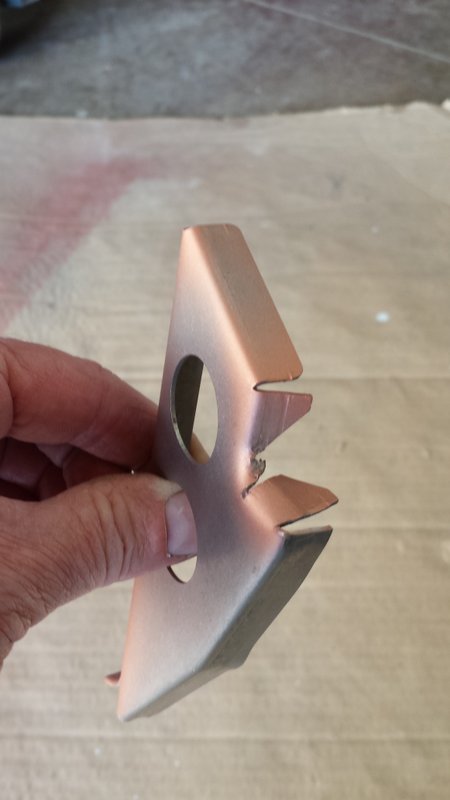 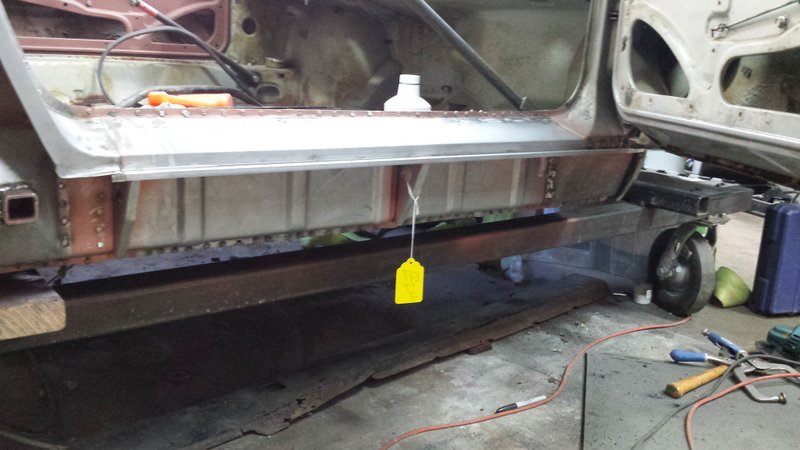 With the thresholds finished, I welded in the door jamb and latch bracket, installed the latch, 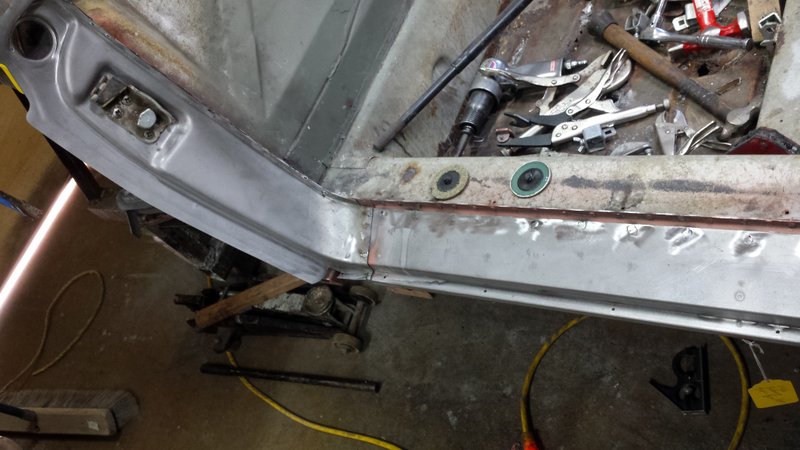 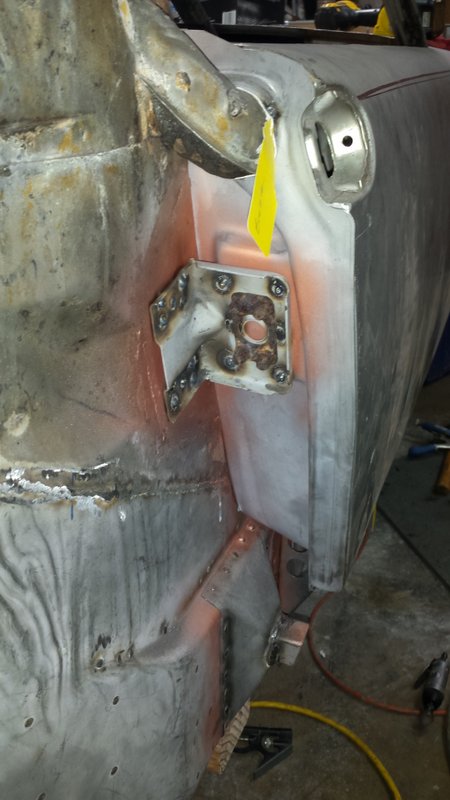 and checked the door gap. An even 7mm. Once the quarter panel is on, that should close up to ~4-5mm. And the door latches easily with that solid German clunk. (IMG:style_emoticons/default/clap56.gif) 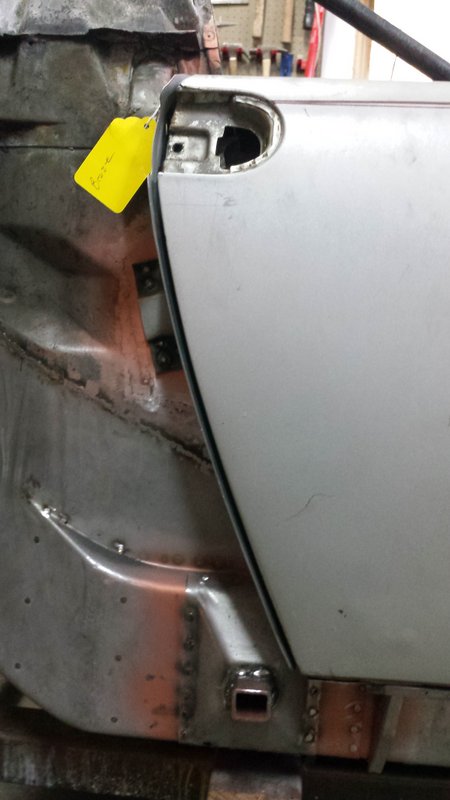 Harvesting Organs I've also been busy harvesting hell hole parts from a donor piece I bought last spring. Still some work to do but the hard part is done. Man those suspension consoles are a bitch to get off. (IMG:style_emoticons/default/mad.gif) 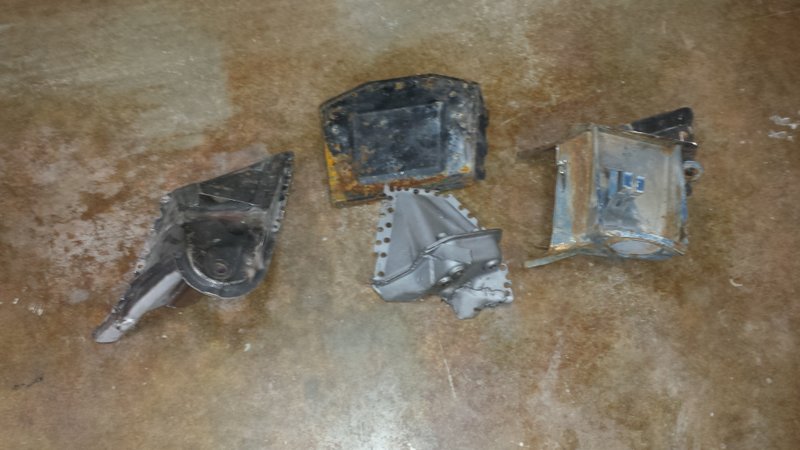 In theory, I should be able to just bolt the outer console to the dolly and it should be aligned correctly. But I'll be checking measurements just to be sure. 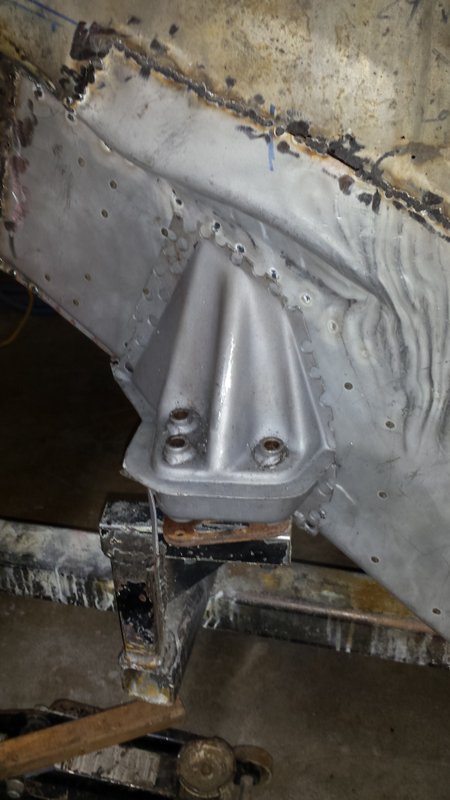 It's starting to look like a car again. (IMG:style_emoticons/default/piratenanner.gif)  |
|
|
|
| BeatNavy |
Sep 28 2017, 07:44 PM
Post
#115
|
|
Certified Professional Scapegoat Group: Members Posts: 2,962 Joined: 26-February 14 From: Easton, MD Member No.: 17,042 Region Association: MidAtlantic Region |
Wow, Brent. You are not wasting any time. Keep on rocking. Before you know it you'll be (IMG:style_emoticons/default/driving.gif)
|
|
|
|
| bbrock |
Sep 28 2017, 08:09 PM
Post
#116
|
|
914 Guru Group: Members Posts: 5,269 Joined: 17-February 17 From: Montana Member No.: 20,845 Region Association: Rocky Mountains |
QUOTE(BeatNavy @ Sep 28 2017, 07:44 PM) Wow, Brent. You are not wasting any time. Keep on rocking. Before you know it you'll be (IMG:style_emoticons/default/driving.gif) Thanks Rob, I was poring through your thread on the suspension console today gleaning tips on getting that placed right. I want to check against the factory alignment but that requires an M10x230mm bolt that I can't find locally. I have an idea to improvise though. I'm really paranoid about getting that bit right. Sadly, I have a new work project starting next week which will mean less time to work on the car. But I have to pay for this insanity some how. (IMG:style_emoticons/default/biggrin.gif) |
|
|
|
| euro911 |
Sep 28 2017, 09:37 PM
Post
#117
|
|
Retired & living the dream. God help me if I wake up! Group: Members Posts: 8,937 Joined: 2-December 06 From: So.Cal. & No.AZ (USA) Member No.: 7,300 Region Association: Southern California |
Mad skills, for sure (IMG:style_emoticons/default/welder.gif)
Just a suggestion ... I drill extra weep holes in bottom of the jack post supports (IMG:style_emoticons/default/idea.gif) (IMG:http://www.914world.com/bbs2/uploads/post-20845-1506232410.jpg) |
|
|
|
| bbrock |
Sep 28 2017, 09:46 PM
Post
#118
|
|
914 Guru Group: Members Posts: 5,269 Joined: 17-February 17 From: Montana Member No.: 20,845 Region Association: Rocky Mountains |
QUOTE(euro911 @ Sep 28 2017, 09:37 PM) Mad skills, for sure (IMG:style_emoticons/default/welder.gif) Just a suggestion ... I drill extra weep holes in bottom of the jack post supports (IMG:style_emoticons/default/idea.gif) (IMG:http://www.914world.com/bbs2/uploads/post-20845-1506232410.jpg) Hard to see in this pic but I drilled a 1/4" hole in the bottom left of this one. Would you add more? |
|
|
|
| euro911 |
Sep 28 2017, 09:53 PM
Post
#119
|
|
Retired & living the dream. God help me if I wake up! Group: Members Posts: 8,937 Joined: 2-December 06 From: So.Cal. & No.AZ (USA) Member No.: 7,300 Region Association: Southern California |
QUOTE(bbrock @ Sep 28 2017, 08:46 PM) QUOTE(euro911 @ Sep 28 2017, 09:37 PM) Mad skills, for sure (IMG:style_emoticons/default/welder.gif) Just a suggestion ... I drill extra weep holes in bottom of the jack post supports (IMG:style_emoticons/default/idea.gif) (IMG:http://www.914world.com/bbs2/uploads/post-20845-1506232410.jpg) Hard to see in this pic but I drilled a 1/4" hole in the bottom left of this one. Would you add more? Yeah, I put one in each lower corner, so no matter what attitude the car is parked in, it will drain better. |
|
|
|
| bbrock |
Sep 28 2017, 10:02 PM
Post
#120
|
|
914 Guru Group: Members Posts: 5,269 Joined: 17-February 17 From: Montana Member No.: 20,845 Region Association: Rocky Mountains |
QUOTE(euro911 @ Sep 28 2017, 09:53 PM) Yeah, I put one in each lower corner, so no matter what attitude the car is parked in, it will drain better. That makes sense. I'll do it. I'm also going to shoot cavity wax in there and refresh it once a year or so. |
|
|
|
|
3 User(s) are reading this topic (3 Guests and 0 Anonymous Users)
0 Members:

|
Lo-Fi Version | Time is now: 18th April 2026 - 11:47 AM |
Invision Power Board
v9.1.4 © 2026 IPS, Inc.