|
|
|
Porsche, and the Porsche crest are registered trademarks of Dr. Ing. h.c. F. Porsche AG.
This site is not affiliated with Porsche in any way. Its only purpose is to provide an online forum for car enthusiasts. All other trademarks are property of their respective owners. |
|
|

  |

| bbrock |
 Apr 15 2019, 10:37 PM Apr 15 2019, 10:37 PM
Post
#1001
|
|
914 Guru  Group: Members Posts: 5,269 Joined: 17-February 17 From: Montana Member No.: 20,845 Region Association: Rocky Mountains |
QUOTE(Dave_Darling @ Apr 15 2019, 09:15 PM)  You might be surprised at how small amounts of fixed volume affect compression ratio. Worth measuring IMHO. Generally, a dish in a piston is either there to provide a specific place for combustion to start, or to make room for valves and/or spark plugs, or just to lower the compression. I have the feeling that in the case of the 914 it's all three. Note that early 1.7 pistons have a dome instead, and the original European-spec 2.0 pistons had a dish with beveled sides instead of the curved sides like the US-spec pistons had. --DD Interesting. These are the original European-spec 2.0 pistons with the beveled sides. The dish is subtle enough that I didn't notice it until I started messing with deck height and cc'ing the heads. When I measured the volume of the dish, it took 6 drops of fluid to fill it. It wasn't enough to be able to measure from a 60cc syringe. I could use a 3cc syringe to get a more accurate read. |
   |

 
|
| bbrock |
Apr 16 2019, 08:49 AM
Post
#1002
|
|
914 Guru Group: Members Posts: 5,269 Joined: 17-February 17 From: Montana Member No.: 20,845 Region Association: Rocky Mountains |
I think I found it. I measured all the pistons from wrist pin bores to piston tops. Measuring with the pistons still on the rods was a bit fiddly but I got consistent results to the thousands. Looks like the wrist pin bore on #3 is indeed lower. Note that I calculated "Max Diff" to indicate change in deck height.
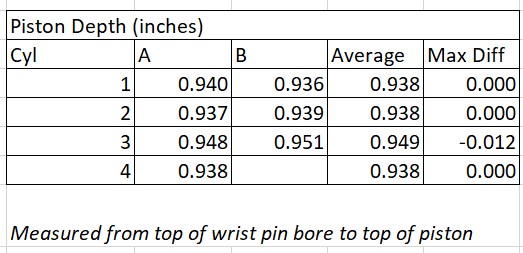 Now the question is what, if anything to do about it. (IMG:style_emoticons/default/confused24.gif) Is it worth trying to fix? If not, should I move that rod assembly to another location? From what I've read, higher compression increases heat generated during compression but reduces exhaust gas temperature. I'm paranoid because I had a bus engine grenade at 60 mph when the #3 exhaust valve had a melt down. Don't want to repeat that. My gut says higher compression on #3 might be a good thing but what do I know? (IMG:style_emoticons/default/confused24.gif) |
|
|
|
| bbrock |
Apr 17 2019, 01:21 PM
Post
#1003
|
|
914 Guru Group: Members Posts: 5,269 Joined: 17-February 17 From: Montana Member No.: 20,845 Region Association: Rocky Mountains |
Well, right or wrong, I decided to just shuffle some barrels around to take advantage of the small differences I found there and move on. I estimated the crushed gasket thickness at 90% of the uncrushed value. This was based in a post from Jake Raby I found on The Samba where he said gaskets vary but most are 0.03 new, and 0.028 crushed (= 90% of uncrushed). I had two sets of gaskets but only one usable. They measure 0.027" thick so I used 0.025" as the crushed estimate for DH calculation. And no, there is not chance they were crushed because they were still in a sealed plastic bag. Here are the final numbers on deck height and compression:
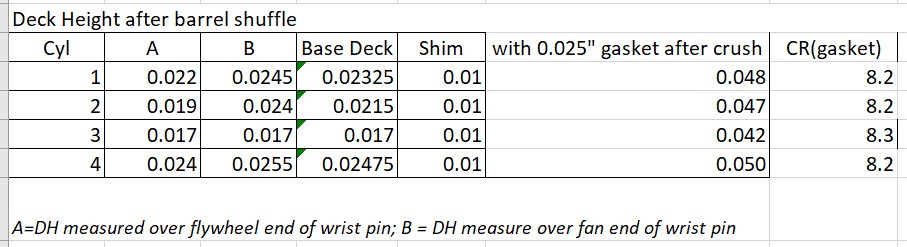 According to this CR>HP calculator, that should be good for one free pony from the slightly higher than stock CR. The irony after all this stewing over deck heights is that I wound up doing exactly what I would have if I'd never heard of deck heights before - install the 0.01 base rings and head gaskets that come with the gasket sets. At least now I'm aware of the irregularities in my engine so I have something new to worry about. (IMG:style_emoticons/default/screwy.gif) With that settled, I took all the P&Cs off one at a time and gave them a good scrubbing with soap and water followed by a flash dry with compressed air and a fresh coat of clean oil. The base sealing surface of each cylinder and mated register was wiped clean with lacquer thinner and Yamabond was applied to the cylinder base and base rings before making a final adjustment or ring gap locations and sliding the jugs on. Each jug was snugged into the register using a socket as a spacer on one stud while I worked on the rest. After all the jugs were on, I installed my throw away set of gaskets into the 3-4 side head but before putting it on, I covered the piston top of #3 with modeling clay. I just did this one since it has the lowest deck. I figured if this one is good, they should all be good.  I then torqued the heads down on both sides (I didn't bother with gaskets on 1-2 at this point) and quit for the night to let the base sealant set while under torque. This morning I mocked up #3 with push rods and rockers and set them to 0 lash before rotating the crank a few revolutions.  I actually had to go through this a few times because I underestimated how much clay was needed to get a good impression of the valves. The valves aren't coming anywhere close to the pistons (like around .15-.20 clearance), which surprised me and made me think something was wrong. But I checked and rechecked everything and made sure the tappets were pushing the valves in fully. Still waiting for confirmation from Elgin on my cam specs, but I'm pretty sure it is stock lift with wider duration so I guess I should expect the valves to get too crazy. Hard to get an accurate thickness measurement in clay, but the minimum clearance looks to be around 0.05" with the slightly thicker head gaskets than will be in the final fit. That all seems good from a safe margin standpoint. 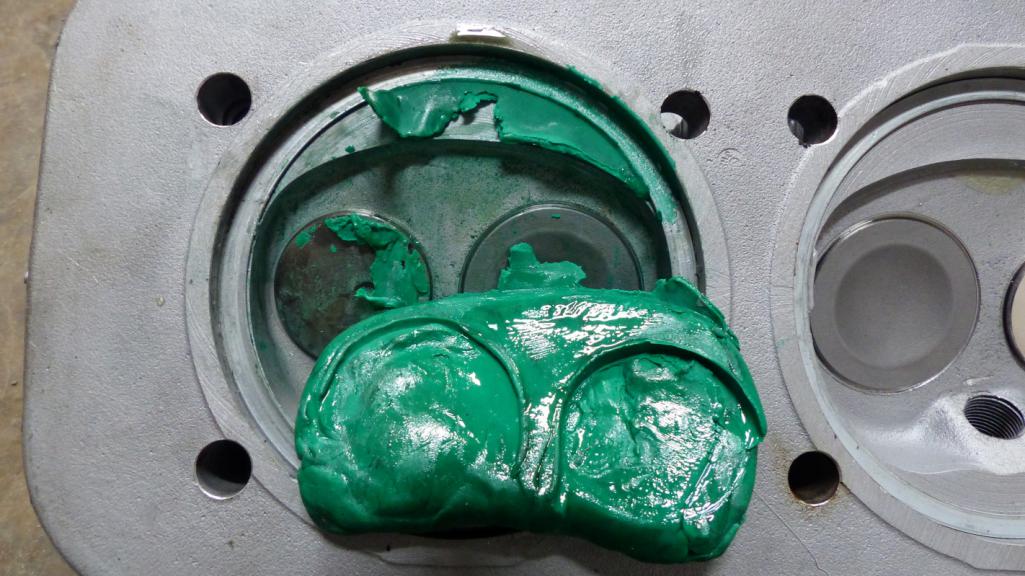 I discovered I may not have a full set of proper head washers so @Mblizzard came to my rescue and is going to send me a set. I won't be able to do final bolt-up until those arrive. I know this isn't the perfect blueprinted build, but I'm glad it is behind me. I normally like working on the guts of engines but I don't have a large, clean bench needed to do it so this has been more stress than fun. Thanks to those of you who helped coach me through this. Happy to get back to cleaning up rusty crap and making it pretty again! (IMG:style_emoticons/default/rolleyes.gif) |
|
|
|
| euro911 |
Apr 17 2019, 02:42 PM
Post
#1004
|
|
Retired & living the dream. God help me if I wake up! Group: Members Posts: 8,937 Joined: 2-December 06 From: So.Cal. & No.AZ (USA) Member No.: 7,300 Region Association: Southern California |
Cylinder#3 overheating issues were common with T-1/T-2 motors due to the oil cooler location ... not an issue on T-4 motors.
|
|
|
|
| bbrock |
Apr 17 2019, 03:07 PM
Post
#1005
|
|
914 Guru Group: Members Posts: 5,269 Joined: 17-February 17 From: Montana Member No.: 20,845 Region Association: Rocky Mountains |
QUOTE(euro911 @ Apr 17 2019, 02:42 PM) Cylinder#3 overheating issues were common with T-1/T-2 motors due to the oil cooler location ... not an issue on T-4 motors. Interesting. I thought it was a problem on all of them. I had a 1.7L engine I rebuilt to 2.0 with hydraulic cam and lifters that ran like a top until the #3 exhaust valve let loose on the Interstate and grenaded the engine 200 miles from home. Might have been coincidence that it was #3 I guess. All these years I blamed an inherent weakness in the engine. Turns out it was just my shitty rebuild and not replacing the valves. (IMG:style_emoticons/default/lol-2.gif) Although it sucked losing that engine, the incident led to one of the most fun and memorable days of my life. |
|
|
|
| MarkV |
Apr 17 2019, 06:33 PM
Post
#1006
|
|
Fear the Jack Stands Group: Members Posts: 1,493 Joined: 15-January 03 From: Sunny Tucson, AZ Member No.: 154 Region Association: None |
My final CR is 8.7 / 1 and I lapped the jugs with no head gaskets. I was worried about heat so I installed a head temp gauge. The sensor for the gauge is on #3 because that's the hot one. Mine doesn't run hot unless I really try to lug it..... It seems to like 275 degrees maybe 300 in the heat of summer. (IMG:style_emoticons/default/blowtorch.gif)
|
|
|
|
| bbrock |
Apr 26 2019, 07:18 PM
Post
#1007
|
|
914 Guru Group: Members Posts: 5,269 Joined: 17-February 17 From: Montana Member No.: 20,845 Region Association: Rocky Mountains |
Frustrated as Hell
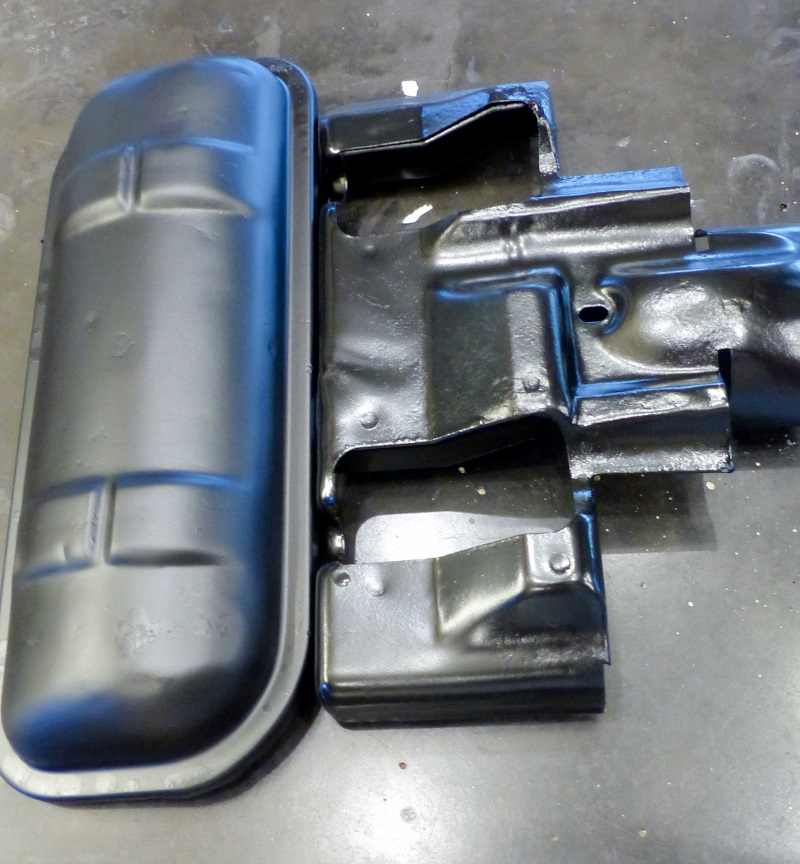
I've spent the last week trying unsuccessfully to accomplish what should have been the simple task of painting my valve covers. I'll warn in advance this is likely to be as much a bitch fest as it is a project update. I can't figure out WTF is going on. I spent last weekend restoring all the small tin and brackets on the engine which entailed cleaning them, media blasting to bare metal, and painting with VHT black satin engine paint. I'll post some pics on that when I'm less pissed off but other than being tedious work, went without a hitch. My only complaint is that some of the pieces show some rust pitting from living in the Midwest but these are all pieces mostly or fully hidden from view anyway so that's minor. The last items to paint were the valve covers. Those got extra attention since they are kind of a focal point of a well-dressed engine. I had 3 sets of covers to pick from. All have pits from salt damage but one set had much less than the others so that's the one I picked. Of course, that was also the only set that was dented and banged up so after de-greasing, then blasting to bare metal, I spent some time with hammer and dolly to make them presentable. Then they were cleaned and dried again, wiped with dewaxer, blown dry and tacked off before applying three coats of VHT Engine Enamel primer. The primer is optional but is supposed to promote adhesion. More importantly, it was the only thing I could think to fill some of the rust pits and remaining small dings since the TDSs for all the body fillers I have don't list max temp ratings, and I haven't seen a high temp high build primer. I've used this primer before and had just applied it to other pieces without any trouble. The directions on the primer are to allow 10 minutes flash time between coats and 30 minutes before wet sanding or applying top coat. I was applying the coats a little heavier than normal to build up some thickness so doubled the between coats flash time and waited a couple hours before wet sanding. Everything looked great up to this point. The paint dried as expected and after wet sanding with 400 grit, about 80% of the pits and other imperfections were concealed. 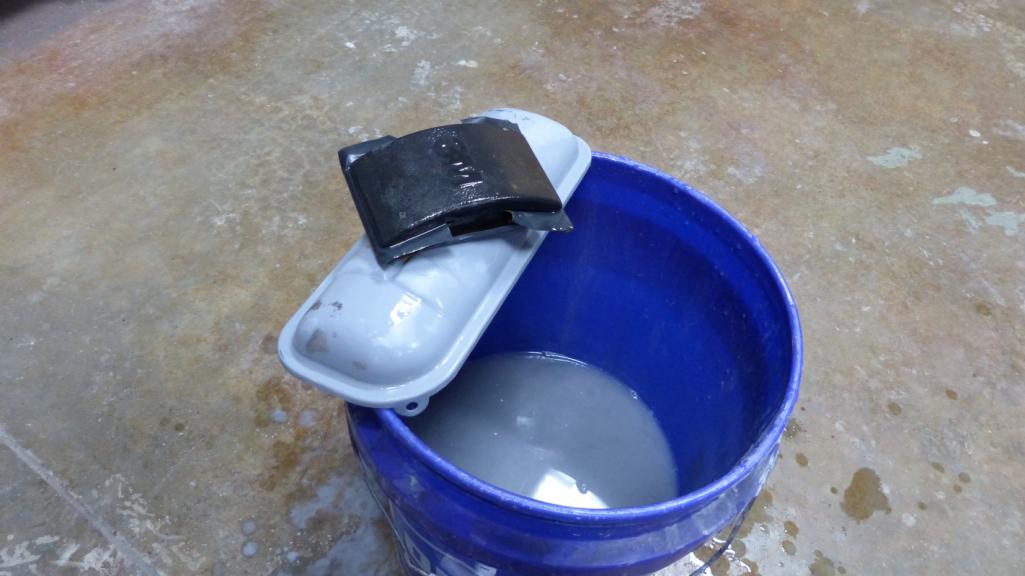 After cleaning and dewaxing, I applied a light coat of primer just enough to cover bare metal exposed by the sanding followed by two light, and one medium-wet coat of the top coat (again, VHT engine paint) according to can directions. The covers looked fantastic and I left them to dry overnight. The next morning I picked up one of the covers to inspect and was surprised that my fingers stuck to a sticky goo. I've lost count of the number of cans of this paint I've sprayed, and not once has it not dried enough to be handled within an hour. Looking at the covers, I could see splotches that were shiny and wet while the other areas had cured to a satin finish. Many of the wet areas had a wrinkled finish so even if they eventually dried, they would look like shit. I also noticed the satin finish was more flat than the previous several cans I had sprayed which was kind of annoying, but I didn't think much else of it. Another weird thing is that I had used this same can of paint to put a final coat on a few of the other pieces and they all dried just fine, but with that duller finish. My thinking was that either I hadn't allowed enough time for that final coat of primer to flash before spraying top coat, or the primer had soaked up water during wet sanding and I hadn't allowed enough time to dry. So, I media blasted the covers back down to bare metal and started over. This time I let the covers dry overnight after wet sanding and let the final light coat of primer dry for several hours before top coating. Again, they looked fantastic and I hung them to dry before leaving home for a conference for three days. I went out to check on them this morning and I'll be damned if the same f'ing thing didn't happen again. Here's what it looked like: 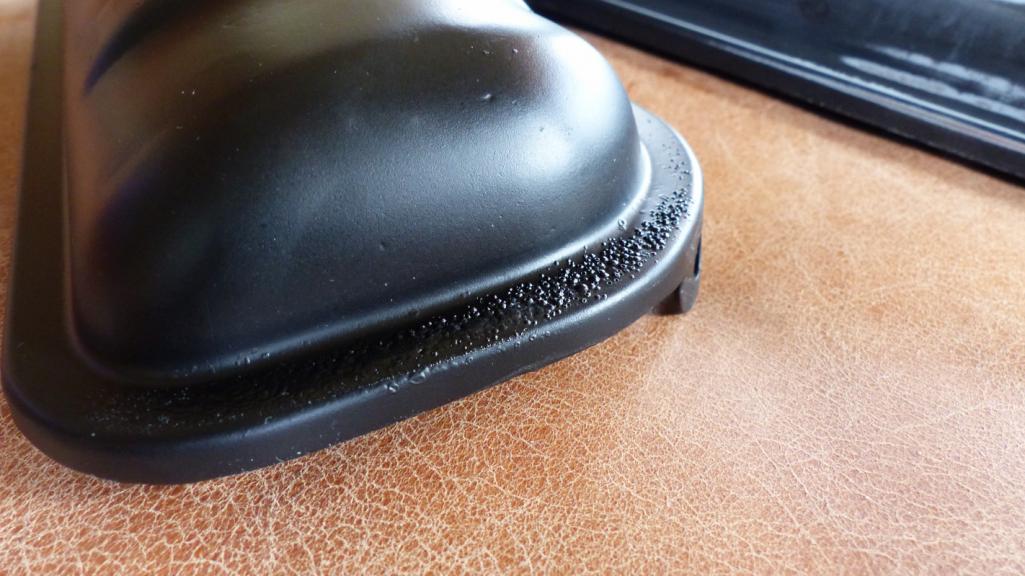 It wasn't as bad as the first time and I think the three days of drying did allow more of the paint to cure. I decided to switch tactics and put the covers in the oven to drive out any solvent or moisture trapped in the paint. I baked them at 200F for about 45 minutes and the paint blistered in several areas even though the paint is rated for 550F. I'm pretty sure the blistering was solvent (or moisture) pop. After baking, all of the paint was dry, hard, and cured, but rough where it blistered. The next step was to wet sand again to sand out the blistered areas and level out the surface. 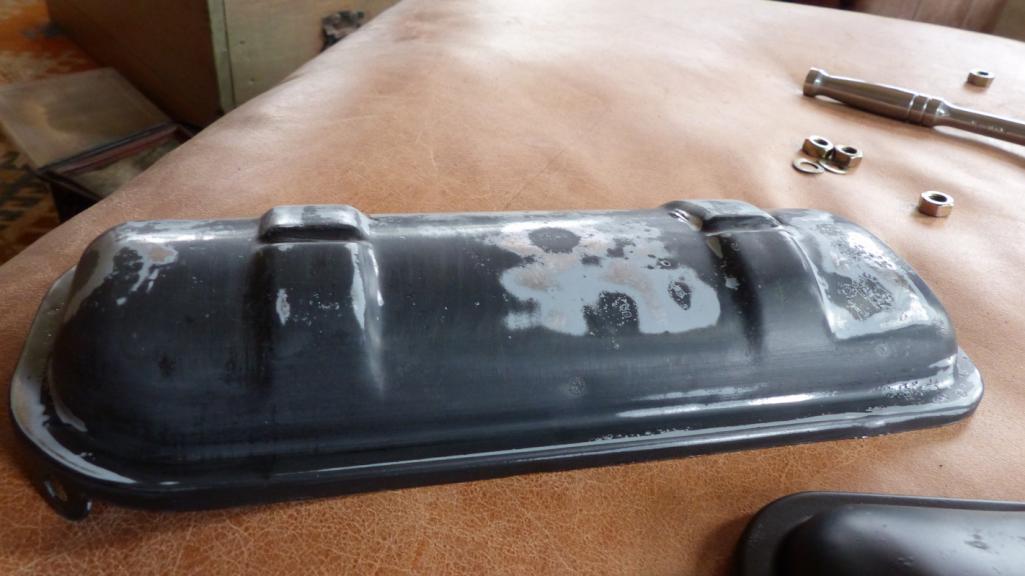 Then they went back in the oven for an hour to make sure they were dry, dry, dry. Then they were wiped with dewaxer and blown dry with compressed air before applying two light and one medium wet top coat (no additional coat of primer this time). After 3 hours of drying, I checking on them and found large areas wet, gooey, and wrinkled again. (IMG:style_emoticons/default/headbang.gif) (IMG:style_emoticons/default/headbang.gif) (IMG:style_emoticons/default/headbang.gif) (IMG:style_emoticons/default/WTF.gif) 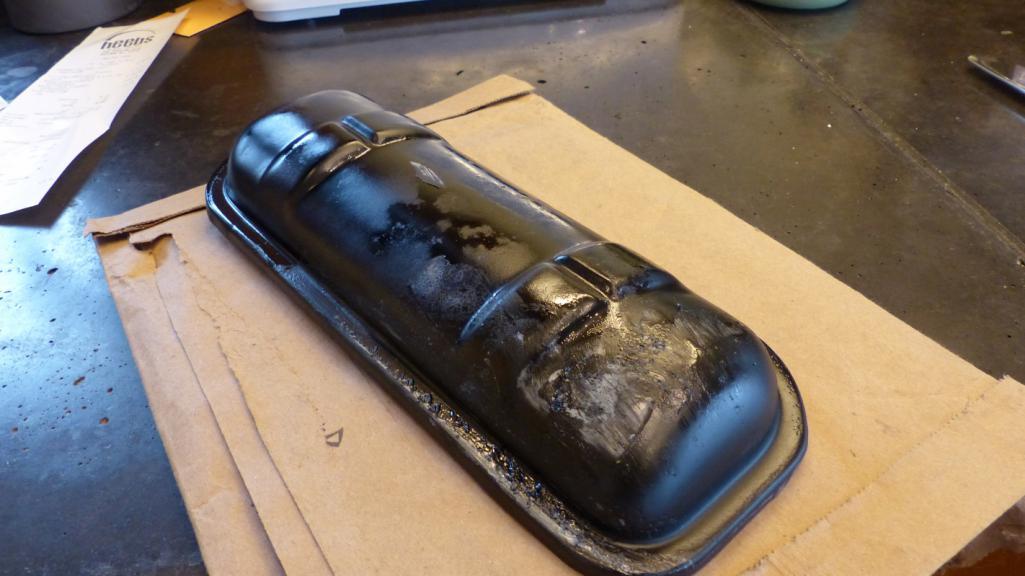 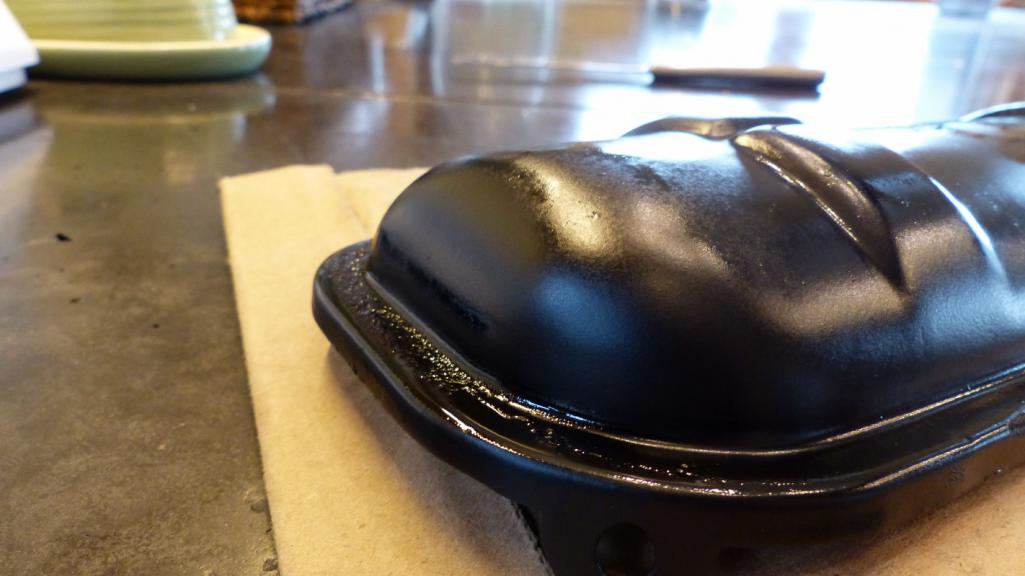 The area on top where primer is showing is where I wiped lightly across with a rag. That paint simply isn't setting up. They are now baking again to harden the paint and then I'll blast them back to bare metal again, but then what? (IMG:style_emoticons/default/confused24.gif) I'm at the point where I think I got a shitty can of paint which is now used up. This is too much work to keep going in circles though. I may have to see what it would cost to have just these covers powder coated. For now, I need a drink. (IMG:style_emoticons/default/beer3.gif) |
|
|
|
| burton73 |
Apr 26 2019, 07:36 PM
Post
#1008
|
|
Senior member, and old dude Group: Members Posts: 4,008 Joined: 2-January 07 From: Los Angeles Member No.: 7,414 Region Association: Southern California |
Brent,
Screw that junk. I have used VHT paint for engines for motorcycles and it work great. Just go right from bead blasting and then bake in your oven after its dry. It has been a long time but it worked great before. $15 a can or so. Bob B (IMG:style_emoticons/default/beer3.gif) |
 |
|
| bbrock |
Apr 26 2019, 07:49 PM
Post
#1009
|
|
914 Guru Group: Members Posts: 5,269 Joined: 17-February 17 From: Montana Member No.: 20,845 Region Association: Rocky Mountains |
QUOTE(burton73 @ Apr 26 2019, 07:36 PM) Brent, Screw that junk. I have used VHT paint for engines for motorcycles and it work great. Just go right from bead blasting and then bake in your oven after its dry. It has been a long time but it worked great before. $15 a can or so. Bob B (IMG:style_emoticons/default/beer3.gif) Hi Bob. This IS VHT engine paint which is why it has me so confused. I've used it for years without any problems at all. I've also baked it in the oven after dry as you suggest, but for some reason, it isn't drying completely in this case. The only reason I'm not applying the VHT top coat direct to metal is because I need to fill as much of the pitting as I can. If I don't, it isn't going to meet my standards. That said, I've used the VHT engine primer many times before and it has also worked great. That's why I'm starting to wonder if I got a bad can of the engine paint which might also explain why the sheen is flatter than the half dozen other cans I've sprayed. BTW, I'm only paying $8 a can for it. Is there a California paint tax? (IMG:style_emoticons/default/confused24.gif) |
|
|
|
| bbrock |
Apr 26 2019, 08:16 PM
Post
#1010
|
|
914 Guru Group: Members Posts: 5,269 Joined: 17-February 17 From: Montana Member No.: 20,845 Region Association: Rocky Mountains |
It's hard to get a good pic and the contrast is actually even greater than you can see here, but here's a picture showing pieces sprayed from two different cans of VHT Satin Black Engine Enamel.
 Both cans were purchased on the same day at my local Autozone. While the valve cover is more what I would consider "satin", all cans of VHT "Satin Black" I've sprayed match the piece on the right which I would call a "semi-gloss." I've learned that VHT uses these descriptions loosely because their "Gloss Black" Roll Bar and Chassis Paint is a dead match for the piece on the right which is really what I want. |
|
|
|
| andrewb |
Apr 26 2019, 10:50 PM
Post
#1011
|
|
Member Group: Members Posts: 114 Joined: 25-May 10 From: UK Member No.: 11,762 Region Association: None |
QUOTE(bbrock @ Apr 17 2019, 10:07 PM) the incident led to one of the most fun and memorable days of my life. ..................because........come on,don't keep us hanging !! |
|
|
|
| bbrock |
Apr 27 2019, 12:16 AM
Post
#1012
|
|
914 Guru Group: Members Posts: 5,269 Joined: 17-February 17 From: Montana Member No.: 20,845 Region Association: Rocky Mountains |
The problem with the valve covers is solved! Sure enough, it was a bad can of paint. After baking the pieces earlier today, I decided to try just dry sanding them with 320 grit to sand off all bad paint. Then I dewaxed and sprayed with a fresh can of the same stuff. This time it flashed off evenly within minutes of application like it normally does and dried to the same semi-gloss as previous cans. It didn't register with me until I pulled my respirator off as I left the garage, but the bad paint lacked the strong solvent smell it should have had. Something was definitely off with it. I put the last coat on the covers less than two hours ago and they are already dry enough to handle. I'll give them a bake tomorrow but I'm glad that's over. (IMG:style_emoticons/default/cheer.gif)
|
|
|
|
| bbrock |
Apr 27 2019, 01:05 AM
Post
#1013
|
|
914 Guru Group: Members Posts: 5,269 Joined: 17-February 17 From: Montana Member No.: 20,845 Region Association: Rocky Mountains |
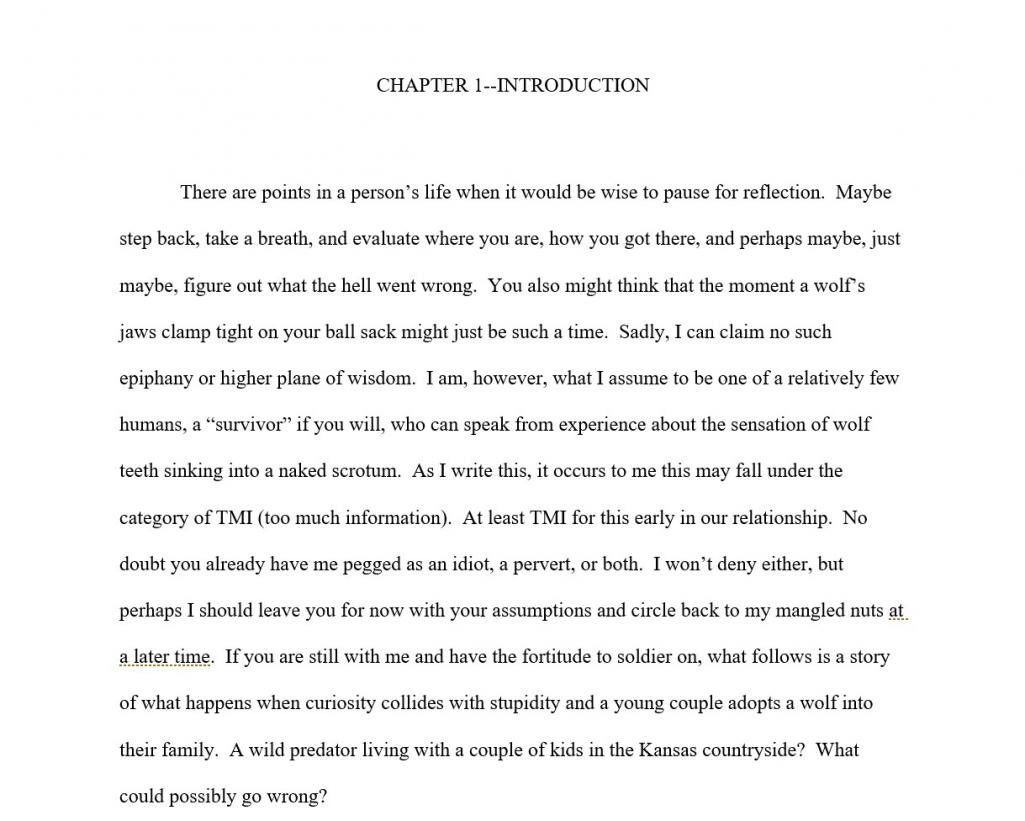
QUOTE(andrewb @ Apr 26 2019, 10:50 PM) QUOTE(bbrock @ Apr 17 2019, 10:07 PM) the incident led to one of the most fun and memorable days of my life. ..................because........come on,don't keep us hanging !! Oh that's kind of a long story and I'm not sure how entertaining for anyone who wasn't there, but here is an excerpt from a rough draft of a chapter in a book I'm working on about our wolf that contains the story of when the bus engine went boom.   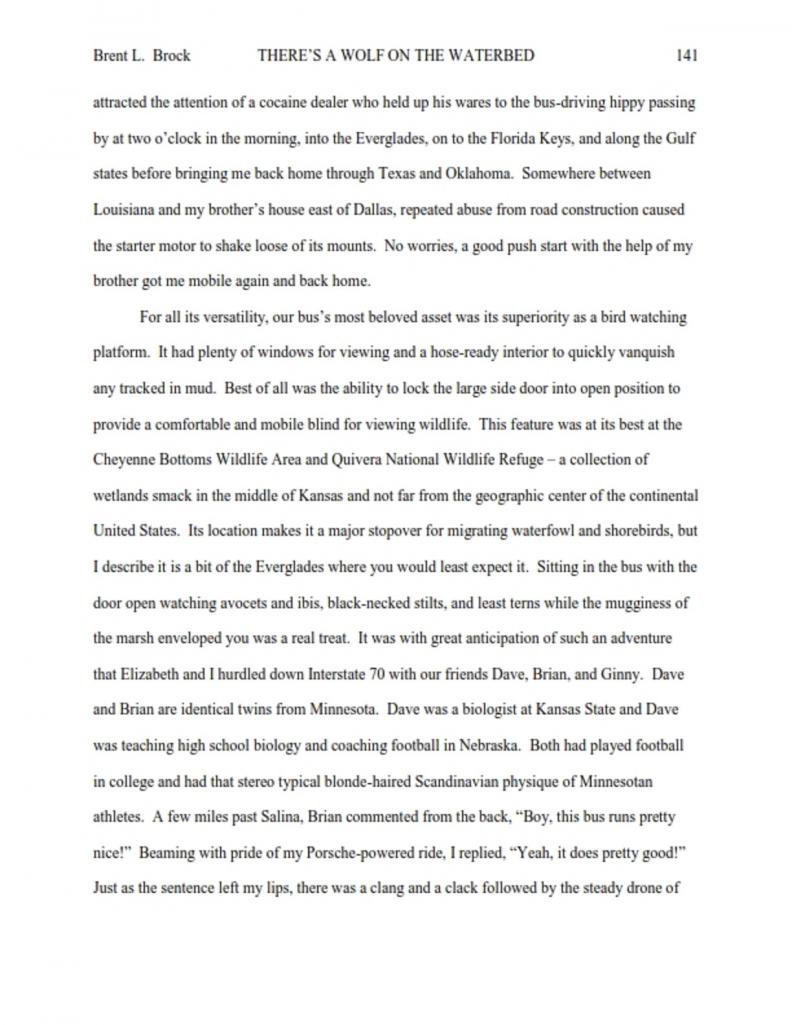 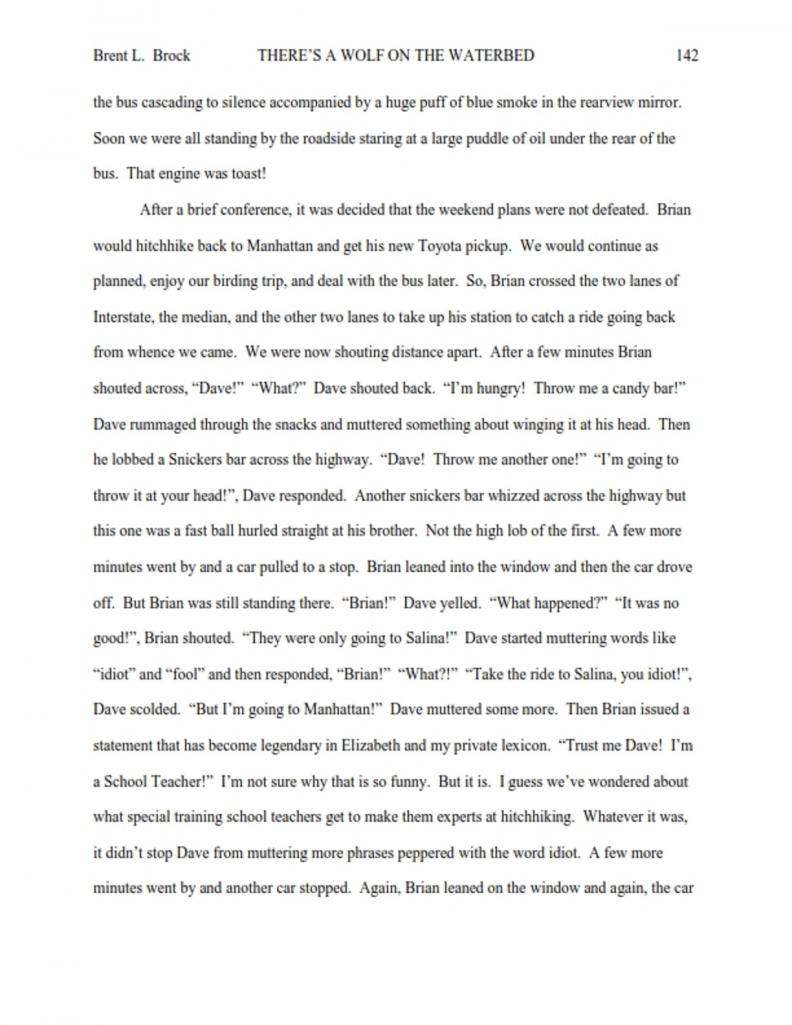 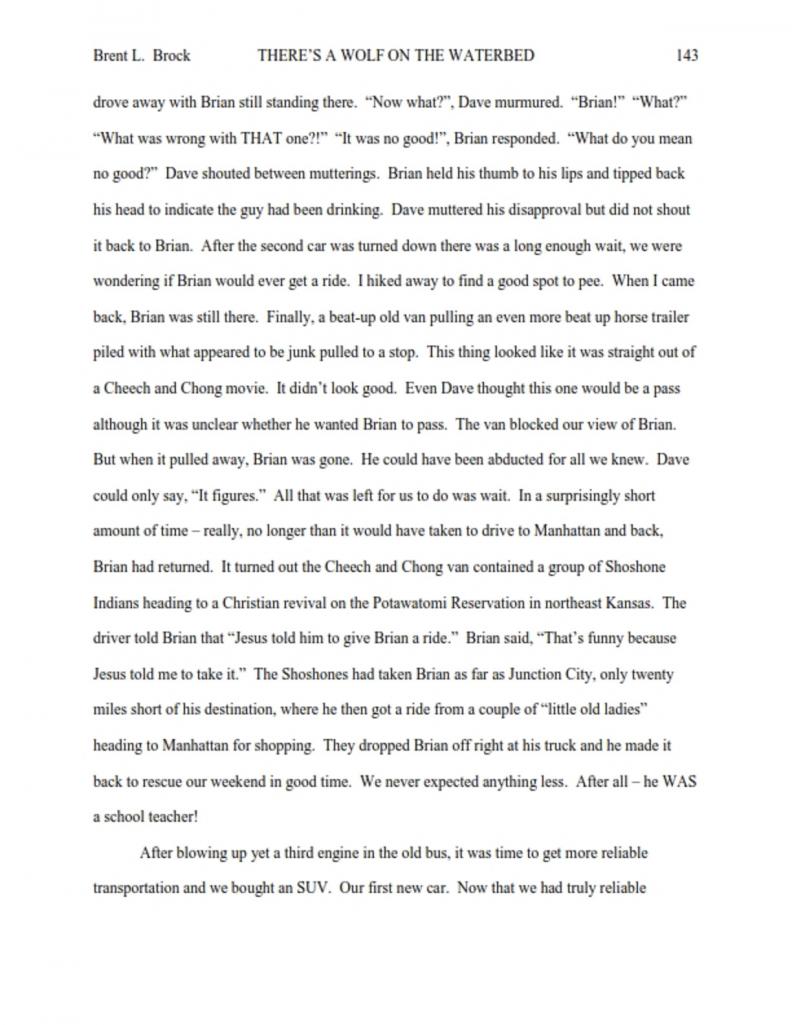 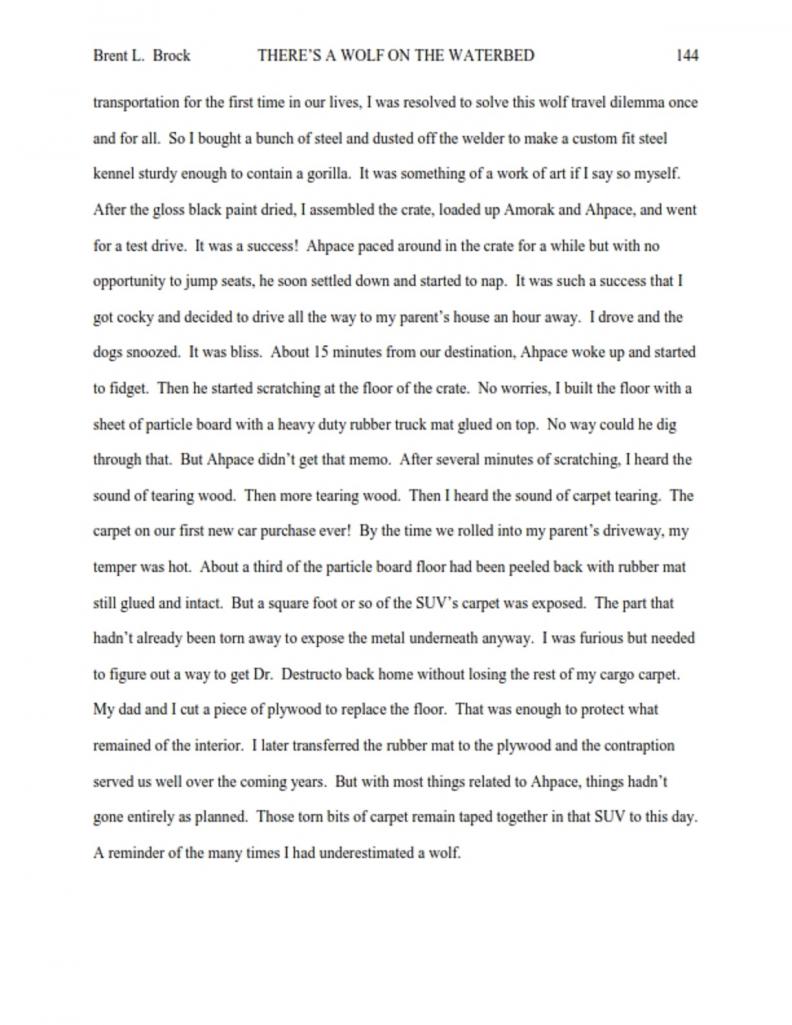 |
|
|
|
| Superhawk996 |
Apr 27 2019, 03:53 AM
Post
#1014
|
|
914 Guru Group: Members Posts: 7,839 Joined: 25-August 18 From: Woods of N. Idaho Member No.: 22,428 Region Association: Galt's Gulch |
(IMG:style_emoticons/default/lol-2.gif)
No wonder your posts are so entertaining to read! Also I can't believe that when you were having problems with the valve cover paint that you just didn't plate them! (IMG:style_emoticons/default/shades.gif) Keep up the work and finish that book that ought to be a fun read! |
|
|
|
| tygaboy |
Apr 27 2019, 07:15 AM
Post
#1015
|
|
914 Guru Group: Members Posts: 5,824 Joined: 6-October 15 From: Petaluma, CA Member No.: 19,241 Region Association: Northern California |
Hurry up and finish the car so you can get back to the book! I need a copy...
|
|
|
|
| bbrock |
Apr 27 2019, 04:43 PM
Post
#1016
|
|
914 Guru Group: Members Posts: 5,269 Joined: 17-February 17 From: Montana Member No.: 20,845 Region Association: Rocky Mountains |
Thanks guys. I'm not happy with this yet and it will get some heavy editing, but here's the current draft of the opening paragraph.
 Now back on topic. Job.... done! 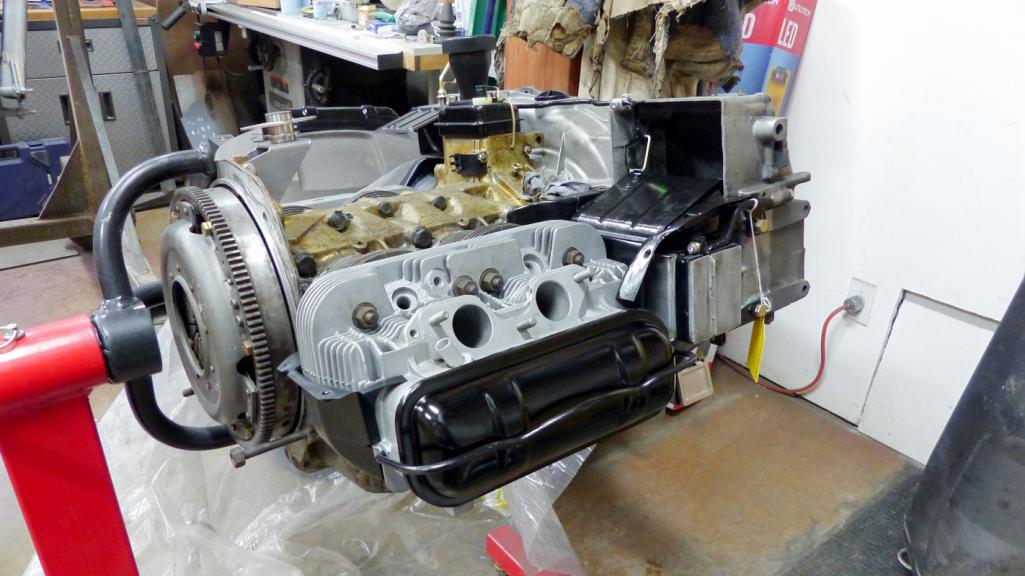 It's only fitting that this PITA job culminates with that sickening feeling of dragging that clamping bail across the fresh paint of a painstakingly restored valve cover. (IMG:style_emoticons/default/icon8.gif) (IMG:style_emoticons/default/barf.gif) |
|
|
|
| BPic |
Apr 27 2019, 04:52 PM
Post
#1017
|
|
Member Group: Members Posts: 343 Joined: 5-February 18 From: Miami, Florida Member No.: 21,864 Region Association: South East States |
I want more! Don’t dangle the intro and one chapter. This is awesome stuff. I’ve always wanted a wolf or wolf hybrid. But I must ask, have had more kids since the intro?
|
|
|
|
| KELTY360 |
Apr 27 2019, 07:00 PM
Post
#1018
|
|
914 Neferati Group: Members Posts: 5,189 Joined: 31-December 05 From: Pt. Townsend, WA Member No.: 5,344 Region Association: Pacific Northwest |
QUOTE(bbrock @ Apr 27 2019, 03:43 PM) Thanks guys. I'm not happy with this yet and it will get some heavy editing, but here's the current draft of the opening paragraph. Now back on topic. Job.... done! It's only fitting that this PITA job culminates with that sickening feeling of dragging that clamping bail across the fresh paint of a painstakingly restored valve cover. (IMG:style_emoticons/default/icon8.gif) (IMG:style_emoticons/default/barf.gif) First paragraph sure beats: "It was a dark and stormy night". Hell, it even beats: "Call me Ishmael". Write on! |
|
|
|
| Dion |
Apr 27 2019, 10:49 PM
Post
#1019
|
|
RN Group: Members Posts: 2,926 Joined: 16-September 04 From: Audubon,PA Member No.: 2,766 Region Association: MidAtlantic Region |
Can’t wait for this book to be published.
A Renaissance man/ Hippie author and channeling Jack Hanna It just can not get any better! (IMG:style_emoticons/default/beer3.gif) |
|
|
|
| andrewb |
Apr 27 2019, 11:51 PM
Post
#1020
|
|
Member Group: Members Posts: 114 Joined: 25-May 10 From: UK Member No.: 11,762 Region Association: None |
QUOTE(bbrock @ Apr 27 2019, 08:05 AM) Oh that's kind of a long story and I'm not sure how entertaining for anyone who wasn't there, but here is an excerpt from a rough draft of a chapter in a book I'm working on about our wolf that contains the story of when the bus engine went boom. Brilliant, thank you. I'm glad I asked. Shoulda known it would involve wildlife. Strangely enough I've been in the same situation - '71 bus, bunch of guys, side of the road, pool of oil - but with a ferry to catch. Guess I'd better write a book - but with less wolf. Put me down for a copy too please. |
|
|
|
|
2 User(s) are reading this topic (2 Guests and 0 Anonymous Users)
0 Members:

|
Lo-Fi Version | Time is now: 12th May 2026 - 04:44 PM |
Invision Power Board
v9.1.4 © 2026 IPS, Inc.