|
|
|
Porsche, and the Porsche crest are registered trademarks of Dr. Ing. h.c. F. Porsche AG.
This site is not affiliated with Porsche in any way. Its only purpose is to provide an online forum for car enthusiasts. All other trademarks are property of their respective owners. |
|
|

  |

| rgalla9146 |
 Jun 21 2019, 04:53 PM Jun 21 2019, 04:53 PM
Post
#1101
|
|
Advanced Member  Group: Members Posts: 4,959 Joined: 23-November 05 From: Paramus NJ Member No.: 5,176 Region Association: None |
QUOTE(Dave_Darling @ Jun 21 2019, 06:48 PM)  QUOTE(bbrock @ Jun 21 2019, 08:32 AM) I discovered that the front trunk lock was binding when the handle was bolted in place.... Aren't those two fasteners supposed to be Allen-head screws? --DD (IMG:style_emoticons/default/agree.gif) I'm with you Dave. |
   |

 
|
| bbrock |
Jun 21 2019, 05:03 PM
Post
#1102
|
|
914 Guru Group: Members Posts: 5,269 Joined: 17-February 17 From: Montana Member No.: 20,845 Region Association: Rocky Mountains |
QUOTE(burton73 @ Jun 21 2019, 04:11 PM) QUOTE(Dion @ Jun 21 2019, 01:01 PM) Brent, I’m loving every minute of this thread. Sorry bout the snow, we’ve had a month of rain. “Waiting for the sun” cue the Doors..... That coil set-up. Very slick! Keep at it. Doors – Waiting For The Sun Lyrics At first flash of Eden, we race down to the sea. Standing there on Freedom's Shore. Waiting for the Sun (3x) Can you feel it now that spring has come. And it's time to live in the scattered sun. Waiting for the Sun (3x, pause, again slower) Waiting.... Waiting.... Waiting.... Waiting.... (2x) Waiting for you to - come along Waiting for you to - hear my song Waiting for you to - come along Waiting for you to - tell me what went wrong This is the strangest life I've ever known. Yeah! (Riff 8x) Can you feel it now that spring has come. And it's time to live in the scattered sun. Waiting for the Sun (3x) Waiting... For... The suuuuun. (Riff 2x) That's some good MoJo Bob! It worked too. Today we were able to "Break On Through to the Other Side." Which, BTW, is spinning on the old B&O turntable and playing at high volume now thanks to your inspiration. I've gotta get me a lava lamp. (IMG:style_emoticons/default/aktion035.gif) 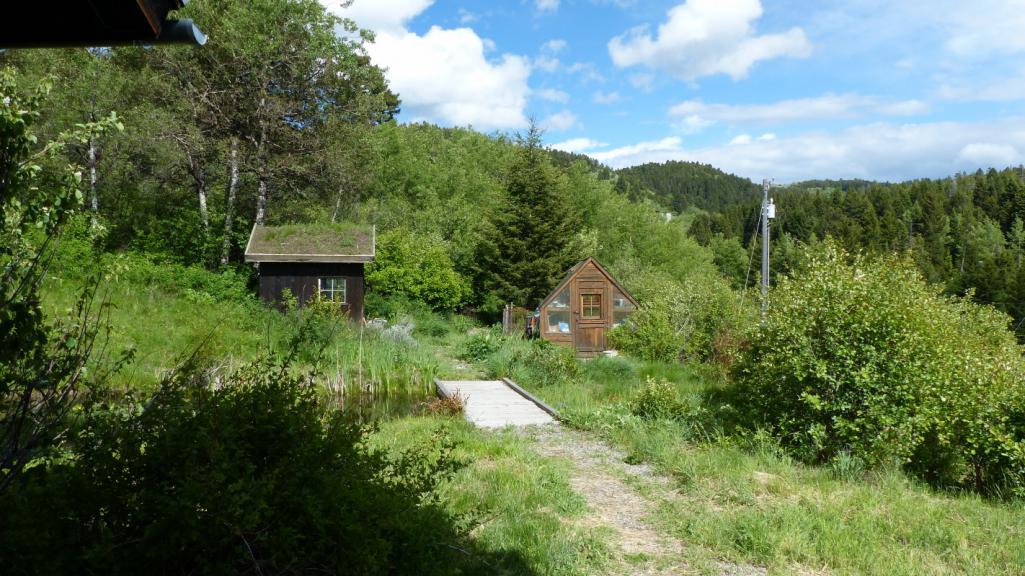 |
|
|
|
| bbrock |
Jun 21 2019, 05:07 PM
Post
#1103
|
|
914 Guru Group: Members Posts: 5,269 Joined: 17-February 17 From: Montana Member No.: 20,845 Region Association: Rocky Mountains |
QUOTE(rgalla9146 @ Jun 21 2019, 04:53 PM) QUOTE(Dave_Darling @ Jun 21 2019, 06:48 PM) QUOTE(bbrock @ Jun 21 2019, 08:32 AM) I discovered that the front trunk lock was binding when the handle was bolted in place.... Aren't those two fasteners supposed to be Allen-head screws? --DD (IMG:style_emoticons/default/agree.gif) I'm with you Dave. You are correct. Seems like I might have already ordered those and forgotten about them. Will check the hardware stash and add to my next Belmetric order if I don't find them. Thanks for keeping me on my toes (IMG:style_emoticons/default/beerchug.gif) |
|
|
|
| BPic |
Jun 21 2019, 05:09 PM
Post
#1104
|
|
Member Group: Members Posts: 343 Joined: 5-February 18 From: Miami, Florida Member No.: 21,864 Region Association: South East States |
QUOTE(Dave_Darling @ Jun 21 2019, 06:48 PM) QUOTE(bbrock @ Jun 21 2019, 08:32 AM) I discovered that the front trunk lock was binding when the handle was bolted in place.... Aren't those two fasteners supposed to be Allen-head screws? --DD Excellent observation Dave. This car certainly will not run when he’s done. (IMG:style_emoticons/default/biggrin.gif) Seriously though Brent. I love this thread and it is my go to when I need info. I’m sure when your finished you’ll be up for a little moonlight drive. |
|
|
|
| bbrock |
Jun 21 2019, 05:30 PM
Post
#1105
|
|
914 Guru Group: Members Posts: 5,269 Joined: 17-February 17 From: Montana Member No.: 20,845 Region Association: Rocky Mountains |
QUOTE(BPic @ Jun 21 2019, 05:09 PM) I’m sure when your finished you’ll be up for a little moonlight drive. Yep, me and Gloria. Then it would be a wonderful night for a moondance. See what I did there? (IMG:style_emoticons/default/biggrin.gif) Allen screws added to the Belmetric order. That could have been worse than the car not running. Most likely the trunk lid would have flown open at high speed. BTDT with my first 914. FYI, it is a less than ideal situation. (IMG:style_emoticons/default/yikes.gif) Y'all saved my bacon (IMG:style_emoticons/default/beerchug.gif) |
|
|
|
| BPic |
Jun 21 2019, 05:35 PM
Post
#1106
|
|
Member Group: Members Posts: 343 Joined: 5-February 18 From: Miami, Florida Member No.: 21,864 Region Association: South East States |
QUOTE(bbrock @ Jun 21 2019, 07:30 PM) QUOTE(BPic @ Jun 21 2019, 05:09 PM) I’m sure when your finished you’ll be up for a little moonlight drive. Yep, me and Gloria. Then it would be a wonderful night for a moondance. See what I did there? (IMG:style_emoticons/default/biggrin.gif) Allen screws added to the Belmetric order. That could have been worse than the car not running. Most likely the trunk lid would have flown open at high speed. BTDT with my first 914. FYI, it is a less than ideal situation. (IMG:style_emoticons/default/yikes.gif) Y'all saved my bacon (IMG:style_emoticons/default/beerchug.gif) Is Gloria a brown eyed girl? (IMG:style_emoticons/default/rolleyes.gif) |
|
|
|
| bbrock |
Jun 21 2019, 05:38 PM
Post
#1107
|
|
914 Guru Group: Members Posts: 5,269 Joined: 17-February 17 From: Montana Member No.: 20,845 Region Association: Rocky Mountains |
QUOTE(BPic @ Jun 21 2019, 05:35 PM) QUOTE(bbrock @ Jun 21 2019, 07:30 PM) QUOTE(BPic @ Jun 21 2019, 05:09 PM) I’m sure when your finished you’ll be up for a little moonlight drive. Yep, me and Gloria. Then it would be a wonderful night for a moondance. See what I did there? (IMG:style_emoticons/default/biggrin.gif) Allen screws added to the Belmetric order. That could have been worse than the car not running. Most likely the trunk lid would have flown open at high speed. BTDT with my first 914. FYI, it is a less than ideal situation. (IMG:style_emoticons/default/yikes.gif) Y'all saved my bacon (IMG:style_emoticons/default/beerchug.gif) Is Gloria a brown eyed girl? (IMG:style_emoticons/default/rolleyes.gif) (IMG:style_emoticons/default/thumb3d.gif) |
|
|
|
| rgalla9146 |
Jun 21 2019, 06:42 PM
Post
#1108
|
|
Advanced Member Group: Members Posts: 4,959 Joined: 23-November 05 From: Paramus NJ Member No.: 5,176 Region Association: None |
(IMG:style_emoticons/default/smile.gif) My wife and my daughter are both beautiful brown eyed girls.
I had those two allens plated yellow cad ....results not so good. |
|
|
|
| raynekat |
Jun 21 2019, 10:46 PM
Post
#1109
|
|
Advanced Member Group: Members Posts: 2,171 Joined: 30-December 14 From: Coeur d'Alene, Idaho Member No.: 18,263 Region Association: Pacific Northwest |
Dang it Brent, you're scaring me about the 914Rubber front trunk cable. Mine seemed OK, but after reading your post, I'm ordering a factory one tomorrow to replace it. Last thing I want is a broken front trunk cable. Dude, you're making me rebuild my car again after I thought I had it nearly done. (IMG:style_emoticons/default/tongue.gif)
|
|
|
|
| bbrock |
Jun 21 2019, 11:10 PM
Post
#1110
|
|
914 Guru Group: Members Posts: 5,269 Joined: 17-February 17 From: Montana Member No.: 20,845 Region Association: Rocky Mountains |
QUOTE(raynekat @ Jun 21 2019, 10:46 PM) Dang it Brent, you're scaring me about the 914Rubber front trunk cable. Mine seemed OK, but after reading your post, I'm ordering a factory one tomorrow to replace it. Last thing I want is a broken front trunk cable. Dude, you're making me rebuild my car again after I thought I had it nearly done. (IMG:style_emoticons/default/tongue.gif) Sorry about that. I really don't want to badmouth those cables. Maybe they are fine, but I didn't like the feel and way mine operated. Too important of a part to take chances for me. |
|
|
|
| bbrock |
Jun 23 2019, 10:32 PM
Post
#1111
|
|
914 Guru Group: Members Posts: 5,269 Joined: 17-February 17 From: Montana Member No.: 20,845 Region Association: Rocky Mountains |
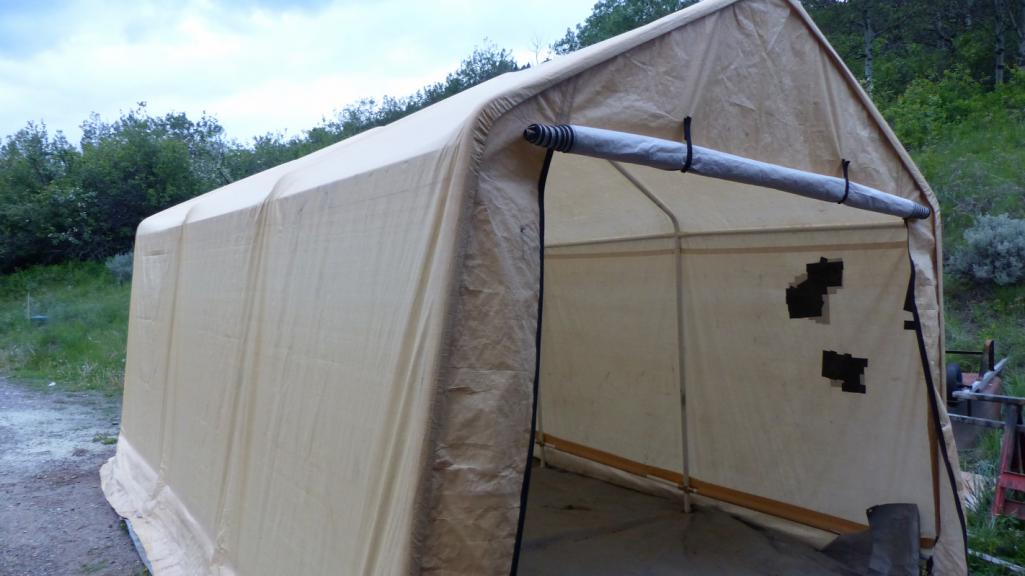
The big accomplishment this weekend was getting the HF portable garage tent set up for another (and hopefully last) season. I decided to back it several feet away from the house and garage door this year to better anchor the front and allow an easier path to walk between the tent and house. In the past, I've set it up so it became an almost connected extension of the garage when the doors were open. There really wasn't much benefit.
 This let me offload some of the clutter from the garage which should yield a 17.8% reduction in non-recreational cursing. (IMG:style_emoticons/default/rolleyes.gif) 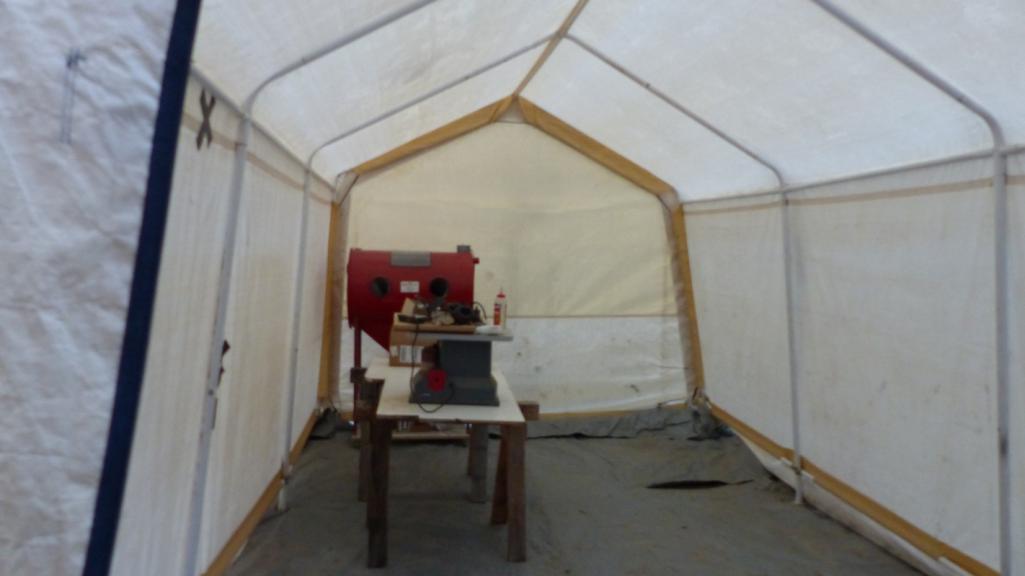 The rest of the weekend was spent finishing up small tasks as I inch toward getting the car off the rotisserie. Got the calipers that @mb911 and @sixnotfour donated boxed to send down to PMB to exchange for plated housings. I needed to harvest the late adjusters from one of Ben's calipers and a piston from one of Jeff's to replace one of mine that was kind of marginal from corrosion. I added my late rear caliper to the box because I think that one is still good. If nothing else, maybe Eric can use those Ribe bolts. 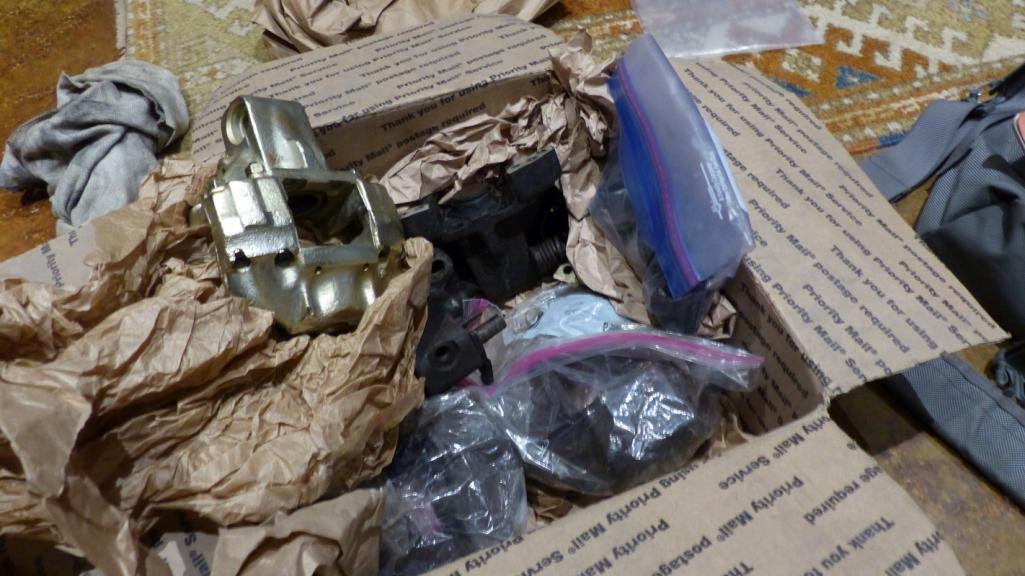 I also installed spark plugs in the engine just to close those holes. The plan was to just loose thread them in the hope they would leak and not build compression so I could still easily turn the engine. That failed. Even lightly finger tight, they are building compression. I'll need to back them out some. All went well until the last one which was #2. I couldn't bet my spark plug socket in at the right angle. I realized then why the hole on the tin on that cylinder was mangled and pried open before I fixed it. A quick Google on this forum found an old thread with the right trick. Used a piece of fuel hose stuck on the end of the spark plug to get them started. I had a piece of silicone tubing left over from cushioning my fuel hardlines that did the trick.  I mentioned before that the 914Rubber SS trailing arm pivot shafts come with toothed washers to compensate for lack of serrations on the shaft ends. 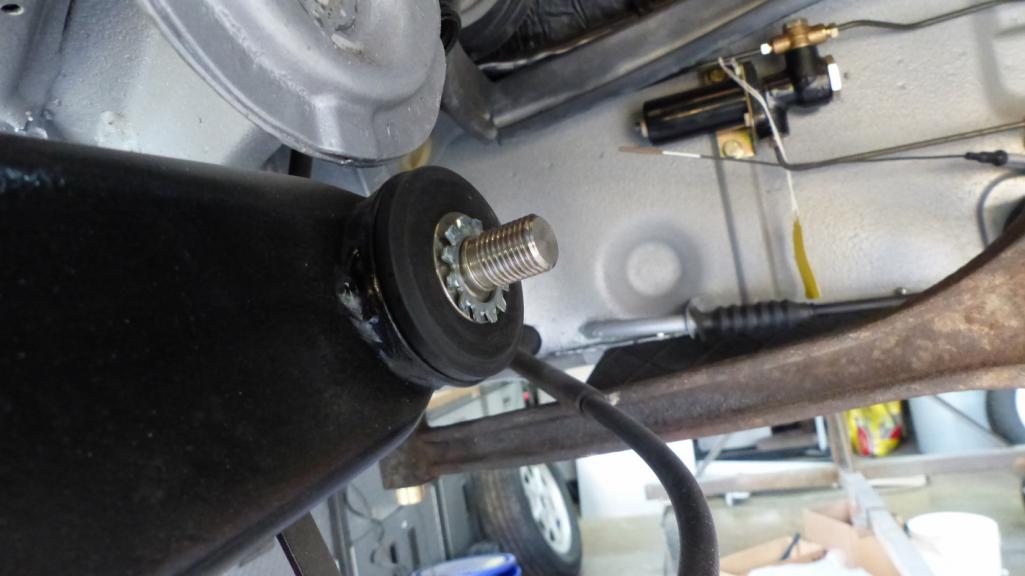 That's a good solution and works fine with the original Fuji nuts. I had to replace two of those nuts and couldn't find the split Fuji nuts in that size, so I opted for reusable self-locking flange nuts. The flange nuts are taller than the Fujis and the last thread didn't engage. The solution was to replace the thick toothed washers with Schnorr washers which are thinner and actually match the original serrations on the shafts. 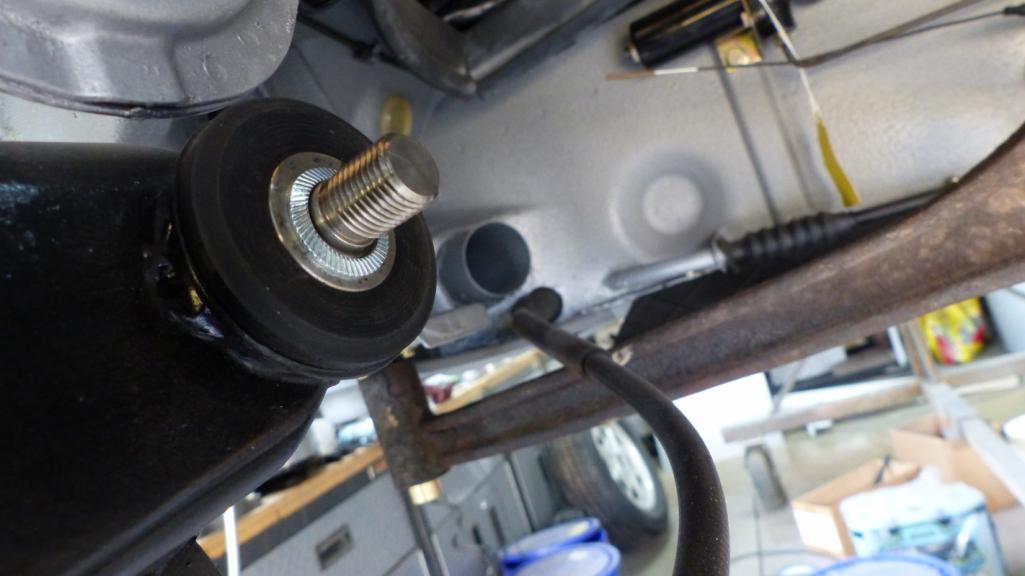 That was a lot of work for probably no real benefit but I feel better anyway (IMG:style_emoticons/default/smile.gif) Thanks to the input on my question about installing just stubs vs full axles, I decided to install just the stubs while I was messing with the trailing arms. I'll torque them to spec once the car is on the ground to make sure my wheel bearings are safe when I roll the car around. The only thing left before pulling the car off the rotisserie is to install brake calipers and fill and bleed the system. I want to bleed it while I have easy access. Last week I discovered I had mislabled a couple of the Bowden cables on my fresh air mixers so I took care of that tonight. A tedious task but I'm glad I caught it now rather than after the blower box was in (IMG:style_emoticons/default/yikes.gif) The last thing I did was order one of these: (IMG:http://www.914world.com/bbs2/uploads_offsite/www.uroparts.com-20845-1561350726.1.jpg) A meter long piece of 60mm diameter hot air hose. Should be enough to do all the remaining hoses to match the original. Good night. (IMG:style_emoticons/default/beerchug.gif) |
|
|
|
| bbrock |
Jun 24 2019, 11:12 PM
Post
#1112
|
|
914 Guru Group: Members Posts: 5,269 Joined: 17-February 17 From: Montana Member No.: 20,845 Region Association: Rocky Mountains |
Release the Kraken!
This is WWOT but I have posted a critter pic in awhile and just had to share this. Got an email from a friend today who was part of an expedition that a couple days ago filmed a frickin' giant squid in the Gulf of Mexico. He's the one interviewed in this article. https://www.ksat.com/news/sa-zoo-part-of-ex...meZMBQagxCnzwTw Here's the youtube version of the vid with cheezy music. https://www.youtube.com/watch?v=M5cpDVsP2Sw |
|
|
|
| bbrock |
Jul 6 2019, 08:34 PM
Post
#1113
|
|
914 Guru Group: Members Posts: 5,269 Joined: 17-February 17 From: Montana Member No.: 20,845 Region Association: Rocky Mountains |
Not too much exciting to report but figured I should get caught up.
I decided to swap out the 60mm hoses for the URO ones. The 914Rubber hoses are way more durable than the original or repro paper/foil hoses, and they are easier to install. I've discovered I have a bit more "weanie" in me than I thought though so wanted the original look. As with the 50mm hose, this 60mm hose is a nice reproduction of the original. Here is the new hose next to some of my stained and dirty originals. (IMG:http://www.914world.com/bbs2/uploads/post-20845-1561829773_thumb.jpg) Unfortunately, I screwed up my measuring and ordered too short of a hose for all four pieces needed. That was an expensive mistake as it's going to cost me about $20 extra over what the right length hose would have cost. headbang.gif It you decide to do this, you want the longest (1500mm) posted by @UROpartsman . Screw-up aside, I think what I've been able to install dresses out the bulkhead area nicely. (IMG:http://www.914world.com/bbs2/uploads/post-20845-1561830058_thumb.jpg) I also followed a tip from @Aggiezig and bought an 8-pack of LED lights to hang in the tent. I'm hoping these will give me better light for working at night and painting - hoping they will help neutralize a bit of the yellow light that shines through the tent walls. 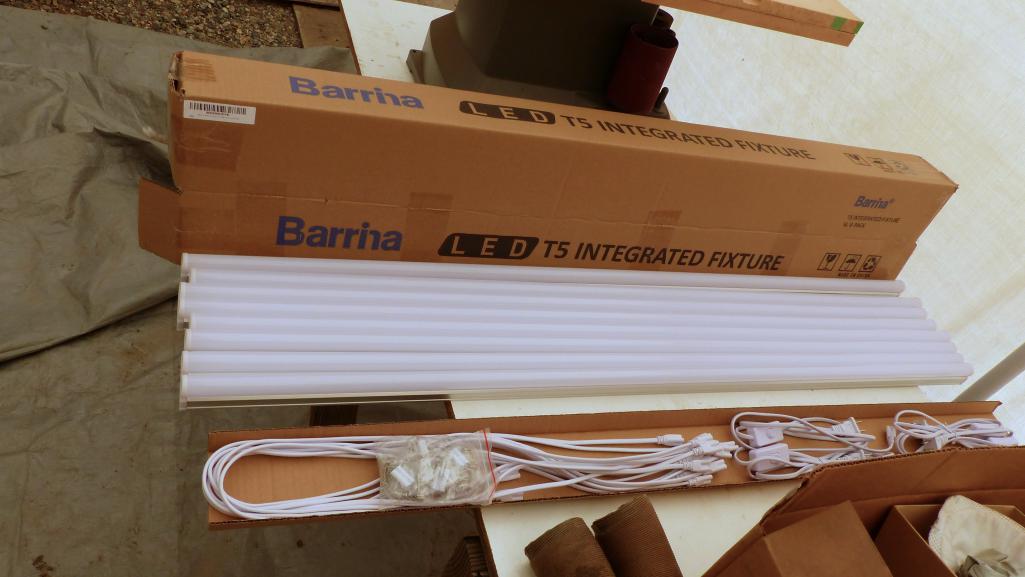 I took a day off from the car on the 4th to tackle a small project I've been putting off. It started off interesting right off the bat... literally. I opened the greenhouse door in the morning and this flopped onto my shoulder.  I let it climb into a crevice formed by a panel resting on the side of the house that the sun was beaming on. Bats like to day roost in crevices about 1/2" to an inch wide and HOT, like over 100F. That panel fit the bill and it was eager to crawl inside. Back to work. The task was to finally build a potting bench inside the potting shed I built just before starting the car project and then piled it with junk so it was unusable for the intended purpose. Well, somebody liked it that way at least. 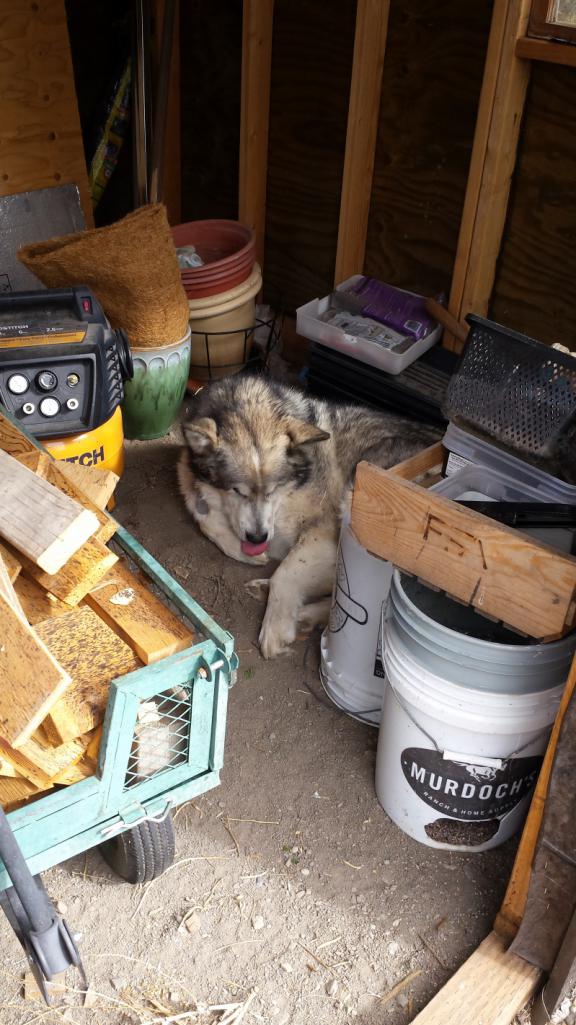 Project took a little longer than expected because I used only salvage materials I had on hand so it required designing and building at the same time.  Okay, that job is done, back to work on the car. |
|
|
|
| mepstein |
Jul 6 2019, 08:58 PM
Post
#1114
|
|
914-6 GT in waiting Group: Members Posts: 20,685 Joined: 19-September 09 From: Landenberg, PA/Wilmington, DE Member No.: 10,825 Region Association: MidAtlantic Region |
Just don't let it scratch or bite you. Rabies shots are (usually) only available at the ER and are expensive.
Cute dog. |
 |
|
| bbrock |
Jul 6 2019, 09:26 PM
Post
#1115
|
|
914 Guru Group: Members Posts: 5,269 Joined: 17-February 17 From: Montana Member No.: 20,845 Region Association: Rocky Mountains |
Main task for the last few days has been to make a working alternator. I had 3 crusty cores to start with. Disassembly was pretty frustrating. The pulley was seized pretty bad on the first core. Factory service manual says to use a 3-pronged puller IF NEEDED . Yeah right. The pulley metal is quite soft and even after giving it all I could with MAPP gas, it wouldn't budge. Here's the result and it still hadn't budged on the shaft.
 In the end, I had to use a ball joint pickle fork on an air chisel to get it off. Amazingly, the case nose suffered only a few small dents where the fork rode. I'm going to spare many details but this set the stage for the rest of this frustrating project. I wound up swapping the positive diodes and carrier between two stator housings. The carrier on the stator I was going to use was corroded and pitted.  That alone didn't warrant swapping diodes but is kind of ugly. The real issue is that the insulation on the diodes had crumbled to dust so the diodes needed to be desoldered to replace the insulation anyway, so might as well swap with a better carrier.  I scavenged some high temperature insulation from some old halogen fixtures in the scrap bin. That should work. 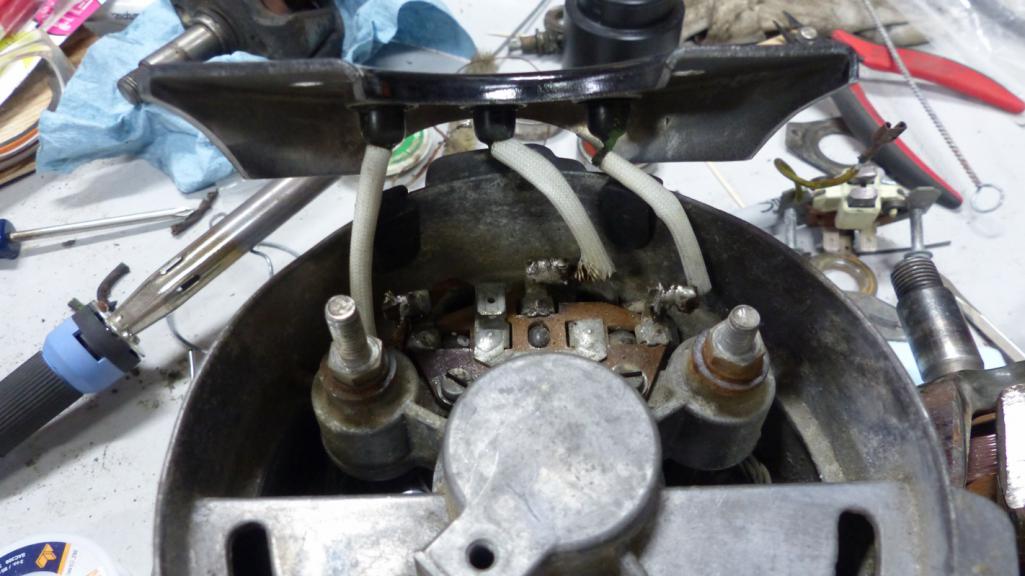 Luckily, the diodes still tested good after the swap. All three rotors tested good but one looks sketchy so I set that one aside. Slip rings need replaced on two of the rotors so I started with the rotor with good slip rings, and the one set of good brushes. New bearings went in easy but installing the rotor without wrecking the brushes is a challenge. The factory manual just says, "Pull up carbons before installation and arrest." What the hell does that mean!!!??? I finagled a piece of wire to hold the brushes enough out of the way to get the rotor in, then slid the nose housing on and pressed on the retaining washer to hold the rotor in place. I gave it a spin, nice and smooth but... PHUCK! There was a wobble. The shaft was bent. No doubt from all the BS trying to get that $#@% pulley off. I think it probably isn't bad enough to prevent it from working, but not worth the risk. I could see that thing constantly throwing belts. Since one of the other rotors looks a little weird to me, I gave up on having two working alternators and will settle for one good one, and one almost good one. I semi assembled the extra and tagged it with a description of what is good and what isn't before putting it in storage.  Then to add insult, I broke a brush extracting the bent rotor. I decided to order a new set of brushes and new slip ring rather than swap the ring from the bent rotor. Might as well start fresh. After replating all the washers and screws, here are pics of the semi assembled "new" alternator waiting for brushes, slip ring, and rear bearing. First, the before pic. 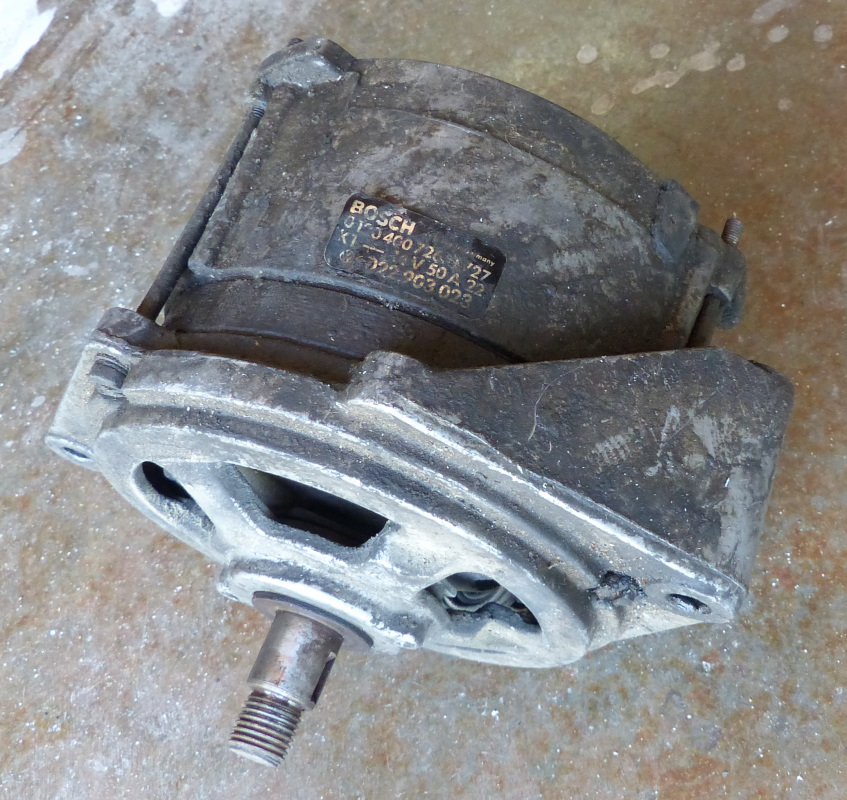 And the refresh. 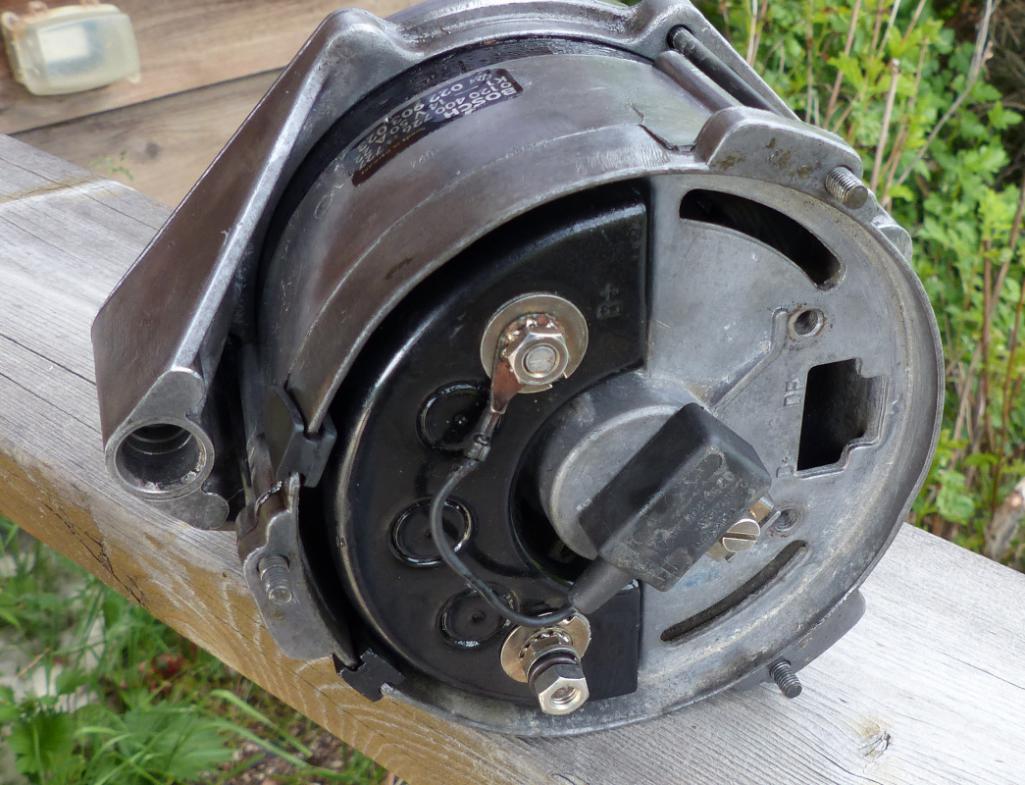 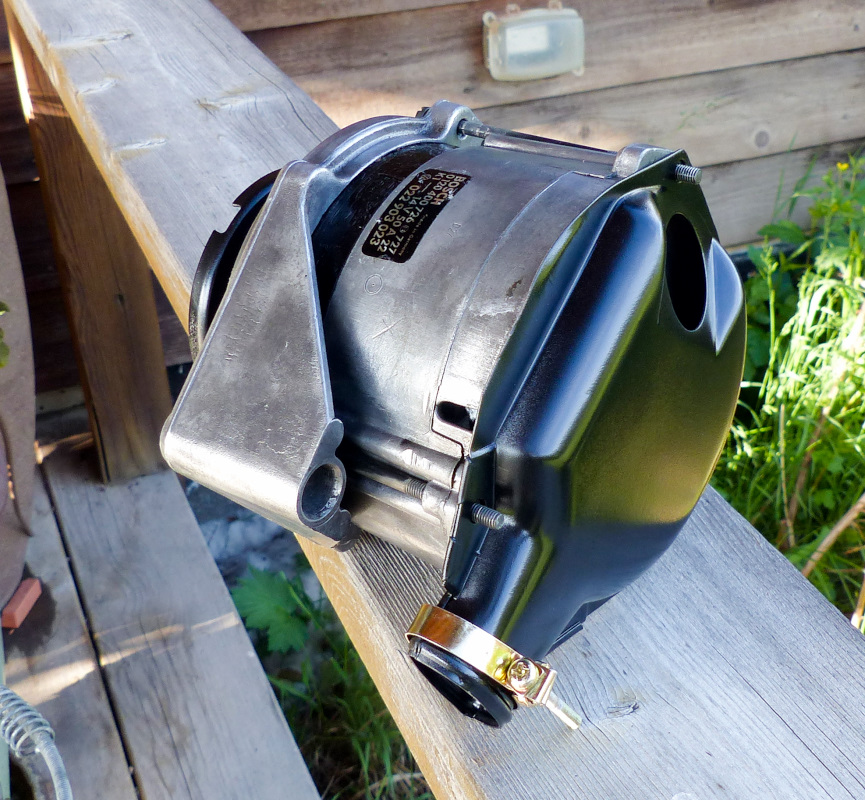 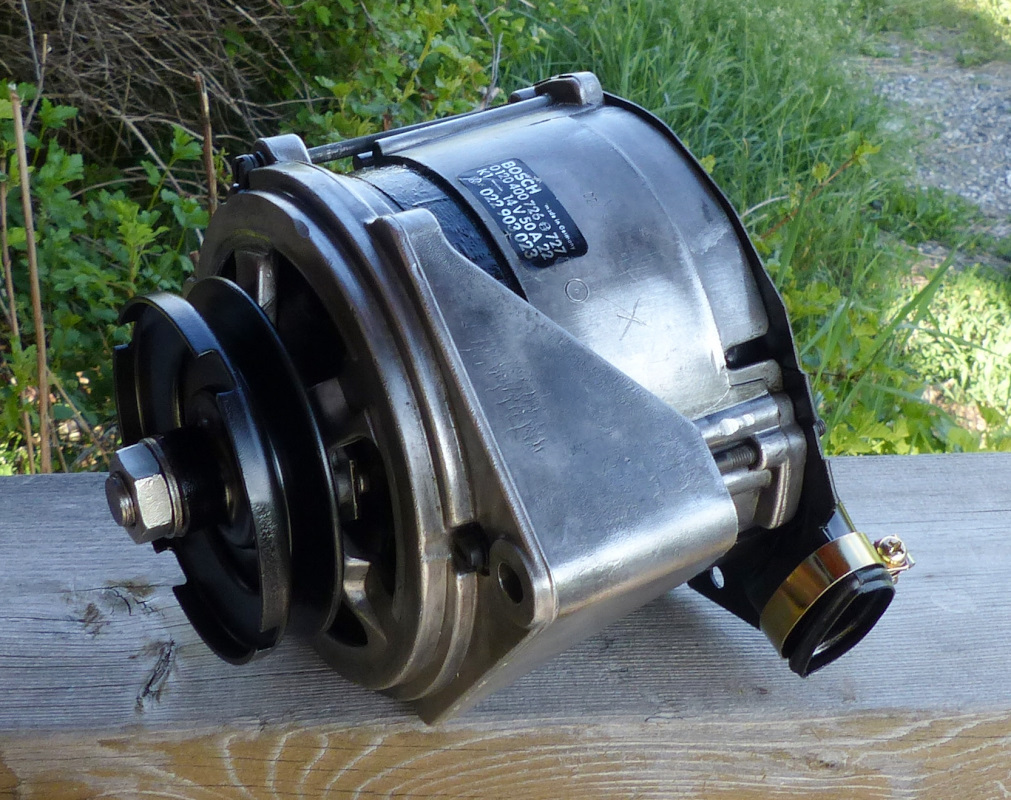 |
|
|
|
| bbrock |
Jul 6 2019, 09:39 PM
Post
#1116
|
|
914 Guru Group: Members Posts: 5,269 Joined: 17-February 17 From: Montana Member No.: 20,845 Region Association: Rocky Mountains |
QUOTE(mepstein @ Jul 6 2019, 08:58 PM) Just don't let it scratch or bite you. Rabies shots are (usually) only available at the ER and are expensive. Cute dog. That's why the glove. One thing about bats and rabies is that they succumb very quickly to rabies so bats that act healthy rarely have it. This bat was doing normal the normal healthy bat thing of roosting in a warm crevice until I opened the door and ruined it. The stats on rabies in bats are exaggerated because most bats collected for testing are bats found on the ground and obviously sick so the sample is skewed. That said, it is nothing to screw around with and there is no question that bats are a major reservoir although the actual risk to humans is quite low. I actually looked into getting vaccinated for rabies because of my profession which includes occasionally working with bats. Even my exposure risk is too low to justify it though. |
|
|
|
| preach |
Jul 7 2019, 04:23 AM
Post
#1117
|
|
Ridge Runner Group: Members Posts: 1,100 Joined: 27-March 10 From: Live Free or Die Member No.: 11,513 Region Association: North East States |
I just replaced my florescents with 16 of those LEDs. HUGE difference.
Great attention to detail as always. (IMG:style_emoticons/default/smile.gif) |
|
|
|
| Dion |
Jul 7 2019, 07:24 PM
Post
#1118
|
|
RN Group: Members Posts: 2,926 Joined: 16-September 04 From: Audubon,PA Member No.: 2,766 Region Association: MidAtlantic Region |
Way to go Brent. Chip away at the stone. Learning a lot from your processes.
Always good. (IMG:style_emoticons/default/beerchug.gif) |
|
|
|
| Superhawk996 |
Jul 13 2019, 05:27 PM
Post
#1119
|
|
914 Guru Group: Members Posts: 7,839 Joined: 25-August 18 From: Woods of N. Idaho Member No.: 22,428 Region Association: Galt's Gulch |
Brent,
To the point of our conversation about metal working and shrinking in particular, here is a picture of a little shrinking bowl I made out of scrap Oak. My homemade shrinking tines are sitting on top. These are used to "tuck" the material by inserting the sheet metal between the tines and then giving it a sharp twist to "fold" the material into a small triangle shaped teepee formation. Then use the shrinking bowl to "push" the teepee together and downward. Works miracles for shrinking metal.  |
|
|
|
| bbrock |
Jul 14 2019, 06:47 PM
Post
#1120
|
|
914 Guru Group: Members Posts: 5,269 Joined: 17-February 17 From: Montana Member No.: 20,845 Region Association: Rocky Mountains |
Operation Alternate Reality Complete.... i hope... (IMG:style_emoticons/default/blink.gif)
Got the new slip rings and brushes to put on the unbent rotor. Removing the slip rings is easy, just a small puller works. I just pulled it up part way and then desoldered the lower rotor winding wire before pulling it the rest of the way. 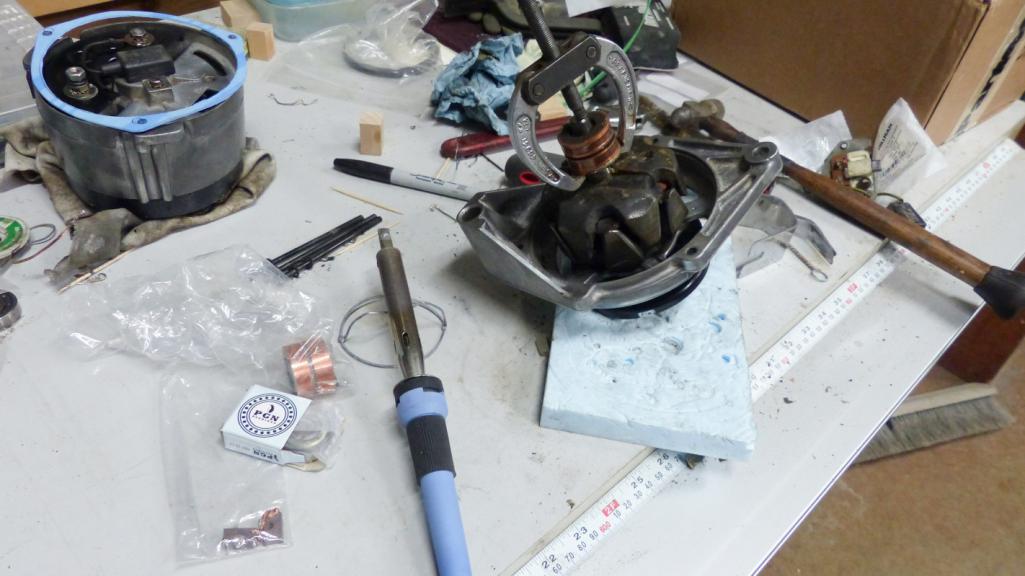 Then I hit a snag when the fiber insulation on the slip ring connecting wires turned to dust. This sleeving is much smaller diameter than the diode sleeving so my salvage stash did me no good. I went all over town on Friday trying to find some high temp fiberglass insulation sleeve. No luck. I had resigned myself to another delay as I waited for another ebay order but a Saturday morning scavenger hunt through my halogen scrap pile again and found exactly what I needed. Rather than try to strip the wires completely and risk doing more damage, I just stripped them back to good insulating and wrapped the joint with some polyimide tape I had on hand. The tape is just to make sure the wires don't ground to the armature before being encapsulated in epoxy. 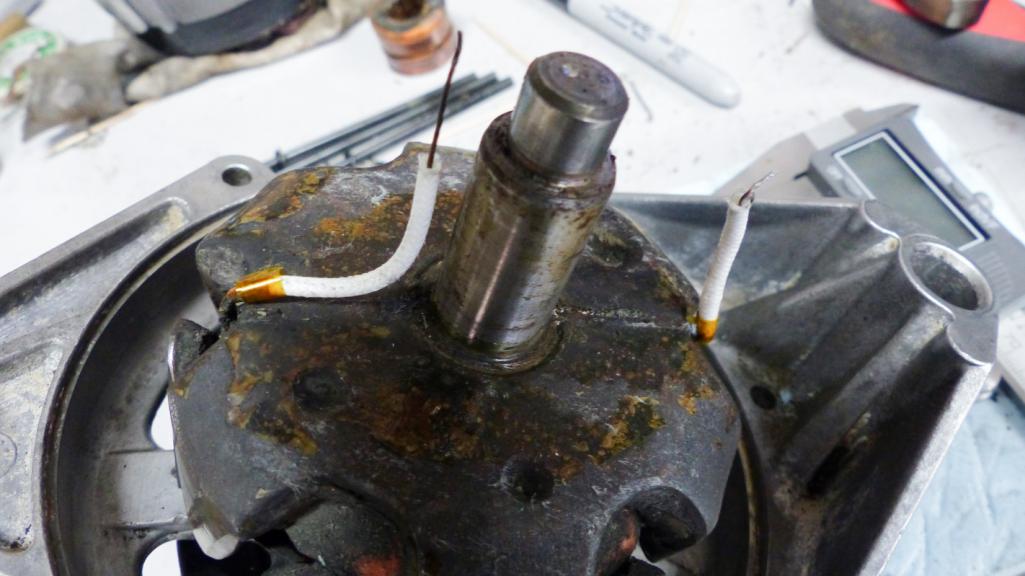 After the new slip ring was replaced and wires soldered on, I needed to secure and encapsulate the wires to the top of the rotor. The factory used insulating varnish which you can buy for about $8 shipped on ebay, but I had this epoxy potting compound left over from the relay board so I decided to use it. (IMG:http://www.914world.com/bbs2/uploads_offsite/www.electriduct.com-20845-1563151641.1.jpg) It is rated for a constant service temp up to 284F and intermittent temps up to 347F. If my alternator gets that hot, I have bigger problems than failed glue. The only downside of the potting compound is that it is runny. Something a little more viscous would be better but it just took a little patience to build up a thick enough coat. 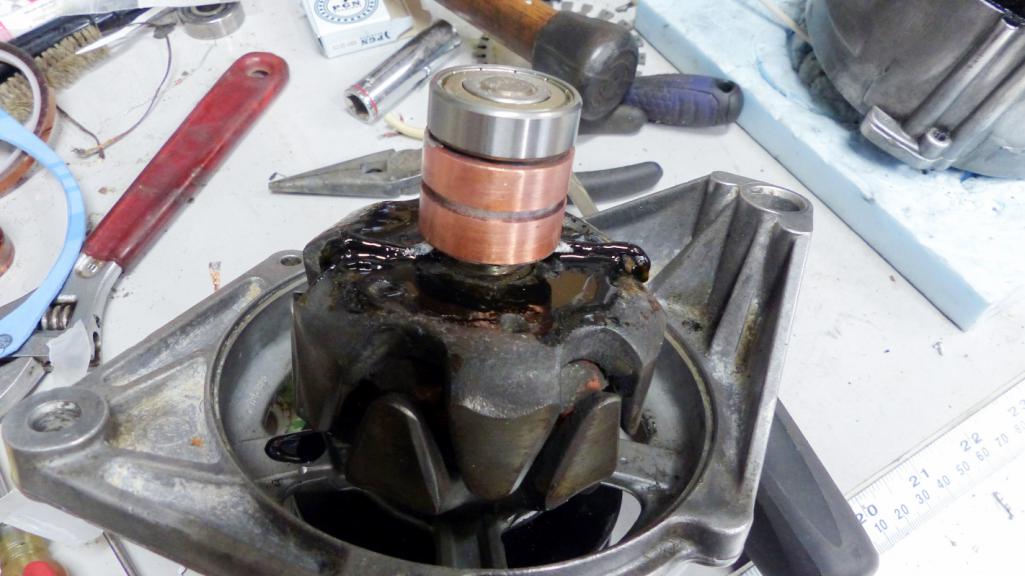 After assembly, the rotor tested 4.3 ohms resistance between slip rings. Right on spec. Now time for the brushes. Nothing exciting to report there. Just desolder the old ones and solder in the new. Here's a pic with one old and one new brush installed to show the wear. Still plenty of life left in the old brushes if I hadn't broken the wire on one. 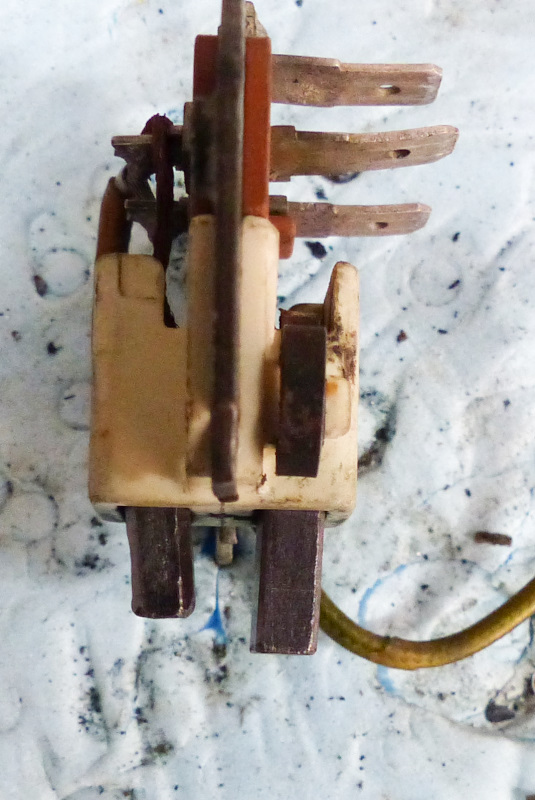 Now to figure out how to get the rotor in without trashing those new brushes. If the brushes are worn down enough, you can just leave the brush holder loose and push the brushes back out of the way while the rotor slides in. That's not an option with long new brushes and "Pull up carbons before installation and arrest" still wasn't helping me understand how to proceed for some reason. After fiddle farting around with bad ideas, I finally figured out you can push the brushes in and then grab the braided wires connecting them with a thin needle nose pliers through the plug connector. This are the wires to grab. 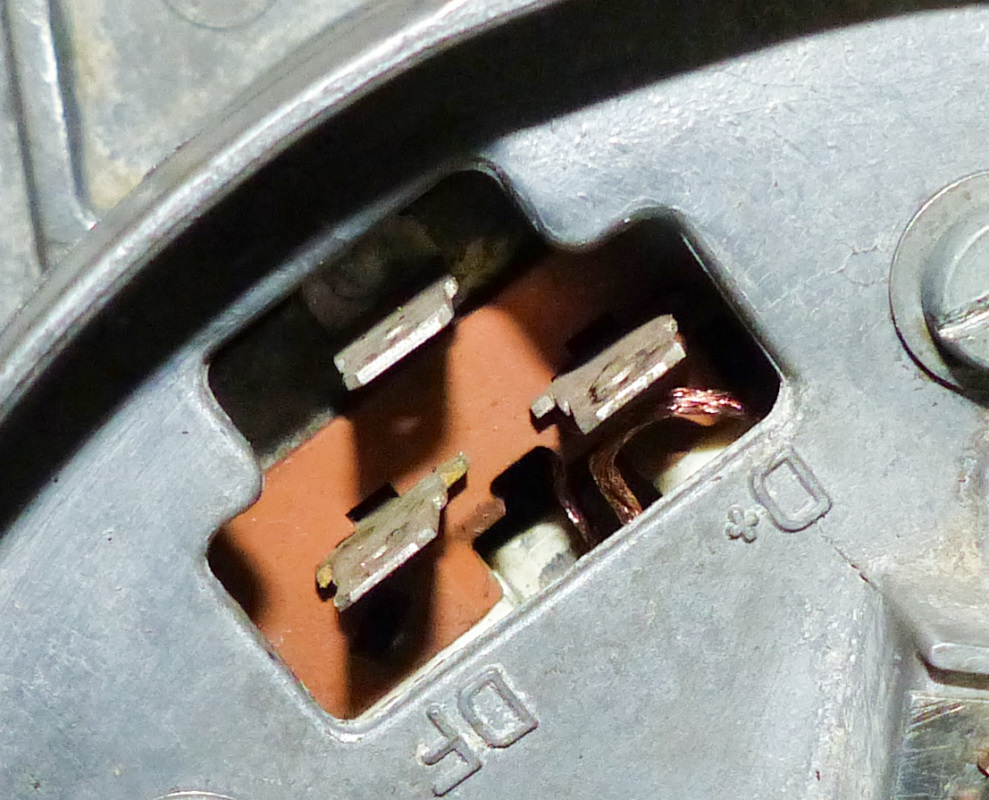 Pinch them with needle nose while pushing the brushes all the way into the holder. 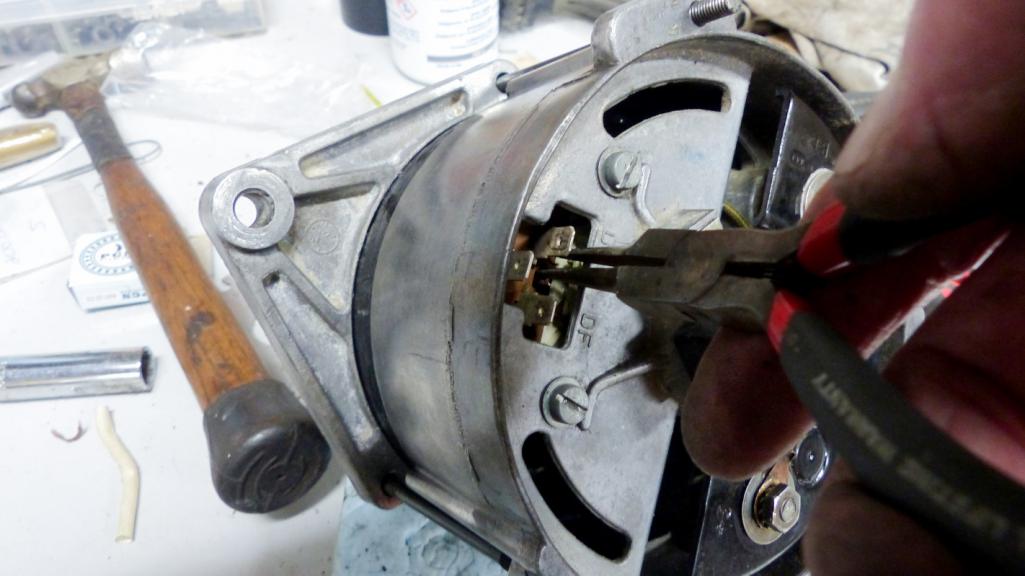 Now you can easily slide the rotor into the housing without crunching the brushes. At this point, I had run through all the tests in the factory manual that can be done with a multimeter and the alternator outside the car. All 9 diodes tested good, as did the rotor and stator. It would be nice to test the output before bolting it in but I couldn't find any information about how to do this with an external regulator. I called my FLAPS who said they could do it but didn't sound that confident. I was skeptical but hauled the assembled alternator into the shop. Sure enough, as soon as it went on the bench, the diagnostics said the alternator could only be tested in the car. Oh well. I decided to just bolt it in. In theory, anything that could be bad has been replaced and/or tested good. I bought a new gasket for the rear cover - some assembly required. 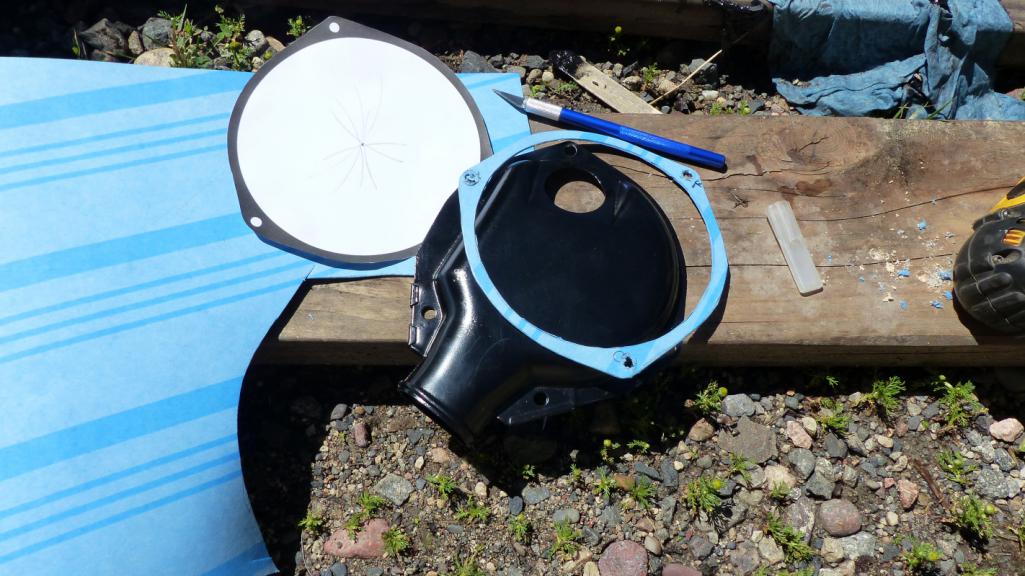 Then I connected the harness I made, put the cover on, and bolted it in place. So here she is back home after 35 years. 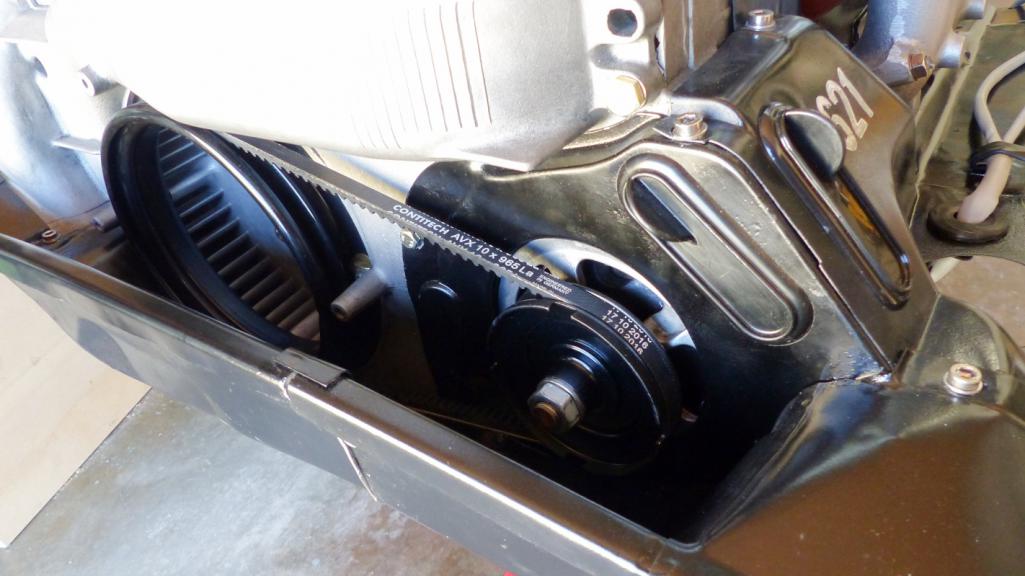 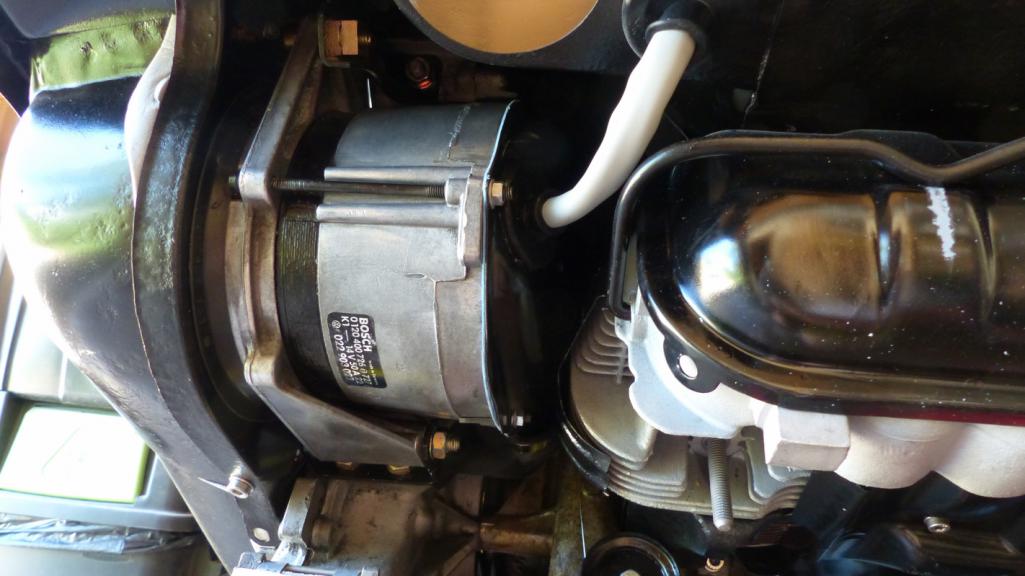 I won't lie. This project was not easy, but was it worth it? Absolutely. The best price I've seen for reman Bosch alternators is $167 at NAPA and most suppliers are listing over $200. The grand total that I have in mine to refurbish is $25. For a guy with more time than cash, that's a good deal. Plus, I now know a lot more about how alternators work. (IMG:style_emoticons/default/beer3.gif) |
|
|
|
|
3 User(s) are reading this topic (2 Guests and 0 Anonymous Users)
1 Members: 930cabman

|
Lo-Fi Version | Time is now: 12th May 2026 - 04:21 PM |
Invision Power Board
v9.1.4 © 2026 IPS, Inc.