|
|
|
Porsche, and the Porsche crest are registered trademarks of Dr. Ing. h.c. F. Porsche AG.
This site is not affiliated with Porsche in any way. Its only purpose is to provide an online forum for car enthusiasts. All other trademarks are property of their respective owners. |
|
|

  |

| Millerwelds |
 Sep 29 2017, 11:29 AM Sep 29 2017, 11:29 AM
Post
#121
|
|
Pleepleus  Group: Members Posts: 741 Joined: 24-June 08 From: Grass Valley, CA Member No.: 9,206 Region Association: Northern California |
I'm stoked on your progress! Great work. You're killing it. Keep at it! (IMG:style_emoticons/default/beerchug.gif)
|
   |

 
|
| tygaboy |
Sep 30 2017, 08:14 AM
Post
#122
|
|
914 Guru Group: Members Posts: 5,810 Joined: 6-October 15 From: Petaluma, CA Member No.: 19,241 Region Association: Northern California |
(IMG:style_emoticons/default/agree.gif) !!
Looking REALLY good. And if it's anything like what I experience, it looks even better in real life. There are lots of us looking forward to each your updates so get back out there and keep up the great work! (IMG:style_emoticons/default/cheer.gif) (IMG:style_emoticons/default/smilie_pokal.gif) |
 |
|
| 914dave |
Sep 30 2017, 03:34 PM
Post
#123
|
|
914 Addict Group: Members Posts: 740 Joined: 19-October 03 From: Willow Grove Pa. Member No.: 1,262 Region Association: North East States |
Very nice work. Did the same inner long work to my car. Doing the same to dion's car this winter. Sent him this thread as motivation. Keep it up!!
|
|
|
|
| bbrock |
Sep 30 2017, 11:43 PM
Post
#124
|
|
914 Guru Group: Members Posts: 5,269 Joined: 17-February 17 From: Montana Member No.: 20,845 Region Association: Rocky Mountains |
Threshold - take three
QUOTE(tygaboy @ Sep 30 2017, 08:14 AM)  (IMG:style_emoticons/default/agree.gif) !! Looking REALLY good. And if it's anything like what I experience, it looks even better in real life. Funny you should mention this. I've wasted way too much time just staring at this side of the car and admiring how nice it looks. But the more I stared, the more something was bugging me. The threshold gap below the door looked wide toward the front. I tried to convince myself it was just an illusion caused by the rust in the lower right corner of the door. But no. Somehow the narrow section of threshold that goes around the hinge post had slipped low before I welded it. I think the torque of the zip screws I used to pull the seam tight probably did it. Anyway, I spent an hour cutting that part loose and rewelding. Looks better now but not anything that shows up in a pic. Mostly grunt work today The rest of the day was a lot of work but not much worth photographing. This morning I installed this new tank purging valve on my compressor. I thought I had enough wire on hand to wire up a 120 outlet to plug into. I was wrong so will have to wait for my next trip to town before wiring it in. 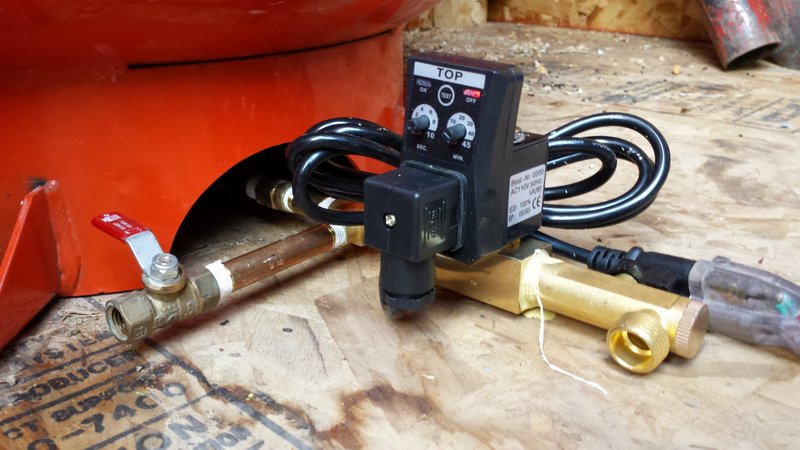 My compressor is in an unheated shed and it is usually chilly here, so despite our low humidity, it still produces a lot of water. I had one of those cheap HF valves on it which worked well through the summer. But after the first night below freezing (we've already had a couple of snows), it started leaking. This one should do better, While I was in there, I also installed a union joint to make things easier if I ever have to move the compressor again. 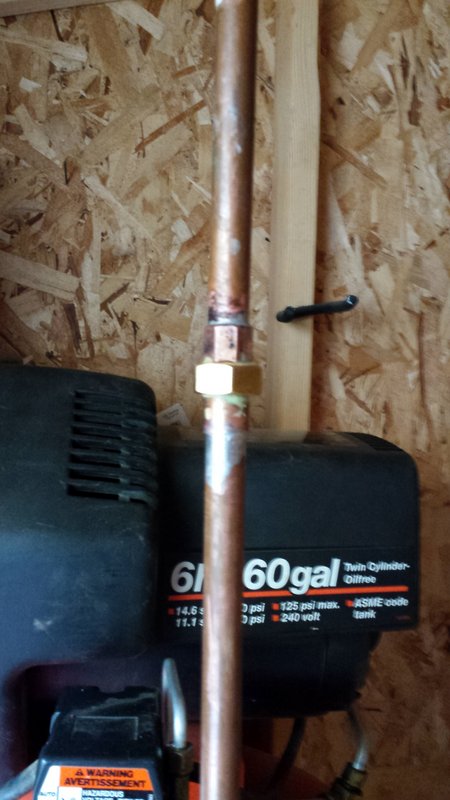 Most of the day was spent cutting the old gussets off of the donor suspension consoles and grinding off those welds. Then a final bead blasting and a soak down with Jasco to kill any rust that might still be hiding in seams. I bought the first set of gussets from 914Rubber after Mark put them on the site and they are on the way. I really like recycling donor parts but these consoles chew up a lot of time cleaning and prepping. Hopefully, I'll get the outer console attached tomorrow. I mentioned I needed an ~230mm long M10 bolt to follow the factory procedure to check the alignment spec for this part. Good luck finding one. Googling turned up one in a warehouse in Germany. McMaster-Carr and Belmetric both top out at 200mm. Fastenal carries 220mm and 240mm which would work, but $20 shipped. My improvisation was to buy the longest M10 I could find locally, cut it in two pieces, and weld a piece of steel tube between to get the right length. Seems to have worked out okay. 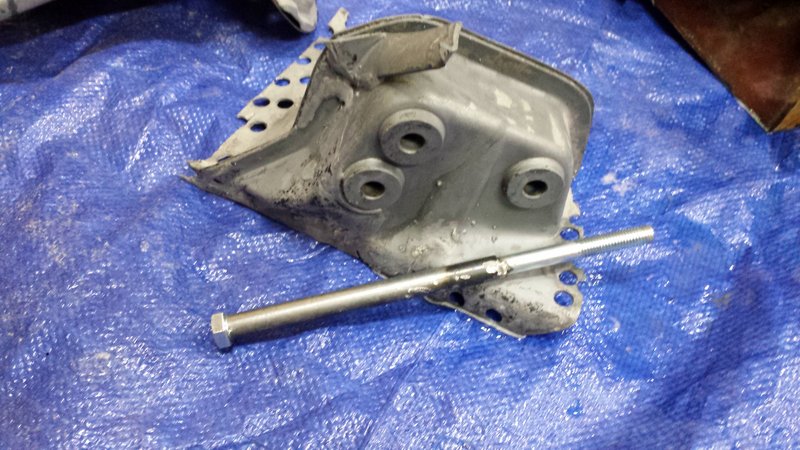 Since I don't have any interesting pics from today, here's a pic of some of the other residents here. This was taken from our deck. 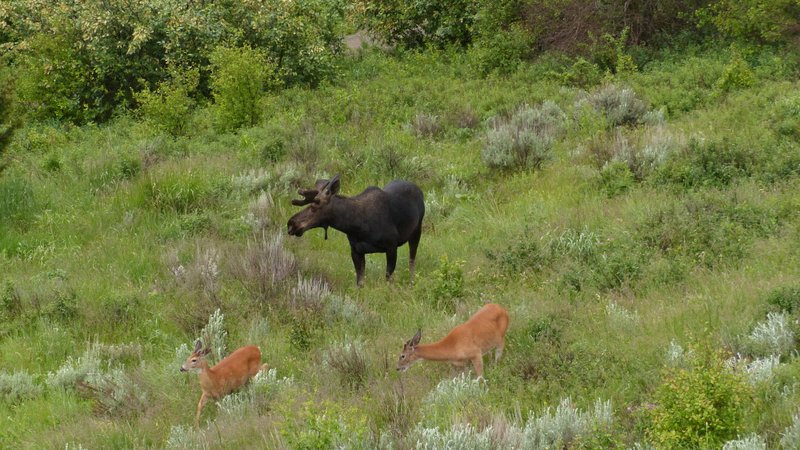 |
|
|
|
| tygaboy |
Oct 1 2017, 08:25 AM
Post
#125
|
|
914 Guru Group: Members Posts: 5,810 Joined: 6-October 15 From: Petaluma, CA Member No.: 19,241 Region Association: Northern California |
|
|
|
|
| bbrock |
Oct 1 2017, 09:32 AM
Post
#126
|
|
914 Guru Group: Members Posts: 5,269 Joined: 17-February 17 From: Montana Member No.: 20,845 Region Association: Rocky Mountains |
Squirrel on porch. Here is Squirrel:
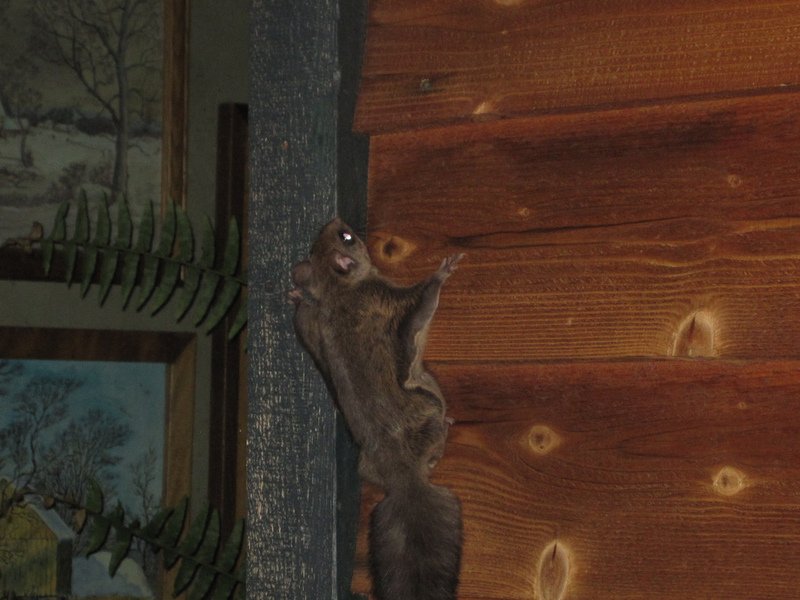 Must catch squirrel. |
|
|
|
| Matty900 |
Oct 1 2017, 06:31 PM
Post
#127
|
|
Senior Member Group: Members Posts: 1,302 Joined: 21-February 15 From: Oregon Member No.: 18,454 Region Association: Pacific Northwest |
Very impressive work! Your doing a great job. I can appreciate that feeling of seeing it come together. Keep the photos comming (IMG:style_emoticons/default/beerchug.gif) |
|
|
|
| trojanhorsepower |
Oct 1 2017, 06:37 PM
Post
#128
|
|
Senior Member Group: Members Posts: 1,031 Joined: 21-September 03 From: Marion, NC Member No.: 1,179 Region Association: None |
Wow! Great job.
|
|
|
|
| raynekat |
Oct 1 2017, 06:42 PM
Post
#129
|
|
Advanced Member Group: Members Posts: 2,171 Joined: 30-December 14 From: Coeur d'Alene, Idaho Member No.: 18,263 Region Association: Pacific Northwest |
Not sure what I like best?
The great work you've been doing on your project or.... the incredible wildlife you have up in your neck of the woods. In a few years, I might move a bit more towards the great outdoors like you up in northern Idaho away from the hectic life here in Portland. |
|
|
|
| bbrock |
Oct 1 2017, 11:03 PM
Post
#130
|
|
914 Guru Group: Members Posts: 5,269 Joined: 17-February 17 From: Montana Member No.: 20,845 Region Association: Rocky Mountains |
QUOTE(914dave @ Sep 30 2017, 03:34 PM) Very nice work. Did the same inner long work to my car. Doing the same to dion's car this winter. Sent him this thread as motivation. Keep it up!! QUOTE(Matty900 @ Oct 1 2017, 06:31 PM) Very impressive work! Your doing a great job. I can appreciate that feeling of seeing it come together. Keep the photos comming (IMG:style_emoticons/default/beerchug.gif) QUOTE(trojanhorsepower @ Oct 1 2017, 06:37 PM) Wow! Great job. QUOTE(raynekat @ Oct 1 2017, 06:42 PM) Not sure what I like best? The great work you've been doing on your project or.... the incredible wildlife you have up in your neck of the woods. In a few years, I might move a bit more towards the great outdoors like you up in northern Idaho away from the hectic life here in Portland. Thanks all for the compliments. I'm just muddling through, doing the best that I can. Matty, your car is my aspiration. A true work of art. Raynecat, I hope you do make it to northern Idaho. We love living here. I'll keep throwing in some wildlife shots from time to time. It's why I live here. (IMG:style_emoticons/default/beer.gif) |
|
|
|
| bbrock |
Oct 1 2017, 11:48 PM
Post
#131
|
|
914 Guru Group: Members Posts: 5,269 Joined: 17-February 17 From: Montana Member No.: 20,845 Region Association: Rocky Mountains |
Skeletons in the Closet
This morning I decided to change my game plan. For a number of reasons, I'm going to hold off on installing the suspension console until I can flip the car on a rotisserie. This list of things that need to wait until this pig is on a spit keeps growing. So I decided to turn my attention to the driver's side long. First, I needed to see if I could turn this car around, in a small garage filled with too much crap, so I'd have room to work on the long. These pics make my garage look huge. Trust me, it's not! Turning this car was like a Chinese tile puzzle. Move stuff out of the way, Move the car into the vacated space. Move stuff again, repeat. At one point, I was able to move my table saw with only an inch of clearance. But I got the job done, and it's good to know I can do that without having to roll the car outside on the gravel. MUCH easier on the concrete. 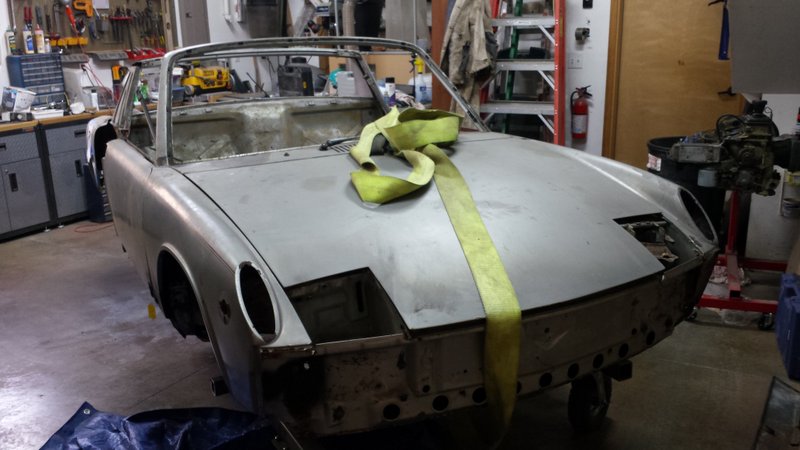  First, an inspection of what I'm dealing with. 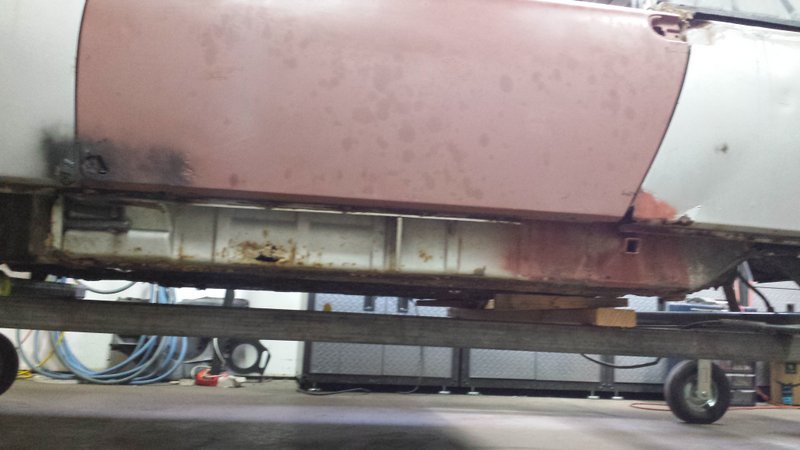 As usual, the driver's side isn't nearly as bad as the hell hole, but it still needs help. The outer long is rusting through in spots so has to be replaced. 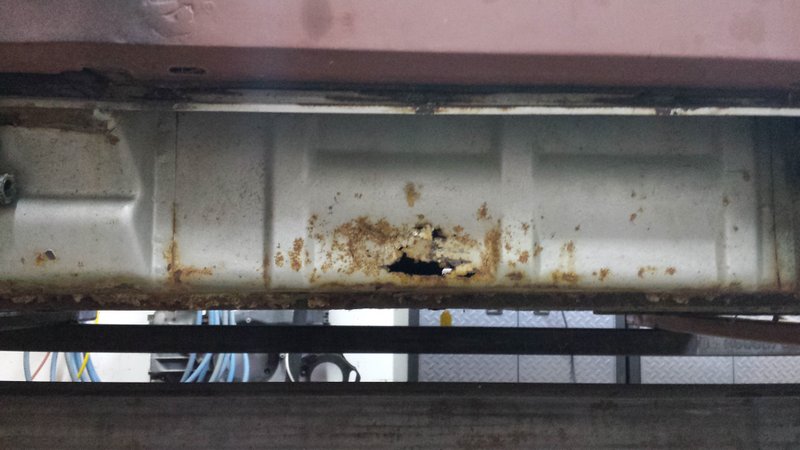 Many years ago, I patched in a rust hole and welded in a new jack plate. I did a pretty crappy job so that all has to be cut out and redone. 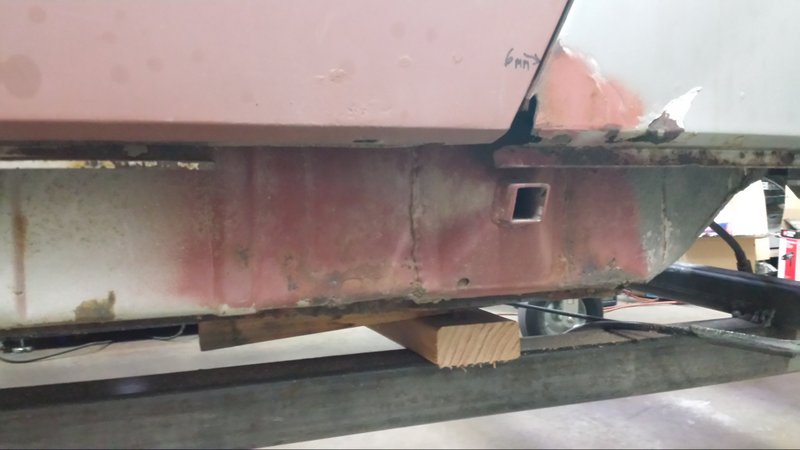 The long is rusted out under the jack plate and I had previously cut out a section for inspection before the restoration went into deep hibernation. That would have been the same year that Chernobyl exploded. No, really! 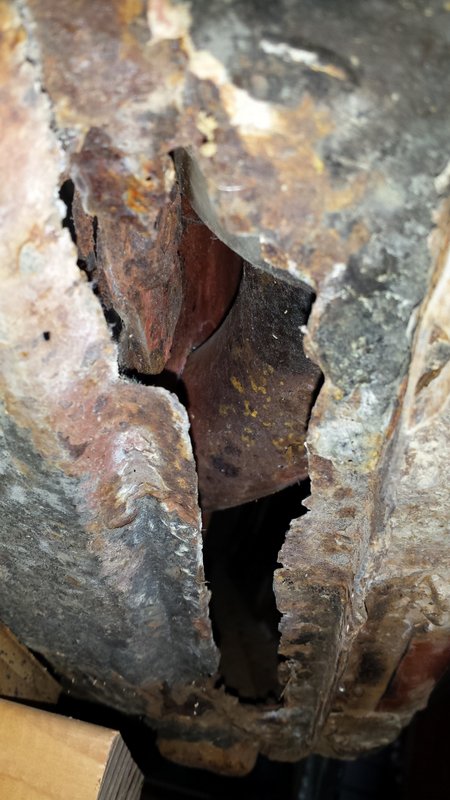 The door gap is 13mm wide at the top on this side so I'm hoping to fix that. The measurement from roll bar to windshield frame is 7mm too wide. I"m pretty sure I caused this by putting the car on jack stands when I did the crappy patch repair.  Once I got the outer long cut off, it took just 3/4 turn on the door brace to bring that measurement back into spec. 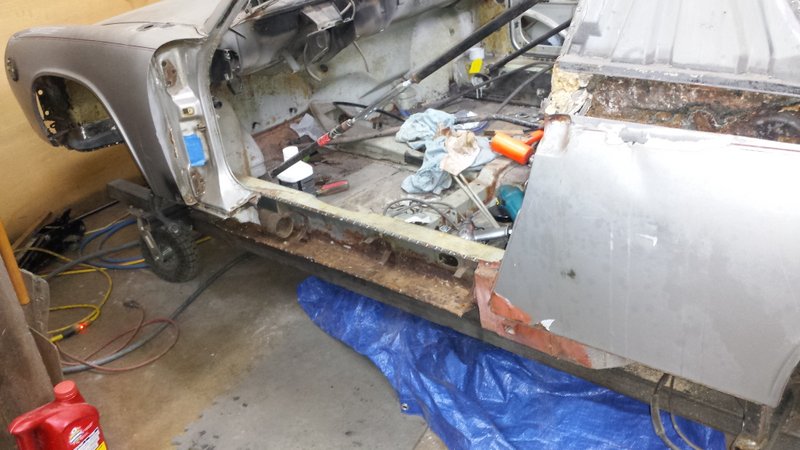 With the long open, I made a thorough inspection. 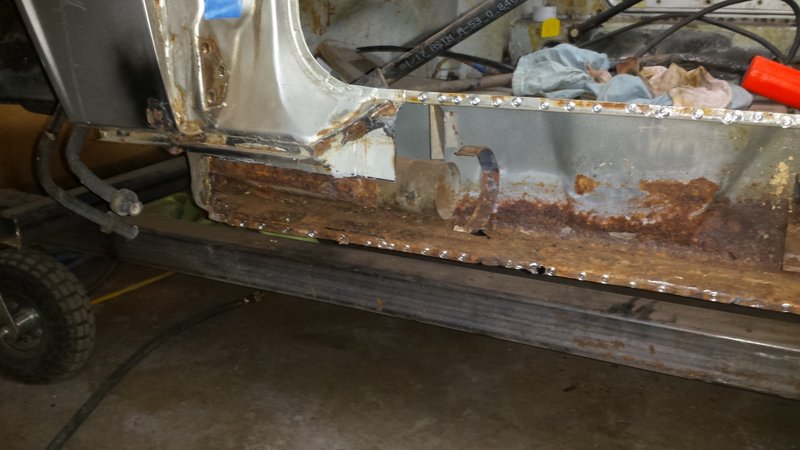 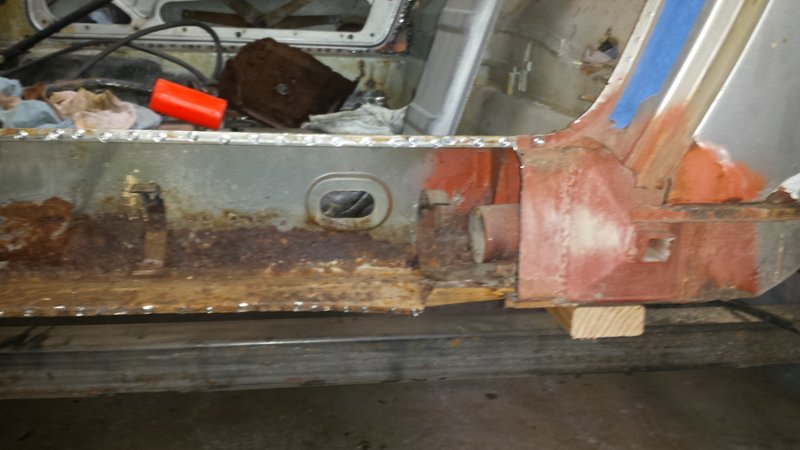 The inner long is rusted through in a few spots along the lower wall near its midpoint. 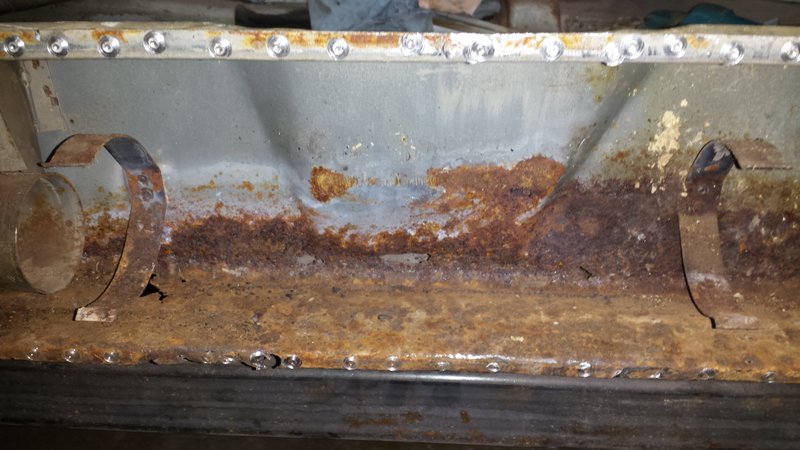 There are also a couple small holes at the very front that I couldn't get a good pic of. I think I'll be able to patch those without removing that PIA heater tube. The worst is the section behind the jack plate which will require some fabrication. But I won't know how much I bunged up the inner wall with the original repair until I cut the quarter panel as I did on the passenger's side, and remove that jack pyramid. 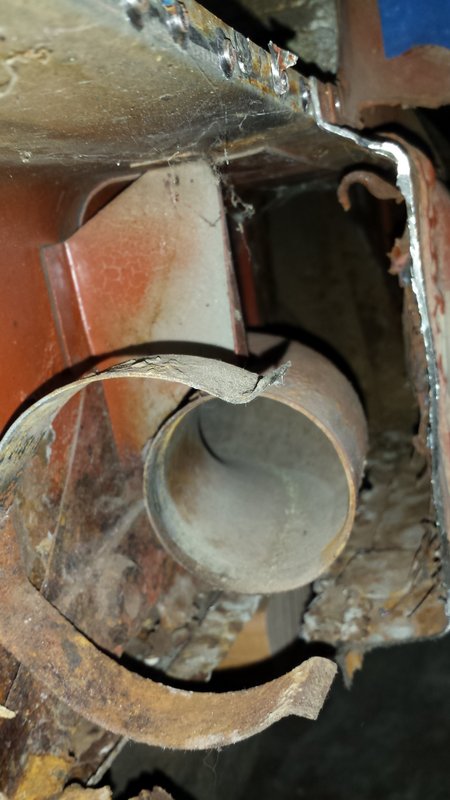 The only surprise was finding this humerus bone among the rust and debris. It is probably from the same weasel whose skull I found in the front trunk during my initial cleaning.  That's as far as I got today. Next step is to remove that jack pyramid and then wheel the car into the tent to blast these areas with crushed glass. Then I will evaluate how much metal needs to be replaced and form a plan from there. |
|
|
|
| tygaboy |
Oct 2 2017, 08:02 AM
Post
#132
|
|
914 Guru Group: Members Posts: 5,810 Joined: 6-October 15 From: Petaluma, CA Member No.: 19,241 Region Association: Northern California |
Moose outside, Squirrel in house and now Weasel in the long...
The Yellow Brick Road has nothing on you! Love that you're sharing your adventure with us. |
|
|
|
| bbrock |
Oct 2 2017, 02:28 PM
Post
#133
|
|
914 Guru Group: Members Posts: 5,269 Joined: 17-February 17 From: Montana Member No.: 20,845 Region Association: Rocky Mountains |
QUOTE(tygaboy @ Oct 2 2017, 08:02 AM) Moose outside, Squirrel in house and now Weasel in the long... The Yellow Brick Road has nothing on you! Love that you're sharing your adventure with us. Ha! The squirrel was still outside. When you come inside the house, it gets downright weird. Here is juat a sample of what lurks within these walls, or did in the past.    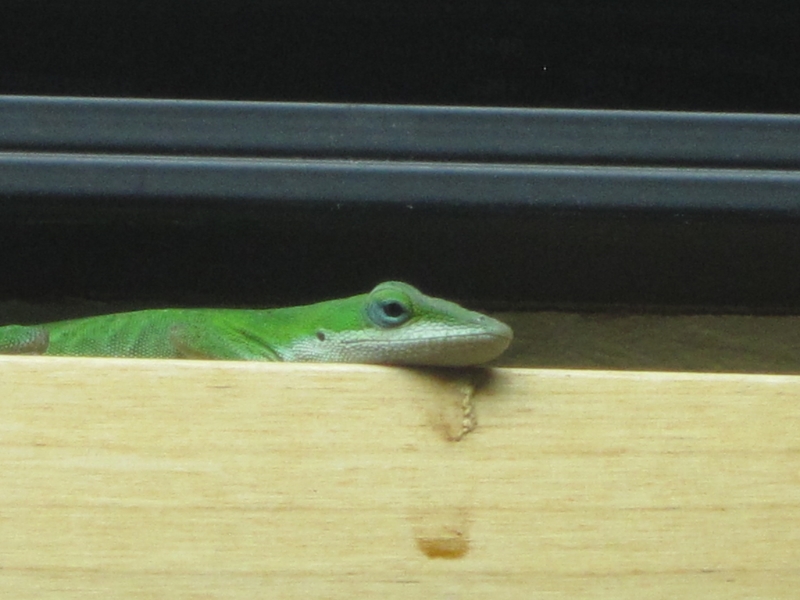 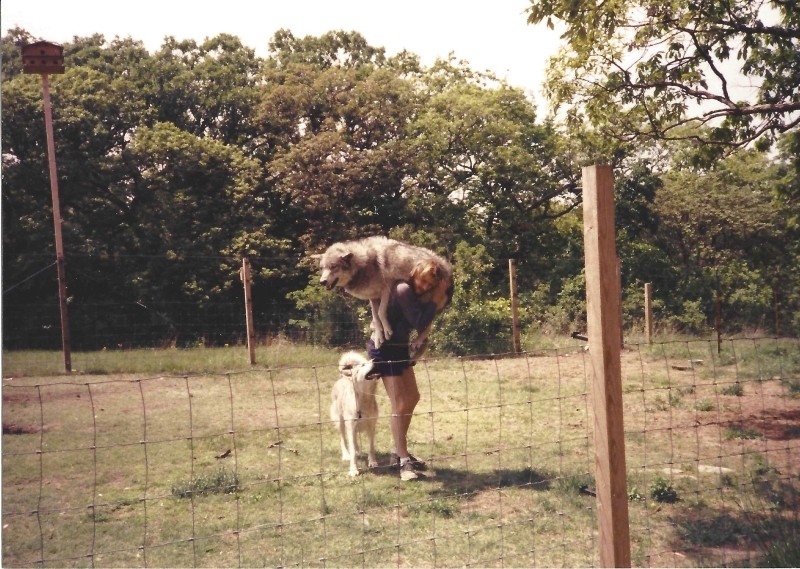 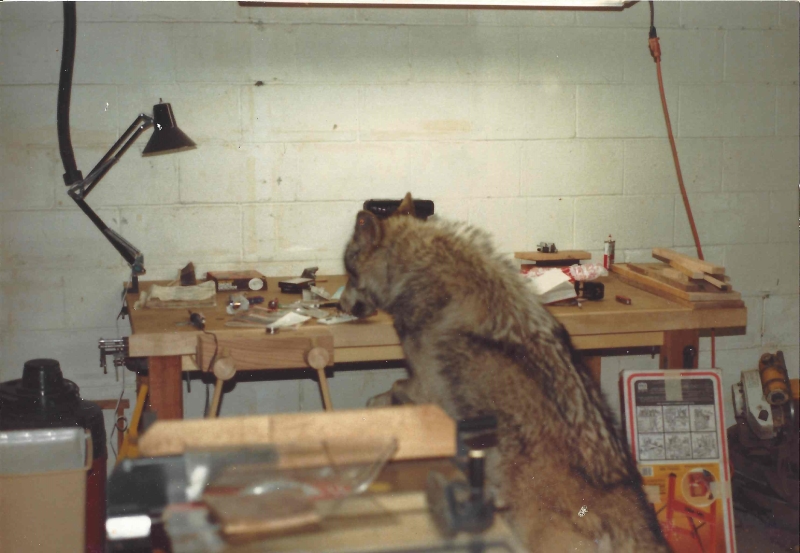 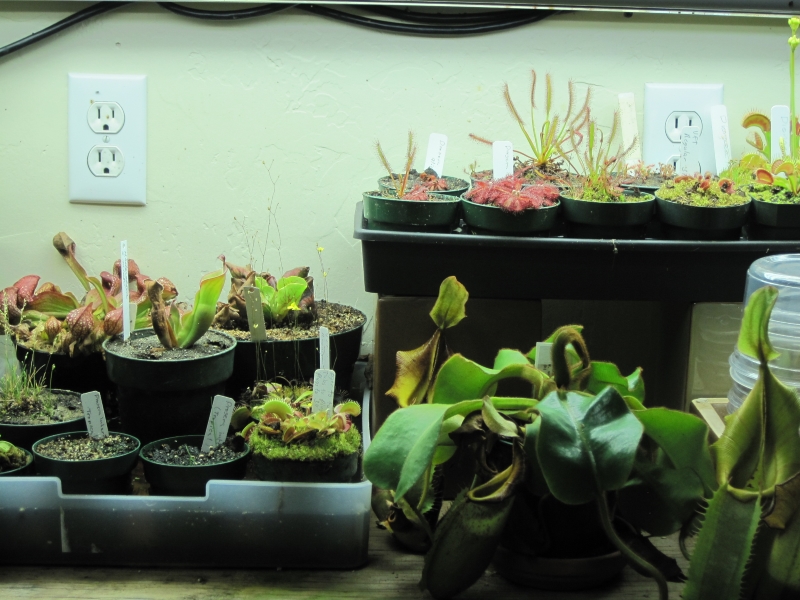 |
|
|
|
| tygaboy |
Oct 2 2017, 02:44 PM
Post
#134
|
|
914 Guru Group: Members Posts: 5,810 Joined: 6-October 15 From: Petaluma, CA Member No.: 19,241 Region Association: Northern California |
I WILL come and visit you! Not "try", not "plan"... WILL!
Wait, even better and more accurate: MUST! I MUST come visit! (IMG:style_emoticons/default/laugh.gif) (IMG:style_emoticons/default/driving.gif) (Like I need more motivation to get my car on the road...) |
|
|
|
| bbrock |
Oct 3 2017, 10:15 AM
Post
#135
|
|
914 Guru Group: Members Posts: 5,269 Joined: 17-February 17 From: Montana Member No.: 20,845 Region Association: Rocky Mountains |
ARGH!!!
Well... setbacks today. I tried to set up to do a little blasting today, but winter is fighting its way into the Northern Rockies a tad early this year and my air hose kept freezing up. 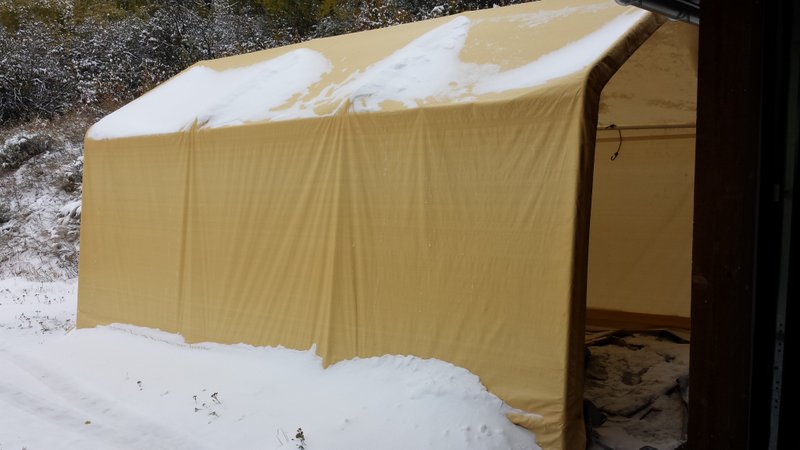 My plan was to use this panel to replace mine, but I got it for free because it has been worked on before. I knew the lower section of the door jamb would need to be patched. But needed to clean it up to make sure the rest was sound. 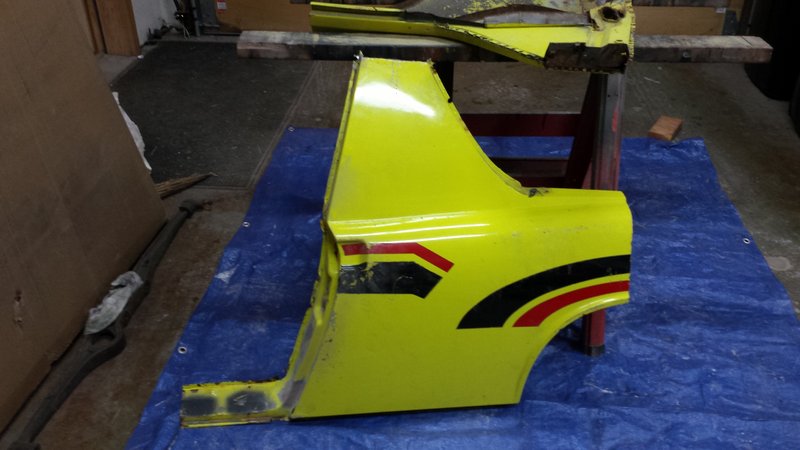 I spent a lot of time yesterday separating the outer skin from the roll bar reinforcement the hard way. And when I got it open, I found this (IMG:style_emoticons/default/stromberg.gif) of a gift inside. A poor patch to say the least. 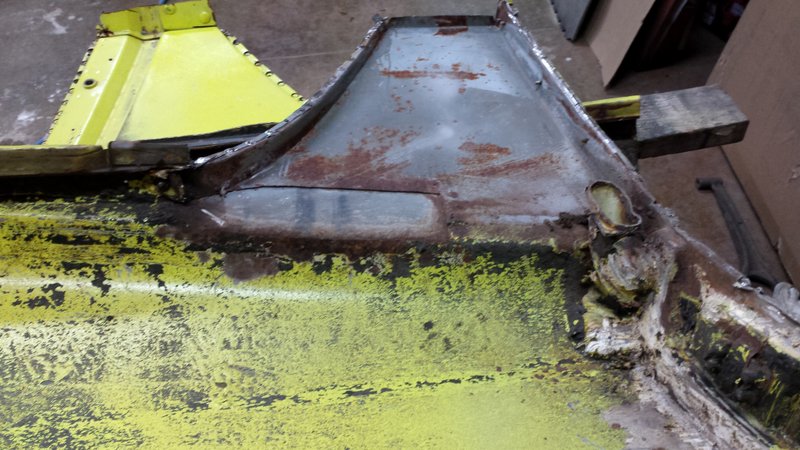 This panel is no better than the one I cut off. Between that, and the door jamb issue, it is trash. Oh wait, I will be able to use this:(IMG:style_emoticons/default/rolleyes.gif)  I took a closer inpspection of the other side where I was planning to use just the sail panel. It's even worse: 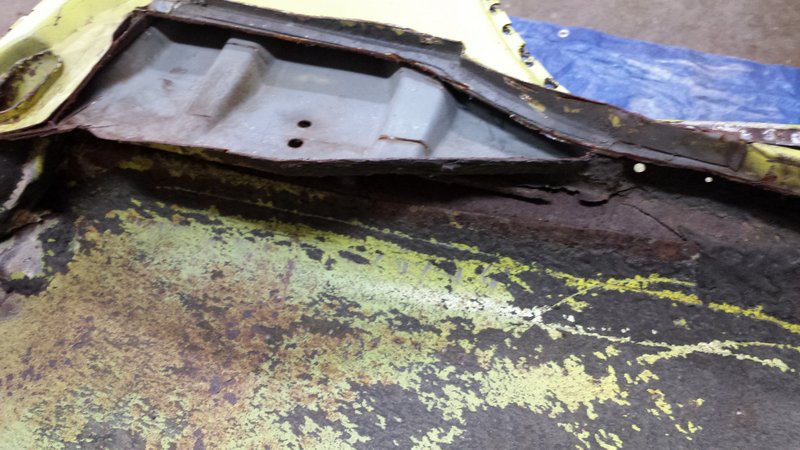 Sooo... Looks like RD will be getting more of my money for two sail panels and another door jamb. That will make reassembly a lot easier at least. I'm waffling on biting the bullet and adding a front floor panel to the order. Mine needs a lot of patch work. Doable, but will probably require at least a week. Having an all shiny new floor is appealing but will mean another big freight bill too. The lesson here is to make sure you have ALL of your donor panels prepped BEFORE placing your sheet metal order. (IMG:style_emoticons/default/headbang.gif) I think I'm going to try to take my driver's quarter panel off while leaving the door jamb on so I can continue to check the door gap while I work on the long. Oh well, onward ho! (IMG:style_emoticons/default/smash.gif) |
|
|
|
| bbrock |
Oct 4 2017, 10:02 PM
Post
#136
|
|
914 Guru Group: Members Posts: 5,269 Joined: 17-February 17 From: Montana Member No.: 20,845 Region Association: Rocky Mountains |
Some goodies arrived
On Monday I received my back ordered engine shelf from RD. 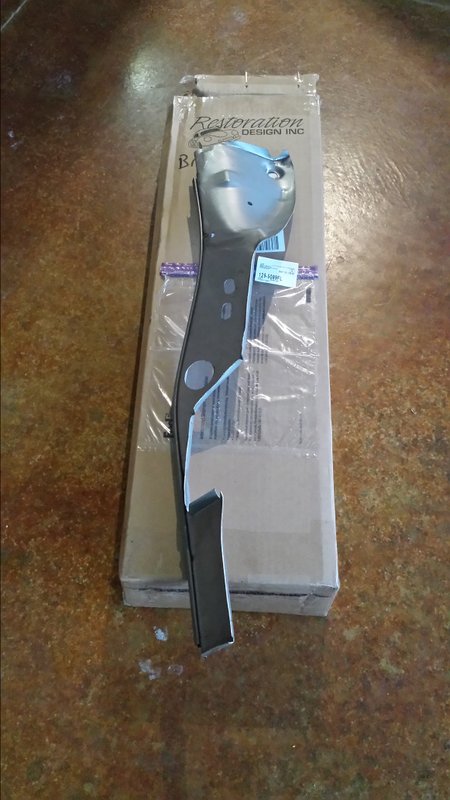 And yesterday, my suspension mount gussets arrived from 914Rubber. 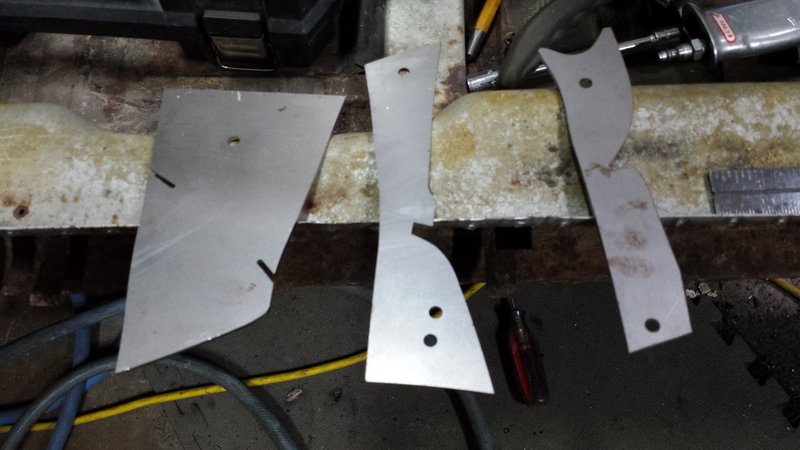 I also placed another order with RD yesterday. I decided to bite the bullet and ordered the front floor pan. I think it will make for a better end product. More excavation I continued the archeology to figure out just how far the tinworms have spread on this side. First I cut off the jack pyramid to reveal my old patch. It actually wasn't too bad if you ignore the ugliness. Just a flat plate welded over the inner wall with a square hole cut in for the jack tube. 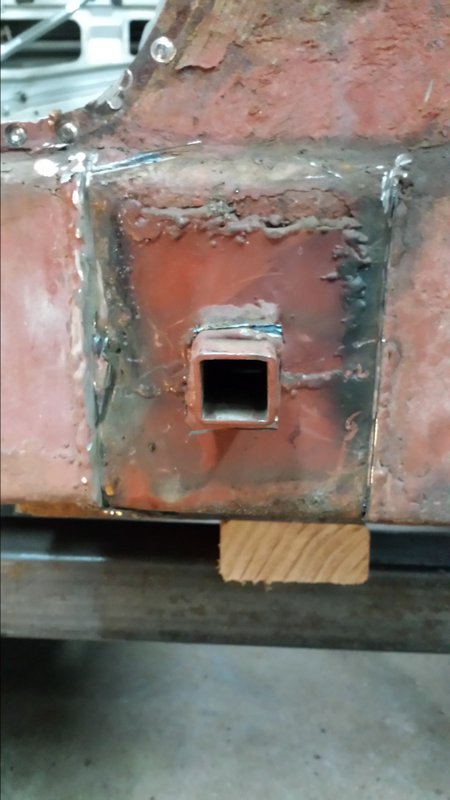 If it weren't for all the rot around it, it was a structurally sound repair, but not up to the standards I'm aiming for now. We can do better. Then I wheeled the car out to the tent for a frustrating afternoon of media blasting with crushed glass. It is snowy and cold outside which caused my safety glasses to want to fog up with my P95 mask on. And moisture had gotten into the pressure pot, causing the media to cake and not flow. But eventually I was able to get enough done to make a good assessment. 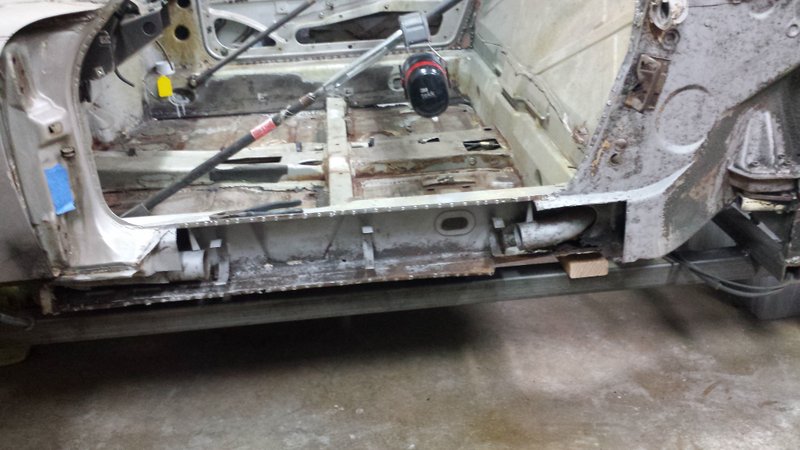 Unfortunately, the result is not good. While there is less rot on this side, I'm still going to have to rebuild the entire floor and lower wall of the inner long like I did on the passenger side. The differences are that I have most of the original to use as a pattern, the corrosion stops much lower on the side wall so I think I can do this without pulling those blasted heater tubes, and the curved part of the rear of the front wheel house is still solid so I don't have to replicate that compound bend. The rear inner wheelhouse section is in much better shape than the hell hole but is still going to be work. The floor is gone below the jack support and the inner wall needs repair from the hump for the engine mount forward. But it's going to be tricky because access to that area is poor since the inner wheel house is solid rearward of the jack support. 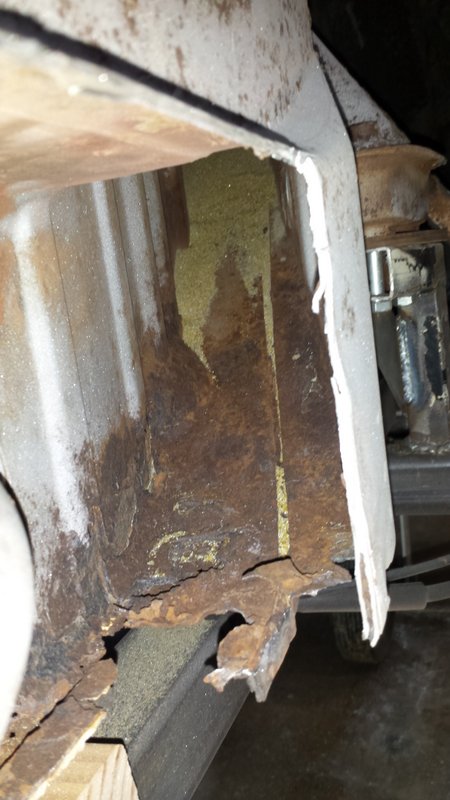 The floor looks gooey in this shot because I had just sprayed it down with Jasco. The metal is a little pitted but still solid rearward of the engine mount hump. I think it will be fine with a Jasco treatment and epoxy primer followed by cavity wax. 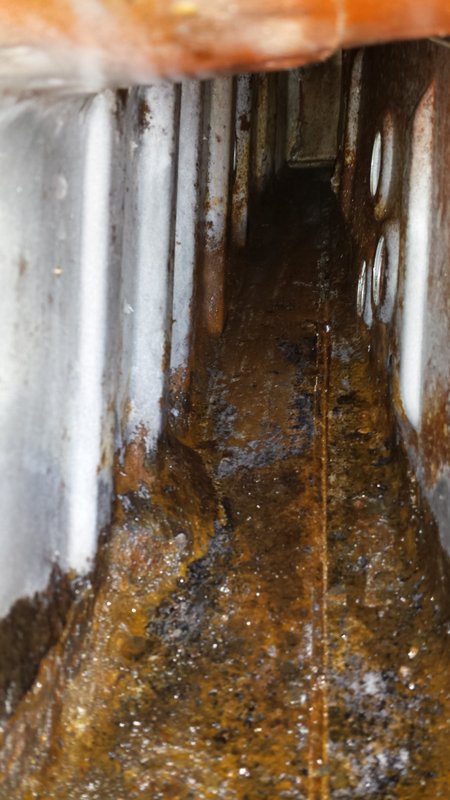 Tomorrow I will cut off the doughnut triangle under the heater tube to get better access the the outside wall of the inner long. I know it is rusted through in a small spot where it passes through the firewall. I'm worried I may need to remove the engine mount to get access to make necessary repairs. I'd like to avoid that of course. (IMG:style_emoticons/default/sawzall-smiley.gif) |
|
|
|
| bbrock |
Oct 9 2017, 12:01 AM
Post
#137
|
|
914 Guru Group: Members Posts: 5,269 Joined: 17-February 17 From: Montana Member No.: 20,845 Region Association: Rocky Mountains |
A Big Wind!
Well... on my to-do list for the weekend was pulling the cover off of the tent garage so it didn't collapse under the snow this winter. Friday night, a warm front came through with high winds gusting up to 56 MPH. At 4 am, I looked out the window and everything looked fine. At 6:30 am, I looked outside and "Bubba's room was gone!" That, BTW, is a direct quote I heard a guy say on the news when describing the aftermath of an Oklahoma tornado tearing through his trailer court. Here's what was left of Bubba's room Saturday morning: 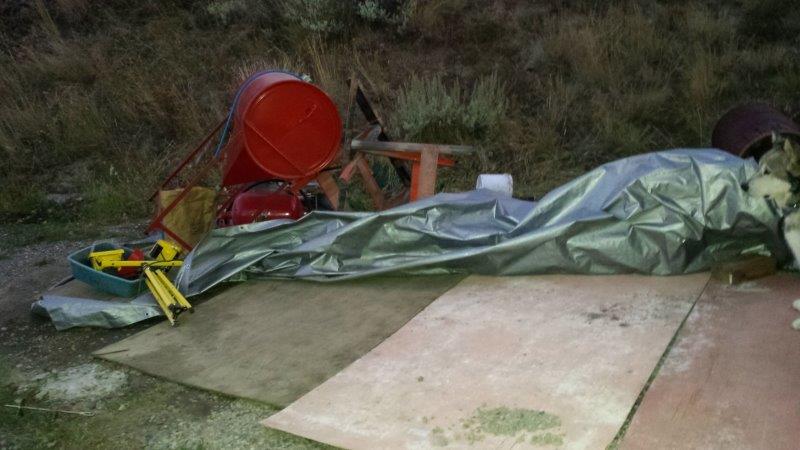 And here's where I found Bubba's room. The only thing that kept it from blowing into the next county (which is only a couple hundred feet up the road) was a rope attached to the tent that wrapped around one of the trailing arms of my car. They apparently make good anchors. 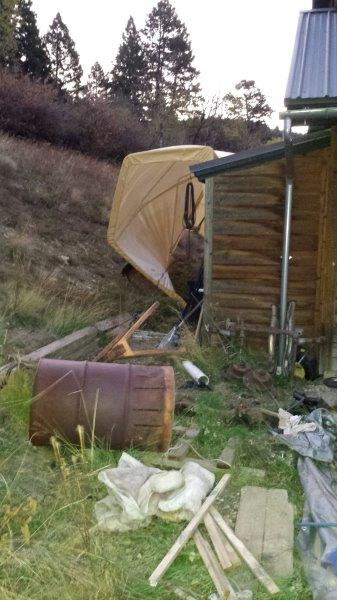 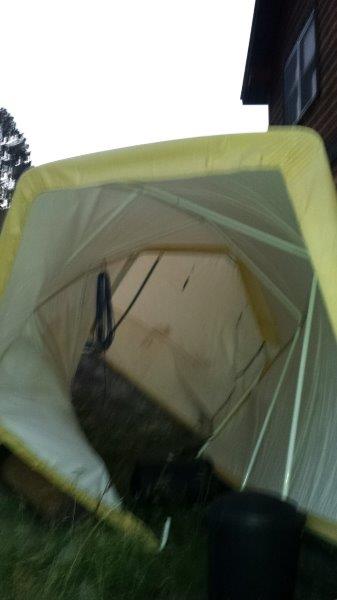 The actual anchors were still firmly in the ground: 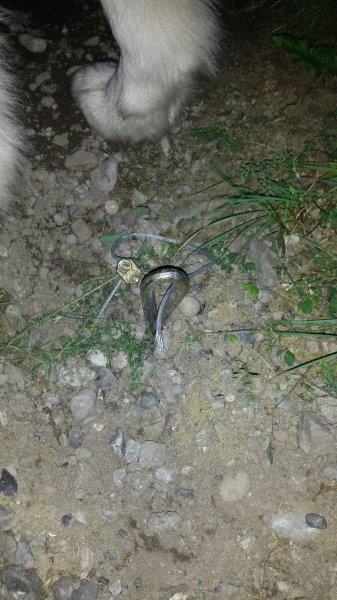 But the cheap-ass cable clamps failed.  Now I remember thinking that I should replace those clamps when I set up the tent. But I forgot. To add insult, I have a pile of good ones in the garage. (IMG:style_emoticons/default/headbang.gif) The tent is a little torn up, but nothing some gorilla tape won't fix. But I won't put it back up until spring... which means mid-June around here. Fab-a-dabba-doo Despite the late start on the car, I managed to finish cutting out the rusted sections of the driver's inner long. 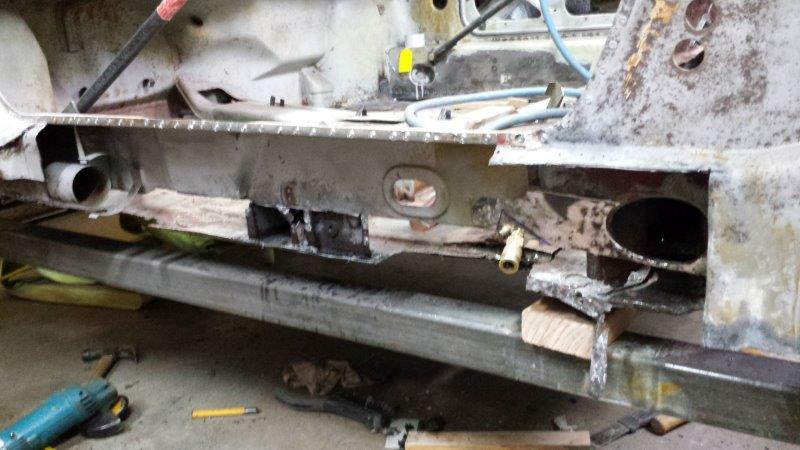 Then I set to work fabricating a new lower section of the long. By the end of the day, I had the front half mostly done: 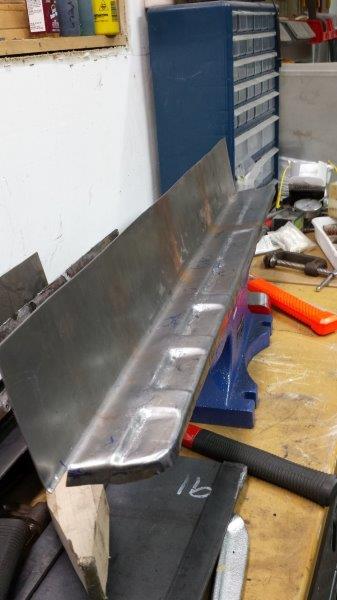 This morning, I worked on the recess for the e-brake handle. Getting that banged out to align perfectly was just loads of fun. (IMG:style_emoticons/default/blink.gif) Of course, bending that metal shrank the back wall, which warped the piece. So I had to use my shrinker on the welding flange followed by some hammering on the anvil to straighten things back out. It wasn't too hard, just took time. But I finally got the recess in pretty good shape. It will require a little hammer and dolly work to fine tune it once it is tacked in place. 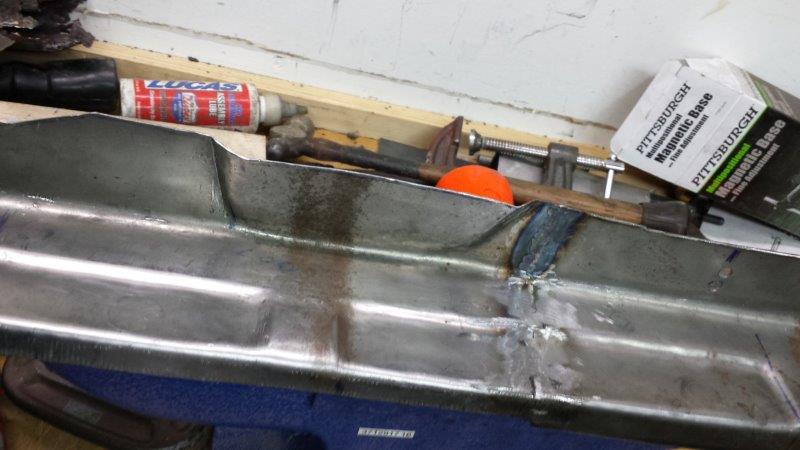 Fabbing the rear section only took a couple hours since it is a much simpler piece. By late evening, I had the two halve melted together and trimmed. Ready to install. 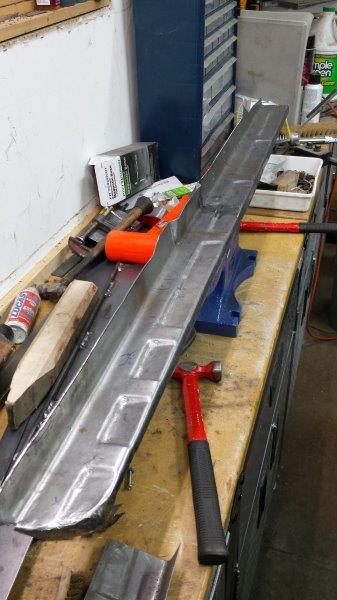 Not a bad looking piece if I say so myself. (IMG:style_emoticons/default/shades.gif) And about an hour ago, I had the piece tacked into place. 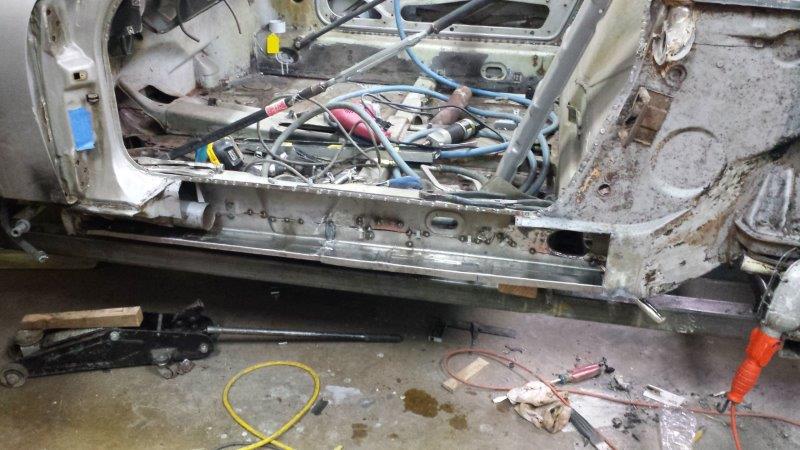 |
|
|
|
| mb911 |
Oct 9 2017, 05:40 AM
Post
#138
|
|
914 Guru Group: Members Posts: 7,742 Joined: 2-January 09 From: Burlington wi Member No.: 9,892 Region Association: Upper MidWest |
Looks great.. I wish when I made mine I had something to follow to make the recesses like you did but nothing for a pattern could be found.. I still need to figure that out..
|
|
|
|
| altitude411 |
Oct 9 2017, 10:11 AM
Post
#139
|
|
I drove my 6 into a tree Group: Members Posts: 1,306 Joined: 21-September 14 From: montana Member No.: 17,932 Region Association: Rocky Mountains |
Nice work Montana! Following your thread and soon to be looking out for your car. Great job! (IMG:style_emoticons/default/beerchug.gif)
* it was blowin a hawks ass here as well... time to adjust (the lean) for winter.  |
|
|
|
| bbrock |
Oct 9 2017, 08:49 PM
Post
#140
|
|
914 Guru Group: Members Posts: 5,269 Joined: 17-February 17 From: Montana Member No.: 20,845 Region Association: Rocky Mountains |
Ben PMed me about dimensions for the recesses in the inner long floors. I figured I'd post here in case it helps anyone in the future. Sorry for this crude drawing. I am neither an artist or draftsman and no longer have a CAD program on my computer.
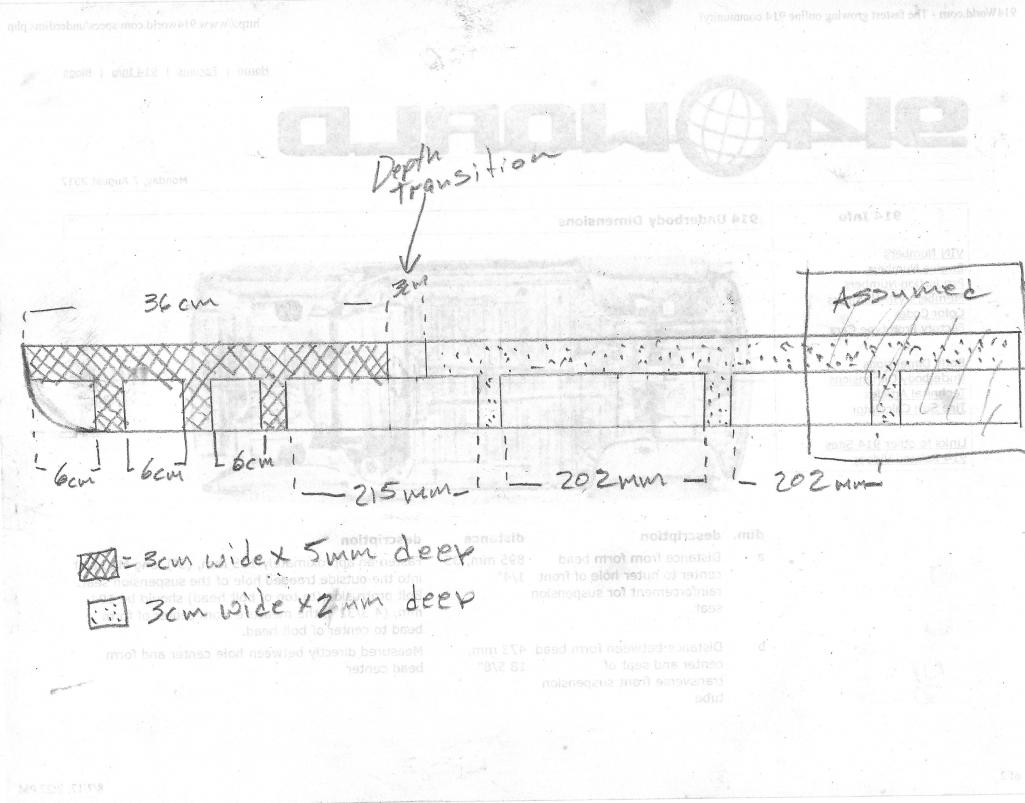 Notes: - Areas marked recesses are recessed when viewed from the bottom of the long and raised when viewed from the inside surface. -The long channel along the length of the inner wall forms the recess where the floor pan is welded on. - All channels running perpendicular to the long channel start at full depth from the long channel, and taper to near zero depth as the approach the outer edge. - Left and right longs are mirror images of each other. - The rear sections of both my longs were rusted out, so I've marked the area where I have just assumed the channel layout. My assumption is that the long channel extends as far as the rear edge of the floor pan, and there is one additional perpendicular channel spaced the same distance apart as the two shallow channels. If someone has better pieces for pattern, maybe they can correct these assumptions. - I used both centimeters and millimeters i the measure,ents, so pay attention to the units. Hopefully this helps someone. |
|
|
|
|
2 User(s) are reading this topic (2 Guests and 0 Anonymous Users)
0 Members:

|
Lo-Fi Version | Time is now: 18th April 2026 - 01:24 PM |
Invision Power Board
v9.1.4 © 2026 IPS, Inc.