|
|
|
Porsche, and the Porsche crest are registered trademarks of Dr. Ing. h.c. F. Porsche AG.
This site is not affiliated with Porsche in any way. Its only purpose is to provide an online forum for car enthusiasts. All other trademarks are property of their respective owners. |
|
|

  |

| bbrock |
 Nov 6 2019, 02:53 PM Nov 6 2019, 02:53 PM
Post
#1281
|
|
914 Guru  Group: Members Posts: 5,269 Joined: 17-February 17 From: Montana Member No.: 20,845 Region Association: Rocky Mountains |
Shit Show
From Sunday on has been one frustration after another. I won't go into details but I finally got the car prepped for the main event Monday evening and I took the day off yesterday for the big finale. It did not go well. Started right off the bat with a chunk of crap landing in the sealer coat in the middle of the trunk lid. My attempt to quickly pick it out made things worse so I had to wait for the sealer to harden enough to stand the crap out and respray before moving on. At about 6 pm, I was ready for base coat. I was slowed down by a few dirt nibs that I had to sand off between coats. The worst was that the tight space makes hose control a real challenge. Despite trying to be as careful as possible, I wound up with two touches that had to be fixed. Finally, by 9pm I had 3 coats of L96D laid down nicely with no mottling or tiger striping. I few flecks of shit here and there, but nothing major, and not bad considering the conditions I was working under. There is a 24 hour recoat window for this paint so I decided to call it a night and spray clear this morning. Of course I forgot to take a pic. (IMG:style_emoticons/default/screwy.gif) After inspecting yesterday's work this morning, I decided to do a little touch up on the engine lid. There were a couple spots where the primer didn't get sanded perfectly flat and were telegraphing through the base. I sanded those down with 800 grit and resprayed with base. Not too hard but time consuming. Okay, now time for clear coat. There were some issues here too, but I worked through them. The worse was a bug that plopped down on the hood. I was half way through my third wet coat and into the home stretch very happy with how things were looking. So happy, I was thinking I might even skip cut and buff and leave the little bit of orange peel as more faithful to the original finish. Moving up to the last coat on the front, I made the last pass spraying under the windshield frame when I heard a pop and then saw about a quarter pot of clear coat splash down on the hood and over the front left fender. It took a half second to realize what had happened. The fucking lid had popped off the sprayer pot! Those plastic friction fit lids were the one thing that looked like trouble to me on these Finishline guns from the get go, but had not given me a lick of trouble on all the primer and base spraying I have down. The difference is that the clear coat is really slimy compared to the other coatings. In my shock, I just walked around muttering "ruined.... ruined." Then I grabbed an unused plastic body filler applicator and lightly squeegied off some of the clear coat. That was probably a mistake but I don't think made it worse. Next I laid on more clear coat really thick to get the puddle to flow as much as possible. That actually helped a lot. The plan is to let it hardened and then wet sand it down smooth. Then I'll decide whether to respray or just polish. I'm thinking I'll start with 800 grit and work down but open to suggestions. After that chaos, I had lost my wet line and focus but I completed the spray. I wound up with some dry overspray in a couple spots so the whole car will get cut and polish. That all happened a couple hours ago so I'm still recouperatig. Here are a few quick pics of where it is now. I'll try to get better pics later. Part of the car looks great. The other part, not so much. I think it's going to look pretty fantastic though. I just caused a LOT more work for myself than I had hoped. 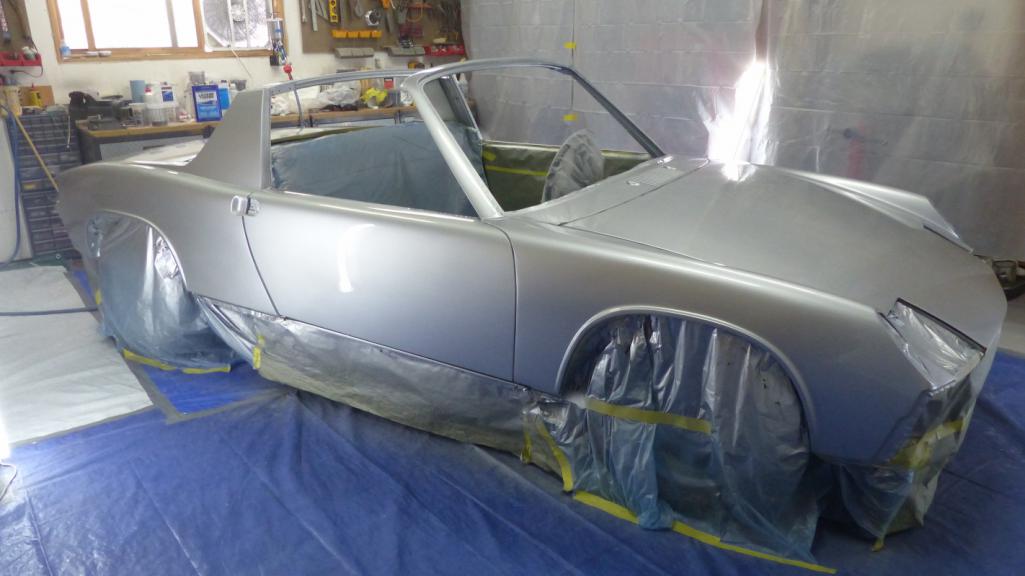 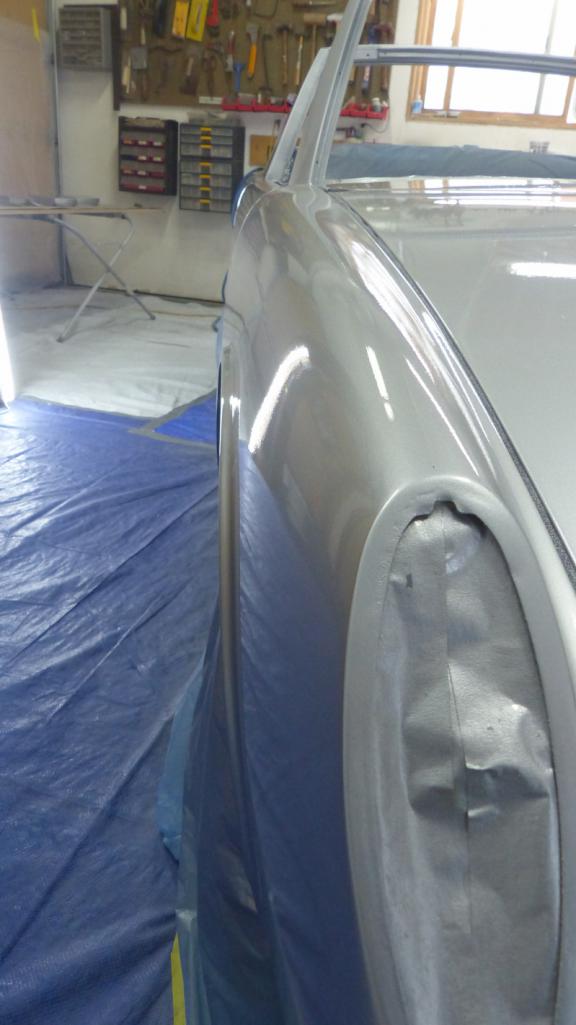 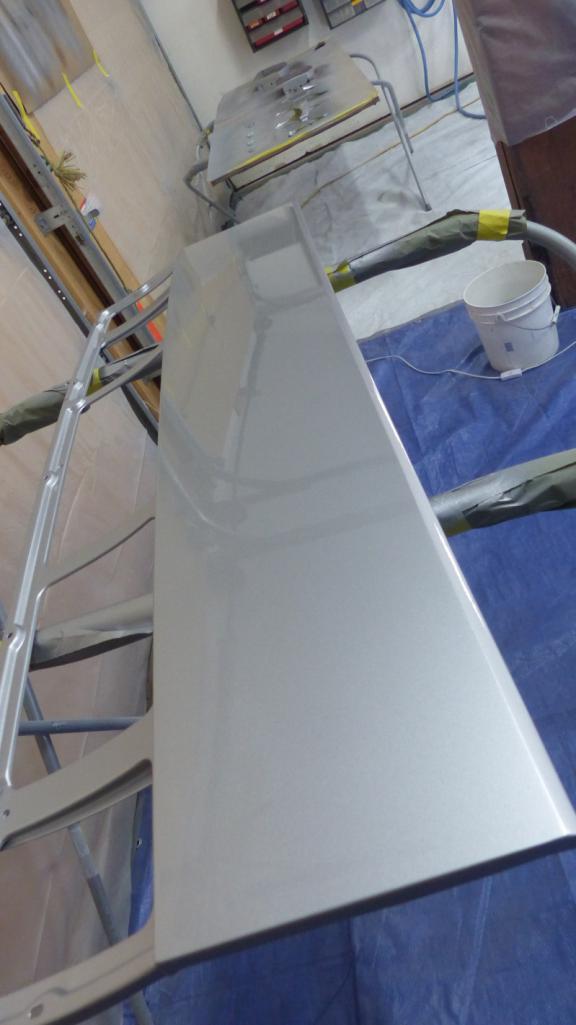 And the disaster zone: 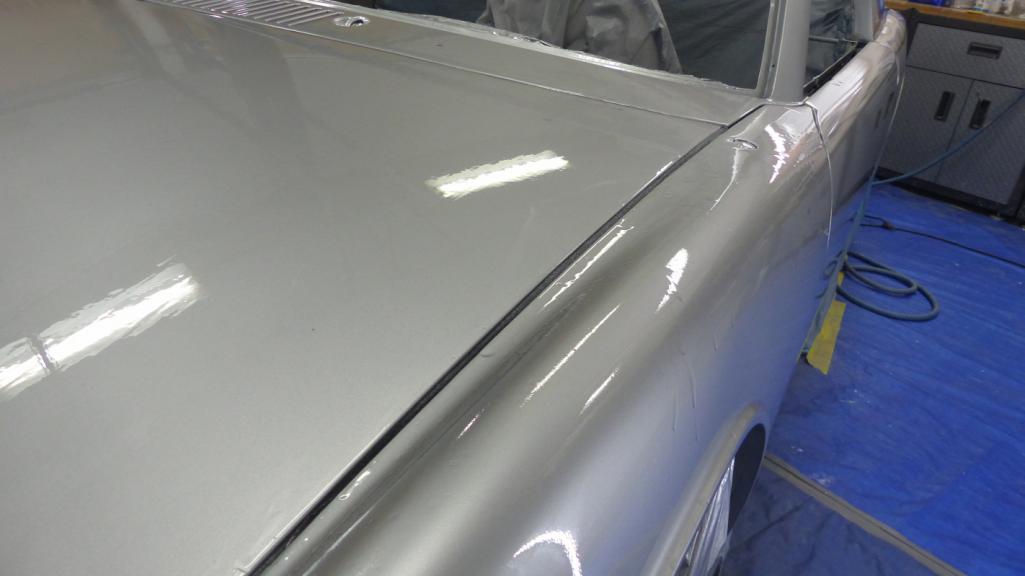  |
   |

 
|
| doug_b_928 |
Nov 6 2019, 03:32 PM
Post
#1282
|
|
Senior Member Group: Members Posts: 730 Joined: 17-January 13 From: Winnipeg Member No.: 15,382 Region Association: Canada |
It looks really good to me, Brent. And, on the upside, now you get to master the technique (and teach us at the same time) of removing runs from clearcoat.
|
|
|
|
| bbrock |
Nov 6 2019, 03:48 PM
Post
#1283
|
|
914 Guru Group: Members Posts: 5,269 Joined: 17-February 17 From: Montana Member No.: 20,845 Region Association: Rocky Mountains |
QUOTE(doug_b_928 @ Nov 6 2019, 03:32 PM)  It looks really good to me, Brent. And, on the upside, now you get to master the technique (and teach us at the same time) of removing runs from clearcoat. @doug_b_928 Thanks Doug. The pictures don't do justice though. It really looks horrible. Exactly how you would expect it to look if you spilled a whole bunch of clear coat. Alternatively, image an elephant with a really bad cold sneezing on a corner of the car. It's a damn mess but should sand out I think. BTW, before thing started going upside down weeks ago, I was going to post some details on block sanding the surfacer. It turns out that I did have two high spots that needed to be knocked down a little before they would block out properly. You asked about that in the other thread and I said I didn't think they needed to be tapped down, but they did. Just very gentile taps with the body hammer followed by another coat or two of surfacer and they blocked out fine. |
|
|
|
| tygaboy |
Nov 6 2019, 03:48 PM
Post
#1284
|
|
914 Guru Group: Members Posts: 5,824 Joined: 6-October 15 From: Petaluma, CA Member No.: 19,241 Region Association: Northern California |
Forgive me if now isn't the best time to try and lighten your mood but I laughed out loud when I read "I just caused a LOT more work for myself than I had hoped."
Trust me, I get it. These sorts of mishaps make me see red, big time (IMG:style_emoticons/default/headbang.gif) ... BUT: Don't forget the absolutely enormous amount of work you've ALREADY DONE. The amount needed to fix this is a rounding error! You are so close and you've done such a great job. Stand tall, be proud, stiff upper lip and all that. Remember, there's a reason for everything and this latest episode is going to add that much more interest to the story of your car's resurrection. And by the way, I think the paint looks killer! (IMG:style_emoticons/default/first.gif) |
|
|
|
| bbrock |
Nov 6 2019, 04:00 PM
Post
#1285
|
|
914 Guru Group: Members Posts: 5,269 Joined: 17-February 17 From: Montana Member No.: 20,845 Region Association: Rocky Mountains |
QUOTE(tygaboy @ Nov 6 2019, 03:48 PM) Forgive me if now isn't the best time to try and lighten your mood but I laughed out loud when I read "I just caused a LOT more work for myself than I had hoped." Trust me, I get it. These sorts of mishaps make me see red, big time (IMG:style_emoticons/default/headbang.gif) ... BUT: Don't forget the absolutely enormous amount of work you've ALREADY DONE. The amount needed to fix this is a rounding error! You are so close and you've done such a great job. Stand tall, be proud, stiff upper lip and all that. Remember, there's a reason for everything and this latest episode is going to add that much more interest to the story of your car's resurrection. And by the way, I think the paint looks killer! (IMG:style_emoticons/default/first.gif) Laugh all you want. I don't mind. Had I messed up the base coat, I'd be really pissed. Clear coat can be fixed with sandpaper, polish, and time. I'm a bit annoyed at that shitty pot lid design. Devilbiss should know better. Worst part is that it may mean more nights of the wife parking her car outside. She was not happy this morning when there was 1/8" of ice coating the whole car. I'm thinking as soon as the paint is hard enough to move the car, I'll get it back on its side of the garage so she can pull hers inside tonight. |
|
|
|
| mb911 |
Nov 6 2019, 04:02 PM
Post
#1286
|
|
914 Guru Group: Members Posts: 7,764 Joined: 2-January 09 From: Burlington wi Member No.: 9,892 Region Association: Upper MidWest |
Runs and mess ups as described happy to the best painters. The proof of quality is how well you can hide the mistakes.. If your past work hasn't already spoken for itself you will surely solve a few runs.. And yes I got 1 spot on my paint job this weekend that sagged a bit..
It will look fantastic |
|
|
|
| johnlush |
Nov 6 2019, 04:35 PM
Post
#1287
|
|
What's all this then? Group: Members Posts: 376 Joined: 26-May 04 From: Cheyenne, WY Member No.: 2,108 Region Association: Rocky Mountains |
You see the drips and the extra work but I see really straight body panels and nice even panel gaps. And the silver looks great! But I totally get your frustration. One of the many reasons I don't paint anymore.
As far as your wife having to park outside - the lady of the house here has gotten used to that. I keep the peace by doing all of the snow removal and ice scraping on her car as needed. Small price to pay for a garage stall... |
|
|
|
| Superhawk996 |
Nov 6 2019, 07:18 PM
Post
#1288
|
|
914 Guru Group: Members Posts: 7,839 Joined: 25-August 18 From: Woods of N. Idaho Member No.: 22,428 Region Association: Galt's Gulch |
Take a deep breath. You will persevere.
It will be fine when you finish. You have the skill, patience and talent to pull this off. (IMG:style_emoticons/default/pray.gif) Now get to work! (IMG:style_emoticons/default/cheer.gif) |
|
|
|
| Dion |
Nov 6 2019, 07:36 PM
Post
#1289
|
|
RN Group: Members Posts: 2,926 Joined: 16-September 04 From: Audubon,PA Member No.: 2,766 Region Association: MidAtlantic Region |
Brent, man.... (IMG:style_emoticons/default/sheeplove.gif) yes you had a “spot” of trouble, but ....
You can certainly be so proud of your accomplishments! That paint is looking great in the pics. Obviously you will be your worse critic. That only proves what a perfectionist you are. Home stretch my friend. It’s so close. I’d be so pissed as well. I think, by you sharing this shit gets out some frustration. I hope it does at least. We learned al lot from your endeavor and continue to do so. I hope ya catch a break in Montana’s weather soon. Keep at it!!!! & Get those sanding blocks ready! (IMG:style_emoticons/default/poke.gif) |
|
|
|
| bbrock |
Nov 6 2019, 09:05 PM
Post
#1290
|
|
914 Guru Group: Members Posts: 5,269 Joined: 17-February 17 From: Montana Member No.: 20,845 Region Association: Rocky Mountains |
Thanks all. I'm not happy about the spill, but not that upset either. It can be fixed without having to buy more of the expensive base coat. Just to be clear though,(okay, let's make that a pun) this wasn't a small splash of paint. The spray pot was turned sideways to spray the underside of the windshield frame when the lid popped off. I'd estimate about 4-6 ounces of paint landed on the hood and splashed across the car. It splashed all the way to the opposite fender. What I have learned is that the camera will make the tiniest little welding flaw look like a disaster, and the most disastrous paint spill look like a few little runs.
I spent about an hour wet sanding with 800 grit and I think this pic shows better what I'm up against. 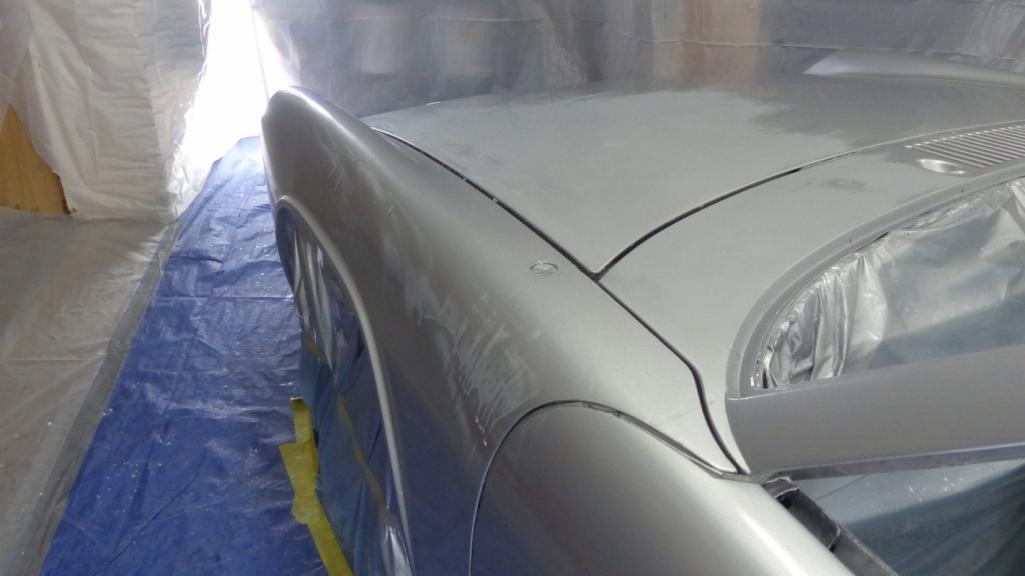 The dull area is about 90% of the area of splashes, sags, and runs but there are big dollops of clear coat spread right across the deck lid and even a couple on the right fender. The sags on the left fender are almost continuous from the door almost to the turn signal opening. There is also a run down the front of the left door but that won't be much of a problem. In hind sight, my instinct to try to squeegee excess clear off was a bad one, but my second instinct to lay more paint on as thick as I could was a good one. My attempt to squeegee lifted a little bit of pigment and flake from the base coat into the clear. It is only in two small spots and I was able to sand the clear down thin enough that the flaws have all but disappeared. Laying the clear down thick both allow a lot of the splash to flow out and left me with a lot of material to sand to flatten the surface without getting too close to the base. I think 800 grit was the right starting place get the surface flat. Given the extent of the damage, I'm thinking it might be best to sand the whole hood and left fender flat with 800 and then reshoot those panels with clear. The rest of the flaws are more in the realm of normal sags to fix. Still open to suggestions but this seems like it will work. On a more positive note - I'm also quite pleased with the body work. There are two spots I was never quite happy with but I'm not telling where they are. Even I have to squint and chase the light around to see them so I doubt anyone will ever notice. (IMG:style_emoticons/default/rolleyes.gif) |
|
|
|
| raynekat |
Nov 6 2019, 10:00 PM
Post
#1291
|
|
Advanced Member Group: Members Posts: 2,171 Joined: 30-December 14 From: Coeur d'Alene, Idaho Member No.: 18,263 Region Association: Pacific Northwest |
Brent Dude....you always make my day shine when you post your adventures here.
I can tell you....I would never try to paint a car myself, so you're way ahead of me. Your ability to spell out all the gory details is extraordinary. You've got the "chops" so I know you'll get this all figured out in the end. I piddle around in the garage doing this and that, but nothing of the stature of what you seem to take on and accomplish. So keep your chin up. I've already had a couple of beers in your honor tonight. Man...and are you cold there or what? Here in the PNW, we are unseasonably warm and dry. Never seen anything like it. The moles are going crazy right now due to the temperate weather. My back yard looks like the Wind River Range in Wyoming. It's wild! Take care buddy and hang in there. |
|
|
|
| KELTY360 |
Nov 6 2019, 11:16 PM
Post
#1292
|
|
914 Neferati Group: Members Posts: 5,189 Joined: 31-December 05 From: Pt. Townsend, WA Member No.: 5,344 Region Association: Pacific Northwest |
You're going to have so much fun assembling the car over the winter that you'll forget about the trauma of getting color on before Thanksgiving. Congratulations, it's looking awesome!
(IMG:style_emoticons/default/first.gif) |
|
|
|
| sixnotfour |
Nov 7 2019, 07:35 PM
Post
#1293
|
|
914 Wizard Group: Members Posts: 11,242 Joined: 12-September 04 Member No.: 2,744 Region Association: NineFourteenerVille |
yes og peel would have been cool....ive seen the tv pro clear jobs peeled as shit...dont feel bad ..the last step is always the most painful/satisfying..
(IMG:style_emoticons/default/first.gif) |
 |
|
| 914_7T3 |
Nov 7 2019, 11:56 PM
Post
#1294
|
|
Please forgive me, I'm new to all of this! Group: Members Posts: 1,898 Joined: 3-April 17 From: Los Angeles, CA Member No.: 20,991 Region Association: Southern California |
I think the silver looks really good and glad its a correctable situation.
(IMG:style_emoticons/default/blink.gif) Like you said, made more work for yourself, but you'll power through the frustration. Don't let it detract from the milestone of getting color layed down. Keep moving forward. Also not going to tell you to embrace the process as two years later I still have no idea what that means... |
|
|
|
| TravisNeff |
Nov 8 2019, 10:13 AM
Post
#1295
|
|
914 Guru Group: Members Posts: 5,082 Joined: 20-March 03 From: Mesa, AZ Member No.: 447 Region Association: Southwest Region |
This is turning out fantastic, sorry to hear about the mishap with the drippage, the rest looks great!
|
|
|
|
| rudedude |
Nov 8 2019, 12:59 PM
Post
#1296
|
|
Senior Member Group: Members Posts: 560 Joined: 1-January 05 From: minneapolis, mn Member No.: 3,387 Region Association: Upper MidWest |
I've seen my painter buddy use a small razor blade plane to shave down runs, says its better than trying to sand them out.
|
|
|
|
| bbrock |
Nov 8 2019, 04:46 PM
Post
#1297
|
|
914 Guru Group: Members Posts: 5,269 Joined: 17-February 17 From: Montana Member No.: 20,845 Region Association: Rocky Mountains |
QUOTE(rudedude @ Nov 8 2019, 11:59 AM) I've seen my painter buddy use a small razor blade plane to shave down runs, says its better than trying to sand them out. Thanks. I watched several videos demoing that technique and it's what I'll use for the couple normal runs I have plus a few dirt nibs. The paint pot spill is WAY beyond shaving with razors though. I just don't think it can be appreciated from the pics. Anyone who say or felt it in person would say "Holy fuchs batman. What a mess!" I've made good progress though and need to make a decision. Will post an update very soon. |
|
|
|
| bbrock |
Nov 8 2019, 05:29 PM
Post
#1298
|
|
914 Guru Group: Members Posts: 5,269 Joined: 17-February 17 From: Montana Member No.: 20,845 Region Association: Rocky Mountains |
I just got home from the paint shop to pick up another quart of clear just to be safe. I may not need it but rather to have it and not need it than find myself just a little short in the middle of the respray.
Spent some time last night and a little before work this morning erasing the catastrophe. It isn't really that hard. It's mostly like sanding out really expensive surfacer. I have most of it back to a flat surface. I don't know if you can tell in the pic, but about 3/4 of the lid was covered with splatter and lumpy goo and pretty much all of the fender. Another hour or two with the 800 should finish it up. 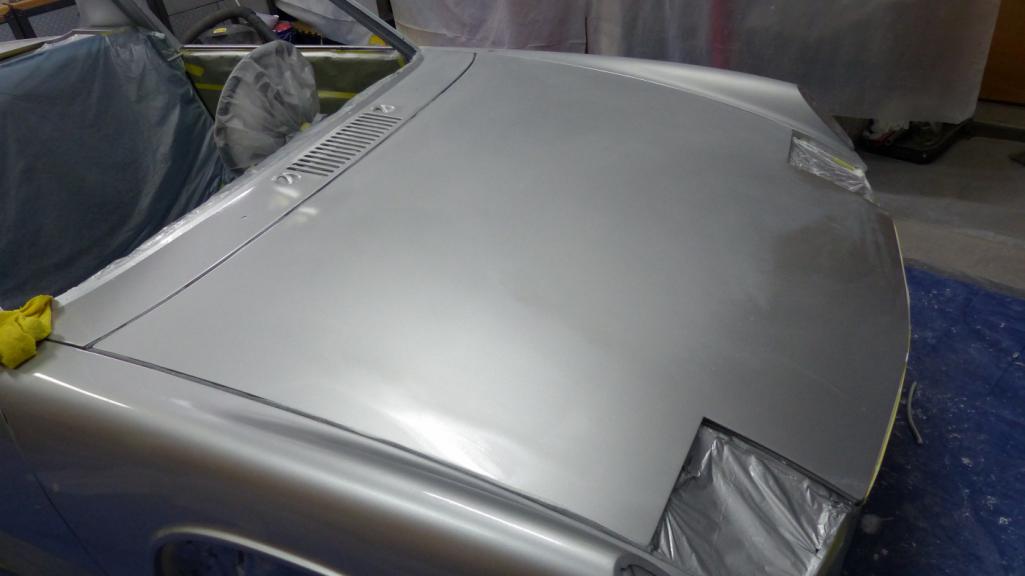 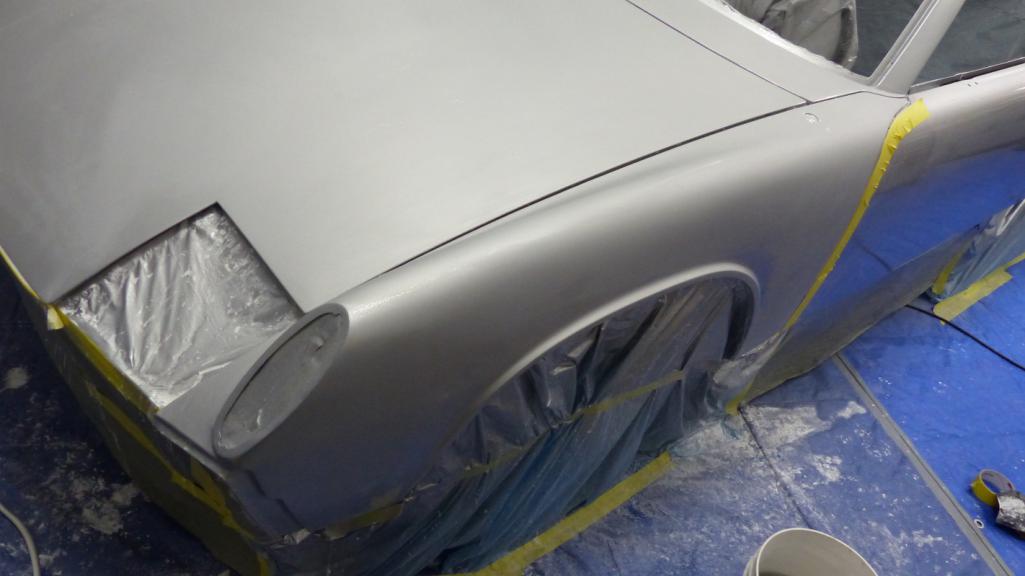 I definitely want to shoot another coat of clear on the fender to restore the film depth, but truth be told, I could probably just continue sanding the lid and cowl to 2000 and buff. However.... there are some flaws on the lid and cowl that are going to haunt me. I'll follow up with another post, but there are three places where flakes of sealer blew onto the base coat just as the first coat of clear was going down. Depending on the angle, they can be seen from a few feet from the car. Not good. Here are the worst two of those with a bit of water sprayed on so you can see:  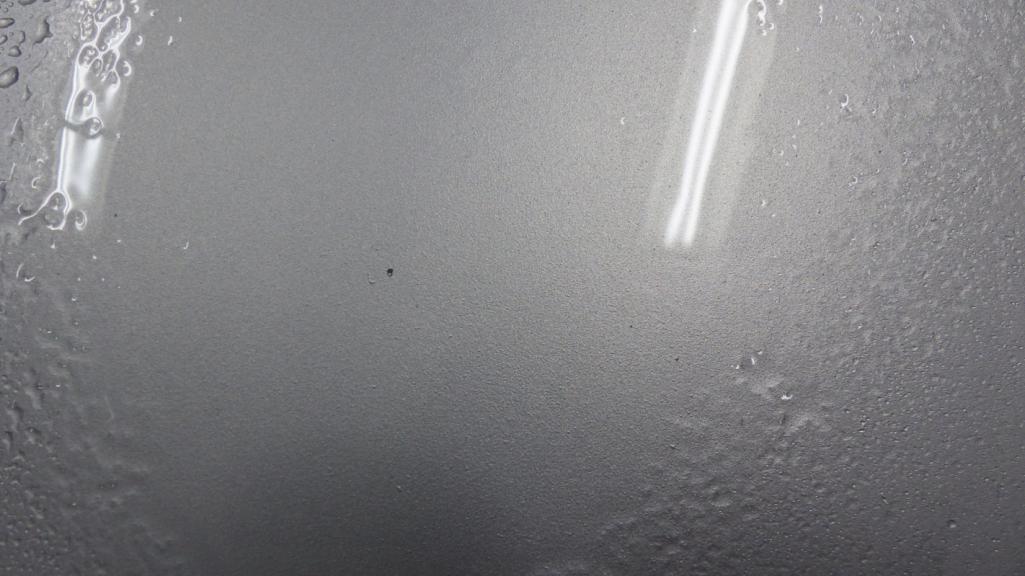 In addition, there are two spots I created a mess with my dumb squeegee attempt. They are two lines where I lifted a tiny bit of base into the clear. Being metallic, these really catch the light from certain angles and disappear from others. I can probably make those disappear by sanding most of the clear off but then I'd have uneven thickness. 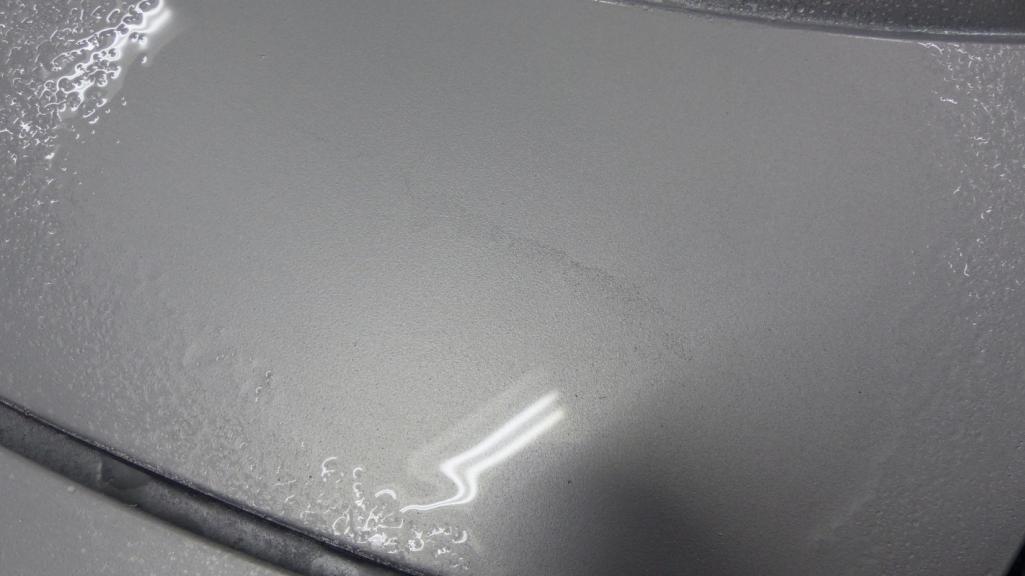 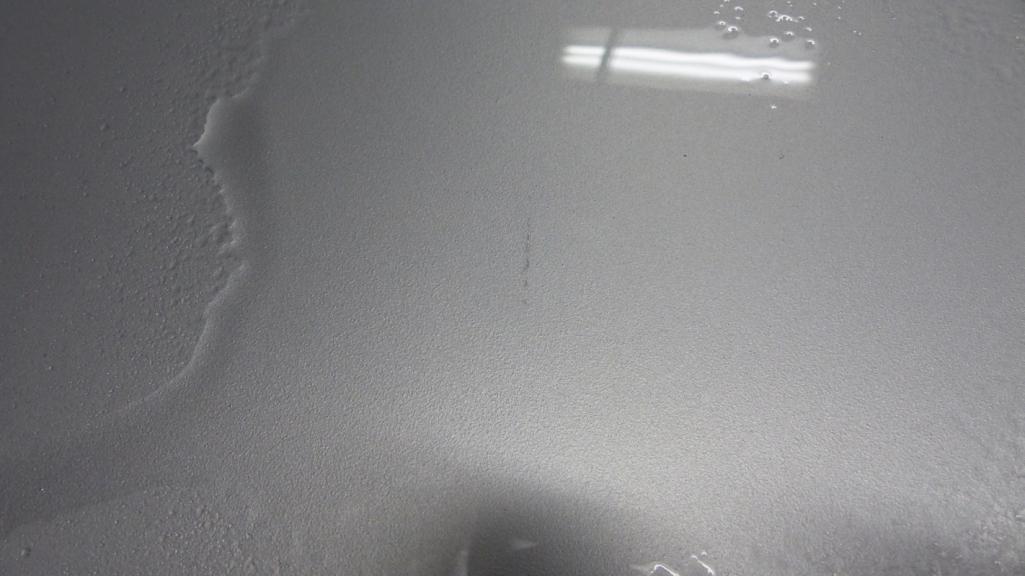 Now I'm thinking maybe I should sand the frunk lid and cowl down more aggressively and respray with base. I have plenty of base left to do the job. Then follow with 3 wet coats on the lid and cowl and 1-2 coats on the fender. The tech sheet says 2 wet coats but I'm doing 3 to leave extra for cut and buff. The tech sheet does not specifically list PPG clear coats as a suitable substrate for the DBC base, but it says it can be sprayed over "cleaned and sanded OEM finishes" so I think I'm good there. Any thoughts about that plan? (IMG:style_emoticons/default/confused24.gif) I'll part with a happier shot of the rear deck lid. More dust nibs to repair than I would like but nothing that screams, "hey dumbass, you left a piece of shit in your paint." 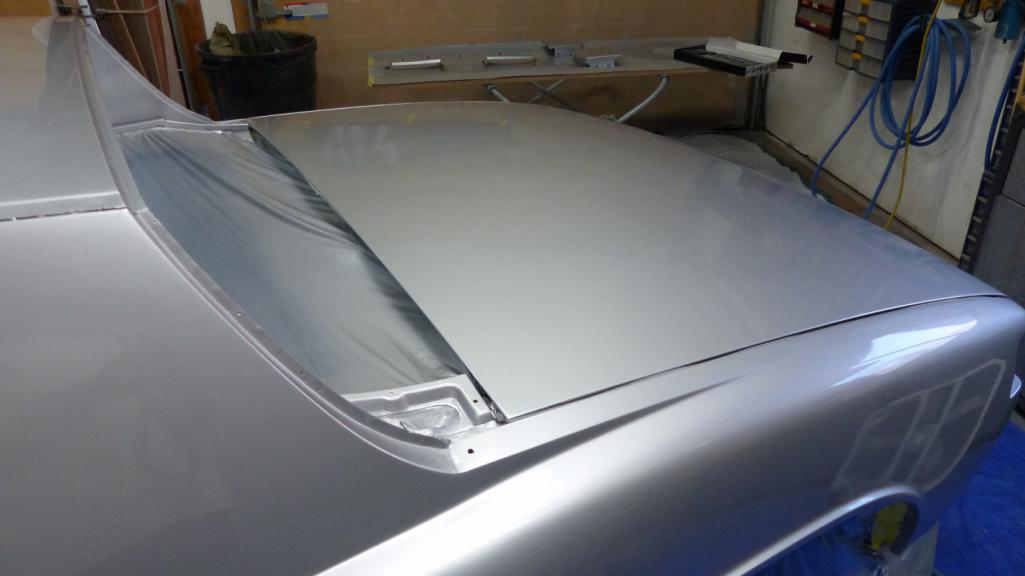 |
|
|
|
| tygaboy |
Nov 8 2019, 05:39 PM
Post
#1299
|
|
914 Guru Group: Members Posts: 5,824 Joined: 6-October 15 From: Petaluma, CA Member No.: 19,241 Region Association: Northern California |
Brent - that trunk shot looks AWESOME! Stand proud, young man.
|
|
|
|
| bbrock |
Nov 8 2019, 05:49 PM
Post
#1300
|
|
914 Guru Group: Members Posts: 5,269 Joined: 17-February 17 From: Montana Member No.: 20,845 Region Association: Rocky Mountains |
QUOTE(tygaboy @ Nov 8 2019, 04:39 PM) Brent - that trunk shot looks AWESOME! Stand proud, young man. I just noticed you can see the reflection of my biggest fan in that shot. (IMG:style_emoticons/default/lol-2.gif) |
|
|
|
|
2 User(s) are reading this topic (2 Guests and 0 Anonymous Users)
0 Members:

|
Lo-Fi Version | Time is now: 12th May 2026 - 03:55 PM |
Invision Power Board
v9.1.4 © 2026 IPS, Inc.