|
|
|
Porsche, and the Porsche crest are registered trademarks of Dr. Ing. h.c. F. Porsche AG.
This site is not affiliated with Porsche in any way. Its only purpose is to provide an online forum for car enthusiasts. All other trademarks are property of their respective owners. |
|
|

  |

| bbrock |
 Oct 9 2017, 08:50 PM Oct 9 2017, 08:50 PM
Post
#141
|
|
914 Guru  Group: Members Posts: 5,269 Joined: 17-February 17 From: Montana Member No.: 20,845 Region Association: Rocky Mountains |
QUOTE(altitude411 @ Oct 9 2017, 10:11 AM)  Nice work Montana! Following your thread and soon to be looking out for your car. Great job! (IMG:style_emoticons/default/beerchug.gif) * it was blowin a hawks ass here as well... time to adjust (the lean) for winter. Ha! Hawk's ass. That's just about right. (IMG:style_emoticons/default/beerchug.gif) |
   |

 
|
| bbrock |
Oct 10 2017, 09:46 PM
Post
#142
|
|
914 Guru Group: Members Posts: 5,269 Joined: 17-February 17 From: Montana Member No.: 20,845 Region Association: Rocky Mountains |
Good progress today. I finished welding in lower inner long patch. Then trimmed an dry fit the outer from RD. Then I tackled the outer wall patch for the area under the jack support.
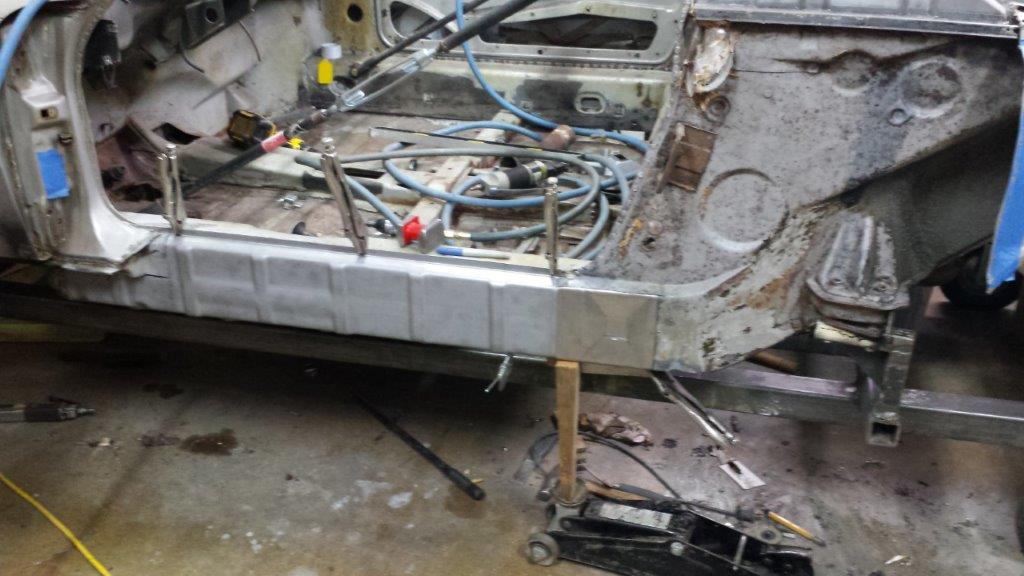 I was going to make a hammer form for that pyramid recess under the jack support using 3/16" steel. But I didn't have any on hand and didn't want to wait until my next trip into town. So I decided to give it a go just hammer with the help of the vice and anvil. If you can forgive a few hammer marks, I think it will look close to factory fresh once it is burned in. 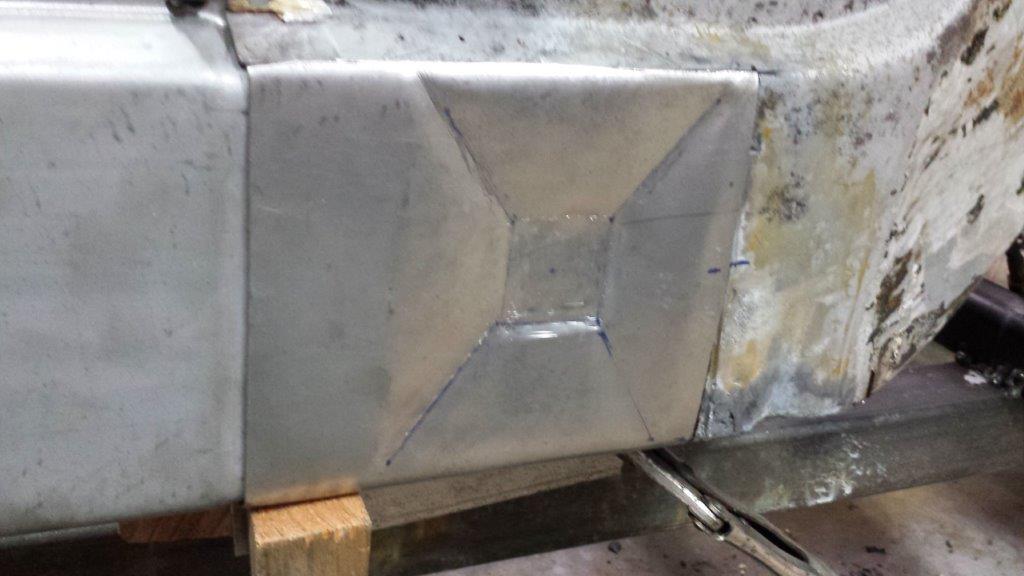 Next up is fabbing patches for the inner walls of both sides of the long. |
|
|
|
| tygaboy |
Oct 11 2017, 08:30 AM
Post
#143
|
|
914 Guru Group: Members Posts: 5,810 Joined: 6-October 15 From: Petaluma, CA Member No.: 19,241 Region Association: Northern California |
Holy Toledo! Your car is WAY apart. I'm always in awe of you guys who (seem to) think nothing of lopping off 1/2 the side of their car. (IMG:style_emoticons/default/pray.gif)
There should be a club/t-shirt for folks who pull off this sort of thing. Continued great results as you soldier on! (IMG:style_emoticons/default/sawzall-smiley.gif) (IMG:style_emoticons/default/smash.gif) (IMG:style_emoticons/default/welder.gif) |
 |
|
| bbrock |
Oct 11 2017, 12:21 PM
Post
#144
|
|
914 Guru Group: Members Posts: 5,269 Joined: 17-February 17 From: Montana Member No.: 20,845 Region Association: Rocky Mountains |
QUOTE(tygaboy @ Oct 11 2017, 08:30 AM) Holy Toledo! Your car is WAY apart. I'm always in awe of you guys who (seem to) think nothing of lopping off 1/2 the side of their car. (IMG:style_emoticons/default/pray.gif) There should be a club/t-shirt for folks who pull off this sort of thing. Continued great results as you soldier on! (IMG:style_emoticons/default/sawzall-smiley.gif) (IMG:style_emoticons/default/smash.gif) (IMG:style_emoticons/default/welder.gif) Says the guy who has basically re-engineered and built his car from scratch... (IMG:style_emoticons/default/poke.gif) And didn't you just put a complete floor pan on that machine? |
|
|
|
| mb911 |
Oct 11 2017, 02:29 PM
Post
#145
|
|
914 Guru Group: Members Posts: 7,742 Joined: 2-January 09 From: Burlington wi Member No.: 9,892 Region Association: Upper MidWest |
Lol Chris I assume you are talking about me as well.. That's the fun isn't it making something out of nothing..
|
|
|
|
| tygaboy |
Oct 11 2017, 02:32 PM
Post
#146
|
|
914 Guru Group: Members Posts: 5,810 Joined: 6-October 15 From: Petaluma, CA Member No.: 19,241 Region Association: Northern California |
Ben - Yep, you, bbrock and Dion come immediately to mind. I know there are others, too, that I'd lump in with you metal cuttin' crazies! (IMG:style_emoticons/default/laugh.gif)
|
|
|
|
| bbrock |
Oct 11 2017, 02:47 PM
Post
#147
|
|
914 Guru Group: Members Posts: 5,269 Joined: 17-February 17 From: Montana Member No.: 20,845 Region Association: Rocky Mountains |
Oh Yeah, that list is LONG! And there is no way I'd be doing this if others hadn't documented their processes before me. We are only the current cohort standing on the shoulders of giants. (IMG:style_emoticons/default/pray.gif)
|
|
|
|
| bbrock |
Oct 20 2017, 10:05 AM
Post
#148
|
|
914 Guru Group: Members Posts: 5,269 Joined: 17-February 17 From: Montana Member No.: 20,845 Region Association: Rocky Mountains |
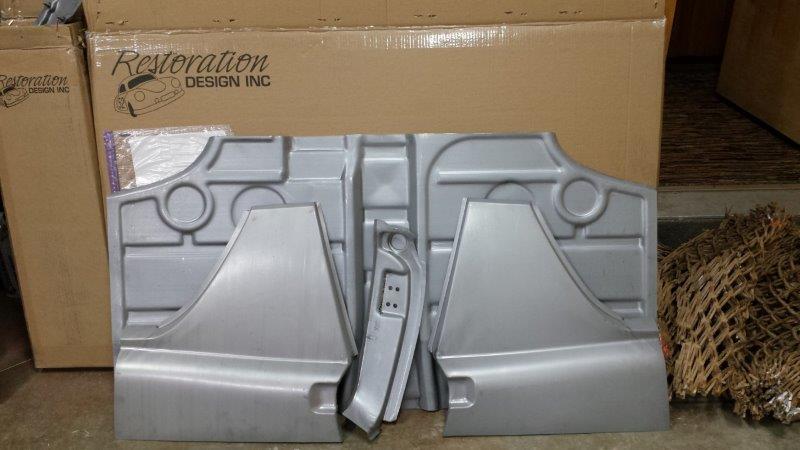
I've gotten behind on updates so let's get caught up. Let's start with some more sheet metal porn. These arrived last Wednesday:
 Now back to work. First up was finishing welding in the inner long floor. That went pretty well. 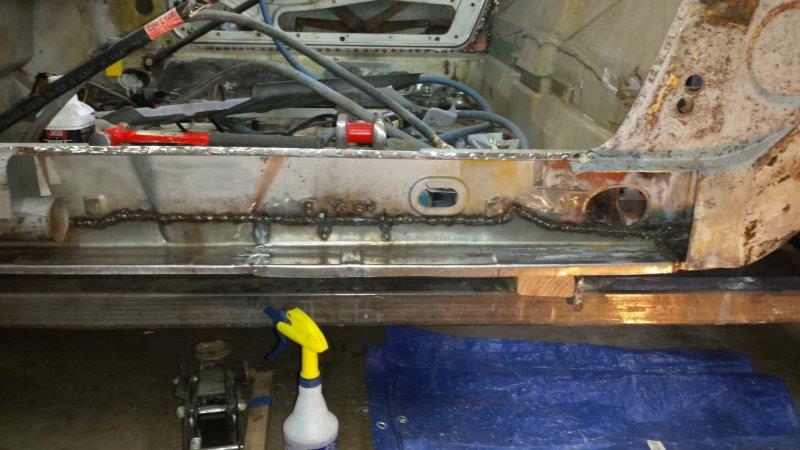 Next, I welded in the outer wall, inner side patch behind the jack support. That little piece took forever to get right. Between the compound curves and limited access, it was a booger to get shaped and trimmed. You can see my whoopsy where I trimmed too much off of a corner. I'm not too worried about that though because once the inner wall is in, it should be easy enough to fill in that corner with the welder. But still... (IMG:style_emoticons/default/headbang.gif) 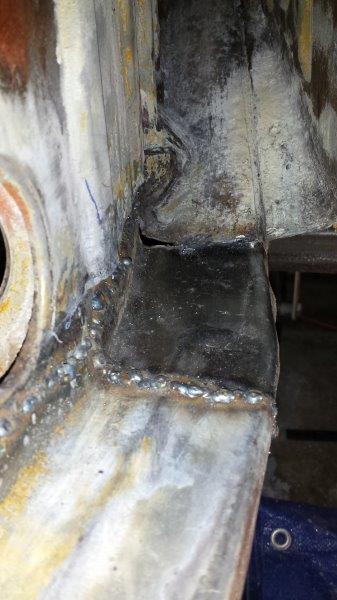 Now let's patch that inner wall. This was another piece that was a PIA to get shaped and prepped. 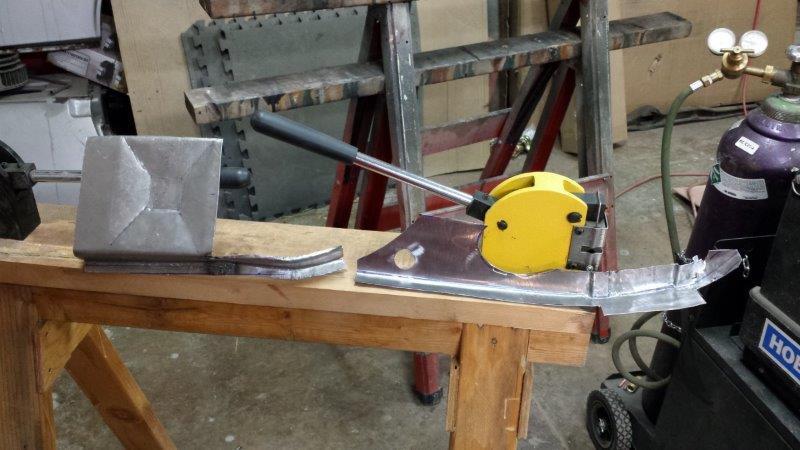 Tin worms had gotten to part of the inner wall over the hump for the engine mount bracket, but luckily, the outer wall had a little pitting, but was still sound. My plan was to include that area in the larger inner wall patch. But due to limited access, I couldn't get that little whoopty-do shaped and trimmed accurately as an integral appendage to the patch. So I made a template with tracing paper and just cut a small piece of sheet metal to patch that separately. Even then, there was no room to manipulate the welding gun, so the the welds look like turkey shit. But structurally, it is sound. 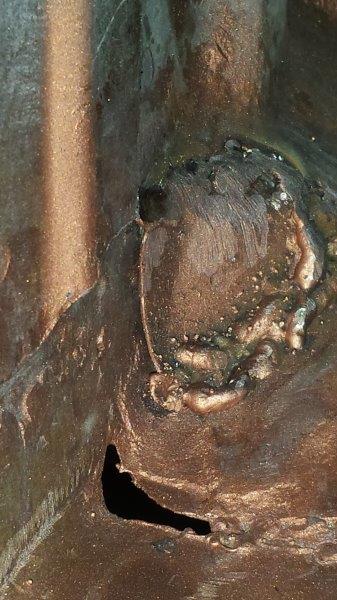 Next the larger patch and outer wall were prepped, and the patch was welded in. 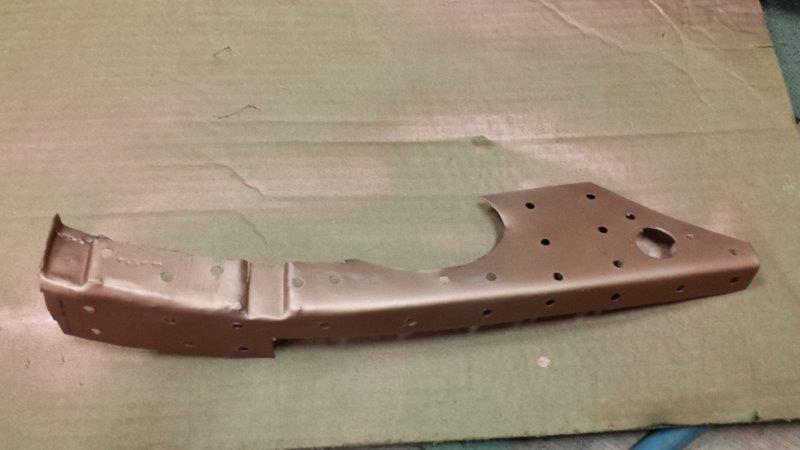 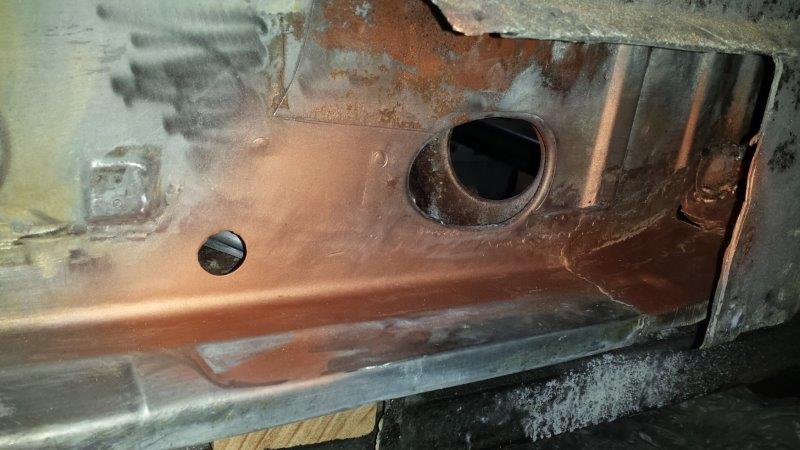 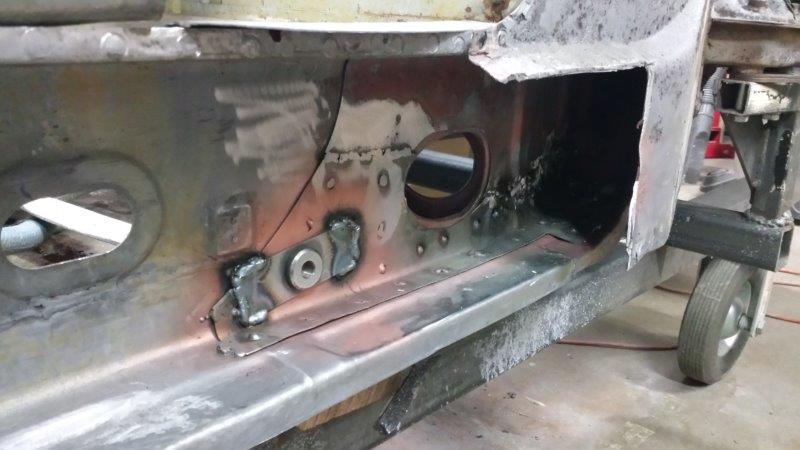 Again, space was so tight inside that area that I had just enough room to stick the gun in with a bare hand. So the rearward portion of the weld job is a bit of a shit show, but structurally sound. I take no pride in this part of the repair. But the only option to make that area look pretty would be to open up the inner wheel well to provide better access like I had on the passenger side. But that option seemed like it was fraught with a lot of risk for limited reward. 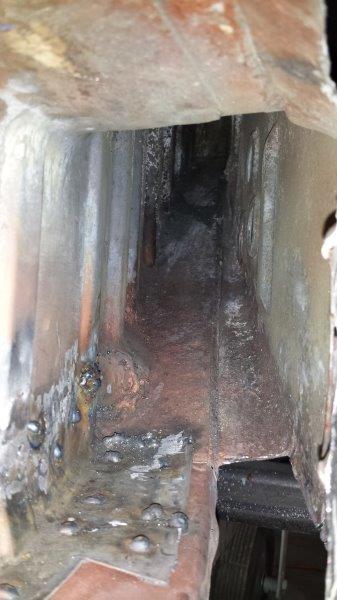 Now it was time to tackle the inner wall of the jack support. This is a complicated piece and I was going to build a hammer form from maple or 3/16" steel, but then I happened to notice a scrap of 3" schedule 40 PVC in the shop and thought that might offer a simpler option. Sure enough, the PVC fit very close to the diameter of the doughnut I needed to create. 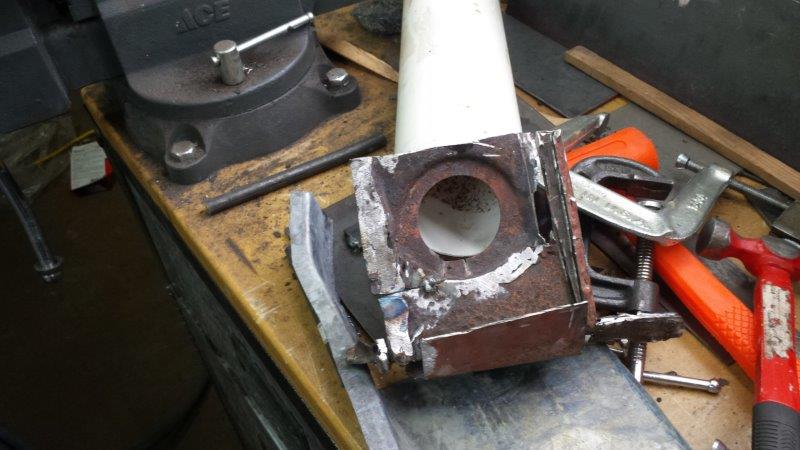 So I drilled a 2" hole in a piece of sheet metal with a hole saw, then hammered it into a doughut using a wooden mallet and the PVC for a form. This would have been easier if I'd have cut the PVC down so I was hammering lower on the bench. But my table saw was covered with crap and I'm lazy. 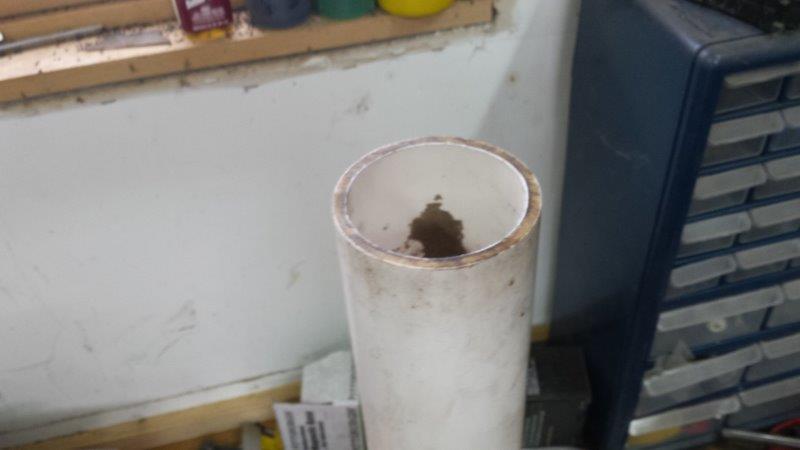 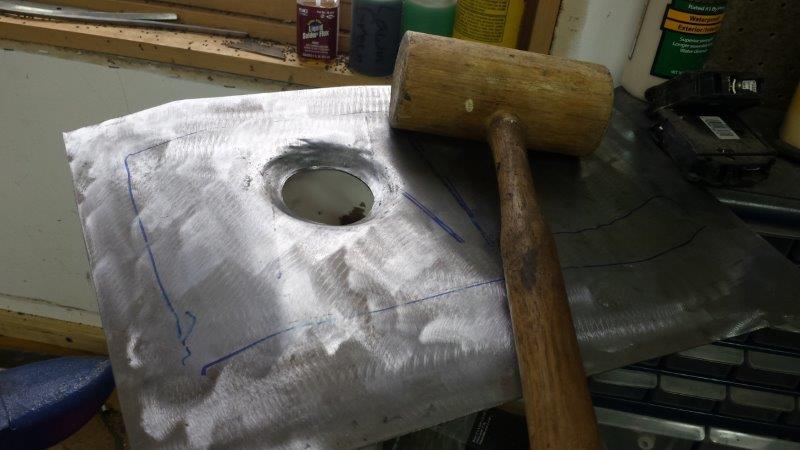 I was able to raise a reasonable facsimile of the original doughnut. It isn't an exact match, but very close and functionally equivalent. The doughnut on the original is sunk in an hourglass-shaped recess to make it fit tight against the pyramid of the outer wall. I created the recess by lining up the piece on the edge of my anvil and tapping at an angle with the edge of my mallet. This took a bit of finesse, but I was happy with the result. 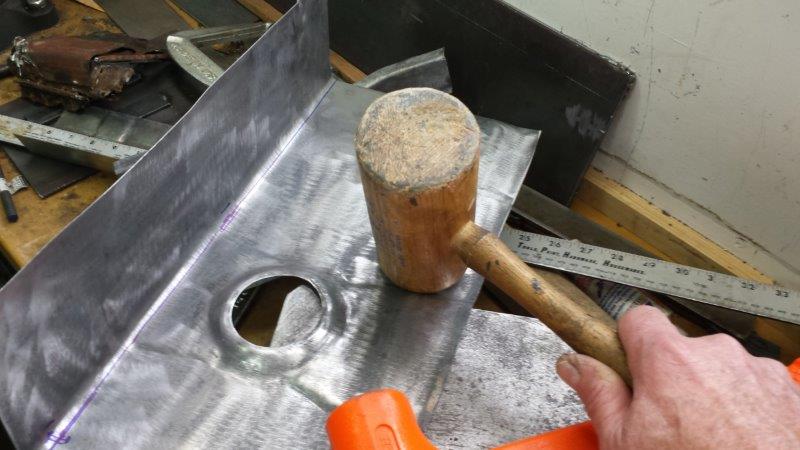 Here's the final result. 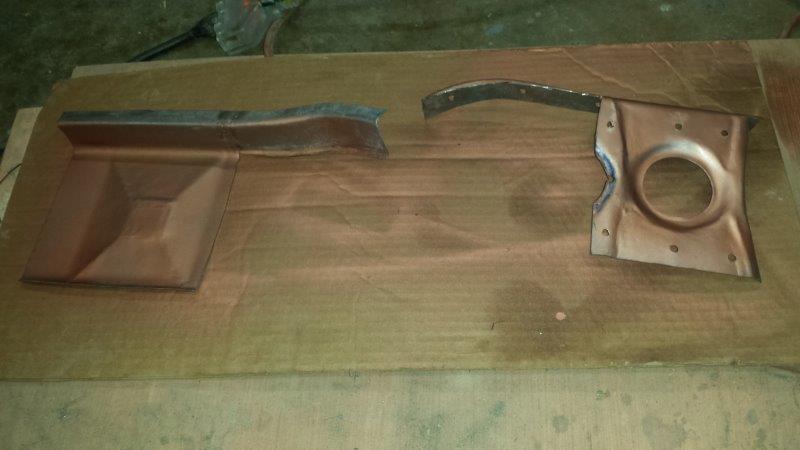  Tuesday, Oct. 17 - the anti-climax I spent a few hours grinding down welds and prepping things for epoxy primer. Everything was given a treatment with Jasco the night before. Then cleaned and wiped down with wax and grease remover, and all flanges and butt weld areas were masked before primer. I pulled my second ratte can of Eastwood Epoxy Primer off the shelf and found it was defective. I felt like a Who down in Whoville who, after weeks of preparation and anticipation, woke on Christmas Day to find the Grinch had been busy. That exciting moment of paint and reassembly would have to wait. I should say that this wasn't Eastwood's fault. They had already replaced the defective can. No need to bore with details except that I thought the original can was still usable, and it wasn't. My bad. (IMG:style_emoticons/default/blink.gif) Wednesday, Oct 18 - Primer, finally I had a gallon of very expensive PPG DPLF series epoxy primer on hand, but no way to spray it. My only spray gun is an ancient siphon-fed high pressure pot, and I wasn't going to waste my $325/gallon primer through an inefficient gun. The next day, I took a trip to the local HF to pick up one of their cheap HVLP spray guns. It is good enough for primer, I think. The new gun worked well. It was my first experience working with 2K paint or an HVLP gun. My how painting has improved over the decades! (IMG:style_emoticons/default/cheer.gif) But in my excitement, I forgot to take a picture of all the nicely primed parts. (IMG:style_emoticons/default/blush.gif) Yesterday, Oct, 19 I tried my best to shoot primer all the way to the rear of the long, but couldn't get it done. So I engineered and fabricated this high tech remote access primer delivery system. 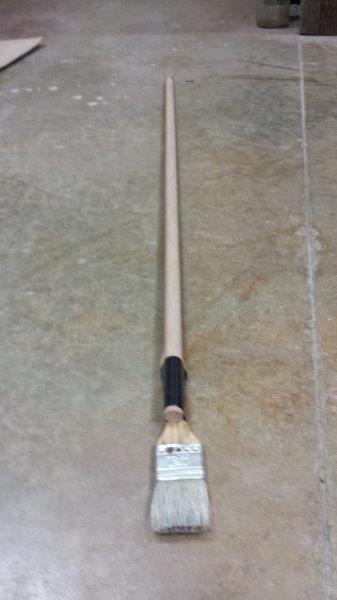 And I at least got a pic of that result. 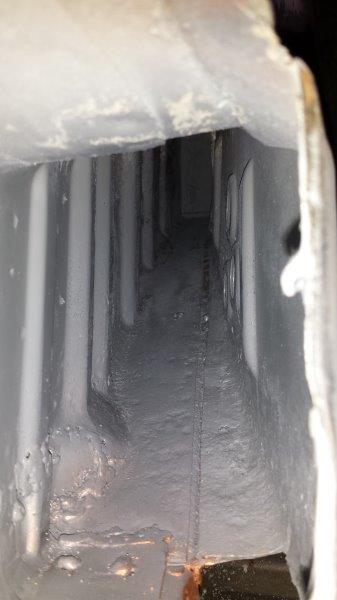 After this cures a week or two, I'll follow up with some Eastwood Internal Frame Coating as backup for any spots that might have been missed. And all cavities will be sprayed with cavity wax. Reinstalling the the rear heater tube and hose went without a hitch. The outer paper wall of the heater hose split slightly when I removed it, so I put a wrap of Gorilla tape on just for a little added reinforcement. Would have been fine without, but I wanted to be sure. It would be nice to be able to clean that hose before reinstall, but didn't want to risk destroying it.  Then the jack area patch went in. I thought of all kinds of ways to offset the inner and outer wall welds, which is preferred. But access limited options and every alternative I could think of was fraught with risk. So I decided to chamfer the butt weld gap so I could make sure to run a puddle into both layers. It seemed to work well and the result is acceptable. 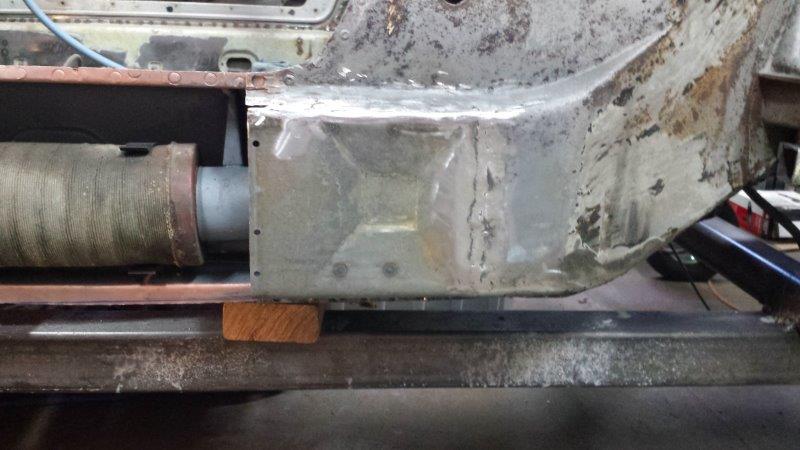 Then I welded in the front wheel well patch that extends into the long. 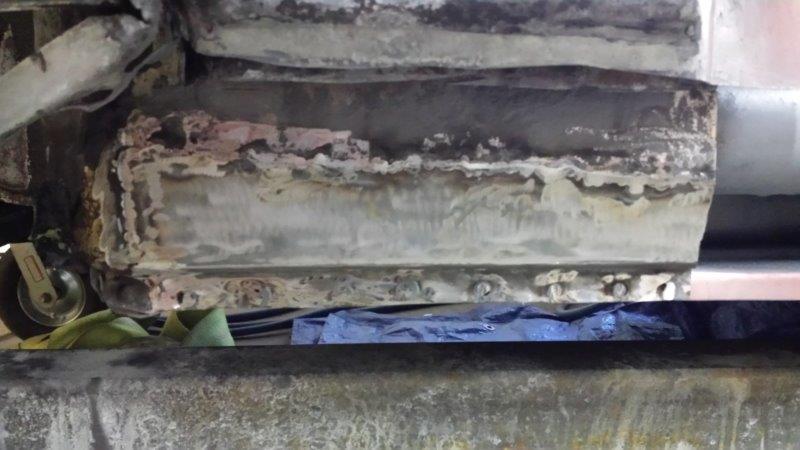 I wanted to primer the backs of those butt welds, so I designed and frabricated a space-aged limited tolerance primer delivery tool. 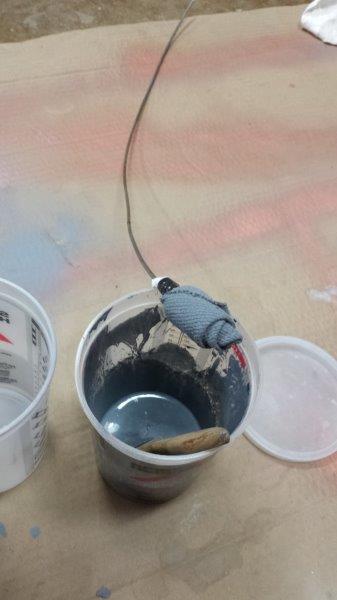 And finally it was ready to fit the outer long! I like to weld up the patch area at the front first. That way, the piece can move with any shrinking that occurs from the butt weld without pulling the whole frame structure. 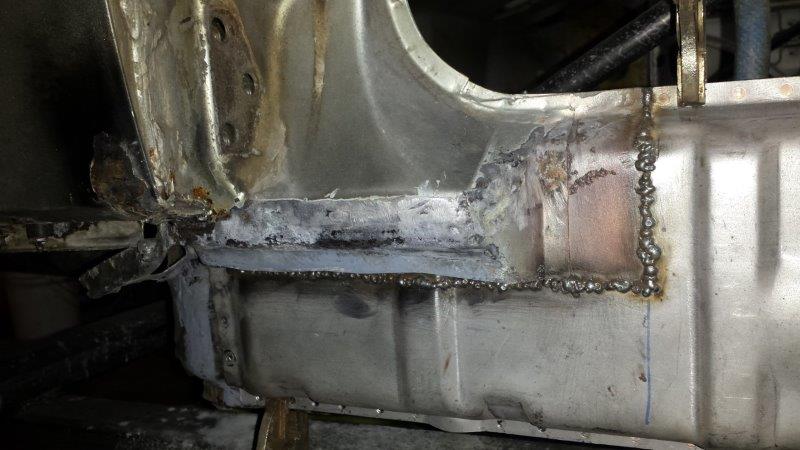 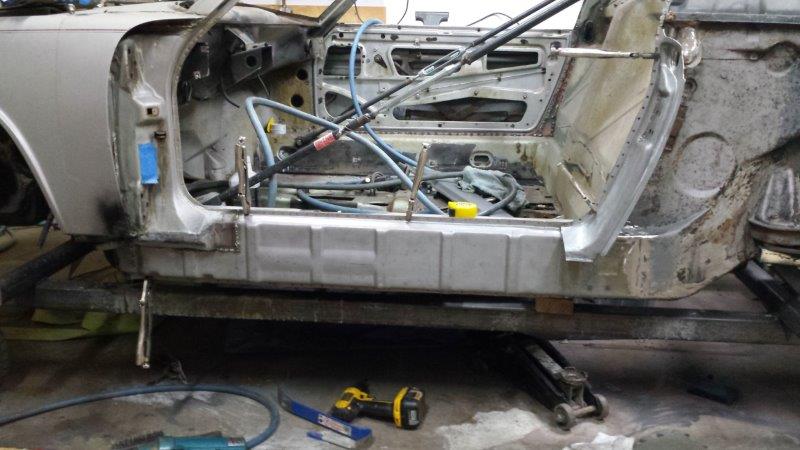 That was a lot to cover. Today I'll dry fit the door jamb with zip screws and refit the door so I can check gaps while I weld up the long. I'm running low on MIG gas, so we'll see how far I get. (IMG:style_emoticons/default/beerchug.gif) |
|
|
|
| tygaboy |
Oct 20 2017, 10:52 AM
Post
#149
|
|
914 Guru Group: Members Posts: 5,810 Joined: 6-October 15 From: Petaluma, CA Member No.: 19,241 Region Association: Northern California |
|
|
|
|
| porschetub |
Oct 20 2017, 12:44 PM
Post
#150
|
|
914 Guru Group: Members Posts: 5,082 Joined: 25-July 15 From: New Zealand Member No.: 18,995 Region Association: None |
QUOTE(tygaboy @ Oct 12 2017, 09:32 AM) Ben - Yep, you, bbrock and Dion come immediately to mind. I know there are others, too, that I'd lump in with you metal cuttin' crazies! (IMG:style_emoticons/default/laugh.gif) (IMG:style_emoticons/default/agree.gif) totally ,hats off to you guys....huge undertaking (IMG:style_emoticons/default/smilie_pokal.gif) . |
|
|
|
| mb911 |
Oct 21 2017, 07:39 AM
Post
#151
|
|
914 Guru Group: Members Posts: 7,742 Joined: 2-January 09 From: Burlington wi Member No.: 9,892 Region Association: Upper MidWest |
Its looking good.. I have to take off from updates this weekend as out of town.. Keep the great work up to take up my slack.
|
|
|
|
| bbrock |
Oct 21 2017, 05:22 PM
Post
#152
|
|
914 Guru Group: Members Posts: 5,269 Joined: 17-February 17 From: Montana Member No.: 20,845 Region Association: Rocky Mountains |
Trying to do as Ben says and keep plugging along. Yesterday, I got a lesson in why it is so important to wear underwear when doing a project like this because I just about (IMG:style_emoticons/default/stromberg.gif) my pants when I bolted on the door and dry fit the jamb to check door gaps. They were WAY off (IMG:style_emoticons/default/new_shocked.gif) It was hard to tell how much was because the jamb needed to be tweaked for fitment, and how much was a real problem. But the gap was zero near the door handle, and (I'm just guessing) 15mm lower on the door. I decided I needed to trim the sail panel enough to clamp it on for a dry fit so I could properly align the jamb the way it will be in in its final resting place. That took a bit of fiddling to get right, but I finally got there and things started looking MUCH better.
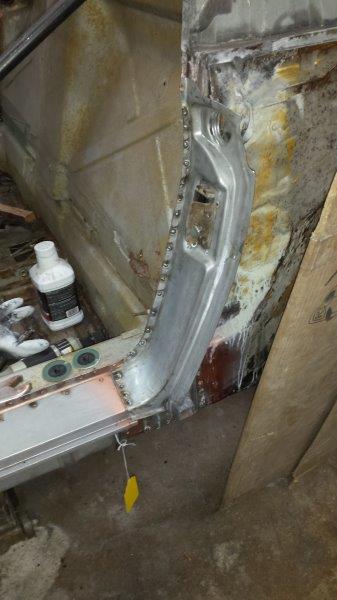
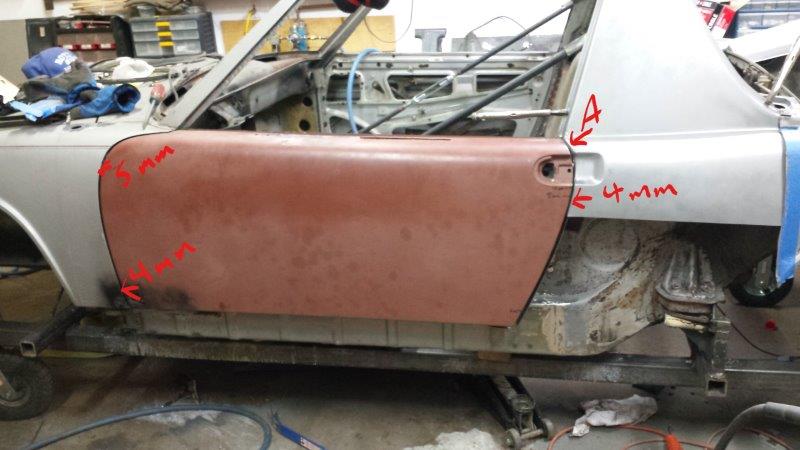 But there was still a major concern. At the spot labeled "A" in the above pic, the door was 2mm higher than the quarter panel. I adjusted the sail panel as much as possible but still couldn't get things to line up. I looked for any possible adjustments at the door hinges and found none. It was puzzling because my measurements from roll bar to window frame, and across the door opening were both spot on with factory specs. (IMG:style_emoticons/default/WTF.gif) It made no sense and I was getting really worried that something was seriously bent or torqued. Then I decided to just push down on the door above the handle area and presto, the door went into perfect alignment. 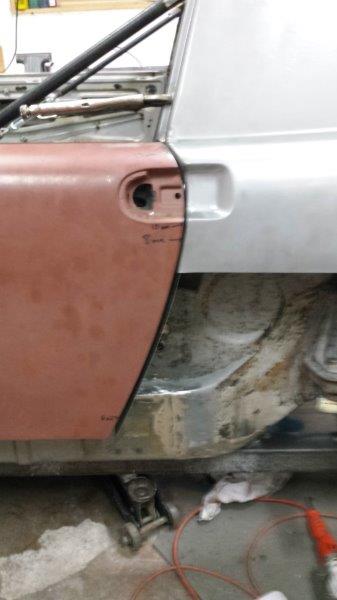 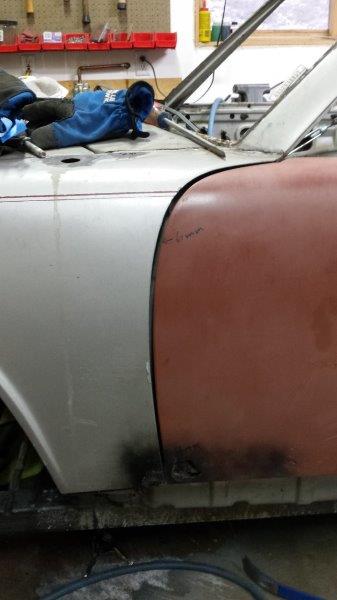 It's a little unsettling, but other than a couple small rust patches in the skin, the door is solid. Apparently, there is enough give in the door that it can be bent up or down a few mm. Anywho, with that little nightmare out of the way, I spent the next couple hours plug welding the long shut. I'm getting better at my plug welding technique, but still have a tendency to overfill the holes a bit, leaving enough dome that they need to be touched with a grinder. 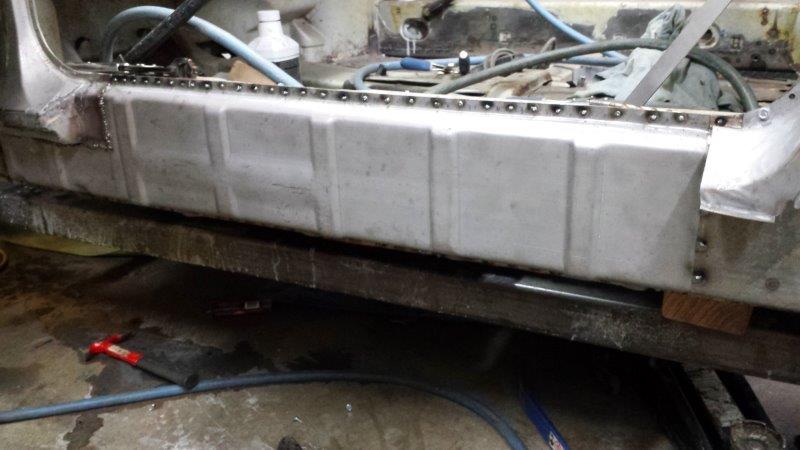 After welding, the door fitment and measurements were unchanged. (IMG:style_emoticons/default/piratenanner.gif) 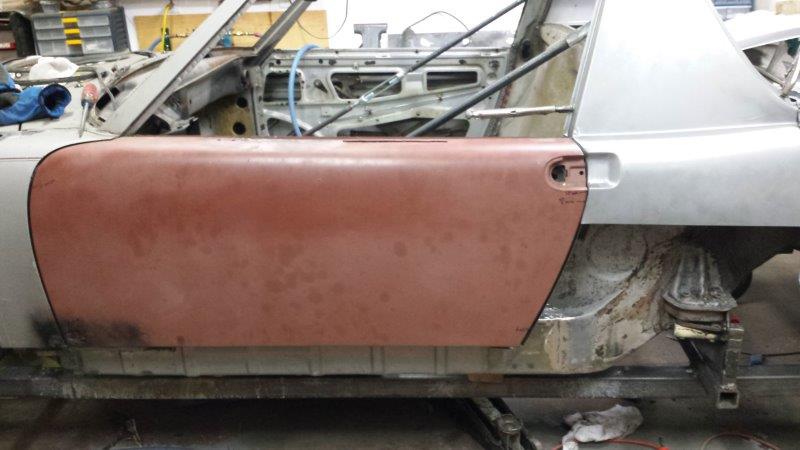 Just as a refresher of where this door started: (IMG:http://www.914world.com/bbs2/uploads/post-20845-1492440892.jpg) Nice improvement. (IMG:style_emoticons/default/cheer.gif) Last night, I got the jack tube welded in. Unfortunately, the replacement gun liner I ordered for my welder was for the newer style Handler and didn't fit my old unit. This leaves me with no way to run .035 wire until I find a replacement. So the inside weld around the tube required some grinding to not look like a pile of bear crap. After getting the tube in, I called it a night. This morning, my welder gas was running on empty so I tried to use it all up in time for a run into town for a fresh exchange. I welded on the jack pyramid. I'll leave welding around the tube until I can run thicker wire. 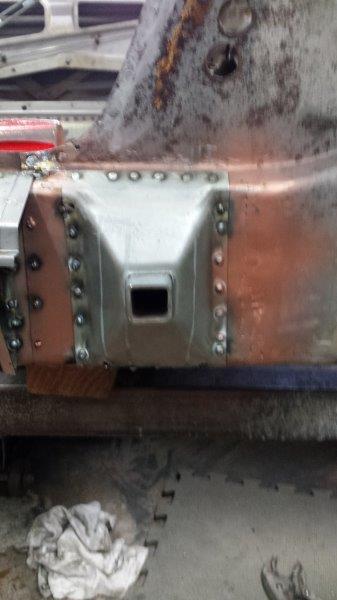 I was still getting 20 lbs of pressure at the gun so I kept going. I welded in the threshold. 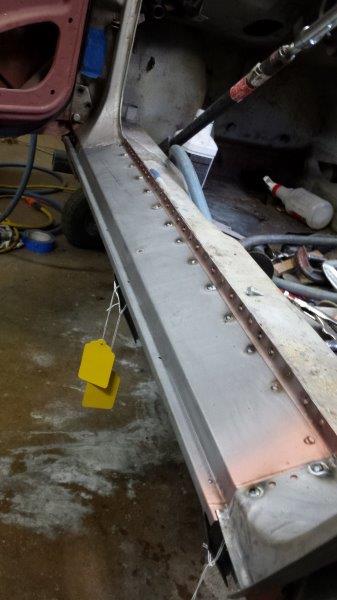 Still had gas, so I burned on the brackets. 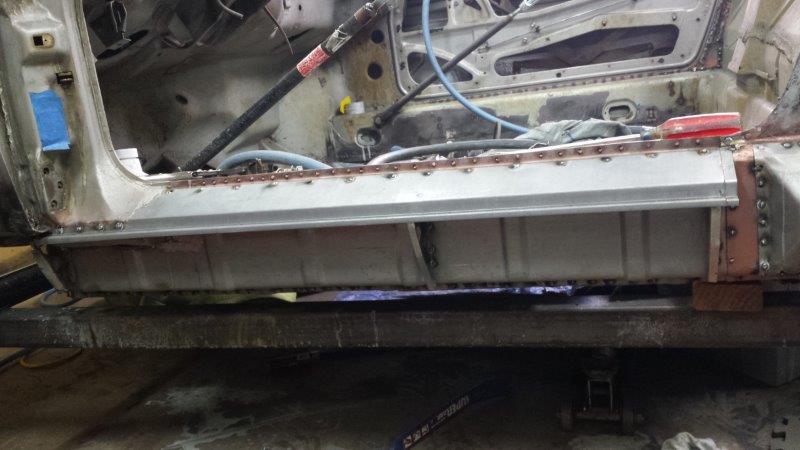 Still had gas. So I started on the door jamb. Got it plugged on in a few spots and the gas gave out... 10 minutes too late to get to the welding shop before they closed at noon (IMG:style_emoticons/default/mad.gif) 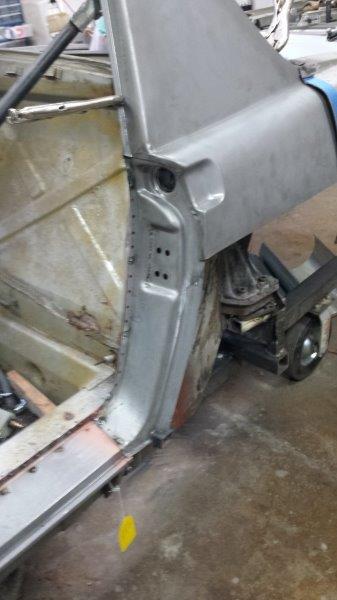 Oh well, welding is over for the weekend. But there is plenty of other stuff to do. I ended with clamping the sail panel back on to admire the progress. 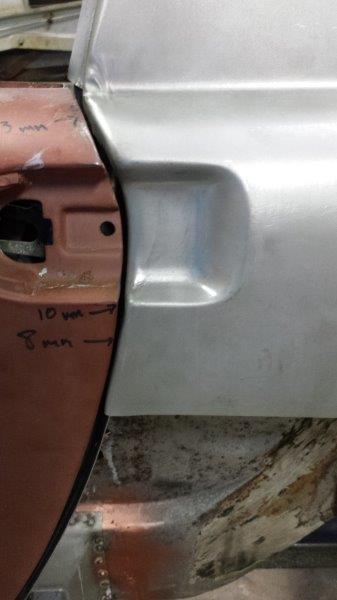 The gap is down to 2mm at the door handle, but that is just because I don't have the sail panel aligned exactly right. It will be fine with final fitment. I think this will be a good time to do a little shop cleanup and organizing. (IMG:style_emoticons/default/beer3.gif) |
|
|
|
| tygaboy |
Oct 21 2017, 09:26 PM
Post
#153
|
|
914 Guru Group: Members Posts: 5,810 Joined: 6-October 15 From: Petaluma, CA Member No.: 19,241 Region Association: Northern California |
Wow - AWESOME progress! And I hear you on the underpants and measurements... Nerve wracking. But man, you are knocking it out! Very nice.
And you have every right to be proud of the improved fit you've achieved. (IMG:style_emoticons/default/beer3.gif) is right! (And you still have Sunday to tidy up...!) |
|
|
|
| bbrock |
Oct 27 2017, 09:31 AM
Post
#154
|
|
914 Guru Group: Members Posts: 5,269 Joined: 17-February 17 From: Montana Member No.: 20,845 Region Association: Rocky Mountains |
Nothing too exciting this week but more progress. Monday I got a fresh C25 bottle for the welder and finished welding in the door jamb.
 But I was getting ahead of myself because when I cut off the old door latch bracket, I found a spot of deeply pitted metal underneath. Yes, I'm stupid. (IMG:style_emoticons/default/screwy.gif) It wasn't a big deal, but if the jamb were still off, I'd probably weld in a small patch. Instead, I just cleaned it back to good steel and zap, zap, zapped to fill the hole with the welder. Then welded the new bracket in place. 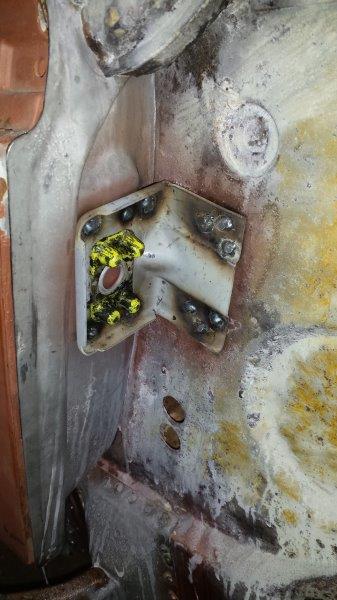 I have one last task to do before I can put the shell on a rotisserie. The bumper mounts were rotted out and it would really suck to watch the rotisserie rip the nose off the car. 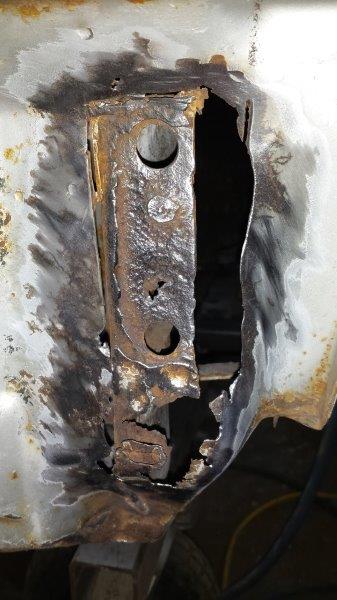 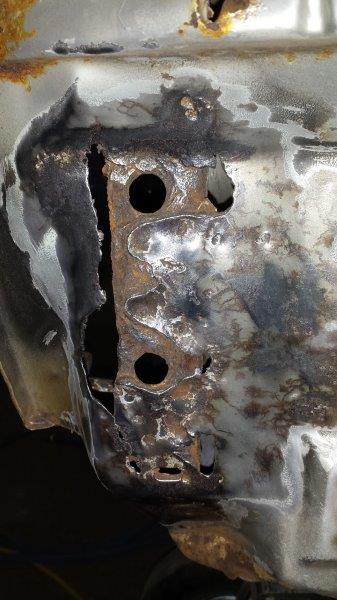  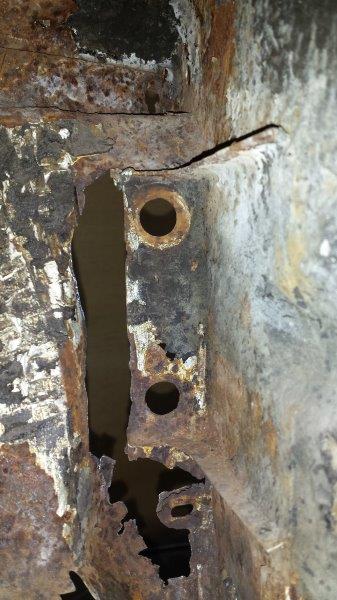 I thought this would be a quick sheet metal patch job, but the structure is a little complicated. The bumper mount is actually a 3 layer sandwich of metal that integrates a bracket, inner wheel well, and front nose skin together. 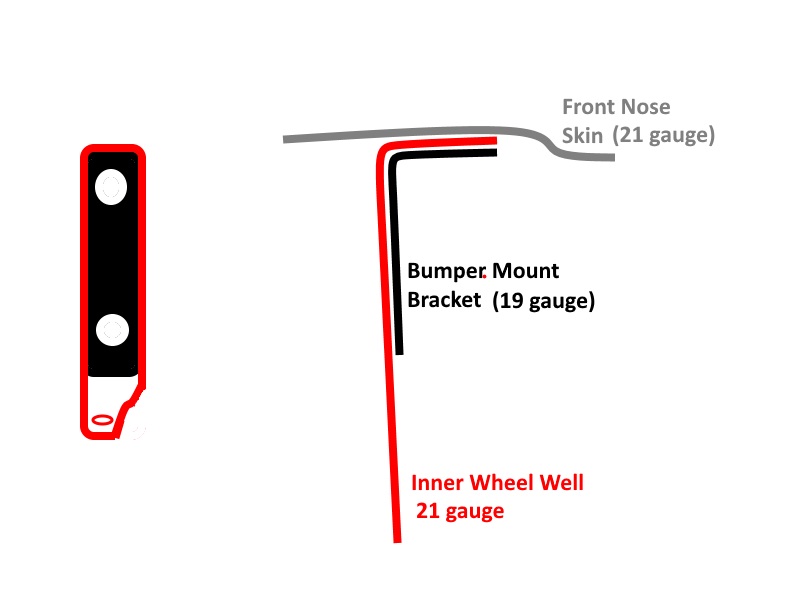 After cleaning back to solid metal, I made a tracing paper template for the front part of the inner wheel well. 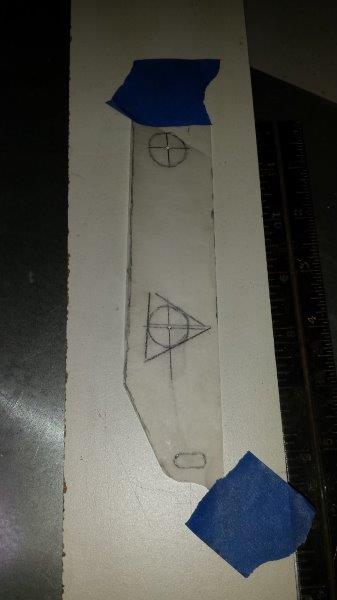 I cut out some rot in the bracket and patched it with 18 g sheet. Then I fabbed a new front piece of the inner wheel well out of 21 g sheet scavenged from the trunk lid. 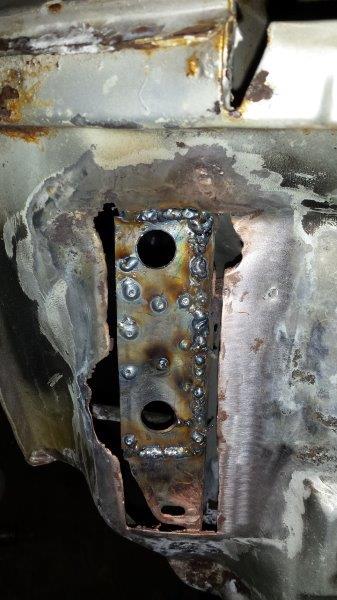 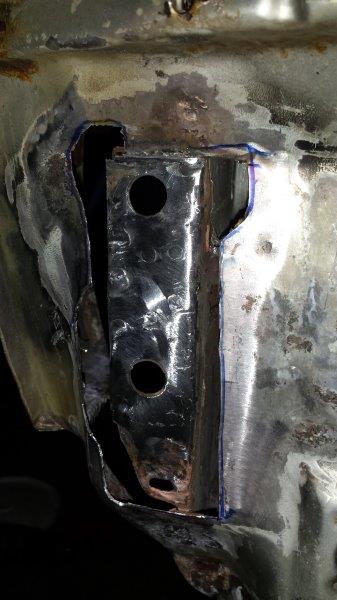 Then a skin graft from the trunk to patch the front nose skin. 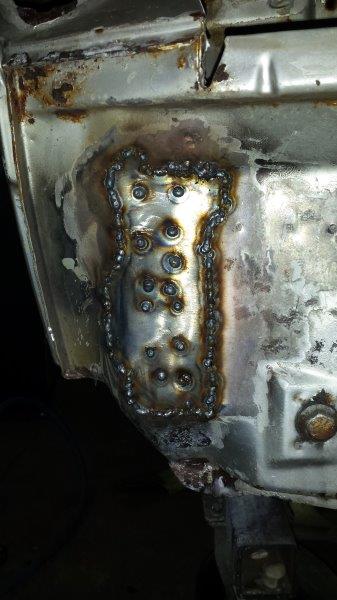 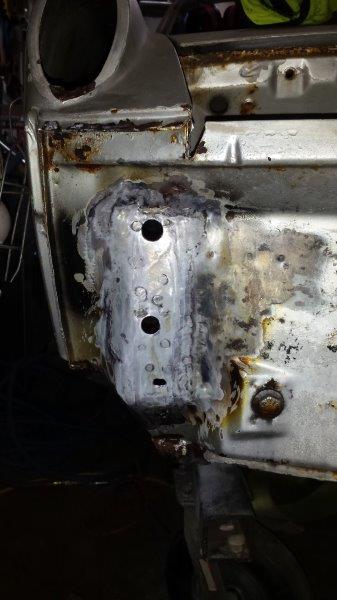 I'll do some more cosmetic work on this as I go through the chassis for metal finishing. For now, at least one side is strong enough to hange the car on. These pics are a little boring. So here's a pic from Monday. You can see the frame of my tent garage at the bottom.  And here's an older one. This is my idea of a really good day.  |
|
|
|
| bbrock |
Nov 9 2017, 07:43 PM
Post
#155
|
|
914 Guru Group: Members Posts: 5,269 Joined: 17-February 17 From: Montana Member No.: 20,845 Region Association: Rocky Mountains |
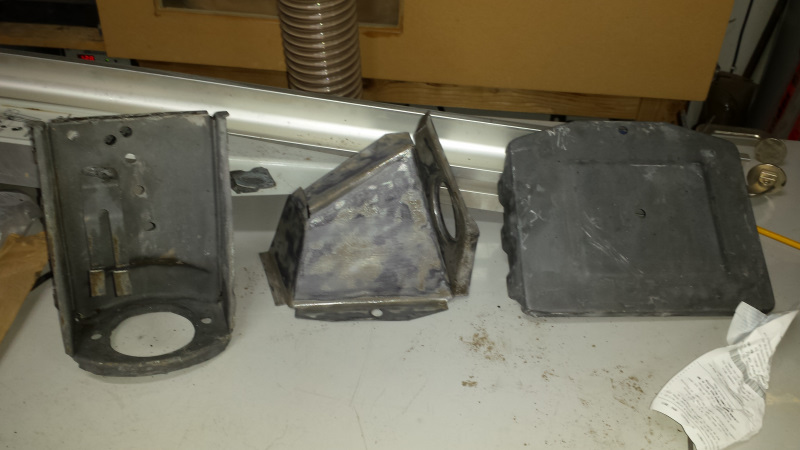
It's been a bit hectic between work and this project so I skipped a week of updates. But some progress has been made.
I finished patching the driver's side front bumper mount area. 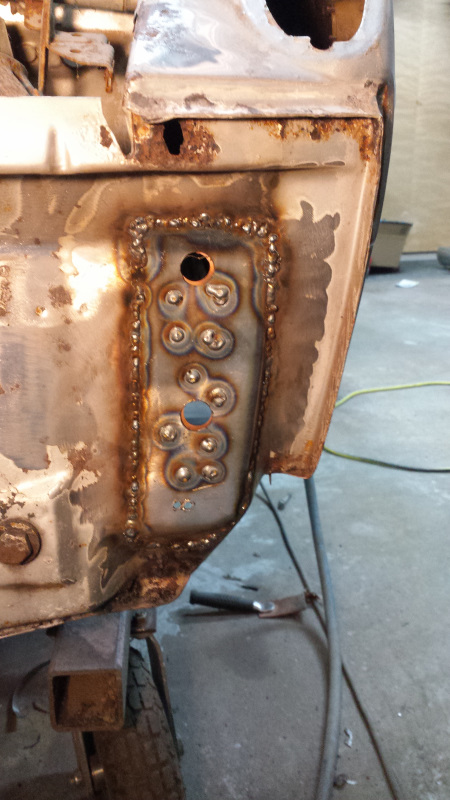 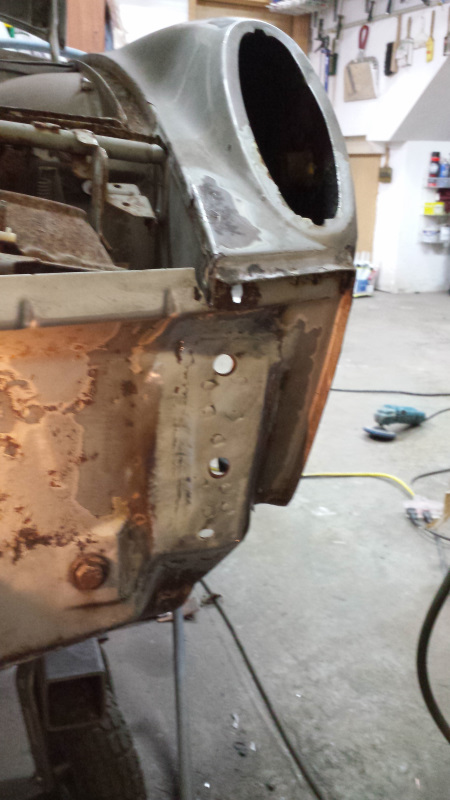 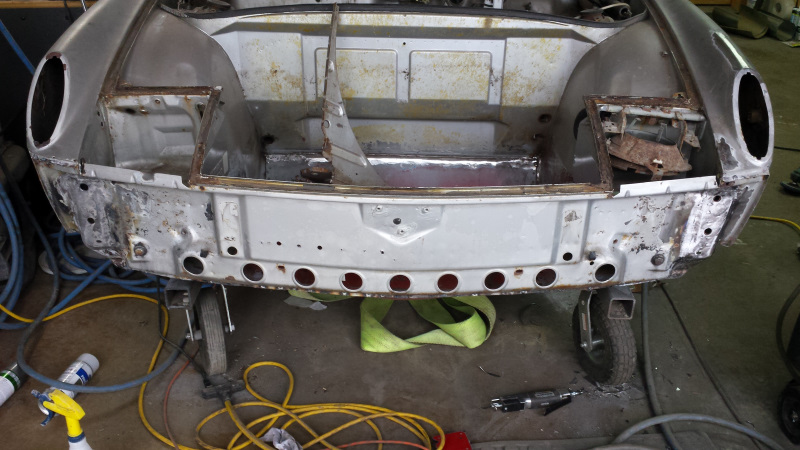 Then I hoped to start converting my roller dolly to a rottiserie to dive into finishing the engine compartment and replacing the floor, but I was waiting on parts to sort out my welder. More on that later. While waiting, I zapped a strip of 22g onto the drivers long to replace the vapor hose hold down. 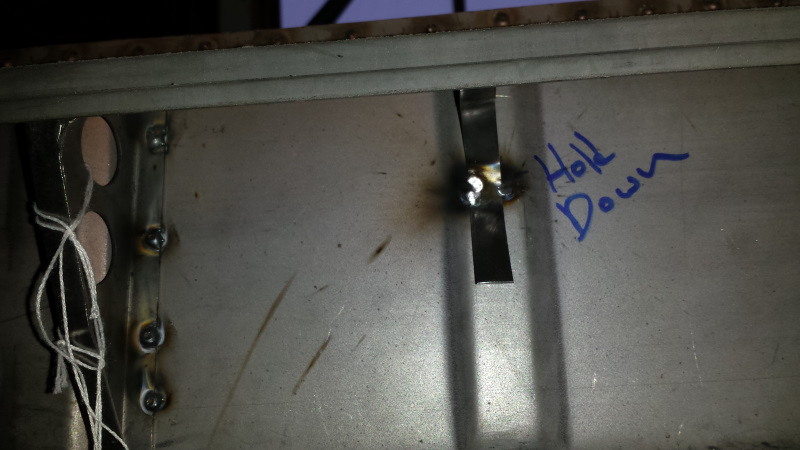 Then, I decided to patch the firewall on the drivers side. 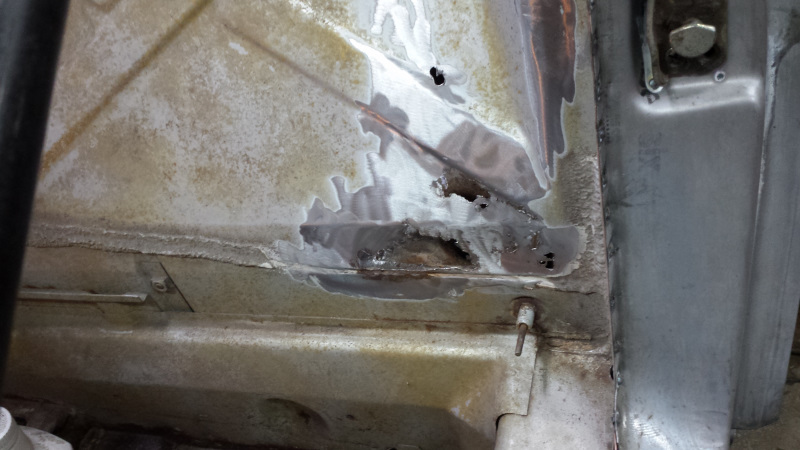 That hole above the channel bead was an unfortunate isolated pit surrounded by good metal. So I just zapped it closed using a copper backing plate. 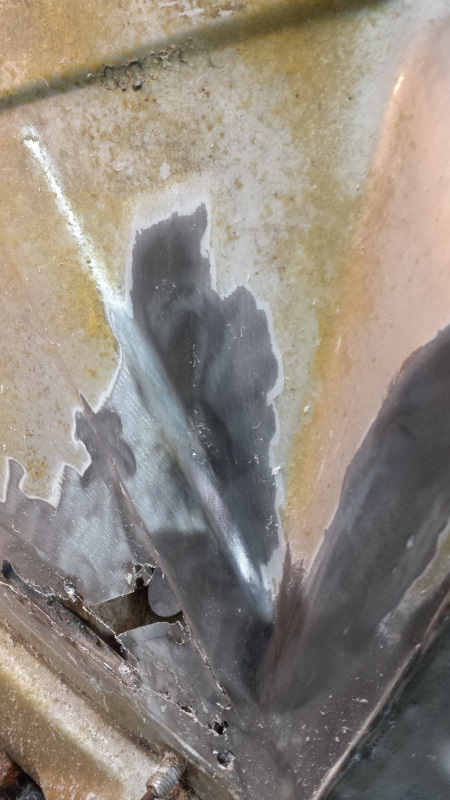 For the lower area, I fabbed a patch and welded it in. 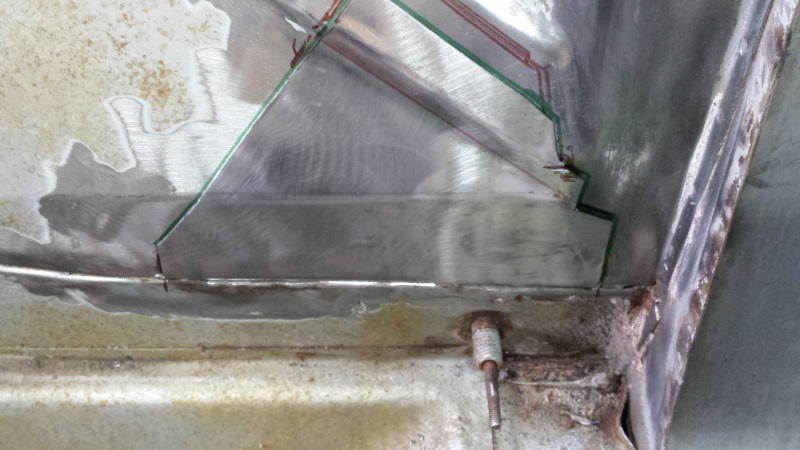 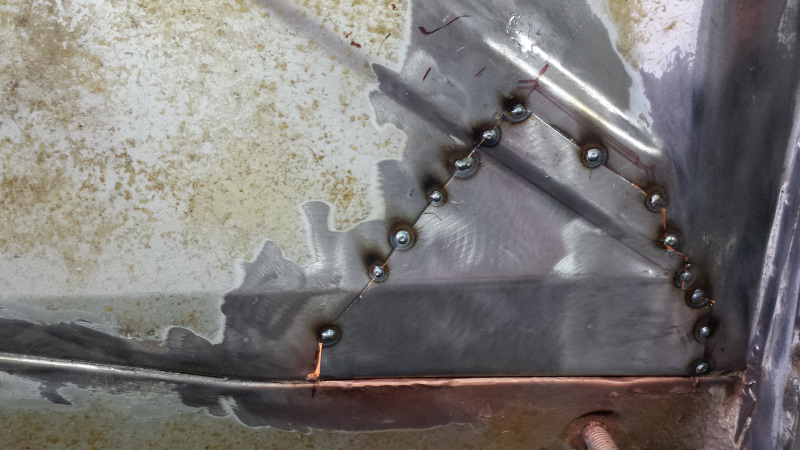 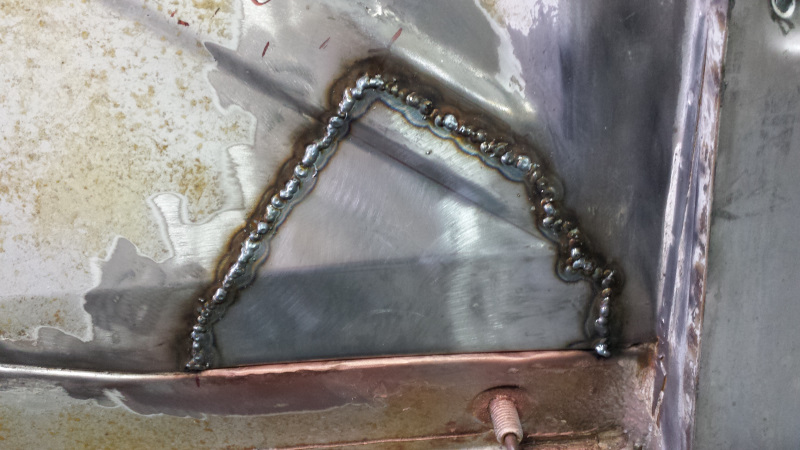 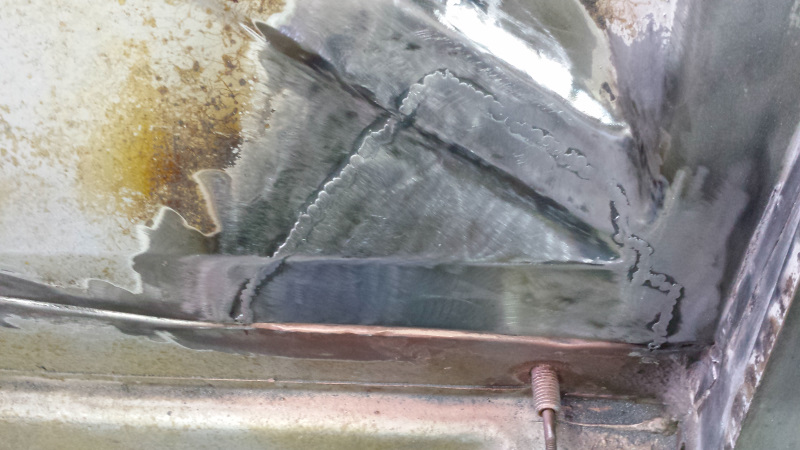 Still can't get rid of that shrink. Heating and hammering as Ben suggested helped, but poor access on the back limited how much of the seam I could hammer and dolly. It will only take a dab of filler to smooth those valleys, but I'd rather have it smooth with no filler. I'm starting to curse you guys that post pics of your invisible butt welds. (IMG:style_emoticons/default/slap.gif) Still waiting for welder parts, so I harvested the rest of the hell hole pieces from my donor parts. 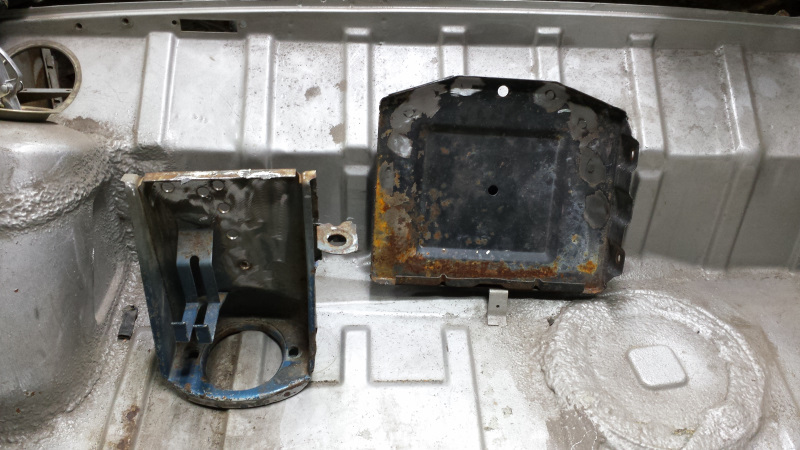 The battery tray had obviously been a replacement on the donor car and was in great shape other than a little surface rust. The engine mount was a bit crusty on the back, but still solid. 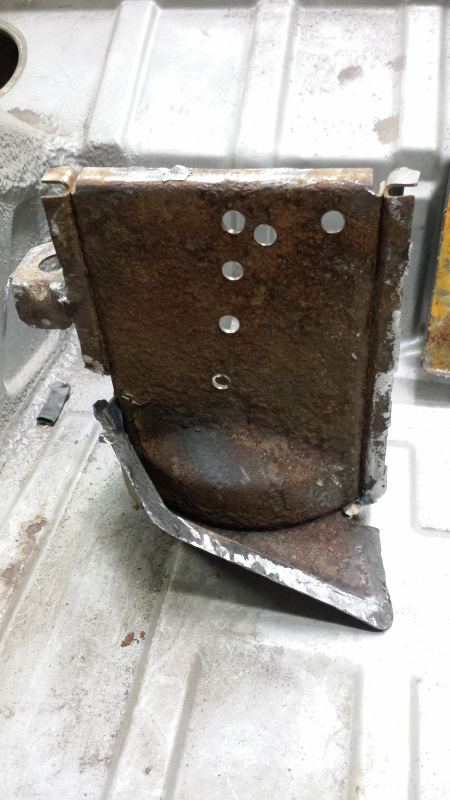 Both parts cleaned up nicely with bead blasting, but I have a little more work to do on the mount, so will wait to post pictures when they are done. Unrelated to chassis work, I got a fun GB package from 914rubber.  It will be quite some time before I'm ready to used these parts, but I had to take advantage of the GB on the master cylinder. (IMG:style_emoticons/default/smilie_pokal.gif) I hope I don't regret not getting the easy option. All this welding and grinding has taken a toll on my shop air filtration filters. So replacements were in order. Certainly don't what that (IMG:style_emoticons/default/stromberg.gif) in my lungs! 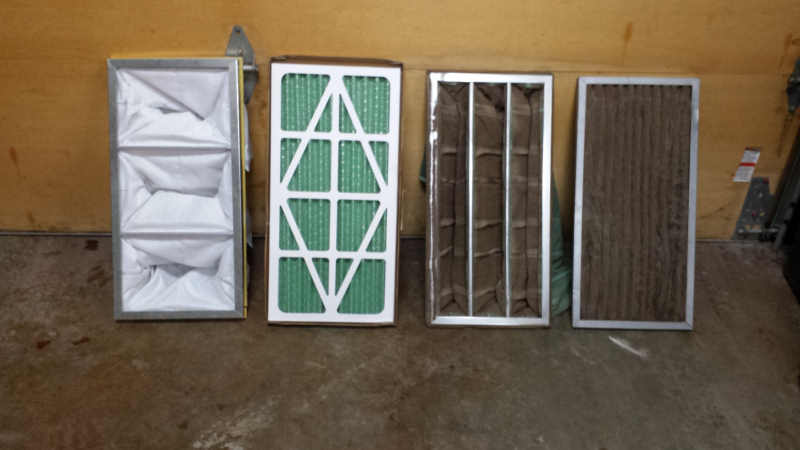 And the welder parts arrived. 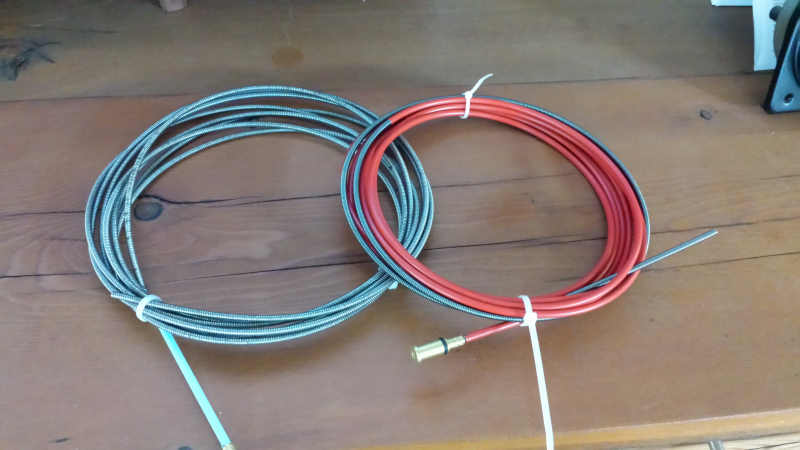 I wrote about this on another thread, but a couple months ago, my welder started acting up. I was still using the original, 30 year old, liner that came with my welder. So assumed changing the liner would make things right again. It wasn't easy to find liners for this discontinued gun, but I managed. But after installing the new liner, the welder was no better. It was time to face that I'd been in denial. The spark had gotten weak to the point that I was cranking the amps up to full power just to stitch weld thin sheet metal. After some research, I learned this is a classic symptom of bad diodes. So today I pulled them and tested them. 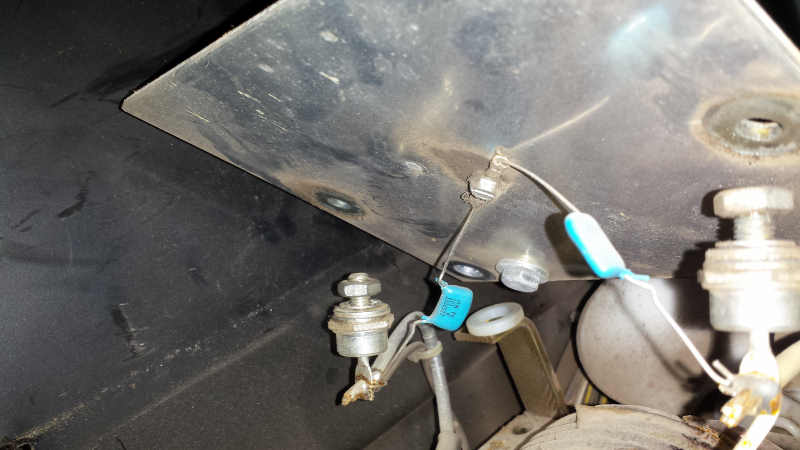 Sure enough, both diodes read open in both directions. The local welding shop sells Miller products, but they don't stock diodes and had no interest in helping me find them. This is the same shop that still sells silica sand for blasting media. (IMG:style_emoticons/default/yikes.gif) Diodes are easy to find online and I have a set on order, but I'm dead in the water until they arrive. There are plenty of non-welding tasks to do though. So I'll manage to stay busy somehow. (IMG:style_emoticons/default/beer3.gif) |
|
|
|
| bbrock |
Nov 15 2017, 02:35 PM
Post
#156
|
|
914 Guru Group: Members Posts: 5,269 Joined: 17-February 17 From: Montana Member No.: 20,845 Region Association: Rocky Mountains |
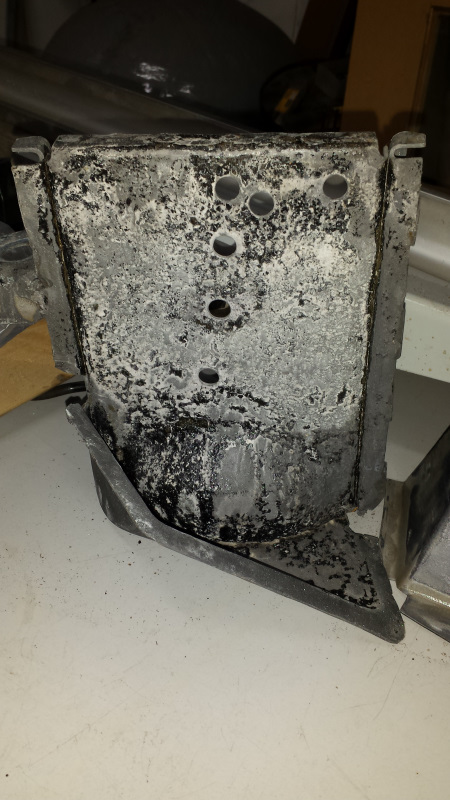
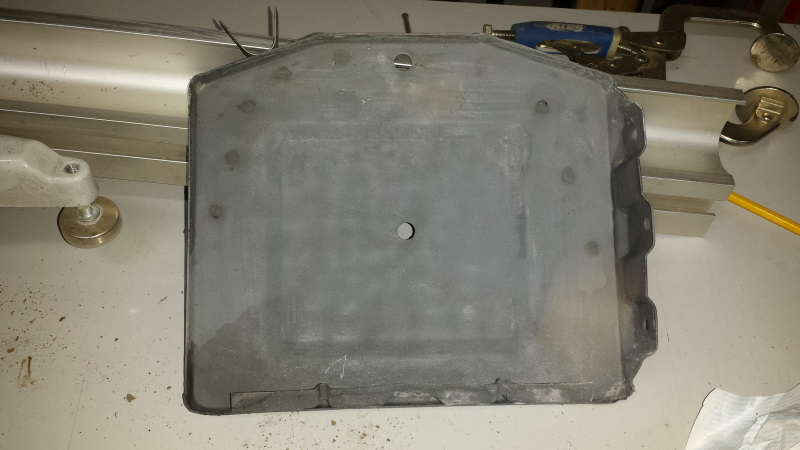
Not a whole lot of progress, but some. While waiting for welder parts, I worked on a couple non-Porsche projects. But I did finish cleaning up the engine mount and battery tray, and treating them with Jasco. I also stripped the Dansk tray support I got from RD. The Dansk support comes with a super tough power coat which would be great, I think. But not so great if you want to primer and spray with the chassis. It was a bear to get off. The Jasco will need to be reactivated and rinsed before installing the parts, but they cleaned up nicely.
   With the welder down, I turned my attention to the engine. The heads are the only things that weren't rebuilt back in 1989. You know, back when Madonna and the B-52s were making me weep for the musical arts. Even Neil Young was putting out crap. Why Neil... why? Anyway.... I disassembled one head. Some of those valve keepers didn't want to let go. But I got the valves out. Everything looks good so far, no nasty surprises. 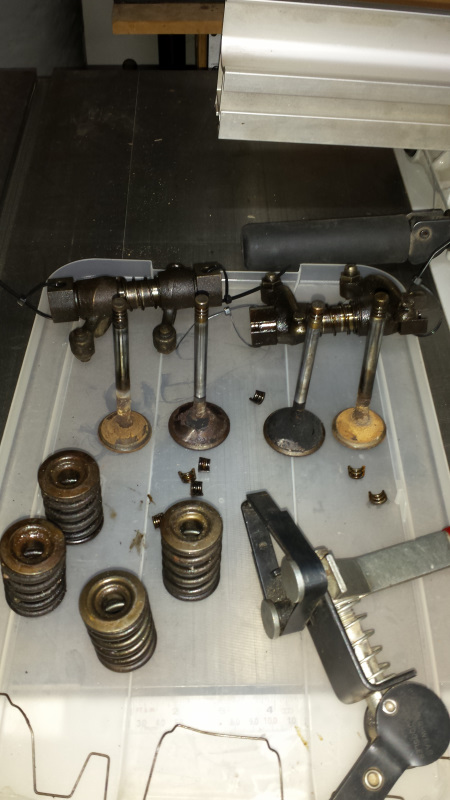 With the heads disassembled, time to clean them. I gave them a scrub with soap and water to get the worst of the almost thirty-year old grease off. 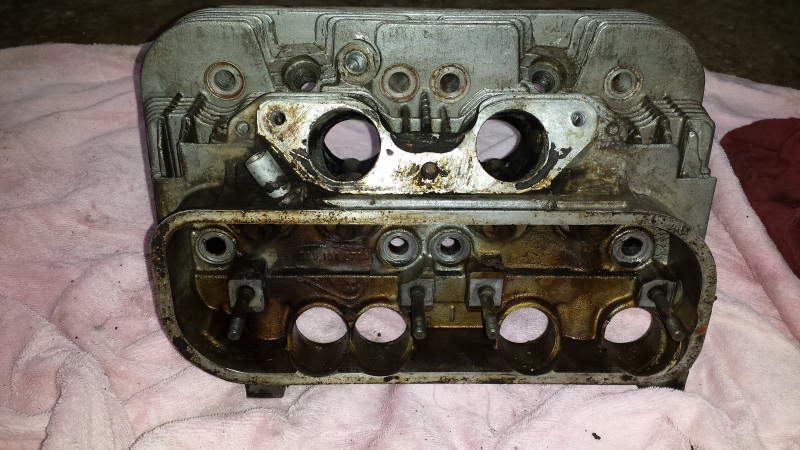 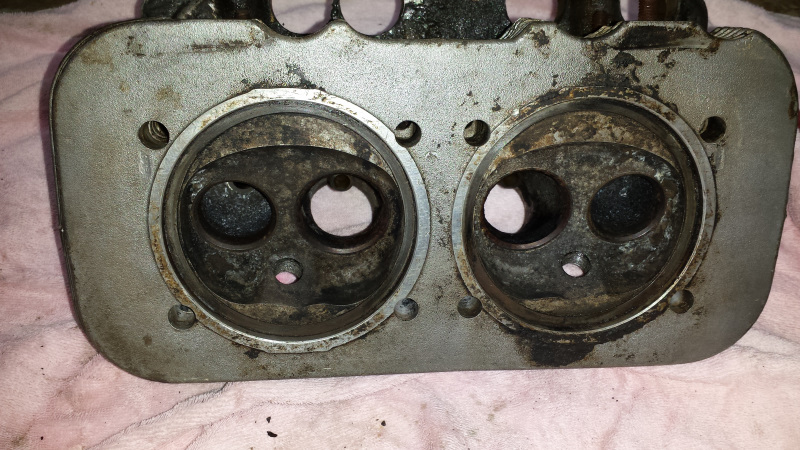 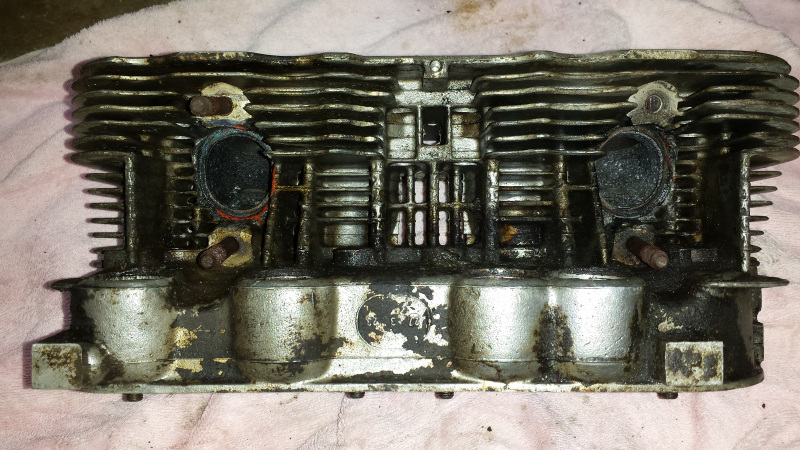 Still pretty nasty. I loaded up the borrowed blasting cabinet with walnut shell to finish the cleaning. Then I hit another snag. The blasting cabinet I'm using likes to clog, but I was able to get it to work barely adequately with glass bead by pulsing the trigger to clear the tube. The walnut shell was a no-go. The best I could get was maybe 20 seconds before it would clog. Putting a gloved finger over the nozzle and puffing air would clear the clog until the rubber hose worked loose enough the pop off. Then I had to get in the cabinet and reconnect things. Too much of a pain. The little bit I did blast, worked really well. But this won't do. I did a little online research and quickly discovered that the single tube siphon in this cabinet is the problem. 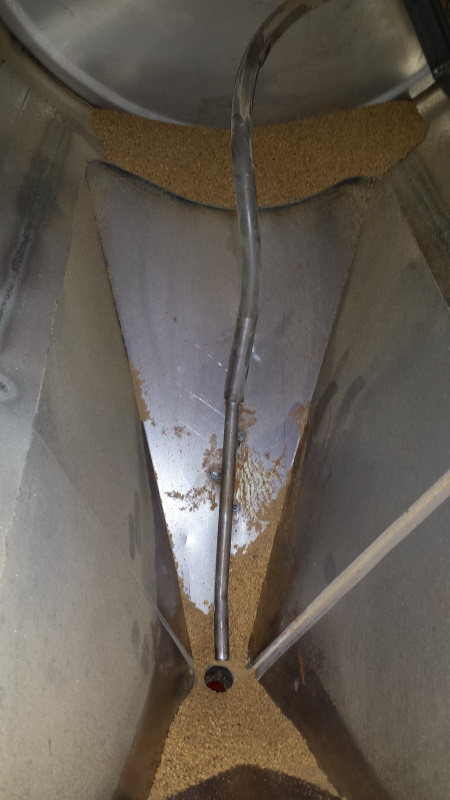 I just got the go-ahead from the owner to modify the tube to this double tube design which is said to work well. 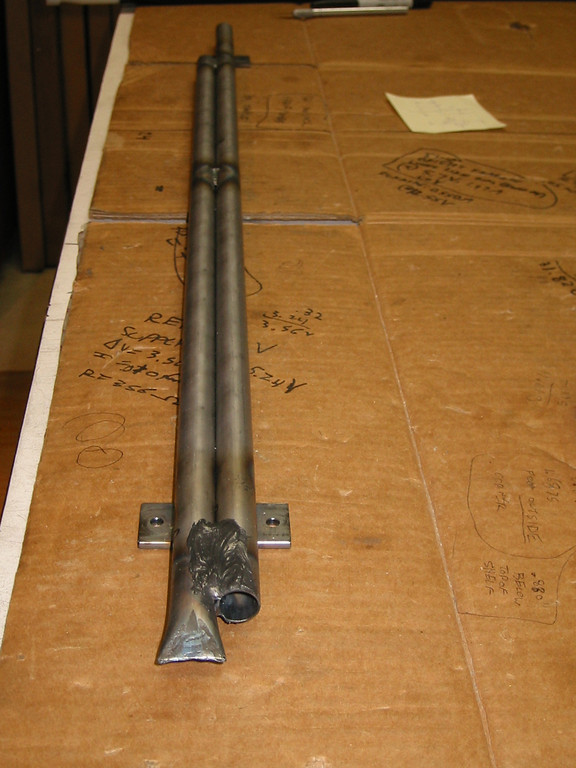 This is another pretty boring update, so here is a bat: 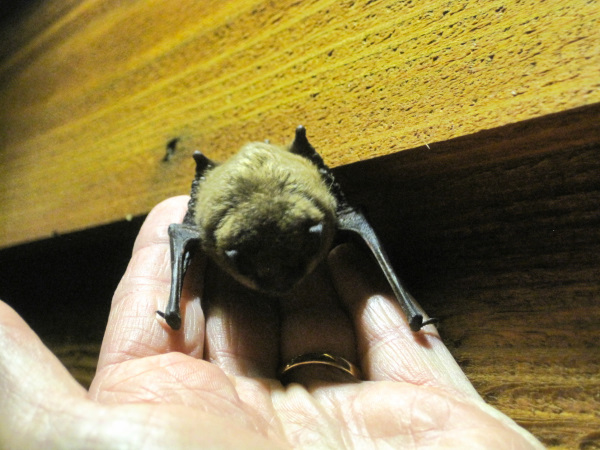 |
|
|
|
| trojanhorsepower |
Nov 15 2017, 03:46 PM
Post
#157
|
|
Senior Member Group: Members Posts: 1,031 Joined: 21-September 03 From: Marion, NC Member No.: 1,179 Region Association: None |
Nice Pine. What state?
|
|
|
|
| bbrock |
Nov 15 2017, 06:55 PM
Post
#158
|
|
914 Guru Group: Members Posts: 5,269 Joined: 17-February 17 From: Montana Member No.: 20,845 Region Association: Rocky Mountains |
QUOTE(trojanhorsepower @ Nov 15 2017, 02:46 PM) Nice Pine. What state? Are you talking about the siding behind the bat? It's actually "white fir" which I was told includes grand fir, noble fir, and a few other species. It was logged and milled in NW Montana. It looks a lot like pine. I don't think I'd use it again for siding though. |
|
|
|
| 76-914 |
Nov 15 2017, 10:30 PM
Post
#159
|
|
Repeat Offender & Resident Subaru Antagonist Group: Members Posts: 13,878 Joined: 23-January 09 From: Temecula, CA Member No.: 9,964 Region Association: Southern California |
Cute Bat. That pick up tube looks like the one that transformed my
POS HF cabinet into a useful blaster. Eually important is the use of 3/8 ID hose and fittings. Keep on keeping on. Your almost there. (IMG:style_emoticons/default/beerchug.gif) |
|
|
|
| bbrock |
Nov 16 2017, 05:56 PM
Post
#160
|
|
914 Guru Group: Members Posts: 5,269 Joined: 17-February 17 From: Montana Member No.: 20,845 Region Association: Rocky Mountains |
Diodes delivered! I made a special 6 mile round trip down our snowy mountain road to pick up the mail, giddy with the prospect of having a working welder by the end of the evening. I got home and opened the package, all aquiver with excitement.
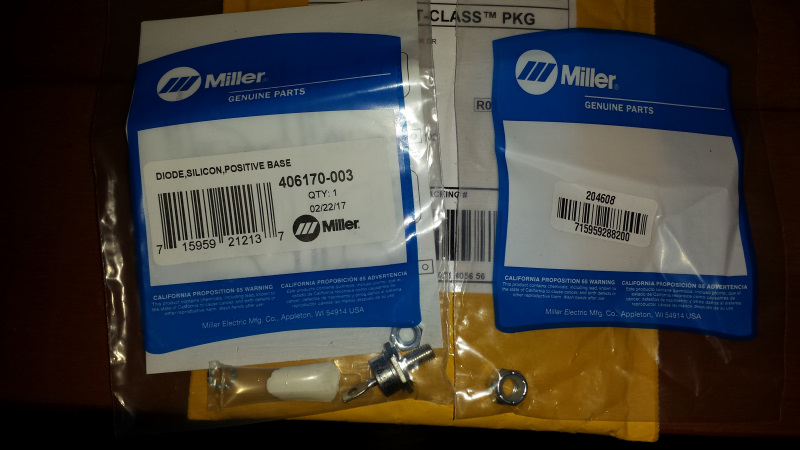 (IMG:style_emoticons/default/stromberg.gif) , (IMG:style_emoticons/default/stromberg.gif) , and more (IMG:style_emoticons/default/stromberg.gif) (IMG:style_emoticons/default/headbang.gif) (IMG:style_emoticons/default/headbang.gif) One diode kit and one.... nylon insert nut? (IMG:style_emoticons/default/WTF.gif) Waiting to hear from the ebay seller on my refund request. I don't think there will be a problem, but another week of delay. This whole operation depends on a welder. Without it... no chassis work, no blasting cabinet repair. Might be a good time to start working on the wiring harness. If this isn't interesting, here's a coyote.  |
|
|
|
|
1 User(s) are reading this topic (1 Guests and 0 Anonymous Users)
0 Members:

|
Lo-Fi Version | Time is now: 18th April 2026 - 03:07 PM |
Invision Power Board
v9.1.4 © 2026 IPS, Inc.