|
|
|
Porsche, and the Porsche crest are registered trademarks of Dr. Ing. h.c. F. Porsche AG.
This site is not affiliated with Porsche in any way. Its only purpose is to provide an online forum for car enthusiasts. All other trademarks are property of their respective owners. |
|
|

  |

| 914_7T3 |
 Apr 6 2020, 11:06 PM Apr 6 2020, 11:06 PM
Post
#1541
|
|
Please forgive me, I'm new to all of this!  Group: Members Posts: 1,898 Joined: 3-April 17 From: Los Angeles, CA Member No.: 20,991 Region Association: Southern California |
QUOTE(bbrock @ Apr 6 2020, 09:45 PM)  QUOTE(914_7T3 @ Apr 6 2020, 09:36 PM) QUOTE(bbrock @ Apr 6 2020, 09:26 PM) I love 914Rubber, but these are not even close to being usable. I'm going to give the AA gaskets a try. Looking good! The AA ones fit really well and work great as a replacement. Good to know. Thanks! (IMG:style_emoticons/default/thumb3d.gif) BTW, I'm not convinced I have the right flasher. I need to get a full set of bulbs and do some testing. If you are referring to the relay, below is the one that worked in my car before the electrical Gremlins surfaced. There are different versions of the Hella TBB4 ending in part #-02 or -04 etc... I believe the -02 to be correct for a '73. 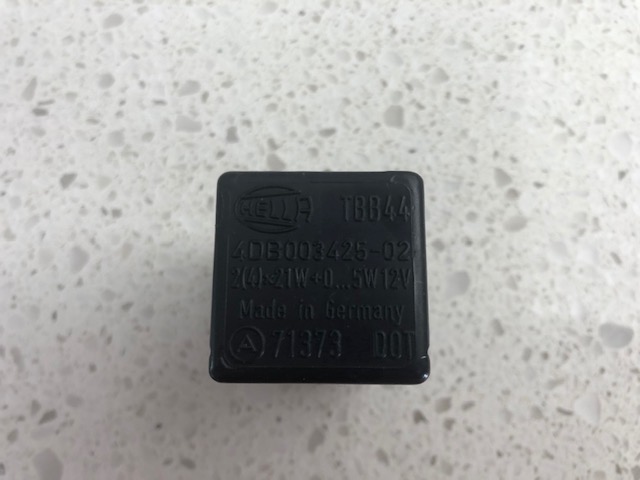 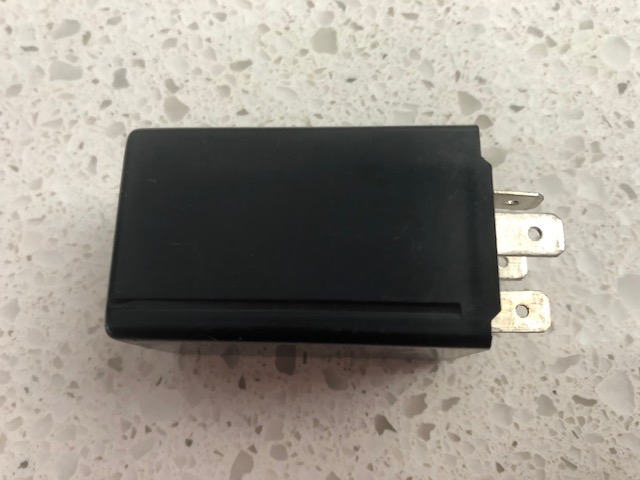 |
   |

 
|
| dr.tim |
Apr 7 2020, 10:24 AM
Post
#1542
|
|
Member Group: Members Posts: 101 Joined: 17-December 11 From: Butte, America Member No.: 13,907 Region Association: Rocky Mountains |
Spiffy.
...and anything that was binding me to a date of April 25 has been closed or cancelled. (IMG:style_emoticons/default/dry.gif) That also means I am available for an eastern journey as necessary, convenient, or bored. |
|
|
|
| UROpartsman |
Apr 7 2020, 12:31 PM
Post
#1543
|
|
Member Group: Members Posts: 301 Joined: 22-October 15 From: Simi Valley, CA Member No.: 19,288 Region Association: None |
We haven't offered a tail light seal for the 914, but we do have a BMW 2002 tail light seal that could be a similar material and profile. It's part number 63 21 1 356 945, and it's grey in color, is 5mm diameter by 70cm long (you'd have to use more than one per 914 tail light), and it's a soft silicone foam material.
If folks are interested, we could look into increasing the length to fit 914 tail lights. Attached image(s) 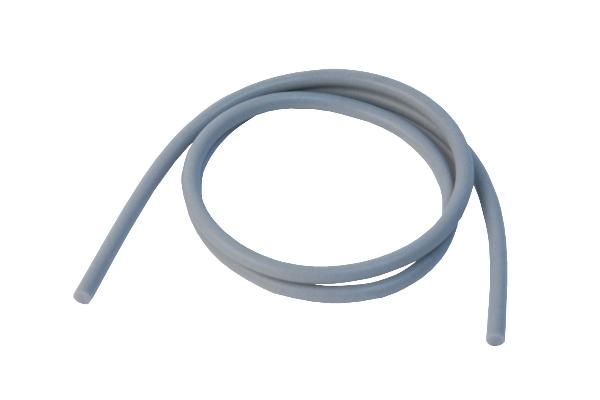
|
|
|
|
| bbrock |
Apr 19 2020, 02:01 PM
Post
#1544
|
|
914 Guru Group: Members Posts: 5,269 Joined: 17-February 17 From: Montana Member No.: 20,845 Region Association: Rocky Mountains |
I haven't been good with updates because as usual, I have several mini-projects going simultaneously and all have stalled until I make a run into Cootieville for supplies. I didn't like going to Cootieville before the pandemic and now really don't like going. However, yesterday I notices something wasn't quite right with my dash pad. I couldn't quite put my finger on it.
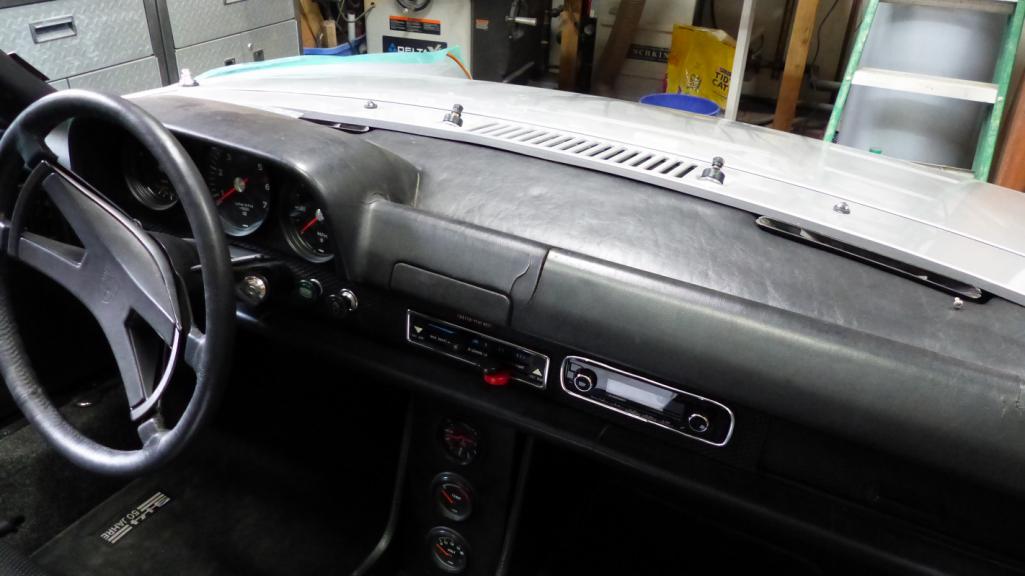 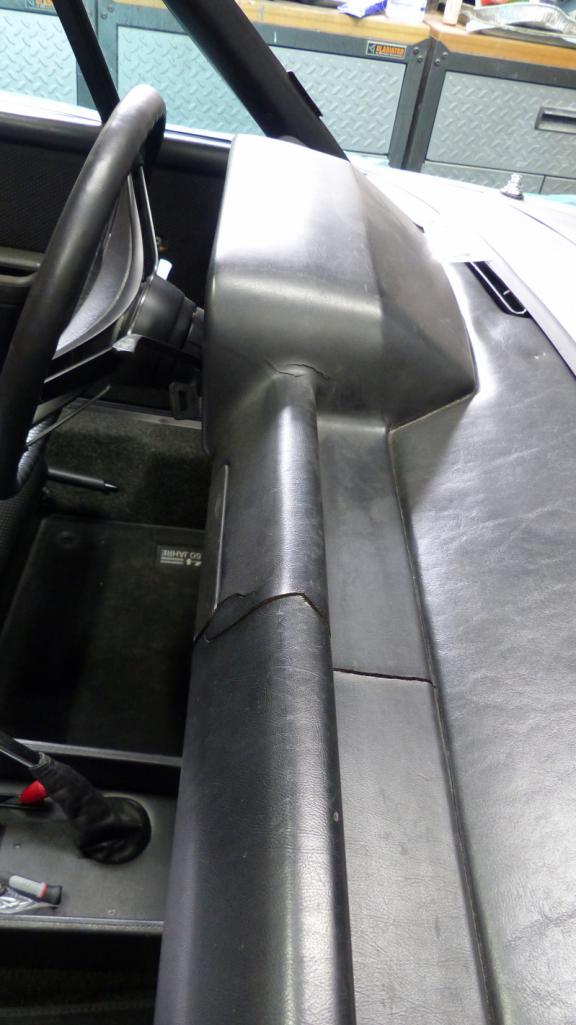 I decided to give it a good cleaning and the old 303 Protectant treatment. That stuff has worked wonders for sprucing up vinyl so let's see what it does here. 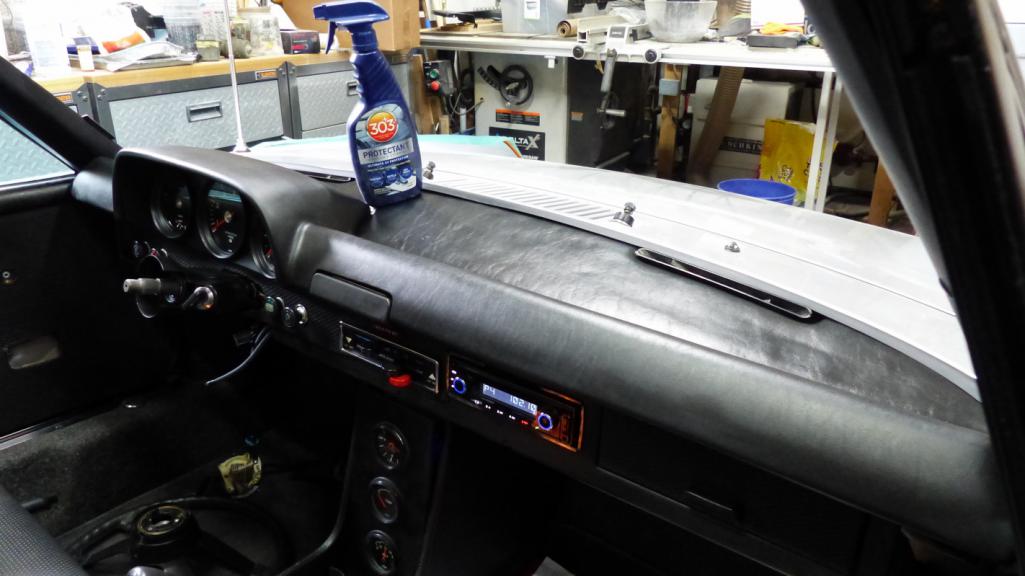 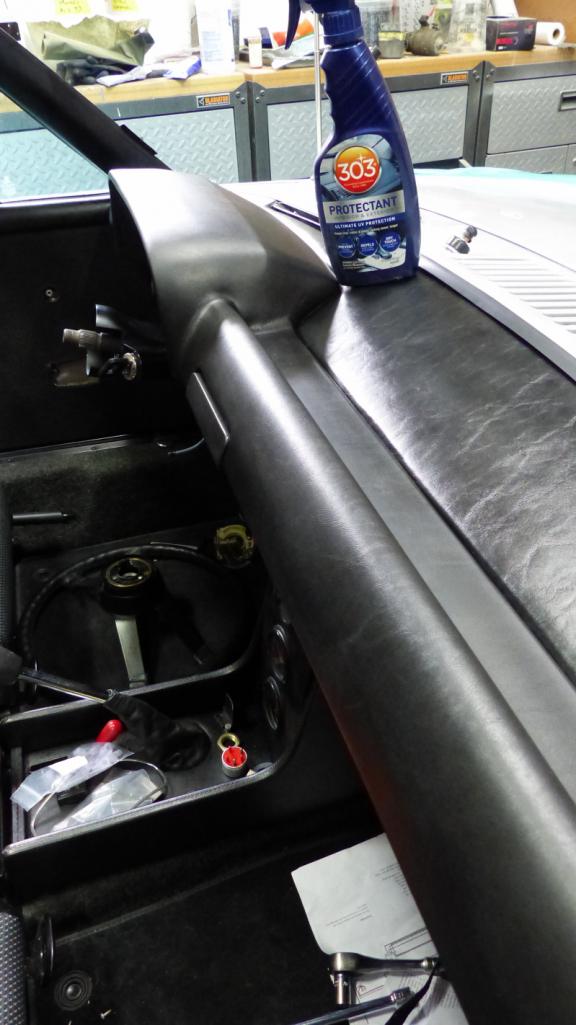 Yep. That looks a fair bit better. I tell you, this stuff is just magic. (IMG:style_emoticons/default/shades.gif) Now off to Cootieville for supplies. |
|
|
|
| KELTY360 |
Apr 19 2020, 02:14 PM
Post
#1545
|
|
914 Neferati Group: Members Posts: 5,189 Joined: 31-December 05 From: Pt. Townsend, WA Member No.: 5,344 Region Association: Pacific Northwest |
(IMG:style_emoticons/default/bs.gif) (IMG:style_emoticons/default/biggrin.gif)
But it looks like you've perfected orange peel. (IMG:style_emoticons/default/shades.gif) |
|
|
|
| euro911 |
Apr 19 2020, 02:16 PM
Post
#1546
|
|
Retired & living the dream. God help me if I wake up! Group: Members Posts: 8,937 Joined: 2-December 06 From: So.Cal. & No.AZ (USA) Member No.: 7,300 Region Association: Southern California |
(IMG:style_emoticons/default/WTF.gif) ... It took out all the cracks?
... c'mon, man (IMG:style_emoticons/default/screwy.gif) |
|
|
|
| Cairo94507 |
Apr 19 2020, 03:10 PM
Post
#1547
|
|
Michael Group: Members Posts: 10,628 Joined: 1-November 08 From: Auburn, CA Member No.: 9,712 Region Association: Northern California |
Hey...I wonder if 303 makes a rust repair???? I could have saved a lot of money! (IMG:style_emoticons/default/beerchug.gif)
|
|
|
|
| Superhawk996 |
Apr 19 2020, 07:38 PM
Post
#1548
|
|
914 Guru Group: Members Posts: 7,839 Joined: 25-August 18 From: Woods of N. Idaho Member No.: 22,428 Region Association: Galt's Gulch |
QUOTE(euro911 @ Apr 19 2020, 04:16 PM) (IMG:style_emoticons/default/WTF.gif) ... It took out all the cracks? ... c'mon, man (IMG:style_emoticons/default/screwy.gif) (IMG:style_emoticons/default/agree.gif) the suspense is killing me (IMG:style_emoticons/default/hissyfit.gif) |
|
|
|
| FlacaProductions |
Apr 19 2020, 08:33 PM
Post
#1549
|
|
Advanced Member Group: Members Posts: 2,198 Joined: 24-November 17 From: LA Member No.: 21,628 Region Association: Southern California |
It's called elbow grease, fellas!!! 303 doesn't work like that of you?? Rub harder!!!
|
|
|
|
| bbrock |
Apr 19 2020, 10:10 PM
Post
#1550
|
|
914 Guru Group: Members Posts: 5,269 Joined: 17-February 17 From: Montana Member No.: 20,845 Region Association: Rocky Mountains |
QUOTE(FlacaProductions @ Apr 19 2020, 07:33 PM) It's called elbow grease, fellas!!! 303 doesn't work like that of you?? Rub harder!!! ^^^^^ This. It's all in the technique guys. However... (IMG:style_emoticons/default/rolleyes.gif) I might have glossed over the step where I pre-ordered a 914Rubber dash top in their Black Friday sale and it finally showed up last week. As others have said, it is a very good reproduction. The only thing that causes concern is that the hood over the instrument pod on the original is rigid - I think there is a metal frame embedded inside. The 914Rubber piece is flexible so I hope it doesn't start to deform over many hot summers of use. Enough of these are running around SoCal now that I would think such a problem would have already shown up. I do have a few tips for installing these things. The nylon studs are screwed in to embedded nuts and are longer than the originals. That is not helpful. Also, some of them were clipped at slight angles which makes the nuts want to cross thread when they go on. Also not helpful. It might be worth getting out the old Dremel to trim them to the correct length and maybe put a taper on them. Also, it looks like blue locktite was used to lock the studs in place. That is not strong enough and the stud can start to turn when you tighten the nut on install. If it turns enough, it will push a visible bulge into the top of the dash top. REALLY not helpful and a real bitch to correct when you are half way through an already difficult install. I peeled the siding off the house with my cursing. (IMG:style_emoticons/default/blowup.gif) This is one of those rare jobs for red Locktite. Stick 'em down! Oh, the dash also comes with steel nuts which seems like a bad combo on nylon studs. The factory used nylon nuts and so did I. My top was actually missing one of the studs so I moved the missing location to the easiest to access above the radio cutout. I can install it with dash top in place. Hopefully it is in the package arriving tomorrow. |
|
|
|
| jaredmcginness |
Apr 20 2020, 07:54 AM
Post
#1551
|
|
... Group: Members Posts: 509 Joined: 12-June 19 From: Baltimore Member No.: 23,209 Region Association: MidAtlantic Region |
Dang, I should have bought that 303 a long time ago! Would have saved me replacing a lot of parts! (IMG:style_emoticons/default/lol-2.gif)
|
|
|
|
| bbrock |
Apr 20 2020, 08:27 AM
Post
#1552
|
|
914 Guru Group: Members Posts: 5,269 Joined: 17-February 17 From: Montana Member No.: 20,845 Region Association: Rocky Mountains |
QUOTE(jaredmcginness @ Apr 20 2020, 06:54 AM) Dang, I should have bought that 303 a long time ago! Would have saved me replacing a lot of parts! (IMG:style_emoticons/default/lol-2.gif) It really is good stuff, but there are side effects. Notice in the pics that it made my steering wheel fall off. (IMG:style_emoticons/default/huh.gif) |
|
|
|
| Superhawk996 |
Apr 20 2020, 05:14 PM
Post
#1553
|
|
914 Guru Group: Members Posts: 7,839 Joined: 25-August 18 From: Woods of N. Idaho Member No.: 22,428 Region Association: Galt's Gulch |
Looks great. Was wondering if you did just a a topper or the whole new part. Question answered.
|
|
|
|
| Superhawk996 |
Apr 20 2020, 05:54 PM
Post
#1554
|
|
914 Guru Group: Members Posts: 7,839 Joined: 25-August 18 From: Woods of N. Idaho Member No.: 22,428 Region Association: Galt's Gulch |
QUOTE(bbrock @ Apr 20 2020, 10:27 AM) It really is good stuff, but there are side effects. Notice in the pics that it made my steering wheel fall off. (IMG:style_emoticons/default/huh.gif) @bbrock I've heard that some sort of little blue pill can have the same effect on your man parts. (IMG:style_emoticons/default/slap.gif) |
|
|
|
| trojanhorsepower |
Apr 21 2020, 07:10 PM
Post
#1555
|
|
Senior Member Group: Members Posts: 1,031 Joined: 21-September 03 From: Marion, NC Member No.: 1,179 Region Association: None |
QUOTE(bbrock @ Nov 15 2017, 08:55 PM) QUOTE(trojanhorsepower @ Nov 15 2017, 02:46 PM) Nice Pine. What state? Are you talking about the siding behind the bat? It's actually "white fir" which I was told includes grand fir, noble fir, and a few other species. It was logged and milled in NW Montana. It looks a lot like pine. I don't think I'd use it again for siding though. Wow, sorry. Just rereading this. I meant the snake, but I guess its a gopher not a pine, there almost the same....... |
|
|
|
| bbrock |
Apr 21 2020, 07:51 PM
Post
#1556
|
|
914 Guru Group: Members Posts: 5,269 Joined: 17-February 17 From: Montana Member No.: 20,845 Region Association: Rocky Mountains |
QUOTE(trojanhorsepower @ Apr 21 2020, 07:10 PM) QUOTE(bbrock @ Nov 15 2017, 08:55 PM) QUOTE(trojanhorsepower @ Nov 15 2017, 02:46 PM) Nice Pine. What state? Are you talking about the siding behind the bat? It's actually "white fir" which I was told includes grand fir, noble fir, and a few other species. It was logged and milled in NW Montana. It looks a lot like pine. I don't think I'd use it again for siding though. Wow, sorry. Just rereading this. I meant the snake, but I guess its a gopher not a pine, there almost the same....... Oh HELL! Now we are talking snakes! Yay!!! (IMG:style_emoticons/default/cheer.gif) Even cooler than Porsches! It's only been a couple years but let's get to the bottom of this. This pic is in Montana, so yes, gopher snake (IMG:http://www.914world.com/bbs2/uploads/post-20845-1509118419.jpg) And this pic is the same dude (me) maybe a couple years earlier with a Kansas specimen (bullsnake).  Back in those days, gopher, bull, and pine were all considered subspecies of the species (Pituophis melanleucus). Now gophers and bulls have been split into their own species (Pituophis canifer) but separate subspecies. So yes indeed. They have been confusing scientists for decades and sure are similar. Nice to hear from another snake aficionado and the rest of you are better people for having a bit of useless information about cool snakes! (IMG:style_emoticons/default/rolleyes.gif) Oh... and if anyone says I was a nerd, I going to call you a... No. No I'm not. Of course I was (am) a nerd. Look at that scrawny little greasy-haired geek. |
|
|
|
| bbrock |
Apr 22 2020, 06:33 PM
Post
#1557
|
|
914 Guru Group: Members Posts: 5,269 Joined: 17-February 17 From: Montana Member No.: 20,845 Region Association: Rocky Mountains |
QUOTE(raynekat @ Apr 6 2020, 08:44 PM) "Okay, after wrestling to get the wires hooked up and the boot on the back, the bucket is remounted with hardware for the first time in three decades. Just need to screw the lens on. A few light turns of the screw driver and... *tink* " DOH! (IMG:style_emoticons/default/headbang.gif) Brent, if I were you, I'd just go ahead and break the other lense right now and get it out of your system. Then you won't have to worry about it needlessly at at a later time. (IMG:style_emoticons/default/smile.gif) (IMG:style_emoticons/default/lol-2.gif) Everything looks great as usual you mad scientist. (IMG:style_emoticons/default/w00t.gif) @raynekat Well Doug, you were right. The other lens broke after only a single install and removal. Now weird or unnecessary pressure was applied. It looks to me like they didn't use the proper solvent weld adhesive. 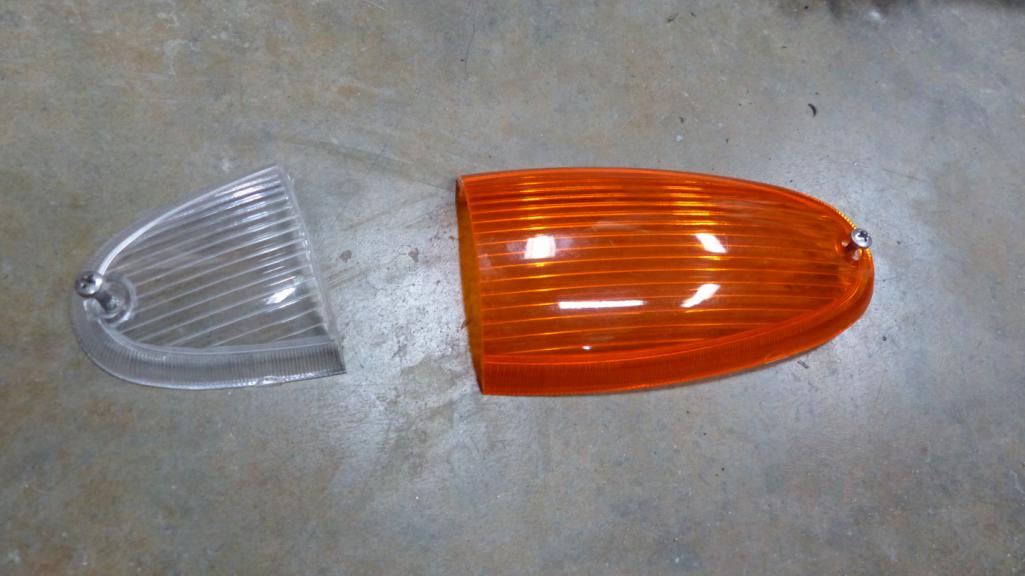 Now it has it and looks good as new. 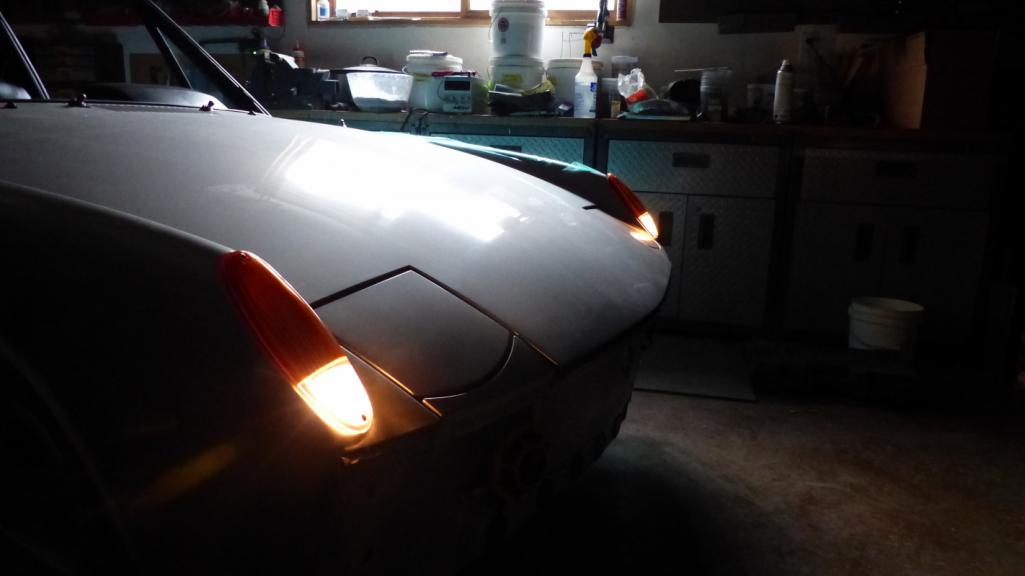 |
|
|
|
| raynekat |
Apr 22 2020, 09:05 PM
Post
#1558
|
|
Advanced Member Group: Members Posts: 2,171 Joined: 30-December 14 From: Coeur d'Alene, Idaho Member No.: 18,263 Region Association: Pacific Northwest |
QUOTE(bbrock @ Apr 22 2020, 05:33 PM) QUOTE(raynekat @ Apr 6 2020, 08:44 PM) "Okay, after wrestling to get the wires hooked up and the boot on the back, the bucket is remounted with hardware for the first time in three decades. Just need to screw the lens on. A few light turns of the screw driver and... *tink* " DOH! (IMG:style_emoticons/default/headbang.gif) Brent, if I were you, I'd just go ahead and break the other lense right now and get it out of your system. Then you won't have to worry about it needlessly at at a later time. (IMG:style_emoticons/default/smile.gif) (IMG:style_emoticons/default/lol-2.gif) Everything looks great as usual you mad scientist. (IMG:style_emoticons/default/w00t.gif) @raynekat Well Doug, you were right. The other lens broke after only a single install and removal. Now weird or unnecessary pressure was applied. It looks to me like they didn't use the proper solvent weld adhesive. Now it has it and looks good as new. Well there ya go Brent. For sure it's fixed gud n' tite now! (IMG:style_emoticons/default/drunk.gif) |
|
|
|
| tygaboy |
Apr 22 2020, 09:26 PM
Post
#1559
|
|
914 Guru Group: Members Posts: 5,824 Joined: 6-October 15 From: Petaluma, CA Member No.: 19,241 Region Association: Northern California |
And Brent said,"Let there be (parking) light."
It's great to watch your car waking up from its loooooong sleep! |
 |
|
| bbrock |
Apr 22 2020, 09:59 PM
Post
#1560
|
|
914 Guru Group: Members Posts: 5,269 Joined: 17-February 17 From: Montana Member No.: 20,845 Region Association: Rocky Mountains |
Well here's one that might leave you shaking your head saying, "what a dumb fucher."
Over on the Samba is a thread on refurbishing the early metal charcoal canisters by drilling a hole in the two-port end, dumping out the old charcoal, refilling with fresh and installing a plug. Sounds simple enough. DON'T DO IT. It will ruin your canister. Ask me how I know. (IMG:style_emoticons/default/headbang.gif) Okay, I don't give up that easily. With a ruined canister in hand, I figured I might as well figure out how to open it up and see what is inside. The dissection was pretty brutal, but it led me to a somewhat easy way to refurbish these early canisters. First, let's look at the guts and why just drilling a fuching hole in one end is a stupid-ass idea. On the right is a stack of screens and filters that now have a nice 1-inch hole in them because I stupidly believed what I read on The Samba. The plastic plug is what will be used to plug the now unnecessary hole. On the right is why drilling a hole is a stupid idea. A stack of a wire screen, coco fiber filter, and perf metal screen all spring loaded against the cap to hold the carbon pellet charge nice and tight. Take a guess what happens to that spring-loaded stack when you dump the charcoal out... That's right. It rattles around loose inside a can and you are fuched. 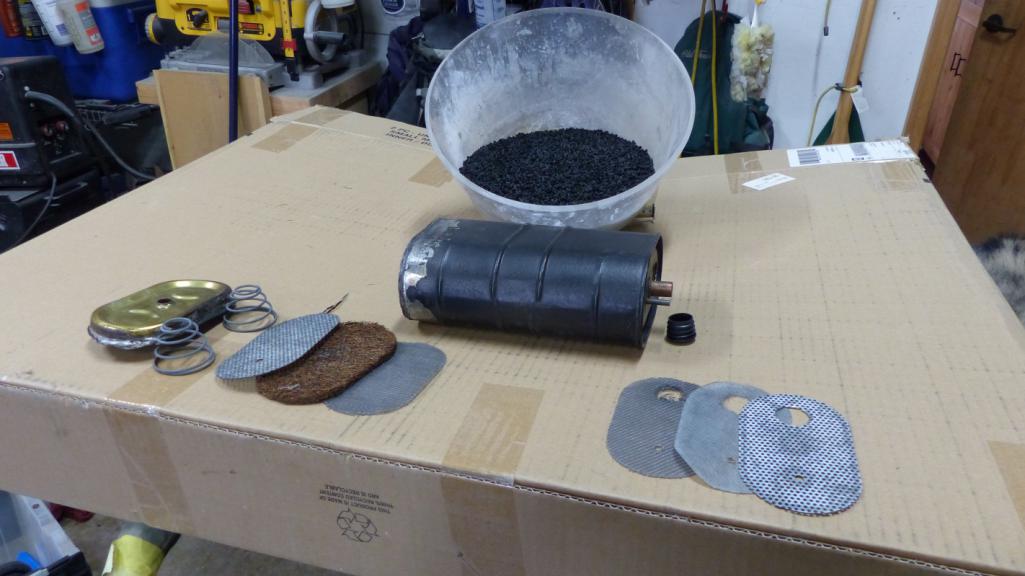 Alright, how do we fix this turd? Well, the can ends are crimped and rolled and there isn't a clean way to unroll them. So here's what you do. Flip the thing over to the single port, spring-loaded side and grind the edge off the rim. I used an 80 grit disc on an angle grinder and it was quick and easy to grind away until the layers of metal separate. You can see the seam opening opposite the grinder. 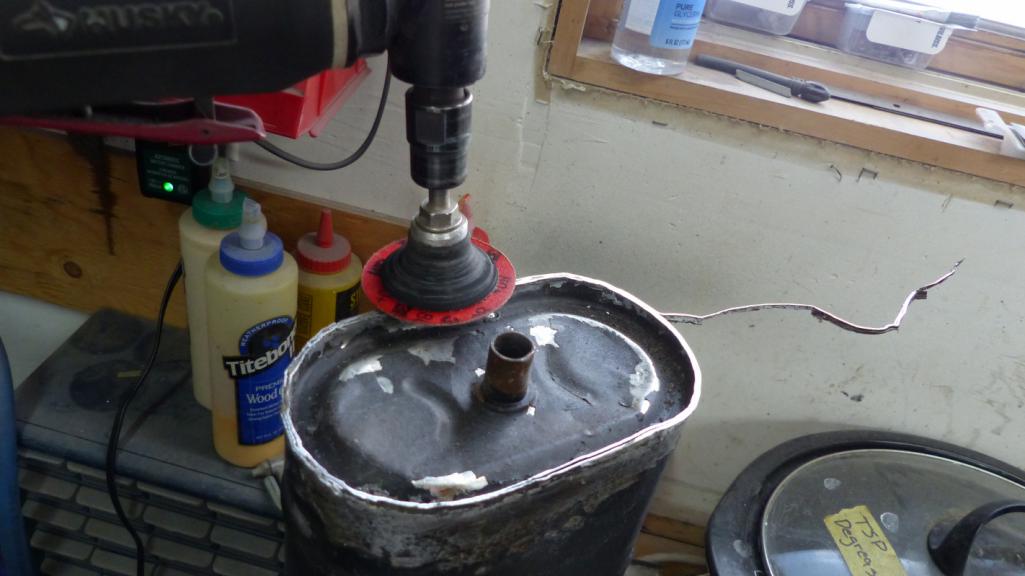 Now you can empty the can, replace the screen stack in what is now the bottom and refill with fresh charcoal. I tried to find special vapor grade charcoal but could only find it for sale in bulk, so I used aquarium charcoal. The three pound bag I bought was not quite enough so I topped off with some of the original charcoal. You want it about a half inch below the lip of the can. This pic is before topping it off. 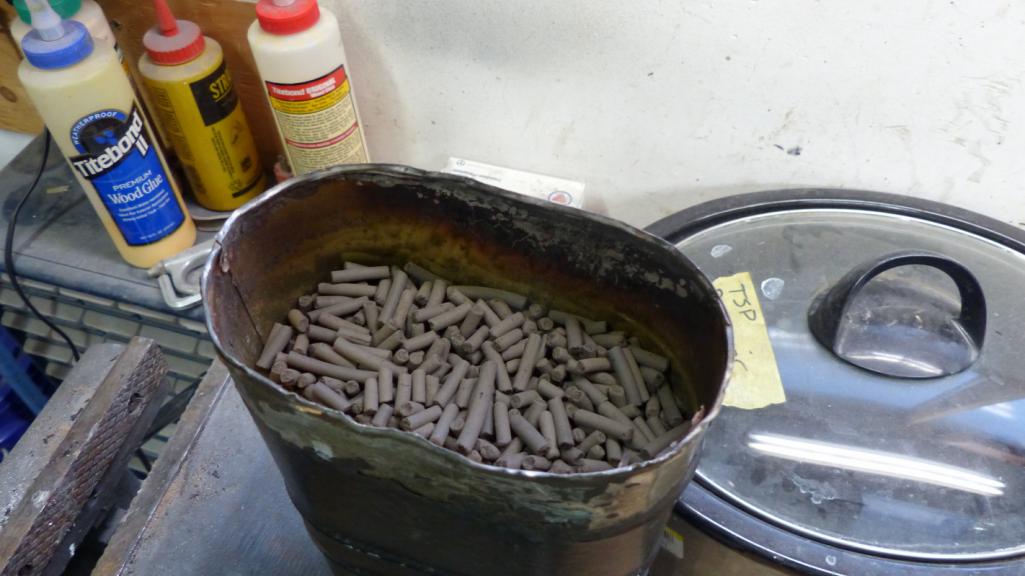 Reassemble the screen/filter stack on top of the charcoal and put the springs on with small ends up. There are indentations in the lid that hold them in place. 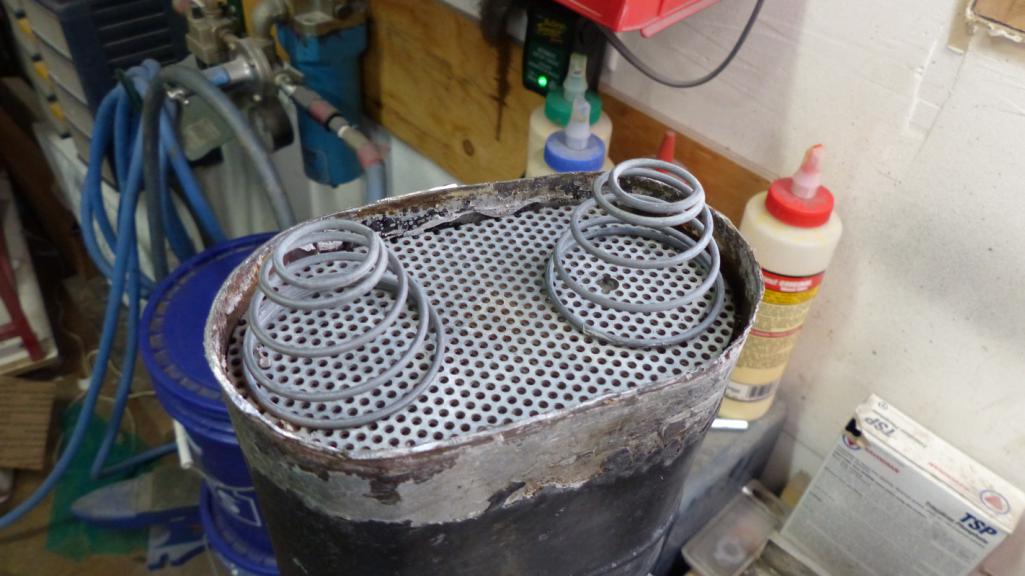 Then put a generous bead of sealant around the lid flange. Make sure it is gasoline resistant. Yamabond worked really well. Press the lid in place until the edges are flush and clamp until the sealant sets. 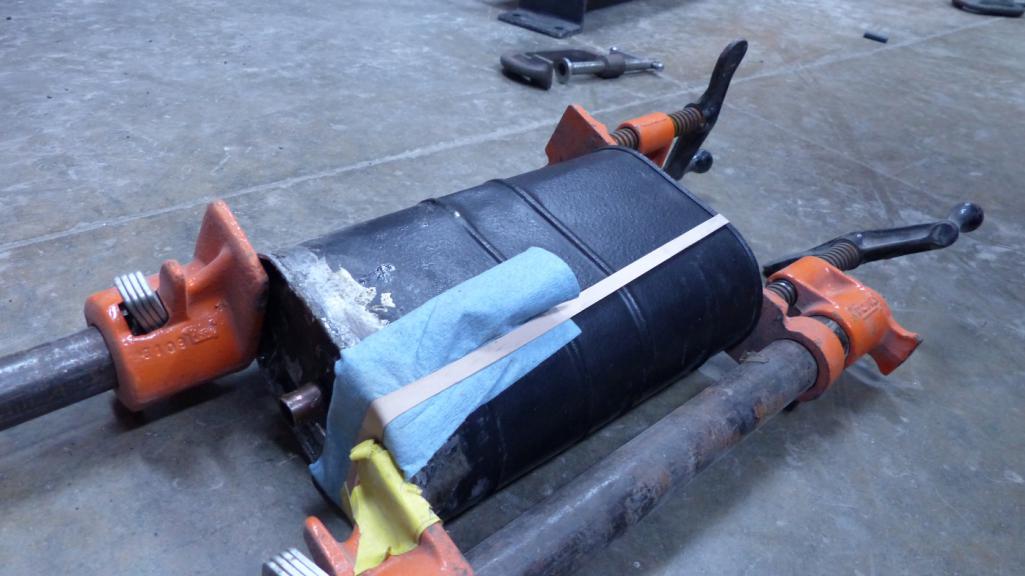 Now here's the trick to finishing it off and also the tricky part. Bend a strip of thin (26 gauge) metal in half and cut it to about 1/8" wide. Open up the crimp so you can get it on the can edge. Run a file or sandpaper over the cut edges to smooth them or your likely to slice the shit out of yourself in the next step. 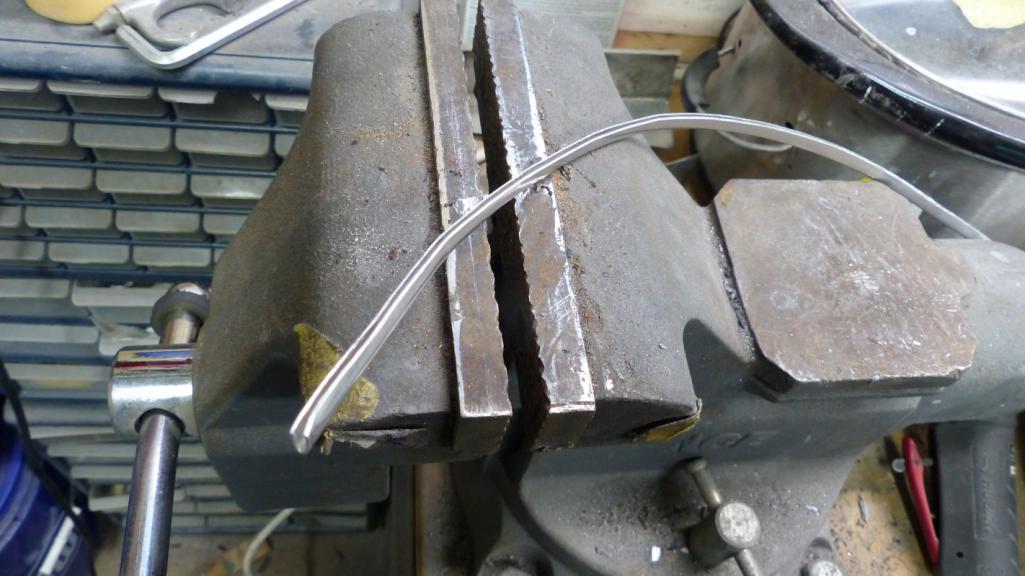 Now you have to work the strip onto the ground edges of the can and crimp it on as you go. This would be easy if the strip was preformed into a flat oval to match the can but mine was all twisted and deformed from the cutting and had to be formed as I crimped. Bending the strip around the ends was the hardest because the groove closes up and has to be wedged open with a screwdriver blade frequently. 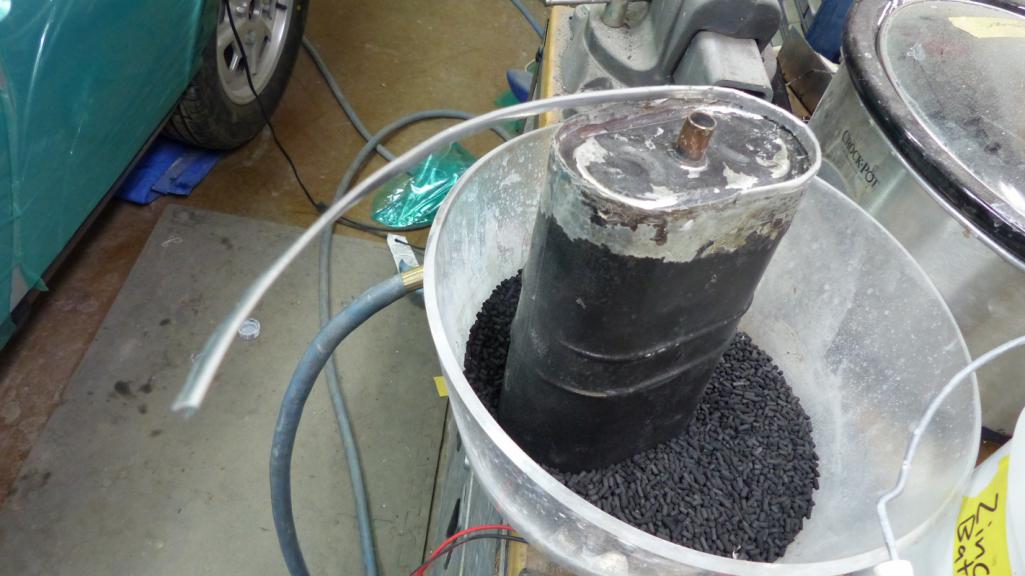 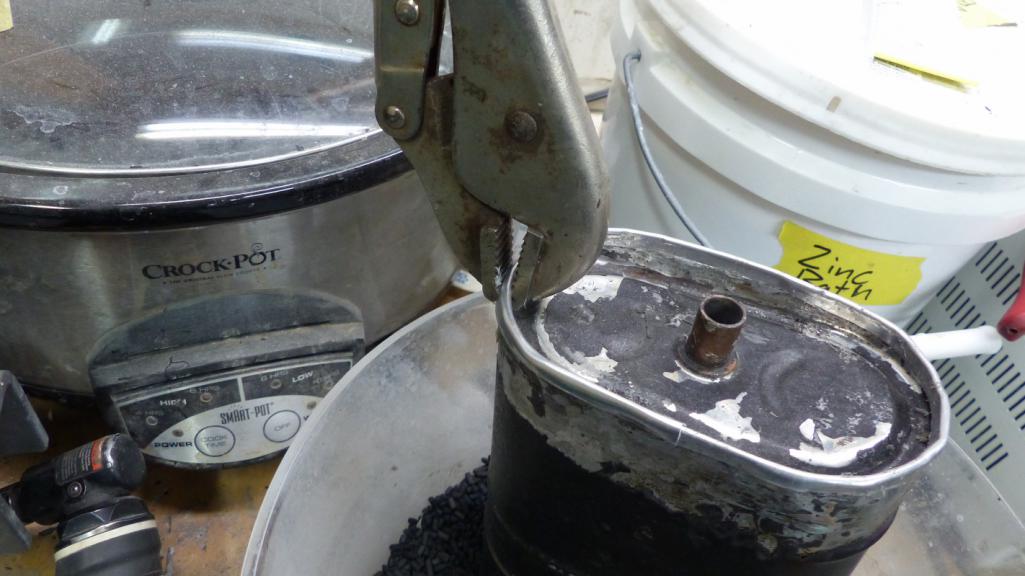 Eventually the strip is formed and crimped tight to make a nice finished edge. The only thing left is to paint it. And wall-A, a nice refurbished early style charcoal canister. 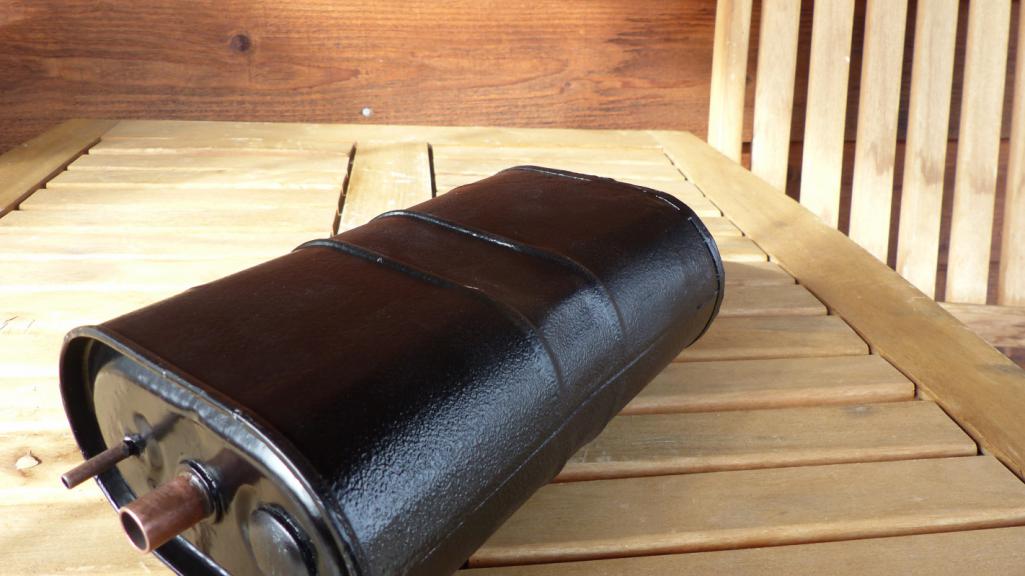 BTW, if you didn't follow the how to make orange peel thread, I found Eastwood Rubberized Rust Encapsulator does a nice job of matching the original finish on the canister. (IMG:http://www.914world.com/bbs2/uploads/post-20845-1587600965_thumb.jpg) |
|
|
|
|
2 User(s) are reading this topic (2 Guests and 0 Anonymous Users)
0 Members:

|
Lo-Fi Version | Time is now: 12th May 2026 - 04:45 PM |
Invision Power Board
v9.1.4 © 2026 IPS, Inc.