|
|
|
Porsche, and the Porsche crest are registered trademarks of Dr. Ing. h.c. F. Porsche AG.
This site is not affiliated with Porsche in any way. Its only purpose is to provide an online forum for car enthusiasts. All other trademarks are property of their respective owners. |
|
|


| bbrock |
 Mar 27 2017, 05:11 PM Mar 27 2017, 05:11 PM
Post
#1681
|
|
914 Guru  Group: Members Posts: 5,269 Joined: 17-February 17 From: Montana Member No.: 20,845 Region Association: Rocky Mountains |
My name is Brent and I’m new to 914 World but certainly not to 914s. My 1973 2.0L has being lying dormant and neglected for over thirty years now and is long overdue for a resurrection. The path to where I am now has been a long one so forgive me for the long introduction, but some of you might be able to relate.
History I wasn’t much of a car guy as a kid growing up in NE Kansas. I liked cars, but I didn’t LOVE them. But when I saw my first 914, it spoke to me in a way that no other car had before… or since. My first ride in a teener didn’t come until my senior year in high school when a co-worker took me for a spin in a 914 he had borrowed from his dad’s used import car dealership. The car did not disappoint and I was hooked! I knew I had to have one. The year was 1981. I was 19 and beginning my second year of college at Kansas State when I took out a small loan to buy my first car. I found a barely road-worthy 1970 1.7L in Missouri for $2,300 and was beaming with pride when I rolled up to the college dorm with my new, but rather shoddy looking, prize. But being as I was 19, and that organ that would eventually become a brain was not yet developed, I managed to shove the nose of my new Porsche under the tail end of a pickup truck at an intersection the very next day. Devastated; I had the car towed to a little one-man body shop at the edge of town. The front left corner was toast. I had enough money left from my loan to buy a partial front clip from AA. I got a call from the body shop the day the clip arrived and was told there was a problem. I went to inspect and saw that AA had sent a wrecked clip. The fender was smashed and the cost to hammer out the panels was 3X the cost of the part. I got in a heated argument over the phone with AA when I was told that sort of condition should be expected with used parts. What a bunch of BS! Surface rust and a few dings is one thing, but this part has been smacked hard enough the turn signal opening was half the width it should have been. Pointing out that their own advertising promised used parts would be collision free got me nowhere. In the end, I had to pay return freight and a restocking fee to get rid of the shitty part. That was the first and ONLY time I’ve done business with AA and I’m still pissed 36 years later. Luckily, a 914 had arrived at a junk yard 60 miles away and I picked up the parts, minus the lid, for a fraction of what AA had charged and hauled it myself. But my woes of fixing my 914 were far from over. The body shop guy told me he found a trunk lid and that if I prepaid for parts and labor, he could put my car back together, shot with primer, for $400. Like an idiot, I believed him. I took out another small loan and wrote him a check. Every time I stopped by to check out the progress, there was a different excuse. The lid was at another shop getting MIG welded to repair minor rust… things like that. Then the guy just disappeared. I spent a few weeks stopping by almost daily to find an empty shop. Finally, one day a crusty looking old guy was there. “Are you looking for Joe?”, he asked. “Join the club.” Joe had been bilking lots of people out of money and had skipped out of the country. The guy telling me this had recently entered partnership with Joe and had lost thousands of dollars. We would both shortly receive a bankruptcy letter listing us as creditors and leaving us with little recourse to recoup our losses. It was my first hard lesson in trust. The silver lining was that the new guy had another shop and took pity on me and completed the work that was promised at a very reasonable price. I know he lost money on the deal. My now patchwork-colored teener was back on the road but I wasn’t any smarter at 20 than I was at 19 so my car would again suffer the consequences. It was a cold, snowy, Kansas winter when I was home at my parents for Christmas holiday. I had learned from experience that if I put the 914 to bed in that weather without adding a bottle of drying agent to the gas, she was not going to start. But I wasn’t alone and shop after shop was sold out of HEET. On the fifth stop, I finally found a few bottles and was heading home to my parents when I hit a patch of black ice at low speed on possibly illegal balding tires and wrapped the front neatly around a fire hydrant. Well shit! Here we go again. I was done with body shops and con-men so decided it was time to learn to weld. I found donor parts at the same junk yard as before and set about cutting out the damage and replacing using my brother’s oxy-acetylene torch. Amazingly, I managed to get the car back together in drivable condition. I won’t pretend it was a good repair job, but adequate. I learned a lot about working on 914s because just about every week, something new broke – clutch, torsion bar, struts, and the constant battle with bad wiring in the FI and ignition. I’m sure there is a part on a 914 I haven’t removed and replaced, but I can’t think of what that would be. About a year later, my then girlfriend and now wife of 30+ years needed to replace her aging Honda and a nice looking 914 appeared for sale. It was a ’73 1.7L and looked much prettier than mine. We shouldn’t have bought it because it had been wrecked and not put back together right. It had a barely detectable sideways crab as it rolled down the road that a 4-wheel alignment couldn’t fix. But it made a good daily driver and was nice enough that when Elizabeth and I were married, her cousin hid the car for us so my original patchwork 70 got the traditional “Just Married” treatment.   Around that time in 1984, I spied an ad in the college paper for a 914 for $500. Always needing parts, I thought this was my chance to get a big pile of parts at a bargain price. After talking with the owner, I discovered this was a 1973 2.0L. (my dream model and year). It had suffered the dreaded hell hole and the RR suspension console was dangling free. The PO (the car's second owner) couldn’t get a shop to even quote her a price on fixing it, and I was welcome to go have a look. I found the car in a parking lot next to the local import car parts shop. I couldn’t believe what I saw. Not only was it my dream ’73 2.0, but it was metallic silver with 4-spoke Fuchs, center console but not appearance group (black bumpers and no targa vinyl). This is exactly the car I would have ordered at the dealership. I knew that the wheels alone were worth the asking price. From 30 ft., the car looked gorgeous. From 10 feet, it looked really good but you could see it had been repainted, and not well. The interior was complete and clean. The only thing wrong with this car was a rotten battery tray and suspension console. And even that rot was limited and hadn’t spread to other bits of the hell hole. I finagled another small loan and didn’t quibble on the price. THIS would be my car. Back at the junkyard I found a console from the same donor I had taken the front for my 70 from. I spent a weekend in my parent’s garage welding it in and spent the next several years enjoying the hell out of that car. In the meantime, I rebuilt the engine on the old 70 to donate it to a VW bus and sold the chassis for parts. My wife’s ’73 became my project car and I earned my label as a DAPO botching an outer long replacement by overheating the weld and using poorly placed door bracing. The result was an increase in the sideways crab and a passenger door that didn’t close as cleanly as it should. I continued my assault on the car by stripping it down to respray in black lacquer – a purposeful choice to reveal all of the flaws. It was a lot of work and there were many goofs to be redone, but the end result was actually quite stunning. It didn’t last long though since I didn’t have a garage at the time and black lacquer is no match for the Kansas sun. But it did convince me that I could prep and spray a car with respectable results; better than the job on my 2.0L anyway. I don’t remember the exact catalyst that caused me to tear it apart, but as much as I loved driving the 2.0L, it didn’t always love me and I was frequently stranded – and this was pre-cell phone days. The problem was almost always some damn thing with the FI. Plus, the car was leaking oil badly and there were rust issues that needed repair. I convinced myself it was time for a complete tear down and rebuild, and I commenced to do just that. I was in my mid-twenties and Reagan was President. Restoration Begins… and Stops… and Stops Again I made a rookie mistake and started with the engine. I did a complete teardown and had all the bottom end parts machined and balanced at the local machine shop. Although I am kind of regretting it now, I decided to ditch the D-Jet that caused 95% of my reliability woes and opted for dual 40IDF Webers. Carb conversions were all the rage back then and I had lost patience with the FI. If I were to start this today, I’d probably keep the FI which I still have in storage. But to complement the carbs, I installed a “street grind” cam from Automotion. I’ve tossed my old Automotion catalogs and there are no other specs on the invoice. I only remember that the folks there recommended this grind to get the most from my carbs while staying close to the performance of the FI. The other mod I chose for the engine was a new set of OEM euro spec (8.0:1) Mahle pistons and jugs. I’ve always had this crazy idea that the euro spec cars were how Porsche intended and American spec was a compromise. As part of that rebuild, I stripped and repainted all of the tin with high temp paint and replaced the little hardware. Heads had not yet been touched, and Reagan was still the President. Then life intervened. Elizabeth had put her college on hold while I finished mine, and it was while she was finishing her degree that I tore the car apart. Then it was my turn to go back for a graduate degree so the project went on hold. Time was in short supply. Clinton was President by the time I got my grad degree. Now neither time or money were as much of an obstacle, but having adequate shop space for the restoration was. All I had was an open carport that was not up to the task although I was able to turn it briefly into a makeshift plastic spray booth for the last car which we had since given to our nephew (kicking myself now). So, Elizabeth and I set about building a two-story barn with plenty of space for a large woodshop, mechanics shop, and spray booth. When I say build, I mean we picked up hammer and nails and built the thing. I must say; the thing was a work of beauty. All that was left was to install windows and then my restoration project could resume in earnest. And then I got offered a job in Bozeman, Montana which had been a long-time dream for this wildlife biologist. So without so much as ever rolling a car into the new shop, we packed up and headed to the mountains. That was 13 years ago and I’ve gotten a lot of grief for hauling my little project 1,200 miles across the continent. And she has weathered through many Montana blizzards sitting neglected in my driveway; waiting for me to come to my senses. And Now… Maybe I am having my mid-life crisis but the itch to get this car back on the road had gotten too strong to ignore. Over the years, I would periodically cruise the Web for 914 news, but would quickly put it aside with the resignation that I’m back where I was with no good space to work on the car. But then I read Darren Collins’ amazing odyssey on this forum. Not only is it inspirational, but it also gave me an epiphany. The bulk of the work in a restoration is in cleaning and refurbishing small parts. I don’t need a big-ass shop for that. In fact, we do have a 2-car garage but half of it is filled to the gills with woodworking tools and the other half has to remain open for the daily driver so we don’t have to scoop and scrape several inches of snow off every morning, and to protect the car at least a little from the horde of deer mice that plague every vehicle parked outdoors in the mountains. But I have a plan. I purchased a set of 10” pneumatic castors at HF and will build a rotisserie on them. That will allow me to roll my chassis over my gravel driveway and in and out of the garage as needed. That will still leave the challenge when it comes time to paint (I don’t have the means to farm out a $10K paint job). But it will get me through strip, patch, and primer. We have planned on building a detached garage since we built our house. Maybe I’ll figure out how to fund it. Determined to make progress, it was time to take stock of what I have ahead of me. The car had been mostly stripped prior to our move, but many of the parts that had been carefully stored in sheds wound up strewn haphazardly in the trunks and cockpit during and after the move. The old pitted windshield had been removed long ago and donated to the other car. The plexi I had installed to seal out the rain had cracked to shards and only the tarp over the car kept out rain and snow. The old tires turned to dust years ago, leaving the belly of the car only a few inches above the damp earth. Not the treatment I intended to give my car but it is what it is. I was prepared for the worst last week when I began excavating to survey the damage of years of neglect. The car wreaked of weasel piss and I actually found a weasel skull in the front trunk. But that weasel piss probably accounts for the surprisingly low amount of rodent nests found in the car. Considering the abuse, things could be worse. 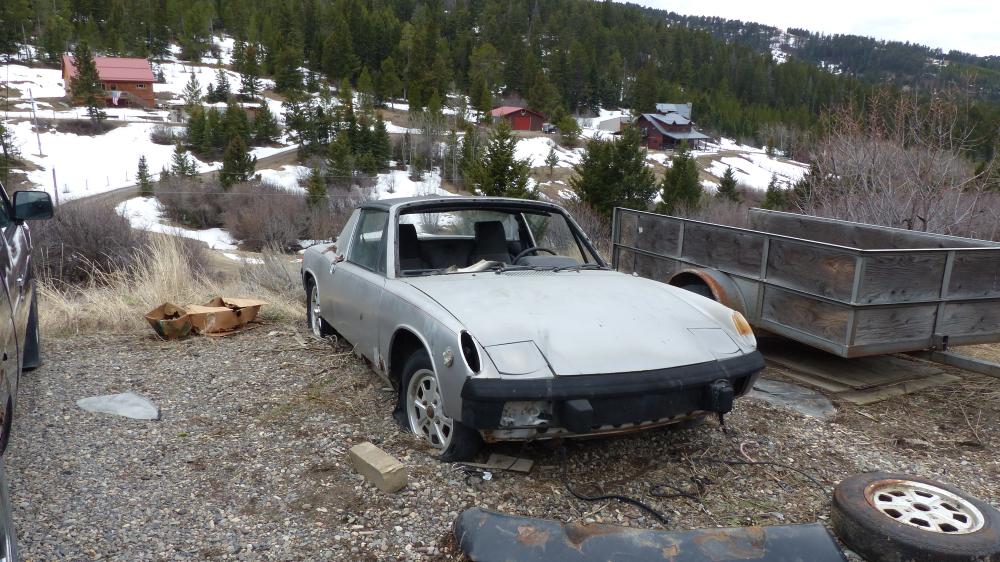 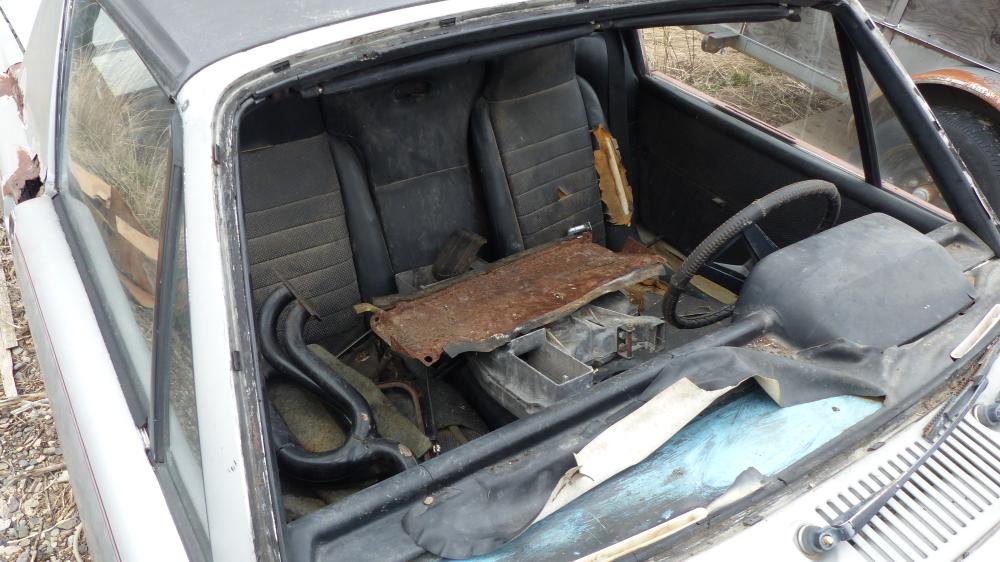 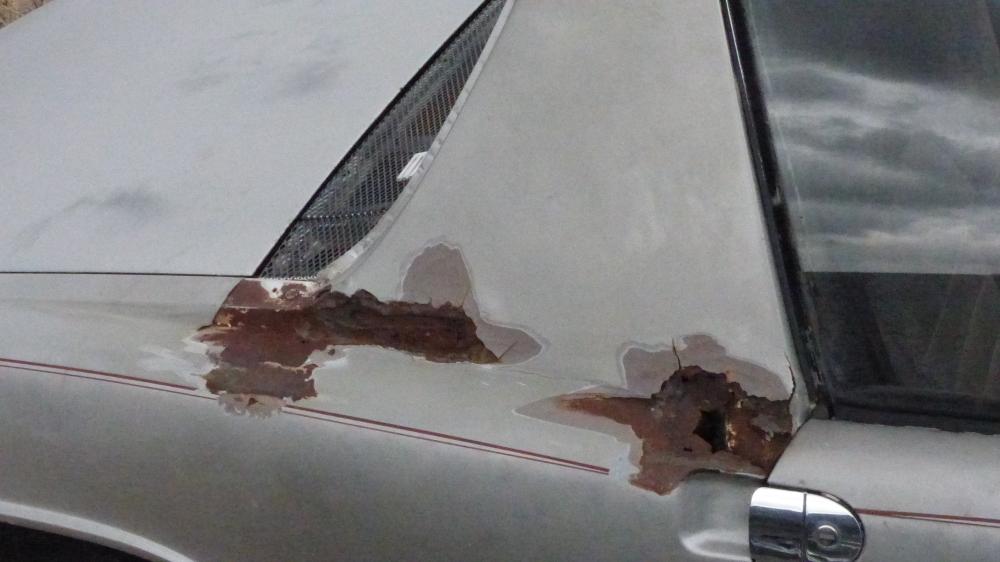 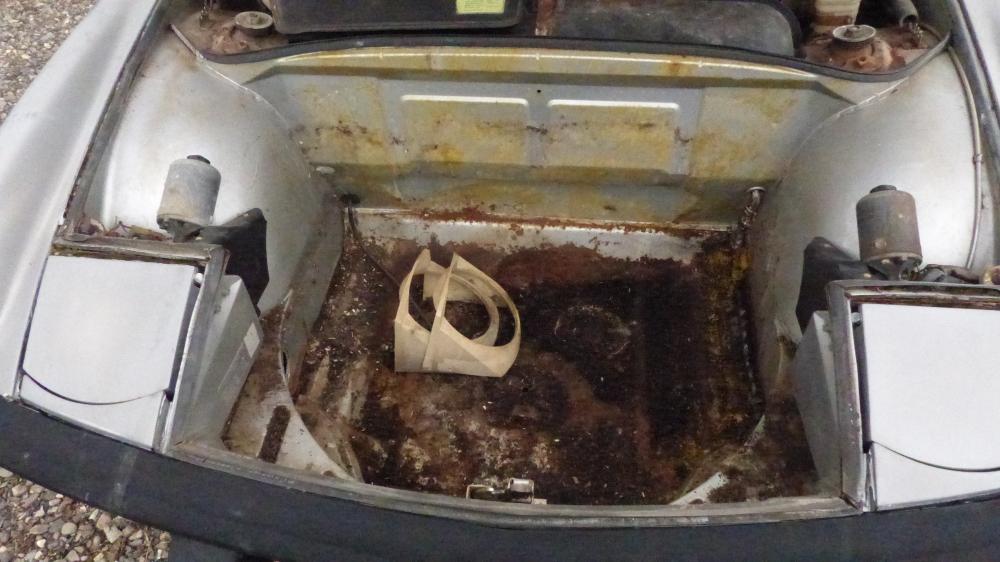 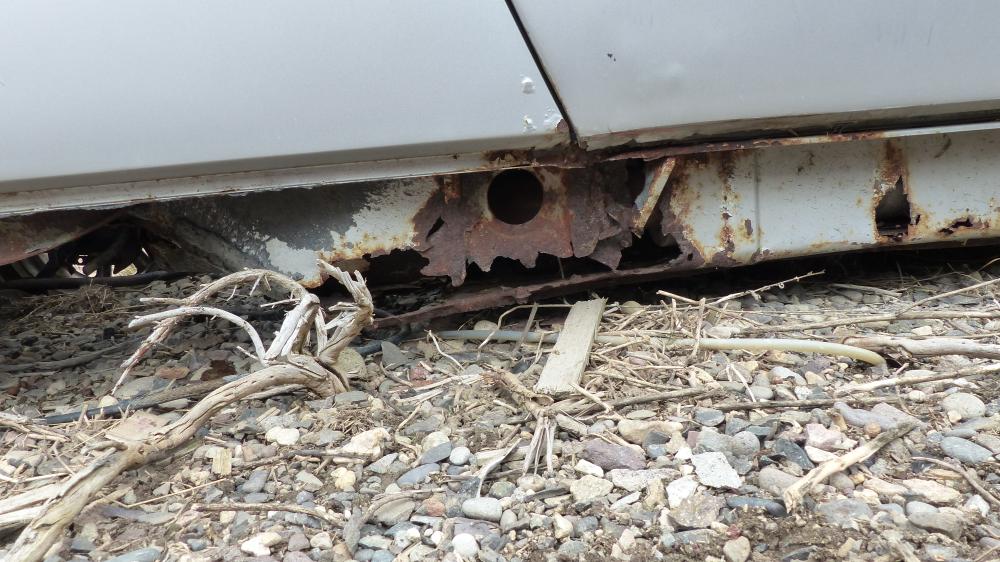 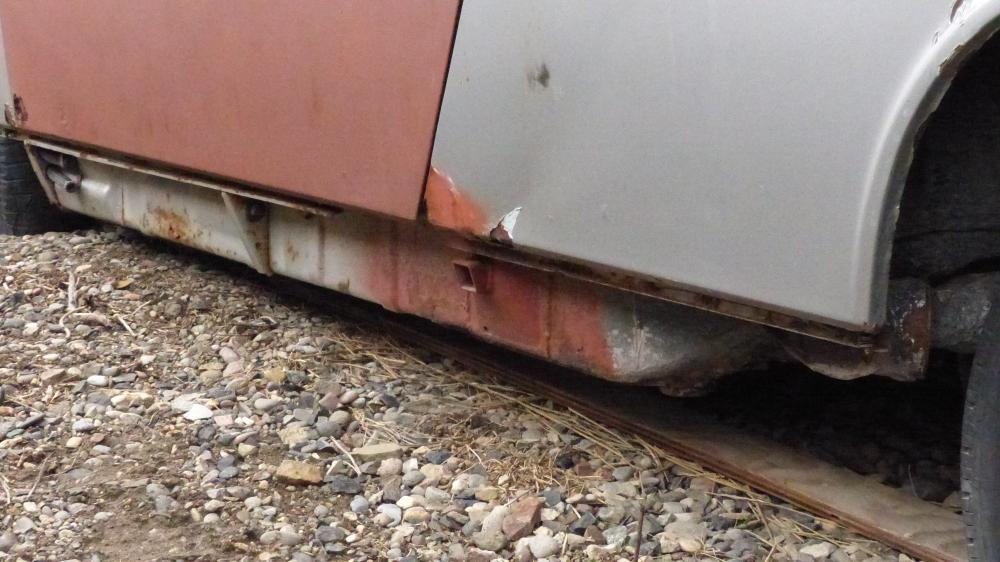 Thirty years ago, I had all kinds of plans to modernize this car. But history gains importance as we age so now I want to keep it mostly stock. That’s also the easier and cheaper route given that the car is disassembled, but nearly complete. My rule for mods is to do nothing that can’t easily be reversed to original stock. The biggest sacrifice is that I won’t be blanking out the side markers as originally planned even though I really hate them. Mods planned are: Engine: These have already been done. Otherwise I might rethink them.
|
   |

 
|
Posts in this topic
 bbrock Intro from Montana: '73 2.0L rustoration thread Mar 27 2017, 05:11 PM
 RAX 914 Great intro, good luck with your project! Mar 27 2017, 05:56 PM 76-914 :wttc: Be sure to post lots of pics during the Rus... Mar 27 2017, 06:33 PM sb914 Friggin AA :beer3: Mar 27 2017, 06:51 PM jmitro cool story! Good luck.
You have a lot of work ... Mar 27 2017, 06:57 PM bbrock Thanks all.
Good point on 2-stage paint, I thin... Mar 27 2017, 08:22 PM
RAX 914 Great intro, good luck with your project! Mar 27 2017, 05:56 PM 76-914 :wttc: Be sure to post lots of pics during the Rus... Mar 27 2017, 06:33 PM sb914 Friggin AA :beer3: Mar 27 2017, 06:51 PM jmitro cool story! Good luck.
You have a lot of work ... Mar 27 2017, 06:57 PM bbrock Thanks all.
Good point on 2-stage paint, I thin... Mar 27 2017, 08:22 PM
 Unobtanium-inc
Thanks all.
Good point on 2-stage paint, I thi... Mar 27 2017, 08:45 PM mtn flyr Wow, quite an intro! I am in Bozeman, is your... Mar 27 2017, 08:36 PM bbrock
Wow, quite an intro! I am in Bozeman, is you... Mar 27 2017, 10:51 PM mtn flyr
Wow, quite an intro! I am in Bozeman, is yo... Mar 28 2017, 08:44 AM ConeDodger It isn't often that we don't have to tell ... Mar 27 2017, 08:49 PM Cairo94507 :wttc: Great intro; loved the whole story. Laughe... Mar 27 2017, 09:07 PM bbrock
Your project seems reasonable. Personally, I wou... Mar 27 2017, 11:00 PM PanelBilly You have a lot of work ahead of you. All the parts... Mar 27 2017, 09:50 PM mark04usa :wttc: Enjoyed your 914 story very much. I sure ca... Mar 27 2017, 10:26 PM Frankvw Nice story. It will be a lot of work, but since yo... Mar 28 2017, 12:44 AM JawjaPorsche Such an amazing story. A story of life. Thanks f... Mar 28 2017, 04:02 AM RobW :wttc:
Get a move on! You have a dream to fu... Mar 28 2017, 04:47 AM cary I'd start with digging into the RH long first,... Mar 28 2017, 08:10 AM KELTY360 Great story and kudos for hanging on to that car. ... Mar 28 2017, 08:32 AM bbrock
BTW, since you're only going to keep it kinda... Mar 28 2017, 04:00 PM Mikey914 Welcome. You will have many questions posting up p... Mar 28 2017, 08:38 AM cary I hope I didn't come off too abrupt. :wttc: ... Mar 28 2017, 01:56 PM bbrock
I hope I didn't come off too abrupt. :wttc:... Mar 28 2017, 03:50 PM 914_teener
I hope I didn't come off too abrupt. :wttc... Mar 28 2017, 07:32 PM cary Hmmm. The in and out deal really won't work fo... Mar 28 2017, 07:57 PM cary By chance is Kelly Seevers one of your neighbors? ... Mar 28 2017, 07:59 PM bbrock
By chance is Kelly Seevers one of your neighbors?... Mar 28 2017, 11:10 PM xperu
By chance is Kelly Seevers one of your neighbors... Aug 10 2017, 09:33 PM xperu
By chance is Kelly Seevers one of your neighbors... Aug 10 2017, 09:33 PM bbrock
Are you near Noxon, my brother lives there. He i... Aug 10 2017, 09:44 PM cary Forgot about the MIG gas ...................... an... Mar 29 2017, 07:56 AM bbrock
Forgot about the MIG gas ...................... a... Mar 29 2017, 10:20 AM bbrock Made a little progress today. My engine yoke arri... Mar 29 2017, 09:42 PM TM_Corey Love the story!!
:wttc: Mar 30 2017, 09:45 AM mepstein You should decide if you want a restoration projec... Mar 30 2017, 09:57 AM dcheek
You should decide if you want a restoration proje... Mar 30 2017, 04:17 PM bbrock I intended to get the car on a roll-around jig ove... Apr 3 2017, 01:27 PM Dave_Darling Sorry, but I gotta ask...
Are you gonna be a dent... Apr 3 2017, 04:07 PM bbrock
Sorry, but I gotta ask...
Are you gonna be a den... Apr 3 2017, 04:44 PM JOEPROPER
Sorry, but I gotta ask...
Are you gonna be a den... Apr 12 2017, 06:44 AM Porschef
[quote name='Dave_Darling' post='2471578' date='A... Apr 13 2017, 10:50 AM bbrock
Sorry, but I gotta ask...
Are you gonna be a den... Jun 9 2017, 07:17 AM bbrock New Wheels and Tires
Well, they aren't exac... Apr 11 2017, 03:08 PM burton73 Hi Brent,
I love your story and the picture of yo... Apr 11 2017, 10:12 PM KELTY360
Hi Brent,
I love your story and the picture of y... Apr 12 2017, 10:23 AM bbrock
Welcome to the board. Great guys and lots of know... Apr 12 2017, 11:02 AM cary
[b]But I work with my brain by day and really enj... Apr 13 2017, 08:21 AM r_towle :wttc:
NICE mullet! Apr 11 2017, 10:22 PM burton73 Posted twice Apr 11 2017, 10:52 PM bretth +1 Zappa! (Whips out old vinyls) Apr 12 2017, 07:28 AM Rusty Welcome to the board, just a little bit late.
Wit... Apr 12 2017, 01:52 PM aggiezig :wttc:
Really admire your passion for your 914. ... Apr 13 2017, 12:05 AM bbrock
:wttc:
Really admire your passion for your 914.... Apr 13 2017, 07:44 AM worn Off topic. But I too admire the plan.
I am think... Apr 13 2017, 08:12 AM bbrock
Off topic. But I too admire the plan.
I am thin... Apr 13 2017, 08:21 AM bbrock Fun Diversion
Here's just a quick little si... Apr 13 2017, 08:47 AM bbrock Weekend Update
Saturday I swapped out the rear sw... Apr 17 2017, 09:17 AM bbrock I haven't posted any progress in awhile but, d... May 15 2017, 10:49 AM KELTY360 Nice progress. Great to see another resurrection. May 15 2017, 11:20 AM LowBridge welcome :wttc: and wow... you nailed that gauge ... May 15 2017, 11:55 AM bbrock
welcome :wttc: and wow... you nailed that gauge... May 15 2017, 12:28 PM burton73 It is coming among well. Gauges look super. Did yo... May 15 2017, 12:33 PM bbrock
It is coming among well. Gauges look super. Did y... May 15 2017, 12:45 PM burton73 Pelican sells them. I had the one on my 86 Carrera... May 15 2017, 01:28 PM bbrock
Pelican sells them. I had the one on my 86 Carrer... May 15 2017, 11:21 PM euro911 [quote name='burton73' post='2486346' date='May 15... Aug 14 2017, 04:47 PM bbrock
]On the speedos I've torn apart, there's ... Aug 14 2017, 04:54 PM bbrock duplicate deleted May 15 2017, 11:32 PM bbrock More Progress
Haven't updated in a couple w... Jun 5 2017, 11:54 AM bbrock I forgot to mention that the trunk bracing was rem... Jun 5 2017, 11:59 AM Dave_Darling Awesome! I wonder if that is a reference to t... Jun 9 2017, 01:44 PM bbrock
Awesome! I wonder if that is a reference to ... Jun 9 2017, 02:16 PM bbrock I'm overdue for an update here. There has bee... Jul 3 2017, 07:32 PM bbrock This weeks update is a short one. I got the tail ... Jul 10 2017, 06:17 PM tygaboy Man, that's a lot of inches of seam welding yo... Jul 10 2017, 06:33 PM bbrock
Man, that's a lot of inches of seam welding y... Jul 10 2017, 07:36 PM bbrock Overdue for an update again.
As usual, I like to ... Aug 10 2017, 12:59 PM tygaboy
I'm still having trouble with that sunken edg... Aug 10 2017, 01:29 PM burton73 Brock,
You really are doing a great job on restor... Aug 10 2017, 01:42 PM bbrock
[quote name='bbrock' post='2515579' date='Aug 10 ... Aug 10 2017, 02:50 PM bbrock Well Bummer.
Since my rear trunk lid is not repai... Aug 10 2017, 09:25 PM mbseto Nice fab work, and great progress. This is a fun ... Aug 11 2017, 06:36 AM 76-914 I really enjoy reading this thread but hadn't ... Aug 11 2017, 08:12 AM bbrock
Today I chuckled while reading your experience wi... Aug 11 2017, 09:12 AM Fatboy007 What an inspiration. Take your time and enjoy the... Aug 11 2017, 09:35 AM cary I've been too busy to keep up.
I'm with Ch... Aug 11 2017, 03:03 PM bbrock Saturday Aug. 12, 2017
Spent the day cleaning u... Aug 14 2017, 02:42 PM euro911 My fist time seeing your thread, Brent (?) - read ... Aug 14 2017, 03:42 PM tygaboy Fab-iddy, fab, fabulous fabbing! :smash: Loo... Aug 14 2017, 04:18 PM bbrock
Fab-iddy, fab, fabulous fabbing! :smash: Lo... Aug 14 2017, 05:23 PM burton73
Fab-iddy, fab, fabulous fabbing! :smash: L... Aug 14 2017, 05:36 PM bbrock August 16, 2017 - More fabbing
Not much progres... Aug 16 2017, 11:05 AM tygaboy I think the way to avoid that is to make that part... Aug 16 2017, 11:20 AM bbrock
I think the way to avoid that is to make that par... Aug 16 2017, 11:37 AM bbrock August 19, 2017 - No Progress
I had to work on ... Aug 22 2017, 10:39 AM tygaboy Man, I'm in awe of you guys who cut out such m... Aug 22 2017, 12:22 PM mb911
Man, I'm in awe of you guys who cut out such ... Aug 22 2017, 01:30 PM bbrock
:agree:
But I also do those kind of projects a... Aug 22 2017, 02:12 PM bbrock
Man, I'm in awe of you guys who cut out such ... Aug 22 2017, 02:09 PM
Unobtanium-inc
Thanks all.
Good point on 2-stage paint, I thi... Mar 27 2017, 08:45 PM mtn flyr Wow, quite an intro! I am in Bozeman, is your... Mar 27 2017, 08:36 PM bbrock
Wow, quite an intro! I am in Bozeman, is you... Mar 27 2017, 10:51 PM mtn flyr
Wow, quite an intro! I am in Bozeman, is yo... Mar 28 2017, 08:44 AM ConeDodger It isn't often that we don't have to tell ... Mar 27 2017, 08:49 PM Cairo94507 :wttc: Great intro; loved the whole story. Laughe... Mar 27 2017, 09:07 PM bbrock
Your project seems reasonable. Personally, I wou... Mar 27 2017, 11:00 PM PanelBilly You have a lot of work ahead of you. All the parts... Mar 27 2017, 09:50 PM mark04usa :wttc: Enjoyed your 914 story very much. I sure ca... Mar 27 2017, 10:26 PM Frankvw Nice story. It will be a lot of work, but since yo... Mar 28 2017, 12:44 AM JawjaPorsche Such an amazing story. A story of life. Thanks f... Mar 28 2017, 04:02 AM RobW :wttc:
Get a move on! You have a dream to fu... Mar 28 2017, 04:47 AM cary I'd start with digging into the RH long first,... Mar 28 2017, 08:10 AM KELTY360 Great story and kudos for hanging on to that car. ... Mar 28 2017, 08:32 AM bbrock
BTW, since you're only going to keep it kinda... Mar 28 2017, 04:00 PM Mikey914 Welcome. You will have many questions posting up p... Mar 28 2017, 08:38 AM cary I hope I didn't come off too abrupt. :wttc: ... Mar 28 2017, 01:56 PM bbrock
I hope I didn't come off too abrupt. :wttc:... Mar 28 2017, 03:50 PM 914_teener
I hope I didn't come off too abrupt. :wttc... Mar 28 2017, 07:32 PM cary Hmmm. The in and out deal really won't work fo... Mar 28 2017, 07:57 PM cary By chance is Kelly Seevers one of your neighbors? ... Mar 28 2017, 07:59 PM bbrock
By chance is Kelly Seevers one of your neighbors?... Mar 28 2017, 11:10 PM xperu
By chance is Kelly Seevers one of your neighbors... Aug 10 2017, 09:33 PM xperu
By chance is Kelly Seevers one of your neighbors... Aug 10 2017, 09:33 PM bbrock
Are you near Noxon, my brother lives there. He i... Aug 10 2017, 09:44 PM cary Forgot about the MIG gas ...................... an... Mar 29 2017, 07:56 AM bbrock
Forgot about the MIG gas ...................... a... Mar 29 2017, 10:20 AM bbrock Made a little progress today. My engine yoke arri... Mar 29 2017, 09:42 PM TM_Corey Love the story!!
:wttc: Mar 30 2017, 09:45 AM mepstein You should decide if you want a restoration projec... Mar 30 2017, 09:57 AM dcheek
You should decide if you want a restoration proje... Mar 30 2017, 04:17 PM bbrock I intended to get the car on a roll-around jig ove... Apr 3 2017, 01:27 PM Dave_Darling Sorry, but I gotta ask...
Are you gonna be a dent... Apr 3 2017, 04:07 PM bbrock
Sorry, but I gotta ask...
Are you gonna be a den... Apr 3 2017, 04:44 PM JOEPROPER
Sorry, but I gotta ask...
Are you gonna be a den... Apr 12 2017, 06:44 AM Porschef
[quote name='Dave_Darling' post='2471578' date='A... Apr 13 2017, 10:50 AM bbrock
Sorry, but I gotta ask...
Are you gonna be a den... Jun 9 2017, 07:17 AM bbrock New Wheels and Tires
Well, they aren't exac... Apr 11 2017, 03:08 PM burton73 Hi Brent,
I love your story and the picture of yo... Apr 11 2017, 10:12 PM KELTY360
Hi Brent,
I love your story and the picture of y... Apr 12 2017, 10:23 AM bbrock
Welcome to the board. Great guys and lots of know... Apr 12 2017, 11:02 AM cary
[b]But I work with my brain by day and really enj... Apr 13 2017, 08:21 AM r_towle :wttc:
NICE mullet! Apr 11 2017, 10:22 PM burton73 Posted twice Apr 11 2017, 10:52 PM bretth +1 Zappa! (Whips out old vinyls) Apr 12 2017, 07:28 AM Rusty Welcome to the board, just a little bit late.
Wit... Apr 12 2017, 01:52 PM aggiezig :wttc:
Really admire your passion for your 914. ... Apr 13 2017, 12:05 AM bbrock
:wttc:
Really admire your passion for your 914.... Apr 13 2017, 07:44 AM worn Off topic. But I too admire the plan.
I am think... Apr 13 2017, 08:12 AM bbrock
Off topic. But I too admire the plan.
I am thin... Apr 13 2017, 08:21 AM bbrock Fun Diversion
Here's just a quick little si... Apr 13 2017, 08:47 AM bbrock Weekend Update
Saturday I swapped out the rear sw... Apr 17 2017, 09:17 AM bbrock I haven't posted any progress in awhile but, d... May 15 2017, 10:49 AM KELTY360 Nice progress. Great to see another resurrection. May 15 2017, 11:20 AM LowBridge welcome :wttc: and wow... you nailed that gauge ... May 15 2017, 11:55 AM bbrock
welcome :wttc: and wow... you nailed that gauge... May 15 2017, 12:28 PM burton73 It is coming among well. Gauges look super. Did yo... May 15 2017, 12:33 PM bbrock
It is coming among well. Gauges look super. Did y... May 15 2017, 12:45 PM burton73 Pelican sells them. I had the one on my 86 Carrera... May 15 2017, 01:28 PM bbrock
Pelican sells them. I had the one on my 86 Carrer... May 15 2017, 11:21 PM euro911 [quote name='burton73' post='2486346' date='May 15... Aug 14 2017, 04:47 PM bbrock
]On the speedos I've torn apart, there's ... Aug 14 2017, 04:54 PM bbrock duplicate deleted May 15 2017, 11:32 PM bbrock More Progress
Haven't updated in a couple w... Jun 5 2017, 11:54 AM bbrock I forgot to mention that the trunk bracing was rem... Jun 5 2017, 11:59 AM Dave_Darling Awesome! I wonder if that is a reference to t... Jun 9 2017, 01:44 PM bbrock
Awesome! I wonder if that is a reference to ... Jun 9 2017, 02:16 PM bbrock I'm overdue for an update here. There has bee... Jul 3 2017, 07:32 PM bbrock This weeks update is a short one. I got the tail ... Jul 10 2017, 06:17 PM tygaboy Man, that's a lot of inches of seam welding yo... Jul 10 2017, 06:33 PM bbrock
Man, that's a lot of inches of seam welding y... Jul 10 2017, 07:36 PM bbrock Overdue for an update again.
As usual, I like to ... Aug 10 2017, 12:59 PM tygaboy
I'm still having trouble with that sunken edg... Aug 10 2017, 01:29 PM burton73 Brock,
You really are doing a great job on restor... Aug 10 2017, 01:42 PM bbrock
[quote name='bbrock' post='2515579' date='Aug 10 ... Aug 10 2017, 02:50 PM bbrock Well Bummer.
Since my rear trunk lid is not repai... Aug 10 2017, 09:25 PM mbseto Nice fab work, and great progress. This is a fun ... Aug 11 2017, 06:36 AM 76-914 I really enjoy reading this thread but hadn't ... Aug 11 2017, 08:12 AM bbrock
Today I chuckled while reading your experience wi... Aug 11 2017, 09:12 AM Fatboy007 What an inspiration. Take your time and enjoy the... Aug 11 2017, 09:35 AM cary I've been too busy to keep up.
I'm with Ch... Aug 11 2017, 03:03 PM bbrock Saturday Aug. 12, 2017
Spent the day cleaning u... Aug 14 2017, 02:42 PM euro911 My fist time seeing your thread, Brent (?) - read ... Aug 14 2017, 03:42 PM tygaboy Fab-iddy, fab, fabulous fabbing! :smash: Loo... Aug 14 2017, 04:18 PM bbrock
Fab-iddy, fab, fabulous fabbing! :smash: Lo... Aug 14 2017, 05:23 PM burton73
Fab-iddy, fab, fabulous fabbing! :smash: L... Aug 14 2017, 05:36 PM bbrock August 16, 2017 - More fabbing
Not much progres... Aug 16 2017, 11:05 AM tygaboy I think the way to avoid that is to make that part... Aug 16 2017, 11:20 AM bbrock
I think the way to avoid that is to make that par... Aug 16 2017, 11:37 AM bbrock August 19, 2017 - No Progress
I had to work on ... Aug 22 2017, 10:39 AM tygaboy Man, I'm in awe of you guys who cut out such m... Aug 22 2017, 12:22 PM mb911
Man, I'm in awe of you guys who cut out such ... Aug 22 2017, 01:30 PM bbrock
:agree:
But I also do those kind of projects a... Aug 22 2017, 02:12 PM bbrock
Man, I'm in awe of you guys who cut out such ... Aug 22 2017, 02:09 PM  |
1 User(s) are reading this topic (1 Guests and 0 Anonymous Users)
0 Members:

|
Lo-Fi Version | Time is now: 12th May 2026 - 05:16 PM |
Invision Power Board
v9.1.4 © 2026 IPS, Inc.